CHARTING 101
TexAnne eMailed a question that sends me off on a tangent. She’d like
to know more about how to take a set of prose directions from a source
like one of Barbara Walker’s stitch treasuries and turn them into a
chart. In specific, she’d like to know about how to handle things
like double yarn overs, and stitch counts that vary from row to
row. These are excellent questions. Since not everyone can
leap right in at the graphing lace level, I’ll start with simple
charting and work up to the harder bits later in the week.
To
start, transforming prose to charted directions is easier than some
people think. Tools include some sort of mechanism on which to do the
chart. I ping-pong back and forth between good old pencil and paper,
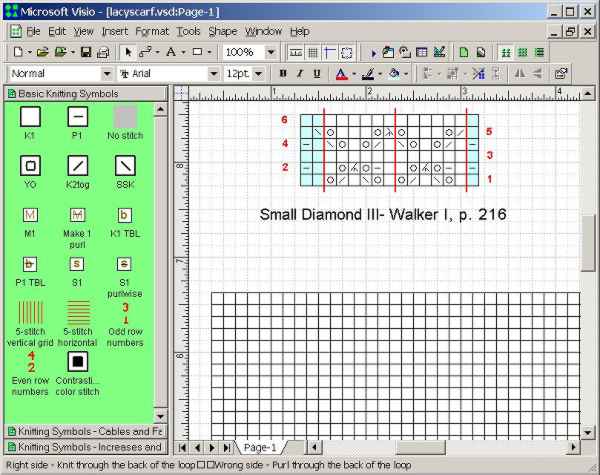
and Microsoft Visio. Visio is an expensive Windows drafting/drawing
program that I have on hand, mostly because I use it when I work as a
consultant. There are other solutions out there, ranging from forcing
spreadsheets to handle the function, to dedicated knitting programs.
But don’t despair if you have access to no computerized tool for
charting. Plain old 1/4 inch quadrille paper (the Junior High
School geometry teacher’s friend), a friendly pencil and forgiving
eraser work just fine. Principles of conversion remain the same
regardless of tool used.
Let’s start out with some basics.
Charts are read from the bottom up. In most cases (but by no means
always) there is a one to one correspondence between a stitch in the
work and a box on the graph.
Charts represent the work as seen
from the public or right side. As such, if you’re working flat, you
need to remember that the same symbol that represented a knit stitch on
your right side row will represent a purl stitch on your wrong side
row. (If you’re unsure of this basic binary truth, go grab something
with both knits and purls on the same row, like a swatch in ribbing,
and use a pin to poke through a single stitch, then identify it on both
sides of the work).
Two more basic truths of charts:
- Almost every author or chart source has a unique symbol set. Some are similar, but none are absolutely identical.
- Not everything can be completely charted
Oh, chart purists will argue about #2, but there ARE some patterns that just don’t lend themselves well to charted expression.
Let’s
start with an easy one. Here’s a recipe for a simple basket rib done in
all knits and purls. Stitch counts remain constant from row to
row. The source is Barbara Walker’s Treasury of Knitting Patterns, Scribners, 1968;? page 17 (see footnote below).
Multiple of 4 stitches + 1
Row 1: (right side) K1 , *p1, k1; rep from *
Row 2: K2, *p1, k3; rep from *, end p1, k2.
Row 3: P2, *k1, p3; rep from *, end k1, p2
Row 4: P1, *k1, p1: rep from *
Row 5: K1, *p3, k1; rep from *
Row 6: P1, *k3, p1; rep from *
Now
to chart this out, we examine the instructions. It’s pretty clear that
there will be an edge stitch. The “Multiple of 4 stitches + 1” says so.
So let’s start with Row 1. The stitches will read exactly as written,
in the direction of the work. That means that the first stitch will be
at the right hand edge of our chart. Since the directions call for a
multiple of 4, +1, let’s start off with an auspicious 13 stitches –
that’s three repeats. plus that one spare:
All
well and good. In my twisted logic, a blank square is a knit, a square
with a dash in it is a purl. Not everyone uses this notation. Some
people use a square with a vertical line in it to represent a knit, and
a horizontal to show a purl. Some people use a dot to indicate a purl.
There’s never been any international standardization of knit symbols,
so use what’s comfortable to you.
If you follow the charts that I’ve put up here and on wiseNeedle,
you’ll notice that I like to keep tabs of how many stitches are across
my row by using a red rule every five stitches. When I chart out a big
pattern, I set up a large red grid first and then populate it, but here
I’ll add in the red lines and row numbers as I need them. Again, this
is a matter of personal preference. Set your rules 4, 5, or 10 stitches
apart, or don’t use any at all. It’s up to you.
Now to add Row
#2. The original prose instructions were written for someone knitting
in the flat. In general unless you have absolute evidence to the
contrary from any accompanying text, assume that prose instructions are
written in the flat. This means that WHEN SEEN FROM THE FRONT OF THE
WORK, the second row will commence at the left hand edge of the graph.
A clue on this pattern is the notation “(Right side)”. In a piece knit
in the round EVERY row is a right side row, so this piece must have a
wrong side row – hence it is knit in the flat. Yes I know this is
confusing, because you always work in the same direction, but remember
that if you were knitting in the flat, you’d have flipped the work over
to go back.

Aha!
A second complication! The prose instructions start off with K2, p1,
but the chart shows p2, k1! Don’t panic. Remember, we’re on the second
row – a wrong side (aka purl side or inside) row. The “2” is at the
left edge to remind us of that fact. Those first two wrong-side knit
stitches WHEN SEEN FROM THE FRONT are purls. That’s the way they are
graphed. If your head is starting to hurt, just contemplate that while
this is a mind-stretching exercise, mental gymnastics like this have
been shown to delay brain aging.
Adding Row #3 makes which stitches compose the 4-stitch repeat more clear:

In
adding Row #4, I’ve moved to a more conventional method of shading.
Most charts that show edge stitches do so by shading them. Here it’s
clear that there are three repeats, plus one column of edge stitches
(to be fair, I could designate either the first or last column as my
edge, as in this simple pattern with a one-stitch edge, it doesn’t
matter which column serves that purpose.)
In
prose it’s not immediately evident where the actual repeat falls, and
what parts of the directions cover the non-repeating edge stitches.
This is one reason why I prefer working from charts.
Since we’ve
covered the basics, I’ll quickly add the last two rows. Graphed out,
not only do we see where the repeats are, we also see that a
basketweave pattern is formed by a half-drop. Rows 1-3 and 4-6 contain
the same basic unit, but in rows 4-6 it’s advanced by two stitches. I’ve
marked the same basic unit in yellow on rows 1-3, and in orange on rows
4-6.
The
simple nature of this repeat and the symmetry that builds it into a
basket weave pattern are difficult to discern by just reading the prose
instructions, but in a chart, the logic stands out.
Now,
knitters working both in the round and in the flat can use this same
chart. People knitting in the flat would cast on a multiple of 4
stitches plus 1. Then they would start at the bottom right corner and
work across Row 1, then they’d flip the work over and start the next
row at the “2” – taking care to do the mental flip; and so on. People
knitting in the round would cast on an even multiple of 4 stitches, and
starting AFTER the blue edge stitch, would work across Row 1 as many
times as needed – skipping the blue stitches, eventually returning to
the point where their round commences. They’d then start to work Row 2,
again working from the chart’s right hand edge and skipping the blue
edge stitch whenever it was encountered.
So you see –
translating a pattern into a chart isn’t that tough. This particular
texture is an easy one. It’s all knits and purls, with no increases or
decreases. There are no variant stitch counts. Every row has the same
number of stitches. There are no slipped or dropped stitches, no wraps
or other bits of oddness.
In Charting 102, we’ll look at the
mystery that is The Stitch That Isn’t There. I’ll go over patterns with
increases and decreases, and what happens when the stitch count
changes. TexAnne, I hope this helps.
* My quotation of B. Walker’s directions, verbatim. Normally I
don’t do this. If I use a pattern that’s in a stitch treasury, I
try to alter it a bit. I start at a different place in the
repeat, center the repeat differently, chart it where it was in prose
before, or rechart it starting at a different point. I do this
because while no one person owns copyright on a knitting texture
pattern, they do own copyright on the way they have expressed that
pattern. This is analogous to recipes. No one owns the
concept of “apple pie,” but thousands of authors each own their
individual description of what goes into one, and how to make
it.
In this case however, quoting Walker verbatim falls within the bounds
of fair use. I’ve given the citation, crediting the original
author. The quotation is there because the premise of this piece
is how to take a standard set of well-known prose instructions and turn
it into a chart.
SOCK YARN RUN DOWN
Some random questions popped into my inbox this week. I try to answer:
You said you
knit a lot of socks, and the colorful bits on the booties are
leftovers. Leftovers from what? What are your favorite sock
yarns?
I like the Euro-style classic finish hard twist wool/nylon blend sock
yarns best (I don’t care for either wearing or knitting cotton
socks). My short list includes Socka/Fortissima, Regia, Meilenweit, and the like. I’m slightly less fond of Reynold’s
sock yarns, finding them a bit coarser than I like. I knit with
Opal once, the yarn’s texture was nice and the colors were interesting,
but not so much that I’d pay a premium to find more. I’ve
also tried Kroy 4 ply (aka Kroy Sock), Special Blauband, and Brown Sheep Wildfoote.
I’m not as fond of those. Brown Sheep is too thin, splitty and
flabby. Special Blauband is also thin compared to my usual (their
Blauband Ringel
yarns though are more comparable to the Socka type). Kroy is a
bit less densely spun than the Euro yarns, but it’s economical and is
stocked in solid colors. Once it was difficult to find multicolor
sock yarn, now it’s tough to find solids. I use solids for
contrast, so I was very happy to find Kroy.
I’ve also tried some of the higher priced yarns, like Koigu and Lorna’s Laces.
In truth, though the Koigu colors were fantastic, I was less pleased
with its performance in a sock than most. I found it too thick to
make socks I can wear in most of my shoes, plus even under careful
hand-wash, I found it fuzzed and lost that surface sheen that makes the
colors pop. The socks are wearing well, but they’ve lost that
special something that the yarn had in the skein. I’d use Koigu
again in a heartbeat – but not for socks. The Lorna’s Laces yarn
was a bit loftier than my usual hard twist stuff, but worked up
nicely. It’s wearing quite well.
I’ve also tried a salad of other sock yarns – Alpine, Marathon, Happy Strumpf, Trekking
– whatever wandered into my local yarn store that looked
interesting. While all made suitable socks, none stood out as
things I’d want to seek out for repeat use. Alpine was a Euro
style yarn – good texture, boring colors; the others were heavier than
I prefer.
I haven’t tried the less expensive sock yarns from KnitPicks or Elann. I tend not to buy yarn via the Web if I can get the equivalent locally, and I live in a very sock yarn rich region. (Actually touching yarn before I buy it is a requirement.)
The links above just go to one representative of larger, similarly
named sock lines. If you need more info on sock yarns, try
wiseNeedle. Go to the search page and
look up a sock yarn by name, or select "sock" from the drop down list
of yarn types. About 135 are currently listed – 85% with at least
one review. You can also find a chart showing some repeat lengths of common sock yarn self stripers here.
Still working on the scarf?

I like it better when you write about little stuff. The big projects are boring. What little stuff are you planning?
Unfortunately, I don’t plan my knitting to fuel this blog. I knit
wherever I want to wander, and the blog gets pulled along behind.
That being said, I have to finish this latest crop of booties plus the
Harvey Kombu, then rescue Elder Daughter’s Rogue before returning to my
large blanket. Plus the holidays are coming. I’ve promised
a ton of socks, plus there are some other special gifts that I really
should make. You’ll see quite a few quickies over the coming two
months, I guarantee.
Late breaking addition:? Ooooh. Mittens!? Haven’t done full patterend mittens yet. Thank you , Wendy!
CROWN OR PETAL EDGING
There must be something in the water (please excuse me for not drinking).
I find myself knitting booties for a flood of the newly
expecting. So many in fact that over the past two weeks, for the
sake of fun I’ve taken to playing with ankle part after the eyelet
holes for the drawstring style bow.
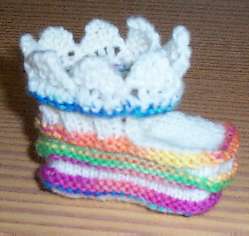
This bootie is a combo of Dale Baby Ull and tiny leftovers from three
candy color different self-striping sock yarns. Like I wrote
before, just a yard is enough to do a stripe, so I save every scrap.
You could argue that my petaled bootie isn’t entirely successful, that
the top round of contrasting welting should be deeper, and that I
should have worked a round in white before launching into the crown-like
points at the top. But hey – these booties are the knitting
equivalent of potato chips – quick snacks tossed off in between more
substantial meals. However they are excellent for playing with
some basic concepts before risking those ideas on a larger piece.
In this case, I looked at the thing (shown above before the bow tie is
inserted), and thought that I’d like a pointy finish. I didn’t
want it elaborate or deep, and was too lazy to haul myself over to my
bookshelf and dig through my collection of stitch pattern books.
It being a no-brain night, I decided to improvise on the fly and do a
no-brain edging knit onto the live stitches of my bootie ankle to
eliminate seaming (a pain on something so small.)
These booties finish out with 40 stitches – 10 on each of four
needles. 40 is a good number, it’s an even multiple of 4 or 5, so
an edging worked on 40 live stitches can have a 4 or 5 stitch
repeat. For no reason whatsoever, I picked 5.
I cast two stitches onto a DPN, and knit one, then did a yarn over and
worked the second together with the first stitch of my bootie ankle
using a SSK. On the second bootie-out and all subsequent
bootie-out rows, I flipped the thing over and knit back to the outer
edge. On the next and edge-in subsequent rows, I knit until just
before the last stitch, finishing out the row with a YO, SSK
incorporating one stitch from the bootie ankle. After I’d "eaten"
up four stitches of the bootie ankle and was ready for the fifth edge
in row, I bound off until I had one stitch on the right hand needle and
one stitch on the left. This last stitch I worked together with
the fifth bootie ankle stitch. Voila!? A very simple 10-row
petal edging custom-matched to the stitch count of the piece being
trimmed. I did seven more points (eight in all – two per bootie
ankle needle) and grafted the last two stitches to the cast on
row. Bootie done, and neither seaming nor casting off was
required.
Neither knitting an edging onto live stitches nor creating a very
simple edging in this manner are new ideas, but both evoke a bit of
"How did you do that" when seen outside of lace knitting circles.
I would improve this a bit were I to do it again. Instead of each
point "eating" five ankle stitches and taking 10 rows to complete, I’d
cheat a bit. I’d do an 8-row repeat, working my bind off on the
fourth edge in row instead of the fifth, BUT instead of working a SSK
with one edging stitch and one bootie stitch to conclude the bind-off
row, I’d work a SSSK, fusing together one edging stitch and TWO bootie
ankle stitches. In effect, I’d be working an 8-row repeat
attached to five ankle stitches. This will draw in just a bit and
counter the tendency for the edging to stretch the live stitches, and
be wider than the tube of the item it completes. Most lace
projects that? are ended off with an edging knit perpendicular to
the body and don’t exploit this natural tendency to ruffle do vary the
stitch attachment count in a ratio closer to 3:2 than 1:1.
So, the next time you do a top-down hat, a tubular iPod case, or even a
toe-up sock, think of finishing it off with a bunch of slightly silly,
fluttery petals instead of the standard bind-off row. Or if you
feel really ambitious – thumb through the lace edging section of your
stitch dictionary, pick one with an appropriate row count and try it
out out to put a crowning touch on your piece.
STILL WASTING TIME
I’m still sweeping out mental cobwebs, occupying my fingers with
interim quickie projects. Saturday’s was another pair of booties, in
the bootie pattern I’ve blogged about before:

This
pair is in lime green Dale Baby Ull, and the leftover of some tweed
sock yarn long since separated from its label of origin. It just takes
a couple of yards to do one of the purl welts. I’ve worked them in
contrast (as shown here), even working each welt in a different color
yarn. Sometimes I do the ties in the same color as the contrast,
sometimes not. It all depends on how much I’ve got. This is why I never
throw away sock yarn leftovers. The smallest bit is enough to accent a
pair of these booties.
I’m still repacking my stash after our
near escape from a basement flood. In doing so I’m running across all
sorts of goodies I had forgotten about. In the same box as my
Kureopatora leftovers, I found about seven or eight balls of Harvey. Lang Harvey
was a wool blend salad with a boucl? finish – 40% wool, 32% acrylic,
15% polyamide nylon, 10% alpaca, and 3% viscose. I’m pretty sure I
scavenged it from a bargain bin at a (long gone) yarn shop I used to
frequent in College Park, Maryland. And I’m also pretty sure that I
bought it circa 1990 or so. Possibly earlier, so the chance of anyone finding more outside their own stash is slim to none. The original intent was
to make a vest, but although I liked the yarn I didn’t like the way it
worked with my chosen pattern, so I stashed it.
What’s boucl?
you ask? It’s a style of yarn that has fallen out of favor. You don’t
see that many of them around any more, the textured yarn niche having
been consumed entirely by the fluttery fur monster.
Boucl?s have an
airy hand. If you think of classic finish multi-strand yarns
(like Cascade 220) as dense cream cheese, boucl?s would be the whipped
variety. Unlike chenille where the fluffiness is made by little
strands that are bound by some kind of "keeper thread," boucl?s have no
fuzz to come unbound. The yarn’s structure is of one or more
two-ply strands. One ply is relatively taught, usually a very
fine nylon thread. The other ply is looser spun, almost slubby,
and is under far less tension. The looser strand is sort of
gathered and lumped around the nylon base thread, resulting in
something that has more loft and that has higher yardage per unit
weight.
Here’s Harvey:
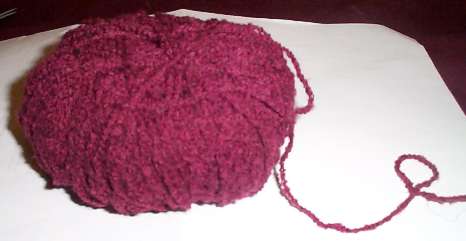
Harvey has two two-ply strands. You can see how nubbly and slubby
it looks. While it reminds me in color and visual appearance of
the iron-upholstered sofa in my grandmother’s apartment (the one that
would sand your thighs off if you sat on it while wearing a skirt in
the summer), it is in fact an exceptionally luxurious feeling, soft and easy to wear yarn.
Some boucl?s are even more fluffy or bumpy than this. Some
have a loopy construction (I’m not sure at what exact point something
stops being a boucl? and becomes – for example – a mohair loop, but I’m
sure one of the spinning folk who read here will enlighten
us.)?? My Harvey is marked at worsted gauge (20 st x 34 rows
= 4 inches or 10cm) . It’s about 126 meters or about 138
yards. A classic worsted like Cascade 220 is about 110 yards for
50 grams. Even taking the fiber salad composition of Harvey into
consideration, 28 yards in 50 grams is a major difference in
yardage.
Now. How does Harvey knit up??
The first time I tried it out I was disappointed, but I had picked a
pattern for which it wasn’t suited at all. I tried it out using a
knit/purl texture pattern that was totally eaten by the yarn’s
texture and dark color. While it isn’t optimal for showing detail
on something like my Kombu, I thought it might be fun to try out in
that pattern:
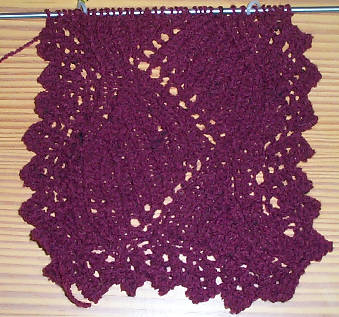
Again, the ribbed detail is partially obscured, although it shows up
better in person than it does in a photo. But the softness and
drape can’t be topped. I’ll be finishing out my Harvey Kombu and
stowing it for the upcoming gift season. I’ll probably have
enough to do a matching hat, too.
Oh, and for an exceptional Kombu that really shows off the pattern’s
texture better than my own attempts at both knitting and photography
(and not to mention her superior execution of the idea) check out Kerstin’s Strickforum. Beautiful!
WINDING A CENTER PULL BALL BY HAND
Yesterday during the attack of Life that kept me from blogging, I did
find a minute to answer a question about winding balls from hanks. I
tried my best to describe how to do it, but was very frustrated not to
be able to show how. So this morning The Small Child and I dug out some
scrap yarn and took some pictures.
Start
by spreading out the fingers of your left hand (right hand if you’re a
lefty). Stash the free end (as opposed to the end attached to your
hank) between your index and middle finger.
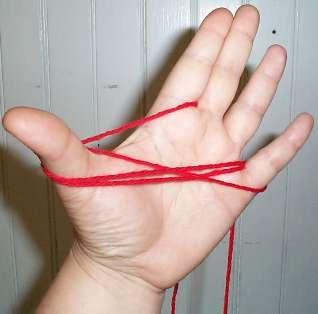
Wind the yarn in a figure 8 around your thumb and little finger until you’ve got a hefty butterfly going.

Once it’s too big to wind this way, take it off your fingers and fold
it in half. Note that I’ve still got the free end between my
fingers. The end that I’m winding is hanging down in front.
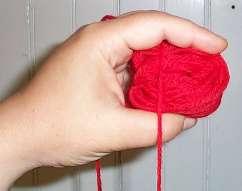
Now hold the folded butterfly in your left hand, with your finger sort
of encapsulating the thing. (When I teach kids to do this, I have them
think about holding a baby bird in a sugar cage.) Winding your yarn
around your fingers, begin to build up a ball. Wind a bit in one
direction, then shift your grip and wind in another.

The goal is to make a very soft, squishy ball so that the yarn isn’t
flattened or stretched out. When my fingers are full (like in the
photo above), I pull my fingers out, rotate the ball in my left hand
and start winding again in a different direction.

Eventually the ball will outgrow your grip size and you won’t be able
to fit it between your fingers as you wind. Don’t worry. Continue to
wind LOOSELY until you’re through, preferably over at least one finger
to introduce extra "give" into the wind so the yarn isn’t stressed. If
you want to use the thing as a center pull, avoid capturing the free
end as you wind. (It’s just above my thumb in the photo
above). Keep going until you’ve finished.

The end product. A nice fluffy ball. You can see the center
pull end trailing off past my thumb, and the outside end trailing off
the bottom.
Even though I have a ball winding machine, I wind more than half of the
yarn I use this way, mounting the hanks on my swift, but making the
balls by hand. The biggest exception is lace weight yarn.
Anything that comes in hanks of more than 700 yards is going to take an
eon and a half to wind by hand. That’s worth hauling out the
winder and wrestling it into submission.
VISIO AGAIN
After Friday’s post on using Microsoft Visio for graphing knitting patterns I received some questions:
What’s Visio?
Microsoft Visio is a professional level drafting/drawing program –
something I’ve co-opted into serving as a pattern development tool, not
something that was designed for that purpose. It’s main use is
technical and scientific illustration – Gantt charts, flow process
models, flowcharts, conceptual diagrams, infrastructure diagrams,
business graphics, organization charts and the like. For example,
network planners use it to lay out routing diagrams for offices, as it
not only can handle a dimensioned architectural drawing, but it can
also keep count of the networking hardware placed on the drawing,
producing a "need to buy" list as the plan progresses.
In my work life, I’m a proposal writer working in engineering and
telecommunications companies. I use Visio extensively to do?
technical illustration and project planning. Visio isn’t the sort
of thing that most people have lying around the house, but because I
have worked as a consultant I have had to buy my own copy. I use
Visio Pro. Visio Standard (the entry level version without some
of the industry-specific bells and whistles) is about $200.
http://office.microsoft.com/en-us/FX010857981033.aspx
What’s a stencil?? Can I use these with other programs?
One feature of Visio (both versions) is the ability to establish a
collection of standard shapes, and call that collection up when
needed. These collections are called stencils. I created a
set of stencils for Visio that contain knitting stitch and graphing
symbols. I attach the stencil to the active drawing, and then
using all of Visio’s drafting features – draw up my chart.
Visio stencils are unique to that program, and cannot be used with
others. There may be (emphasis on uncertainty here) one
other program that can import them, but I do not own that program and
have not tried it. It’s called SmartDraw, and the suite edition
that includes templates sells for just under $300. It purports to
import Visio output, but there’s nothing there that says it takes the
stencils directly. I suspect that you’d need to take the sample
Visio drawing I include in my template set, then use it to create a new
SmartDraw symbol library. As far as lower cost/hobbyist targeted
programs with the same functionality – I don’t know of any that import
Visio stencils. Please chime in if you do.
Can you do everything in Visio that dedicated programs like Aran Paint or Stitch and Motif Maker do?
No. I’m NOT using a program that knows the slightest thing about
knitting, or that is optimized for this sort of thing. There are
no limits that keep me from using impossible combos of stitches, and no
tools that let me do things like replace all the red stitches with pink
stitches everywhere in the active document. There’s no
blank canvas that can be flood filled by a background stitch.
Instead I have to build my diagrams stitch by stitch, adding my stitchs
(or groups of stitches) like a kid laying out a doll’s dance floor of
alphabet blocks.
What I do have is an unlimited size and shape canvas on which to work;
and the ability to group, layer, copy/paste, rotate and reflect my
custom symbols as needed. If I’m doing colorwork, I have an
infinitude of possibilities, and even do color matching by Pantone or
other color codification system. I can make up custom symbols on
the fly, adding to my library as I go along and am not limited to the
symbols present in a knitting font package (in fact, I don’t even
bother with one). I can also export my designs to all standard
web graphics formats, or paste them into other documents as desired.
Is Visio easy to use?
While large parts of the thing would be intuitive to anyone familiar
with other drawing programs, Visio isn’t the easiest program to learn
if you’ve never used any drafting program before. There are lots
of inexpensive training courses out there, some web-based, and some at
local community colleges. Or if you’re adventurous you can do
what I did – just start monkeying around with the thing.
Can I do the same thing with other drawing programs?
I’m pretty sure you can, although not every drawing program works in
exactly the same way. ? In ages past, I co-opted Aldus Superpaint
(on my late lamented Mac) for doing stitching and knitting
diagrams. That one was a hybrid drawing/drafting program. I
set up a series of ground textures that corresponded to filled and
unfilled grid squares (some with specific symbols in them). Then
I created a paintbrush the same size as one grid square. By
selecting the background fills and using the paint brush as a stamper,
I "daubed out" my charts. This is how I did all of the charted
illustrations in The New Carolingian Modelbook.?
I also have convinced Canvas to serve as a knitting/stitching design
aide, but that was a bit more painful. The version of Canvas I
used did not have a robust stencil capability. You could make
libraries of symbols, but they weren’t as accessible as in Visio.
I ended up making one document with reference copies of my
symbols. Then in a new document I established a snap-to grid
equal to the size of a stitch square, and copied/pasted the symbols
from my library document into my new design. It worked, but it
was cumbersome.
I also know that some people use non-drawing programs for this purpose. Others have written quite extensively about creative adaptation of Microsoft Excel and other spreadsheets (and even MS Word) as stitch chart creation programs.
If you’ve smacked another drawing program around for this purpose and
have some hints to share with others please feel free to add your
comments to this pile.
MICROSOFT VISIO STENCIL TEMPLATES
I’ve blogged about using Microsoft Visio to do my charts here before.
At great length.
In short, I’ve devised a set of stencils (shape templates) that covers many of
knitting’s basic stitches. I assemble them like a wall of alphabet
blocks to make my charts, and have used them to build all the knitting
and embroidery pattern graphs here and at wiseNeedle.
That
ever insistent inbox of mine has disgorged a couple of requests for my
Visio templates, so I’ve decided to post them here, free for the
taking. Eventually I’ll remove them from this blog and file them up on
wiseNeedle where they will enjoy a more permanent home.
To use these templates you’ll need a full registered copy of Microsoft
Visio 2000 or later (up to and including the latest Office 2003
edition) – any flavor, for Windows. Sad to say Visio is not a
inexpensive tidbit of a program one can pick up on a whim. It’s a major
tool used in offices and schools, mostly for engineering and other
planning type drafting, and is priced accordingly. Still, I am sure
there’s a subset of technoknitter nerds who like me use the thing in home
businesses, or who have access to it during lunch hours at work or as a
student in a media center.
I might have tweaked the symbols a bit since I last updated this set,
but nothing major has happened to them. I include three templates
– one for basic symbols, one with cable crossings, and one with an
extended set of increases and decreases, all bundled into this handy compressed *.zip file.
Download it, then copy the *.vss files into the Visio template space on
your local hard drive (probably the same place as the folder entitled
“Visio Extras”). If you do that you should be able to access them off the standard Visio stencil menu.
Yes, I know that there are whole companies that do nothing but sell Visio template solutions, and here I am giving one away. It’s “teachware.” If you use it, teach someone else how to do something (especially something knit, stitch or fiber related), and I’ll consider myself well paid. You may use my templates to create original knitting and stitching charts of your own. A credit for the tool would be nice if you publish any of the resulting charts, so that others can find it and use it too. You may not however repost these templates on another site nor may you claim them as your own. (If you do, major demons of vile vengance will haunt your dreams forever, should your kneecaps escape me and my trusty stick.) Linking back here is fine and dandy.
When you try out these templates you’ll find that the symbols are not
use constrained. You can stack the stitches any way you want,
there’s no effort on the part of the template to limit use to “knitting
legal” configurations. But I did include a minor bit of shiny
with the template symbols themselves. For most of them (except
for some of the really esoteric cable crossings) hovering your cursor
over the symbol in the template stencil window will pop up a how to
knit annotation for both right side and wrong side application.
If you do play with these, please let me know. Suggestions for
additions, improvements, or other use case advice are most welcome.
BLOCKING AGAIN
Several people have asked about the blocking board Laura used for her
Paisley. I’ve sent the question to her, and will post any reply.
In
the mean time, here’s another suggestion. When I’m not being lazy
slinging things down willy-nilly on towels, I do follow a bit more of a
method. First, I clear out furniture in the room with our largest area
rug (I’ve got no wall to wall carpeting). Then I lay down a heavy
cotton quilt type blanket to protect the carpet from any moisture, and
to give me more depth into which I can pin. Finally I cover the blanket
with a rally check patterned sheet, one of two I stumbled across in a
discount store. Once all is smooth and ready, I pin out my item, using
long rust-free pins:

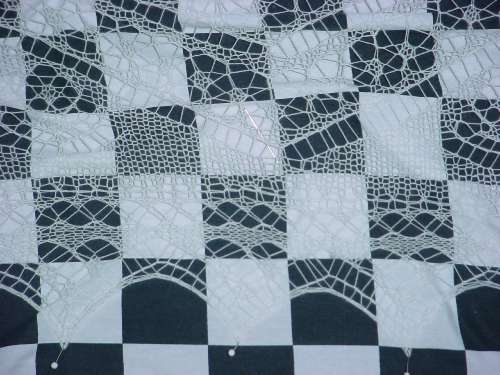
The
item above is my Spider Queen shawl. It stretched out to be about 7 feet
across. I began with a rough estimate of how large my finished item
should end up being, then I started at the center points of each edge.
I pinned them first, working from side to opposite side and tensioning
the piece across between counterpoised pins. Then I stretched out the
corners and did them, too. After that I just zipped back and forth
across the piece ping-pong style, pinning in the middle of each
remaining unpinned length until I had placed a pin in each of the
edging’s points:
About
the only caution I offer (beyond being prepared for the labor
intensiveness of this effort) is that the cheap Dritz pins I used were
long enough and rust-free enough, but they were too thin and too
fragile. They bent going in and the little bead heads pulled off when I
pulled the pins out. Not fun.
I know that rally check print
sheets are not an every day item, but any even check or Tattersall or
windowpane style plaid will work equally well. So would yard goods in
gingham or similar "graph paper" type patterns.
My friend Kathryn gently chides me about blocking my Kinzel Rose of England, languishing in my Chest of Knitting Horrors?
since 1991. While the method above would work for that piece it’s not
on my current schedule. ROE was the first bit of lace knitting I ever
attempted. It’s a testament to the precision and logic of that pattern
that I was able to do it with no prior lace experience.
At the time though, I wasn’t very appreciative though of my materials.
I used a mish-mash of size 30 white crochet cottons from various
makers, bought at different times. You can see where each purchased lot
begins and ends, some by slight color difference, some by texture. I
got about four courses of leaves into the final outside area and
stopped at the point where I ran out of thread (again) and when I was
no longer able to delude myself that the thread lot problem wasn’t
noticeable. I’d need to figure out where I was, buy more mis-matched
cotton, finish out another course of leaves, and do the final
crochet-off finish before I could even think of blocking. Either that
or ravel out a course or two of leaves and finish the thing from that
point. So you can get an idea of what the (eventual) goal is, here’s Judy Gibson’s ROE.
I know some people are asking about when I will be blocking my Alcazar shawl. I’m afraid the Larger Daughter took a fancy to my loud rally check sheets and took them off to sleep away camp. No large item blocking will happen here until she and my sheets return.
PLUGGING ALONG
I was busy this weekend past.
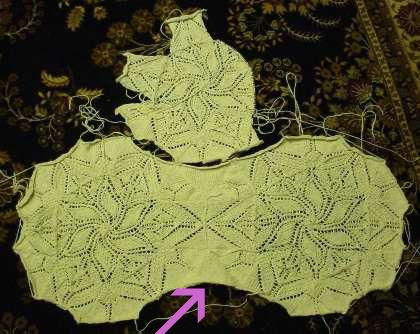
I worked out the plain triangle and made two. Both are sewn into the
growing group. One is indicated by the arrow. I do have a bit of a
scrunch problem, but probably not so much that it can’t be ignored.
The sides of my triangle are less tall than its base is wide.
Therefore, when I’m sewing the bases of the patterned triangles onto
the sides of the plain one, I have to squish them up a bit. You can see the slight rumples that result.
I do however like the way the points of the stars align. While
the orientation I tried last time had more movement in it, because the
stars were offset, this one will have less background area.

For those who have asked how I add arrows or other annotations to my
photos – I use Macromedia Fireworks to slim, retouch, or otherwise
manage my images. I cheat – the arrows are Wingding font
"letters" added with the text tool.
Shoe size chart
Some people have pointed out that their European shoe sizes are off a
bit from the chart shown yesterday. Mostly at the upper
end. The chart’s represented equivalent for US shoe sizes Women’s
9 and above seems to work out one unit larger than people are
reporting. So a 10.5 would be closer to a 42 than a
43. Grains of salt are advised.
SHOE SIZES, WORLDWIDE
I came across this on an Adidas shoe box, and thought it might be of
interest to sock knitters, especially those knitting socks as gifts
knowing nothing but foot sizes. It’s a chart showing adult men’s and
women’s shoe sizes in the US, the UK, France, and Japan. I’ve added the
red line to show my own giant size – US Women’s 10.5 (Euro 43, if such
a beast exists).
Now
by the official centimeter length my giant size works out to a squidge
over 28.5 cm. I find my own wool and wool blend socks fit best if they
are about 25-27 cm when measured from heel to the tip of the toe:
stretchier, finer yarns at the smaller end, less stretchy or heavier
yarn at the top end. The one pair of cotton socks I made was about 27.5
cm, to allow for that yarn’s lack of stretch.
Why do I make my
socks shorter than my actual foot length? If your feet feel like
they’re swimming in your socks, your socks are too big. Socks NEED to
stretch just a bit for optimal fit. Otherwise one gets bunching and
foot blisters where the fabric accumulates in folds inside the shoes.
Too big socks also wear out faster. All that sliding and rubbing
oversize socks do inside shoes translates to extra friction, and
friction is a sock-killer.

Click on image above for full size chart
