KNITTING NEEDLES VII – BRITTANY, CLOVER AND CRYSTAL PALACE
I have to admit that I’m no longer a big fan of wooden and bamboo
needles. I liked them when I was just starting out, but as I got more
miles under my fingers, I developed a serious desire for speed. These
days I stick to shiny, lethal looking metal needles, and only pull out
the woods and bamboos when I have to tame a particularly nasty and
slippery novelty yarn. Since I detest working with those yarns, my
non-metal needles are no longer part of my first bench team. Still, I
do have some experiences to report. Note that elswhere on String I’ve got more on comparative sizes and their metric equivalents, and on comparative needle lengths for circs.
Crystal Palace
Crystal Palace markets Japanese-made bamboo needles of several types:
- Single point, 9 inches long, size US #0-19
- Single point, 12 inches long, size US#0-19
- Double points, sets of five, 8 inches long, size US#0-15
- Double points, sets of five, 6 inches long, size US#0-8
In
general, these are smooth, nicely finished bamboo needles. The single
points have rounded wooden beads on the non-business end. Tapers are a
bit less pointy than metal needles. I’ve found the smaller sizes to be
a bit less fragile than the same size needle in wood because the bamboo
tends to flex and stay bent rather than bend and (eventually) snap, but
even so – if you are someone who routinely finds that your metal
needles sport a scimitar-like curve after use, you might find these in
sizes smaller than US #3 to be too fragile for extended use.
One
other word about bamboo needles in general, sometimes the tips denature
a bit, especially if they get damp. When that happens the consituent
fibers that make up the bamboo fuzz out a bit and begin catching on
one’s work. I haven’t knit with enough Clovers and CPs to be able to do
a comparison between the two lines, but this has happened often enough
to be noticeable. A smooth down with very fine emery paper helped get
rid of my tip burrs.
Takumi Clover Bamboo
Very
similar to the Crystal Palace bamboos, the Takumi are smooth finish,
with moderate tapers, and wooden beads on the ends of the single
points. The beads are more barrel than round, but the look is very
similar. They come in a wider range of lengths, but fewer diameters
than CP. Current offerings on their home website include:
- Single point 13-inch long, size US#0-10.5
- Single point 14 inches long, size US#11-15
- Single point 9 inches long, size US #3-10.5
- Double point sets of four, 7 inches long, size US #0-10.5
- Double point sets of four, 16 inches long, size US #3-10.5
I also see these other sizes listed at various vendors
- Single point 16 inches long, size US #17-19
- Circualrs 16 inches long, plastic cables, sizes US#3-15
- Circulars 24 inches long, plastic cables, sizes US#3-15
- Circulars 29 inches long, plastic cables, sizes US #3-15
- Circulars, 36 inches long, plastic cables, sizes US #3-15
- Flex (Jumper needles), 20 inches long, sizes US #3-15
The
largest difference between the Crystal Palace and Clover circulars is
the nature of the join. CP uses a metal cowling into which fit both the
needle end and the cable. Clover slots the cable into the butt end of
the needle itself, tapering the cable so that it joins the end of the
bamboo part smoothly. I can’t speak to which is better because I have
not used them extensively. I will say that the Clover cable seems a bit
stiffer than the Crystal Palace cable.
The Clover form factor
I have used quite a bit is the Flex jumper needle. Jumper needles are
sort of a hybrid between circs and straights. They’re used like
straights, but being flexible and whippy at the end allow the weight of
the work to puddle on the lap similar to circs. I have several friends
who prefer straights, but because of limited hand mobility find even
short straights tiresome or painful because of the leverage caused by
the weight of the project on the ends of their needles. They greatly
prefer jumpers to classic straights. I also liked them because I used
to knit quite a bit while riding on the Washington, D.C. subway.
Jumpers minimized the threat level for the rider sitting next to me. No
needle ends were waving about at the edge of his/her space. (Yes, using
circs flat is good for this, too.) I did have problems with my Clover
tips furring, especially in the humidity of a Washington summer.
Eventually I switched entirely over to metal needles, using circs in
the flat rather than jumpers.
Brittany
I
adore the look of Brittany needles. I’ve broken about a dozen over the
years. Some died in the course of normal knitting. Others were in-bag
or sofa-side casualties. Again, while I like the look, these aren’t
among the needles I reach for first.
Brittany makes several styles of needle:
- Single points, birchwood, 10 inches long, sizes US #3-17
- Single points, birchwood, 14 inches long, size US #3-17
- Double points, birchwood, sets of five, 7.5 inches long, sizes US #0-17
- Double points, birchwood, sets of five, 5 inches long, size US #0-17
- Double points, birchwood, sets of five, 10 inches long, sizes US#0-17
The
birch single points have simple but pretty turned ends. Tapers are
slightly less pointy across the line compared to bamboo needles. They
also tend to be a bit more slick than bamboo, but are still nowhere
near as slippery as metal. Some people who are fond of wooden needles keep a piece of nice lanolin-rich fleece or roving around, and rub their wooden needles with it after use. I’m not entirely convinced that this helps, as most of the wood and bamboo finishes used appear to be some kind of polyurethane or other plastic. I doubt the moisture can penetrate the finish, but I guess special care can’t hurt.
Brittany
also used to sell walnut
single points with more ornate turned ends. It doesn’t look like they
still carry the line. I’m not surprised, as my walnut needles did tend
to both dry out and break more than did my birch ones. Over the years I
am responsible for the demise of about five pairs of walnut needles,
ranging in size from US #10s (trodden upon) to US #5s (mashed when my
knitting bag got clipped by a revolving door). I’ve also snapped quite
a few birch single points. I took to using them for traveling back
before
metal needles were added to the list of allowables on US domestic
flights. I must have the finger strength of a moose because I can break
birch up to size US #5 clean through just by knitting with it. I
do prefer these harder woods to bamboo though. They’re smoother,
especially at the tip, and their finish is more satiny. They’re nice tools. Now if
only I could learn to knit gently.
ALCAZAR KICK-OFF; PIVOTS
Alcazar progress:
Hazel Carter’s Alcazar is another of her multi-page lace patterns that looks incredibly complex, but with a bit of care and attention, is not that hard to follow. It’s worked slightly differently than the Spider Queen, but follows the same sort of general logic. First a center panel is knit – in this case, from corner to corner on the diagonal; then stitches are picked up around the edges and the secondary layer is knit center-out. Finally an edging is knit onto the live stitches of the outer layer. One small difference – Spider Queen’s outer layer was knit one side at a time, and the four resulting trapezoids were seamed together at the corners. Alcazar’s pattern says that the sides may be knit separately like the Spider Queen’s, or they may be worked all at once by knitting in the round, thereby eliminating the corner seams. I suppose I could have done SQ that way, too, but it was my first large bit of rectangular lace, and I was deeply into beginners’ mode – following directions verbatim – because my understanding of the piece as a whole was so limited.
Also unlike the all-pivot format Spider Queen, some (but not all) of Alcazar’s charts are provided in full format in addition to her standard pivot format. The pivot format is sort of a shorthand notation very useful for symmetrical designs and multiple repeats. This idea isn’t unique to Hazel Carter. Embroidery modelbooks dating back to the dawn of publishing showed graphed repeats that could be mirrored along two axes to produce infinite strips of patterning. It’s a very useful trick that hasn’t caught on as widely as it might for knitting charts.
The picture below shows a single pattern row (of my own invention, not taken from Alcazar). You can see it has edge stitches plus several iterations of the main pattern. I could have graphed it up to show one full iteration of that center pattern, plus the edge stitches. That’s pretty condensed compared to the original. But it takes even less space to show it in pivot format – the tiny row below the long one.
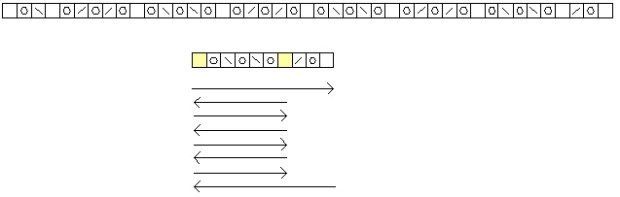
To follow the shorter row you’d start at the lower right, and work across to the leftmost stitch. That’s the first pivot point. I like to mark my pivot columns with a highlighter so that they’re easy to spot. When I get to that first pivot point, I pretend that stitch is a mirror, and begin to follow the chart back in the direction from which I just came. Work to pivot stitch. Work pivot stitch once. I keep knitting in the same direction, without flipping my actual piece over or making a short row, BUT I begin to follow the chart back in the direction from which I came.
Now, those among you who noticed that there were decreases in the first trip will wonder what to do about them on the "return." Mirror them. If they was a SSK on the march from right to left, THE SAME BOX will be worked as a K2tog on the march from left to right, and vice versa. This sounds like quite a bit of mental gymnastics, but it’s no more difficult to do than it is doing the conceptual flip to interpret the even numbered rows of a chart when knitting in the flat.
Another challenge – on my minichart below, on the first pass from right to left I sailed over a highlighted stitch. That’s a secondary pivot point. After I make my turn at the chart’s leftmost edge, I work back to the second pivot stitch, work it, then begin following the chart from right to left again – starting at the secondary pivot point.
I continue zinging back and forth between my two pivot points like an ant trapped in a demonic game of Pong until I have only the final few edge stitches remaining. At that point I "go through" the secondary pivot point and finish out my row.
Now. Why would anyone want to do this?
- Many people find it much easier to keep track of their place on a smaller chart.
- Charts for large lace projects can be unwieldy, this cuts down the bulk somewhat.
- Pivot charts highlight the logic of a piece, and make memorizing a complex row easier.
Your mileage may vary – you may find this all terribly confusing, and wonder why anyone would subject his or herself to such conceptual convolutions, but I like having yet another tool in my toolkit, ready to pull out when the need for it presents itself. If you’re lace-minded, you never know when you’ll need to graph a 300-stitch row, and here’s a way to do it if you don’t have access to a drafting program and a D-size plotter.
DESIGNING SIMPLE LACE
It was pretty much guaranteed to happen. I went through the various lace books on my shelf, but didn’t find a pattern that fit my specs for the Paisley Shawl edging. So I’ll resort to drafting out one of my own.
Now I don’t claim to be any more than a rank beginner at this sort of thing, but I think I’ve grokked a couple of the fundamentals. The books that have helped me most in learning lace construction are:
- Lewis, Susanna. Knitting Lace. Taunton Press (Newton, CT), 1992.
- Miller, Sharon. Heirloom Knitting. Shetland Times (Lerwick, UK), 2002.
- Stove, Margaret. Creating Original Hand-Knitted Lace. Lacis Publications, (California), 1995.
To start, I’m contemplating either a saw-tooth or triangle edge piece, of indeterminant width (but probably not too wide, in order to conserve yarn). I want to put the quad-eyelet flower motif on it. I want the repeat to be a multiple of 12 rows.
Let’s start with the eyelet:

Not too tough. Just a couple of YOs and K2togs, spanning six rows – three of which are purled to make the garter stitch ground.
Now let’s look at a simple sawtooth and triangle. Sawtooth edgings are simple because they’re built by adding stitches somewhere on the row, usually at the rate of one every other row. When the edging is deep enough, the stitches at one side are bound off and the total stitch count is returned to the original number. Here’s a minimal 12-row sawtooth, starting with 5 stitches
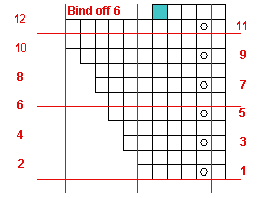
It starts with a cast-on of five stitches (not shown), then adds one stitch per odd numbered row. I stuck these increases in a column and made them eyelet-forming YOs, but they really could occur anywhere on the row, including at the very end and could be M1s or another increase that doesn’t make a hole. So long as each odd numbered row adds one stitch, the thing will widen appropriately. On Row 12 I bind off six stitches, returning the count to the original five cast on, in preparation for the following Row 1. The blue square is the last loop created by the bind-off conga chain, and is blue to remind me that I need to bind off until four live stitches plus the one formed by the bind off itself remain.
I’ve also charted these as all knits, but they could be anything, and anything can be plopped onto the base pattern. That includes the quad-eyelet, or other patterning. The whole thing can also be made wider by working some kind of vertical insertion strip at the right, prior to commencing the stitches of this mini-chart. For example, it’s common to increase the width of an edging by adding a column of faggotting, or a cable or lace insertion there.
Here’s a very 12-row triangle edging. It’s slightly more complicated because all the decreases needed to create the points aren’t lumped together and done on the final row:
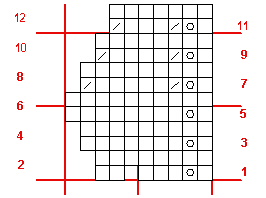
Again, the increases and decreases can occur anywhere in the row. To make comparisons easier, I’ve included the column of YOs as a design feature in both this and the sawtooth. But running them the entire length of the repeat means I would be adding a stitch on the "downhill" side, when I need to be taking one away to make the basic shaping. Therefore I’ve put two decreases on Rows 7, 9 and 11. The first one cancels out the addition of the stitch created by the YO (placed near the YOs for reasoning clarity only, in fact they could go anywhere on the row). The second one forms the triangle’s shape.
I could make the triangle steeper by changing the rate of increase, either by doing something interesting on EVERY row instead of every other row. (That’s one of the discriminators that marks the difference between true lace knitting and lacy knitting. Knit lace mavens would say that these simple examples are properly termed lacy knitting, and not lace knitting.) Or I could add additional YOs, or use double YOs. The possibilities are endless.
Here are the sawtooth and the simple triangle, tarted up with the garter stitch main texture and the quad-eyelet. I’ll start by swatching these, then see if I want something more demonstrative and lacier, or plainer. I’ll also judge width. Narrower might be tough without compromising the space I need to show the eyelets, but wider is VERY easy. If I want to make my life easy I can use any texture pattern with a 3 row, 4 row, 6 row or 12 row repeat to stretch my edging wider. I could use patterns with different row counts, too, but that would make tracking where I am in the thing just a bit harder.

WEDNESDAY UPDATE:?
These two pattern charts will NOT make a nice, neat quad eyelet motif. Explorations of why and a correction are posted in tomorrow’s entry.
QUESTIONS AGAIN
More from the inbox.
Stitch marker in the middle of decreases
Stinkyknitter is also working on the Paisley Shawl. She noted thatsome of therepeats in the second chart begin or end with a decrease, and asks how I manage stitch markers that end up in the middle of two stitches that are supposed to be worked together.
I move ’em.
Being a Continental style knitter, I’m loathe to remove my hands from my needles while I’m working. I usually use my "third hand," grabbing the offending stitch marker in my teeth and holding it for the one or two stitches required. One of the reasons I started using broken earring fobs and making fancy stitch markers a gazillion years ago was that the hanging ornaments made them easy to grab this way.
On my Paisley, the only markers that need to be moved are the plain split rings. They’re pretty small – small enough in fact to be slid through stitches if need be, but they’re also wide enough to stay put unless otherwise "encouraged." When I get to a SSK that’s bisected by a stitch marker I use my needle tip to pop it through the leading stitch, then transfer it to the right hand needle, and work the SSK on the appropriate (far) side of the marker. On K2togs, it’s the third hand method.
Yes it can be a pain to stop and shuffle them around. When I graph up repeats for my own use, I often finagle the beginning and end points so that my markers don’t end up splitting the difference in the decreases.
Re-knitting tension
A couple of people wrote to ask about gauge tension in the re-knitted repairs. They asked if the new replacement work looked different from the rest of the piece, or if the stitches at the edges of the new work where it bordered the old were distorted in any way.
To be truthful, a bit of care is needed when you’re re-knitting the ladders after ripping down. There is great temptation to start out each row working rather loosely, then wrestle to eke out the remaining stitches from the remaining length of the ladder strand. I make a conscious effort to avoid this, and try to form all my stitches with the same tension as the original knitting.
A couple of times I’ve had to re-knit a cable, and that cable was centered in the section being re-knit. I tried working the crossing several times, but always ended up not having enough of the ladder strand available to finish the couple stitches that came after it. So I worked that particular row from both ends, picking up the stitches to the left and right of the cable and then sliding them onto the needles that held the "good" knitting on either side of the section undergoing repair. After they were rescued, the only stitches that remained on my fix-it DPN were those of the cable crossing itself. I did those last, absorbing the tightness into the natural tightness of the crossing.
As far as appearance, after my usual post-knitting wash and dry prior to assembly, any unevenness is smoothed out. I’ve never needed to do anything else to a re-knit repair, nor have any of them been recognizable as such after garment completion. (If I had time instead of rushing out the door to work right now, I’d dig up some pieces that were fixed mid-stream and take some pix to prove it.)
Pattern source
A couple of people missed my first post on the Paisley Shawl earlier this week, and wanted to know where they could find the pattern. It’s in the Spring 2005 edition of Interweave Knits – page 96. Not the Summer edition that (most) subscribers received last week, but the one before that.

Writing
Thank you to everyone who sent in kind words about the tech articles at String. To be truthful, this blog is a busman’s holiday for me. In Real Life I’m a proposal writer, mostly working in/with engineering or high-tech firms. Compared to communicating concepts in nuclear engineering or high-end routing, writing about knitting is easier and lots more fun. Plus winging my way through this has reinforced my appreciation for editors. I’m embarrassed to admit the number of spelling, grammar, or punctuation mistakes I fly past without noticing while I’m writing,but find later. To quote a former boss, "Only fools proof their own work."
PAISLEY SHAWL SECOND MOTIF AND RIPPING DOWN
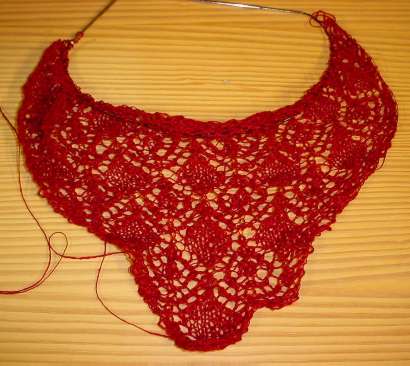
I’m past the center part now on the Paisley Shawl, and have finished the dividing section of K2, YOs. I’m pleased with it so far, although it’s tough to see well wadded up as it is on the circular needle. Still, you can make out some details if you squint at this:
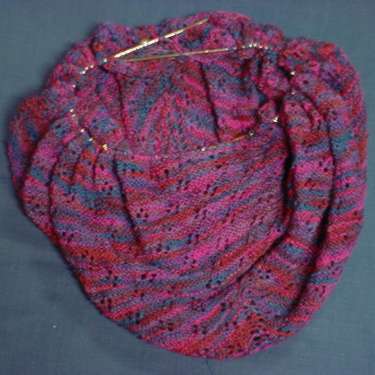
See all those little stitch markers?
I’m a big believer in stitch markers in lace. I don’t use a lifeline, but I do mark my repeats – usually every repeat in a large piece. I find that doing so becomes a built-in proofing system. If the stitch count is off beginning the next repeat, I know something went wacky in either the previous one, or in the repeat one row below. I then have the option of ripping back or ripping down just that one repeat. There are complications of course if a decrease spans the juncture point between repeats, but in general this system has served me well. In this case I’m using three different types of markers. Large silver dinglebobs mark the beginning and midpoint of my rounds (the beginning one is especially elaborate). Small red rings mark the quarter points (my pattern is a square, knit center out, so the beginning, mid and quarter points each define a full side repeat set). Tiny silver color split rings mark each motif repeat. The split rings are crafts store specials, bought in a bag of 200 for less than $1.50.
Ripping Down
I know a lot of people are terrified at the prospect of ripping one repeat down. It’s not as scary as it sounds and can usually be done with success on almost anything. Yes, some stitches are harder to rip back, parse out, and reconstruct than others but it’s always worth a try. The alternative is ripping back entire rows. If deconstructing and re-knitting a section works, that saves the effort of redoing an entire row; and if selective ripping doesn’t work the worst that happens is that you’ll need to rip back that entire row anyway. So you can either luck out and save time, or if luck and skill fail you, you end up no worse than you would have been had the effort not been made.
To rip out a bunch of stitches vertically then re-knit them, it’s good to understand the nature of knit stitches and the way they are seated on the needles. I’ve mentioned stitch mounting and twisted stitches before. Recognizing the difference and seating stitches correctly is very important to this process. For starters, when you pick your stitches up after ripping past the broken part, you want to make sure that the survivors are mounted with the leading leg in front:

I start by identifying a good span surrounding the mistake. I don’t want to split a decrease, so I try to begin and end the segment in an area of plain stockinette or garter stitch. I find the corresponding section on my charted pattern, or if there isn’t one – I chart up the repeat and then identify the suspect bit. Note that if you are doing lace, colorwork or textures, this process is vastly aided by being able to work from charts. You can do it if you have prose directions and are thoroughly familiar with your repeat, but it is much harder to identify the stitches in the section that needs to be redone without a stitch by stitch representation of the work.
Once I have identified my bit to be redone both on the needles and on my chart, I isolate it. I’ll knit to just before it, then slide it onto a DPN of the same size as my working needles. This is one of the few times I use needle tips (or rubber bands). I plug the live needle ends before and after my broken section to prevent the balance of the work’s good stitches from leaking off and complicating the problem. Once I’ve got the section isolated, I ladder it back down past my error. I try to end on a row that’s easy to pick up. For example, rows with lots of increases and decreases or cable crossings can play havoc with stitch mounting, so I try to avoid them. The squeamish might like to thread a mini-lifeline through a row of good stitches below the error to make sure they don’t go down further than necessary, but I just take a deep breath and wing it.
When my suspect rows are unraveled, I end up with a bunch of strands suspended ladder-like between the areas of good knitting. I put the last row of good stitches below this mega-ladder back onto the DPN, taking care to mount them correctly. Then I take a second DPN and following the directions on my chart, and using the bottom-most string of my ladder, I re-knit the first suspect row. It’s usually a bit awkward there on the last couple stitches, but care and patience always defeats the problem. I repeat the process with the second row of the suspect area, using the now bottom-most string of my ladder. Sometimes I start each of these make-up rows at the right, working them all as right side rows. Sometimes I do flip the piece over and work every other row as if it were a wrong side row. It mostly depends on whether or not I’m working the whole project in the round or in the flat.
Once all the suspect rows have been re-knit and no ladder strands remain, I uncap the right hand needle and continue with my normal working strand across my "mainstream" row, working across the now rescued stitches. Once those are done, I uncap my left hand needle and continue merrily along my way as if no mistake had dared to intrude itself.
Give this a try the next time you look back several rows and spot a cable crossed katywumpus, or some purls that should have been knit. And if you’re timid, try doing it to a swatch on which you’ve made a deliberate mistake.
CAST ON ROUND-UP – II
Following up on last Wednesday’s post on looped cast-ons, today I’ll blunder through the family of knitted-on cast ons. Reference books not detailed below are listed in the original post.
There are dozens and dozens of cast ons. I know I haven’t gotten you your particular favorite yet. Eventually I hope to cover as many as I can find. Why bother?? Because it’s always nice to have options, to find new ways to do things and in doing so – to find out that some might just be a tad better than others in a specific use case. To someone who only owns a hammer, everything looks like a nail. To someone with a whole toolbox at their disposal, the hammer might not always be exactly what’s needed.
I’ll keep posting these. For the ones that are well illustrated or easy to describe, I’ll forgo illustrations, presenting instead these reference links. When I get to some of the less widely seen (or harder to describe) styles, I’ll begin adding my own illustrations. But we’re still well within the Known World here, so please forgive the lack of pix.
Simple Knit-On Cast On
This is a very popular cast on, although it’s more often taught outside the US. It’s often taught to children learning in large class situations. I know several knitters who learned to knit as small children in schools as far flung as Hong Kong, Brasilia, and Bangalore, all of whom report this as the first cast on they were taught.
Knitting on produces a neat, even edge that’s less elastic and more robust than that produced by the half-hitch cast-on. It can be worked either as the foundation for an entire piece, or as a method of adding stitches at the end or in the middle of a row. It’s not uncommon for example to find a scrap of knitting on (or a sister technique) forming the top edge of a buttonhole.
Advantages:? No need to measure out long tail lengths. Easy to teach absolute beginners. Miller in Heirloom Knitting mentions the utility of this simple cast on for lace (she uses half-hitch and invisible cast ons, too), citing the edge construction as being suitable for going back later and picking up or attaching additional stitches.
Disadvantages:? Not as stretchy as some cast-ons, but stretchy enough for most uses, even lace. The front and back have a different appearance. Some people don’t like the look of one or the other, and add a row to their pattern to make sure that the preferred side is visible when the garment is finished.
On line references:
http://www.knittinghelp.com/knitting/basic_techniques/index.php
http://www.wonderful-things.com/newknit1.htm
http://www.mycraftbook.com/Cast_On_Stitch.asp (a little hard to follow)
http://www.learntoknit.com/instructions_kn.php3
http://www.knitting.co.nz/pages/knitting/caston.php
Book references:
DMC Encyclopedia, Fig. 419
Vogue p. 26
Bantam, p. 17
Miller, Heirloom Knitting, p. 33
Cable Cast On
The cable cast on is very closely related to plain old knitting on. The difference is in the formation of the new loops. In knitting on, the needle is inserted in a stitch in the normal fashion, and the new loop is pulled through the old stitch and placed on the end of the left hand needle. In cabling on, the new loop is formed in the space between the last stitch cast on and the one before it. (The first stitch in a cable cast-on is always a plain on knit on stitch because at the outset there aren’t two loops on the needle in between which one can pick up that new stitch).
Advantages:? No need to calculate tail lengths. Very firm stitch with a pronounced decorative edge. One of the least stretchy cast-ons. Excellent for cuffs, hems, but less useful for necklines, sock tops and other high-stretch scenarios. Very good choice for cottons or other less-elastic yarns that have a tendency to stretch out (and stay stretched) with wear. Makes excellent, long-wearing buttonholes.
Disadvantages:? Stretch (see above). Like knitting on, this has two very different sides visually. Some people add or subtract a row from their pattern to make sure that the preferred side ends up on the front of the work.
On-line sources:
http://www.knittinghelp.com/knitting/basic_techniques/index.php
http://www.wonderful-things.com/newknit1.htm
http://www.knittingatknoon.com/cable.html
http://www.worldknit.com/howto/howtoknit/beginningtechniques/castingon.html
Book references:
Stanfield, p. 16
Vogue, p. 26
Bantam, p. 17
Alternate Cable Cast On
I’ve only seen this one detailed in Vogue. It’s a variant of the standard cable cast-on, made even firmer by working the cast-on row’s stitches through the back, rather than through the front of the piece. I haven’t tried it myself, so I can only report the book’s assertion that this method creates a firm edge. Also, from the accompanying illustration, it has a much less defined "edge spine" running across the bottom edge. People wishing to avoid that visual edge at the bottom of ribbing may want to experiment with this method.
Book reference:
Vogue, p. 26.
DUTCH HEEL
A couple of people have asked me why I thought a Dutch heel was easier than other forms of heel-flap sock heels; and how they fit.
First, there are lots of other treatises on Dutch heels elsewhere on the Web. Judy Gibson has a nice write-up on this heel variant. It’s part of the Socknitters Cybersocks on-line sock tutorial. Regina Williams has done a work-up on the math needed to construct Dutch style heels on toe-ups.
In terms of history Dutch heels date back to at least the 1880s. I found one mention of them on the Web in a transcription of an 1883 edition of The Girl’s Own Paper, a typical young women’s interest magazine of the time. They may in fact be older, but sources on sock heels before 1883 at my fingertips as I type this aren’t very copious.
In terms of fit, Dutch heels have the ample instep (upper foot/ankle) of other shaped heels. That means they’re deeper in the ankle than are short-rowed sock heels. They are also a bit more snug side to side than other forms of round or square heels. People with average to narrow width feet and especially people with narrow heels will find them quite comfortable. While my own feet are in the walrus flipper range of size, my heels are narrower than one would expect given my paddle-like toes. I am still experimenting with Dutch heels, knit both cuff down and toe up. I’ll report back on comfort and fit as compared to short-rowed heels once I get a few more pairs into my wash/wear cycle.
I think the Dutch heel I’ve learned is easier than a standard round heel because the heel cup area maintains the same stitch shaping repeat throughout. the short-row segment that forms the heel has parallel sides. You don’t need to keep as close track of where you are in the shaping’s progression as you complete that stage of the work.
Here’s an example of a hypothetical Dutch heel, worked on 7.5 stitches per inch/10.5 rows per inch (the standard label gauge of Schoeller/Stahl Fortissima/Socka – a textbook classic sock yarn). I’ve calculated this for a average sized cuff-down sock, one that would probably fit someone wearing a US Women’s 7-8 medium shoe size. This works out to a very average sock of 60 stitches around. To simplify things, I’ll suppose a plain stockinette heel flap.
I’d work the ankle as desired. When it was completed, I’d work my heel on 30 stitches (half the available circumference). Because I normally use a set of 5 DPNs, that means I’d be doing my heel across two of them. People using two circs would work this across one of their needles. Magic Loop folks would work this across the stitches on one side of their needle’s loop.

I’d knit the heel flap in plain stockinette, slipping the first stitch of each row to make nice easy to pick up in chain selvedges. I’d probably make it about 30 rows deep, ending after completing a wrong-side row.
To turn the heel, starting on a knit side row, I’d knit 18, work a ssk, then turn my work over. Heading back in the other direction, I’d slip the first stitch, then purl 6. Then I’d do a purl two together, and flip my work over again. Back on the knit side row, I’d slip the first stitch (that’s the one I purled two together on during the previous row), then knit 6 and work another ssk. I’d repeat the slip 1, purl 6, p2tog, turn row; followed by the slip one knit 6, ssk, turn row until I had consumed ALL the stitches available on my heel needles, and my total on-needle(s) stitch count was 8, after the completion of a purl side row.
To make the gusset, I’d knit across the top of the heel to put myself in position to start the gusset pick-ups. Looking down the left side of the heel flap, I’d pick up 15 stitches in the chain stitch selvedge loops. At the bottom of the heel flap I’d do the anti-hole cheat by picking up an additional stitch at the base of the flap, for a total of 16 new stitches. Then I’d pick up my dormant instep needle and work across the top-of-foot stitches. If I were using the circ methods, I’d switch back to my heel-bearing circ or circ segment after the foot-top stitches were done. Now At the base of the heel flap on the other side of the foot-top stitches, I’d first pick up that anti-hole cheat stitch, then 15 in the chain stitch selvedge loops heading back up the right side of the heel flap.
I now have all the stitches I need to create my gusset. I’d knit across the heel flap and down the left hand edge until only three stitches remained, then I’d do a K2tog, and knit the last stitch on the needle. Changing to my top of foot needle(s) I’d work those stitches, then switch back to my heel needle(s), working a K1, ssk, and then knitting back up the side of the gusset and across the top of my heel. I’d knit the next round plain (no K2tog or ssk decrease at the corners of the gusset). After the plain row, I’d do another decrease row, alternating decrease rows and plain rows until I was back to having 60 stitches total again, the same number I had before the heel began.
so we see that the only real difference between a Dutch heel and the other standard heel flap and gusset heels is in the formation of the heel turn (heel cup). In the Dutch heel there are only two rows to remember – s1, knit (x), ssk; and s1, purl (x), p2tog. That to me at least makes it easier to calculate and to teach. Also to work in fits and starts, as my briefcase sock per force should be a project in which the need to keep track of where I am is minimal.
MORE ROGUE; WEB TOOLS
Here’s about 11 inches or so of Rogue. In the continuing cascade of mods made necessary by my shifting to a thinner yarn and smaller gauge, I’ve worked six of the side cable repeats before branching back to complete the side panel chart. No problem there.
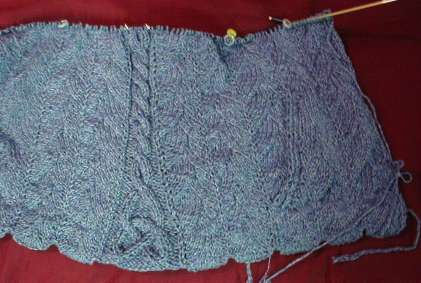
I do note however that as expected – this is going to be a weighty object in cotton. Cotton weighs more per yard than wool. 50 grams of cotton yarn will contain fewer yards than 50 grams of a comparable thickness wool. So far I’ve used about 300 grams of cotton. That’s roughly 2/3 of a pound. My finished piece may end up weighing as much as 2 or 3 pounds!
Useful tools and toys:
I’ve gotten quite a few notes lately asking for help with metric conversions, needle sizes, fabric care, garment sizes and yarn weights; confusion about how to figure out repeats given a set stitch count; and requests for descriptions of basic knitting techniques. Here’s a raft of tools that I find useful for these purposes, plus some other useful or interesting (or amusing) things tossed in.
Knitting needle size equivalencies (FiberGypsy):
http://www.fibergypsy.com/common/needles.shtml
Metric/Imperial unit conversion calculators:
http://www.sciencemadesimple.com/conversions.html
http://www.mcnichols.com/products/productsupportfiles/conv.calc.htm
Factor generators (good for finding possible pattern repeats from a stitch count total)
http://www.markhorrell.com/tools/factors.asp
http://www.counton.org/explorer/primes/primecalc.shtml
Descriptions of the count (X/X) systems of yarn weight and yardage used by machine knitters:
http://www.cara4webshopping.com/cara_free/yarn-wts.htm
http://www.yarns-and.com/yarnto.htm
How-to videos or animations showing basic knitting techiques:
http://www.knittinghelp.com
http://www.dnt-inc.com/barhtmls/knittech.html
Tutorial on reading lace knitting charts (Heirloom Knitting):
http://www.heirloom-knitting.co.uk/pages/beginners_guide2.html
Fabric care label symbols:
http://ohioline.osu.edu/hyg-fact/5000/5556.html
Heel stitch count chart (dead link retrieved using Wayback Machine)
http://web.archive.org/web/20021016042840/http://www.magma.ca/~vanmac/heels.htm
Garment size charts:
http://www.yarnstandards.com/sizing.html
http://www.fibergypsy.com/Charts_and_Other_Helpful_Resources/Size_and_Measurement_Charts/
Sock size survey results:
http://www.needletrax.com/SockSizeAnalysis.html#
Jaya’s round-up of knitting software availble for Palm handhelds:
http://www.palmsource.com/interests/knitting//
Back neck shaping for the Math-Aware:
http://www.hillcrestknitwear.com/knitting%20info/ff%20back%20neck%20formula.html
Toys
Sockman
http://www.renfro.com/consumer/Renfro/funstuff/sockcalculator/
Assorted esoteric Google time-wasters (Google Blogoscoped):
http://blog.outer-court.com/archive/2005-01-29-n34.html
DEMO SOCKS; STITCH FACTORY – MAKE ONES
I’m split among several different knitting foci right now. First, there’s the upcoming class. I’ve finished the hand-outs I’ll be distributing covering both two circ and one giant circ production;? the practice pair of socks; and the sample mini-sock we’ll be making during the workshop. I’m as ready as I’ll ever be. I’ve also gotten word of a potential design commission. If and when that occurs and I’m permitted to bruit about the details, I’ll report them here. In the mean time, here are my practice socks, dutifully completed one with the one giant circular technique, and the other using the two-circ method:

Nothing special. Just plain old Regia 6-ply Crazy Color stockinette socks, with Dutch heels, and standard toes grafted to finish. On the pair with the turquoise toe I took care to finish out the color repeat such that the line of grafting ended up being a contrasting color, so the class can see where it is.
Having put the class socks to be, I’ve picked up Rogue again. A couple of people have asked if I’m doing mirror image Make Ones on either side of the verticals that run up the design. The answer is "Yes."? I don’t usually stoop to this level of ultra-refinement, but for this project because the two Make Ones are separated by only one stitch, using them does make a visual difference. Here’s how I do them:
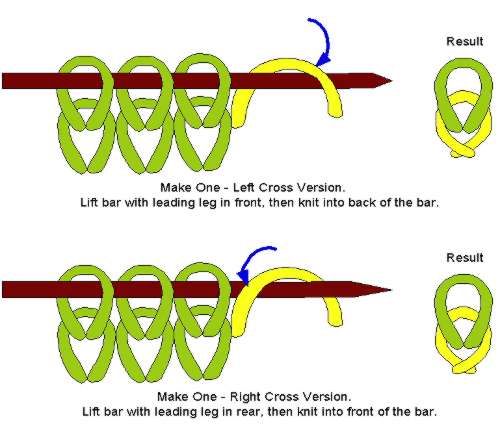
To get a make one with a top leg that crosses lower right to upper left (S-style), I lift the running bar between two stitches, mounting it such that the leading leg of the bar is in the front of the needle (standard stitch orientation). Then I knit into the
back of that bar.
To produce a make one with a top leg that crosses lower left to upper right (Z-style), I lift the running bar between two stitches, mounting it such that the leading leg of the bar is in the back of the needle (opposite of standard stitch orientation). Then I knit into the FRONT of that bar.
As to which to deploy in what situation – most of the time I doesn’t matter. My standard issue default Make One is S-style. If a pattern just calls for one, that’s the one I do. In cases where mirrored ones are needed, I’ll experiment. Sometimes the final result looks better if the S-style Make One is deployed on the left of a visual unit, with its sister Z-style deployed on the right. Sometimes it’s the other way around. On my Little Dragon Skin I’m working the Z-style on the left of the center spine, and the S-unit on the right.
Rogue photos later this week. I promise.
CLASS SOCK; kNITTING TWO ITEMS SIDE BY SIDE
No Rogue progress. My knitting time is consumed with class-related experimentation. Here’s the surviving result:

No surprise. It’s a sock knit from leftovers of the same DK-weight Regia 6-Ply Crazy Color yarn I used for The Small One’s Crazy Raglan. It’s on a single US #3 size 40-inch circ. I’m working these socks at this (for me) giant gauge so I can get in as much experimentation as possible before the actual class.
I’ve been experimenting with various heels, trying to decide which will be the easiest "classic heel" to use in the workshop for our knit-together project. I’m doing this because I’ve been told that the majority of people who have signed up have never made socks before. Some have never even knit in the round. I want the class to get through the danger spots of sock construction – cast on, a heel and a toe.
What you see above is a simple Dutch heel. It’s not as form-fitting as a round or other more finely shaped heel, but of all the turned heels (as opposed to short-row heels), I think it will be the simplest to both describe and work.
I’m still waffling between showing the heel worked entirely on one side of the sock, with the cable needle looping out done at the left and right of the piece, or re-assorting the stitches after completion of picking up along the sides of the gusset, then working the rest of the sock with the looping out at the center top and bottom of the foot. And as you can see, I’ve not yet experimented with toes. That’s next. Toes may be the kicker on stitch reapportionment. If I’m getting too much laddering with the split on the sides as established, I might re-engineer my thought and move the stitches around either immediately after completion of the final gusset row, just before the toe itself, or back before the gusset decreases are started. And that means that the poor sock you see above will cease to exist in the current form, and be sacrificed to the minor gods of ripping back.
Two items side by side on two circs
An anonymous person asked if I could show or explain how to do two things side by side on two circs.
I have to admit, I cheat somewhat because casting two items on side by side can make for confusion and twisted cast-on rows. I begin each item individually and work the first row before mounting my two items side by side. After I’ve got a scrap of knitting, i divide the stitches in half. I thread the first half of Item A onto a circ, followed by the first half of item B. Then I take a second circ and thread the other half of item B onto it, followed by the second half of Item A’s stitches.

I now have a piece that should look (more or less) like the drawing above. I work across the front side of item A, knitting from it’s own ball of yarn. Then I drop that strand, pick up the other and work across the front side of item B. When I finish the last stitch of this side of B, I flip the whole thing over, and using the same B yarn, work back along the reverse of B. Then I drop that strand, pick up the A yarn and work the back side of Item A. At the conclusion of this cycle, I will have completed a full round on both A and B, and have both strands of yarn back in the positions shown in the illustration.
