FRUSTRATION
My deadline looms and I’m nowhere near done. Not even
close. I’ve even moved to mocking up with yarns other than the
one provided because I won’t have enough to finish the project
otherwise.
I have a tricky shape to create prior to fulling. I’ve tried
knitting flat with end row increases/decreases. I’ve tried
short-rowing to build my contours. Neither worked well. I’m now in the middle of
trying to knit a flat medallion, center-out, differing the increase points and rate of increase, plus adding
short rows (rounds actually) to deform the thing into the configuration
I want. So far this last method is producing the most shapely
results, but I fear that the written directions will be complicated to
follow. Here’s one sample round:
*K1, M1, K19, M1, K1*; slip marker; K1, M1, K4, M1, K28, M1, K4, M1, K1; slip marker; repeat ** once
No two rounds are alike, increase points migrate all over the place, and the logic of the
increase progression changes several times over the course of the piece.
To top it off, I haven’t gotten up to the fulling step yet. I
have no idea whether or not my complex shape will full into a nice flat
piece, or whether it will crumple up like a head of Boston
lettuce.
Frustration, frustration.
Maxim number one, repeat as necessary: If you knit for
relaxation, as an enjoyable way to escape a high pressure,
deadline-driven career, taking on a commission that’s also
deadline-bounded is a Bad Idea. Especially if unforeseen events and
multiple
major work-related responsibilities wolf down the majority of what you
thought was discretionary time at the outset of the assignment.
Kim’s Corollary:? Nothing knit under extreme time pressure ever turns out well.
AAARGH.
WHERE HAVE I BEEN?
Mostly working. It’s been an high pressure week, with Life encroaching on knitting time. As a result, I’m woefully behind on my commission, and have done no personal knitting at all.
After all my swatching work (unsuccessful), I am now forced to do the exact thing I wanted to avoid – winging it. Making the project up as I go along rather than sitting down to do a bit of rational planning. While winging it isn’t a problem on one-offs or things I am making for myself, in this case I have to write down detailed notes as I go because the outcome is to be not only the finished piece, but also an intelligible pattern. There are some shaping challenges here, too that are complicating matters. In effect, I am making a flat motif in the round that isn’t symmetrical. I have to control for an even rate of increase, and hope that after fulling I end up with a flat piece instead of Mt. Fuji.
The other annoyance is of course, texture. I have had excellent success producing a flat and ultra dense fabric by fulling garter stitch, but I did it using other yarns. This yarn fulls nicely, but not to the extent of the other yarns I had used before. I will sacrifice a bit of extra oomph and sturdiness for a sleeker, less corrugated finish.
But enough whining. It’s off to work, and after work – to droning away to finish my Mystery Project.
POST SHRINK POST
Over the weekend I fulled the swatches from Wednesday’s post, with only
equivocal success. The washing machine in this house isn’t very good.
As you can see, there’s a little fuzzing, some uneven shrinkage, and no
loss of stitch definition, even after trips through the wash/dry cycle
with all six of the family’s weekly loads.
 |
 |
Swatch 1: Double strand, knit on US #10.5, 3.75 spi, 8 rpi. 15 stitches cast on.
- Pre-wash: 12mm wide x 10mm long.
- Post-wash: 10.5mm wide x 9.5mm long
Swatch 2: Double strand, knit on US #11, 3 spi, 6 rpi. 15 stitches cast on.
- Pre-wash: 13.5mm wide x 11mm long.
- Post-wash: 11.5mm wide x 9mm long. Very distorted
Swatch 3: Double strand, knit on US #13, 2.75 spi, 5 rpi. 15 stitches cast on.
- Pre-wash: 14.5mm x 12mm long
- Post-wash: 12.5mm wide x 9.5mm long
Swatch 4: Single strand, knit on US #10, 4 spi, 9 rpi. 18 stitches cast on.
- Pre-wash: 12.5mm wide x 10mm long.
- Post-wash: 10mm wide x 8.5 (to 11)mm long. Most distorted of all
Swatch 5: Single strand, knit on US #9, 4.2 spi, 10 rip. 18 stitches cast on.
- Pre-wash: 13mm wide x 9mm long
- Post-wash: 10.25mm wide x 8.5mm long
As to texture – all of the swatches firmed up somewhat. There was
very little difference in drape between #4 and #5, although of the two,
#4 was the more fulled. It had spots where the stitches were
almost melded together. Unfortunately it was also the most
unevenly treated, to the point where getting an accurate measurement on
it was very difficult.
I was surprised at how the heavier two-strand swatches turned
out. I really expected to see more shrinkage, and a tighter,
denser fabric with less stitch definition. While they’re nice and
dense, I haven’t lost the corrugation of the original garter
stitch. I also expected the swatches knit on larger needles to
shrink more in relation to their original size than the ones on smaller
needles.
I wouldn’t consider any of the results I got suitable for producing a
knitted bag, but I also don’t think my swatches have fulled to their
limit. I am going to try again tonight, working by hand with a
pot of boiling water and a pot of ice water, and see what I come up
with.
One aside – the color in today’s swatch photos is much more accurate than the earlier photo.
LET’S SING THE SONG OF NINE
Still plugging along. Progress will stall though after this for a bit
as I have some rather intensive fulling and knitting on the Mystery
Project to accomplish.

As
you can see, I’m missing a couple of solid triangles left and right of
the motif at the lower right, but the final result is becoming
increasingly more clear. I like the play of the large starry areas and
the solid white bits. Seaming is a pain, it’s true – but not so big a
pain as I thought it would be. Of course I’ve got a zillion ends at
this point. I may just take the odd moments of this week I can spare
from the Mystery Project and end off as many as possible. That would be
productive yet mindless work that could be done in stolen time.
EIGHT (GIVE OR TAKE) PLUS ECONOMICS
Although I was out of town tending to family matters last weekend,
knitting was accomplished – mostly on the flights and in the airports
as I waited between planes. In addition to yesterday’s swatches,
I did some work on my counterpane.

As you can see there’s a pie slice that’s missing from the leftmost
motif. My guess is that my missing triangle is now loose in the
Orlando airport – a stopover on my way to my final destination. I
doubt my feral triangle will cause more than a moment’s pause as it is
swept up and tossed away. So it goes.
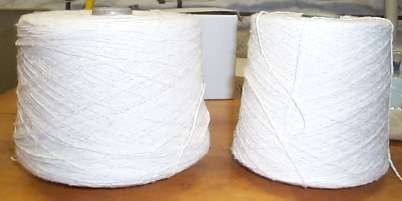
As this piece grows larger, I can say I’ve definitely overbought my
white cotton coned yarn. I have four enormous cones. I’ve
gone through about a third of just one of them. I think I’ll end
up using just two of them to make the whole thing. Here’s
consumption so far. The untouched cone on the left weighs
1250g. It’s the smallest of the four, with the others ranging up
to about 1300g. The nibbled into cone on the right weighs 825g,
and started out at around 1300g. Which all makes sense because my
blanket so far weighs about 475g. (It’s always pleasing when the
math actually works out).
Since I’ve got about 20% of my estimated total surface area done, but
have used only about 8.3% of my yarn (a third of one of four cones –
roughly a 1/12 of my total available yarn), I’ll have LOTS
leftover. Still, I don’t mind. It’s nice yarn and there
will be enough for another project (perhaps another counterpane).
As an added bonus, the stuff was a very inexpensive back room find at
Webs. I paid about $10 per cone for it. Since this project
will last for about eight months at the current rate of production and
I anticipate using only two cones, that works out to $2.50 per month of
knitting enjoyment. It doesn’t get any more economical than that.
How to knit on the cheap?? Don’t buy what’s trendy. Big fat
yarns and glitzy yarns command a premium, but plain finish yarns, even
first quality good wools and cottons can be had at very reasonable
prices (even without resorting to reclaiming yarn).
Think smaller gauges. This stuff isn’t particularly small being
very close to DK weight (5.5spi), but even DK is lighter than many of
the more favored yarns today. And think of? projects that
get their zing from the knitting rather than from the yarn. Yes,
they take a bit more time and attention than some plainer pieces, but
isn’t the entire idea to have fun knitting? No, if you are
on a limited budget you won’t be able to knit that fancy fulled
cardigan from imported Japanese hand-dyed, but I bet with a little
effort you could find a 100% wool sport weight yarn that would make a
smashing texture stitch or stranded colorwork jacket and not break the
bank – especially if you consider how many weeks of knitting time you’d
get by investing in such a project.
MYSTERY PROJECT
I’ve decided while I can’t write about everything, there are some bits
of my Mystery Project that I can discuss. Especially in the early
stages. I’ve already said that it’s a commission for Classic Elite, and
that it’s going to be fulled.
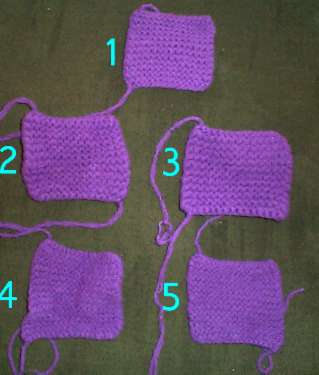
Here is my first set of swatches:
That’s a lot of swatches!
I’m using CE Renaissance.
It’s a 100% wool worsted weight yarn. It’s got quite a bit of loft due
to it’s three-ply construction, and the maker’s gauge is expressed in a
range – from 5spi on US#7 (4.5mm) to 4.5spi on US #8 (5mm). My
direction is to make a very firm fulled fabric, so I’ve made three
garter stitch swatches from double strand and two garter stitch
swatches from single strand. Here are the pre-wash specs:
Swatch 1: Double strand, knit on US #10.5, 3.75 spi, 8 rpi. 15 stitches cast on. Total dimension: 12mm wide x 10mm long.
Swatch 2: Double strand, knit on US #11, 3 spi, 6 rpi. 15 stitches cast on. Total dimension: 13.5mm wide x 11mm long.
Swatch 3: Double strand, knit on US #13, 2.75 spi, 5 rpi. 15 stitches cast on. Total dimension: 14.5mm x 12mm long
Swatch 4: Single strand, knit on US #10, 4 spi, 9 rpi. 18 stitches cast on. Total dimension: 12.5mm wide x 10mm long.
Swatch 5: Single strand, knit on US #9, 4.2 spi, 10 rip. 18 stitches cast on. Total dimension: 13mm wide x 9mm long
Although
I used up a whole skein plus part of another in swatching, it’s worth
it. Note that I’ve got not quite a straight progression, but enough of
a gauge and texture difference to make the experiment worthwhile. The
plan is now to full these as much as possible, then compare the final
dimension with the pre-wash measurements. That will allow me to figure
out what my knitted dimensions need to be to achieve a post-full target
measurement. I’ll also get to see how both row and stitch measurements
change (important as knitting does not shrink uniformly in both
dimensions. I’ll also find out which of my gauges produces the best
fulled fabric for my purpose. Washing will happen later this week. Stay
tuned!
How do I know which swatch is which? See those knots in
the cast-on tails? That’s how they’re numbered. With luck those knots
will still be discernible after fulling.
PROFESSIONAL DEALINGS
I think I’ve mentioned that I’ve done some minor design work for
Classic Elite. I know that some people are curious about how the
pro design thing works. Bearing in mind that my experience isn’t
typical, this is how it’s been for me.
I’m not a first-stringer. In general, I don’t pursue the company
by submitting design proposals. I’d say I’m more of a
third-stringer. They call me with specific assignments based on
ideas or inspirations generated by others – usually at last
minute. My guess is that I get called when more famous and
prolific names are overbooked; when embroidery is involved; or when
deadline crises are afoot. That’s o.k. by me, as I don’t have the
time/energy to devote to knit design as a full career path. I’ve
also done some contract knitting, crocheting and embroidering for them,
producing finished items based on other people’s designs, and in the
process proofing (or fleshing out) the pattern’s early drafts.
What have I done lately? Nothing big, that’s for certain. The current collections include two of mine.

This is a hat and mittens set (I’m not responsible for the sweater
jacket). This assignment was mildly challenging – take one skein
of the bulky (almost superbulky) luxury yarn Tigress
and work up an adult hat and
mittens set that’s easy to knit. Since 200g of Tigress is only
181 yards this was a squeeze. I managed it though, with a very
simple rolled brim hat with some garter ridge details, plus a matching
rolled cuff basic mitten. I have to say I am not a fan of
big-needle knitting and won’t be making another set, but my 14 year old
loved the hat and mitts and was loathe to send them off when I was done.
This one was both easier and more difficult:

This assignment was to create a striped hat/wristlets/scarf set using
yarns of two different weights, but of the same fiber composition and
dyed in the same colors. The yarns didn’t have names attached
when I was using them, but I think they’ve been dubbed "Princess" and
"Duchess"
since. My homework was to take as inspiration a series
of photos showing striped knitting adorned by looped embroidery
stitches. In truth, I don’t remember which pieces use which
weight yarns (the submission deadline was back in the Spring), but I do
remember trying to plan the pieces to make the most efficient use of
the yarn. Again, simplicity and beginner-friendliness were the
marching orders. These use plain old seed stitch. The hat
and wristlets were knit in the round. The looped embroidery
stitches aren’t difficult to do, and are (of course) optional. You have
to **love** seed stitch though as there are miles of it in the
scarf. Of the two yarns, I did like working with Princess (the
worsted weight version). I didn’t retain any (see below) and I
don’t have the finished item, so I can’t comment on durability or
washablity. Duchess was also nice, but I’m not fond of heavier
weight yarns in general.
Past projects I’ve done include a long striped scarf in Bazic,
ornamented with pattern darning and fringed down one long side. The photo of that one in the
pattern leaflet didn’t show the embroidery, so I have no idea if anyone
was ever inspired enough to try it. I also did a series of
nesting baskets crocheted in a very heavy cotton yarn a couple of
summers back. I’ve worked on other projects as well.
I’m sure people have lots of questions about the design process. I’ll try to head some off here:
For real?? They say what to make, and you just make it?
For me that’s how it’s been. Real designers with lengthy
portfolios and industry-wide reputations must have more latitude.
How do I get involved? How can I get my stuff published?
Yarn makers and magazines have design guidelines (by issue for the
magazines). Look them up and submit written proposals outlining
your idea. Make sure your idea includes a sample swatch, and
enough info to make it intelligible to someone else. This may
mean lots of sketches and schematics. It does NOT include sending
a whole finished garment. Be prepared for hundreds of rejections
before an acceptance. Also be prepared to feel like you’ve tossed
your ideas into A Great Black Hole. Also, your proposals will not
be returned unless you include return envelopes and postage (another
reason not to send full garments at this stage). You WILL be
taken more seriously if you’ve got a "knitting resume" behind
you. That might mean a track record of publication elsewhere (a
chicken or egg problem). I do note that some of the on-line
venues are a bit more welcoming of submissions than are the yarn houses
or paper mags. They might be a good place to start. (Oh,
and if like me you’ve ever been a burr under the saddle of any
publisher or maker at any time in the past, you can pretty much forget
about placing anything in their venue.)
In general after you submit your proposal it’s mulled over for a while.
If it’s selected, you get your marching orders to proceed, plus a
contract outlining what you owe (written design or written design and
finished sample), the number and range of sizes the item needs to be
written for, specifications for the exact yarn and possibly even the
color desired by the publisher, and the deadline for submission.
Be warned:? that deadline may be as little as two weeks away, and
may involve a yarn that requires you to recalculate your entire design,
so advance knitting is not always entirely productive. The
deadline cycle is the main reason why I don’t try to do this on a
professional basis. I just can’t commit to doing anything major
to hard, short deadline.
How much does it pay?
Not much. Even though it is taxable income (reported under
"Miscellaneous" or as a home business), if you work out the hours
invested in proposing, designing, drafting, swatching, test-knitting,
pattern writing, and proofing you’ll quickly figure out that you’ll be
working at less than minimum wage. Way less.
Do you get free yarn or get to keep the finished item?
Yes and no. If you work for a yarn company directly like I did,
they do send more than enough yarn to make the project. But under
contract, I’m obligated to return any leftovers and swatches, so I
don’t get to keep any. i also don’t get to keep the
finished item – that’s the photo shoot/trunk show/demonstration model
and gets returned to the pattern publisher as part of the agreed-upon
deliverables. The sample belongs to the publisher, not the
knitter, even though the knitter worked on it.
It’s worth noting that not every designer knits up his or her own
samples, some subcontract out. Others just do the design and the
publisher arranges for the sample to be knit as a separate
contract. Also, if you’re knitting for some other entity than a
yarn maker, you might have to buy the yarn yourself and factor that
into your total contract price.
You sell-out. Isn’t this a big commercial for CE stuff?
I don’t think so. They’re not paying me to push these patterns,
and I don’t get extra for increased sales. Plus I rather doubt
that anyone is going to buy anything based on this rather non-gushy
blog entry. I have also recused myself from posting any reviews
of Classic Elite products on wiseNeedle since my very first
professional interaction with them. I’m mulling this policy over
though, as not all of my experiences with their products have been
uniformly joyous. Still, I thought the general experience might be of interest to some.
Why are you talking about this now?
Because I’ve just gotten another assignment from Classic Elite. All I can
say about it is that fulling and embroidery are both involved.
It’s going to kill me not to be able to blog about this particular
design process real-time because there will be all sorts of lessons
learned on the way. So please be patient with me. There
won’t be much counterpane progress until this has passed, and I’ll be
scampering around looking for other things to write about.
Suggestions there are welcome.
YOU CAN HELP
There are an awful lot of people in Mississippi, Alabama, Louisiana and possibly points further north who will be needing an awful lot of help in the coming days, weeks, and months. And I’m not talking about knitting socks or hats for them either.
If you can afford it, consider donating money to the relief efforts just getting started to assist people affected by Hurricane Katrina. Here’s a link full of legitimate charties that can funnel aid to people in need.
UPDATE:
Unless you have a personal contact at someplace that’s sheltering refugees, and a guaranteed way to get stuff to them (NOT US Mail, UPS, FedEx or chartered truck) – donate money instead of trying to send goods. Think about it. There’s no infrastructure to distribute goods, and there’s a far greater need for the assistance personnel down there to do search and rescue, transport of the vulnerable, wounded or sick, than there is for them to sort donated items for distribution.
More places accepting money donations:
American Red Cross
United Way
LUCKY SEVEN
Still plugging along on the counterpane, at the approximate rate of one
meta-motif per week. Week seven ends with this accumulation,
shown on the top of the bed that it will (eventually) grace:

As you can see in spite of having completed one circuit, there’s still a long way to go:

I still stick by my estimate of approximately 26 motifs (plus half
motifs) to get good coverage for my queen-size bed. I might take
a break this week though and use my knit-time to tend the ever growing
forest of ends. That’s 36 ends per meta-motif. Plus 12 more
for the solid triangles shown above. Plus two more from finding
and cutting a knot out of my yarn. So I’ve already got about 50
ends to deal with in the fragment shown above. Which should keep
me busy for a bit…
INNOVATION AGAIN – BUILDING A BETTER MAGNET BOARD
The idea I hinted at yesterday has to do with magnetic boards. It’s not
something I can make at home, but it’s a set of improvements I’d like
to see made.
To recap, the standard issue magnetic board is very useful and very inexpensive, but it has some shortcomings.
 Boughten |
 Scavenged |
LoRan
appears to be the leading (possibly only) seller of magnetic boards.
LoRan appears to have been bought by or is marketing through the Dritz
line of sewing and crafting notions. LoRan boards come in several
configurations. Some have easel backs, so they stand up on their own.
Some of the easel backed ones have small pencil-holding ledges along
their bottom edge. Sizes appear to be 6"x10", 8"x10", and 12"x18".
There are also supplemental accessories including separately packaged
easel stands, plain gray metal/plastic magnet bars, magnetic bars with
rulers printed on them, see-through magnifying magnet bars, and special
packaged bundles of the base model boards plus accessories. There are
also "after market" vendors that sell other types of place-marking
magnets/magnifiers for use with magnetic boards.
My problem with the LoRan line are:
1.
That it does a lousy job of protecting the charts while the work is in
progress. I didn’t realize exactly how lousy a job until I began using
my improvised solution. The largest LoRan size is bigger than I need
for 99.9% of my knitting charts. But the two smaller sizes are smaller
than standard US 8×11" paper (or the standard Euro A4 size of
210x297cm, for that matter). Charts put on the boards get bashed up –
even if both the board and the page are slipped into a page protector.
This damage is especially bad if the board/chart combo is stuffed into
knitting bags in between working sessions. My el cheapo scavenged
cookie pan’s raised rim did an excellent job of keeping my project
together and unrumpled, and keeping the magnets in place in between
uses.
2. The boards are flimsy and prone to bending and denting.
Once they are no longer flat magnets have a more difficult time
sticking. Again, my cookie sheet was thicker and (for non-cooking
purposes at least) resisted warping and denting better than the
commercial product.
3.
The magnets are wimpy, and can’t grab
through more than a page or two, or are easily displaced in between
working sessions. This one is a balancing act. There are incredibly
strong magnets out there, but they would be difficult to move while
working. Finding just the right amount of stick to stay put when needed
and still be easy to move when necessary is difficult. Even more so
when you remember that for most low adherence magnets, the magnetism
slowly dissipates over time. What worked last year might be less useful
this year. My cut up promotional fridge magnets did a fine job
through up to two sheets of paper, but I like to keep all the pages of
a pattern together when I’m working. I’d want something a bit
stronger, perhaps something that could stick through a plastic
protective cover, plus three sheets of paper, but not necessarily
something thicker. The thicker the
magnet, the more difficult it is to read Think thick rulers vs. thin
rulers. Thick rulers are visually offset from what they are
measuring, making taking accurate measurements more difficult.
What I want is something like this:

Wouldn’t it be nifty if
that transparent magnet-through plastic cover was a full-sheet magnifier page?
Now, how much more would I pay for something like this above and beyond
the flimsy market standard? Not sure. If the least expensive packaging of the LoRan 8×10
sells for about $5.00 US (more or less), I’d pay around $15
for something this elaborate, provided the quality of the piece was
commensurate with the price.
Remember – if you see this product for sale out there, you saw the idea here first. [grin]
