INNOVATION AGAIN – BUILDING A BETTER MAGNET BOARD
The idea I hinted at yesterday has to do with magnetic boards. It’s not
something I can make at home, but it’s a set of improvements I’d like
to see made.
To recap, the standard issue magnetic board is very useful and very inexpensive, but it has some shortcomings.
 Boughten |
 Scavenged |
LoRan
appears to be the leading (possibly only) seller of magnetic boards.
LoRan appears to have been bought by or is marketing through the Dritz
line of sewing and crafting notions. LoRan boards come in several
configurations. Some have easel backs, so they stand up on their own.
Some of the easel backed ones have small pencil-holding ledges along
their bottom edge. Sizes appear to be 6"x10", 8"x10", and 12"x18".
There are also supplemental accessories including separately packaged
easel stands, plain gray metal/plastic magnet bars, magnetic bars with
rulers printed on them, see-through magnifying magnet bars, and special
packaged bundles of the base model boards plus accessories. There are
also "after market" vendors that sell other types of place-marking
magnets/magnifiers for use with magnetic boards.
My problem with the LoRan line are:
1.
That it does a lousy job of protecting the charts while the work is in
progress. I didn’t realize exactly how lousy a job until I began using
my improvised solution. The largest LoRan size is bigger than I need
for 99.9% of my knitting charts. But the two smaller sizes are smaller
than standard US 8×11" paper (or the standard Euro A4 size of
210x297cm, for that matter). Charts put on the boards get bashed up –
even if both the board and the page are slipped into a page protector.
This damage is especially bad if the board/chart combo is stuffed into
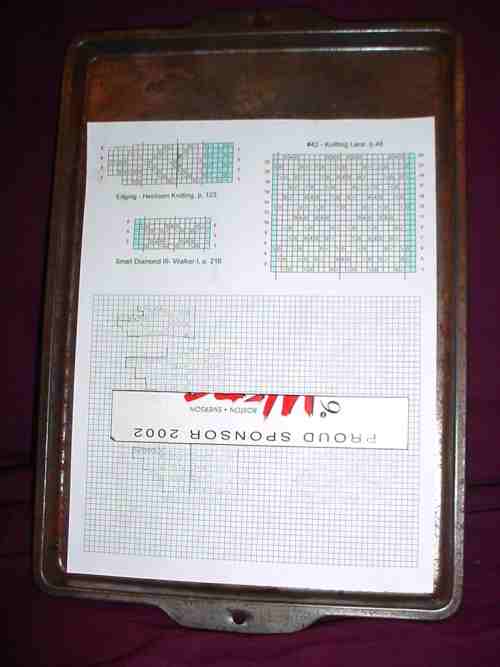
knitting bags in between working sessions. My el cheapo scavenged
cookie pan’s raised rim did an excellent job of keeping my project
together and unrumpled, and keeping the magnets in place in between
uses.
2. The boards are flimsy and prone to bending and denting.
Once they are no longer flat magnets have a more difficult time
sticking. Again, my cookie sheet was thicker and (for non-cooking
purposes at least) resisted warping and denting better than the
commercial product.
3.
The magnets are wimpy, and can’t grab
through more than a page or two, or are easily displaced in between
working sessions. This one is a balancing act. There are incredibly
strong magnets out there, but they would be difficult to move while
working. Finding just the right amount of stick to stay put when needed
and still be easy to move when necessary is difficult. Even more so
when you remember that for most low adherence magnets, the magnetism
slowly dissipates over time. What worked last year might be less useful
this year. My cut up promotional fridge magnets did a fine job
through up to two sheets of paper, but I like to keep all the pages of
a pattern together when I’m working. I’d want something a bit
stronger, perhaps something that could stick through a plastic
protective cover, plus three sheets of paper, but not necessarily
something thicker. The thicker the
magnet, the more difficult it is to read Think thick rulers vs. thin
rulers. Thick rulers are visually offset from what they are
measuring, making taking accurate measurements more difficult.
What I want is something like this:

Wouldn’t it be nifty if
that transparent magnet-through plastic cover was a full-sheet magnifier page?
Now, how much more would I pay for something like this above and beyond
the flimsy market standard? Not sure. If the least expensive packaging of the LoRan 8×10
sells for about $5.00 US (more or less), I’d pay around $15
for something this elaborate, provided the quality of the piece was
commensurate with the price.
Remember – if you see this product for sale out there, you saw the idea here first. [grin]
INNOVATION UPDATE GRAB BAG
Innovation Update
Kate
from the UK has sent a lead on something that’s even better than the
narrow sticky notes I wrote about yesterday. She points us at
removable, translucent highlighter tape.

It’s
inexpensive. Even better, it comes in several widths and lots of
colors, and is packaged as either sheets of removable strips or in
dispensers like adhesive tape. From a quick product search, it appears
to be most widely used by teachers and professors for book
highlighting, and by pilots for annotating aviation charts. A Google
search on "highlighter tape" or "highlight tape" turns up a bunch of
sources. Here are several sources that has a pretty complete listing of
the available form factors (no affiliation):
http://www.windmillworks.com/catalog/c1_p1.html
http://www.crystalspringsbooks.com/products.asp?dept=333
http://www.avidaviator.com/tape.html
Some
advantages include transparency – being able to "look ahead" in your
pattern without displacing the mark, and availability in assorted
colors. Why colors? Two reasons. First, some charts come in color. One
might need to find a contrasting highlight to avoid "wiping out" one or
more colors shown on the chart. Second, I’m no educational or visual
perception theorist, but I know there are people who find reading much
easier if they view pages through colored filters. I wouldn’t be
surprised if some of the chart-shy have perceptual wiring that would
benefit from using color highlights, too.
I’ll be looking for this stuff to try out.
More goodies in office supply stores
I’ve
written about knitting tools that can be found in hardware stores. Now
this train of thought takes me on another mental shopping trip – tools
that can be found in office supply stores. Some are obvious:
- Drawing/drafting
supplies – rulers, protractors, French curves, graph paper, tape
measures, cartographer’s measures (people who do full scale dimensioned
drawings and slopers might find these useful) - Calculators of all sorts
- Filing supplies – sheet protectors, binder and loose files
- Tote
bags – Some of the smaller computer bags and the not-quite-briefcases
meant for file-toting road warriors make excellent stealth knitting
bags. - Organizers – In-drawer, in-briefcase, and desktop organizers can be handy to corral knitting doodads
- Typing stands – Great for propping up charts or leaflets
Some are less obvious. Here’s a smattering of the latter:
 |
 |
Transparencies
– clear plastic pages that can be run through printers or copying
machines. Need to grid up a picture or photo? Print a transparent sheet
up with a graphed lines in the same height:width ratio as your knitting
gauge. Lay that clear line-printed sheet over the image you want to
transcribe to knitting. Voila! Instant knitting graph.
Circular paper clips – Instant stitch markers.
Check files – Yet another possible solution for storing those circs.
Tomorrow – another wish list item.
INNOVATION
Yesterday’s post got me thinking. (Always dangerous.)?
There must be tasks we wish our knitting or crocheting tools could do,
either as tweaks to existing products, or as entirely new items.
I’ve come up with several minor ones over the years. In the
spirit of Anne L. MacDonald* At the risk of compromising patentability
or re-inventing the wheel, I invite people to share ideas, and prime
the pump with some of my own.
Counting Beads

I wrote about these back in my Stupid Stitch Marker Tricks
post. This is intended to be an aid for people who are
working row count repeats or those annoying "Decrease two stitches
every sixth row" directions. It’s a chain with links large enough
to admit a knitting needle, and two different color beads, one at each
end. On the first row, the knitter puts the needle into the link
closest to the green bead. On the next row (or next right side
row if working in the flat), the knitter advances the needle to the
next link, and so on. If the links are used to count pairs of
rows, a six-link chain could count 12.
Inch-Striped DPNs
I know I’ve seen photos of WWII-vintage DPNs that were striped,
but I don’t know if they were striped off in exact inch measurements
(or 2 cm for our metric friends). If I had a set of striped DPNs
I could use them to measure off length as I knit, without fumbling
around for a tape measure or ruler.
Two-Tone DPNs
This idea could be used in combo with the stripes, above. I wrote
about this one in the post remarking on a really bad answer offered up
by Lion Brand. If one had a set of similarly colored DPNs that
had a different color marking one end of each needle, one could use
that color to track where rounds began and ended. (Yes, I know
most people look for the tail, but sometimes it can be less evident,
like when you’re knitting a flat motif center out.)? The knitter
would knit all DPNs with the same color end, EXCEPT for the one that
starts off the round. That one would be employed with the
contrasting color first. If we used red and green again, we’d
knit the first needle with the green end, so that the red end was
rightmost in the work. All successive needles would be knit with
the red end. As the knitter traveled around the work he or she
would know that when a red end presented itself, that was Needle #1.
Long, Thin Sticky Notes
This one is left over from my stitching days, although I sometimes do
use sticky notes to mark my place on knitting charts. I want a pad of sticky notes
that’s six inches wide and less than an inch deep. The sticky should be
along the long edge, not at the tab end. If it had? 10 to
the inch rules on it with prominent decads, so much the better. I want to use it to
mark off the active row of an active knitting or stitching chart. Having rules on the thing would help me keep my place on the chart and if the chart’s scale was 10 to the inch – allow me to do "speed counting."
Anyone have any other innovative ideas for working tools, storage
ideas, charting aids, or other new thoughts for here-to-for unknown
tools or tweaks to existing ones?
*Anne L. MacDonald is best known for her book No Idle Hands:? The Social History of American Knitting, but she also wrote Feminine Ingenuity: How Women Inventors Changed America.
GADGETS – CIRC LABELS
It’s no secret that I don’t see as well as I used to. Between eye
infections and all-purpose aging, I need help. For most things glasses
work just fine, but there are a couple of minor annoyances even with
glasses. One is the teeny labels etched onto most circ needles –
especially the ones smaller than US #4s.
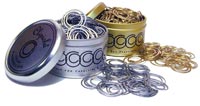
Now,
if I were one of the Super Organized, I’d have a system for storing my
circular needles. Perhaps one of the sorting hanger thingies (see
below), or a binder notebook full of pockets. But I have a lot of circs
and little patience for filing things away, so I make do. Most of mine
live in a hand-me-down wood box that once held a bottle of gift wine.
The lucky few among them get replaced in their original packaging. Not
all of my needles are lucky. The less fortunate among them live in an
incestuous tangle, stuffed into that same wooden box. Figuring out
which needle is which is always a challenge that involves finding the
size gauge that’s supposed to live in that same box, and playing "size
me" until the right one turns up. Either that or calling over one of my
offspring whose eyes function better than mine and having them do the
squint work for me.

I’m not this organized.
Enter my latest acquisition, hot off the gadget rack at my LYS.
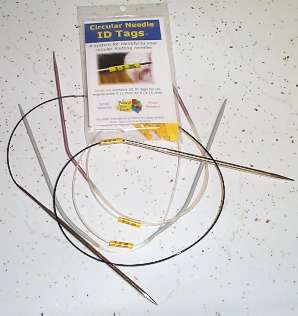
It’s another clever invention from Nancy’s Knit Knacks
– the Circular Needle ID tag set. (No affiliation). Tags are packaged
in two sets – one for US#0-4, and one for larger needles.
(Engraved labels on larger needles are easier to see, so I didn’t buy
the larger set.)?
I can find and read these tags in my needle jumble with no trouble at
all. Needle ID bliss! Of course one still has to remember to put the
tag back on the needle after the project is over, and manage not to
lose the thing in between – but that shouldn’t be too hard. I’ve
stapled the little plastic zip bag of tags in the circ box and will stow
the tags there between uses.
I also note that Nancy’s has been busy, issuing a new needle sizing
gauge that goes down to 000 (always welcome, although I wish it went
down to 00000), and an electronic version of the old katchaa-katchaa
style counter. I don’t use the things but I know that many people
do swear by them. It looks like the electronic one can subtract,
which is nice if you need to rip back. I’m surprised though that
it seems to have only one memory register. It would be even more
useful if it could remember two things at once (like total rows, and
rows in the current repeat).
 High tech |
 Low tech |
No
affiliation here between Nancy’s and me. I am however impressed that
they manage to identify and market to so many niche needs, including
the whole Knit Kard info system, the yardage gauge, and the WPI
tool. There are lots of companies selling knitting notions, but
most seem to be content with the old standards. Nancy’s is one of
the few that seems to be actively seeking out innovation.
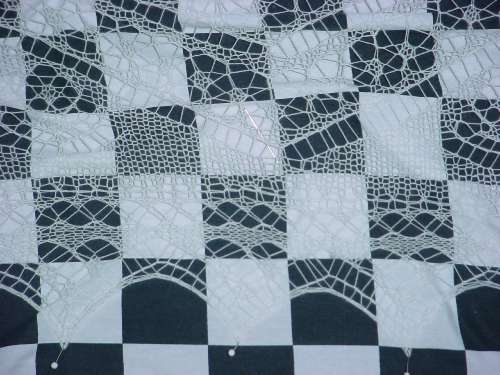
SIX!
Last week was a very Life-Dense week. I didn’t get as much time to knit as I usually do, so progress isn’t as dramatic as it otherwise might have been. Still, I got another meta-motif done and sewn onto the ever-growing counterpane:

At the rate of one meta-motif per week, I think I’ll be working on this queen-size blanket for another 25 weeks or so. That means March or April ’06 is my earliest possible completion date at the current rate of production. I’d better start (or resume) another project and work on the two in tandem just so that I have something interesting to report on. Production on this piece will slow down if I’m time-splitting my nightly hour or two of knitting. Possible completion well into 2007?? Stay tuned…
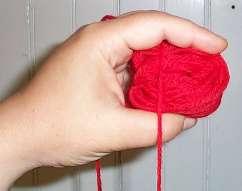
WINDING A CENTER PULL BALL BY HAND
Yesterday during the attack of Life that kept me from blogging, I did
find a minute to answer a question about winding balls from hanks. I
tried my best to describe how to do it, but was very frustrated not to
be able to show how. So this morning The Small Child and I dug out some
scrap yarn and took some pictures.
Start
by spreading out the fingers of your left hand (right hand if you’re a
lefty). Stash the free end (as opposed to the end attached to your
hank) between your index and middle finger.
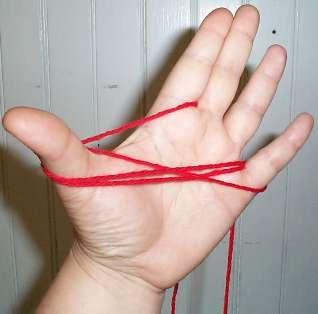
Wind the yarn in a figure 8 around your thumb and little finger until you’ve got a hefty butterfly going.

Once it’s too big to wind this way, take it off your fingers and fold
it in half. Note that I’ve still got the free end between my
fingers. The end that I’m winding is hanging down in front.
Now hold the folded butterfly in your left hand, with your finger sort
of encapsulating the thing. (When I teach kids to do this, I have them
think about holding a baby bird in a sugar cage.) Winding your yarn
around your fingers, begin to build up a ball. Wind a bit in one
direction, then shift your grip and wind in another.

The goal is to make a very soft, squishy ball so that the yarn isn’t
flattened or stretched out. When my fingers are full (like in the
photo above), I pull my fingers out, rotate the ball in my left hand
and start winding again in a different direction.

Eventually the ball will outgrow your grip size and you won’t be able
to fit it between your fingers as you wind. Don’t worry. Continue to
wind LOOSELY until you’re through, preferably over at least one finger
to introduce extra "give" into the wind so the yarn isn’t stressed. If
you want to use the thing as a center pull, avoid capturing the free
end as you wind. (It’s just above my thumb in the photo
above). Keep going until you’ve finished.

The end product. A nice fluffy ball. You can see the center
pull end trailing off past my thumb, and the outside end trailing off
the bottom.
Even though I have a ball winding machine, I wind more than half of the
yarn I use this way, mounting the hanks on my swift, but making the
balls by hand. The biggest exception is lace weight yarn.
Anything that comes in hanks of more than 700 yards is going to take an
eon and a half to wind by hand. That’s worth hauling out the
winder and wrestling it into submission.
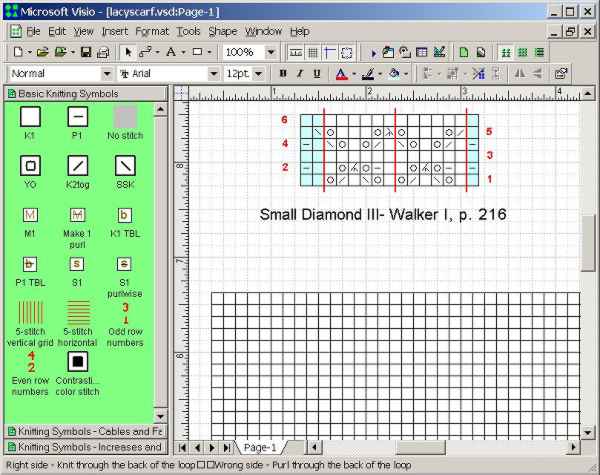
VISIO AGAIN
After Friday’s post on using Microsoft Visio for graphing knitting patterns I received some questions:
What’s Visio?
Microsoft Visio is a professional level drafting/drawing program –
something I’ve co-opted into serving as a pattern development tool, not
something that was designed for that purpose. It’s main use is
technical and scientific illustration – Gantt charts, flow process
models, flowcharts, conceptual diagrams, infrastructure diagrams,
business graphics, organization charts and the like. For example,
network planners use it to lay out routing diagrams for offices, as it
not only can handle a dimensioned architectural drawing, but it can
also keep count of the networking hardware placed on the drawing,
producing a "need to buy" list as the plan progresses.
In my work life, I’m a proposal writer working in engineering and
telecommunications companies. I use Visio extensively to do?
technical illustration and project planning. Visio isn’t the sort
of thing that most people have lying around the house, but because I
have worked as a consultant I have had to buy my own copy. I use
Visio Pro. Visio Standard (the entry level version without some
of the industry-specific bells and whistles) is about $200.
http://office.microsoft.com/en-us/FX010857981033.aspx
What’s a stencil?? Can I use these with other programs?
One feature of Visio (both versions) is the ability to establish a
collection of standard shapes, and call that collection up when
needed. These collections are called stencils. I created a
set of stencils for Visio that contain knitting stitch and graphing
symbols. I attach the stencil to the active drawing, and then
using all of Visio’s drafting features – draw up my chart.
Visio stencils are unique to that program, and cannot be used with
others. There may be (emphasis on uncertainty here) one
other program that can import them, but I do not own that program and
have not tried it. It’s called SmartDraw, and the suite edition
that includes templates sells for just under $300. It purports to
import Visio output, but there’s nothing there that says it takes the
stencils directly. I suspect that you’d need to take the sample
Visio drawing I include in my template set, then use it to create a new
SmartDraw symbol library. As far as lower cost/hobbyist targeted
programs with the same functionality – I don’t know of any that import
Visio stencils. Please chime in if you do.
Can you do everything in Visio that dedicated programs like Aran Paint or Stitch and Motif Maker do?
No. I’m NOT using a program that knows the slightest thing about
knitting, or that is optimized for this sort of thing. There are
no limits that keep me from using impossible combos of stitches, and no
tools that let me do things like replace all the red stitches with pink
stitches everywhere in the active document. There’s no
blank canvas that can be flood filled by a background stitch.
Instead I have to build my diagrams stitch by stitch, adding my stitchs
(or groups of stitches) like a kid laying out a doll’s dance floor of
alphabet blocks.
What I do have is an unlimited size and shape canvas on which to work;
and the ability to group, layer, copy/paste, rotate and reflect my
custom symbols as needed. If I’m doing colorwork, I have an
infinitude of possibilities, and even do color matching by Pantone or
other color codification system. I can make up custom symbols on
the fly, adding to my library as I go along and am not limited to the
symbols present in a knitting font package (in fact, I don’t even
bother with one). I can also export my designs to all standard
web graphics formats, or paste them into other documents as desired.
Is Visio easy to use?
While large parts of the thing would be intuitive to anyone familiar
with other drawing programs, Visio isn’t the easiest program to learn
if you’ve never used any drafting program before. There are lots
of inexpensive training courses out there, some web-based, and some at
local community colleges. Or if you’re adventurous you can do
what I did – just start monkeying around with the thing.
Can I do the same thing with other drawing programs?
I’m pretty sure you can, although not every drawing program works in
exactly the same way. ? In ages past, I co-opted Aldus Superpaint
(on my late lamented Mac) for doing stitching and knitting
diagrams. That one was a hybrid drawing/drafting program. I
set up a series of ground textures that corresponded to filled and
unfilled grid squares (some with specific symbols in them). Then
I created a paintbrush the same size as one grid square. By
selecting the background fills and using the paint brush as a stamper,
I "daubed out" my charts. This is how I did all of the charted
illustrations in The New Carolingian Modelbook.?
I also have convinced Canvas to serve as a knitting/stitching design
aide, but that was a bit more painful. The version of Canvas I
used did not have a robust stencil capability. You could make
libraries of symbols, but they weren’t as accessible as in Visio.
I ended up making one document with reference copies of my
symbols. Then in a new document I established a snap-to grid
equal to the size of a stitch square, and copied/pasted the symbols
from my library document into my new design. It worked, but it
was cumbersome.
I also know that some people use non-drawing programs for this purpose. Others have written quite extensively about creative adaptation of Microsoft Excel and other spreadsheets (and even MS Word) as stitch chart creation programs.
If you’ve smacked another drawing program around for this purpose and
have some hints to share with others please feel free to add your
comments to this pile.
WE ARE FIVE
As you can see, motifs continue to accumulate on North Truro:
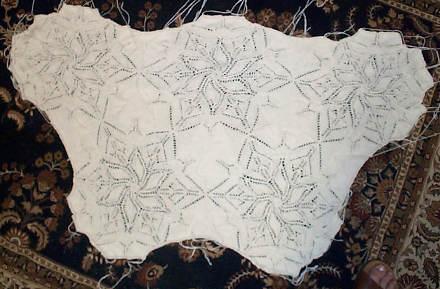
The observant will spot more evidence of my continued existence in the
photo’s lower right. Apologies for the quality of this shot. I
recently replaced the hand-me-down 1.3 mega pixel camera I had been
using with a hand-me-down 3 mega pixel camera. In theory, the best
quality setting of the latter should be better than the best quality
setting of the former. Apparently there is room for contention in
this theory. Still, you can see how the design continues to
grow. Next week’s progress shot will feature the thing on the top
of a queen size bed so you can see how far I’ve got to go.
I’m afraid that while this piece remains interesting to knit, I’m
rapidly running out of things to say about it. I don’t anticipate
any earth shaking discoveries until I get up to the bit where I have to
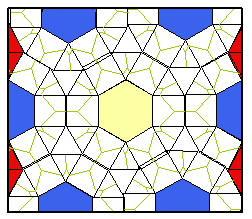
improvise half motifs to go around the edges:
Since I prefer the look of a nice straight edge and matching edging to
the rippled look of a "bare motif" spread, I’ll also have to invent
something to eke out the east/west sides. Plus the actual edging
of course. You can see the full motif smack in the center of this
layout (full yellow hex in the center). The half hexes are in
blue. They’ll pose a bit of a challenge because they’ll have to
be knit flat as opposed to in the round, but since I chart my patterns
by repeat, I don’t need to do any redrafting – just remembering the
circ/flat inversion and only working three rather than six
"petals."? The squares on the edge next to the half hexes also
need to be modified. There will be left and right halfies to
preserve the pattern’s lines. The hardest part will be the half
triangles needed to eke the thing out east and west. Fiddly but
easy to do. I never quite like the way they turn out.
Thought for the day:? Life is only as complicated as you make it.
MICROSOFT VISIO STENCIL TEMPLATES
I’ve blogged about using Microsoft Visio to do my charts here before.
At great length.
In short, I’ve devised a set of stencils (shape templates) that covers many of
knitting’s basic stitches. I assemble them like a wall of alphabet
blocks to make my charts, and have used them to build all the knitting
and embroidery pattern graphs here and at wiseNeedle.
That
ever insistent inbox of mine has disgorged a couple of requests for my
Visio templates, so I’ve decided to post them here, free for the
taking. Eventually I’ll remove them from this blog and file them up on
wiseNeedle where they will enjoy a more permanent home.
To use these templates you’ll need a full registered copy of Microsoft
Visio 2000 or later (up to and including the latest Office 2003
edition) – any flavor, for Windows. Sad to say Visio is not a
inexpensive tidbit of a program one can pick up on a whim. It’s a major
tool used in offices and schools, mostly for engineering and other
planning type drafting, and is priced accordingly. Still, I am sure
there’s a subset of technoknitter nerds who like me use the thing in home
businesses, or who have access to it during lunch hours at work or as a
student in a media center.
I might have tweaked the symbols a bit since I last updated this set,
but nothing major has happened to them. I include three templates
– one for basic symbols, one with cable crossings, and one with an
extended set of increases and decreases, all bundled into this handy compressed *.zip file.
Download it, then copy the *.vss files into the Visio template space on
your local hard drive (probably the same place as the folder entitled
“Visio Extras”). If you do that you should be able to access them off the standard Visio stencil menu.
Yes, I know that there are whole companies that do nothing but sell Visio template solutions, and here I am giving one away. It’s “teachware.” If you use it, teach someone else how to do something (especially something knit, stitch or fiber related), and I’ll consider myself well paid. You may use my templates to create original knitting and stitching charts of your own. A credit for the tool would be nice if you publish any of the resulting charts, so that others can find it and use it too. You may not however repost these templates on another site nor may you claim them as your own. (If you do, major demons of vile vengance will haunt your dreams forever, should your kneecaps escape me and my trusty stick.) Linking back here is fine and dandy.
When you try out these templates you’ll find that the symbols are not
use constrained. You can stack the stitches any way you want,
there’s no effort on the part of the template to limit use to “knitting
legal” configurations. But I did include a minor bit of shiny
with the template symbols themselves. For most of them (except
for some of the really esoteric cable crossings) hovering your cursor
over the symbol in the template stencil window will pop up a how to
knit annotation for both right side and wrong side application.
If you do play with these, please let me know. Suggestions for
additions, improvements, or other use case advice are most welcome.
BLOCKING AGAIN
Several people have asked about the blocking board Laura used for her
Paisley. I’ve sent the question to her, and will post any reply.
In
the mean time, here’s another suggestion. When I’m not being lazy
slinging things down willy-nilly on towels, I do follow a bit more of a
method. First, I clear out furniture in the room with our largest area
rug (I’ve got no wall to wall carpeting). Then I lay down a heavy
cotton quilt type blanket to protect the carpet from any moisture, and
to give me more depth into which I can pin. Finally I cover the blanket
with a rally check patterned sheet, one of two I stumbled across in a
discount store. Once all is smooth and ready, I pin out my item, using
long rust-free pins:

The
item above is my Spider Queen shawl. It stretched out to be about 7 feet
across. I began with a rough estimate of how large my finished item
should end up being, then I started at the center points of each edge.
I pinned them first, working from side to opposite side and tensioning
the piece across between counterpoised pins. Then I stretched out the
corners and did them, too. After that I just zipped back and forth
across the piece ping-pong style, pinning in the middle of each
remaining unpinned length until I had placed a pin in each of the
edging’s points:
About
the only caution I offer (beyond being prepared for the labor
intensiveness of this effort) is that the cheap Dritz pins I used were
long enough and rust-free enough, but they were too thin and too
fragile. They bent going in and the little bead heads pulled off when I
pulled the pins out. Not fun.
I know that rally check print
sheets are not an every day item, but any even check or Tattersall or
windowpane style plaid will work equally well. So would yard goods in
gingham or similar "graph paper" type patterns.
My friend Kathryn gently chides me about blocking my Kinzel Rose of England, languishing in my Chest of Knitting Horrors?
since 1991. While the method above would work for that piece it’s not
on my current schedule. ROE was the first bit of lace knitting I ever
attempted. It’s a testament to the precision and logic of that pattern
that I was able to do it with no prior lace experience.
At the time though, I wasn’t very appreciative though of my materials.
I used a mish-mash of size 30 white crochet cottons from various
makers, bought at different times. You can see where each purchased lot
begins and ends, some by slight color difference, some by texture. I
got about four courses of leaves into the final outside area and
stopped at the point where I ran out of thread (again) and when I was
no longer able to delude myself that the thread lot problem wasn’t
noticeable. I’d need to figure out where I was, buy more mis-matched
cotton, finish out another course of leaves, and do the final
crochet-off finish before I could even think of blocking. Either that
or ravel out a course or two of leaves and finish the thing from that
point. So you can get an idea of what the (eventual) goal is, here’s Judy Gibson’s ROE.
I know some people are asking about when I will be blocking my Alcazar shawl. I’m afraid the Larger Daughter took a fancy to my loud rally check sheets and took them off to sleep away camp. No large item blocking will happen here until she and my sheets return.
