EDGING UP
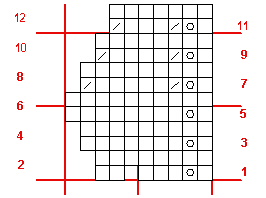
Here’s the final graph and directions for my edging to complement the Paisley Shawl from Interweave Knits, Spring 2005 edition. I haven’t worked out how to do the corners yet, but I suspect I’ll fudge them, working the equivalent of an extra repeat of the chart in each corner. I’ll start several stitches before each corner, working more than one attachment point into one stitch of the shawl body.
Simple Edging for Paisley Shawl
Work Paisley Shawl as directed until after the final row of the paisley lace border, just before the directions for the picot edging begin . You will have 156 stitches per quarter, as described. DO NOT BREAK OFF THE YARN.
The edging will be worked back and forth flat, using a DPN of the same size as your circular needle and the left hand needle tip of that circular. Place a needle stopper or rubber band on the right hand tip of your circular needle to avoid inopportune “stitch leakage” off the bottom of your circ as you work the edging.
Using the DPN, the active yarn strand and the half-hitch cast on, cast on 8 stitches. Avoid leaving a large skip between the circ and the DPN by taking care to make the first stitch immediately adjacent to the last stitch knit normally on your circular needle.
Flip the work over and knit the 8 stitches you just cast on. Flip the work over again and begin following the chart below at Row #1.
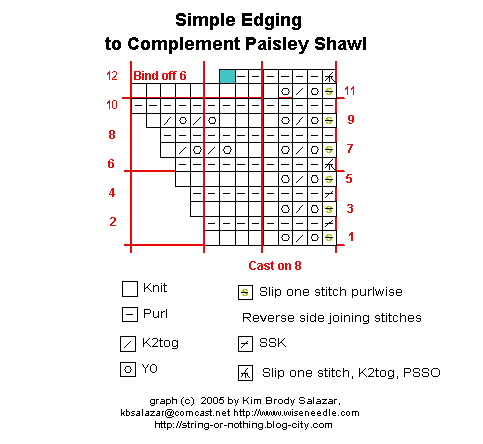
Note that at the end of every wrong-side row you will be working an attachment point. The attachments on Rows 2, 4, 8, and 10 are done as SSKs, with the first stitch of the SSK being the last stitch of the edging, and the second being a single active stitch of the shawl’s body. The attachments on Rows 6 and 12 are done by slipping the last stitch of the edging, knitting two stitches of the shawl body together, and passing the slipped stitch over the K2tog.
The result:
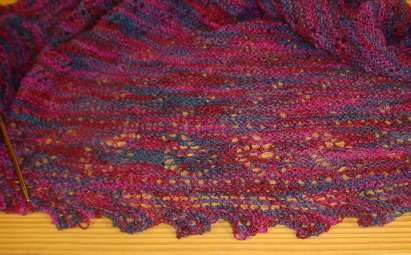
Each sawtooth has a quad flower on it, and the double row of eyelets at the base of the trim echoes the four double column of eyelets that follow the diagonal lines from the shawl’s center to the four corners. Plus the edging is about half the width of the paisley lace band that’s just inside it, so the proportions work well. This edging also knits up quite quickly. Last night I was able to do most (but not all) of Side #1. Based on yarn consumption, I should have enough to finish. Perhaps even have a little bit left over.
Enjoy!
PAISLEY EDGING
After much noodling, doodling, and swatching, here’s the result. I didn’t bother taking photos of every generation of interim swatches. All that rejection is just too depressing. I’m using the tail end off the outside of my yarn ball to work my experiments. Since I need to be frugal, I’ve been ripping back the rejects as I go.
One important thing to note is the difference in the quad eyelet motif. I thought about it some more as I sat in traffic during yesterday morning’s commute. In the shawl body, that motif is presented in plain old north-south orientation, with the rows running horizontally. The motif spans six rows and begins with a single eyelet on the first. In the edging, the repeat is presented on the bias. The motif wouldn’t show in the same orientation. Plus the extra stitches added to form the repeat skew the stitch count. Therefore working the repeat as shown yesterday would not make a quad-eyelet design comparable to the one in the body. If stitch placement were adjusted, it would make a square of eyelets instead of a diamond. Unadjusted as is, it would make a snaky looking blob of eyelets.
Sure enough, by the time I was finally able to swatch tonight that all became painfully obvious. So I began playing. If you look at the body at a 45-degree angle, the eyelets appear as two stacked groups of two. If I were to work them that way perhaps when the edging was viewed in its natural orientation, the eyelets would resemble the ones in the body.
Again, sure enough it worked exactly that way. Working two right side rows with (YO, K2tog)2x produced the proper appearance. But then I had the problem of where to place that repeating unit. How close could I put it to the right hand YO columns before it lost its integrity? On which two right side rows should the unit be worked?
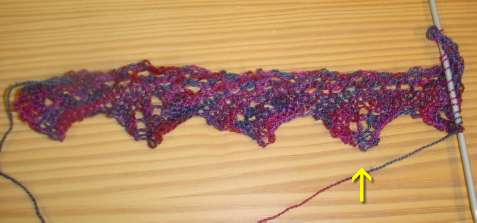
You guessed it. More swatching. You can see some of my spurious results here, with the last complete dag (marked with the arrow) being the one with the most optimal placement:
And here’s the final graph.

Now to go back to the shawl and begin to work the thing onto the live stitches around the edge. More on that tomorrow, guaranteed!
DESIGNING SIMPLE LACE
It was pretty much guaranteed to happen. I went through the various lace books on my shelf, but didn’t find a pattern that fit my specs for the Paisley Shawl edging. So I’ll resort to drafting out one of my own.
Now I don’t claim to be any more than a rank beginner at this sort of thing, but I think I’ve grokked a couple of the fundamentals. The books that have helped me most in learning lace construction are:
- Lewis, Susanna. Knitting Lace. Taunton Press (Newton, CT), 1992.
- Miller, Sharon. Heirloom Knitting. Shetland Times (Lerwick, UK), 2002.
- Stove, Margaret. Creating Original Hand-Knitted Lace. Lacis Publications, (California), 1995.
To start, I’m contemplating either a saw-tooth or triangle edge piece, of indeterminant width (but probably not too wide, in order to conserve yarn). I want to put the quad-eyelet flower motif on it. I want the repeat to be a multiple of 12 rows.
Let’s start with the eyelet:

Not too tough. Just a couple of YOs and K2togs, spanning six rows – three of which are purled to make the garter stitch ground.
Now let’s look at a simple sawtooth and triangle. Sawtooth edgings are simple because they’re built by adding stitches somewhere on the row, usually at the rate of one every other row. When the edging is deep enough, the stitches at one side are bound off and the total stitch count is returned to the original number. Here’s a minimal 12-row sawtooth, starting with 5 stitches
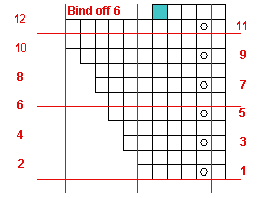
It starts with a cast-on of five stitches (not shown), then adds one stitch per odd numbered row. I stuck these increases in a column and made them eyelet-forming YOs, but they really could occur anywhere on the row, including at the very end and could be M1s or another increase that doesn’t make a hole. So long as each odd numbered row adds one stitch, the thing will widen appropriately. On Row 12 I bind off six stitches, returning the count to the original five cast on, in preparation for the following Row 1. The blue square is the last loop created by the bind-off conga chain, and is blue to remind me that I need to bind off until four live stitches plus the one formed by the bind off itself remain.
I’ve also charted these as all knits, but they could be anything, and anything can be plopped onto the base pattern. That includes the quad-eyelet, or other patterning. The whole thing can also be made wider by working some kind of vertical insertion strip at the right, prior to commencing the stitches of this mini-chart. For example, it’s common to increase the width of an edging by adding a column of faggotting, or a cable or lace insertion there.
Here’s a very 12-row triangle edging. It’s slightly more complicated because all the decreases needed to create the points aren’t lumped together and done on the final row:
Again, the increases and decreases can occur anywhere in the row. To make comparisons easier, I’ve included the column of YOs as a design feature in both this and the sawtooth. But running them the entire length of the repeat means I would be adding a stitch on the "downhill" side, when I need to be taking one away to make the basic shaping. Therefore I’ve put two decreases on Rows 7, 9 and 11. The first one cancels out the addition of the stitch created by the YO (placed near the YOs for reasoning clarity only, in fact they could go anywhere on the row). The second one forms the triangle’s shape.
I could make the triangle steeper by changing the rate of increase, either by doing something interesting on EVERY row instead of every other row. (That’s one of the discriminators that marks the difference between true lace knitting and lacy knitting. Knit lace mavens would say that these simple examples are properly termed lacy knitting, and not lace knitting.) Or I could add additional YOs, or use double YOs. The possibilities are endless.
Here are the sawtooth and the simple triangle, tarted up with the garter stitch main texture and the quad-eyelet. I’ll start by swatching these, then see if I want something more demonstrative and lacier, or plainer. I’ll also judge width. Narrower might be tough without compromising the space I need to show the eyelets, but wider is VERY easy. If I want to make my life easy I can use any texture pattern with a 3 row, 4 row, 6 row or 12 row repeat to stretch my edging wider. I could use patterns with different row counts, too, but that would make tracking where I am in the thing just a bit harder.

WEDNESDAY UPDATE:?
These two pattern charts will NOT make a nice, neat quad eyelet motif. Explorations of why and a correction are posted in tomorrow’s entry.
QUESTIONS AGAIN
More from the inbox.
Stitch marker in the middle of decreases
Stinkyknitter is also working on the Paisley Shawl. She noted thatsome of therepeats in the second chart begin or end with a decrease, and asks how I manage stitch markers that end up in the middle of two stitches that are supposed to be worked together.
I move ’em.
Being a Continental style knitter, I’m loathe to remove my hands from my needles while I’m working. I usually use my "third hand," grabbing the offending stitch marker in my teeth and holding it for the one or two stitches required. One of the reasons I started using broken earring fobs and making fancy stitch markers a gazillion years ago was that the hanging ornaments made them easy to grab this way.
On my Paisley, the only markers that need to be moved are the plain split rings. They’re pretty small – small enough in fact to be slid through stitches if need be, but they’re also wide enough to stay put unless otherwise "encouraged." When I get to a SSK that’s bisected by a stitch marker I use my needle tip to pop it through the leading stitch, then transfer it to the right hand needle, and work the SSK on the appropriate (far) side of the marker. On K2togs, it’s the third hand method.
Yes it can be a pain to stop and shuffle them around. When I graph up repeats for my own use, I often finagle the beginning and end points so that my markers don’t end up splitting the difference in the decreases.
Re-knitting tension
A couple of people wrote to ask about gauge tension in the re-knitted repairs. They asked if the new replacement work looked different from the rest of the piece, or if the stitches at the edges of the new work where it bordered the old were distorted in any way.
To be truthful, a bit of care is needed when you’re re-knitting the ladders after ripping down. There is great temptation to start out each row working rather loosely, then wrestle to eke out the remaining stitches from the remaining length of the ladder strand. I make a conscious effort to avoid this, and try to form all my stitches with the same tension as the original knitting.
A couple of times I’ve had to re-knit a cable, and that cable was centered in the section being re-knit. I tried working the crossing several times, but always ended up not having enough of the ladder strand available to finish the couple stitches that came after it. So I worked that particular row from both ends, picking up the stitches to the left and right of the cable and then sliding them onto the needles that held the "good" knitting on either side of the section undergoing repair. After they were rescued, the only stitches that remained on my fix-it DPN were those of the cable crossing itself. I did those last, absorbing the tightness into the natural tightness of the crossing.
As far as appearance, after my usual post-knitting wash and dry prior to assembly, any unevenness is smoothed out. I’ve never needed to do anything else to a re-knit repair, nor have any of them been recognizable as such after garment completion. (If I had time instead of rushing out the door to work right now, I’d dig up some pieces that were fixed mid-stream and take some pix to prove it.)
Pattern source
A couple of people missed my first post on the Paisley Shawl earlier this week, and wanted to know where they could find the pattern. It’s in the Spring 2005 edition of Interweave Knits – page 96. Not the Summer edition that (most) subscribers received last week, but the one before that.

Writing
Thank you to everyone who sent in kind words about the tech articles at String. To be truthful, this blog is a busman’s holiday for me. In Real Life I’m a proposal writer, mostly working in/with engineering or high-tech firms. Compared to communicating concepts in nuclear engineering or high-end routing, writing about knitting is easier and lots more fun. Plus winging my way through this has reinforced my appreciation for editors. I’m embarrassed to admit the number of spelling, grammar, or punctuation mistakes I fly past without noticing while I’m writing,but find later. To quote a former boss, "Only fools proof their own work."
PAISLEY SHAWL SECOND MOTIF AND RIPPING DOWN
I’m past the center part now on the Paisley Shawl, and have finished the dividing section of K2, YOs. I’m pleased with it so far, although it’s tough to see well wadded up as it is on the circular needle. Still, you can make out some details if you squint at this:
See all those little stitch markers?
I’m a big believer in stitch markers in lace. I don’t use a lifeline, but I do mark my repeats – usually every repeat in a large piece. I find that doing so becomes a built-in proofing system. If the stitch count is off beginning the next repeat, I know something went wacky in either the previous one, or in the repeat one row below. I then have the option of ripping back or ripping down just that one repeat. There are complications of course if a decrease spans the juncture point between repeats, but in general this system has served me well. In this case I’m using three different types of markers. Large silver dinglebobs mark the beginning and midpoint of my rounds (the beginning one is especially elaborate). Small red rings mark the quarter points (my pattern is a square, knit center out, so the beginning, mid and quarter points each define a full side repeat set). Tiny silver color split rings mark each motif repeat. The split rings are crafts store specials, bought in a bag of 200 for less than $1.50.
Ripping Down
I know a lot of people are terrified at the prospect of ripping one repeat down. It’s not as scary as it sounds and can usually be done with success on almost anything. Yes, some stitches are harder to rip back, parse out, and reconstruct than others but it’s always worth a try. The alternative is ripping back entire rows. If deconstructing and re-knitting a section works, that saves the effort of redoing an entire row; and if selective ripping doesn’t work the worst that happens is that you’ll need to rip back that entire row anyway. So you can either luck out and save time, or if luck and skill fail you, you end up no worse than you would have been had the effort not been made.
To rip out a bunch of stitches vertically then re-knit them, it’s good to understand the nature of knit stitches and the way they are seated on the needles. I’ve mentioned stitch mounting and twisted stitches before. Recognizing the difference and seating stitches correctly is very important to this process. For starters, when you pick your stitches up after ripping past the broken part, you want to make sure that the survivors are mounted with the leading leg in front:

I start by identifying a good span surrounding the mistake. I don’t want to split a decrease, so I try to begin and end the segment in an area of plain stockinette or garter stitch. I find the corresponding section on my charted pattern, or if there isn’t one – I chart up the repeat and then identify the suspect bit. Note that if you are doing lace, colorwork or textures, this process is vastly aided by being able to work from charts. You can do it if you have prose directions and are thoroughly familiar with your repeat, but it is much harder to identify the stitches in the section that needs to be redone without a stitch by stitch representation of the work.
Once I have identified my bit to be redone both on the needles and on my chart, I isolate it. I’ll knit to just before it, then slide it onto a DPN of the same size as my working needles. This is one of the few times I use needle tips (or rubber bands). I plug the live needle ends before and after my broken section to prevent the balance of the work’s good stitches from leaking off and complicating the problem. Once I’ve got the section isolated, I ladder it back down past my error. I try to end on a row that’s easy to pick up. For example, rows with lots of increases and decreases or cable crossings can play havoc with stitch mounting, so I try to avoid them. The squeamish might like to thread a mini-lifeline through a row of good stitches below the error to make sure they don’t go down further than necessary, but I just take a deep breath and wing it.
When my suspect rows are unraveled, I end up with a bunch of strands suspended ladder-like between the areas of good knitting. I put the last row of good stitches below this mega-ladder back onto the DPN, taking care to mount them correctly. Then I take a second DPN and following the directions on my chart, and using the bottom-most string of my ladder, I re-knit the first suspect row. It’s usually a bit awkward there on the last couple stitches, but care and patience always defeats the problem. I repeat the process with the second row of the suspect area, using the now bottom-most string of my ladder. Sometimes I start each of these make-up rows at the right, working them all as right side rows. Sometimes I do flip the piece over and work every other row as if it were a wrong side row. It mostly depends on whether or not I’m working the whole project in the round or in the flat.
Once all the suspect rows have been re-knit and no ladder strands remain, I uncap the right hand needle and continue with my normal working strand across my "mainstream" row, working across the now rescued stitches. Once those are done, I uncap my left hand needle and continue merrily along my way as if no mistake had dared to intrude itself.
Give this a try the next time you look back several rows and spot a cable crossed katywumpus, or some purls that should have been knit. And if you’re timid, try doing it to a swatch on which you’ve made a deliberate mistake.
MORE ON ARAN CROCHET
Thank you to everyone who posted or sent notes about yesterday’s blanket. I haven’t kept up with Aran style crochet, but I do have two pattern leaflets about it published in the early 1980s. The first is the one I already mentioned:

It’s written for worsted weight yarn yarn and sizes H, J and K hooks. It includes patterns for a stole (which turns out to be the thing I enlarged), a poncho, a pieced lap robe, a vest, a pullover and a cardigan. Styles are rather unisex (button placement on the cardigan and vest would vary, of course). Sizes range from a kid-size extra small (24-26" to a large 38"-40". The best of the lot are the stole (as lap blanket, as it’s too heavy in my opinion to be worn as a wrap), and the poncho. The pullover is less lumpen looking than the other designs, but it’s a strange combo of extremely heavy work and loose hole-y areas, making it too hot to wear indoors, but too ventilated for many to wear as an outdoor outer layer.
The other booklet I have is this one:

It’s an American School of Needlework leaflet, listing Mary Thomas as the author. It’s also written for worsted weight yarn and size G, J and K hooks. It offers up two basic designs – the bathrobe style wrap sweater and a pullover, written separately for both men and women. Of the two leaflets the designs in the book by Ough are better – worked tighter with less of that stitch out of size crochet at home look, with more stitch variety, and better fit.
In terms of technical details, the two do vary a bit. The designs in the Ough leaflet are worked vertically, with the crocheted rows running the north-south length of the pieces. The Thomas designs are worked in the more conventional east-west direction, across the pieces. I think this helps improve the drape and texture of the Ough designs. Still both share the same weaknesses – heavy, heavy, heavy final products, unstretchy imitation ribbing at cuffs and hem, and a general boxy/slightly odd fit due to the different elasticity factors of the various stitches employed.
Now I note that my familiarity with the style pretty much stalled out in the early ’80s. I haven’t touched it since, and have given more recent books and leaflets only a passing glance. I’ve seen a couple of books on "Fisherman Design Crochet" by Ann Pomeroy, but I haven’t looked at them closely or worked anything from them. Other crochet books also delve into this specialty, mostly as single projects. I hope that the style has evolved somewhat. That stitches and textures are better expressed, that the "ground fabric" is more wearable, that lighter weight yarns are used, and that fit/finish has evolved, too.
WHAT DROVE ME TO KNIT
It was this:
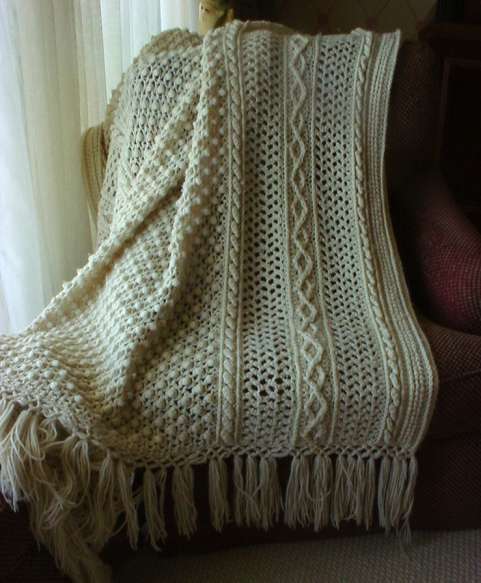
I crocheted this from the American School of Needlework pattern leaflet Original Fisherman Crochet for the Family by Anne Rabun Ough (LA #151):
Well, sort of. Actually I took the poncho pattern in this booklet, expanded it a bit in both length and width, adding extra panels of texture stitches, and edged it with a two-knot macrame fringe. (I tinkered with patterns even before I started knitting). It ate yarn. Crochet uses more yardage than knitting to make an equivalent sized piece. The finished blanket weighs a ton. Even though crochet is usually faster than knitting, it took a long time to make. See those fake cables? Those were done as little semi-detached bits, anchored at the tip several stitches away. The solid parts were panels of slip stitch or single crochet. The narrow, wandering cable was applied slip stitch worked after the piece was finished. The bobble section took forever and a half to finish. I can safely say that I haven’t crocheted a bobble since.
I made this piece as a thank-you gift for my mother, for all that she did in handling our wedding preparations. That was roughly 27 years ago but the thing has aged well, surviving washings and daily sofa or bed-throw use for all these years without pilling, discoloring, shrinking, or snagging. I’m not quite sure which 100% wool yarn I used, but I do remember it had an Irish-inspired name (possibly Plymouth Galway). In any case, here’s yet another example of the lasting power of quality materials.
Why did it inspire me to finally learn to knit? Lots of reasons. For one, bobble exhaustion. Plus at the time there were (and still are) comparatively few attractive, interesting, wearable crochet patterns compared to the wealth of knitting patterns out there. The crocheted faux Aran imitators were certainly interesting to make, but like the ones on the cover of the leaflet, cursed by that "loving hands at home" look. I wanted to make more than just fine lace, fancy tablecloths, and heavy blankets. I envied the style and wearability of knitting. Yes, I know that crochet can be used for far more, and that it can be wildly attractive, but especially at the time it was pretty much limited to tablecloths, blankets, baby things, odd lumpen pullovers done in yarns far to thick for comfortable wear, and granny square ponchos.
So I was primed for learning how to knit. From a book even. But that’s another story.
PAISLEY SHAWL PROGRESS
As promised, here’s a picture. I’m working it on one too-small in diameter US #5 circular needle. The fine yarn and airiness of the relatively large stitches make it easy to cram all the stitches onto the needles – hence the odd looking snood-like object below:

Not having my needle cache at my disposal, I started this piece with two #5 circs borrowed from my mother. I used them in the same manner as working socks on two circs until the piece got large enough, then transferred it to one circ. I’ll probably go back and use two (or possibly four) circs later in production as it grows even bigger.
In the mean time, you can see the center of the piece, the four radiating lines of YO, K1, YO, plus some of the flower-shaped eyelet sets. You can also see the play of color in my berry-hued hand-dyed better than in the jumble produced by the same yarn used for the Birds Eye pattern:

This piece is going much quicker than Birds Eye. For starters, as a true lace texture design there’s something happening on every row of that pattern. The Paisley is lacy knitting rather than lace knitting, in that every other row is worked without increases or decreases. In this case, they are done in purl to yield the garter stitch texture.
So far the Paisley has been quite easy to follow. The flower eyelet area is a repeat with only four simple rows to memorize (the other four being purls). The large size #5 needles make the work grow especially quickly. So far I’ve found no problems with the pattern, although I admit I started it slightly differently than described. Instead of the crochet cast-on in the directions, I used an I-cord beginning (one row of four-stitch I-cord, one row of K1, YO, one row of all knits, then plunge into the pattern from the point where it begins with 8 stitches total). I did this because my mom didn’t have any crochet hooks of suitable size. I am finding that Paisley is also more economical in terms of yarn consumption than was Birds Eye. At the progress points shown in the photos, both shawls have consumed roughly the same amount of yarn. The Paisley is a square approximatley 26 inches across (without stretching or blocking); the Birds Eye was a triangle measuring about 12 inches from the bottom point to the needles. I didn’t measure how wide it was though.
Because it’s been such easy sailing so far (even with my variant cast-on), I’d recommend this pattern to people who are looking for a center-out lace shawl pattern – even for a first lacy project, provided they feel comfortable knitting from charts. Also because it’s going so quickly, I’ll probably finish this piece off before returning to Rogue.
REMEMBER ME? ALSO PAISLEY SHAWL
Here I am!
The life that intruded last week was a spring break visit to Florida, featuring an official Dual Grandparent Visitation. We left last Friday morning, spent several days in the Aventura area with my family, then zipped up to West Palm Beach to visit my in-laws; then returned south for a splendiferous Passover seder. We flew home this morning.
Aside from making the standard "arms tired" jokes, I can say it was an enjoyable whirlwind of a week. The kids are suitably viewed, the grandparents accordingly pleased and proud, the weather was wonderful, and we had lots of fun doing tourist-type things. More on them later this week.
On the knitting end, I can report zero progress on Rogue. I didn’t take it. It was too big, with too many adjunct parts (magnet board, multi-page pattern, extra yarn, pouch of vital knitting doodads). Instead I took the Birds Eye Shawl to finish. But it is Birds Eye no longer. I like the gauge and needle size for the pattern. I adore the pattern itself. I love the yarn I used. But not all together. The more I got into the piece, the more I realized that the hand-dyed multicolor was fighting for attention with the graceful eyelet pattern. So I ripped back the entire thing – roughly two feet measured from the triangle’s tip. Instead I’m working the Paisley Lace Shawl from the Spring issue of Interweave Knits. Scroll down almost to the bottom of this page for IK’s photo of the thing.
I had worked on the Birds Eye shawl on the flight down, but grew increasingly unhappy with it as I knit. By the time I got to our destination, I was looking for an excuse to do something else. In a classic example of good deeds coming home to roost, I’d given my mother a gift subscription to IK this past holiday season. She pulled it out to show me a project she was contemplating, and I riffled past the Paisley. It would work. The pattern is mostly solid garter stitch on large (for lace) needles. The garter stitch is worked in a square from the center out, and is pierced by little flower-like quads of eyelets. The solid area shows off the colors of the hand-dyed quite nicely, and the eyelets provide just a hint of interest instead of major league competition. The flower eyelet center is ringed by a band of motifs that give the piece its name. The effect is sort of reminiscent of the pattern placement in a bandanna, but done in lace.
So far ‘m almost to the end of Paisley’s center section. I’ve got one more repeat of the flower eyelet chart to do. Then it’s on to the namesake pattern around the edge of the piece. I may have enough yarn in my Lorna’s Laces Helen’s Lace to work an additional bit of trim around the outside of the paisley section. Lord knows, I can’t just do a pattern as written – dire things might happen.
Pictures as soon as I find the digital camera. I packed it and took it with us.
ROGUE – PROGRESS; ALSO WHILE THE CAT’S AWAY
More progress to report on Rogue. I’m well into the fronts now, about 26 rows or so into Chart B. As you can see, the hood yoke pattern is working out nicely:
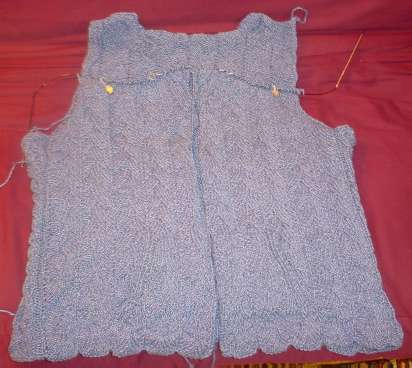
My next worry will be whether or not the shoulder areas meet up properly, but I’m assuming that if not, I can wing it. I’m also assuming that I’ll be able to tinker with the hood depth a bit if I need to compensate for my different gauge. I’ve already started the hood motif a bit later than called for in the pattern to balance out my smaller row gauge.
What’s happening to String or Nothing?
My guess is that you’ll be popping back a couple of times over the next week or so to see what I’m up to. But you’ll find this page still current. Life is going to intrude in my life big time over the next two weeks. I will try to provide updates, but I can’t guarantee them. In the mean time, feel free to browse the archives. To be immodest, here are some of the more interesting bits here:
Reference shelf – articles that contain knitting advice that I hope is useful. Of particular note under this category:
- Yarn Labels 101 – a basic round-up of what’s on yarn label and how to read them.
- Yarn Labels 102 – a continuation of yarn label info deciphering
- Skeins 101– What are the common ways yarn is sold. How to prepare them for actual knitting.
- Skeins 102 – a continuation of the previous, with more on how to get started
- Gauge 101 – Basic hints on making and measuring gauge
- Why Toe-Ups? – The case for toe-up socks
- One Circ/Two Circ Sock Knitting – Using the one giant circ (aka Magic Loop) and two-circ methods for knitting in the round
- Self striping sock yarn repeats – Lengths of pattern cycle repeats for some common self-stripers
- Twisted stitches – What is stitch mounting and why does it make a difference?
- Attaching I-Cord – A couple of ways to knit the stuff onto the edge of your piece
Gadgets – tools used by knitters. Most useful posts include:
- World’s cheapest magnetic board
- Making your own stitch holders
- Strickfingerhuts – Those twisted wire and plastic molded yarn holding gizmos used by Continental style knitters for stranding.
- Stupid Stitch Marker Tricks – They’re useful for lots more besides skittering behind the sofa.
- Strickmuhles – I-cord mills – waste of money or nifty gizmos?
- Needle gauges
- WPI tool
Knitting Patterns – Mostly quick and easy stuff I haven’t gotten around to adding to wiseNeedle yet:
- Simple fingering weight wrist warmers/fingerless mittens
- Fingerless Whatevers – fingering weight wristlet/fingerless mitten with shaped thumb gusset
- Lacy scarf in Berroco Zen or other medium-weight ribbony yarn
- Center-out poncho
- Teeny sock for Red Sox fans
- Paw Warmers – Ultra-easy kids’ bulky yarn wristlets/fingerless mittens
- Lemonade hooded shawl with pockets schematic
Stitch or color pattern graphs:
- Interlace repeat
- Bunny from TNCM
- Dragonflies from TNCM
- Texture patterns – 16 stitch wide mock cable, lace panel
- Texture pattern – Serpentine Rib
- Texture pattern – Broken Rib Check
- Texture pattern – ultrasimple six row feather and fan variant
- Texture pattern – points
- Texture patterns – Dragon Skin and variant
- Fleur de Lys
Embroidery – My other life. This stuff is mostly show and tell.
- Forever coif – blackwork coif in progress. Still.
- Underskirt – what the coif is supposed to go with
- Blackwork sampler – doodling with the patterns from TNCM
- Counted thread dress yoke
- Heretical modern multicolor sampler, plus reverse of the yoke, above
- How to drive your roomates nuts with stitching
Food – Man and woman do not live by needlework alone:
- Cassoulet
- Latkes
- Buffalo Rum Ball Cookies
- Oysters – a chocolate hazelnut cookie
- Cinnamon nut elephant ears for the cookie-challenged
- Nadia’s Yassa Chicken
There are more categories over on the side. Happy browsing!
