PROJECT – SAMPLER SOFA PILLOWS
There are lots of stitch patterns that look tempting in the various stitch dictionaries on my shelves. Some I’ve been able to place on garments, but others just haven’t worked out – mostly because they were too wide or presented composition problems if used over the topography of a person’s body.
About 8 years ago, right after we moved into the house we’re on the cusp of leaving, I decided to take some of these difficult-to-place patterns and do up two sofa pillows. Anticipating severe pillow-abuse that only homes with small children face, I decided not to spend a lot making them. I got three large skeins of Lion Fisherman Wool from a discount crafts store; and pulled out a pair of US #8 needles and some of my stitch treasuries. I started right in, not worrying much about absolute size.
I chose a bunch of patterns from the treasuries, planning out my pillows around an average gauge of 4.5 spi and a target size of around 15 inches, square. If I was off a bit I didn’t worry, knowing my knit pillow tops would stretch to compensate. Just for kicks, I decided to use different patterns for each side:


If you’re a texture pattern junkie like me, in the top picture you’ll recognize Rocking Cable (Walker 3, p. 130) and Medallions with Cherries (Walker 2, p. 141) framed by Bulky Double Cable (Walker 1, p. 243). The simple lacy edging is adapted from #57 in Classic Knitted Cotton Edgings by Hewitt and Daly (p. 44), but I narrowed it a bit by eliminating the openwork along the top edge.
On the other side of these pillows I used Wheat Sheaves (Walker 2, p. 138); and a combo of Patchwork Cable II (Walker 3, p. 93) and Grand Swinging Cable (Walker 3, p. 91). Note that the Patchwork Cable and Grand Swinging Cable match up exactly in row count. I was able to tuck them in together side by side in a playful combo I intend on using someday for a kid’s pullover. That pillow is also framed with #89 from Stanfield’s New Knitting Stitch Library (p. 59).
Once I had my four sides knit and blocked, assembly was easy – even considering that Iput a zipper in each so I could remove the covers for washing. In fact, if you’ve never sewn a zipper into a piece of hand-knitting pillows are excellent practice pieces. To make life easier, I sewed in my zippers first:

I laid the two squares side by side, and pinned the zipper between them. Then I hand-stitched the zipper to each square. Once the zipper was set, I folded the two squares along it, so that the wrong sides were sandwiched between. Then starting at the foot of the zipper, I worked either I-cord or an edging up along the outer edge of my two matched squares, effectively joining them together at the same time as the edging or I-cord was created and skipping the sew-up-the-pillow step. I went around the three open ends of the pillow, joining as I went. When I got to the zippered side, I worked the edging along only ONE of the squares taking care not to foul the path zipper pull with yarn. My (now camouflaged) zipper nestles along that side at the base of the edging. “Zip open, shove in store-bought pillow form, zip shut” were the final steps of assembly.
To fasten the pillow sides together I used the second of the two I-cord attachment methods I described yesterday. The I-cord edged pillow worked exactly the same way, but instead of picking up both legs of the stitches running down the length of the previous round of I-cord, I held the two sides together and picked up the innermost leg of the edge stitch from each one. This turned the outermost legs inside as a selvedge, and made a nice, neat join without gappy holes.
The pillow with the lacy edging was done in a similar manner. Unlike the I-cord however, I had wrong-side rows on the lace. I did my lace trim, using three plain knits on the straight side as my point of attachment. I ended every right-side row of the lace with SSK, pick up one stitch, just like the I-cord. Then I flipped my work over, slipped the first stitch purlwise, knit 1, and continued with rest of my wrong-side row.
Just like in joining the first round of I-cord to my poncho, for both the I-cord and lacy edgings I had to adjust the ratio of stitches picked up to rows or stitches on the piece’s body. I believe I used needles two or three sizes smaller for both the I-cord and lacy edgings. I also ended up working 4:3 on the sides of the piece and 2:3 along the top and bottom. Experimentation at the outset and a willingness to rip back a few rows and try again are both always required when you’re adding a knit-on edging.
I’m pleased with the way these turn out, and surprised at how well the inexpensive wool I used has held up. The pieces were a bit stiff and slightly real-wool itchy when first knit, but softened up quite nicely when washed and blocked. Sure, there’s some pilling, but these pillows have survived 8 years of slumber party pillow fights, general abuse and spills of all sorts. They’ve resisted stains, and freshen up quite well after a general pill-pluck and washing with Eucalan. My only cautions on the Lion Fisherman yarn are that even washed it isn’t Merino-soft; and that my gauge of 4.5 spi worked but is a bit loose for it in garments. I think it would look better knit a tad more firmly as a true worsted.
WORKING REPORT – PONCHO WITH ATTACHED I-CORD
Messing around with the edging on the Waterspun poncho, I realized that I was using two different methods of attaching I-cord, and that "How do I work attached I-cord?" is a common question.
Recap: The first round of I-cord edging was applied to live stitches. Instead of binding off my last row of the poncho body, I left its stitches on the circs. Using a DPN and a half-hitch cast on, I cast on four stitches and knit one row of I-cord. On the second row, I knit three stitches, then did an SSK, working the last stitch of the I-cord together with one stitch of the poncho body. I worked this way, doing three rows of attached I-cord, followed by one round of "free" I-cord. This 3:4 ratio of attached rows:total rows kept the edging from being either gathered or ruffled. When I got all the way around my piece and had incorporated all of the body stitches, I grafted the live stitches at the end of my I-cord to its beginning.
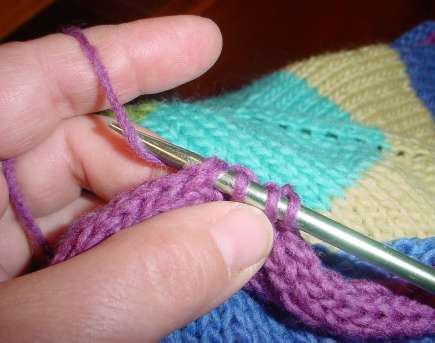
On the second round of I-cord I was not working with live stitches. Instead, I was picking up stitches along the outer edge of an established row of 4-stitch I-cord. On the previous round of cord one stitch was "eaten" by the attachment row. That left three to form the rounded edge. I used the centermost of these three as my line of attachment. To do this round of edging, I again cast on four stitches using half-hitches, and knit one row of unattached I-cord. Then I began working it onto the established round of edging. On the next row I knit two stitches, then did a SSK and picked up a stitch under both legs of the designated spot on the previouslyfinished I-cord. In this shot you can see the knit two, the SSK (under my thumb), and the needle thrust under the stitch of the existing I-cord, ready to do the pick-up.
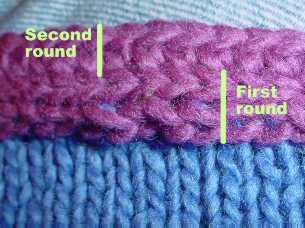
The reason why I didn’t use this method to attach the first round of I-cord is that theattachment rows of each method look different. Pre-block waviness aside, you can see that the first round of I-cord has a smooth chain-stitch like appearance to its bottom edge. The secondmethod produces an attachment row thatlooks rather like crochet, although you can’t see the non-crochet look rounded multi-stitch upper edge from this angle:
I prefer the speed of the second round’s style of attachment (less fumbling and shifting stitches between needles), but I like the look of the first round’s style of attachment. Note that the reverse of the second round’s style is a bit smoother and less leggy. Sometimes I work it around something clockwise instead of counterclockwise, so that the I-cord’s other side presents itself on the public side of my piece.
There’s another nifty use for this second method of attachment. You can use it along with I-cord or a lace edging to make a decorative seam, or you can use it for counterpanes or pieced blankets,multi-directional or domino-style knitting to joinmotifs or sectionstogether without sewing. More on using this for decorative seaming tomorrow.
PROJECT – DOUBLE KNIT HAT GRAPH
Again apologies to those on the updates mailing list. I did a bit more maintenance, adding categories to all the existing posts so it’s easier to page through this ever-growing mound.
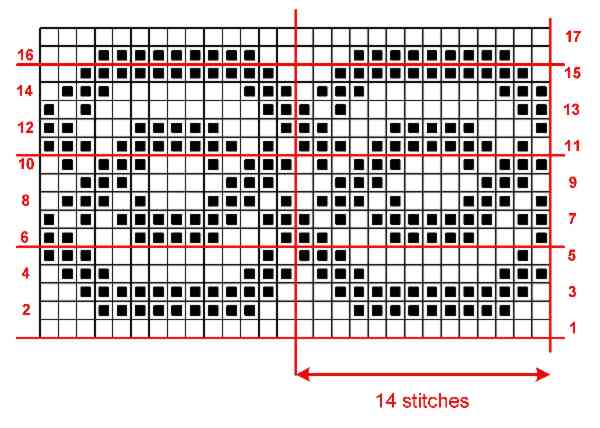
A couple of people have asked for the graph I used to knit the interlace shown on my overly warm teal and black alpaca hat. Here it is.
This one didn’t make the cut for my book because it’s one of the designs for which I lost my notes. A long time ago I had a miserable move between apartments. Several boxes were stolen off the back of my truck. Among the things that went missing was a notebook full of source notations for counted embroidery patterns. I had been researching them casually for more than ten years, and had hundreds compiled. The sketches for most of them had already been redone on my ancient Macintosh, but all associated notes remained solely on paper.
When I was composing The New Carolingian Modelbook I had to go back and confirm the exact origins for all the counted patterns I wanted to include. I managed to find the sources for about 200 of them, but a third as many more have eluded me. This particular interlace is from my collection of the lost. It is similar to designs by Matteo Pagano as published in his 1546 book Il Specio di Penfieri Dell Berlle et Virtuoise Donne, but I can’t swear that it came from that or one of his other works. Given the relatively clumsy, heavy spacing and short repeat it might even have been something I doodled up myself after a day of research.
Many of these early Modelbook designs got there by way of Islamic influences (especially patterns cribbed from woven carpets and embroidered textiles). Over the years the patterns drifted away from work worn by the elite to work worn by middle and then lower social classes, eventually ending up in folk embroidery where they never quite died out. Counted thread needlework styles were revived big-time among the fashionable in the mid 1800s. Researchers found and reproduced surviving older pattern books, and began collecting motifs from traditional regional costumes and house linen. Some of the later and folk uses of counted patterns include standard cross-stitch, Hedebo, Assisi-style voided ground stitching, and various types of pattern darning or straight stitch embroidery done on the count.
This pattern can be interpreted in many crafts. Historically accurate uses contemporary with first publication include cross stitch panels (the long-armed style of cross stitch is overwhelmingly represented in historical samples compared to the more familiar x-style cross stitch); weaving, or lacis and burato (types of darned needle lace).
Counted patterns are a natural for knitting. The first book of general purpose graphed designs that listed knitting as a specific use came out in 1676 in Nurnberg, Germany and was published by a woman: Rosina Helena Furst’s Model-Buchs Dritter Theil. (the title is actually much longer). There may be others that predate this book, but I haven’t seen mention of them, and I haven’t seen the Furst book in person. It’s in the Danske Kuntsindustrimuseum in Copenhagen, a tad far for a day trip from Boston, Massachusetts. The entire group of graphed designs displayed in the early Modelbooks shows a straight continuity with the geometric strip patterns found in modern northern European stranded knitting.
The short 14-stitch/17 row repeat of this graph does work well at knitting gauges. I’ve always meant to use this one again on socks -either as-is or stretching it a bit by repeating the centermost column so that it better fits my sock repeat, or doing eight full repeats at an absurdly tiny gauge. As is, you’d need a multiple of 14 stitches around. A standard 56-stitch sock could accommodate 4 full iterations of the design without adding any columns.
Some people have asked how to get a hold of my book. The answer is, aside from the used market where it is going for quite a premium, I haven’t a clue. Sadly all I can report is that the publishers absconded shortly after publication. I have no idea where they went, and have had no replies from them to any queries since 1996. I received only about a year of royalties on the first 100 or so copies, in spite of the fact that the book went through at least two printings with an estimated total run of 3,000. New copies continue to trickle onto the market even today (they’re sold as used but mint). The new-copy seller has rebuffed my attempts to find the ultimate source.
Moral of the story – don’t enter into publication contracts without a literary agent, and if the company has a name like “Outlaw Press” there’s probably a reason.
WORKING REPORT – WATERSPUN PONCHO
I’m still nibbling away at the The Small One’s Waterspun poncho. To recap – I had seven colors to start, but only about 80% of a skein of each. I decided I really had to have at least one more skein of yarn, so I went out looking throughthe myriad local yarn stores for Waterspun.
How many local yarn stores make up a myriad? An amazing number. I live in the Boston metro area – a yarn paradise compared to most of the rest of the USA. Here’s just a sampling of the shops within an hour’s drive of my home, and most of these are reachable within a half-hour. This list doesn’t include the "big box" hobby shops sellingmostly mass-market yarns:
| Places I’ve been: Wild & Woolly, Lexington (favorite & "home base" LYS) Woolcott, Cambridge Minds Eye Yarns, Cambridge Hub Mills/Classic Elite Outlet, Lowell Fabric Place, Woburn and Newton The Knitting Room, Arlington |
Places I’ve never been: |
Please don’t be jealous. The cost of living in this yarn heaven is very steep, and the economy ofeastern Massachusetts is still hit hard by the Great Tech Crash. Those things make up quite a bit for having so many knitting sources nearby.
In any case, I quickly found that even with a ton of local yarn shops, very fewstock Waterspun during the summer season. Even fewer had a range of colors on hand. I could place a special order formy yarnjust about anywhere, but doing so would mean taking a full single-color bag – much more than I needed. Since I know with absolute dead certaintythat Waterspun is NOT about to disappear, I decided on trekking the 45 minutes up to the Hub Mills/Classic Elite outlet. I had a lunch date aboutten minutes away from the place anyway, so I was able to piggyback my errand and save some gas.
Hub Mills is two small, dusty rooms in the same 19th century brick mill building that houses the Classic Elite manufacture/distribution facility and design offices. Think crumblingblock in an industrial New England mill town, complete with a silted-in canalacross the street. Aside from the usual suspects from the standard set of makers in their full-price inventory, they stock cone-ends and "out-takes" of Classic Elite’s various lines. Fantastic bargains can be had, but like every mill-end shop, it’s hit or miss.People who head for the yarn first and are able to figure out what to do with limited quantities or variant dye lots are the best suited tothis type of shopping. I head up there maybe once every 18 months or so,butI’ve found some interesting bits over the years including samples of a heavier version of Sand that never madeit into distribution, odd cones of Montera and Provence, and assorted Fox Fiber natural-color cottons in non-standard weights, all for bargain-basement per-pound prices. I’ve also made the trip but returned empty-handed because the discount shelves were empty.
This time I found my Waterspun, even though the outlet store didn’t have much either. I found one more skein of the plum, plus a remnant cone of the blue that weighed out to the equivalent of about a skein and three-quarters. The plum’s dyelot looks quite close to my yarn. The blue was off a bit. Here’s what I did with them:
First using the method I described earlier. size US #6 (4mm) needles and my new blue yarn, I picked up 100 stitches around the inside of the neck edge. I placed a marker at the point corresponding toeach corner in theponcho body. I worked nine rows in K1, P1 ribbing. Every other row I started each between-marker section with a SSK, and ended with a K2tog. Because I was decreasing 8 stitches every other row I ended up binding off 68 stitches.
Then I went back to the bottom edge. I had already knit the final blue stripe, but I ripped it back because I wanted to alternate rounds between the new and old blue yarns in order to make the different dye lots less evident. (You can still see some minor striping thanks to the wonders of flash photography. In person the difference is less noticeable). I kept going, alternating yarns until I ran out of my old yarn. I finished up using every scrap of the new yarn.One interesting effect I got from using more or less the same quantity of each color (until the blue) was that with the increasing circumference of the piece, the width of the color stripes changed. I didn’t have more teal than pink, more pink than green and so on. That’s just the way the piece worked out. Had I used only the blue I had on hand, the final stripe would have been proportionally smaller. Adding the yarn I did is why it breaks the established progression of diminution. I’m pleased though. I ended up having a blue strip that’s about twice the width of the previous one. Although it is wider, the proporations aren’t all that bad.
The last step is adding an four-stitch I-cord edging in plum onto the live blue stitches. I’m using US #9(5.5mm) needles, the same size employed for the body. I’m attaching the edging by working the last stitch of the I-cord row as a SSK along with a live blue stitch. I’m doing this at a 3:4 ratio – three attached rows of I-cord, followed by one "free" unattached row. This is keeping the I-cord from bunching up the poncho into a gathered edge. (I could make a ruffled bottom by increasing the number of free I-cord rows.) I’m handling the points by working four unattached I-cord rows at the corner tips.
So far I’ve used less than a quarter of my remaining original ball of plum, and have completed more than a quarter of my I-cord. I should have enough to go around the entire piece once. But as you can see, I’ve got the classic stockinette edgeroll problem. I need more weight to stabilize the thing and tame the roll. Iplan toadd another round of the I-cord on top of the one that’s already there. I’ll document how I attach one row of I-cord to an existing row of I-cord in my next progress report.
GADGETS – STUPID STITCH MARKER TRICKS
I love stitch markers. I use them for just about everything – the more the better! I buy them like popcorn, and make or improvise as many as I buy. They infest my house and are always found while sweeping up, in between cushions, and in the dryer’s lint trap. In fact, I’ve got two little dishes – one next to the washer and one on my dresser, both there for the sole purpose of catching stitch markers at convenient points in the laundry process.
I prefer rigid markers to bits of string or contrasting color yarn. I find for me they transfer from needle to needle faster, and because I often knit without watching my fingers, are easier to spot by feel.
Here are some of the things I use as stitch markers from the catch-all on my dresser:

Clockwisearound the outside and spiraling in, there’s a beaded lizard made for me by my Tween-ager; several split rings and jump rings bought by the bagful at the jewelry findings counter of my local crafts store; some flat gold-tone beads with large holes, and a heart charm intended for use on keychains (same source as split rings); a paper clip; three home-made beaded markers; a yellow flat split ring marker; three more home-made beaded markers (small size); two Susan Bates white plastic rings; an ancient Susan Bates split ring; red and blue Susan Bates flat rings; two coil-less safety pins, and two small turquoise rings “liberated” from my kids’K’Nex building toy set.
I tend to ue the larger decorated markers as row end or abacus markers; and the plainer ones as repeat dividers, or to denote other spots whereI need to pay attention. I don’t have any problem using the stitch markers with the dangling bobs. I let them hang on the side of my work that faces me. Since I sometimes need to use my “third hand” when doing maneuvers like decreasing across a marker, the beads make convenient grabbing tabs for my teeth. (Confession:I feel sort of responsible for foisting the beaded marker fad on the rest of you. Back in ’94 or so I wrote a post to the ancient KnitList that described how I used broken earring bobs and necklace pendants as stitch markers, and was beginning to make singlets expressly for that purpose.)
I used to use the coiled split rings (shiny red, above) to mark individual stitches – usually to help count decreases or spots that needed to line up when a garment was assembled. It has been a long time since I’ve seen these coiled guys in the stores, so I’ve switched to using either jewelry split rings or the safety pins instead.
The one type of marker I absolutely detest is the pig-tailed yellow split ring. I bought them only once and don’t remember the brand name. Those cursed pig-tails seemed to look for an excuse to snap off. They also dug into my fingers as I was working.
Marker Use #1 – Decrease/increase counters
I’m a counting disaster. I detest counting rows. I’m forever losing those little barrel-shaped counter devices that sit on the needle or hang below it. I am also a Wandering Knitter, so I don’t always have a nice settled place to put a pad and paper nearby, nor am I reliable enough to remember to click off the rows on a katchaa-katchaa counter.For the same reason pegboards or counting stones aren’t for me (I’ve got a sweater that ended up with a sleeve eight inches too long because someone kept eating the M&Ms I was relying on as counting stones). I’ve even tried the flipping the string over every ten rows gambit, but ended up pulling out my string. I need to have a tangible reminder to do something, placed directly in my work so that I can feel it. Everything else gets lost, or forgotten. Therefore being the only idiot working on my knitting, I have used markers to idiot-proof my knitting world.
In addition to just sitting prettily between pattern repeats, or marking where one switches attention from chart to chart, I use markers to help me keep track of those pesky directions that say things like “increase every fourth row six times.” If that was my direction, and I’d decided to add my stitch by use a make one (lifted bar) increase after the first stitch of my row, I’d proceed this way. On the first row of my increase section I’d work my first stitch, then place a thin marker and after the marker was set – work my first M1. Then I’d place another thin marker and work to the end of my row. The next time I needed to add a stitch, I’d again work the first stitch of the row, move my marker over, do a M1, then work across the row I’d work along, only having to keep track of how many plain right-side rows were between increase points because ALL of my increases accumulate between the markers. When there are six new stitches between the markers, I’d know I’d done enough.
I handle decreases in much the same way. The first row of the decrease section I place markers before the first stitch that I’ll be decreasing away, and after the last stitch that will be decreased away. Then I work my rows, decreasing at the rate specified until my markers touch.
I’ve got another little gizmo that I’ve used to keep track of the how-many-rows between problem. I’ve made two over the years, but I can’t lay hands upon either one right now. They’re probably packed away in the storage cubby with the rest of my knitting stash, but here’s an illustration:

This is a length of chain links with two different color beads at each end. Red and green are nice mnemonics to set up start and finish, but any color will do. The links are large enough to admit the needle size being used. I made one of these with eight links and one with six. I prefer the one with six because I can use it to count up to 12 rows by using each link to represent two rows. There are VERY few patterns that ask you do do something every 12 or more rows.
The way I use my counting-chain is to substitute it for the first marker in my string of decreases or increases, right in line on my working row. The first row of the six-row decrease set, I put my needle tip into the ring closest to the green bead. On the second row, when I get up to the counting chain, I slip my needle tip into the second ring away from the green bead. Third row, third ring, and so on. In this case, when I got up to the sixth ring I’d know that it would be time to do my increase again, and I’d return my needle tip to the first ring after the green bead.
Now if you see someone selling these after today, know that you saw it here first; and remember I was foolish enough to repeat my mistake of writing about an idea beforepatenting it. [grin]
Marker Use #2 – In-Line Abacus
As I said before: I’m hopeless at keeping track of rows. I’m a lousy and lazy row counter, and manage to muck up every row-counting aid – including placing safety pins every ten rows or slipping a strand of contrasting color string back and forth every ten rows. Instead I use stitch markers as an in-work abacus.
This technique uses two or three stitch markers – preferably ones that are unavoidably different both from those put to other purposes in the work, and from each other. It works best for straight pieces of knitting without edge increases or decreases, or texture patterns that alter the number of stitches on the needle. It can be used in a piece with any of these, but you have to remember to compensate, or you have to place the markers in a relatively unperturbed area.
Let’s say I have a straight run of plain old stockinette worked flat, and I want to keep track of the number of rows I have knit. I decide which of my distinctive stitch markers designates ones and which designates tens. I knit my first stitch, place my ones-marker and keep working. On the next right-side row I advance my ones-marker two stitches to show that I’m in the middle of the third row. I keep going until I’m finishing the tenth row (it’s a wrong side row). At that point I remove my ones marker. On the next row (my eleventh), I work one stitch, place my ones-marker, then place my tens-marker and work to the end of the row. On the next right-side row, I work one stitch, keep my tens marker in place and advance my ones-marker two stitches. That shows I’m on the 13th row.
I can keep doing this for as long as required. Sometimes I need to introduce a hundreds-marker. Other times I move the counting markers in from the edge – mostly to avoid shaping increases or decreases, marking my point of origin with another distinctive marker that never moves. Using a point of origin marker I can even use my stitch marker abacus to keep track of rounds in circular knitting.
Of course there are disadvantages. Fiddling with the markers often involves use of that “third hand.” I haven’t swallowed a marker yet, but some have spun off to add to the feral herd of markers swarming in my house. I do find however that I am FAR less likely to forget to move a counting marker than I am to forget to spin a barrel counter, or make a notation on a pad. And unlike M&Ms – other people can’t eat my tracking device as I knit.
PROJECT – DOUBLE KNIT FULLED HAT
Not every project turns out perfectly. Some start out well, but end up beinga bitshy of the goal.
Some years back my husband requested an ultra-warm hat. I took him at his word, and settled ona watch capin alpaca. Now, alpaca ismuch warmer than woolto begin with – but I didn’t know that at the time. To make sure thehatwas wind-proof I decided to knit it large, then full it to size. Finally to make sure it was nice and snuggly (and to have an excuse to try out the technique) I decided to do a double-knit hat. That’s not "double knit" as in the yarn weight designation – a yarn that knits up at 22 st=4 inches or 10cm. That’s "double-knit" as in a special technique that produces a fabric of two thicknesses, both of whichdisplay their knit-sides to the world (the purl sides are sandwiched back to back inside, between the layers).Those of us who remember the Leisure Suit ’70s, can think polyester double-knit, but done at hand-knitting scale.
Double knitting is a strange beast. It’s related to the famous sock-inside-a-sock trick described in the book War and Peace. In it the stitches of the two layers alternate on the needle. The knitter either works each layer from its own ball, or uses one ball of yarn to accomplish each round in two passes – first knitting the odd numbered stitches and slipping the even ones, then going back and slipping the odd numbered stitches and purling the even ones. The two-ball method if employed carefully can produce the two separate layers of fabric needed to pull off the War and Peace trick. Using one ball of yarn, or using two colors, swapped back and forth between the layers makes a two-sided fabric that does not separate.
Always being up for a challenge, I decided to use a two color stranded pattern, worked in the round. My intent was to employ only two strands of yarn, trading them back and forth to meld the two layers together into one unit. The result would bethe same design showing up on both sides of the work, but in a positive/negative value trade. On one side Color A would be the foreground and Color B the background, but on the other side Color B would be the foreground and Color A would be the background. You can sort of see the difference between the hat body and its reverse side, shown on the flipped up cuff-style brim:

The knotwork design isan out-take from my book of graphed counted embroidery from pre 1600 sources. I havethis onein the notes I drew upon to compose the book, but my documentation of the exact source wasn’t good enough to include in The New Carolingian Modelbook. I used Indiecita Alpaca Worsted 4-Ply, a worsted weight 100% alpaca yarn imported by Plymouth, and knita bittightly at 5.5 spi. Experienced fullers/felters are beginning to shudder here.
I won’t say I truly enjoyed the knitting. Having to remember that two-stitch groups (one inside and one outside) equalled on box unit while following a complex graphmade the project perhaps a bit overly ambitious. Eventually I muddled through, finished the cap, and with much difficulty – fulled it.
What made the result a disappointment?Several things.
Remember how warm I said alpaca is? Double knitting means that the fabric is two layers thick. This watch-style cap with a folded brim has FOUR layers of fulled worsted-weight fabric in the ear-band area. Although I live in an area of the US known for cold, wet winters I will say that in the eight years I’ve been here there has been only one winter with a solid month of below -10F (-23C) weather, cold enoughto wearthis portablelittlehead-oven in comfort.
Fulling alpaca isn’t as easy as fulling wool. Also, I knit this piece much too tightly for something that was to be fulled. There just wasn’t enough room in the already-densely packedpiece for the stitches to pull together properly. It did shrink, but not as much as Iexpected – especially in width. The hat ended up being a bit too wide for the target head. Plus the two colors didn’t shrink at the same rate. It took many, many trips through the washer/dryer, plus a conserable amount of hand-bashing to even out the fast-shriking teal with the slow-shrinking black. It looks good now, but during the process I think I swore at it enough to provide an entire national navy with suitable vocabularly.
Fulling/felting something, a pattern with fine colorwork detail can be wasted effort. Especially if you’re using a rather hairy and soft yarn to start with. It’s tough to make out the detail of the knotwork patterning in my finished hat. In fact, it’s tough tomake outthat the flipped-up brim is displaying the same pattern in negative.
The upshot of all of this is that I learned some valuable lessons: 1. Save fancy patterns for after I understand the basics of a new technique. 2. Knit loosely if you expect to full a piece to shrink it. 3. Alpaca is extremely warm andmore difficult than woolto full. 4. Colorwork patterning is muddied in fulling. 5. My husband really DIDN’T want an ultra-warm hat. I wear this piece now and he’s much happier with his lightweight Ch’ullu, even on a -10F day.
PROJECT – NO-MATH PULLOVER
A couple of failed start-ups ago, I was sitting in the cafeteria withthe company’sresident theoretical mathemetician. I was penciling out a new knitting project, and he was watching me shape the pieces and place repeats. I did a few simple calculations, ratios, slopes, division – nothing terribly complex, but he was impressed at the amount of math that was going into the design. So impressed in fact that he scoffed at the idea of pre-numerate people (meaning people who had no formal math education) coming up with complex patterns.
Now you and I both know that some prettyinvolved knitting went on for quite a while before modern math education took hold.Dr. Math and Igot into a discussion on the subject, and the outcome was I bet him that I could come up with a complex knitted pattern that was constructed using only simple counting. He took the bet. With a bottle of good single-malt Scotch on the line, I was off and running.
I decided to go further. I’d make a sweater that required no swatching, or gauge measurement to boot. I remembered an idea I had seen in a vintage Anna magazine, put out some time in the 1960s. I decided to give the method a try.
I fished some rustic Maine style wool out of my stash (Have Ewe Any Wool – I’d bought it at a Gore Place Sheep Festival the previous year). I knew from prior experience I’d be using a US #9 on this wool. I happened to have a set of 18-inch European 5.5mm DPNs, but I could have worked this on circs. Here’s the logic of my project.
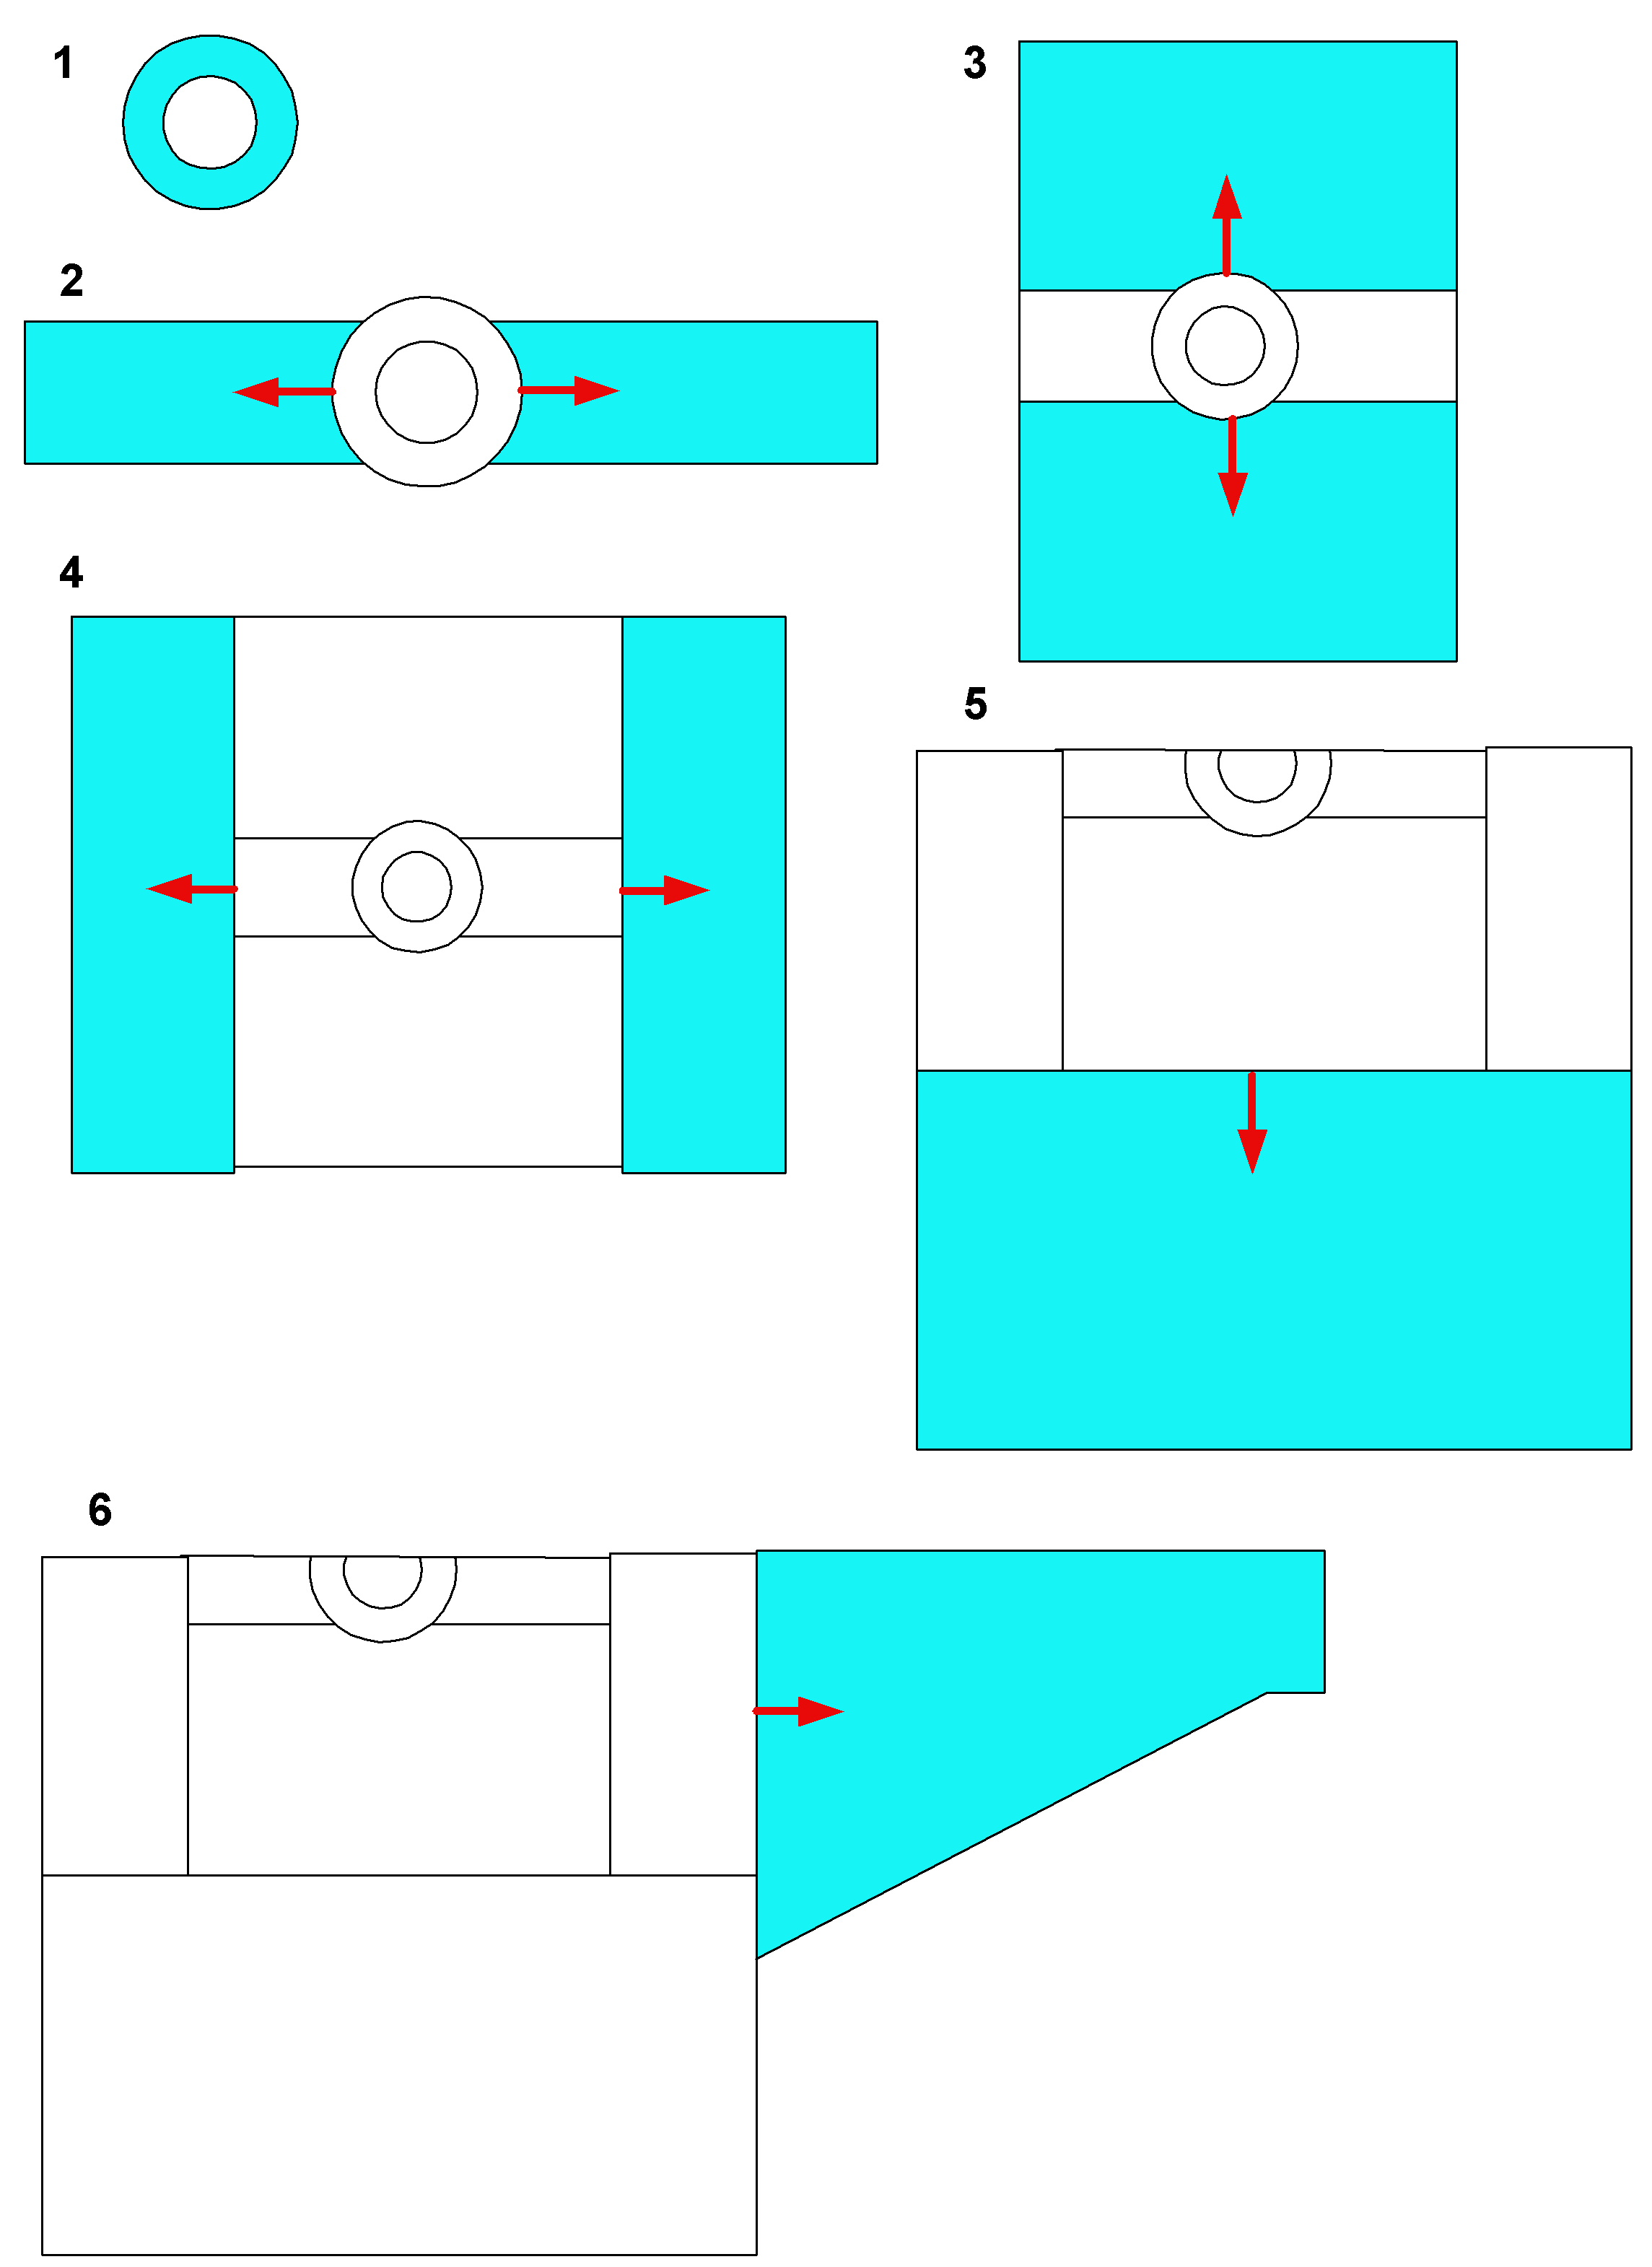
Apologies that some lines have been lost in the above diagram due to file re-sizing, but they aren’t dead-vital.
First in the round I cast on enough stitches to make the neck ribbing (Step 1). I worked them for about an inch and a half. Then counting from the point where I cast on as center front, I determined and marked the center back. Once that was marked, I counted out the center ofeach shoulder. I eyeballed the number of stitches I should use for the shoulder strip and knit out two epaulette-shaped pieces (Step 2), leaving the rest of the stitches on holders. I kept going,trying on the piece until I had a strip that was as wide as my shoulders. I now had something that looked like a bell-pull with a hole in the middle.
I put the live stitches at the ends of the epaulettes onto holders, and began the center front bib area. Starting around a hand-span’s worth of stitches in from the end of the epaulette, I picked up stitches along the sides of my strips until I got to the collar. There I knit across the stitches I had reserved, and picked up the same number of stitches on the other side of the collar. I knit down until I had a hanging piece that was about2 inches below my arm, placing the stitches on a holder instead of binding them off. I repeated the process for the back (Step 3).
Once the bib areas were done, I added width so that the upper body was wide enough to fit me shoulder to shoulder. I picked up the first “wing” along the side of the bib area, then worked across the live shoulder strip stitches, and picking up along the side of the second bib piece. I put these stitches on holders instead of binding off (Step 4).
After the upper body was done, I folded the piece along the shoulder line. I picked up stitches along the side of the first wing, worked across the live center bib panel stitches, then picked up along the side of the second wing. At this point I decided I needed to add more length, so I knit about another three inches in the flat before joining the front and back and switching over to working in the round. I continued to knit the body down in the round, working until it was the desired length, ending with a ribbing (Step 5).
I now had a sweater body with two holes for arms. I picked up along the edge of the arm opening along the little bit of body I just added before joining, then worked across the live wing stitches, finishing by picking up the remaining few stitches along the side of the other bit of late-added body. I worked the sleeve out to the cuff, doing double decreases at the bottom edge every other row until the sleeve looked narrow enough for comfort. I continued working it out as a tube until it was long enough (yes, I know the diagram shows decreases evenly to the cuff. Shoot me.). I ended off with some cuff ribbing. (Step 6)
Here’s the result:

I admit on beyond the method described above, I tarted the thing up a bit with some cables and texture stitches:

I used the Twin Leaf Panel from Walker’s Second Treasury (p. 235) for the centermost panel in the bib area. I framed it with an unusual eccentric chain link cable that featured an openwork detail. I thought I got that one from Stanfield’s New Knitting Stitch Library, but I can’t find it in there right now. I also used the same cable on the epaulette strip, continuing the design down the sleeve to the cuff. Plain 2×2 cables (mirrored left and right) frames the fancy-work areas on both the bib and sleeves. I did like the openwork detail of the eccentric cable, so I decided to introduce more openwork into the piece by using YO K2tog or SSK YO combos instead of the more traditional purl ground on which most cables float. That’s what makes the curious spines between the patterned panels. The rest of the piece is done in seed stitch.
So there you have it. I produced a visually complex piece using only simple counting. To determine centers, I counted in from the ends rather than divide. To place cables knowing their stitch count widths, I counted out from my center markers, and placed additional markers to indicate where they went. I did no other math of any sort, and did no swatching or gauge measurements either.
Did I win my bet? Of course. To be fair, it WAS a sucker’s bet.
The Scotch is now long gone and the sweater is now a bit stretched out, but the Bowmore canister lives on as a trophy, happily holding needles here on my desk at wiseNeedle Central.
WORKING REPORT – WATERSPUN PONCHO
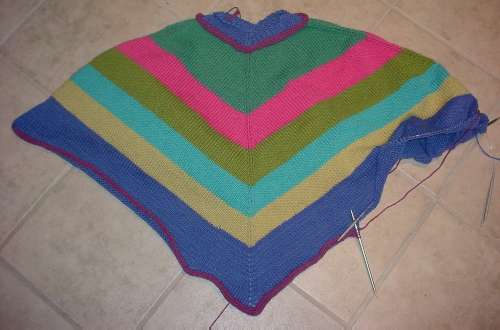
The Tiny One’s poncho continues apace. I only have had about an hour or so to knit each evening, and as you can see, I’m almost done. Dark blue is the last body stripe. The remaining plum is reserved for edging and mistake-fixing.
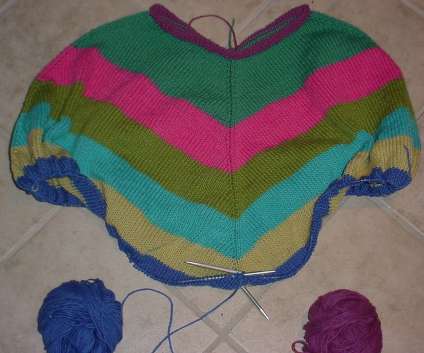
It does turn out that the neckline is way too wide. 100 stitches as cast-on would have worked for an adult, but for a tall Kindergartener (size 8), it’s too big. If I were to begin again, I’d probably go with 80 stitches, tops. Instead of ripping everything back and starting again, or unpicking the top and knitting in the opposite direction, I’m going to fudge it and in doing so produce a detail that (I hope) will look planned.
My goal is to preservethe currentrolledcollar as a welt detail,but fillin the loose-fitting neckline with a contrasting texture. Using plum, I’m going to pick up stitches in the purl bumps of the last row of thecurrent rolled collar, just before I switched from plum to the teal and began the body increases:
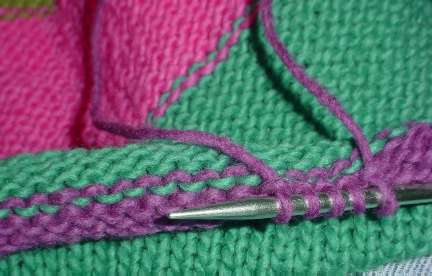
Using these stitches, I’ll work at least six rows of K1, P1 ribbing. Where the "corners" of the piece happen, I’ll use a double decrease, keeping the centermost stitch of the decrease on top: slip two together as if to knit, return both slipped stitches to left hand needle, k3 tog.
With luck, I’ll have just enough of the plum left over to do an I-cord edging. If not, I’ll rip back any completed I-cord and buy another skein. Even if the dye lots don’t match (which they probably won’t as I got the plum months ago), between the striping and the large visual distance between bits of the same color at neck and hem any differences will not be noticeable.
The moral of the story is – if you decide perfection isn’t a prime goal, make sure you have coping strategies on hand that turn any shortcomings into design features.
GADGET – WPI TOOL; PARROT SWEATER
Private eMails brought three questions yesterday, which I answer in turn.
What’s "parrot-color"?
The easiest way to explain the parrot thing is to show you this pullover:

It’s a flash sweater knit from Rainbow Mills Matisse.Their "Navajo Panted Sky"kit included six 4-ounce skeins of Matisse, and produced a one-size-fits-many sweater that’s about 48 inches around.Mine is about as big as the materials provided allow, and I wear a tall 18. Note that thewidth of the piece isfixed so that thecolor repeats flash. Smaller peoplecan make thebody and sleevesshorter, but end up with a baggier fit than I get.
I foundthis10+-year oldkit for buried in a stack of other things at my local yarn store three years ago. Although I’ve seen Matisse listed on a couple of on-line sources lately, and know some of their other kits are still around, I hadn’t seenthis particular packagefor quite a while.I lusted after the thing because I’ve got a magpie’s taste in color, and because I’d done a couple of flash-type pieces before: the one worn by The Tiny One in yesterday’s post (Grandma’s Little Darling,a Rainbow Mills kit of unfortunate name), Flash (my own noodling); and my Typeset Tee (a modified flash piece, also original).
I enjoyed this piece immensely. At this giant gauge (well, giant for me, anyway) it went very quickly. I finished it in about a week. The single-ply construction Aran weightMerino is particularly soft. Even though I rarely wear even the softest of wools next to my skin I am comfortablewith only a cami or tee underneath. Of course the tradeoff for having such a soft wool spun as a single is a certain amount of pilling, but it’s actually quite moderate compared to the pilling I’ve experienced off of Manos.
What’s a WPI Tool?
I know that lots of people – especially spinners and weavers – employ the Wraps Per Inch (WPI) system to describe yarn thickness/weight. I’ve had people recommend that I include fields for it in the yarn review collection. I’ve held off doing so because of an experiment I conducted a while back.
Over the course of a week I took several yarns and a ruler into my local yarn store and asked about fifty people to determine the WPI count for each. I asked most participants to do the test twice. I used a fingering, a sport, a worsted and a bulky yarn. The results were quite disappointing. There was very little consistency among the readings with large variations from person to person, and in some cases from attempt to attempt. Bad data is worse than no data, so based on this lack of consistency and the limited familiarity of the knitting public with the WPI measurement, I decided not to include it in my standard data set. I did however continue to play with the system myself, trying to train my bumbling fingers in The Right Way.
I had absolutely no success at consistent WPI measurement until I found the WPI Tool put out by Nancy’s Knit Knacks. I bought mine within this past month. It’s shown in yesterday’s post – the little stick thing with the notched end. It also is marked off in 1-inch increments and comes with a laminated card that lists the WPI count for various yarn types. It provides a smooth, calibrated surface which is twirled to accumulate the wraps, in contrast toan edged ruler around which the yarn is wound (and apparently, stretched). Using this tool I can finally get consistent, accurate WPI measurements. I still don’t plan on adding WPI as a permanent field in the yarn review collection, but I’m going to add that figure to all future write-ups as part of what I write aboutin the yarn review Comments sections.
So what’s with the endorsements?
For the person who wrote toask if I’d been paid off to post thegadget articles here, please note that I maintain my full independence. On beyond the "no affiliation" disclaimer, I can say that I’veforked overfull retail for every item I’ve described, and have received no compensation or consideration from any pattern writer, yarn or gadget maker, retailer, or wholesaler in connection with anything I have ever said or published about a particular product.
In the interests of full disclosure, I have written patterns that I have sold to publishers including KnitNet, Schaefer Yarns, and Classic Elite, butI have recused myself from reviewing any yarn connected with those sales, and (with theexception of remindingpeople not to bug me for the Seesaw Socks)do not provide references or links to retailers selling them.
BUTTON PUSHING
Thanks to the ingenuity of QueerJoe, there’s now a button for this rag.

I takehis contribution as the highest form of praise and bush slightly; heapcopious thanks upon the sender, and soldier on.
