GREEN CONTINUES
[UPDATE: A pile more patterns have been added to the Knitting Patterns page (Button above).]
Yes, I’m still porting old site content over here, but to reassure my embroidery audience, my massive green sampler is still in the works. With the quickie book covers out of the way, I’ve turned back to it:

The pulled background fill does go slowly, but progress is being made. You’re looking at about half of the strip. The large downward pointing clump of lettuce at the left is actually the center. So I’ll be working on this one for a while.
Extra bonus: See that dangling thread? That’s how I end off without adding more knots, or adding bulk that obscures the drawn mesh effect. I take several running stitches down the center of an area that will be tightly overworked. Then after I do that stitching and the loose end is captured, I snip it close to the work. Starting a new thread is done in the same way.
Extra extra bonus: If you click to zoom on the photo, you’ll see a little arrow pointing out a mistake. I’ll be ripping that little bit out. My work isn’t perfect, just proofread.
UPDATES CONTINUE
Added several more rescued patterns from wiseNeedle to the Knitting Pattern link above, including:
- Firefighters’ Socks
- Impossible Socks
- Pine Tree Toe Up Socks
- Jelly Bean Toe Up Socks
- Ch’ullu Hat
- Knot-a-Hat Earwarmer Band
- Spring Lightning Lacy Scarf
Will continue to plug away. Reminder – please, if you are thinking of linking to these, please link to the source page rather than the individual PDF. I can’t guarantee that the PDF links won’t change.
KNITTING PATTERN PAGE UPDATED
Ported over patterns for
- Kombu Scarf
- Justin’s Octagon Crib Counterpane
- Mountain Laurel Crib Counterpane
- Kids’ “Chain Mail” Coif and Hauberk
- Simple Toe-Up Socks in Four Sizes
Click at “Knitting Patterns” link at top of this page to view.
Stay tuned! More are coming.
BOOKED!
[NEWS FLASH: Kombu Scarf, Justin’s Counterpane and Mountain Laurel Counterpane patterns have been ported over. All are under the “Knitting Patterns” button above.]
The embroidered notebooks are finished and ready to send off to the recipient:

Each one took a bit over two weeks to finish out. The stitched area is approximately 5.3” x 8.25”, made to slipcover a standard 5”x 4” pocket journal style notebook (Moleskine is the most well known brand, but these were “work alikes” I found in Staples). Before you ask – they’re the same front and back – completely stitched. 🙂
Website Port
Thanks to everyone who sent encouragement on the port. The first three knitting patterns I reformat and post will be the Mountain Laurel blanket, Justin’s Octagon Blanket and the Kids’ Faux Chain Mail. I wish it were an instant process, but a bit of redrafting is in order. I’ll have all up ASAP.
Also thanks to the folks at Craftgossip.com who picked up the folded ribbon trim method I used on the Steampunk dress. If you’ve found String due to their link, welcome! I’ve got a lot more to show you.
SURPRISE!
Wondering what we’ve been up to?
Well… You’re looking at it.
After a good run, we’ve closed down wiseNeedle. Sustaining it was no longer possible. I’ll be rescuing the patterns and most of the articles from it, and reposting them here over time. And the yarn review collection will become part of the data trove at (as yet stealthy) Nimblestix. They’re still in Beta, but if you log on with “wiseneedle” after your user name, you’ll get a priority spot in their admission queue.
All String content is here. There will be some inevitable cleaning up as we settle into a new set of internal links. Most but not all links here from external sites should work. We’ll try to fix as many of the broken ones as we can. In the mean time, please take advantage of the much-improved category index and search features.
What have I been stitching?
On our trip to India and on our vacation at Cape Cod I busied myself with small, hand-held stitching projects: two quick book covers for small pocket sized appointment/jotting notebooks.

The finished book cover is adapted from two patterns that will be included in TNCM2. The one in process is a multicolor rendition of a filling in Ensamplario Atlantio, with a twist edging adapted from a larger design, also in TNCM2.
So. Be welcome! Let me know what you think of this new site and about what parts of wiseNeedle should be at the top of my rescue-me queue.
MESHY!
As some have pointed out, doing the fill in the voided background of this rather large strip will be a marathon effort. But I’m chipping away at it, slowly but surely:

The downward facing center spray is in fact the middle of the strip, so you’re only looking at about half of the total width. As graceful as this looks without voiding, with the background fill, it’s far more dramatic. I really like it.
Here’s another shot of the fill, held up to the light so you can see how meshy it is:

I’ve gotten better at the Italian two-sided framed cross stitch. While I had been waxing the last inch of the silk to assist in threading my needle, I’ve found that waxing the entire length really helps avoid splitting. I’ve also learned that the silk is mega-strong, and can take it when I pull firmly. So now my holes are larger and more uniform than when I began. Unfortunately I’ve also learned that this stitch is near impossible to tease out once done, so I won’t be able to go back and replace my “learning bits” stitched when I started.
For Susan – I’m using Two Sided Italian Cross Stitch, as shown in Christie’s Samplers and Stitches, 1920. I’m using the version shown in Figure 130, on page 85, but I am pulling it VERY tightly so that it behaves like a drawn thread stitch, compressing and bundling the weave while accentuating the holes. I’m using one strand of Soie d’Alger, color 1846, on a rather loosely woven (approximately) 40 count linen, and stitching with a small eye ball-point needle more commonly used for hand-hemming tricot fabrics. This particular pattern is being worked over 2×2 threads, laying down outlines first in double running, then going back and working the fill. If I had bothered to start and end my double running bits invisibly, this work would be totally identical front and reverse, with no way of telling which side is which. This is why this style was so popular in the 16th and 17th centuries for bed hangings, linens, napkins, cuffs and other items that showed on both sides. Prior to this piece I attempted this look on more standard densely woven modern even weave, with little success.
LETTUCE
And so on to the next strip:

(With a gratuitous shot of the last strip finished out, for good measure.)
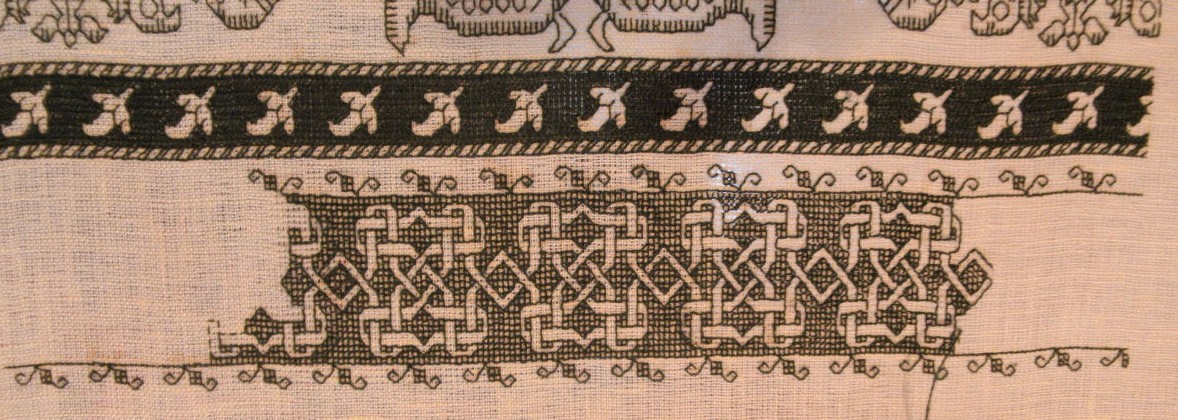
This latest pattern is rather wide, with an interesting companion edging. You can also see that the double running foreground is quite quick to work up. This is less than five days stitching, and a very short five days at that thanks to the standard run of work related deadlines. Progress will slow down now because I’m beginning to work in the background. I’m doing it in Italian two-sided framed cross stitch, pulled tightly to achieve a mesh-like effect. I’d be happier with a more profound “draw” and a more meshy presentation. I could probably get that if I were working over 3×3 threads, but I’m stitching over 2×2 here, a stitch size chosen to present as much of this large pattern as possible. But the mesh is still very evident:

There are several examples of this pattern family in museum collections, but I don’t have time to pull them up right now. I’ll save them for a future post in our “Long Lost Twins” series. Here’s the one I’m using for this stitching: Punto di Milano, Museum of Fine Arts, Boston Accession #99.176. They tentatively identify it as Spanish, from the 1600s. I’ve seen similarly lettuce-like over foliate patterns identified as being North African or Italian, from around this time and persisting (in simplified form) for the following 100 years or so. But remember – these patterns are from an area in which scholarship is still developing from its Indiana Jones/Avid 19th Century Collector roots. With the paucity of provenance and documentation left by the original collectors, I’d expect to see attributions wander a bit over the next few decades, before modern methods make temporal and location points of origin more clear.
DRIVE BY POSTING
I’ve been a bit lax of late, not posting progress on my long, green sampler. In spite of steampunk outfits, work deadlines, and other craziness, slow progress is being made. As you can see, I finished the last pattern, and I’m almost done with the latest strip:

This latest one is of a particularly long repeat. So long in fact that only a portion of it fits across this space. I’ve chosen to do it foreground style, in long-armed cross stitch. The ultimate source is one of Domenico da Sera’s modelbooks, published in Lyons, in 1532. I found a single page from Lotz 69b reproduced, and charted it up from that. This pattern will be in TNCM2.
STEAMPUNK SATURDAY
…More like month-of-Saturdays, actually.
Here’s the outfit that accompanies the hat I showed off in my last post:

You can’t see the watch-type pendant and magnifying glass hanging from the chains at her waist.
The blouse and vest were flea market finds, along with the buttons and broken necklace chains that adorn it. We made the skirt and petticoat, the hat and the woven ribbon bag. The hat is a cut down New Year’s Eve party top hat, plus feathers and other adornments. The belt is an 80s-era retread from my closet, and the gear necklace and earrings were holiday presents this year past.
Here’s a close-up of the skirt trim. It’s a wide strip of brown ribbon, edged with black ribbon, folded and ironed into points:

I don’t remember where I first read about doing the points – possibly in an ancient Threads magazine, before they abandoned fine handwork, possibly in a Victorian era ladies magazine or millinery guide. The ribbon folding isn’t quite ruching, since no gathers are stitched, and it isn’t pleating, because the folds are not perpendicular to the ribbon. I used it once before, to make teeth on a dinosaur costume, when Elder Daughter was a toddler.
Wherever this trick came from was, it’s a very useful technique for producing custom, flexible trim that eases nicely around corners. I did mine in inexpensive double sided satin ribbon. A two-tone ribbon with different colors on each side would make points of alternating colors. Here’s how:


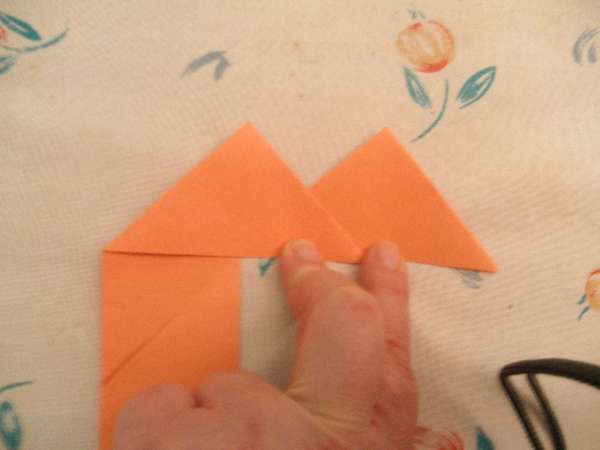
Fold a triangle, tucking the leading edge underneath. Then do an inverse triangle. Finally, flip the inverse triangle up so that it lies on top of the completed one.
You can see that if you wanted to make rick-rack instead of a row of upward pointing triangles, that second fold step would be done so that the “good side” landed on top, and the third step would be omitted.
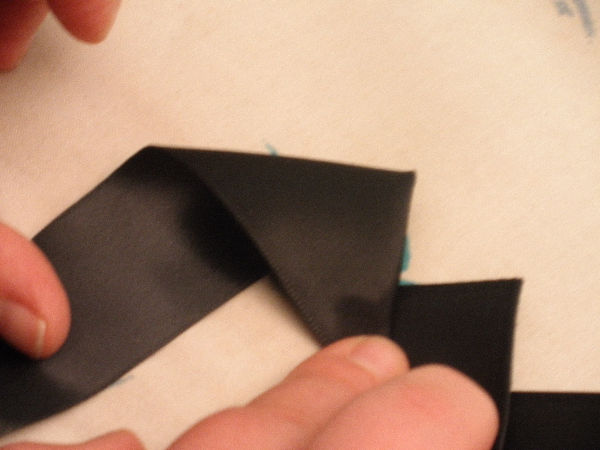
Here’s the same process in actual ribbon, with firm steam pressing on the silk setting in between manipulations:


and the final product, ready to be pinned and sewn in place. Note the flexibility that can accommodate both inner and outer curves:

Younger daughter wore this to the Waltham Watch City Steampunk Festival, at the Charles River Museum of Industry and Innovation. After planning and accumulating the bits for the better part of the year, she was thrilled to do so, and had a great time.
PROGRESS
We’re quite busy these days at String Central. I continue to work on the long green sampler. Here’s the latest strip, photographed in early dawn light. This pattern is also in TNCM2, albeit without the gridded voiding. The little complementing border was stolen from a different TNCM2 pair.
TNCM2 as a whole also progresses. And to top it off, Younger Daughter and I are hard at work on an outfit for her to wear to the Waltham Watch City Festival steampunk gala.
Long time readers here may remember that last year at this time, Younger Daughter spent quite a bit of April and May in Children’s Hospital, in the throes of an argument with her burst appendix. She had wanted to attend the festival last year, and was very disappointed to have missed it. As a distraction, we planned out the outfit she would have liked to have worn. Being on the young side, what we designed for her was more steampunk than steamy-punk (no exterior corsets, hip high hemlines, or fishnet stockings). As incentive for cooperation with often uncomfortable hospital requests, I promised to make said outfit.
Now a year later, she’s totally better and my promise has been called in. We’re about halfway through the venture. A blouse/waist has been obtained (an antique barn bargain retread). We’re just finishing up a camel wool walking skirt, and will be trimming it next week with black and brown point folded ribbon. She’ll be decorating a brown suede bolero with copious brass buttons, plus a watch, a compass and a magnifying glass. The bolero and buttons were also flea market finds. Pix of all of these as they near completion. But I can present her hat:

She started with an costume top hat, and excised about 2 inches of height. She covered the surgical scar with a brown ribbon, complete with a bow and streamers in the back; then added feathers and gears.
Cute, no?
