DYEING FOR A REST
Yes, I am still swamped at work, by the same project that has eaten my time and sanity since last November. The end though is in sight. Thank goodness. In the mean time everything else suffers. Especially blogging.
I was able to steal an evening this weekend past because Younger Daughter was celebrating her birthday. We had a house full of 8-year old girls, lots of cake, giggling, glow in the dark sticks, and other modest entertainments suitable to a sleep-over party. Along the way we did t-shirt tie dyeing. I got a bunch of inexpensive plain white t-shirts from Walgrens, and a tie dye kit from the local arts and crafts store (more chaotic but much more fun than those big box crafts palaces). The kit came with almost everything other than the shirts – instructions, three squeeze bottles pre-loaded with dye powder in screaming primary colors, one empty squeeze bottle with marks on it for using two of the other colors to make a fourth, soda ash, rubber gloves, and rubber bands. All I needed to add were the shirts and a bucket. The kids had lots of fun making their own creations, but when they were finished, I had about half of the dye left.
What to do with it? Well – what would you do?
What I did was experiment after the kids had wiggled themselves into their sleeping bags and (mostly) gone to sleep.
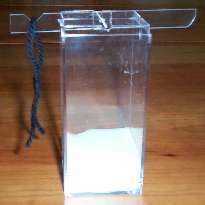
I had some old Southmaid Cotton 8 unmercerized white cotton left over from blankets past. It was very inexpensive, around $1.75 per skein, and it’s been kicking around my stash forever. Using my swift, I wound out about six skeins worth (2.5 oz each, no yardage provided), knotting them end to end as I went along. I secured my mega skein in three places with a loose figure 8 tie, just like all the countless skeins of yarn I’ve bought over the years. Then following the dye kit directions, I soaked the yarn in the soda ash bath. It sat there for a couple hours. Then I squeezed as much of the ash water out as I could and laid my yarn out on plastic. Then I took my squeeze bottles and had at it.

This is much harder than it seems. First, keeping the colors in neat segmets is a challenge that must get easier with practice. Second, making sure that the full depth of the skein is penetrated by color is also difficult. Again practice must be key. Perhaps I was overly ambitious with the amount of yarn I was trying to color, but you can see in the blue that I didn’t get the core of the skein as evenly colored as the outside.
Still, garish colors and imperfect execution as it is, it was a noble experiment. Without measuring, my guess is that I have enough yarn here to (eventually) make a sweater for Younger Daughter. At worst case, possibly a tee-shirt for her. Which would be congruent given the origin of my inspiration.
Will I try this again? Possibly. Messy is always fun.
MR BUNN’S FIRST LESSON – USING A McMORRAN BALANCE TO DETERMINE YARDAGE
Some people have asked how Elder Daughter (about to be 15) did all the math that led up to her bunny’s pirate sweater. I don’t think they were asking how she was able to accomplish the task in the first place, but instead, what methods she used. All those numbers sound daunting, but it’s really not that hard if you take it step by step. I wanted to to do as many steps as possible, so we started out with as little information beforehand. Here’s what she did, taken in large part from the write-up that was on her poster.
First, as I said – I was evil. I gave her a lump of yarn without a label.

Now I knew what it was, but Evil OverMoms don’t tell. The first thing she did was determine how many yards of yarn she had. Here’s her write-up (the spacing on the equations is a bit squirrely because they were exported from MS Word’s equation editor):
First, I had to find the total weight of the yarn. Using a scale, I found I had to 225 grams of yarn, total.
Then, I turned to a precision instrument to help me. The McMorran balance is designed to determine yardage per pound. The formula that comes with the balance requires the user to first find out how long a piece of yarn is needed to make the balance register level. My balancing length for this yarn was 9.75 inches.
The next step is to use the formula that comes with the balance to determine yards per pound (YPP):
In my case
My yarn has 975 yards per pound, but I needed to find out how many yards were in 225 grams. The formula to convert grams to pound is:
Plugging in my values I find out:
Now I multiply YPP times my weight in pounds:
And so Elder Daughter defeated the first yarn demon, and determined how much yardage was contained in her tangle – a whopping 482.6 yards. I’ll post more in this series when she brings her poster home and we can scan her drawings. For the record, McMorran Balances also come in a metric version. But I have the Imperial unit one, and it was more fun to make sure she did as many conversions back and forth as possible.
MR BUNN GOES TO SCHOOL
This post comes under the heading of "Bragging Parent."
Elder Daughter’s school hosts a math fair every spring. Much as in a science fair, students are encouraged to create exhibits detailing concepts, or offering up research or practicum results. The only stipulation is that they have to involve math. One of the suggested topics this year was "Math in Everyday Life." Suggestions for this topic included documenting the math inherent in a cooking or hobby project. Elder Daughter chose to do hers on the math required to create a mini-sweater. Evil OverMom made sure she got lots of pencil time in doing so. [insert bwaa-haaa-haa sound effect here.]
She decided to take Mr Bunn (her first toy), and outfit him with a pirate motif sweater. She did some fashion sketches, and searched the web for a pirate motif. She found one on a wristband offered up by MagKnits.

To start, I gave her a tangled pile of yarn, of undetermined yardage and gauge. She rolled it up, weighed it and used a McMorran Balance to figure out her yards per pound. Lots of conversions between grams and pounds ensued.
I then had her measure Mr Bunn and draft out a proportionally designed pattern. There were percentage adjustments for ease, plus determining the length of the T-slit for the neck hole using Pythagorean geometry.
Then she did a gauge swatch, weighed it and figured out her yarn consumption per unit area, and based on that – whether or not she’d have enough yarn to do her project. (Obviously I made sure that she would, but let her figure it out on her own). More ounces, grams, pounds conversions!
After that she used that same swatch to determine row and stitch gauge. Averaging here, as she took several measurements at different spots on the swatch to get more accurate figures.
She used multiplication and ratios to translate her pattern and her gauges into actual stitch count directions. Then she drafted up a to-scale final pattern schematic. Finally, she mathematically determined placement for the motif.
And then she knitted the sweater and did up her poster, documenting all of the equations and methods she used. (The poster is still at school). On the day of the fair she manned her mini-booth and explained all of this to the judges.
I regret that in spite of effort and originality, Elder Daughter didn’t win one of the coveted few prizes. But that’s a mom talking. She did get an excellent grade on the project from her teacher. Also she learned quite a bit about design, data conversion, and drafting, had fun with applied math, and is now talking about designing up a person-sized sweater. All of which make her a winner in my book.
WHERE ARE THE SOCKS OF YESTERYEAR?
UPDATE: THE STITCH PATTERN BELOW IS NOW AVAILABLE IN AN EASY TO DOWNLOAD PDF FORMAT AT THE KNITTING PATTERNS LINK, ABOVE.
As you can tell from my absence from these pages, life again overtakes my leisure pursuits. Still, even though I haven’t had much time to write, I have been able to fit little scraps of knitting into my not-so-copious free time.
First, I knit a pair of replacement socks for Friend Alexx. They’re replacements because I had made a pair for him over the holidays that failed to fit. Since my socks come with an unlimited warranty, I was honor bound to replace them. Friend Alexx requested a pair of heavy hiking/slipper socks – preferably purple variegated. It took a bit of searching to find a purple mix in DK weight washable wool that didn’t trail off into prissy pink or boudoir lilac. But I did. Cleckheaton Tapestry 8 Ply, in Color #4. The pair is now done and waiting for me to darn in the ends and send them to the recipient. No pix – they’re pretty standard stockinette in screaming purple, but they’re dense and cushy.
In a coincidence, I stumbled across a briefcase I had been using three years ago. In it I found a pair of socks I had started for Alexx’s wife, Friend Kestrell. At that point, Kes was learning to knit and wanted to make socks. So I decided to make a pattern just for her. This presented a couple of challeges because Kes is blind. I wanted to use a simple knit/purl brocade that made a deeply embossed texture, and that would be relatively easy for a new sock knitter to memorize. Having worked with Friend Rosie (another non-sighted knitter) I also wanted to make a pattern in which one could use feel to determine one’s location.
My best intentions at that time led me to finish out one sock, and make my way through the heel of the second. Then for whatever reason something happened and I stopped working on the project. Around that time my job world changed, and the briefcase holding the socks was “retired.” The socks were forgotten in the ensuing turmoil.
In any case when the pair resurfaced, I had a finished sock but no pattern written down. I know I had drafted out the textured brocade, but I couldn’t find it on my archives. Another friend came to the rescue. My stitchpal Kathryn saves everyhing. I had shared the original chart with her way back when, and she was kind enough to send me a copy.
But there was a complication. The chart I sent Kathryn was for a 14-stitch repeat. My done-sock was worked on 72 stitches – an 18-stitch repeat. Yes, I had the finished sock, but it can be surprisingly difficult to graph up a piece from as-knitted, especially when the knitted object is done at tiny gauges with a variegated yarn. But between the sock and the logic of the pattern I was able to noodle it out and continue. I present both the 14 stitch and 18 stitch repeat. The 14 fits neatly on any sock worked on 56 stitches. If you are partial to working with a set of five rather than four needles, you will find that one full repeat will fit on each needle, and each needle will be worked in the same way. Also, being top-down symmetrical, this pattern wil look pretty much the same for toe up and cuff down socks.
Here’s a set of quick and dirty charts. Yes, I know that Kes and Rosie would have problems reading a *.jpg chart. See below for full prose instructions.

Kes’ Brocade – 14 stitch version, transcribed for knitting in the round only
Row 1: (Right Side) P2, K3, (P1, K1)3 times, K2, P1
Row 2: (Wrong Side) P3, K3, P1, K1, P1, K3, P2
Row 3: K1, P3, K3, P1, K3, P3
Row 4: K2, P3, K5, P3, K1
Row 5: K3, P3, K3, P3, K2
Row 6: P1, K3, P3, K1, P3, K3
Row 7: K1, P1, K3, P5, K3, P1
Row 8: (P1, K1)2 times, K2, P3, K3, P1, K1
Row 9: K1, P1, K3, P5, K3, P1
Row 10: P1, K3, P3, K1, P3, K3
Row 11: K3, P3, K3, P3, K2
Row 12: K2, P3, K5, P3, K1
Row 13: K1, P3, K3, P1, K3, P3
Row 14: P3, K3, P1, K1, P1, K3, P2
Kes’ Brocade – 18 stitch version, transcribed for knitting in the round only
Row 1: (Right Side) K3, P4, (K1, P1)2x, K3, P3, K1
Row 2: (Wrong Side) K1, P3, K4, P1, K4, P3, K2
Row 3: K2, P3, K7, P3, K3
Row 4: K3, P3, K5, P3, K4
Row 5: K4, P3, K3, P3, K4, P1
Row 6: P1, K4, P3, K1, P3, K4, P1, K1
Row 7: K1, P1, K4, P5, K4, P1, K1, P1
Row 8: P1, K4, P3, K1, P3, K4, P1, K1
Row 9: K4, P3, K3, P3, K4, P1
Row 10: K3, P3, K5, P3, K4
Row 11: K2, P3, K7, P3, K3
Row 12: K1, P3, K4, P1, K4, P3, K2
Row 13: P3, K4, P1, K1, P1, K4, P3, K1
Row 14: P2, K4, (P1, K1) 3 times, K3, P3
The astute will notice that the thing is symmetrical on two axes. The 14 stitch repeat mirrors around central stitch #8, and row #7. The 18 stitch repeat mirrors around stitch #9 and row #7.
And for good measure here’s a close-up showing the final texture. Or as good a photo as I could manage given my limited photography skills, the dark color and speckled nature of the yarn I used. Which yarn is it? I believe it’s Ancient Fortissima from the pre-merger days. The 100g ball (now long since separated from the ball band) is sort of ragg-style tweedy, with haphazard stripes being produced when one or more of the constituent plies shades off to a new tone. In real life it’s more deep burgundy/blood red than it is magenta/blue. The striping effect though isn’t uniform. Sock #1 has a far more demonstrative striping pattern than does on-the-needles sock #2.

I’m about half-way through the brocaded cuff of sock #2 right now (not shown). As soon as I’m done, I’ll pack up both pairs along with the finished pattern and send them to my friends.
SHORT ROW HEELS – THOSE LITTLE HOLES
I promised to describe how I avoid those small holes that can form at the top of the diagonal line of joins formed by short row style heels. Please bear with this household’s limited photography skills. Those are my hands. Elder Daughter (now 14) is manning the camera.
To start – here is my sock, worked toe up on five needles. Each with the same number of stitches on it. This sock is ideal for illustrating this process because I have planned my sock foot depth to hit at the points of color change. It’s easier to refer to stitches by color. Apologies if you’re color-impaired.
I have just completed the knit side row in which I have knit together that last wrapped stitch along with the wraps at its base. There are no more stitches "in front" of me, waiting to be wrapped. I’m ready to rejoin the body of the sock. But before I do so there’s one last step that needs to be done with the leftmost heel needle and streteched out stitches in the interstice between the heel needle (green and white stitches) and the body needle (orange stitches). I’ve put down my empty needle and am about to do this next step using the needle bearing the green and white heel stitches.

In step two, you can see that I’ve gone one round down below my active row and am in the process of picking up one stitch, using the tip of my heel needle.

Step 3 shows that picked up stitch (light green), safely parked on my heel needle. At this point, my just-completed heel needle contains ONE MORE stitch than all of the others. After Step 3, I pick up my fifth needle and knit across the first then second needle bearing my top-of-foot stitches.

When I get to the other side of the top-of-foot stitches and have my fifth needle poised to start working up the right side of my heel, I pause. There are two anomalies on this side. First – we’ll need to do the same pick-up of one stitch as we did at the end of the first heel needle. The second is a bit trickier. If you look closely, you’ll see that because I launched directly into my first full round after re-activating the last wrapped heel stitch on heel needle #1, I never got back to the commencement of the heel to re-awaken the rightmost heel stitch on the other heel needle. You can see it below, noosed by its blue wrapping stitch. THIS IS O.K. NOT TO WORRY. We’ll deal with it as part of this side of heel.

Now (in spite of blurry pix), you can see that using my empty fifth needle, I am picking up one stitch in the row below the first stitch on my heel needle. It’s light green, and is being formed in the orange stitches below the start of the turquoise heel stripe.

Next is the wrapped stitch cheat. In the shot above you can see there are actually two wraps on this first heel stitch. One is blue, one is green/white. The blue stitch happened first, and is lower on the carrying stitch than is the nearly impossible to see green/white one. It is extremely difficult to work both of these wrapped stitches along with the carrier. So I cheat. I lift the lower wrap (blue) and place it on the end of my heel needle. Then I knit it and the carrier stitch together, ignoring that other green/white wrap. UNLESS THEY’VE READ THIS CHEAT, NO ONE WILL EVER NOTICE THE OMISSION. It will have no effect on sock wear, or the presence or absence of that litle hole.

Now because I’ve picked up a stitch on this needle too, I have two top-of-foot needles that each bear my original number of stitches, plus two heel needles that each bear my original number + 1 stitch. On this next round I take care of that. I work across heel needle #1, taking care to do a SSK on the last two stitches. I’m now back to my original count, and have eliminated the gusset hole on this side of the heel. I work across the top of the foot stitches as usual. When I get to the other heel needle, I knit the first two stitches together. Again I’m back to my original count, and have snicked up any potential hole on this side. Once I’ve completed this "remedial decrease" row, I consider my heel complete and go on to do whatever I feel like for the ankle.
Here’s the result:

ANOTHER SOCK QUESTION – WEIGHING THE SKEINS?
Linda writes in with a sock-related question.
Do you weigh your skeins/balls of sock yarn before you start?
She goes on to point out that she weighs her sock yarn that comes in "makes a pair" size balls (usually marked at 100g). Because (like me) she knits for big feet, she is also often afraid that she’ll run out if she makes sock #1 too large. Weighing the remaining yarn as she knits sock #1 tells her how close she is to having used up 50% of the total.
It’s a good idea, but I don’t do it. Mostly because the lousy kitchen scale I have at home isn’t precise enough for the task at hand. That and laziness. Also at this point, trust. I know that a 100g ball of yarn is plenty for a pair for me, even with my clown-sized feet. and that if I knit the foot to fit, then knit the ankle part as long as the foot, I’ll have enough left over for 2 inches of ribbing. That doesn’t mean I don’t get nervous. I do. Sometimes I do run short. So I suppose I really should go out and buy a decent scale…
This brings up Linda’s second observation. To paraphrase:
Sometimes the ball weight is less than the label states. My ball of Sockotta I just started is labeled 100 gms but weighed in at only 94 gms. Maybe my scale is wrong…
While a calibration or accuracy difference between any two measurement devices is always a possibility, perhaps her scale isn’t wrong. Yarn weight is measured under "standard conditions." Presumably if Linda was experiencing the same set of conditions (most specifically – humidity), her ball of yarn would weigh the full 100g. It’s also not entirely unknown for distributors to offer products that hit the exact mark only as an over-the-lot average, with some balls being heavy and others light. Certainly not optimal but not uncommon either. Inconsistent yardage has been mentioned in the wiseNeedle yarn reviews (sample: Diana, Dulce, .Manos, Melin, Tibet). Finally there ARE some yarns that are consistently short of the listed yardage. That’s a big flaw that has also cropped up a few times in the yarn reviews posted on wiseNeedle (sample: Superwash 12 Ply, Nature Cotton).
Should one expect every skein to hit the 50g or 100g (or whatever mark)? Under ideal conditions, yes. But I doubt it will happen often in our imperfect universe. My solution to the problem is on larger projects – to buy that extra skein as insurance. I’ve dipped into my insurance yarn often enough to make it a standard part of my yarn purchase planning.
ETHICS OF BUZZ MARKETING
A weighty topic for String.
I’ve been contacted recently by several publishers and manufacturers. Each has offered advance copies of books or free product samples, with the hope of seeing a review of those items posted here or on wiseNeedle. This to me smacks of buzz marketing. I have turned them all down.
Buzz marketing is yet another "latest thing." In buzz marketing a vendor engineers a campaign that seeds mention of their product such that the word seems to come spontaneously from unaffiliated individuals – all talking (or writing) about the product in their own words. One of the ways to start a buzz campaign is to seed the product out to influential (or prolific) people who know lots of other people interested in new items or ideas. Prolific bloggers or podcasters are excellent pipelines for getting the word out. Giving them goodies for free is one low cost way to spread buzz to other leading-edge consumers. At this point I suppose I should be flattered to be considered either prolific or influential.
So. What’s the catch? Why not accept freebies, try them out and then post the results, good or bad?
Mostly because I am uncomfortable with the ethics of the base idea. When does accepting free samples begin to color one’s thoughts? At what point are one’s opinions compromised? At what point does one become a mouth organ for others rather than oneself? Yes, I know there are magazines that accept freebies and test samples – even paid ads, then turn around and totally blast bad or defective products, regardless of prior considerations. Computer Gaming World is known for having dissed the deserving on the page opposite an ad for the product being criticized. But there are far more specialty coverage venues that avoid any semblance of criticism of advertisers or sample providers.
Plus, once this practice becomes widely known the whole issue of trust surfaces. Paid endorsements are something else again – everyone knows Tiger Woods gets megabucks from Nike. His integrity isn’t an issue because the link between them is so public. Formal public endorsements aside – can you trust the opinions of someone who even with the best of intentions may be an unpaid shill? Isn’t entering into this sort of arrangement both a bit exploitative on the part of the marketer, and duplicitous on the part of the shiller? I see a slippery slope here. Accepting freebies to me is the first baby step on a continuum of ethical compromise – the same continuum that in its most egregious manifestations pops up in bribery, kickback, and blackmail scandals.
Where does that leave our little world of knitting and knit blogging? Good question.
Is accepting freebies for the purpose of (perhaps) writing something about them an ethical challenge for other people? Is it any different than wearing a branded item – an Izod shirt, or carrying a Louis Vuitton handbag? Your thoughts?
NEW CAROLINGIAN MODELBOOK
I know there are folks who are looking for my book on embroidery. Every now and again a copy or two surfaces in Albuquerque, where the fly-by-night publisher was. Always at the same bookseller. It looks like that same bookseller has "found" a couple more copies. I get nothing from these sales, but I do know that people are rabid to lay hands on the thing. Even if this sale is closed by the time you get there, keep an eye on these people because if more copies resurface anywhere, it will probably be with them.
Please note that I have no affiliation with the seller. In fact on my previous attempts to contact them, they told me that I was dead (which was news to me); and rebuffed my request for the publisher’s last known address.
My thanks to embroidery pal Mistress Karen Larsdatter for spotting the sale notice!
A RAINBOW OF PROGRESS
Once again life overtakes blogging. But this time it didn’t intrude so completely that all knitting ceased. As a result I can report on progress and make some promises.
First, progress on my Trekking XL socks. With the exception of binding off, they’re done.

Yes, both of the socks are the same size. There’s a slight distortion because the photo was taken on a futon sofa with a canted seat area, then flipped 90 degrees. The sock on the left was further from the camera, and just looks smaller. As you can see though, just as I predicted, the tweedy type of striping is wildly unpredictable. Both were knit toe-up from the same ball of yarn. The sock on the left was done first. You can see the color match between the cuff cast-off row and the toe of the sock on the right. I did have a small quantity of yarn left over. Probably enough to have been more generous in my K2P2 rib (it’s only 20 rows deep).
Before anyone asks – there is no way to make a pair of identical socks knit from tweeds made up of several plies that cycle independently through a set of colors. If you’re dead set on identical rather than fraternal pairs, stick to printed yarns. Like the one in the next photo:

I still need to spell my camo tee knitting with something else, so I grabbed the next ball of yarn off the top of my sock yarn stash. This one is Lana Grossa Meilenweit Fantasy. The Fantasy color variant has the longest true repeat I’ve found in a fingering weight sock yarn. This one is in nice spring colors. Again, more autopilot knitting on my standard toe up, short row heel sock. I feel like using large needles this time, so I’m working this pair on #00s, about 9 spi and only 72 stitches around.
Lydia asks how I avoid little holes at the points of my short-rowed heels, at the spot where the heel ends and all the formerly dormant stitches have been re-activated, and the first post-heel full round starts. She also wants to know if I put my non-heel stitches on a holder when the heel itself is being worked.
I don’t bother off-loading my non-heel stitches. I just leave them on the two DPNs on which they ride for the entire sock and let them dangle. I never have a problem losing them off the ends (I prefer relatively long DPNs for other reasons, but not losing stitches off the end is another good reason not to switch to shrimpy needles.) On the gusset top hole problem – I pick up a stitch on each side during that first post-heel round. There’s a little trick to it, so I promise to take pix of that point when I get up to it on this pair.
On my camo tee – I’m still going…

I’m finding that the repeat becomes less and less stable the further I get into the piece, even though my stitch count remains the same. Better pix soon, I promise that too.
MORE CAMO, TREKKING SOCKS
Working away at the camo tee. The striping has settled down somewhat:

Unfortunately, the need to keep precise tension in unstretchy cotton is tiring on my hands, and when my hands get tired the gauge (and in this case the flash ratio) wanders. I find flash pieces and self-stripers to be easier in forgiving and somewhat self-correcting wool. So to ward off fatigue, I’ve been alternating projects, working a pair of socks at the same time.
Now the socks themselves are nothing special at all, being plain old stockinette with my standard figure-8 cast on toe and short rowed heel, but the colors of the sock yarn I’m using are particularly pleasing, and given the appearance of the skein – quite a surprise:

For the record this is Zitron’s Trekking XXL, color number 100. It’s marked as 75% superwash wool, 25% polyamide nylon, at 420m for 100g (2.5 oz, 459 yards). It’s very similar to the Skacel yarn of the same name, and to an older Socka yarn I remember using yearsandyears ago. The striping effect here is serendipity, caused by a confluence of color change among the yarn’s four constituent, individually shading plies.
I’ve used yarns that look like this before and had mixed results. The Socka pair was a minor disappointment. I bought two identical looking skiens of the same color number, in vivid fall reds, oranges, greens, and browns. One striped like the pair above. The other remained somewhat muddy, with no clear color sectioning because the tweedy bits never quite aligned. I note that since just before the heel this skein has calmed down somewhat. I’m hoping that it gets more demonstrative again on the ankle, and that the second sock (it’s a two-sock size ball) while not an identical match to the first, will display a similarly cheerful stripe effect. From the size of yellow-red blob that’s peeking out just over the "TR" on the label, I supect it will.
