SHOE SIZES, WORLDWIDE
I came across this on an Adidas shoe box, and thought it might be of
interest to sock knitters, especially those knitting socks as gifts
knowing nothing but foot sizes. It’s a chart showing adult men’s and
women’s shoe sizes in the US, the UK, France, and Japan. I’ve added the
red line to show my own giant size – US Women’s 10.5 (Euro 43, if such
a beast exists).
Now
by the official centimeter length my giant size works out to a squidge
over 28.5 cm. I find my own wool and wool blend socks fit best if they
are about 25-27 cm when measured from heel to the tip of the toe:
stretchier, finer yarns at the smaller end, less stretchy or heavier
yarn at the top end. The one pair of cotton socks I made was about 27.5
cm, to allow for that yarn’s lack of stretch.
Why do I make my
socks shorter than my actual foot length? If your feet feel like
they’re swimming in your socks, your socks are too big. Socks NEED to
stretch just a bit for optimal fit. Otherwise one gets bunching and
foot blisters where the fabric accumulates in folds inside the shoes.
Too big socks also wear out faster. All that sliding and rubbing
oversize socks do inside shoes translates to extra friction, and
friction is a sock-killer.

Click on image above for full size chart
INCHING ALONG
More bits and pieces are accumulating. You can see I’m more than
half way done with the second meta-motif. I’ve got two triangles
to sew on (I don’t actually do the stitching until the squares on both
sides of a triangle are complete.

In this photo you can better see what the motifs look like
individually. The center hex is pretty straightforward. The
triangle
is knit base to tip. The tip’s center is a textured stitch.
The
square (shown attached to the center hex at the bottom right) also
features the same textured area in the parallelograms that flank its
center spine. When the motifs are placed together, these textured
areas join up to make the star-shaped framing device that surrounds the
center hex’s flower.
Unfortunately this sort of project isn’t very good for blog progress
reporting. From here on in it’s going to be more photos of
exactly the same thing, done again and again and again and again.
You get the idea. I’ll probably mark the completion of each
meta-unit, and show a couple more photos of significant milestones –
like joining the motifs using the plain triangles I wrote about last
week, but I’ll try to avoid boring everyone with needless
repetition. Which means I’ll have to think up something else to
write about.
BLACKWORK MERMAIDS
In the absence of any knitting progress, I offer up another embroidered tidbit.
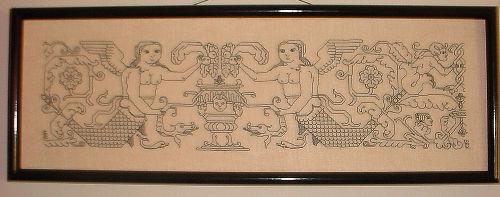
This is the last pattern in my New Carolingian Modelbook. It’s the same one that the SCA Lady Lakshmi used to make a hat for her friend Mistress Morwenna.
As you can see (in spite of my lousy camera work), my panel isn’t centered on the middle of the repeat. Instead I’ve skewed it a bit to focus on one mermaid, and to show the second bounce center – the twist at the panel’s extreme right. This is in part because I wanted to work one full cycle, but was limited by the size of the piece of linen I had available. For the record, this is done on 30 count linen (about 15 spi) using one strand of standard DMC embroidery floss.
This is one of the pieces I entered in the Woodlawn Plantation embroidery exhibition over the years. It won an honorable mention prize (feedback was that the judges didn’t like the skewing of the repeat). Amusingly enough, my brazen, bare-breasted mermaids must have offended some sensibilities. The piece was displayed at the very top of the wall in a room with 15-foot ceilings. The prize ribbon was clipped athwart the bosom of one mermaid, and a yellow sticky note was affixed to her sister’s.
ONE STITCH = THREE FEET
I was out webwalking again and came upon this:

It’s a report of a bit of performance art/industrial control/knitting
that boggles the mind. The artist is directing the production of
a knit US flag, using aluminum street light poles as needles and giant
strips of felt for yarn. The actual knitting was performed by two
John Deere excavators, handled with amazing delicacy and
precision. The image is from a story on iBerkshires.com, reporting about the event which took place at the Massachusetts Museum of Contemporary Art.
The artist in question is David Cole.
This isn’t the first exploration of knitting (giant or human scale)
he’s done. He’s also done a previous bit of oversize knitting
with construction machinery, working up fiberglass insulation into a
giant slouchy teddy bear. His other works can be seen at his
website.
I can’t say that the gauge of the flag was in fact 1 st=3 feet, but one
has to admit that it’s pretty huge. I’m especially boggled at the
thought of someone deconstructing the movements to produce a knitting
stitch, then reproducing that series behavior using the controls of the
excavators. I’d love to applaud not only Mr. Cole (for his
imagination in thinking up this concept), but also the equipment
operators. "Knit a flag" is an incredible thing to put on one’s
equipment resume, and is quite a testament to their skill.
VISITOR PARADE
Where are all you people coming from? Not literally, of course, but I have been wondering of late.
Blog City has introduced new statistics tools. Among the other
things it does is maintain a list of the top read blog pages since the
feature came on line. The list is pretty much what I
expected. The poncho write-up is
my most popular, fueled in part by the fact that the link has been
widely collected by people maintaining pattern indexing sites. My Stupid Stitch Marker Tricks piece and the one on double-edged I-cord strips has also been in mailing list and other blogs’ discussions of late – no surprise there. Make your own stitch holders also has had lots of traffic, as had the column on the history of the Kitchener Stitch name.
In fact, all the bits I’ve marked as "Reference" both on the right hand
margin, and in the categories index are things I expect to see visited
often. Reference pieces are bits I think might be more broadly
useful than the rest of the drivel I usually post. But there are
also some surprises on the list.
The piece I did on the baby booties
has had a huge readership, with most of the hits coming from Japanese
websites. My guess is that the step by step photos have helped
Japanese knitters who were struggling with the English
instructions. Another page that has had a phenomenal number of
hits (almost all of them occurring in the last 10 days) has been the
More Knitting Fun piece. That one I just don’t understand.
I can’t find any referrers to it, and the write-up itself is rather
plain. It’s just an all-prose report on
stumbling across a remarkable knitted object – a knit-covered
bicycle. Yet in the past week or so it has had over 2,000
visitors. That’s more than double the number who looked at the
poncho page in the same period.
Go figure…
Of course, the Referring Web Pages tool that shows up on each page of the site should be giving me a clue. I do know from that roughly where people are hopping in from, at least for some of the pages. Thanks go to QueerJoe, the first blogger to send traffic my way; Curmudgeon Marilyn, who’s prickly writings I enjoyed for a long time, and whom I’ve not yet managed to annoy; to Wendy, crossroads of the blogworld; and to all the other leaping off spots that launch people in this general direction.
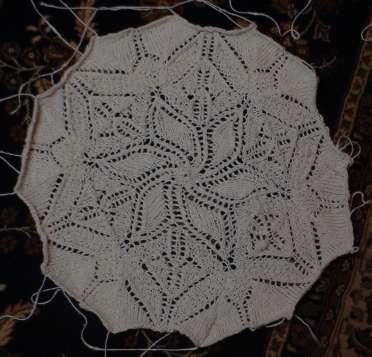
N. TRURO – SECOND MOTIF
As you can see, I’m making slow progress on my counterpane.

Athough you can’t read the tape measure, one meta-unit unblocked measures around 15.5 inches across.
I’ve started the second motif, and done the hex,? half of its
squares, and one triangle. Here I’ve lined up the two as I intend
to sew them together. I will need a fourth motif when I finally
get enough done. It will probably be a solid stockinette
triangle, to go in this spot:
Either that or I need to engineer something with lines of YOs that match up with those on the bordering squares.
I did spend quite a bit of time trying to make a triangle knit from the
tip down that is as close as possible to the one I’ve got that’s knit
from the base up. So far no dice. I just can’t get a
congruent pattern on the rows that use YOs and double decreases in the
original. My triangles end up being rather rotund, and I lose the
lacy openness of my original. Plus the nifty lines formed by the
YOs are shifted somewhat, and no longer align with the squares when all
is to be sewn together. My counterpane will have to remain
assembled from lots of smaller pieces. Perhaps the next one I
play with will be an honest dodecagon rather than this assembled one.
And for those who have written to say that I’m a crazed loon for trying to knit this higher complexity tesselation instead of sticking to plain old squares or hexes, you’re not telling me anything new. Go play with geometry.
MARVELS OF MODERN TECHNOLOGY
I’m sure others have blogged about this already – needles with built-in sensors that
log the stitch count for you. There’s a base station that
displays the count, and appears to have holders to park the needles
when they’re not in use.
I can’t find any confirmation that this has moved beyond prototyping
into the realm of a real product, but regardless of development stage I
would have some questions for the maker:
- Are the sensors adaptable to any size needle, or is the knitter locked into using only one size?
- What is that size, and how long are the needles?
- Does it equally sense the movements of both throwers and pickers (British/American and Continental styles)?
- How does it handle complex stitches?? For example, would it
log a SSK as one stitch or three – counting the three movements it
takes to produce it as separate stitches? - Can you dial up or down to readjust stitch count and compensate for multiple movement stitches?
- Is there a memory function?? For example, if I sit down and knit today will it remember where I left off yesterday?
- Is it possible to get interim counts, kind of like the way you
can use trip set on a car odometer to record smaller intervals??
This might come in handy if one wanted to track a repeat in addition to
tracking total stitch count. - Does it handle row count?? (For most knitters, row count is a far more annoying tracking problem than is stitch count).
- Is there an upper limit? For example, if I work a flat piece in a
tiny yarn, I could easily have a couple hundred stitches across, even
on a 14-inch straight. - Does the count span rows, or is it set up to track on a single row basis?
- How sensitive is it to spurious movements?? For example, if
I bobble the needles as I reach for something or flip the work over, will that increment the
count?
I’m not about to run out and buy something like this, even if my
questions were all answered, but it’s very interesting to see some
creativity and technology applied to the problem.
For me, low tech is still the way to go:? my stitch marker abacus
for tracking rows, and for those projects where I need to know count
across at all times (very few and far between), a series of stitch
markers placed every 10 or 25 stitches (or between repeats), as counted
out from the center.
KNITTING NEEDLES VII – BRITTANY, CLOVER AND CRYSTAL PALACE
I have to admit that I’m no longer a big fan of wooden and bamboo
needles. I liked them when I was just starting out, but as I got more
miles under my fingers, I developed a serious desire for speed. These
days I stick to shiny, lethal looking metal needles, and only pull out
the woods and bamboos when I have to tame a particularly nasty and
slippery novelty yarn. Since I detest working with those yarns, my
non-metal needles are no longer part of my first bench team. Still, I
do have some experiences to report. Note that elswhere on String I’ve got more on comparative sizes and their metric equivalents, and on comparative needle lengths for circs.
Crystal Palace
Crystal Palace markets Japanese-made bamboo needles of several types:
- Single point, 9 inches long, size US #0-19
- Single point, 12 inches long, size US#0-19
- Double points, sets of five, 8 inches long, size US#0-15
- Double points, sets of five, 6 inches long, size US#0-8
In
general, these are smooth, nicely finished bamboo needles. The single
points have rounded wooden beads on the non-business end. Tapers are a
bit less pointy than metal needles. I’ve found the smaller sizes to be
a bit less fragile than the same size needle in wood because the bamboo
tends to flex and stay bent rather than bend and (eventually) snap, but
even so – if you are someone who routinely finds that your metal
needles sport a scimitar-like curve after use, you might find these in
sizes smaller than US #3 to be too fragile for extended use.
One
other word about bamboo needles in general, sometimes the tips denature
a bit, especially if they get damp. When that happens the consituent
fibers that make up the bamboo fuzz out a bit and begin catching on
one’s work. I haven’t knit with enough Clovers and CPs to be able to do
a comparison between the two lines, but this has happened often enough
to be noticeable. A smooth down with very fine emery paper helped get
rid of my tip burrs.
Takumi Clover Bamboo
Very
similar to the Crystal Palace bamboos, the Takumi are smooth finish,
with moderate tapers, and wooden beads on the ends of the single
points. The beads are more barrel than round, but the look is very
similar. They come in a wider range of lengths, but fewer diameters
than CP. Current offerings on their home website include:
- Single point 13-inch long, size US#0-10.5
- Single point 14 inches long, size US#11-15
- Single point 9 inches long, size US #3-10.5
- Double point sets of four, 7 inches long, size US #0-10.5
- Double point sets of four, 16 inches long, size US #3-10.5
I also see these other sizes listed at various vendors
- Single point 16 inches long, size US #17-19
- Circualrs 16 inches long, plastic cables, sizes US#3-15
- Circulars 24 inches long, plastic cables, sizes US#3-15
- Circulars 29 inches long, plastic cables, sizes US #3-15
- Circulars, 36 inches long, plastic cables, sizes US #3-15
- Flex (Jumper needles), 20 inches long, sizes US #3-15
The
largest difference between the Crystal Palace and Clover circulars is
the nature of the join. CP uses a metal cowling into which fit both the
needle end and the cable. Clover slots the cable into the butt end of
the needle itself, tapering the cable so that it joins the end of the
bamboo part smoothly. I can’t speak to which is better because I have
not used them extensively. I will say that the Clover cable seems a bit
stiffer than the Crystal Palace cable.
The Clover form factor
I have used quite a bit is the Flex jumper needle. Jumper needles are
sort of a hybrid between circs and straights. They’re used like
straights, but being flexible and whippy at the end allow the weight of
the work to puddle on the lap similar to circs. I have several friends
who prefer straights, but because of limited hand mobility find even
short straights tiresome or painful because of the leverage caused by
the weight of the project on the ends of their needles. They greatly
prefer jumpers to classic straights. I also liked them because I used
to knit quite a bit while riding on the Washington, D.C. subway.
Jumpers minimized the threat level for the rider sitting next to me. No
needle ends were waving about at the edge of his/her space. (Yes, using
circs flat is good for this, too.) I did have problems with my Clover
tips furring, especially in the humidity of a Washington summer.
Eventually I switched entirely over to metal needles, using circs in
the flat rather than jumpers.
Brittany
I
adore the look of Brittany needles. I’ve broken about a dozen over the
years. Some died in the course of normal knitting. Others were in-bag
or sofa-side casualties. Again, while I like the look, these aren’t
among the needles I reach for first.
Brittany makes several styles of needle:
- Single points, birchwood, 10 inches long, sizes US #3-17
- Single points, birchwood, 14 inches long, size US #3-17
- Double points, birchwood, sets of five, 7.5 inches long, sizes US #0-17
- Double points, birchwood, sets of five, 5 inches long, size US #0-17
- Double points, birchwood, sets of five, 10 inches long, sizes US#0-17
The
birch single points have simple but pretty turned ends. Tapers are
slightly less pointy across the line compared to bamboo needles. They
also tend to be a bit more slick than bamboo, but are still nowhere
near as slippery as metal. Some people who are fond of wooden needles keep a piece of nice lanolin-rich fleece or roving around, and rub their wooden needles with it after use. I’m not entirely convinced that this helps, as most of the wood and bamboo finishes used appear to be some kind of polyurethane or other plastic. I doubt the moisture can penetrate the finish, but I guess special care can’t hurt.
Brittany
also used to sell walnut
single points with more ornate turned ends. It doesn’t look like they
still carry the line. I’m not surprised, as my walnut needles did tend
to both dry out and break more than did my birch ones. Over the years I
am responsible for the demise of about five pairs of walnut needles,
ranging in size from US #10s (trodden upon) to US #5s (mashed when my
knitting bag got clipped by a revolving door). I’ve also snapped quite
a few birch single points. I took to using them for traveling back
before
metal needles were added to the list of allowables on US domestic
flights. I must have the finger strength of a moose because I can break
birch up to size US #5 clean through just by knitting with it. I
do prefer these harder woods to bamboo though. They’re smoother,
especially at the tip, and their finish is more satiny. They’re nice tools. Now if
only I could learn to knit gently.
NORMALCY? WHAT’S THAT?
I have now survived my week from hell, managed to recuperate (somewhat); and we have returned the house to something resembling order. It’s not a very close resemblance, as this family’s housekeeping skill set is rather deficient, but horizontal surfaces can now be seen, laundry is no longer threatening to avalanche, and a machete is no longer needed to find the front door.
Add to that some progress on my counterpane:
As you can see, I’ve finished the first meta-motif, including seaming in the corner triangles. It’s a bit smaller than my original estimate, but not by much. Plus it will be stretched a bit not only in the blocking, but also by the natural tension of the surrounding motifs once it is in place. One thing I’m pleased with is the lack of cupping in the center hex. Too tight blocking plus that extra seam between the bottom of the squares and the sides of the hex constrained the stretch of the thing the last time around. Working the squares directly onto live stitches around the hex appears to have eliminated that problem.
Now there’s a new thing to consider. I’ve got a dodecagon (a twelve sided figure) here. Right now the triangle units are knit base to tip. But if I figure out a way to flip the design over, it’s conceivable that I could translate the thing into a tip-out piece. AND if I can do that, it’s possible for me to add those units to the squares, already worked center out, and instead of a bunch of smaller seamed pieces, produce the twelve sided meta-unit as a single piece.
Food for thought here…
QUESTIONS – NORTH TRURO COUNTERPANE
How do you start the hexes?
There
are quite a few ways to start off a flat knit piece done both in the
round and center out. I keep gravitating back to the I-cord method.
This piece is a hex, so I start by casting on a three-stitch I-cord,
and working one round (I’d start off an octagon with four stitches). On
the second round of the I-cord, I take my first needle and knit one,
then make an increase in the space between the just worked and next
stitch. If I want a more open center I’ll do a YO. If I want a more
solidly filled center, I’ll do a make 1 lifted bar increase (a devil to
do on the second round of an I-cord). Then I’ll take another needle and
repeat the K1, increase 1 unit. And again on a third needle. Now I have
three needles in the work, each bearing two stitches, plus one in the
hand to work with. At this point I flip over and begin following my
pattern. For an octagon, I’d do much the same, but with a set of five
instead of four needles.
Why bother with the multiple units when you can just assemble the hexes into a perfectly good counterpane?
For pretty much the same reason I make cassoulet instead of being happy with franks and beans.
How big are your motifs?? How many are you planning on making?
It’s
difficult to get a gauge on this stuff, but if forced, I’d say I’m
getting approximately 6 stitches and 8 rows per inch over the
stockinette areas. Unblocked, my center most hexes are about 10 inches
across at the widest point. The squares are about 5.5 inches on a
side. The bases of the triangles are also about 5.5 inches across. One
entire meta-unit of hex surrounded by squares and triangles (unblocked)
is about 21 inches across. I haven’t measured my bed yet, but it’s only
a queen size. Given the vague bed linen sizes posted here
and there, my counterpane should be a square or a rectangle something
between 85 and 100 inches on a side. I’ll need at least 4 units across
and 5 units head to foot. Given my chosen layout, that’s about
four rows of four units, plus three rows of three units, or 28 units.
That adds up to 28 hexes plus 168 squares and 168 triangles. Plus
half hexes, and the smaller units needed to square out the edges
somewhat (they’re never going to be exactly linear), and an edging of
some unknown depth. I’m not quite sure how many of the other shapes
I’ll need yet.
Doing the same size counterpane using only the hex units would mean
making about 10 rows of 8 units, and 9 rows of 7 units – that’s 142
hexes, plus edge half hexes and a border.
This project should keep me busy for a while.
