As promised here’s a rundown on pattern repeat type, and centering fills and strips in designated spaces on your project. For one, there’s really very little need to sit down and stitch-by-stitch completely graph out the design to your final dimensions. In general knowing where the edges and centers of your space, plus the pattern repeat type is all that’s required. These hints go for both fills in regular and irregular shapes, and for strip or band type designs that march along the width of your project, or decorate the edge of a garment.
And a note on grounds, if I may. Aida, Hardanger, Anne Cloth, and Monks Cloth are types of purpose woven grounds used for modern countwork. They feature prominent holes outlining their base size units. Departing from that established grid can be very difficult and involve piercing the fabric in the solid spots between the built-in holes. Partial stitches do exist in the purpose-woven world, and are much despised by stitchers. Working multiple grids skew to each other on the same piece of purpose woven ground is almost never done. I’d say never-never, but somewhere it might exist, although I haven’t seen it nor the rants of despair from folk who have encountered it.
Evenweave (or near-evenweave) is a bit more flexible. Since the stitchers count threads on evenweave instead of hole-defined units, they can employ multiple grids on one piece. If the stitcher decides to work their unit over 2×2 threads, two adjacent spaces can use different grids, offset by one thread so long as the juncture where they meet is taken into consideration. I did this on my Two Fish piece, using the skew alignment to hint at undulating motion. Note the knot and grid filling. Not only is it stitched discontinuously across the bel, I also interrupted the grid. Both sides are worked 2×2, but NOT on the same 2×2 grid – the tail section is displaced one thread up and over.

So when you see me talking about skew grids or using partial stitches when centering various types of symmetry on a single piece, please know that the ability to do this is mainly something that can be done on evenweave. Purpose woven grounds like Aida will limit the way patterns of differing symmetries can be centered against each other. It’s just a fact of life.
Before I begin, all of the fills and bands charted on this page are available in my Ensamplario Atlantio series, my Epic Fandom Stitch Along, or previously shared here on this blog. All are available as free downloads for personal use. Links are provided.
OK. Finally getting into it. Patterns can be grouped into a few basic clusters, with some caveats.
Center Line Repeats
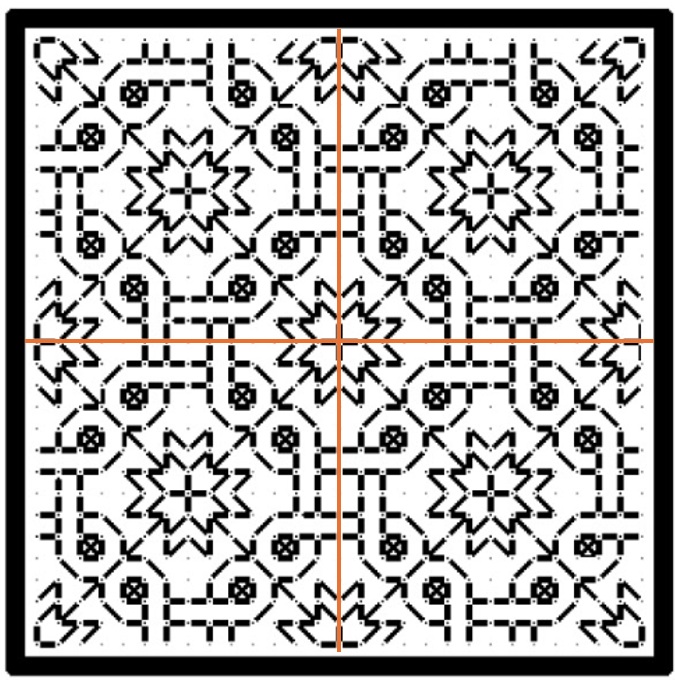
First we have simple line-center repeats. These are designs that cover even numbers of units, and mirror along a center line. The chosen pattern may be a band or strip, with one vertical line where the design mirrors to its left and right. Or it might be an all-over design or fill, with at least one vertical and one horizontal mirroring line.
This blackwork fill/all-over design has both a horizontal and a vertical center line, marked in red. The motif tiles into square blocks of 14 units. The easiest way to use it is to either count to or (if irregular) eyeball the visual center of the space to be filled, then begin stitching the design at the spot where the two center lines meet. Even if the space to be filled is NOT a multiple of 14 but is any other even number of stitches, if centered this way the design will truncate neatly around the edges, as it does in the sample from Ensamplario Atlantio Volume 1, below.
But if the space to be filled contains an odd number of stitches you will either have to displace the center lines so that there is one more unit to one side or the other, or you might have to work partial stitches all the way around the perimeter for full coverage.
Some people insist on using a single grid for ALL of the fills on an inhabited piece. That means that even if they are working over 2×2 threads on evenweave, where adapting the grid you are using to the space at hand would be quite easy, they choose not to. They end up having to either accept minor misalignments between adjacent patterns, or employing partial stitches to eke out the design. That can be avoided by NOT mixing fills or bands with this type of symmetry with some of those discussed later in this article.
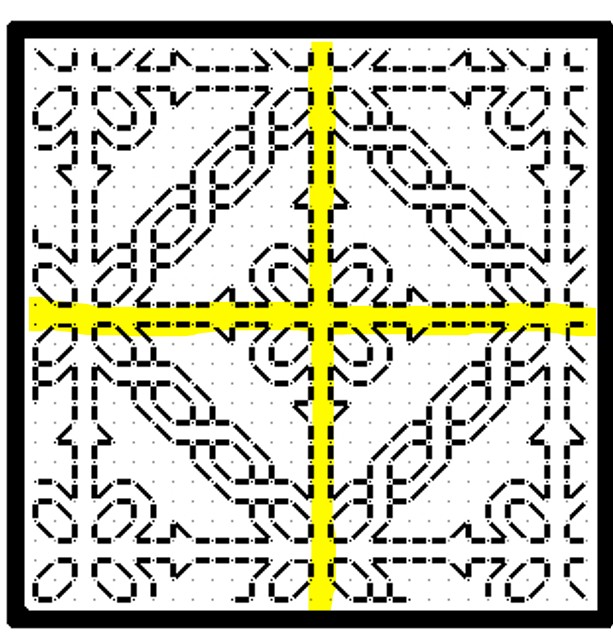
Here’s the same type of symmetry expressed in a band pattern. This one is from my Epic Fandom Stitch Along. Note that in this simple meander there are two lines of symmetry (sometimes called mirror or bounce lines). The pattern replicates in mirror image on either side of them, just as it does in the all-over fill. One full repeat is 36 units, and alignment in your desired space can be focused on the center/mirror/bounce lines of either the up or down facing fronds.

Regardless of symmetry type, if you are filling an irregular spot, and you are eyeballing the center alignment point you might end up having to work half stitches around the edge of your area, again to eke out the coverage. This is one reason why some instances of inhabited blackwork (the kind with the freehand drawn outlines infilled with counted geometrics) rely on heavily stitched, thick outlines. Those “fig leaf” the offending partial stitch spots and make the work look neater.
Here’s a bit on my Unstitched Coif, where I eyeballed the alignment of the fill, worked a ton of half stitches (a challenge on 72-74 count near evenweave, stitched over squares of two threads), then went back and put in heavier outlines to hide irregularities. Zoomed waaaaay in like this you can see them around the edges. For scale, that little bud at the upper left is smaller than a US penny.

Now there are some exceptions and complications. We’ll get to those later.
Center Unit Repeats
All well and good you say, but the symmetrical repeat I want to use doesn’t meet up neatly at a center line like those. In most cases your repeat has a “spine” of a single unit rather than a center line. That column or row of units is repeated only once, and is not mirrored, although the design itself does mirror left and right (or up and down) that non-repeating column or row. That means that a full repeat of the design includes two symmetrical wings, plus that pesky center unit – an odd number of units, total. Here’s a fill/all-over design that features center units. In this case one full repeat is a square of 23 units (one center unit, plus 11 more units to the left, and to the right of it).
And here’s a strip repeat, also with a simple center-unit style symmetry. Like the line unit band above, there are two possible centers. Either one can be used, although convention on band samplers is to feature two main motifs in the center of the stitched area – in this case the pair of beak to beak chickens.

The strip above is from my Workshop Handout broadside, another free download here at String you can access via this post or via the Embroidery Patterns tab at the top of every page.
Hybrid Repeats
Some designs display a delightful flexibility when it comes to centering because they incorporate BOTH a center unit and a center line bounce point/mirroring. This happens with fills/all-overs and for strip/band patterns.
Here’s a sample of a fill that includes both. I’m only marking one repeat of each type on it, otherwise the thing will end up looking like a swatch of plaid.

This design can be aligned either to the center lines (red), or center units (yellow). And here’s an example of the same type of pattern in a strip or band. The center can be the red line or one of the yellow columns.

Again, if a combo of center line and center column symmetrical strips are used on a band sampler in a mixed environment that doesn’t deviate from one universal grid note that true center alignment will not be possible. The even-number repeat centerline bands will all line up with each other. But if you insert a design with center unit/column symmetry but have to use the same “stitch holes” in Aida as the rest of your project, that center column will not line up with the true center of the rest of the piece. Which may or may not matter to you. Food for thought.
Staggered Drop Repeats
Now it gets harder to identify these. This style of repeat is common in fills/all-overs, but less common in strips/bands, but they do occasionally pop up. For the most part they employ mini-motifs, sometimes in straight-on replication, sometimes with mirroring or rotation; and use regular offsets to place them. Sometimes its a simple half-drop, sometimes it’s a larger interval or not regular when the horizontal and vertical offsets are compared. Most of the time these staggered or evenly scattered mini-motifs do resolve into very large area true repeats, with the same motif repeating in the same relative position in the field, but it’s rare to use these in areas big enough for that resolution to happen. How to center them? It’s a bit more complicated.
Here are three with different rates of periodicity (how big the sample has to be before it manifests a true, full repeat), presenting different problems. These are all from Ensamplario Atlantio Volume 1, Second Edition.

The flowers at left can be centered in a panel in one of two ways. Either using the regular center-line symmetry of the very simple little four petaled flower, or by counting to identify the centerpoint of the more complex sprigged flower. Either way will work, although I think using the smaller mini-motif would be visually more pleasing. Note that regardless of the size or count of the space you use these repeats “walk” and will always truncate around the edges.
The snail garden square at the right is a hybrid. It can be effectively centered either on the tiny squares and on the larger snail-bearing unit. Both work nicely. Which I would choose would depend on the size of the space I wanted to fill with it. If the space was large enough to accommodate four of the snail gardens without truncation, I’d probably use the tiny squares as my center alignment point. The snail gardens rotate around them, and optically form a flower-like shape when viewed from a distance. If the space was small, I’d put the garden in the middle to ensure at least one full iteration of it was represented.
The griffin/dragon beastie in the center presents a harder problem. There’s only one element here, and it has no clear center line or center column/row. Additional complications come from the rotation and offset of the beastie motifs. The easiest way to center this one is to find the center point of the beastie itself, match that to the center point of the area to be filled, and work the others around the first, completing the truncated ones as possible. In the photo below, this is what I did with the wing like bits, second from the right in the photo below, and what I SHOULD have done with the little dolphins in the box next to them, but obviously didn’t.

The myriad mistakes in my current piece are what inspired this post. In addition to the errant dolphins in the latest section, you can see that the voided bit currently underway wasn’t properly aligned. It’s a center line repeat, I have an even number of units across, but if you compare the left and right edges, you’ll see that the design is shifted two units to the right. The center of that strip does not align with the center of the set of boxes, above. The dolphin box is intentionally shorted one unit compared to the others in its row because my count across is not divisible by four (available area minus 6 units total for the gutters between the boxes). There are more similar mistakes in the previously completed part, now wound around the roller bars of my stretcher frame.
I confess to making many alignment sins on this one that together have landed me in this predicament, including initially basting the center guideline that runs the entire length of the piece offset to the right by three units; never going back and measuring, but instead working the other vertical guidelines off that one; starting the first blocks and not bothering to confirm centers or edges until it was too late to pick out and start again; fudging everything in to try to compensate for the pile of errors that was accumulating behind me; and not paying enough attention to centering the various fills in their boxes.
I will continue on to completion with this one, warts and all, but I may revisit the base concept of voided strips alternating with boxed fills in a future work.

Really nice to see someone else talking and showing how to use symmetry for designs….
Amytis de la Fontaine
[…] The Symmetries of Linear Stitched Fills and Strips. The difference between designs with even and odd numbered stitch counts, and how they can be used to best advantage. Plus pitfalls of aligning them with each other, especially when using purpose-woven grounds like Aida. […]