FINISHED!
At long last I can present my finish photo. Not my mounted and ready to display shot, but my “all stitching done” pix:

and proof that I’ve signed the thing:

I finished it up within 24 hours of my last post. Where have I been since then?
Wallowing in post-project ennui. Knitting socks for Elder Daughter. Treating myself to a flat Millennium Frame for the next stitched project, which being silk, is not a good candidate for a round frame. Working on a lecture on embroidery patterns, to be given at the Hrim Schola XVI (also here)– an SCA event focused on sharing learning about needlework, to be held on 17 March. Working on TNCM2, which now looks to be topping out at 60 plates of source-annotated historical patterns, more or less. Handling work deadlines. Shuttling said Elder Daughter back to college, and Younger Daughter to fencing class. Mocking The Resident Male for being a latecomer to blogging. The usual.
Imminent Death of wiseNeedle
On a more serious note, I am also preparing to take down wiseNeedle. Some of the content will be salvaged and re-offered, like the patterns and the glossary. But the rest won’t be.
Why do this after a on-the-Web run dating back to 1995? Mostly economics. I’ve supported the thing out of my own pocket since the beginning. It wasn’t cheap because we need a commercial grade SQL service to support the yarn review collection, plus incorporation to protect family assets from potential suits by folks upset by yarn review content. Ad revenue made it a business, and taxes on that tiny income stream had to be handled, too.
Thanks to the advertising, wiseNeedle broke even for several years, but no longer. Yarndex made a slight dent in readership, but our independent non-sponsored stance preserved interest. Folk knew that when they saw wiseNeedle reviews posted, the information was all-volunteer and totally unsponsored. But when Ravelry broke loose, traffic here nosedived and never recovered. It’s now at about 8 percent of what it was back then. They now take up the lion’s share of knitting traffic on the Web, with their own advice boards and yarn review collection. It’s clear that concerns beyond the hobbyist level – small time independents like wiseNeedle no longer have a place on the ‘Net. Ravelry as a newly minted 500-pound gorilla, wins.
String and its URL will continue although we will be porting it to a lower cost service later this year. I am hoping to preserve String’s back content, but I’m not sure how to handle wiseNeedle’s sublinks. All of those (plus String’s) may break. It’s a shame that the yarn review back catalog of info will be lost. It covers lots of yarns dating back through time and is still a valuable resource for people looking to make substitutions. Unless there’s an entity interested in buying and hosting the database (sans contributors addresses, to preserve their anonymity), it will be going away soon.
ONLY INCHES AWAY FROM DONE
O.k. Here I am:

Only inches away from total done-ness. Just a tiny bit more gridded void fill at the uppermost left hand corner, and to finish out two narrow strips in the final section:

I’ll probably finish all of it up tonight or tomorrow. Then the only thing that remains is the signature strip.

I’m plotting that out right now.
Post-project separation sadness has already set in.
BLACKWORK SAMPLER – YEAR 2
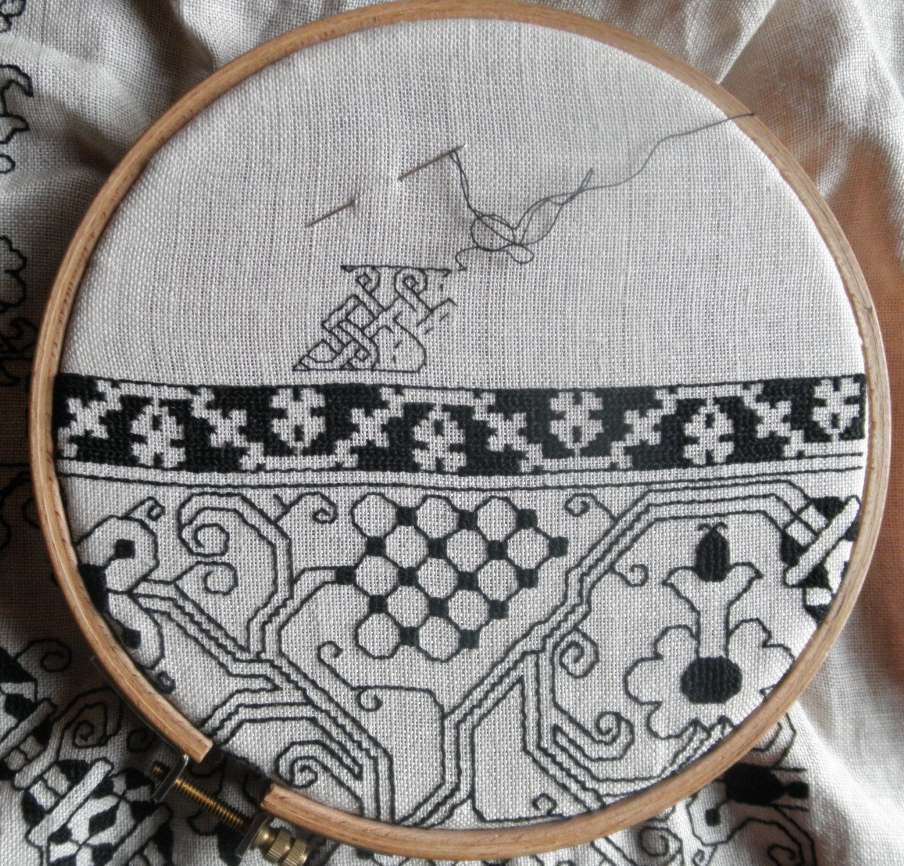
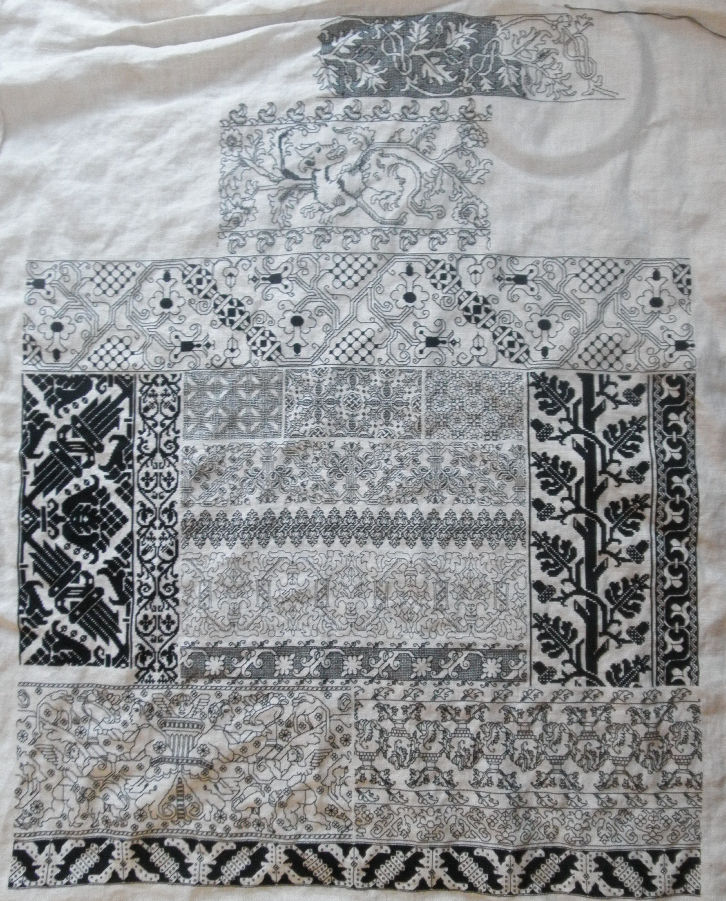
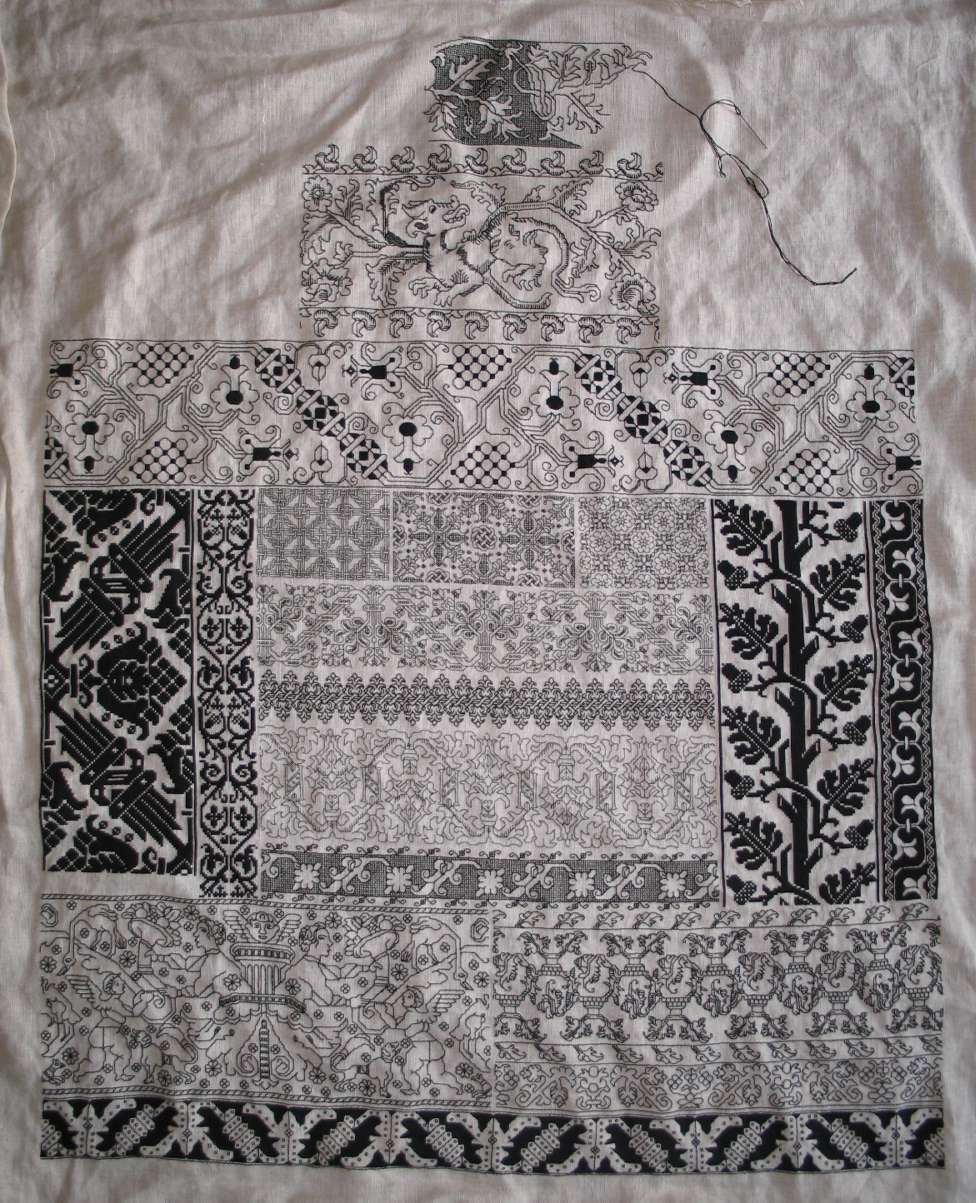
This is new for me. I’ve had projects that spanned years (decades, even), but never before have I had one embroidery project that I worked on without stopping, that has taken more than a year. Even my blackwork underskirt was done in 10 months. But as of mid December, I have now spent an entire year working on my big blackwork sampler. I’m not quite done. Almost, but not quite:

You can see that I’m filling in the area to the left of the dragon. I’ve finished the first dark band, and am now on a lighter one just above it. Two more to go, balancing the progression of shade values on the dragon’s right. Then it’s a sliver of the voided leaf panel at the top of the work, to finish that off even with the edge of the strips below. And finally – I will sign the piece in the strip beneath the dark panel on the leftmost edge. And it will be done. Maybe two more weeks? More if work deadlines intrude.
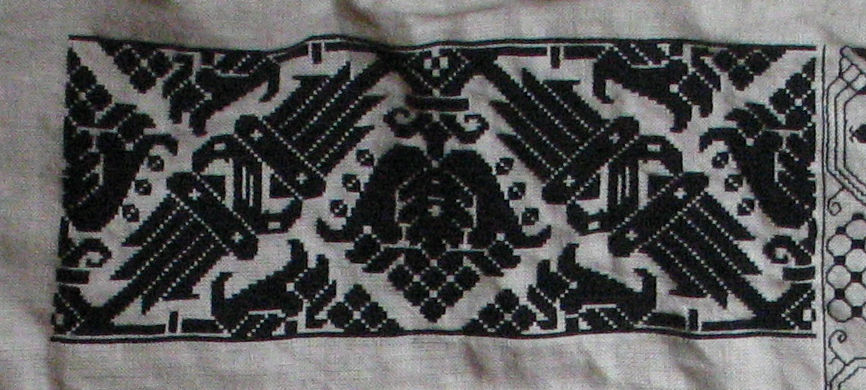
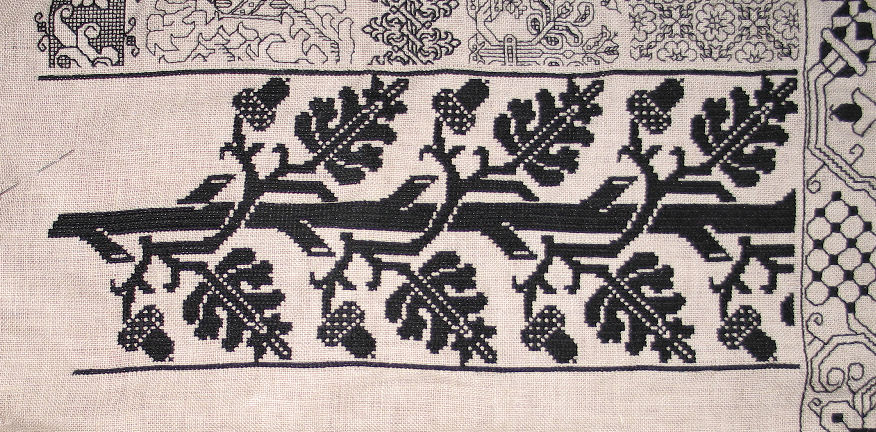
Here’s a close-up of the latest two strips:

The sharp-eyed will note that the voided one on the bottom is included in TNCM, on Plate 28:4. It’s from Jean Troveon’s Patrons de diuerse manieres…, published in Lyon in 1533. Those of long memory may remember that I’ve used it before. It’s doubled, and appears on the left and right-most edges of my filet crochet dragon window curtain.
The Troveon’s original is shown single width, but the halved fleur-de-lys motifs seemed to beg use as an all-over pattern. Also, the graph of the original is shown in reverse of mine color placement, with the foreground emphasized rather than the background, more like the treatment in the crocheted piece. (Come to think of it, that knot strip along the top of the curtain might be a candidate for the dark strip at the top of my current sampler section. Hmmm….)

The lighter strip I’m currently working on will be in TNCM2. It’s adapted from a non-graphed (but oh-so-obviously-intended-to-be) design in Ostaus’ La Vera Perfezione del Disegno…, Venice, 1561 and 1567. I’ve chosen to augment it here with the frilly edge treatment.
In any case, the holidays have departed here at String. The tree is undecorated, the cookies, panforte, goose, cassoulet, and other goodies have been consumed or distributed. And the long slog through the year commences.
SNEAKING UP ON A YEAR
O.k., I’ve finished the upper right hand corner, shown here in a traditional String pre-dawn fuzzy photo:

And here is all that’s left to go:

Just the upper left. You can see I’m finishing out the leaf strip that runs across the entire top. Then I’ll find several smaller strip patterns for the area beneath it. I’ll use two relatively narrow dark strips to set off the space, similar to what I did on the right, then fill in with lighter ones. But they will be different from the set on the right. I used five total there. I might use six on the left. It will depend on what strikes my fancy when I get there. After that the only thing that will remain will be signing the piece in the small blank area immediately beneath the mega-dark strip on the left hand center edge.
I get notes from folk marveling on my rapid progress. But it hasn’t been all that speedy. The first note I posted about this project was on 2 January of this year. I had already been stitching on the piece since around the second week of last December, but hadn’t written about it because I was in the middle of posting my tutorial on graphing line unit patterns using GIMP (November-December 2010). Here’s the first snap of the thing, so you can see the progress since:

To be fair, just the small area I completed yesterday is larger than many contemporary commercial samplers, but even so, a project in a simple technique that takes more than year to finish even when working with daily diligence, isn’t exactly being worked at light speed. Or is being stitched by someone with a day job…
In other news, there are major seasonal celebrations afoot. First is a happy birthday to Long Time Needlework Pal Kathryn Goodwyn -she of “Too many centuries, too little time.” Long may she research and stitch! And I tease readers here again about her forthcoming Flowers of the Needle series, which I’ve had the opportunity to see in preview. It’s worth every bit of slavering, panting anticipation.
Plus it’s Cookie Season again in String Central’s kitchens. That means the obligate ten varieties, plus Panforte again this year. I delight in having an apprentice baker now, and no longer having to staff the entire manufactory myself.
STORMING THE CASTLE
UPDATE: THE UNICORN PATTERN BELOW IS NOW AVAILABLE AS AN EASY DOWNLOAD PDF AT THE EMBROIDERY PATTERNS LINK, ABOVE.
Holiday over, we slowly revert to standard routine here at String Central. However, that doesn’t mean we have nothing to show off.
First, Smaller Daughter – her class built models of castles, manor farms, and cathedrals as part of their Middle Ages history unit. You can’t see the details she lavished on hers – the working drawbridge, the flower garden, the well (with working bucket), the stables, or the forces manning the towers, but now you know they’re there:
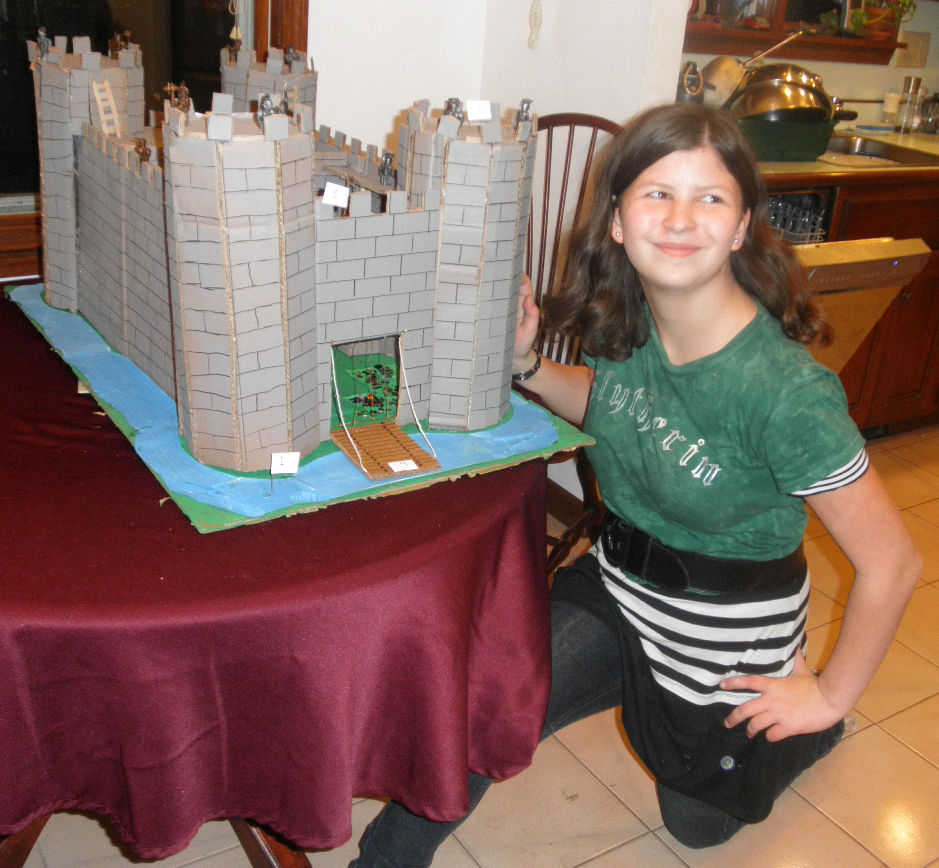
Slytherin? Well, we are Salazars, after all… And there’s the inevitable Castle Uprising Aftermath:

Too bad the teachers don’t grade them on general post-project carnage.
Not less for being presented second, Elder Daughter has been taken with double sided double knitting. She has been adding double knit squares bearing mythical creatures to her Barbara Walker Learn to Knit sampler afghan. Here’s a graph for her next square, an original unicorn, based loosely on a Siebmacher yale (heraldic goat):
Apple. Tree. Lack of distance between the two is noted. With considerable pride, I might add.
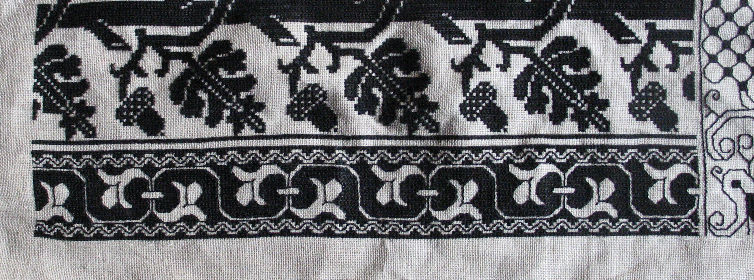
And finally in spite of the welcome and happy chaos of a house crammed full of family, turkey, and way too many pies – I did manage to move a bit forward on the great blackwork sampler:

The dark band with the frilly edging will be in TNCM2. The one just below it was in my first 1974 booklet. I recently rediscovered that I had graphed it from my all time favorite source. It’s the pattern I used for my double sided double running stitch logic lesson back in August, 2010. You can find the lesson (and the pattern) here.
YOU GUESSED IT – MORE PROGRESS!
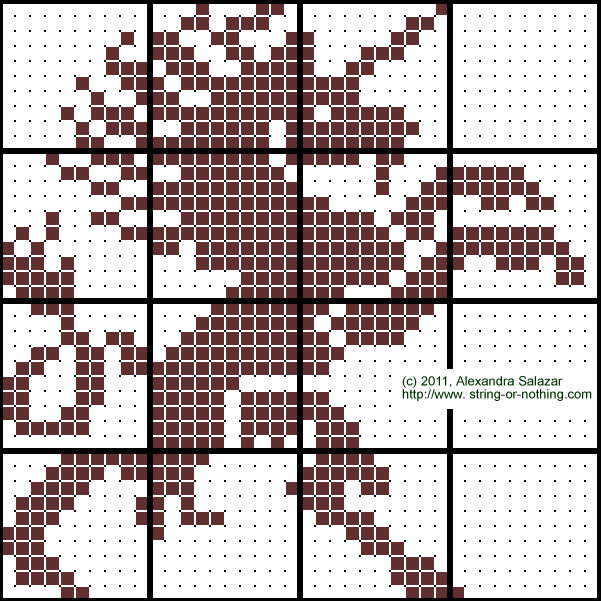
A boring progress post today. I’m still filling in the upper right hand area, next to the dragon:

Three bands, about 60% of the height of the area filled. These patterns are all in TNCM2.
And speaking of upcoming books – I’ve been busy lending a hand to Long Time Needlework Pal Kathryn, helping her over some minor layout hassles as she readies her greatly spiffed up and recomposed Flowers of the Needle re-issue. I can’t break official silence to say when and where, but I can assure you that it’s going to be well worth the wait; and that I’ll be sure to post links to Kathryn’s site when it goes live.
In the mean time, off to bake pies and sterilize the house in preparation for the holiday.
FILLING IN
True to my word (although somewhat tardy) I post this week’s progress:

I’m filling in the left edge area next to the dragon with narrower bands:
It’s Question/Answer time again. These are from posts left here on String and from my various inboxes:
Rachel asks, “…the very bold patterns on the side, what type of stitch did you use to do those?”
Like the narrow border I just added to the piece, the dark bits in these patterns all use long-armed cross stitch:

I tend to follow this logic. Here’s a close-up of the texture it produces:

When worked back and forth across an area it produces a plaited texture. There appear to be quite a few variants of long-armed cross stitch family, and a similarly wide family of names for it. I’ve seen very similar stitches called:
- Tent stitch – nothing to do with the common needlepoint technique of the same name. On the front this looks like standard LACS. I’m assuming that the reverse shows verticals. (Looks in vain for the one corroborating photo of this, to no avail.) On historical pieces this stitch tends to march back and forth to fill a voided background, with the stitching direction parallel to the strip’s long dimension. But not always…
- Punto a spina pesce – obviously Italian in provenance. Hard to tell from the photos (and not being able to see the back), but the angle of the long-leap over may be greater than in tent stitch, but this may be an artifact of differences in warp/woof thread count of the ground. Or it may be possible that the reverse shows horizontals instead of LACS’s verticals. It’s interesting to note that the Museum of Fine Arts, Boston distinguishes between tent and punto a spina pesce. The photos do show however that stitching direction for this one seems to vary on the whim of the stitcher, combining horizontal, vertical, AND diagonals.
- Closed herringbone – also seems to closely resemble LACS on the front, but produces horizontals on the back. LACS forms a species cline (a related continuum) with the herringbone family.
- Portuguese Stitch, twist stitch, Slav stitch, twist stitch, long-legged cross stitch, plait stitch Greek stitch – all reported names for LACS. Some can be found here.
- Montenegrin Stitch – A related stitch, but with an additional vertical component. The stitch is used more for foreground stitching, rather than background fill, and the direction of stitching closely follows the design’s lines – merging horizontal to diagonal, to vertical as dictated by the pattern being stitched. (It’s hard to tell but the fifth band down on this sampler, with the strong blue up and down may be Montenegrin, or may be LACS).
There’s a nice piece on historical use of cross stitches, including some members of the LACS family on Northern Needle.
Rachel also asks, “Are all the designs on your sampler going to be in your next modelbook?”
Most of them. Exceptions are the three direct quotations from Lipperheide, and the three small all-over patterns that can be found in Ensamplario Atlantio . Also some of the patterns appearing on my last two large samplers – Clarke’s Law and Do Right – will also be in there. The exceptions being patterns that have already appeared in The New Carolingian Modelbook.
Lisa asks, “I’ve got Ensamplario. But where can I find outlines to fill in that book’s designs? I really don’t want to do a checkerboard.”
The answer is “all over!”
To start, there are sources for outline patterns from blackwork’s heyday. Around the same time as I got this question, Elmsley Rose reminded me that the on line edition of Trevalyn’s Commonplace Book is still available at the Folger. It’s a bit late for inhabited blackwork, but is not out of the question. It contains drawings in it that would be super for it (and even better for spot filled/stippled blackwork). This is the same resource that Kathy over at Unbroken Thread is using for her cap project. Of special note are the plates starting around the 7th page of the display (when 50 per page are shown). These peasecods would be killer; as would these plumes. Thanks from us all, Elmsley!
If you’re not stuck on historical sources, all sorts of motifs and repeats are out there. I’ve done quite well using patterns intended for stained glass, and stencils as inspiration. I don’t have pix (these being from the pre-Internet era), but I did a couple of pieces from a Dover book of Japanese stencils that combined simple florals with the geometric fillings, to excellent effect. Patchwork patterns are also very useful as framing devices for contrasting fills. Also I’d nominate coloring books as outline sources. Yes, coloring books. Maybe not a SpongeBob book or Disney special, but there are quite a few that show flowers, butterflies, seashells, or geometrics.
Late breaking update! I forgot to mention one source for historical and heraldic motifs, simply drawn. It’s the traceable art collection maintained by a consortium of SCA heralds. They use it to simplify the process of drawing up heraldry. But there are all sorts of images in there that would make excellent small blackwork projects. Please contact the artists listed on the images before re-use.
So there are lots of places to look into – you needn’t be forced to do a plain square grid.
Jane asks, “How many threads do you stitch over?”
To date most of my pieces have been on 36-50 count linen, worked mostly over 2×2 threads. But that’s not the way historical pieces were worked. Their ground cloth weaves were in the 50-count and finer range, and they tended to stitch over anywhere from 3-5 threads. Three or four seems to be most common, and I can’t rule out up to 6×6 either. Also, as I graph up more and more from artifacts, I do note that not all historical ground cloths were spot on even weave. Most are off just a hair in one dimension or another, usually compressed along the vertical compared to the horizontal (selvedge to selvedge). Also – and again I work from photographs, so I can’t swear to the pinpoint count that up close and personal with actual pieces would bring – some of them do look as if they were stitched on skew counts. Taking one more thread on the vertical to make the output a bit more square in appearance.
I hope these answers help. Please feel free to ask questions. It makes figuring out what to write about MUCH easier. <grin>
DRIFTING LEAVES
Or in our case today, drifted leaves. Covered by snow during our unseasonable pre-Halloween snowstorm. Very odd to have to shovel a path for trick-or-treaters.
In any case, here are some leaves as yet untouched by the weather:
Progress on this current strip is slow. Like all voided background designs, it takes a lot of stitching to do the area cover. Still, I’m moving along. Here’s the thing in full sampler context:
I’m still considering what to put left and right of the dragon, but have decided that whatever designs I end up using, both sides will be collections of narrow bands with short repeats, worked horizontally. But given the pace of the current strip, I probably won’t be getting to them until January. Not only due to current production speed, but also because of holiday interruptions and some end-of-year knitting obligations.
EDGE OF THE KNOWN WORLD
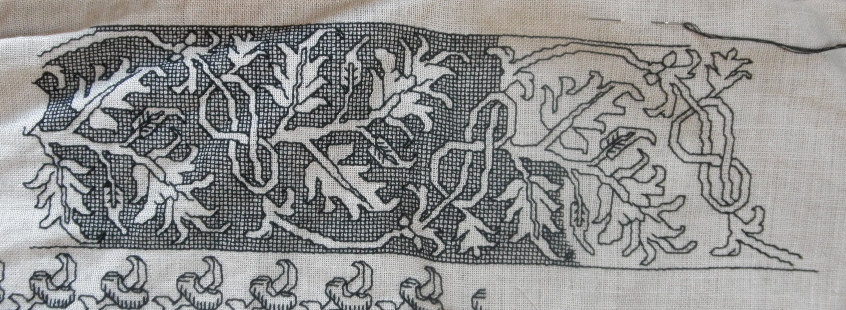
I’ve reached the top edge of my giant blackwork sampler:
The current panel will span the entire width of the piece:

It’s adapted from a Lipperheide pattern. The original is shown with a pulled thread mesh background, rather than the squared fill I’m using. That background made the book’s illustration very difficult to work from, so I had to redraft the pattern before I could begin. The squared voided fill takes a long time to stitch, so I am guessing that it will be a couple of weeks before I can address the areas to the left and right of my dragon. Not sure yet what will go there – possibly gangs of narrow borders, either horizontal or vertical. We’ll see…
In other news, I am very proud of the whole String family. Smaller daughter has spent the last two weeks farming a sourdough starter “It’s not fair! Other kids get kittens or puppies. Why do I get Francis The Yeast Culture for a pet?”
Yesterday we decided it was time to try it out. The Resident Male took charge of mixing up the dough, the various rises, loaf forming, and baking. Here is the result, crunchy-fresh and hot from the Dutch oven in which he baked it:

I wish this was Smell-o-‘Net because the house is heavenly right now. Marian would have been proud of him, too!
DRAGON DONE
The dragon panel is finished!
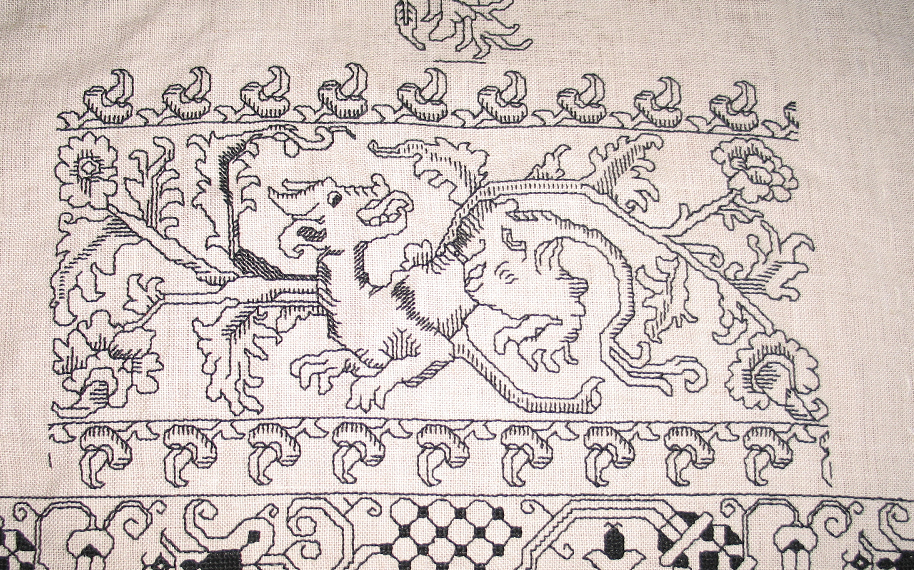
I wish the shading on the tail end of the beast better balanced that on the head end, but what I have here is true to the original. If I ever stitch him up again, I may modify the pattern somewhat and either lighten the branch on the right, or darken something on the left. Still I’ve been fond of this guy since I first saw him in the ’70s, and am delighted to have finally successfully charted and stitched him. He’ll be the last two charts in TNCM2 (he’s too big for one page).
What’s next? A panel that will run the width of the piece at the top edge. This one will be another crib from Lipperheide, but unlike the last bits I borrowed from that source, it was too difficult to stitch it directly from the engraving. The background of that illustration is shown in the drawn squared filling (some museums label th stitch “punto milano”, possibly Italian 4-sided stitch, drawn very tight). It sort of looks like a drawn thread ground, but it would have been VERY difficult to achieve all that thread removal given the scale and convolutions of the un-voided motif areas. In any case, I had to regraph it from the Lipperheide panel prior to work. Even though I drafted it up I do not think I will include this one in TNCM2 because it’s available in another contemporary source.
