JOYOUS ENDING
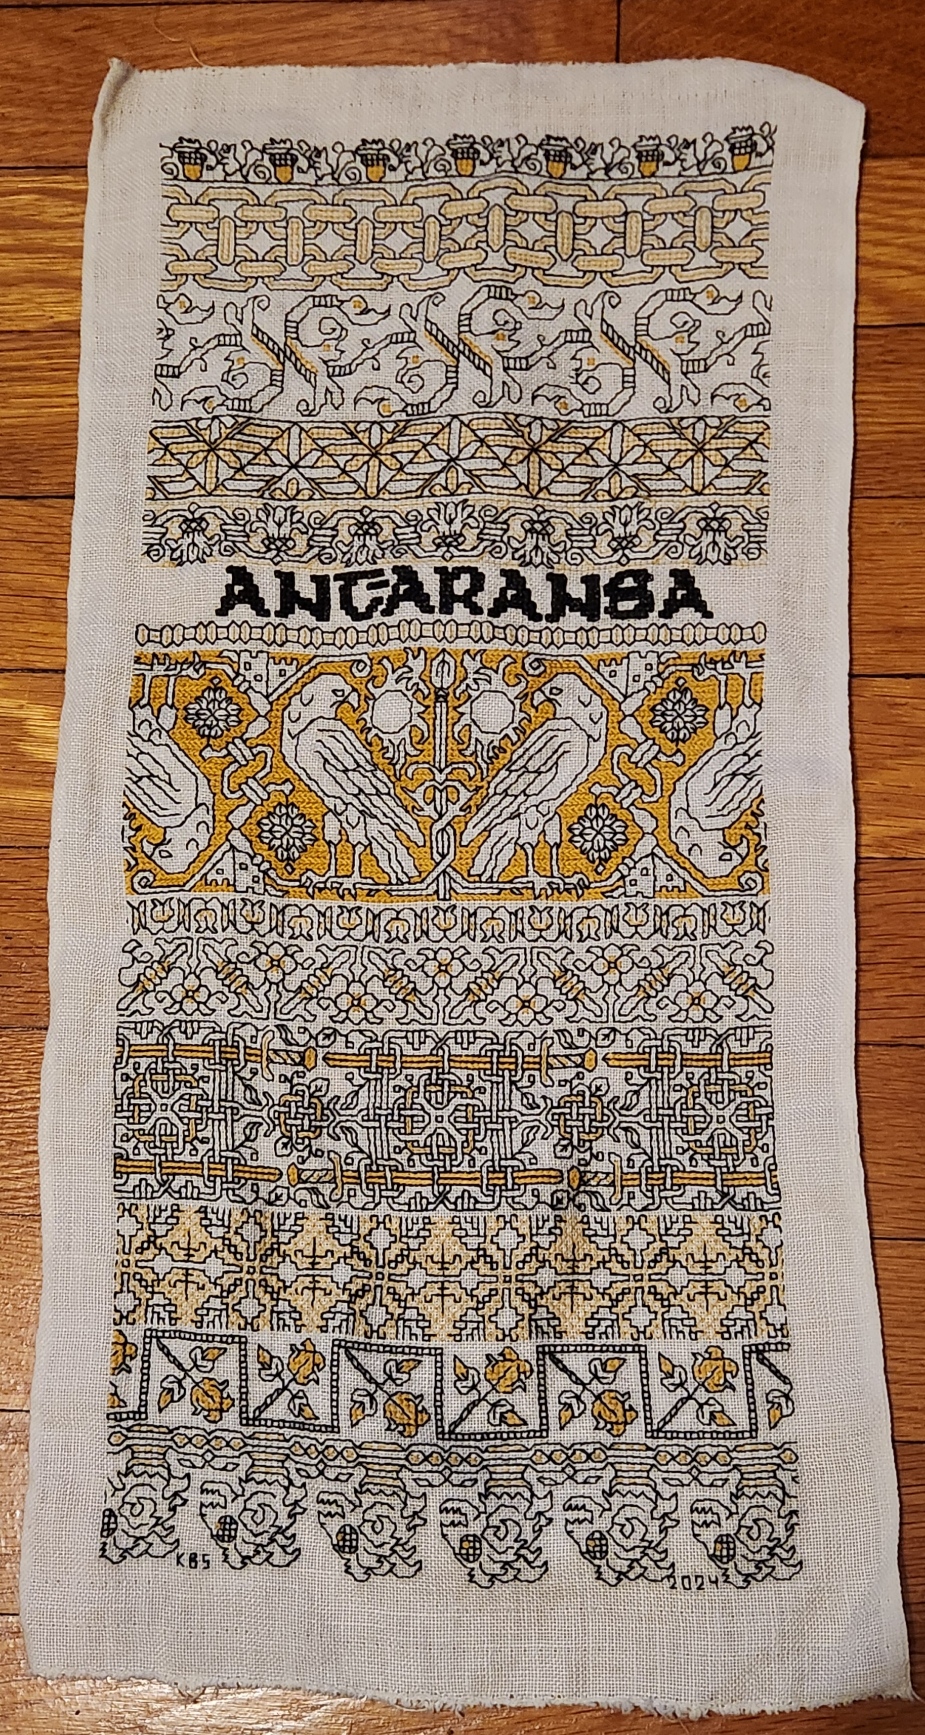
I’ve finished the latest piece – the sampler in tribute to the Resident Male’s nascent book Forlorn Toys. He is still writing it, so I won’t give spoilers beyond what I have already cited: the motto, the very obvious panel of aforesaid toys, my attempt at spaceships, and the band with the curious feathery rabbit like creatures.

All in all, I am quite pleased with it. Joy now goes to join my Wall of Shame – the place where my completed but as yet unframed/not-ready-for-public-display pieces live side by side with my unfinished projects. As you know this one like so many others is stitched on reclaimed household linen. I did not notice a bleach-weakened bit along a patch of the edging at the lower left. When that was hooped over and tension applied, the neatly done hem stitching failed, leaving a hole. I will eventually mend that, but other priorities assert themselves.
First among those priorities is a piece I promised to the community of therapists and nurses that tended to me at Vanderbilt Rehab Center at Newport Hospital. It’s fueled by a gift of silk floss from Occupational Therapist Abbey. She admired the work I brought with me intending to stitch. She had an inherited stash of silk threads but no use for it, and asked if I would like it. Always happy to have such things, I agreed, and she sent me a wonderous assortment of Pearsall’s silk floss – long discontinued – in jewel tones.

A princely gift, indeed. And only fitting that I use it for a gift back to the caregivers who got me back on my feet and moving again.
I’ve selected a tinted linen to use as ground for this one. I am not sure who gave me this because I didn’t put a note into the package (possibly my spawn, so apologies if it was). It’s custom dyed Zwiegart 36 count linen (big as logs for me), from Hollis Hands Create – a frosty barely blue tint called Silver Moon.
The first step is to begin the design of the motto. In this case “RELENTLESS FORWARD PROGRESS,” furnished by the Vanderbilt Physical Therapy team. Done. And then to begin thinking about how the rest of the piece will be worked. Not a band sampler this time, it will be a “framed” piece, with one or more bands of design running around all four sides of the motto, complete with corners and any improvisations to make the bands’ designs work out correctly with minimal fudging. Therefore I will be doing a some on-screen work to prepare for this one. More than I would have needed had this been a simple band sampler. For example, those corners will have to be drafted out even if I chose band designs I’ve previously devised. And I will have to plan to use multiple colors effectively because while there are many hues in my bag of silks, there are no duplicates, and most of the skeins are partials. It will be fun to figure out how best to use my limited quantity treasures.
And then there’s selecting a size for the piece and preparing my ground. For that the first bit is to true the edges of the linen cut. To do that I find and pull the warp or weft thread at the narrowest point of the cut, withdrawing it entirely from narrow end across to the widest end. This gives me a clean line along which to cut, and ensures that my edges are parallel. On this piece of ground with one selvedge edge, you can see that the left and right sides perpendicular to the selvedge each are slightly skew, one by about an inch, and the other by about 3/4 of an inch.
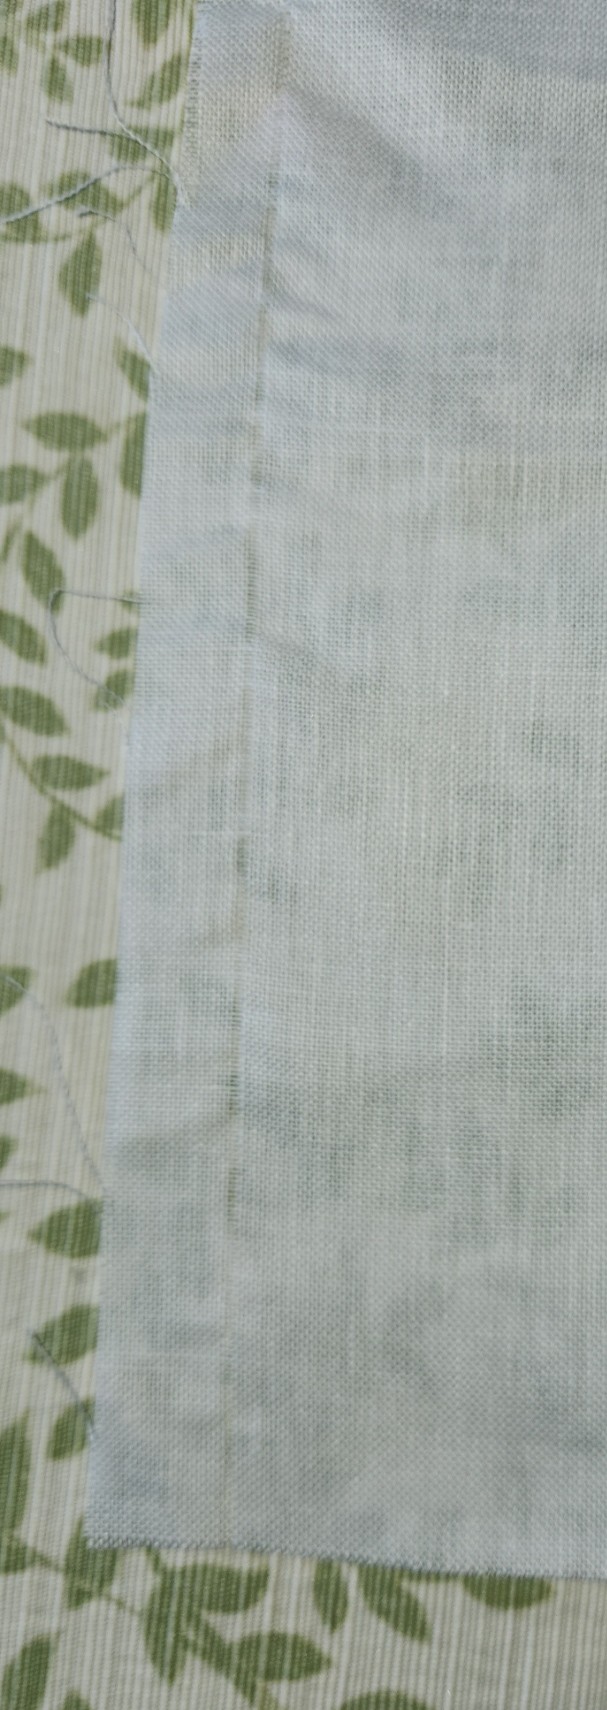
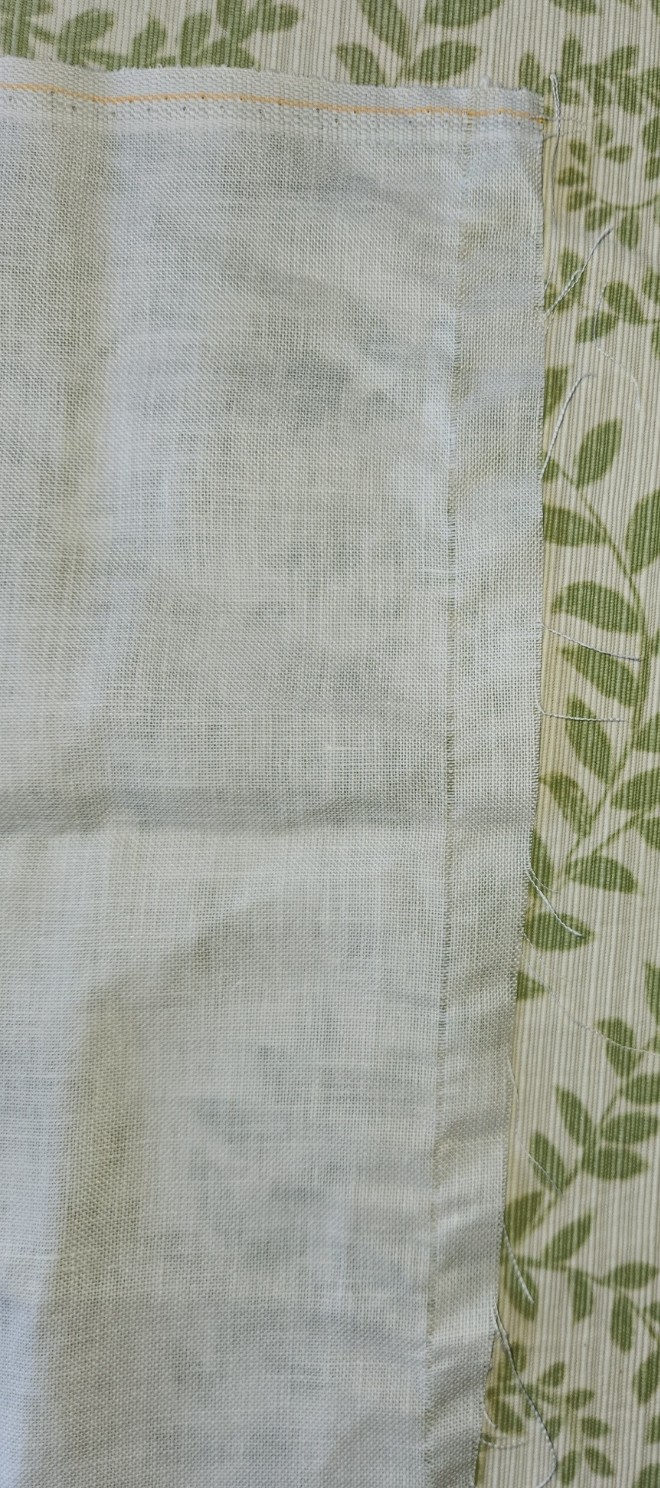
Note that regardless of the retail source, or whether or not the edges are serged or otherwise finished, if I buy a cross bolt full width cut or a fat quarter I always inspect the edges and true them in this manner. I have yet to receive any cut that was done completely congruent with weave direction. Sometimes the deviation is minimal, and there is only an inch or so lost all the way around. Sometimes, especially with lower price precuts sold in big box crafts stores, up to four inches can be wasted all the way around
This is why if you purchase pre-cut yardage, even if you have added on extra width to allow for easy hoop use and framing, it doesn’t hurt to add an additional inch or two all the way around. You never know when you will get a cut so skew that after the cloth is trued parallel to the weave, the cloth ends up being much smaller than you thought you were buying. Charles Craft prepackaged cotton and cotton blend evenweave was notorious for skew cuts. Their products started me doing this “proofing” step, and I have not regretted it since.
I won’t be using this entire fat quarter on this project. I will measure my ground cloth piece after it’s cut and the left and right edges are hemmed. I’ll decide then on the orientation of my sampler, cut my ground accordingly (also on a pulled thread line), and hem that last edge. The remaining bit will be returned to stash. And I will get a start on selecting my framing pattern(s) and drafting up my new corners.
On the non-computer work side, while the design work is going on but after I get my piece of cloth sized and hemmed, I will baste in guidelines: centers and stitching area edges. The final count of the available stitching real estate between the area edge marks will help inform final design tweaks.
I don’t think of all this pre-work as being very complex or onerous. The physical prep is mostly mindless and gives me plenty of headspace for the rest of the planning.
Now off to select my patterns… I toyed with using icons representing progress from sitting to walking, but I decided that was too limiting. The rehab therapies offered go far beyond simple sit to stand to walk, and I wanted the piece to be as inclusive (or non-specific) as possible. And the logos for the various institutions and professional certifications involved are too fussy to be easily charted at my scale. So it’s a mix of florals, geometrics, and possibly a pet or mythical beast or two thrown in. After all, who doesn’t identify with dragons or kittens?
PROGRESS ON A WEALTH OF FRONTS
It’s been half a month since the last post, and all sorts of things have happened.
First, I’ve finished the wildly intricate interlace panel on my current sampler.

Second, as I was doing so I found an error in my chart for it as it appeared in the original edition of The New Carolingian Modelbook. The error was a minor one, a copyists/flip and mirror problem with two side by side crossings. It’s my guess that no one has attempted this particular design before, otherwise they would have either contacted me about it, or trumpeted my incompetence on social media. So of course I had to correct the problem. For a legible copy of the correction, including the original TNCM source attribution, and two chart versions – one for the border as shown, and one for a wider border or all-over design, please click here download a PDF file.

I have also been able to draft out a couple of tribute specific bands for this sampler, referencing the in-process novel Forlorn Toys in specific. They will be coming up after I finish the latest leafy strip. So stay tuned!
In other news, at long last, the Victoria and Albert Museum has updated all of the pages for the individual contributors under the Unstitched Coif Project. Again thanks to Fearless Leader Toni Buckby! My page can be found here, and has both the essay I did to accompany my work, plus ultra high resolution ZOOMABLE photographs of the back and front of the piece. For some reason the museum chose to lead with the photo of the backs of all of the pieces.

And for those of you who have asked about my personal health odyssey – I am improving. I’m in the middle of graduating from walker to cane. I can get around well with the cane, but I am still shaky with it over uneven terrain, so I mostly stick to it indoors, and continue to rack up practice distance. I have also been able to sit longer, as my stitching and blogging progress demonstrate.
There are still some hurdles to go, including a stint of proactive/preventive radiation to minimize any chance of chordoma recurrence, but I will take that in stride like all the rest. In the mean time, I’m feeling further along to being my old self than I have in months. No doubt due to the incessant care, coaching, and excellent cooking of my Resident Male.
ASSIST FINISH AND TOYS KICK-OFF
At long last, ASSIST is complete. It still needs to be ironed and framed or otherwise prepared for display, but the stitching is done.

The tumbled columns on the top are there because my life was pretty much tossed around the time I started that strip. I had just gotten the chordoma diagnosis, and was racing to get as much done as possible. At the same time I was working on an early release for Ensamplario Atlantio III, and the Epic Fandom Stitch-Along compilation. I ended up not completing ASSIST, opting to leave it unfinished, that I would get back to it as a sign of hope. Well, slowly over the past two weeks, I’ve made steady progress. I trained myself to recline at an angle. That freed 1.5 hands for embroidery employment, and with practice my speed increased.
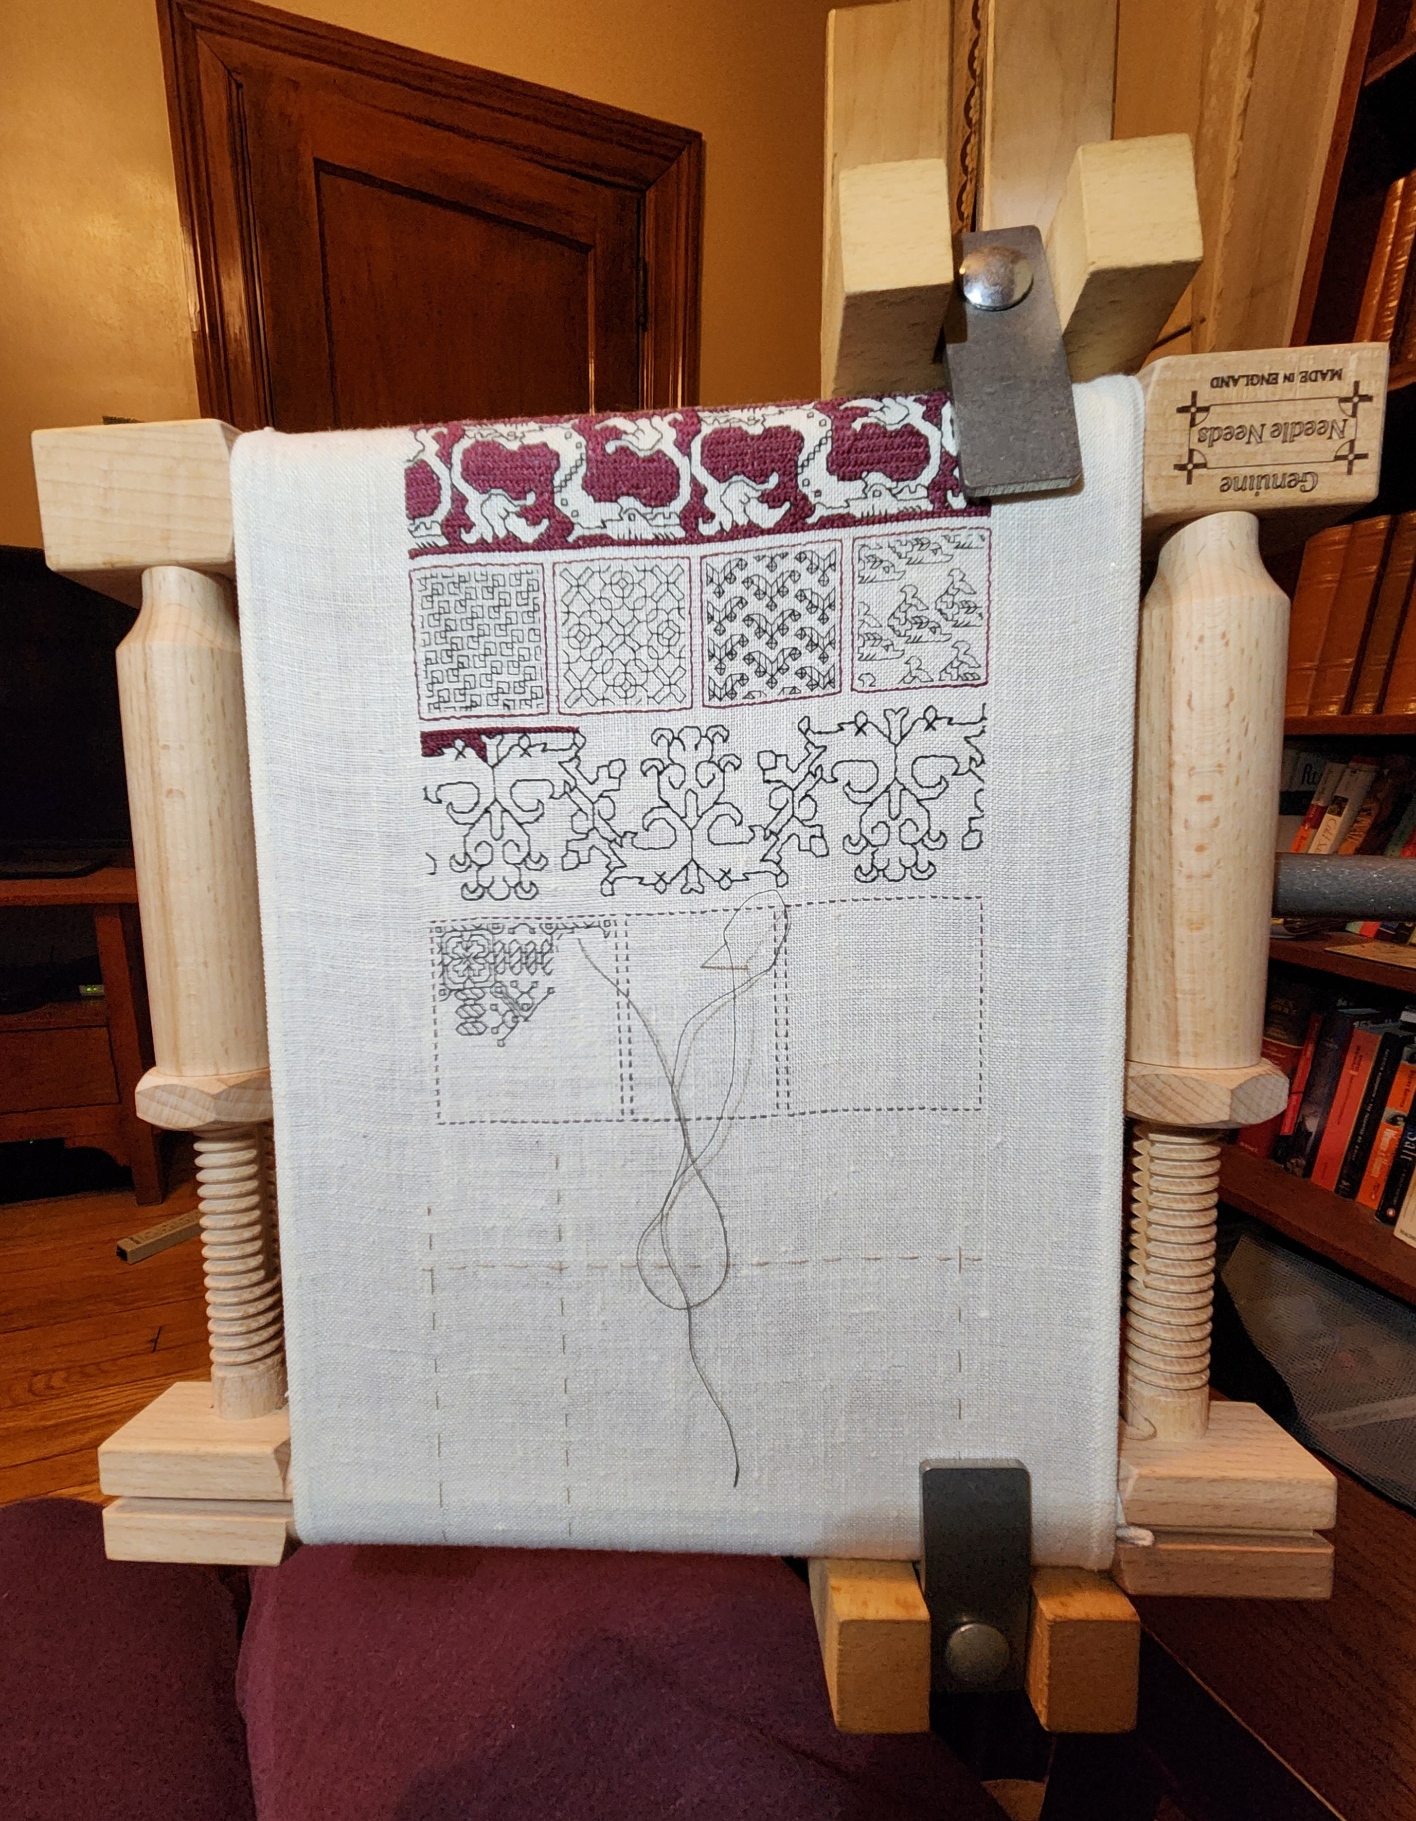
But now on to the next one. The Resident Male is working on another book (his 7th counting both published and as yet unpublished works), and I having marked the presence of most of the others, I need to welcome Forlorn Toys, too.
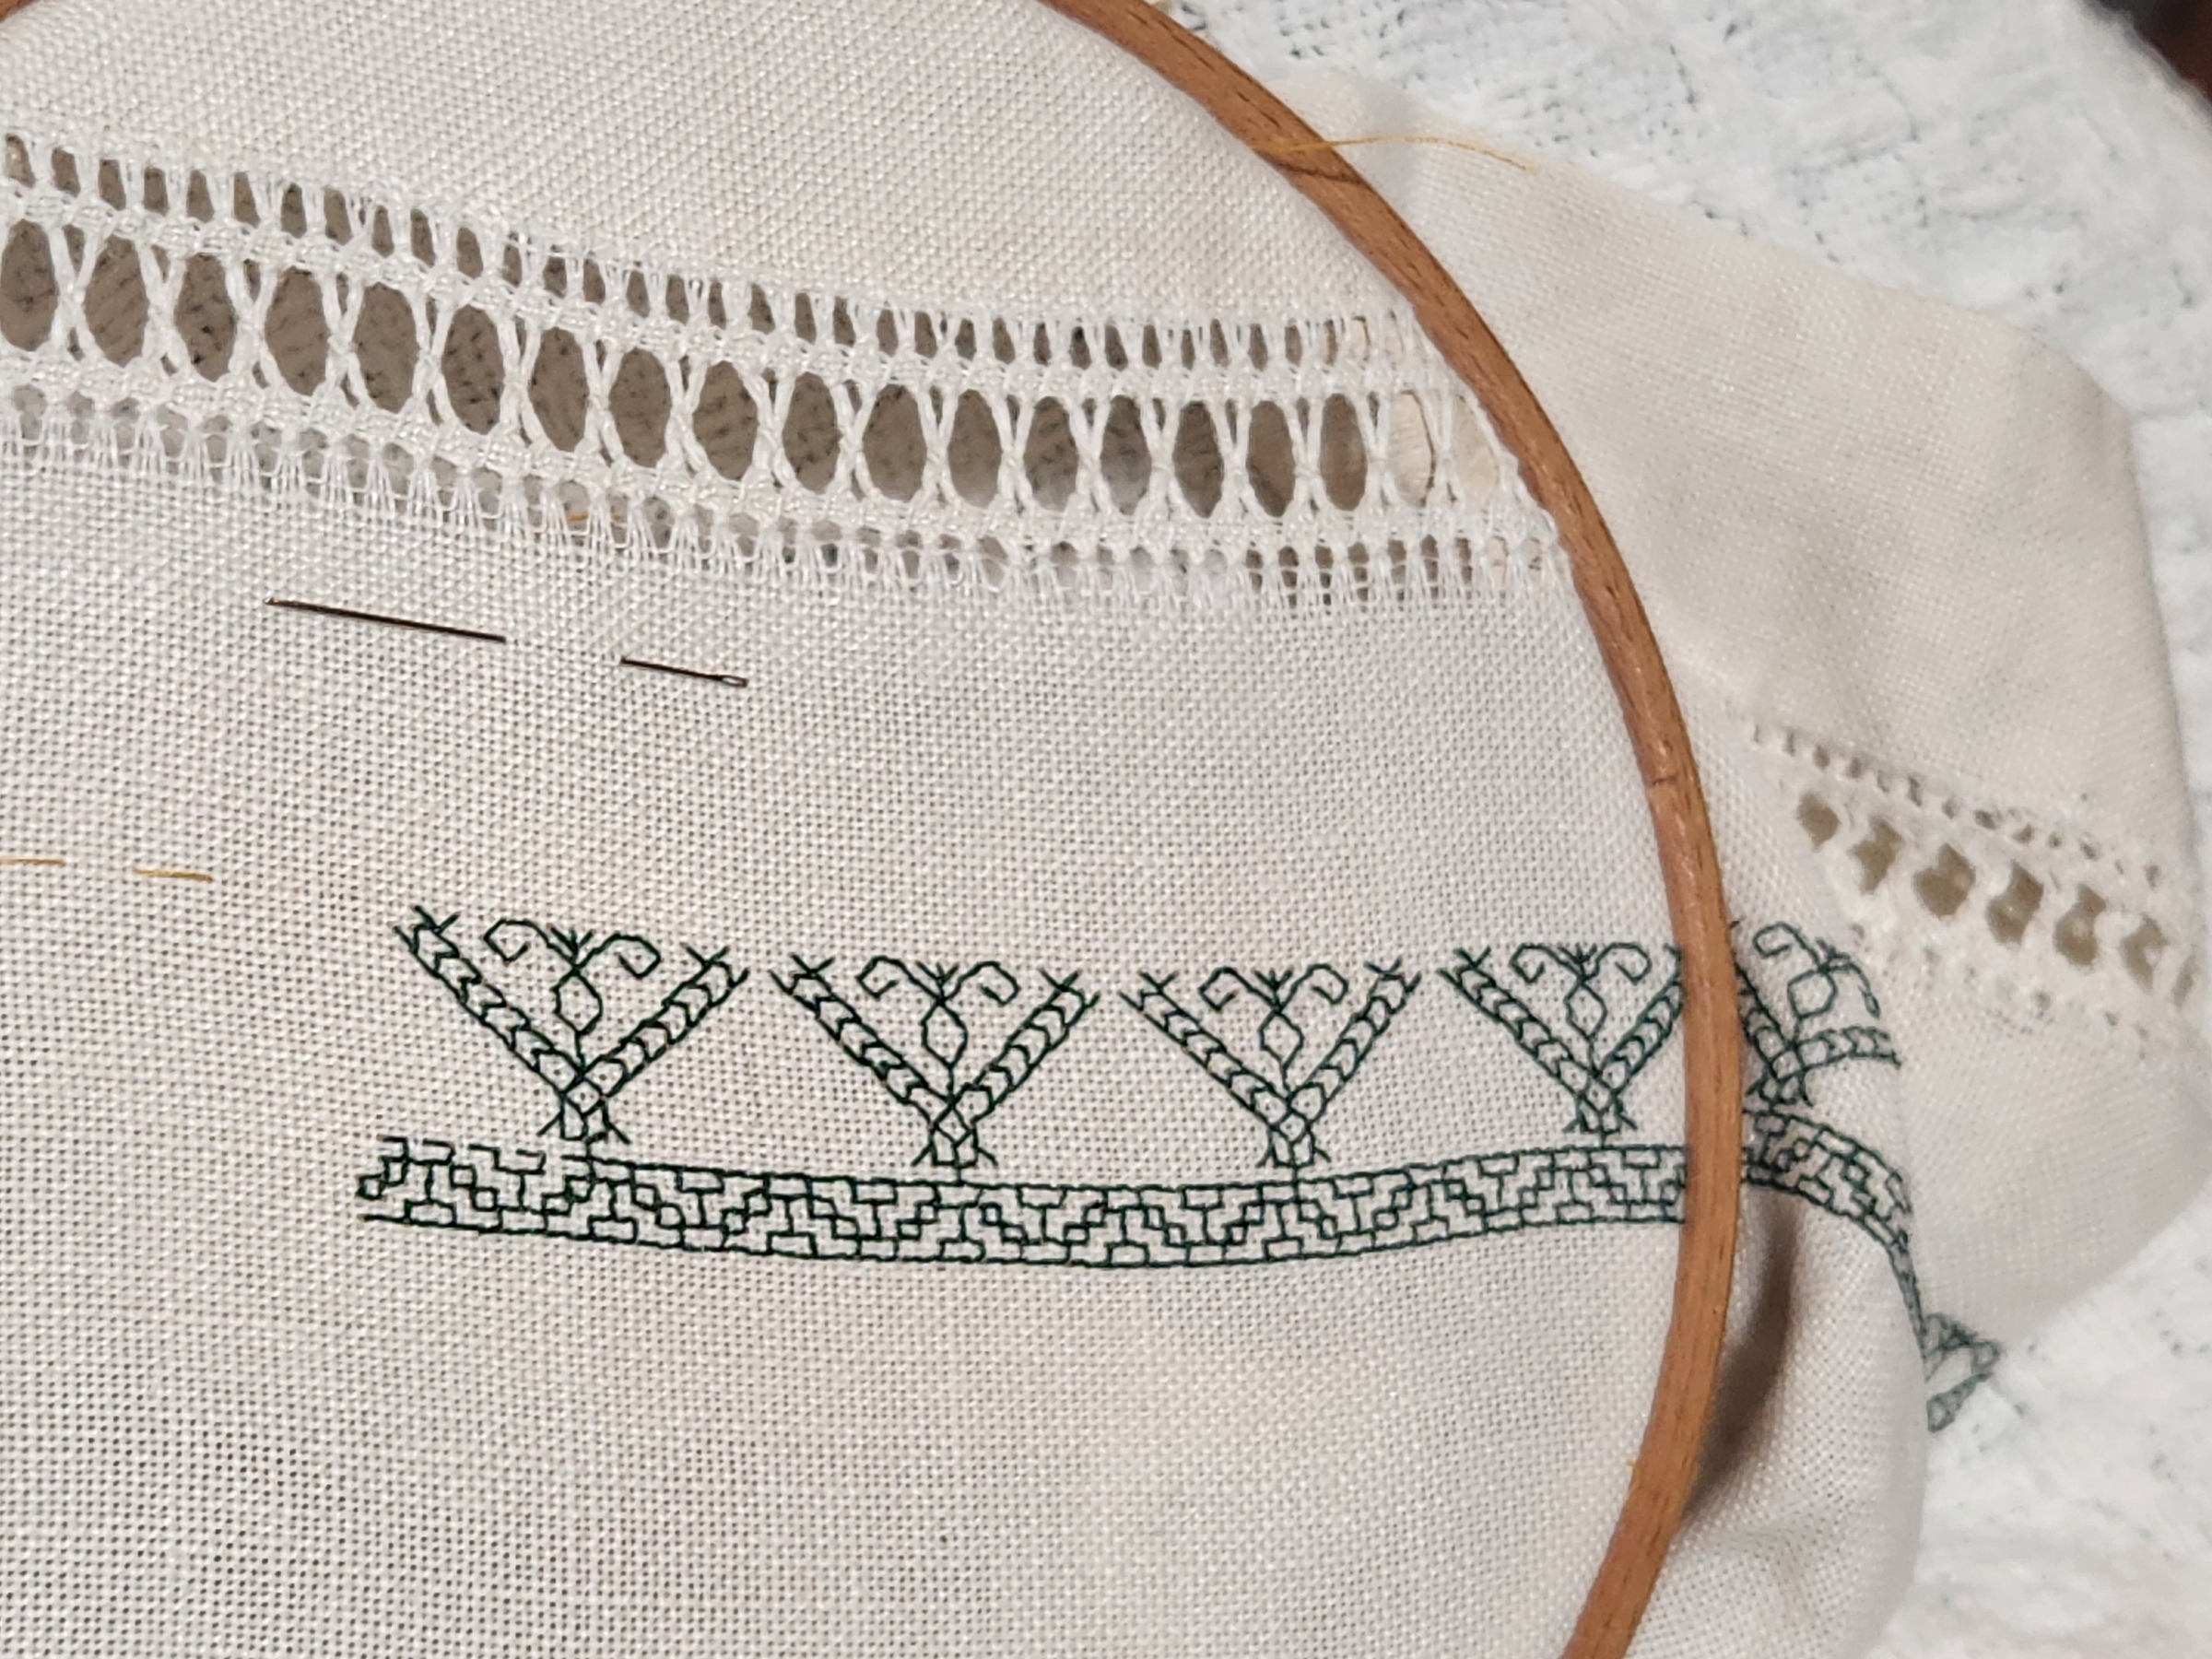
Again I pull out a battle-weary rescued bit of linen, yet another thrift store find. Yes, it has some flaws and stains. I don’t care (the title after all is Forlorn Toys). Most of that will be overstitched and very difficult to see. It happens that this piece is the longest yet, with the entire cloth (stitchable area plus margins) being 12 X 35 inches. And it sports nifty hand-done bits of Italian hemming done all the way around it. I’m leaving those intact. (Excuse the sickbed photo, I’m doing the best I can).
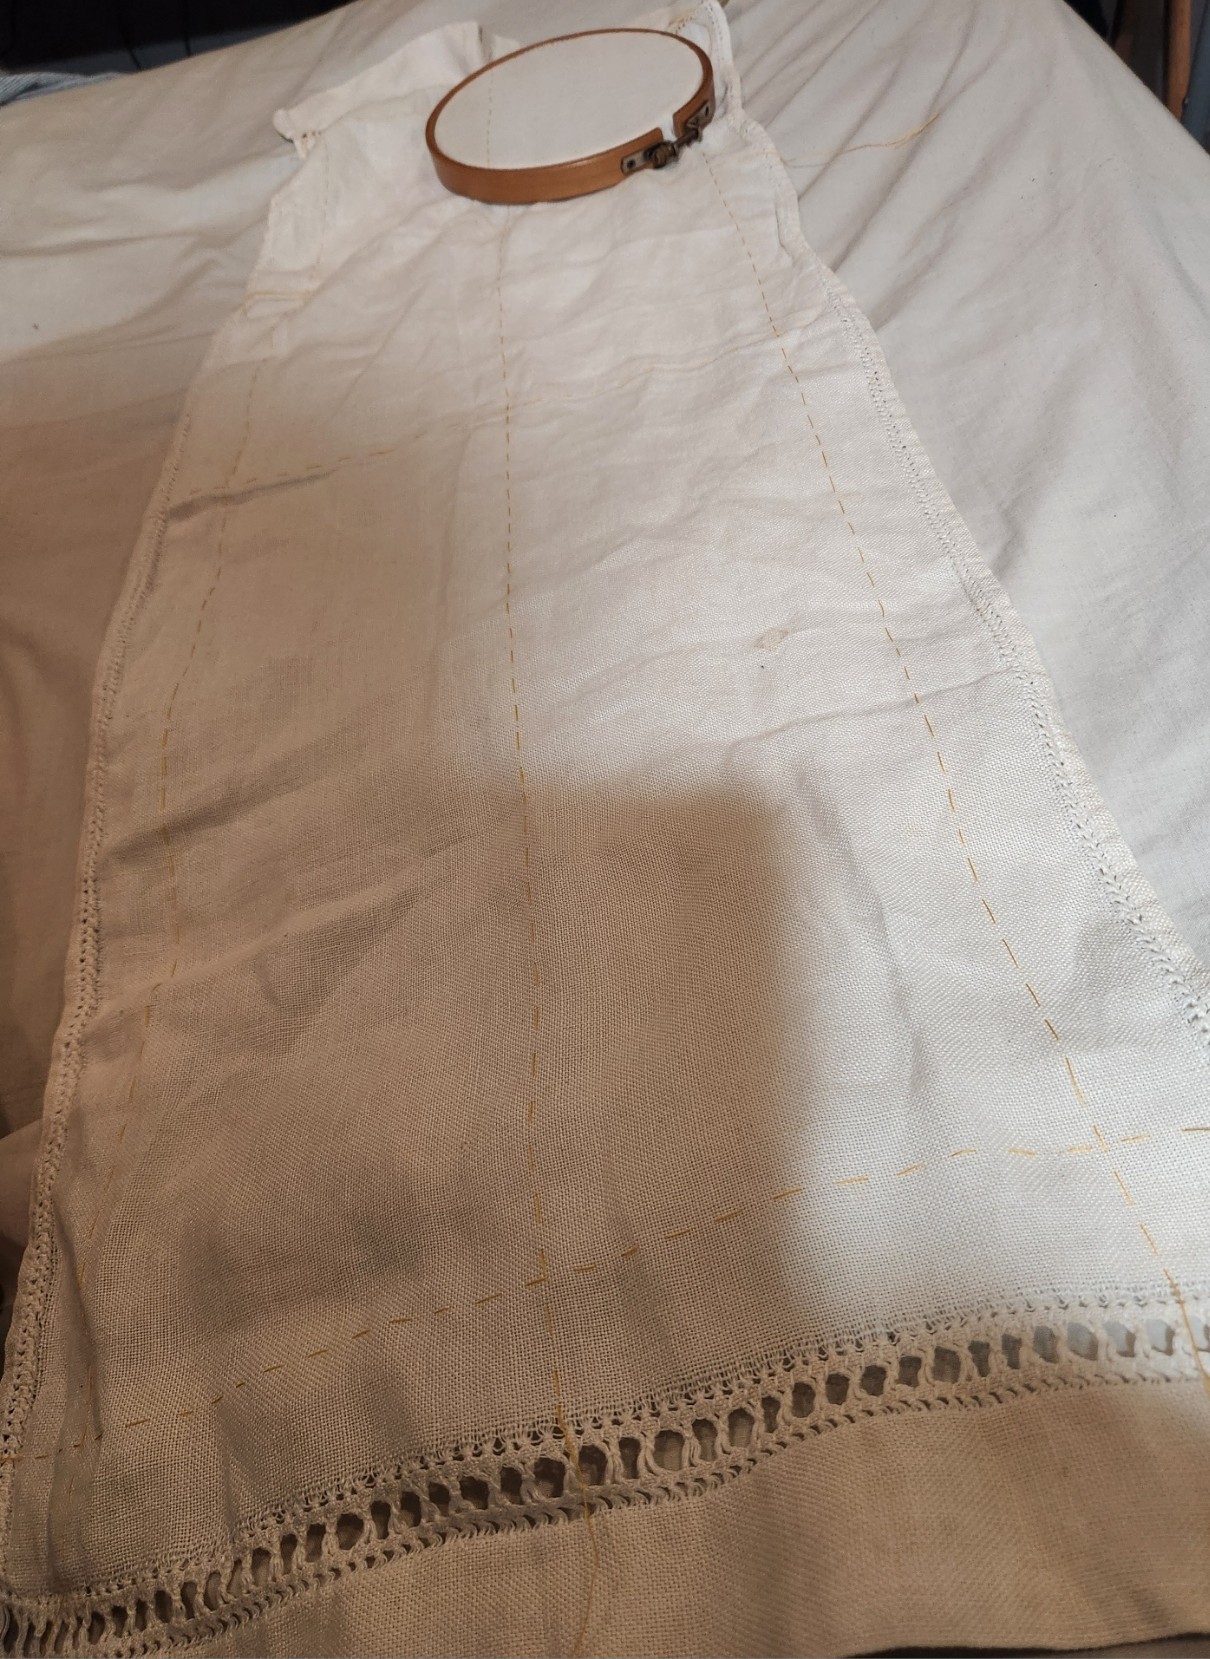
My penny method gives me a thread count of 37×39 threads per inch. Although this hemstitched cloth was done with a less than 100% adherence to accuracy have set my margins averaging out discrepancies, leaving a stitching area of 9.25 inches. That means that that after the margins are removed, the stitching area will accommodate roughly 171 stitches across ([smaller thread count x width/2]).
Armed with that info I can begin thumbing through my favorite reference site looking for a typeface in which the longest part of this one’s motto will fit. Minor complication here – GIMP, my workhorse solution for dash and dot pattern drafting is not working well with my templates since yesterday’s update. I will eventually get that sorted, but it will take a bit of effort. If you or someone you know is a GIMP Wizard with a little time to spare, please let me know.
In the mean time I am well into the first band (an edge accompaniment from T2CM Plate 25), although the final style for the Toys sampler has not yet been set. All I can say is that it will be worked in green DMC #890 cotton, and mostly in linear stitching. Nice view of the hem stitching here, too.
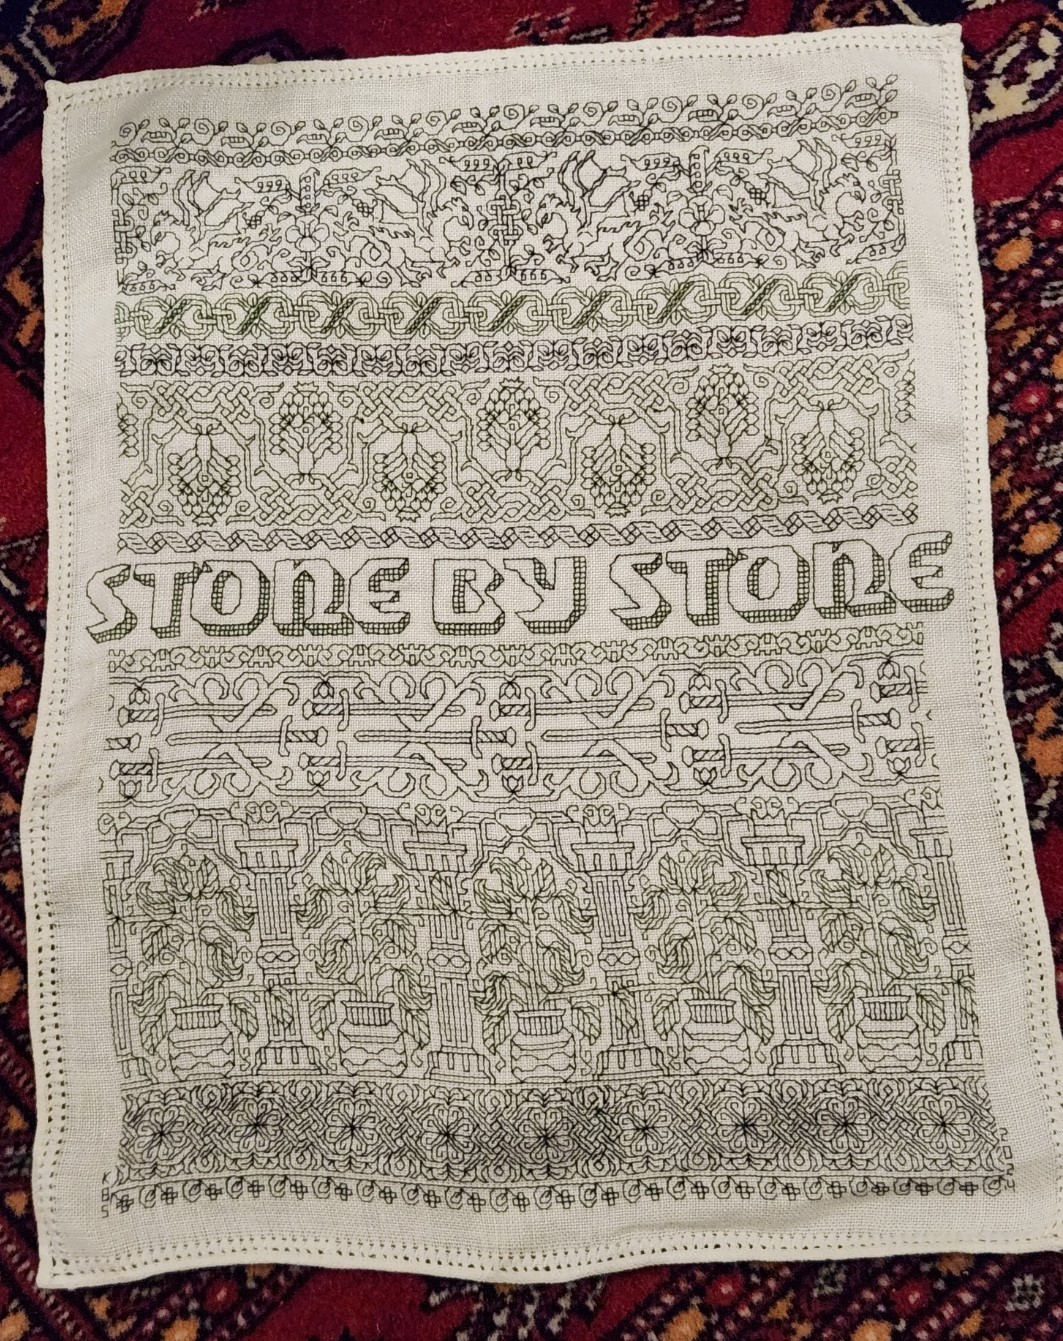
Onward and upward. As my Resident Male has written before, Stone by Stone.
AND FROM THE FLIP SIDE
Here I am. A bit less than I was, in terms of body parts, weight, and height, but overall what remains is whole and mostly functional.
I am not going to go into the all the details, but I will say that I am incredibly lucky. So many things can go wrong during and after a 12-hour surgical procedure that involves many tricky bits near major nerve centers. But I am happy to say that my chordoma tumor was removed successfully, along with my coccyx and more than half of my sacrum. I will have to have a deep survey next month for surety, then be on lifelong watch to make sure it doesn’t recur, but for now at least I am cancer-free.
The surgical team was able to avoid some nerve damage, and to install a rather elaborate truss system to support my spine and hold my pelvis together. Those two things let me walk again, and even climb stairs – things I had hoped to be able to do, but realistically was accepting that I might not. I’m wobbly with a walker, and need a spotter on the stairs, but each day brings new strength as I exercise and practice. I am hoping that by the holiday season I will be off the walker and on a cane, headed to unassisted ambling.
The one area that is lagging behind is sitting. As you would expect, with that much alteration to my fundament, sitting would pose challenges. So far I am able to sit on a special cushion for about 4-5 minutes. I continue to train for improvement.
Weight is an expected loss during cancer treatment, and that did happen. But height? In my case because my lower spine was amended, a certain degree of shrinkage has occurred. I used to be 5’8″. I’m now 5’7″. So it goes.
And as you can tell by the presence of this update, I have computer access again. I’m using it as an inducement to get out of bed and stand, above and beyond the various exercise routines recommended by my physical therapist. Time however is limited. I can do a couple of short sessions a day, but no more. That means posts here will continue to be few and far between, and that no substantive work will be happening on The Third Carolingian Modelbook, or on corrections to Ensamplario Atlantio III (or for that matter EnsAtl IV).
I can however stitch again. I can do it laying in bed, sort of. Like the computer work, sessions are limited by endurance, so progress is slow. But there has been progress.

Compared to the last post, the dragon square is finished, and I’ve begun the voiding on the top strip. Nice and mindless, simple work.
So there it is. I’m still here, slowly recuperating. I do thank my spawn, siblings, mom, inlaws, and everyone else who sent encouraging notes, showed off their work from my designs, phoned, sent gifts, memes and silly bits to cheer me up, or visited. Your sharing buoyed me through a very challenging two months.
I also want to thank my surgical team, attending specialists, nursing staff, therapy staff, cleanliness/safety staff, and everyone else I interacted with at Rhode Island/Brown University Hospital, and in Newport Hospital’s Vanderbilt Rehab wing. That I write this at all is testament to the quality of their handiwork and care.
And it goes without saying that he who is precious to me – my Resident Male – deserves major thanks for his constant presence and support, gentle nursing, firm coaching, and patience. He drove hundreds of miles back and forth to Rhode Island between 17 March and 29 April, and has catered to my every petulant wish since returning home.
Stay tuned. I intend to keep these posts coming, and pivot away from tedious health updates back to the needle arts.
SEE YOU ON THE FLIP SIDE
That time has come. Tomorrow is the beginning of The Great Eviction, in which my invader and I will be separated. I am ready, packed, prepped, and armed with great ferocity and the single minded determination to overcome, outlast, and outwit my adversary and come back as unchanged as possible (except for the obligate scars, of course).
I’ve marked my level of optimism on my latest sampler. I haven’t mentioned progress in a while, but it quickly became my Emotional Support Embroidery after receiving my diagnosis last month. Not ironed, but as a WIP, it’s too early to think about doing that.

Yes, it’s still unfinished. I’ll do some more on it later today of course, but I won’t be done. That’s on purpose. I have every intention of future completion. And note the victory wreaths on the top as-yet-to-be-background-stitched strip. That strip is also deliberately placed skew to the centering of the rest of the sampler. My life has been tilted akilter, so this bit is, too.
I’d also like to everyone for the unexpected outpouring of support. I am overwhelmed by the vast number and generous sentiment of the comments here, on various social media platforms, and sent to me personally by direct message and email. I had no idea I had reached so many people around the globe. I am not a spiritual person, but I can say that if Providence can be petitioned, perhaps the wide ecumenical spread and volume of promised prayers in every major worldwide religion (and many of the less well known ones) will tilt the odds even more in my favor.
See you soon!
-Kim
EPIC FANDOM STITCH-ALONG NEWS
Just a quick post to let folk know that the Epic Fandom Stitch-Along from several years ago is still free, and available for download here at String-or-Nothing. AND I’ve made it much easier to do so.
I have consolidated all of the individual week by week releases along with the general info provided before the project began into a single 50-page PDF document. No more hunting for the single page you need in a forest of other pages! It’s now on the My Books tab, and I’ve added a link to the top of the SAL tab, as well.
Or you can click here to hop directly to the PDF.
As ever, enjoy! I do hope some folk are brave enough to try this one. And like always, nothing brings me more joy than seeing the pattern children out at play. Do the whole SAL, cherry pick the panel you want to do.
Same restrictions as my other offerings – personal use only, and please respect my copyright. Other than that, have fun. 🙂

THE SYMMETRIES OF LINEAR STITCHED FILLS AND STRIPS
As promised here’s a rundown on pattern repeat type, and centering fills and strips in designated spaces on your project. For one, there’s really very little need to sit down and stitch-by-stitch completely graph out the design to your final dimensions. In general knowing where the edges and centers of your space, plus the pattern repeat type is all that’s required. These hints go for both fills in regular and irregular shapes, and for strip or band type designs that march along the width of your project, or decorate the edge of a garment.
And a note on grounds, if I may. Aida, Hardanger, Anne Cloth, and Monks Cloth are types of purpose woven grounds used for modern countwork. They feature prominent holes outlining their base size units. Departing from that established grid can be very difficult and involve piercing the fabric in the solid spots between the built-in holes. Partial stitches do exist in the purpose-woven world, and are much despised by stitchers. Working multiple grids skew to each other on the same piece of purpose woven ground is almost never done. I’d say never-never, but somewhere it might exist, although I haven’t seen it nor the rants of despair from folk who have encountered it.
Evenweave (or near-evenweave) is a bit more flexible. Since the stitchers count threads on evenweave instead of hole-defined units, they can employ multiple grids on one piece. If the stitcher decides to work their unit over 2×2 threads, two adjacent spaces can use different grids, offset by one thread so long as the juncture where they meet is taken into consideration. I did this on my Two Fish piece, using the skew alignment to hint at undulating motion. Note the knot and grid filling. Not only is it stitched discontinuously across the bel, I also interrupted the grid. Both sides are worked 2×2, but NOT on the same 2×2 grid – the tail section is displaced one thread up and over.

So when you see me talking about skew grids or using partial stitches when centering various types of symmetry on a single piece, please know that the ability to do this is mainly something that can be done on evenweave. Purpose woven grounds like Aida will limit the way patterns of differing symmetries can be centered against each other. It’s just a fact of life.
Before I begin, all of the fills and bands charted on this page are available in my Ensamplario Atlantio series, my Epic Fandom Stitch Along, or previously shared here on this blog. All are available as free downloads for personal use. Links are provided.
OK. Finally getting into it. Patterns can be grouped into a few basic clusters, with some caveats.
Center Line Repeats
First we have simple line-center repeats. These are designs that cover even numbers of units, and mirror along a center line. The chosen pattern may be a band or strip, with one vertical line where the design mirrors to its left and right. Or it might be an all-over design or fill, with at least one vertical and one horizontal mirroring line.
This blackwork fill/all-over design has both a horizontal and a vertical center line, marked in red. The motif tiles into square blocks of 14 units. The easiest way to use it is to either count to or (if irregular) eyeball the visual center of the space to be filled, then begin stitching the design at the spot where the two center lines meet. Even if the space to be filled is NOT a multiple of 14 but is any other even number of stitches, if centered this way the design will truncate neatly around the edges, as it does in the sample from Ensamplario Atlantio Volume 1, below.
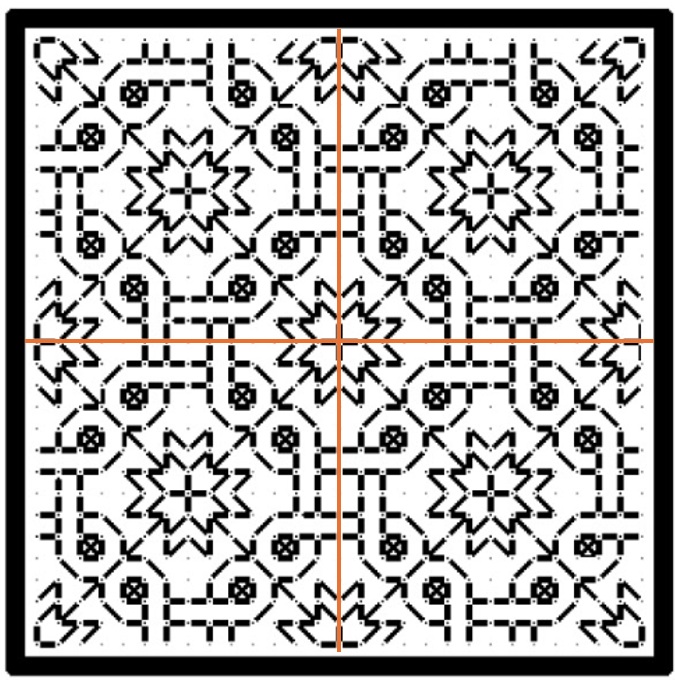
But if the space to be filled contains an odd number of stitches you will either have to displace the center lines so that there is one more unit to one side or the other, or you might have to work partial stitches all the way around the perimeter for full coverage.
Some people insist on using a single grid for ALL of the fills on an inhabited piece. That means that even if they are working over 2×2 threads on evenweave, where adapting the grid you are using to the space at hand would be quite easy, they choose not to. They end up having to either accept minor misalignments between adjacent patterns, or employing partial stitches to eke out the design. That can be avoided by NOT mixing fills or bands with this type of symmetry with some of those discussed later in this article.
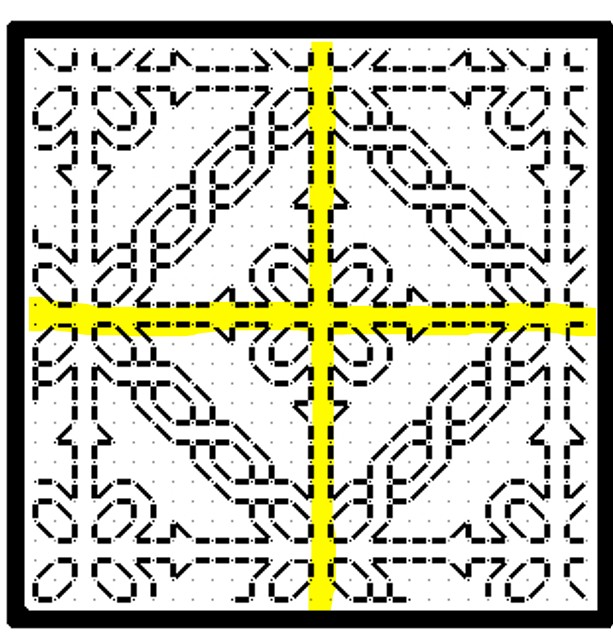
Here’s the same type of symmetry expressed in a band pattern. This one is from my Epic Fandom Stitch Along. Note that in this simple meander there are two lines of symmetry (sometimes called mirror or bounce lines). The pattern replicates in mirror image on either side of them, just as it does in the all-over fill. One full repeat is 36 units, and alignment in your desired space can be focused on the center/mirror/bounce lines of either the up or down facing fronds.

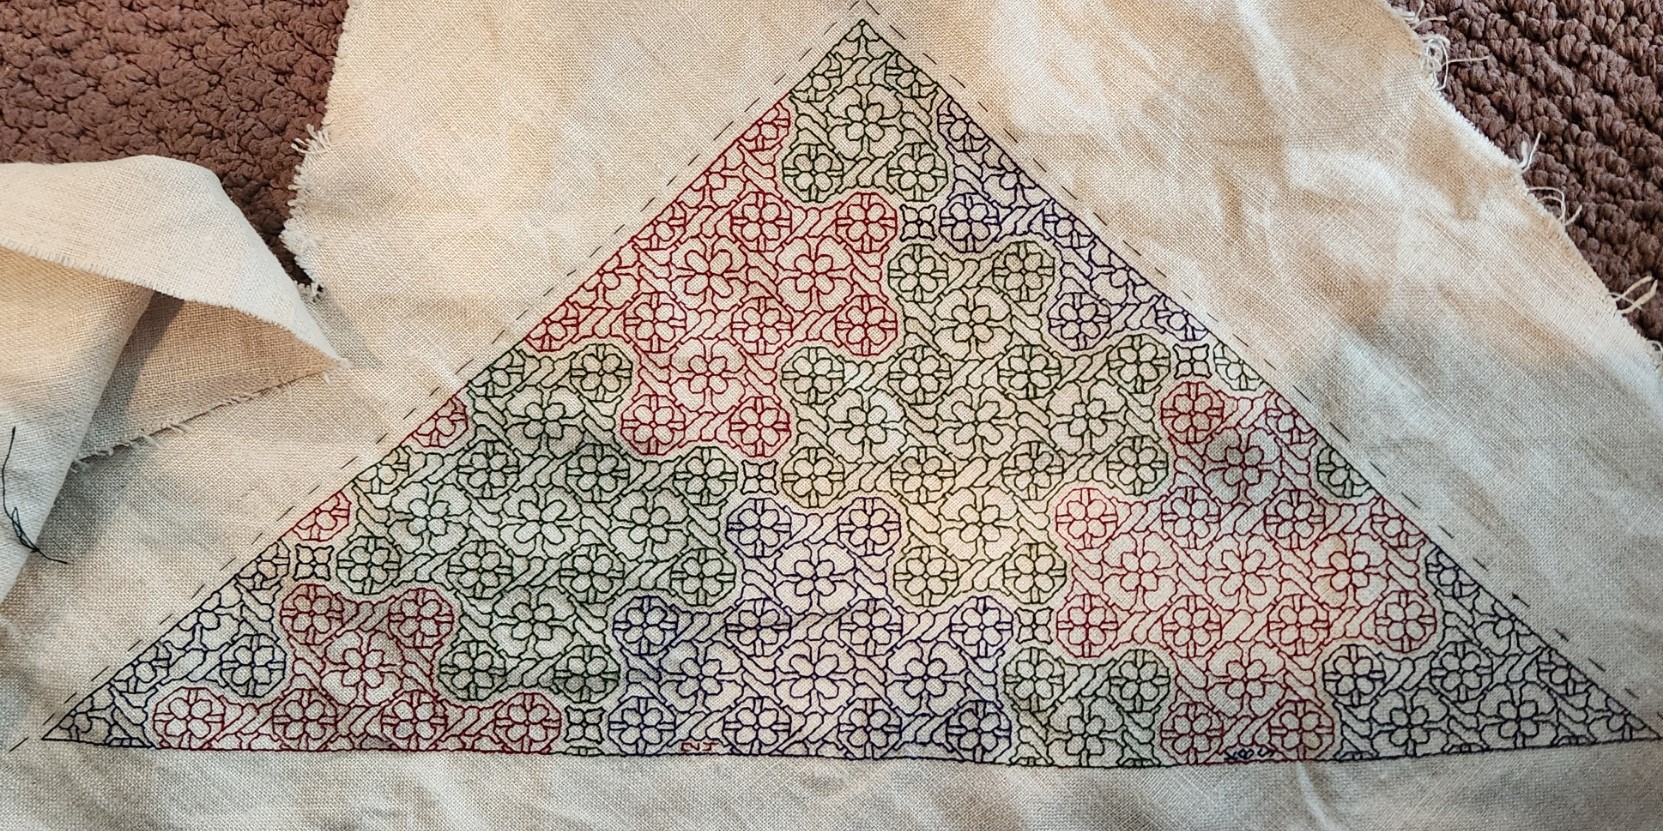
Regardless of symmetry type, if you are filling an irregular spot, and you are eyeballing the center alignment point you might end up having to work half stitches around the edge of your area, again to eke out the coverage. This is one reason why some instances of inhabited blackwork (the kind with the freehand drawn outlines infilled with counted geometrics) rely on heavily stitched, thick outlines. Those “fig leaf” the offending partial stitch spots and make the work look neater.
Here’s a bit on my Unstitched Coif, where I eyeballed the alignment of the fill, worked a ton of half stitches (a challenge on 72-74 count near evenweave, stitched over squares of two threads), then went back and put in heavier outlines to hide irregularities. Zoomed waaaaay in like this you can see them around the edges. For scale, that little bud at the upper left is smaller than a US penny.

Now there are some exceptions and complications. We’ll get to those later.
Center Unit Repeats
All well and good you say, but the symmetrical repeat I want to use doesn’t meet up neatly at a center line like those. In most cases your repeat has a “spine” of a single unit rather than a center line. That column or row of units is repeated only once, and is not mirrored, although the design itself does mirror left and right (or up and down) that non-repeating column or row. That means that a full repeat of the design includes two symmetrical wings, plus that pesky center unit – an odd number of units, total. Here’s a fill/all-over design that features center units. In this case one full repeat is a square of 23 units (one center unit, plus 11 more units to the left, and to the right of it).
And here’s a strip repeat, also with a simple center-unit style symmetry. Like the line unit band above, there are two possible centers. Either one can be used, although convention on band samplers is to feature two main motifs in the center of the stitched area – in this case the pair of beak to beak chickens.

The strip above is from my Workshop Handout broadside, another free download here at String you can access via this post or via the Embroidery Patterns tab at the top of every page.
Hybrid Repeats
Some designs display a delightful flexibility when it comes to centering because they incorporate BOTH a center unit and a center line bounce point/mirroring. This happens with fills/all-overs and for strip/band patterns.
Here’s a sample of a fill that includes both. I’m only marking one repeat of each type on it, otherwise the thing will end up looking like a swatch of plaid.

This design can be aligned either to the center lines (red), or center units (yellow). And here’s an example of the same type of pattern in a strip or band. The center can be the red line or one of the yellow columns.

Again, if a combo of center line and center column symmetrical strips are used on a band sampler in a mixed environment that doesn’t deviate from one universal grid note that true center alignment will not be possible. The even-number repeat centerline bands will all line up with each other. But if you insert a design with center unit/column symmetry but have to use the same “stitch holes” in Aida as the rest of your project, that center column will not line up with the true center of the rest of the piece. Which may or may not matter to you. Food for thought.
Staggered Drop Repeats
Now it gets harder to identify these. This style of repeat is common in fills/all-overs, but less common in strips/bands, but they do occasionally pop up. For the most part they employ mini-motifs, sometimes in straight-on replication, sometimes with mirroring or rotation; and use regular offsets to place them. Sometimes its a simple half-drop, sometimes it’s a larger interval or not regular when the horizontal and vertical offsets are compared. Most of the time these staggered or evenly scattered mini-motifs do resolve into very large area true repeats, with the same motif repeating in the same relative position in the field, but it’s rare to use these in areas big enough for that resolution to happen. How to center them? It’s a bit more complicated.
Here are three with different rates of periodicity (how big the sample has to be before it manifests a true, full repeat), presenting different problems. These are all from Ensamplario Atlantio Volume 1, Second Edition.

The flowers at left can be centered in a panel in one of two ways. Either using the regular center-line symmetry of the very simple little four petaled flower, or by counting to identify the centerpoint of the more complex sprigged flower. Either way will work, although I think using the smaller mini-motif would be visually more pleasing. Note that regardless of the size or count of the space you use these repeats “walk” and will always truncate around the edges.
The snail garden square at the right is a hybrid. It can be effectively centered either on the tiny squares and on the larger snail-bearing unit. Both work nicely. Which I would choose would depend on the size of the space I wanted to fill with it. If the space was large enough to accommodate four of the snail gardens without truncation, I’d probably use the tiny squares as my center alignment point. The snail gardens rotate around them, and optically form a flower-like shape when viewed from a distance. If the space was small, I’d put the garden in the middle to ensure at least one full iteration of it was represented.
The griffin/dragon beastie in the center presents a harder problem. There’s only one element here, and it has no clear center line or center column/row. Additional complications come from the rotation and offset of the beastie motifs. The easiest way to center this one is to find the center point of the beastie itself, match that to the center point of the area to be filled, and work the others around the first, completing the truncated ones as possible. In the photo below, this is what I did with the wing like bits, second from the right in the photo below, and what I SHOULD have done with the little dolphins in the box next to them, but obviously didn’t.

The myriad mistakes in my current piece are what inspired this post. In addition to the errant dolphins in the latest section, you can see that the voided bit currently underway wasn’t properly aligned. It’s a center line repeat, I have an even number of units across, but if you compare the left and right edges, you’ll see that the design is shifted two units to the right. The center of that strip does not align with the center of the set of boxes, above. The dolphin box is intentionally shorted one unit compared to the others in its row because my count across is not divisible by four (available area minus 6 units total for the gutters between the boxes). There are more similar mistakes in the previously completed part, now wound around the roller bars of my stretcher frame.
I confess to making many alignment sins on this one that together have landed me in this predicament, including initially basting the center guideline that runs the entire length of the piece offset to the right by three units; never going back and measuring, but instead working the other vertical guidelines off that one; starting the first blocks and not bothering to confirm centers or edges until it was too late to pick out and start again; fudging everything in to try to compensate for the pile of errors that was accumulating behind me; and not paying enough attention to centering the various fills in their boxes.
I will continue on to completion with this one, warts and all, but I may revisit the base concept of voided strips alternating with boxed fills in a future work.
ANOTHER NEW TOY
If you’ve been reading here over the past month, you’ll have seen me working the current project in a hand held hoop. I love hoops, especially their portability and versatility. But I vastly prefer the “real estate,” tautness, and ability to use two hands that using a scrolling frame gives. I’ve had two sizes of the Needle Needs Millennium frame for quite a while. I tend to pull those out for the big projects, especially those with metal threads, or that feature easily crushed or disarranged stitches (satin stitch, knot stitches). I also have a sit-upon hoop. I do use that extensively for the smaller pieces with less fragile work on them. It has some of the advantages of the other two types, but as a compromise, with less ability to place the piece in exactly the optimal spot and angle for visual acuity and best lighting. The hands down most efficient way for me to stitch is the big Millennium on my Lowery stand.
After months of hoop-in-hand, I was yearning for the scroll frame experience. I heard that Needle Needs had a new junior size frame, and was also offering smaller roller bar and side extension pieces for the Millennium system. So I sat down and weighed price, stitched area size, and the fact that pieces from the new junior frame are not compatible with its larger brother, then splurged on a pair of new extenders and roller bars.

I have two sets of the older 8-10″ side stretchers. I got that relatively small size because I realized that the bigger ones would produce a stitching area that would be difficult to reach. That bore out when I was working the coif using the 24″ roller bars and the 8-10″ extenders. My behind-the-work left arm could reach only 60% of the available area with it set at full extension – barely making it to the top edge of my piece, and I had to flip the frame over to work the remaining spaces. But while I might have gotten the even smaller 5-7″ sides this time around, I had the feeling that a space that small in combo with the Lowery frame extender arm would be less than optimal.
Obviously the new components arrived yesterday and were immediately deployed:
And I was right. You can see how much of the available area is “eaten” by the width of the gripping Large Frame Extender. Even if I position the frame so that the clamp is grasping the corners of the roller bars, it’s awkward to work right up against the Extender’s upright. But just like with the larger set-up for the Coif, I can flip the frame upside down to work that side of the piece.
I know that not all my new projects will be narrow band samplers, but between the new short roller, and the new short side stretchers, plus the pieces I have on hand used in new size mix combos, my toolkit has valuable extended capability.
As for more on the design on this sampler, the types of symmetry often seen in fills and how to best center them depending on the type of symmetry, that will have to wait until the next post. For some reason the blogging software is having indigestion, and I’ll have to cut today’s intended post into two. Will finish that one out and get it up by the end of the week.
CATCHING AN ASSIST
According to the posting date, it’s been about 10 days since I last reported in on progress on Assist. I’ve had a couple of mis-alignments due to low lighting and inattention. Some I’ve picked out, others I saved as cautionary lessons. And I’ve taken a slight departure from my usual working cadence.
Here’s the latest in-hoop view.

Obviously I’m working voiding on the row of snaky, vaguely draconic S-shaped flowers. But I’m only half-way done with that, yet I’ve gone on to start (although not finish) the row of smaller fills underneath.
Why the partials?
Because it’s very likely I’ll be attending Arisia over the weekend. It’s a big science fiction convention here in the Boston metro area. There will be discussions, panels, and lectures to attend. I like to keep my hands occupied at such things, so I can better follow along without distraction. Therefore to minimize lap clutter and make this project more portable I want to have enough started with established repeats, so I can work “off book/screen” for the balance of the weekend. That plus using the chatelaine means quick convenience – nothing can be dropped or left behind as we migrate from one panel room to the next.
As far as difficulty, the voiding requires no pattern reference once the foreground repeat is established. The partial fills each have enough detail that I don’t need to refer back to those patterns, either. I can just copy what I’ve already worked. Note that that second one is rather far along. In that case I DID get lost and decided to finish that square out here at home and not trust to luck on the go.
I’ll probably start on the foreground of the next voided strip, too. Either below the four-box fill row, or above the three-box fill row that sits on top of the motto (seen peeking out at top, from the folds underneath the frame). Which one I’ll do will depend on which design I pick next. I think one that’s as wide as or very slightly narrower than the Assist strip will sit nicely at the growing pile north of the motto. Something wider and more demonstrative for below. How wide and how demonstrative is going to be a function of the very narrow nature of the composition as a whole. I only have 102 units across to play with. Lots of my drama queen voided/double running strapwork strips have repeats significantly wider than that. We’ll see.
And a working hint. You can see that I’m not stitching up to the red double-running stitch boxes outlining my fills. I’m leaving a one-unit strip of unworked linen between the red outlines and the fills. Usually I “fig-leaf” any partial stitches when working fills in spaces buy doing them first, then stitching a heavy outline around the fill area to cover all sins. This time I opted for a lighter look. The hint is if you look at the on-deck set I’m currently stitching, and the two completed sets above (visible as partials in and above the hoop) you’ll see that I lay down the first pass of double-running, then work the fill, then go back and complete the double-running by stitching the second pass. I’m doing this because counting those little dashes is immensely easier to do than trying to navigate by counting the stitches in a completed line.
The uncorrected mistakes to date? There are four, and I hang my head in shame.
First, my original basted guidelines were off by three units. The natural vertical center of the piece is three units to the right of my first go at basting. That I didn’t catch until I had finished the voiding on Assist. Voiding is not something that should be picked out by the faint-hearted, especially in silk on somewhat fragile vintage linen. So I adjusted my alignments rather than picking out. When I frame or finish this up as a scroll there will be some compensation to keep the final field even all the way around.
Second, I’m off by an entire unit somewhere between the vertical center and right guide line, probably with two one-thread width displacements in an earlier slubby or worn/fuzzy bit on the vintage linen. There I didn’t catch that until the first row of fills and Assist were done. Oops.
Third, that interlace box. The interlaces are not centered, again they’re off. This error I blame on SWI – stitching while intoxicated. We had a lovely bottle of champagne that evening, to celebrate the close of the holiday season, consumption of the last of our leftovers and cookies, and (in passing) to toast our 43rd wedding anniversary. Obviously it went straight to my head. I left that one in to warn me against similar excesses in the future.

And last, the width of the rightmost box on the current fill line. All of the ones in this row are supposed to be squares of 24 stitches. Except that one. There was only room for him to be 23 units wide. Now four boxes of 24 units plus three separators of two units each equals 102. But there he is, one stitch unit narrow. So it goes. I’ll pick a nice scattered fill with a half-drop repeat and no one will notice. Plus an added benefit of the strident, visually distracting alternating strips is that they break cadence. I can correct the count after the next one is done, and the correction will be difficult to see because of the solid red mass separating it from the fills above.
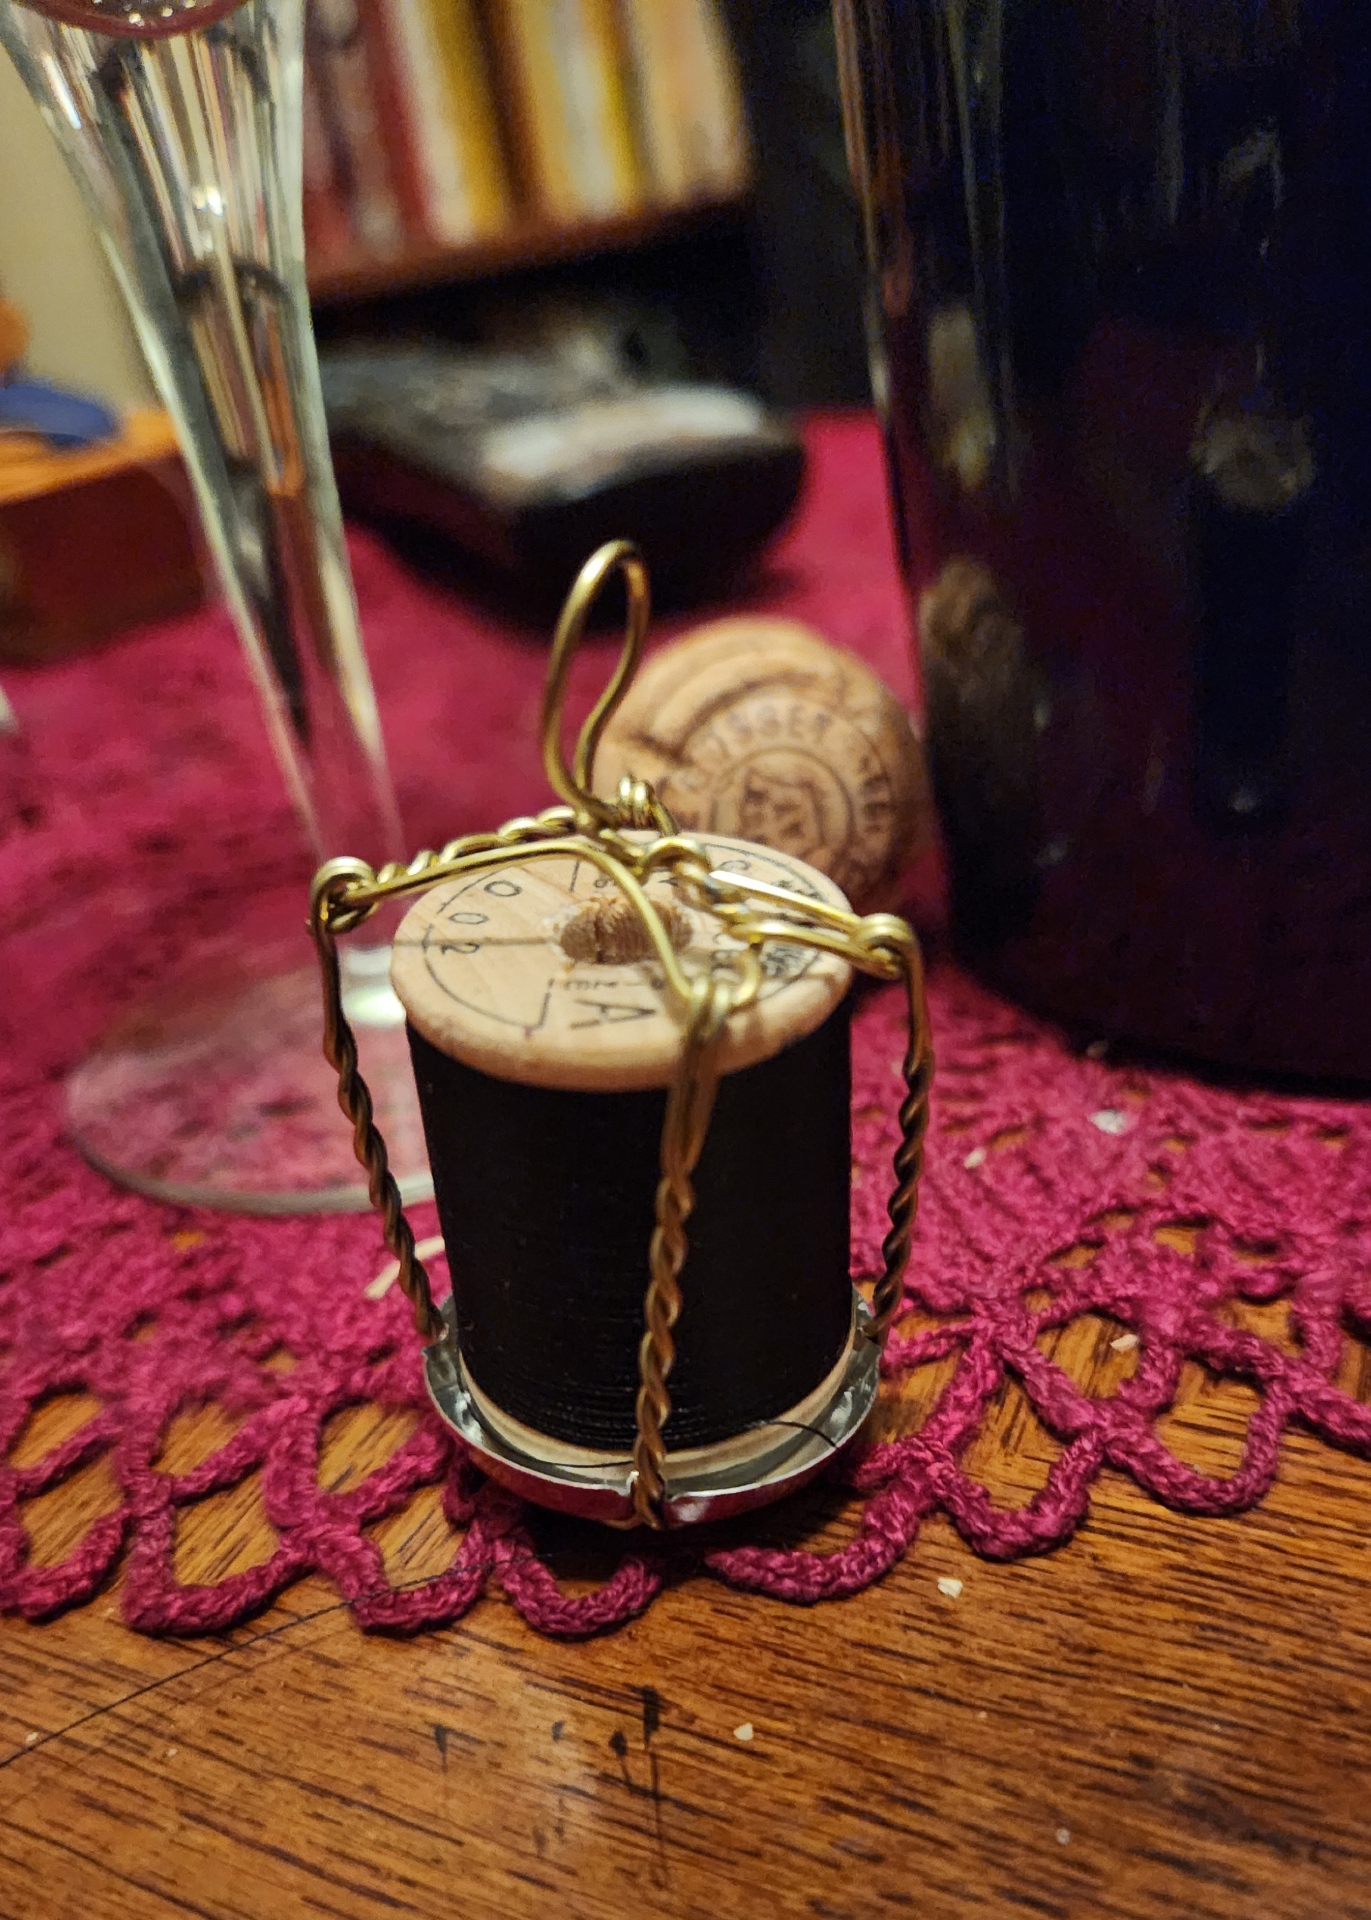
Oh. I did get a side benefit from the dissolute evening of sodden stitchery. I took the cork cage/bail from the bottle and twisted it into a spool holder for my chatelaine. I may go back and redo this with a silver tone one I had saved from last year’s bottle, but for now, it’s working well. The tiny spool of Corticelli Size A embroidery silk spins with little effort; just enough to make inadvertent unwinding unlikely, but easily enough to reel off what I need.
Will this piece be absolutely perfect? Nope. Far from it. And that doesn’t bother me because I have the next stitching project already in sight.
ASSISTANCE AND ACCOMPLISHMENT
I’ve started the third sampler in the PERSIST – RESIST – ASSIST series. Persist happened several years back. The other two are recent reactions to the greater world and everything in it. Assist is longer and wider than Resist. It’s approximately 40 threads per inch x 46 threads per inch. I didn’t have a selvedge edge on this remnant, so I’m unsure if it is more densely packed in warp or weft. I’m assuming weft. It’s long – roughly 23 inches after hemming. Subtract about 1.5 inches for margin all the way around and that’s a stitching length of 20 inches. Lots.
I’ve decided to use some of my stash threads, a mix of the the Cifonda Art Silk I brought back from India, in a plum color; plus some very fine Belding Corticelli silk, size A in black. The plum works up a bit more on the red continuum than purple. This is what I have so far:

And a closeup of the work completed so far:

My intention is to fill the cloth with voided for heavy foreground pieces in the plum and black, alternating with boxed squares or rectangles of fill samples. The heavy solid foreground/voided pieces will be done in two strands of those threads. The fill samples will be outlined in double running using two strands of the plum. The fills so far have been worked in one strand of the black. I might do some fills in two strands as I go along, for increased line weight contrast, but there’s an equal chance I might not. Two strands produces a muddy look, and I want to emphasize the airy laciness of the fills with the densely stitched solid bands.
Oh, that bare bit below the knot to the right of the T? That’s an artifact of a big mistake. It’s very hard to rip back long armed cross stitch neatly, and by the time I discovered I had mis-counted the black outline for that knot, it was mostly embedded in the background stitching. So I am leaving that line blank, and will be using it at project completion to house my initials and date. And I bet if I hadn’t ‘fessed up, you’d never have noticed.
As for my productivity round-up for 2024, finished items inclusive of knitting, crochet, crafting, and stitching, this is what I can show.
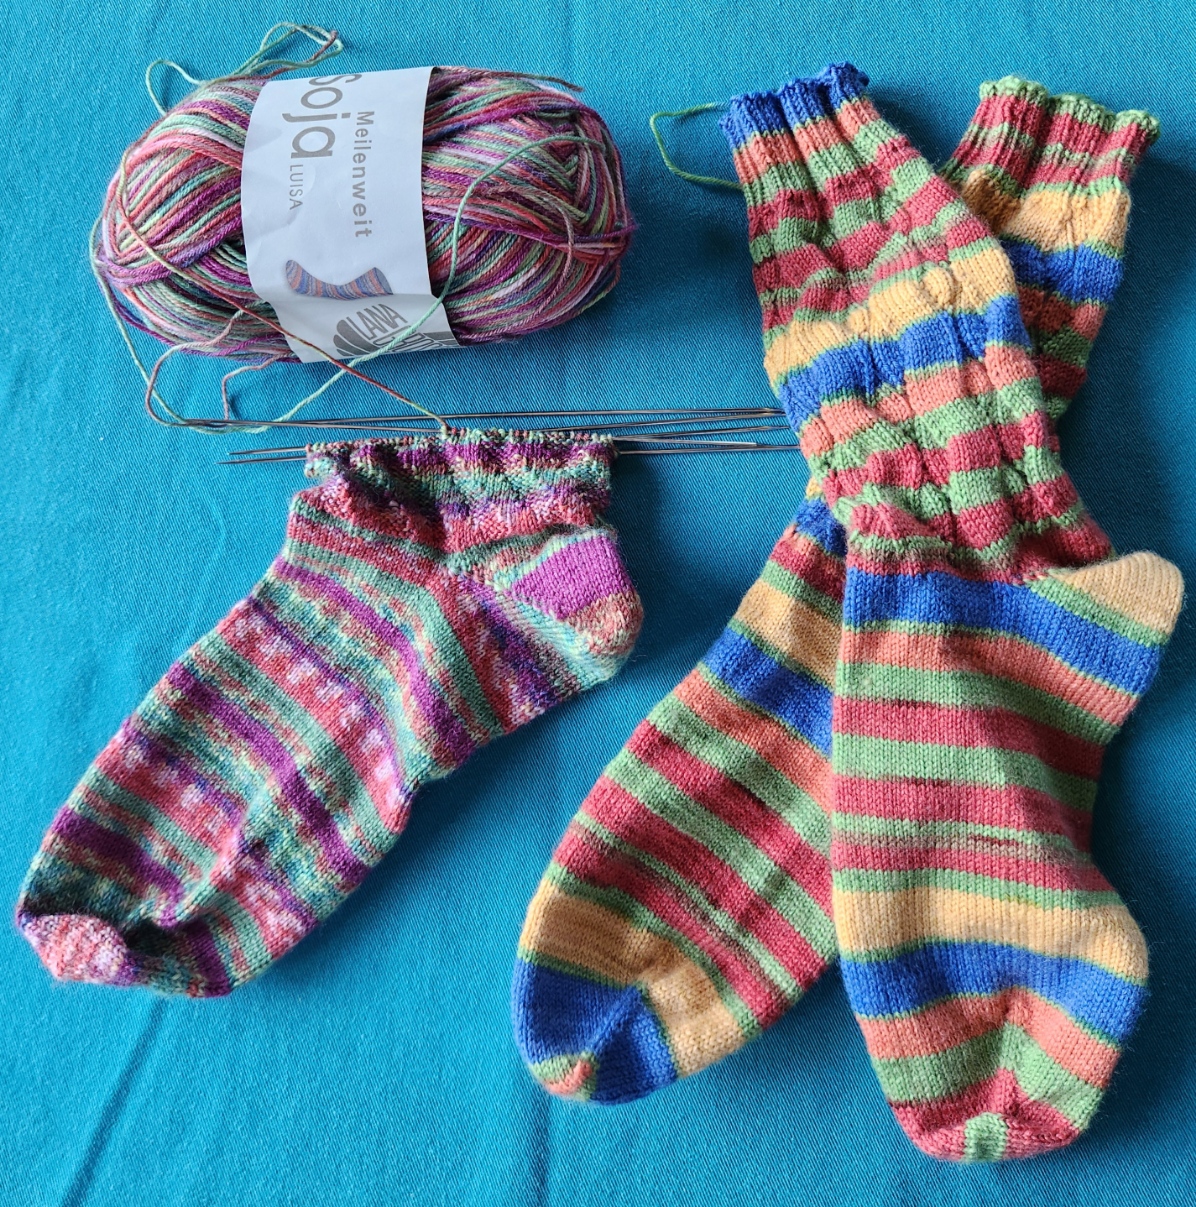


Above are a couple of pairs of socks representative of the seven pairs I finished this year. The rest were distributed before I remembered to take photos. Also above is one of two knotted fabric scrap garlands, made to increase festivity levels at the kids’ homes; the companion stocking to the one I made for Elder Spawn (the wolf turned out a bit wonky, in a loveable sort of way); a set of 12+ crocheted snowflakes, also for Elder Spawn’s new home; and a shoulder shawl from luscious Australian possum fur yarn (the yarn was a gift from an old pal and was too yummy NOT to use immediately upon receipt.)


Above are the three samplers in the series honoring the Resident Male’s literary output, plus RESIST; the triangular headscarf (aka forehead cloth) I finished and gave to another dear friend (again, distributed prior to finished item pix), and the ribbon I stitched for my chatelaine, so its weight would not tear my favorite shirts.
Obviously there are also WIPs – things begun but not yet done. Chief among them are the sashiko covers for my thrifted Arts and Crafts style chair frame and my vintage barrel chair. These bits will be cut apart and reassembled as part of a pair of recycled denim patchwork cushion sets/upholstery. Lots more on this to do, but the project turned out to be less portable than I wished. Our nomadic summer interrupted. I’ll try to get back to doing more pattern snippets before the spring, with luck to get at least one of the cushions done by summer.

No. I don’t spend all day doing these things. I’ve got plenty more to keep me occupied during daylight hours beyond writing these posts. I’m at work on THREE books/booklets – Ensamplario Atlantio Volume III; The Third Carolingian Modelbook; and composing all of the charts, articles and commentaries on my Epic Fandom Stitch-Along into one downloadable (free) booklet, to make it more manageable for those who might wish to belatedly join in the fun. There are other things in the works, too – some volunteer assignments, charting that isn’t destined for inclusion in the books, mending or making other stuff as needed, and gardening (we grew a ton of peppers and eggplants in a small raised bed, this summer past.)
The projects seen above were all done mostly in the hours after dinner, while watching TV or playing video/console games with The Resident Male. With an extra hour or two stolen on weekends after chores are done; or an hour here and there when we are at the beach place. It’s not in my nature to be bored in retirement.
