BLOCKING AGAIN
Several people have asked about the blocking board Laura used for her
Paisley. I’ve sent the question to her, and will post any reply.
In
the mean time, here’s another suggestion. When I’m not being lazy
slinging things down willy-nilly on towels, I do follow a bit more of a
method. First, I clear out furniture in the room with our largest area
rug (I’ve got no wall to wall carpeting). Then I lay down a heavy
cotton quilt type blanket to protect the carpet from any moisture, and
to give me more depth into which I can pin. Finally I cover the blanket
with a rally check patterned sheet, one of two I stumbled across in a
discount store. Once all is smooth and ready, I pin out my item, using
long rust-free pins:

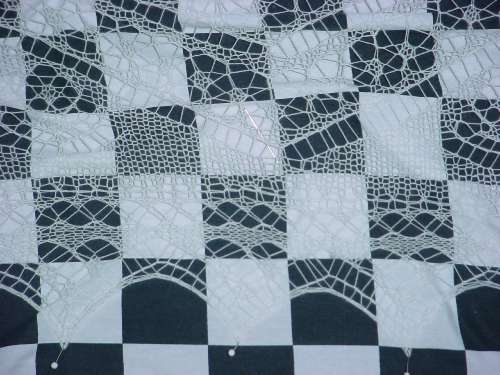
The
item above is my Spider Queen shawl. It stretched out to be about 7 feet
across. I began with a rough estimate of how large my finished item
should end up being, then I started at the center points of each edge.
I pinned them first, working from side to opposite side and tensioning
the piece across between counterpoised pins. Then I stretched out the
corners and did them, too. After that I just zipped back and forth
across the piece ping-pong style, pinning in the middle of each
remaining unpinned length until I had placed a pin in each of the
edging’s points:
About
the only caution I offer (beyond being prepared for the labor
intensiveness of this effort) is that the cheap Dritz pins I used were
long enough and rust-free enough, but they were too thin and too
fragile. They bent going in and the little bead heads pulled off when I
pulled the pins out. Not fun.
I know that rally check print
sheets are not an every day item, but any even check or Tattersall or
windowpane style plaid will work equally well. So would yard goods in
gingham or similar "graph paper" type patterns.
My friend Kathryn gently chides me about blocking my Kinzel Rose of England, languishing in my Chest of Knitting Horrors?
since 1991. While the method above would work for that piece it’s not
on my current schedule. ROE was the first bit of lace knitting I ever
attempted. It’s a testament to the precision and logic of that pattern
that I was able to do it with no prior lace experience.
At the time though, I wasn’t very appreciative though of my materials.
I used a mish-mash of size 30 white crochet cottons from various
makers, bought at different times. You can see where each purchased lot
begins and ends, some by slight color difference, some by texture. I
got about four courses of leaves into the final outside area and
stopped at the point where I ran out of thread (again) and when I was
no longer able to delude myself that the thread lot problem wasn’t
noticeable. I’d need to figure out where I was, buy more mis-matched
cotton, finish out another course of leaves, and do the final
crochet-off finish before I could even think of blocking. Either that
or ravel out a course or two of leaves and finish the thing from that
point. So you can get an idea of what the (eventual) goal is, here’s Judy Gibson’s ROE.
I know some people are asking about when I will be blocking my Alcazar shawl. I’m afraid the Larger Daughter took a fancy to my loud rally check sheets and took them off to sleep away camp. No large item blocking will happen here until she and my sheets return.
GALLERY – MORE PAISLEY!
I get a big kick out of seeing what others have made from my patterns
or pattern pieces. It’s a bit like meeting up with old friends
years down the road and finding out what they’ve been up to. I’m
delighted to be able to show off any photos of their work here in the Gallery section.
My latest vicarious bit of happy warmth was provided by my knitpal
Laura Need. She decided to do the Interweave Knits Paisley Shawl
from the Spring ’05 edition, but to finish it off with the simple edging I noodled up. She sent me the picture below and gave me permission to post it:
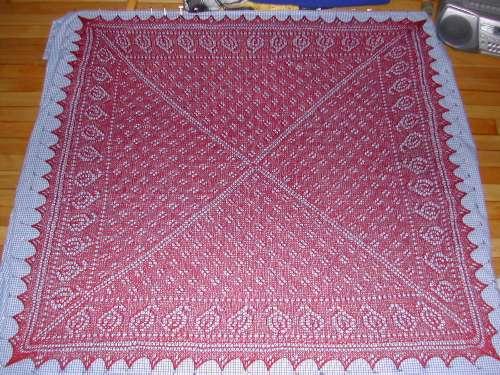
Laura used Zephyr, and her Paisley pinned out to about 46 inches
square. She did a much more even job of the knitting and blocking
than I did. Plus she had the wisdom to use a solid color.
You can see the difference:
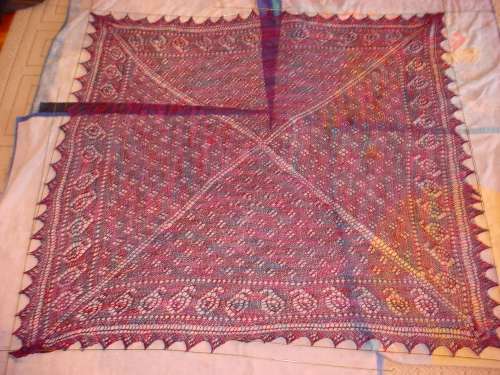
Laura’s paisleys and eyelets really pop out. You can see the edging especially well. The piece’s texture patterning isn’t fighting for your attention with ground color variations. That’s a big improvement. I
took the lazy way out of blocking, using my wires rather
haphazardly and patting them in place rather than pinning them down to tension the work. She did it the more labor intensive way that
produces better results – pinning out the individual points evenly on a
dimensioned blocking surface. (Hers also pinned out to be six
inches larger than mine.)
All in all I’m extremely impressed and quite pleased that Laura found
fun in my minor contribution to this pattern. A great job!
ON THE STUMP
Here’s a curious piece that came to me from the same grandparents as my fly bowl (I’ve been told that it’s actually a bee dish, not a fly bowl).

This
is an original pen and ink line drawing that appears to depict a piece
of stumpwork embroidery. It bears a sigil of the letters HCs (possibly
CCS) but has no other signature on it. It hung in my grandmother’s
library for years, and always held a certain fascination for me when I
was a kid. At that time I didn’t realize the embroidery connection. At
seven I liked the whimsical little animals in the corners, and the fact
the central figure was a queen. Anecdotal family tales say the title of
this piece is "Queen Esther."
Years later when I began
embroidering in earnest (started on that path by the same grandmother),
I stumbled across the stumpwork style and recognized the drawing for
what it was. I’m torn. I’m not exactly sure if this is a copy of a
piece displayed in a museum, or if it’s a freehand drawing inspired by
that style. I rather suspect the former. There is supposed to be a
stumpwork piece depicting Queen Esther n the
collection of the Massachusetts Historical Society, but I haven’t seen
a picture of it, so I can’t say if my pen and ink drawing shows that
particular artifact.
Stumpwork
(raised or embossed embroidery) was popular in the 1600s, tailing off
into the early 1700s. It has enjoyed a couple of minor revivals since.
It’s characterized by three dimensional effects, and is gaining
interest right now, in part fueled by the popularity of ribbon
embroidery and Brazilian embroidery, two other more modern styles that
also employ three dimensional effects. There are also traditional
forms of padded stitching practiced in Thailand and Cambodia that also
use heavy stitching on separately embroidered motifs that are affixed
to a ground over stuffing.
In stumpwork, much of the
stitching is done over raised grounds, separately stitched and sewn
onto a backing fabric. These motifs and slips are stuffed
underneath with batting or even little wooden forms. Additional raised
effect is provided by the inclusion of detached stitching, much of it
based on detached buttonhole, hollie point, or other "free" lace
stitches. On some pieces, further embellishment is provided by the
liberal use of gold and silver threads, sequins, spangles and even
beads. Some say that the little wooden forms used for stuffing
are the "stumps" that gave the work its ungraceful name, others say
that the name is a corruption of the word stamp, as many of the faces
of the figures were printed by stamping rather than being stitched.
It’s heavy and encrusted looking except in its very lightest
manifestations, not well suited for wearing. Instead it was employed
mostly for decor – panels, mirror surrounds, book covers, cushions, and
most especially small chests (cabinets) that were covered inside and out with the stitching.
Creating
a cabinet was a crowning glory for the amateur needleworker of the late
1600s. They were expensive to do, required better than average skill,
and represented a sort of needlework "graduation" for teens just about
done with the course of informal study that passed for most girls’
educations at that time.
There are several articles on stumpwork available elsewhere on the web, but precious few pictures of historical examples: This one has a useful bibliography, Janet Davies has some photos of artifacts that show the dimensionality of the stitching on her stumpwork and raised Elizabethan embroidery pages, CameoRoze also offers up an article on the modern revival of the style. In a Minute Ago also offers up a nice round-up of stumpwork and related styles as they are practiced today.
In the mean time my Not Embroidery hangs in my bedroom, where it complements a larger blackwork panel.
FOUR TODAY FOR TODAY
Four motifs done. My guesstimate is that four represents about 15% of
the total finished area. That means I’m looking at something like 26 or
so in total, with some of them being halfies.
It
looks like the trillium background shapes will form rings around the
star motifs. I’m really looking forward to seeing that develop. My next
step though may be to work out the half-width motif set. That would
include a half-hex, three normal triangles, one normal square and two
half-width squares.
UPDATE – Looking for past posts here
I do try to post stuff here that I hope is useful. I also realize
that much of it might not strike a reader as being useful today, but
might stick in memory somewhere and pop up when the specific need is
encountered. I’ve gotten a couple of questions (including a
comment early today) about how to find past posts. I’ve tried to
provide tools to do that.
First, for the knitting projects and some broad subject areas, I’ve set
up category tags. You can see them in the right hand sidebar (you
might have to scroll right a bit because of an over-large graphic I
posted last week). Projects all are named something like "Project
– Lacy Scarf" and index all the posts that mention each project.
The broad subject categories also work that way. Clicking on the
"Reference Shelf" tag will bring up all the posts that I thought people
might find especially helpful, likewise "Embroidery" should find all
the posts that discuss that subject.
Some particularly popular posts have merited direct access under the
major category "References," also in the right hand sidebar. Yarn
Labels 101 and 102 for example are two posts that get lots of traffic
from people just becoming familiar with yarn labels and how to read
them.
Finally for all those search needs that keyword indexing didn’t
anticipate, there’s a search box in that same sidebar. You can
type a word in there and bring up all posts that mention it, or you can
click on the "advanced search" tag right below that box to do more
complex multi-word or time-limited searches. Typing "booties" in
the search box should find the posts I did on A. Krekel’s pattern for
booties that really do stay on.
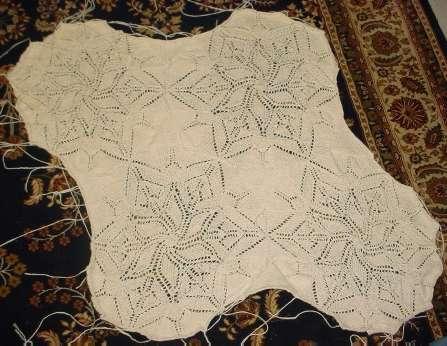
COUNTERPANE QUESTIONS
I know I said I wasn’t going to bore anyone with further progress on my
North Truro Counterpane, but I did get to an interesting point
yesterday, and my inbox has been graced with several questions.
First, the show and tell:

As
you can see, I finished a couple more side squares of Motif #3, and
seamed in most of the other little triangles that I knit over the
weekend. That let me join #3 onto the two units I had already
completed. I like the accidental trillium flower of negative space that
forms where three motifs join. I’d love to say that was intentional,
but it wasn’t. There’s lots that science doesn’t know about this
designing stuff, yet.
Now for the mailbag:
Aren’t you going to have a bushel of ends to deal with?
Two
bushels. Even though I’m knitting the squares out from the hex center,
there’s two for the center hex, plus two for each for six squares, plus
two each for six triangles, minus one for the hex end I use to do the
first square, and one for the end that doesn’t get started at the
outset of that first square. 24 in all for each motif. As you can see
in the pix, I like to leave them long so they’re available for sewing
the motifs together. As I get further into the thing, I’ll know WHICH I
need to leave particularly long, and which I can plan to be shorter.
Still, I plan on darning in ends incrementally as I go along rather
than waiting for the end of the entire project.
Why aren’t you blocking the motifs before sewing them together?
Good
question. Sometimes I do block the motifs before I assemble them. This
time I didn’t. This particular no-name yarn and needle combo seem to
produce motifs that lie relatively flat, showing the openwork well
without the block. I suspect my squish problem WOULD be partially fixed
by blocking, but leaving the hex motif live on the circular as I finish
out the squares isn’t exactly conducive to the knit-block-assemble
production method. Plus pinning out each night’s production means
leaving the ironing board up to do the blocking, and I don’t want to
trip over it for the next umpteen months.
Are you going to leave the edges wavy?
I
could. You can see that the lower edge makes a nice gentle wave. I
could leave the thing raw, edge it with I-cord, or sew on a (yet to be
designed) complementing edge strip just as it is. But I probably won’t.
Just on the principle that the biggest fun comes from the most abstruse
and useless effort, I’ll probably do up half hexes and half squares to
produce a nice straight edge, then affix that as yet mythical edging to
it.
Lovely crib blanket! You’re nuts for spending so much effort on a baby blanket.
Huh?
This is destined to be an oversized Queen-size spread for my own bed.
(I’ve knit a blankie for each of the kids, why can’t I have one, too?)
If you think I’m addled for attempting this as a mini-throw, I’m sure
you think I’m a gibbering raving loon for doing one that big.
PLUGGING ALONG
I was busy this weekend past.
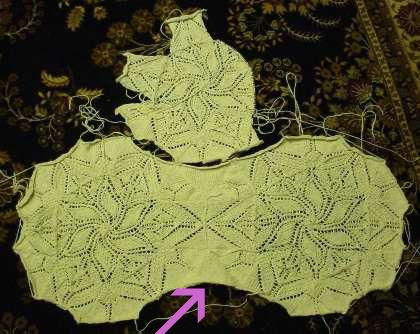
I worked out the plain triangle and made two. Both are sewn into the
growing group. One is indicated by the arrow. I do have a bit of a
scrunch problem, but probably not so much that it can’t be ignored.
The sides of my triangle are less tall than its base is wide.
Therefore, when I’m sewing the bases of the patterned triangles onto
the sides of the plain one, I have to squish them up a bit. You can see the slight rumples that result.
I do however like the way the points of the stars align. While
the orientation I tried last time had more movement in it, because the
stars were offset, this one will have less background area.

For those who have asked how I add arrows or other annotations to my
photos – I use Macromedia Fireworks to slim, retouch, or otherwise
manage my images. I cheat – the arrows are Wingding font
"letters" added with the text tool.
Shoe size chart
Some people have pointed out that their European shoe sizes are off a
bit from the chart shown yesterday. Mostly at the upper
end. The chart’s represented equivalent for US shoe sizes Women’s
9 and above seems to work out one unit larger than people are
reporting. So a 10.5 would be closer to a 42 than a
43. Grains of salt are advised.
SHOE SIZES, WORLDWIDE
I came across this on an Adidas shoe box, and thought it might be of
interest to sock knitters, especially those knitting socks as gifts
knowing nothing but foot sizes. It’s a chart showing adult men’s and
women’s shoe sizes in the US, the UK, France, and Japan. I’ve added the
red line to show my own giant size – US Women’s 10.5 (Euro 43, if such
a beast exists).
Now
by the official centimeter length my giant size works out to a squidge
over 28.5 cm. I find my own wool and wool blend socks fit best if they
are about 25-27 cm when measured from heel to the tip of the toe:
stretchier, finer yarns at the smaller end, less stretchy or heavier
yarn at the top end. The one pair of cotton socks I made was about 27.5
cm, to allow for that yarn’s lack of stretch.
Why do I make my
socks shorter than my actual foot length? If your feet feel like
they’re swimming in your socks, your socks are too big. Socks NEED to
stretch just a bit for optimal fit. Otherwise one gets bunching and
foot blisters where the fabric accumulates in folds inside the shoes.
Too big socks also wear out faster. All that sliding and rubbing
oversize socks do inside shoes translates to extra friction, and
friction is a sock-killer.

Click on image above for full size chart
INCHING ALONG
More bits and pieces are accumulating. You can see I’m more than
half way done with the second meta-motif. I’ve got two triangles
to sew on (I don’t actually do the stitching until the squares on both
sides of a triangle are complete.

In this photo you can better see what the motifs look like
individually. The center hex is pretty straightforward. The
triangle
is knit base to tip. The tip’s center is a textured stitch.
The
square (shown attached to the center hex at the bottom right) also
features the same textured area in the parallelograms that flank its
center spine. When the motifs are placed together, these textured
areas join up to make the star-shaped framing device that surrounds the
center hex’s flower.
Unfortunately this sort of project isn’t very good for blog progress
reporting. From here on in it’s going to be more photos of
exactly the same thing, done again and again and again and again.
You get the idea. I’ll probably mark the completion of each
meta-unit, and show a couple more photos of significant milestones –
like joining the motifs using the plain triangles I wrote about last
week, but I’ll try to avoid boring everyone with needless
repetition. Which means I’ll have to think up something else to
write about.
BLACKWORK MERMAIDS
In the absence of any knitting progress, I offer up another embroidered tidbit.
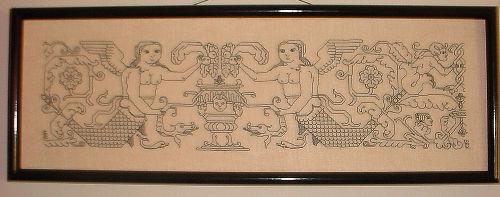
This is the last pattern in my New Carolingian Modelbook. It’s the same one that the SCA Lady Lakshmi used to make a hat for her friend Mistress Morwenna.
As you can see (in spite of my lousy camera work), my panel isn’t centered on the middle of the repeat. Instead I’ve skewed it a bit to focus on one mermaid, and to show the second bounce center – the twist at the panel’s extreme right. This is in part because I wanted to work one full cycle, but was limited by the size of the piece of linen I had available. For the record, this is done on 30 count linen (about 15 spi) using one strand of standard DMC embroidery floss.
This is one of the pieces I entered in the Woodlawn Plantation embroidery exhibition over the years. It won an honorable mention prize (feedback was that the judges didn’t like the skewing of the repeat). Amusingly enough, my brazen, bare-breasted mermaids must have offended some sensibilities. The piece was displayed at the very top of the wall in a room with 15-foot ceilings. The prize ribbon was clipped athwart the bosom of one mermaid, and a yellow sticky note was affixed to her sister’s.
ONE STITCH = THREE FEET
I was out webwalking again and came upon this:

It’s a report of a bit of performance art/industrial control/knitting
that boggles the mind. The artist is directing the production of
a knit US flag, using aluminum street light poles as needles and giant
strips of felt for yarn. The actual knitting was performed by two
John Deere excavators, handled with amazing delicacy and
precision. The image is from a story on iBerkshires.com, reporting about the event which took place at the Massachusetts Museum of Contemporary Art.
The artist in question is David Cole.
This isn’t the first exploration of knitting (giant or human scale)
he’s done. He’s also done a previous bit of oversize knitting
with construction machinery, working up fiberglass insulation into a
giant slouchy teddy bear. His other works can be seen at his
website.
I can’t say that the gauge of the flag was in fact 1 st=3 feet, but one
has to admit that it’s pretty huge. I’m especially boggled at the
thought of someone deconstructing the movements to produce a knitting
stitch, then reproducing that series behavior using the controls of the
excavators. I’d love to applaud not only Mr. Cole (for his
imagination in thinking up this concept), but also the equipment
operators. "Knit a flag" is an incredible thing to put on one’s
equipment resume, and is quite a testament to their skill.
