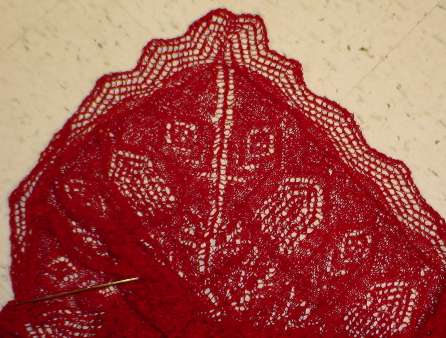
ALCAZAR – CORNER
I’m in the home stretch on my Alcazar. I’m about three quarters of the
way through edging the second side. That means I’ve worked one corner
and am about to work the second. I have to say that how to work the
corners wasn’t intuitively obvious in my first read through of the
pattern, and the original photo was of little help. It’s almost
impossible to see exactly
what’s going on with the edging in the photo because in the sample it
was knit in a
darker color which cannot be seen against the high contrast black
background used to display the rest of the shawl.
The pattern itself wasn’t too tough. It’s a plain variant of a
classic wave edging. It took me a couple of times through before
I realized that Carter was describing wrapped short rows for her corner
treatments. Now conceptual interference might have been in play thanks
to the glass of wine I had just before embarking on the corner, but
confusion remained even upon revisiting the instructions in the sober
light of morning. I admit I got the gist of the thing from the chart
and written accompaniment, and then (mostly) winged it. I’m not 100% pleased with Corner #1, but not so unpleased that I feel like tinking back and doing it again.
The
first step is to pause roughly one repeat away from the corner. Count
the number of live stitches remaining between your stopping point and
the absolute corner. There should be 25. Work that final repeat. If
there are too few or too many, adjust your rate of attachment by either
working one or more attachment points as sl 1, K1, psso instead of sl
1, K2tog, psso; or as sl 1, K3 tog, psso. The former should be done if
you’ve got fewer than 25 stitches remaining; the latter if you have
more than 25.
With luck and planning you’ll reach the absolute
corner stitch on the last row of the pattern repeat – the last row in
the first segment of Chart 4. You then work the plain return row, and
embark upon the next segment of the edging chart. Work across all the
stitches as directed. You’ll end up with one more stitch than is
accounted for in the chart. Wrap it short row style. Flip the work over
and slip this just-wrapped stitch, then finish off the plain return
row. On the next row work the stitches as directed. There will be two
left over. Wrap the first one, ignore the one further away from the
point of your left hand needle, flip the work, slip the just-wrapped
stitch and complete out your plain row. Do the same thing on the
remaining rows of the chart, only on each row the number of "sleeping"
stitches dormant at the end of the needle will be incremented by one.
Finish out this second segment of the chart. That last row will have
only two live stitches on it, plus a whole load of sleeping stitches
waiting for the next step.
And that next step is to begin the
next chart segment. Again work the stitches as directed. This first row
is two knits. The next stitch will be one that you had wrapped and set
dormant before. Knit it along with the loop around its base, then flip
the work over, slip this just-woken-up stitch and finish off the plain
side row. Keep doing this – following the chart, waking up the stitch
after the current row is completed, flipping the work over, slipping
that first newly woken stitch and finishing out the plain side row.
With
more luck, by the time you get to the last row of this chart segment
you will have woken up all of the formerly dormant stitches, and you’ll
be ready to march along Side #2 working the main edging repeat.
I
have to confess to one major error. Those plain side return rows? I
worked them as purls, yielding a stockinette-based edging. It wasn’t
until I was all the way around the corner and well into Side #2 that I
noticed that the directions said to knit them. A garter-based edging
would be a tad less curl-prone. I sat there and thought about ripping
back, but I decided to keep going as-is.
The flogging will commence in the morning…
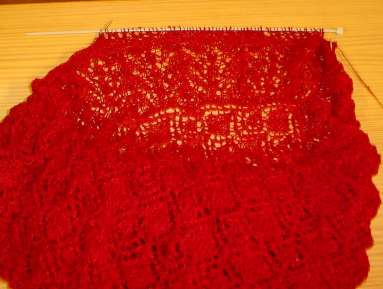
ALCAZAR – EDGING BEGUN
In spite of the massive amounts of prose here over the last week or so,
I have been knitting away at Alcazar. Here you see progress to
date:

In spite of my blurry photo, you can see the fountain area at the
bottom of the outer band, surmounted by the alternating pierced and
flower-bearing arcade layer. The final edging is knit
horizontally across the top. The edging itself is very simple – a
wave edging that appears in many variants, both stockinette and garter
based (it’s stockinette here).
One caveat. If you have never started an edging that’s attached
across a needle full of live stitches, the instructions in Alcazar
might leave you a bit baffled. Here’s what happens.
First, you finish out the final row of the outer band but do not break
off the yarn. Set it aside. Then taking a DPN of the same
diameter as your circ, you cast on the requisite number of stitches
using waste string and some sort of provisional cast on (the choice is
up to you, but I crocheted mine directly onto my DPN).
Now you’ve got a DPN with a bunch of waste yarn stitches on it.
Break off the waste yarn leaving a small tail so the rest of it stays
out of your way.
Take the main piece, with the right side facing you (vast areas of this
one are in stockinette, so identifying the right side is easy).
Put some sort of needle tip cap, rubber band or other plug at the end
of what would have been the right hand needle of your original
circ. Trust me on this as leaving this end free is a recipe for
disaster.
Holding the DPN VERY close to the shawl and using what would have been
the left hand needle end of your circ, purl across the provisional
cast-on stitches using the main yarn. Now work the first row of
the edging chart using the DPN. At the end of it you’ll be back
at the side where the edging is being attached to the main body.
The last stitch of the edging is worked together with the next two live
stitches of the shawl body by slipping it, then knitting the two body
stitches together and passing the slipped edging stitch over the
just-completed K2tog.
You’ll find that most patterns that work an edging on like this direct
that every so often the rate of attachment be increased, to make up for
the fact that knit rows and knit stitches are rarely the same
height. In this particular pattern, the final row of the repeat
is attached by slipping the last two edging stitches, knitting two body
stitches together, then passing BOTH edging stitches over the just-made
K2tog.
Keep working the edging back and forth following the chart.
You’ll find that once you’ve finished the first repeat you can ditch
the DPN and use the two ends of your original circ if you prefer.
In my case, my only 3.0mm DPN was a non-slippy aluminum one that was
driving me crazy. As soon as I could I went back to using both
ends of my nice, shiny, ultra-slick Inox circ.
Although this method is most commonly seen in attaching lace edgings to
live edges, you can use it to knit any horizontally-worked strip to the
live stitches of vertically knit edge. You’ll need to play a bit
with the rate of attachment to make sure your edging lies as you like –
either ruffled (increase the number of edging rows per body stitches),
flat, or a bit cupped (decreasing the number of edging rows to body
stitches) – but not having a seam to work is always very much
appreciated.
KITCHENER STITCH
I’m working (albeit in the background) on a project to get "Kitchener
Stitch" and "to Kitchener" into the Oxford English Dictionary.
I’ve already corresponded with an OED committee member and he is
fascinated by the historical connection. Should we find
sufficient documentation he would be glad to nominate the term for
inclusion.
I’ve gone on? about this before – mostly noting that until
knitters on both sides of the Atlantic began talking to another via the
‘Net, no one really noticed that that this term for grafting
(especially in sock toes) was far more common in the U.S. and Canada
than it was in the U.K.
This is in spite of the fact that Earl Horatio Herbert Kitchener was a
prominent British military figure in WWI, and a pre-1900 hero of the
Sudan Wars. He’s also the guy after whom the Sirdar yarn company
was named (a pal of his owned it and named it after Kitchener’s title
during his tenure in the Sudan). You’ve all seen Kitchener’s
picture, he’s the guy in the major league mustache who figured so
prominently in British WWI recruitment posters.

So far research has turned up some tantalizing facts:
Just before and in the early part of WWI, Lord Kitchener was in charge
of updating the British military kit, and oversaw the development of
standards for all items of battle dress and equipment, including
socks. Whether or not he (or his staff) issued military
specifications for socks that included seamless toes is still a tidbit
we have not pinned down.
Grafting as a technique to close up sock toes appears to not have been
widespread before the 1920s, and with very, very few exceptions is not
documented before 1920. We are still looking for exact,
research-grade citations for the earliest specific mention of grafting
(with a technique description) to close up sock toes. We’ve got
some anecdotal references, but nothing we can take to the committee.
The term "Kitchener Stitch" or "Kitchener Grafting" is still not pegged
down, although other sources lead me to believe that it was first used
in a socks-for-the-troops pamphlet issued by the Canadian Red Cross
circa 1916 – possibly from Kitchener, Ontario. This theorized
pamphlet has not yet been found. One pebble in the gears of this
theory is that Kitchener, Ontario was only named in 1916. (It
changed its name from "Berlin" at that time as part of the general
anti-German sentiment common during the War.). ?? Again, any
leads on this (with research grade citations) are most welcome.
We’ve got one from around 1923 or so as our earliest.
Jean Miles in Edinburgh is investigating another theory – that Lord
Kitchener (or someone acting in his name) either endorsed or submitted
a sock pattern? to those knitting for British Expeditionary Forces
at the outset of WWI. Again she’s got no true citations, and is
looking for leads.
As far as the technique of grafting in general – it appears to be rare
before 1920, if in fact it was done at all. Socks of that era
usually had round toes of some kind, and were terminated with a simple
draw the yarn end through the last several stitches type closure.
Some used variants of the three-needle bind off, but grafting (under
any name) is absent in museum samples before 1920 or so. Deborah
Pulliam wrote to me to say that in the course of her research she has
examined hundreds of pre-1900 and post-1900 socks and stockings, plus
hundreds of early knitting manuals and instruction sheets, and she has
not yet found a grafted toe prior to 1920. She also states that
flat toes were extremely rare prior to 1910, and are totally
unrepresented in socks and stockings prior to 1850.
There is another style of sock, I believe it is a full sole re-footable
one that was called a Kitchener Sock sometime around the late teens,
early 1920s, but it does not resemble the socks common today, nor has
the use of any grafting to make that sock been noted. Once more,
a good citation is lacking.
By research grade citations, I mean full annotation – name of author,
name of publication, date and place of publication, page number of the
citation, and a quotation of the paragraph in which the term appears.
So if you’ve got access to a local research library or Red Cross
archive and have nothing better to do, please poke around and let me
know the result. You might be the person responsible for
correcting this grievous oversight and getting Kitchener into the OED.
ALCAZAR – STILL PLUGGING
I took the time this morning to slip some stitches onto an extra needle so you can see more progress than the usual red lump photo would show.
The clear patch of diamonds is part of the center panel. Above it is a row of "fountains" – a texture pattern also appearing in Barbara Walker’s Second Treasury of Knitting Patterns (p. 272). After that comes some garter stitch, and then six or so rows of the arches I spoke about yesterday. It’s hard to see them because the rows are bunched up against the needle.
But in taking this picture, there was a bit of heartbreak experienced:

See those blurry stitches still on the temporary needle?? They’ve laddered back between one and four rows – in the middle of one of the more complex sections of the pattern (the knitting equivalent of the bread always hitting the floor jam-side down.)? Obviously some reconstruction here is needed, as I have no intention of ripping back six 700-stitch rows on behalf of a measly five stitches. That possibility still exists if I can’t rescue them, but I always try before I punt and rip.
Needless to say, this is the last time I try photographic grandstanding with a lace project in process.
PROOF THAT I EXIST
… that I’m not sylph-thin, and that I do finish wearables:
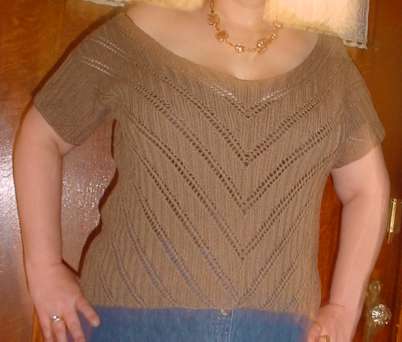
This rather blurry picture was taken by the 6-year old, which explains the
low center of reference and focus quality. (Bloggers have no shame, and willingly press even small children into service.) I’m tallish and some say intimidating, but not THAT tall or intimidating.
The item being worn is my Raiisa tee. So far I haven’t gotten a good photo of the thing, either on or off a wearer. I’ve provided the pattern but the charts for it are massive, and not for the faint of heart. I’m very pleased with the end product. Sausage arms and barrel body aside, it’s one of the more flattering summer knits in my closet.
As to the short lines, odd line breaks and general strange formatting here on String – I’m not quite sure what’s going on. Blog-City had a major upgrade earlier this week, and all sorts of minor things have gone awry. Please bear with me.
UPDATE:
Several people have written to say that this photo doesn’t prove that I exist, as it could have been taken of any random headless person. I concur, and would be happy to continue to be just a figment of everyone’s imagination, except for this. (I suppose I should update that page, as the gnome is now finishing up first grade.)
ALCAZAR – MORE PROGRESS
Still humming along on Alcazar. I’m almost through Chart #2, the fountain section. Again, one very minor (and absolutely obvious) glitch on the half chart. In row 21 there’s a blank box. That should be read as a knit stitch. The problem looks like it was caught and fixed by hand on the full-chart version.

I’m enjoying this one. It’s going much faster than I expected. One thing that makes the Carter patterns fun is the patter that accompanies them. Yes, some people just want the pattern. I happen to enjoy the way she fills out her instructions with an accompanying folk tale, or takes valuable space to explain the symbolism of or thought process behind cher design element choices. For example, this pattern is inspired by the buildings and gardens of the Alcazar, a palace in Seville, Spain. Parts of the palace are Moorish in origin, parts were added by various later rulers, including Pedro the Cruel and most recently – Franco.
If you look at Carter’s design and then at the palace pix above, you can see the tiled mosaic floors, fountains, cobblestone paths, and arched doors and pierced screens that inspired her. Very nifty.
BAG LADY
What makes a good knitting bag?? That depends on the knitter. Some like the granny-style standers – those bags on a frame. Some like backpacks. Others live and die for the absolute latest Vera Bradley?design. While I’m probably closest to the backpack set, I have my own ideas. For me it’s about minimalism and function, not style – so a parade of freebies has mostly been what I’ve used.
I’m thinking about this today because The Resident Male just returned from a conference at which he received an excellent bag. I snarfed it up immediately. He didn’t stand a chance.
What I want to find:
- Ample, roomy interior deep enough to hold a large project
- Pierce-proof sides
- Sturdy bottom square enough to sit up on its own
- Wide enough to accommodate long single points
- Light weight
- At least one large width zippered pocket for safe pattern stowage
- Comfy handles long enough to sling over my shoulder
- A zippered top, so that when the thing is tossed in the back seat of the car, nothing tumbles out
- Additional inside pockets to hold notions
- Not looking like a knitting bag (no prissy, cutesy or country-kitchen themed patterning)
- Low cost.
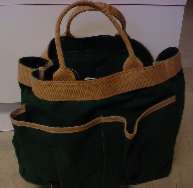
Here’s my (very boring) new bag:

It hits all the high points – lacking only interior pockets, plus it’s mostly waterproof/water resistant. It may be boring but it’s 99.5% perfect as a knitting bag. I’m delighted.
Here are several others from my collection.
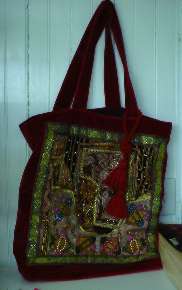 |
 |
 |
 |
The red velvet one covered with embroidery and bits of wedding saris is beautiful and capacious. It was also a highly appreciated gift. It’s extremely fragile, as the sequins and jewels have a habit of shedding. Plus it’s very floppy. Too beautiful and too delicate to schlep around, this one lives in the living room, lounging around on display and holding my upstairs project of the moment. (Yes, I have different projects in different rooms, and often work on what’s closest rather than my primary project.)? Gorgeous, but a B- mostly?for limited utility.
The little green canvas tool bag was one I went out and bought. It’s rugged, with lots of pockets around the outside. I loved the style, but didn’t think hard about how useful it would actually be. Unfortunately it’s too shallow for a big project, the splayed outer pockets spill their contents, and the handles are too short to make carrying it around comfortable. As a knitting bag it rates a C-.
The small blue embroidered bag was a find at the Gore Place Sheep and Wool Show. For the past several years there has been a Hmong family from Viet Nam displaying and selling hand made items? – bags, pillow covers, hangings and other pieces decorated with traditional cross stitch and quilting. This little bag is just big enough for one pair of socks in progress. It’s quilted, so it (mostly) resists needle point penetration. It’s got a small zipper pocket on the outside that holds notions. The straps are long enough that I can sling it over a shoulder and knit directly from it while standing. I’ve got a couple of these, each holding socks in progress. One lives at home and one lives at work. They’re ideal take-alongs for doctors appointments, the infrequent lunch break, waiting on post office lines, and knitting during other bits of found time. A solid A-. A specialty bag, excellent for socks or other small projects;?downgraded a bit because I tend to use ridiculously small (and sharp) steel DPNs that can stab through both it and me.
And the last bag – the woefully dirty el cheapo cotton trade show special is the type of bag I use most often: souvenir nerdbags from technical conferences. ? No pockets, no sturdy bottom, no zippered top, no point-proof sides, but ultra abundant. This particular one might be considered a Geek Collectible. It’s from the very first release of Oracle for the Macintosh. It was already old when I began using it to pack extra clothes to accompany The Older Daughter to day care, and she’s now 14. This type of bag merits a solid B+. Not the best by far, but serviceable, and best of all – free.
ALCAZAR – EDGE PICK-UP AND PROGRESS
Alcazar continues. As mentioned before, progress will be slower now that rounds are more than 500 stitches. As you can see though, I’m averaging four or so per evening:

This blurry photo was taken by stuffing my bag-like Alcazar over the corner of one of my sofa pillows. The area below the horizontal line of meshes is the side edge of the center square. The area above is the new part added on around that square’s perimeter. You can see what I meant by picking up in the side meshes – each one of those big openings had one stitch picked up in it, with YOs in between pick-ups.
No problems with Chart 2 so far, and the pattern (once established) contains enough internal clues so that it’s easy to proof as I go along. For example, there are central double decreases that always line up in a particular stitch column. If one is off alignment it’s pretty clear that something odd happened between the current spot and the last one. As a result I haven’t deployed my usual swarm of stitch markers to mark the repeats.
My opinion so far on difficulty is that I probably wouldn’t recommend Alcazar as a first lace project to someone who has never knit from a chart before. BUT I think that anyone who CAN follow a chart and who has the patience to do so for 500 stitch rounds should have no problems at all – whether or not they’ve ever attempted a lace project before.
GALLERY – DRAGONFLIES AND FLOWERS
I am so flattered!?
My friend Nancy has done an amazing thing with some graphs from The New Carolingian Modelbook. She took the tulip repeat from Plate 5:1, and the dragonflies from Plate 12:2, some snappy color choices, a good eye for placement, a comfy garment shape, and a true talent for stranded knitting and came up with this:

I’m tickled pink (and blue, and green, and yellow…)
Details on the graphed patterns
Tulip – This pattern was published at least?three times?prior to 1600 (early pattern book publishers freely copied off each other.)? The first appearance of it I’ve found is a book entitled Furm Oder Model Buchlein, put out in Augsburg, Germany, 1524.That makes it from?one of the earliest extant books of graphed patterns. (It’s theorized that broadside sheets were sold prior to entire books of collected patterns, but none of those leaflets survive.) The?other appearances of the tulip pattern?I’ve stumbled on were in Matteo Pagano’s Trionfo Di Virtu, Venice, 1559; and Sessa’s I Frutti, also Venice, 1564.
Dragonflies – This one is my own, inspired by insects appearing in a series of Italian pattern books from the 1530s.

The excellent photo was taken by Nancy’s friend Terri (credit where credit is due). Nancy didn’t tell me the yarn she used, but she’s a frequent visitor – perhaps she’ll see her masterpiece and leave a comment.
For those looking for a copy of TNCM, it’s hard to come by. The publisher did a disappearing act shortly after the book came on the market. Copies continue to trickle out for sale, and it sometimes shows up used or on eBay. Both Amazon.com and abebooks.com list used copies as being available, although some of them are at grasp-the-chest-and-stagger high demand/collector prices.
ALCAZAR – BACK TO SNOOD STAGE
I’ve finished the center square of Alcazar, and have successfully picked up the requisite number of stitches around its perimeter. This was relatively painless as picking up sessions go because of the highly sane way in which the pick-ups were structured. If you go back to Friday’s picture, you’ll see that there are mesh-like spaces along all four edges. The directions say to achieve the correct number, all you have to do is pick up one stitch in the first mesh, do a YO, pick up a stitch in the next mesh, do a YO, and so on. And it worked! I managed to get the correct number on the first pass on each side.
So now my Alcazar is totally on one circ, and I’m in the midst of the several rounds of plain knitting that precede the next chart. Which explains this enigmatic sack-like object:

There’s one bit of advice in the pattern that will be a bit of a pain. When working this piece in the round instead of doing the sides flat as trapezoids to be corner-seamed later, Carter suggests twisting the last and first stitch of each side together (doing a left twist or right twist, it shouldn’t matter) on every odd numbered row, in order to give the corners a bit more stability. That’s fine with me, except that I’ve got markers at each corner. I’ll either have to take them off and replace them (a fumbling around style pain); or move them one stitch to either the left or the right so that they aren’t mid-twist. If I do the latter, I’ll have to remember that every subsequent chart of the piece is going to be off by one stitch (a different but entirely mental?pain).
Happy Birthday to Me
It’s that time again. Last year the kids asked what I wanted for my birthday. I said "Good children." And the younger one piped up "Covered in chocolate!" Which led to the older one drafting up my all time fave birthday card:

To be truthful, at this point just I celebrate anniversaries of my 21st birthday. How many has it been? The stock answer is "Several."
