SLOWLY UNPACKING
Remember I said that
- I had rescued my knitting things from the storage cubby;
- I was bound and determined to turn a rather dingy basement room into a needlework retreat; and
- I wanted to?outfit my haven?on a budget as close to zero as I could manage.
I can report progress on?all three?fronts. I’m sure you don’t care about seeing six stacked Rubbermaid storage tubs, but this is slightly more interesting:
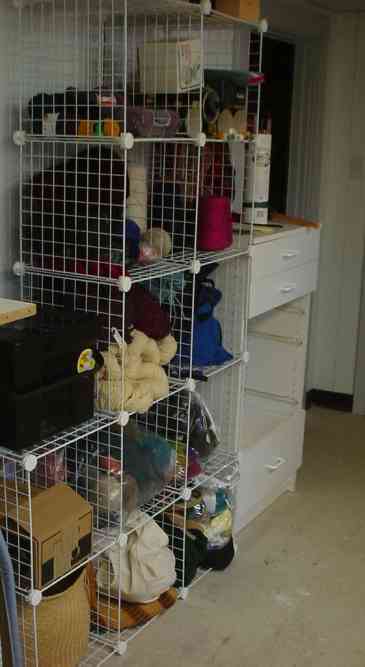
I’ve kept the large table shown in the before shot. The ceiling tile is replaced, the floor is scrubbed, and?all debris is gone. I moved the white wardrobe to the same wall shown in the new photo, above. The white drawer unit is now further down the wall, and the mesh cubes shown here?are betwen it and the gas pipe, which you can see sticking up between it and the other white cabinet in the before photo. My storage tubs of yarn are stacked in the corner of the room where the wardrobe used to sit. No progress on a comfy chair yet, but we’re replacing my daughter’s desk chair this week, so I’ll probably snarf up the abused cast-off for my workroom.
As you can see, the el-cheapo Home Depot storage units we brought over?from the old house are not good candidates for relocation. The drawers are out of the unit you see because?during the move it?shifted from true, and the tracks are now too far apart to hold them. Some minor carpentry is in order before it’s useable again. If you’re thinking of buying this type of peg-together pressboard storage furniture at a home center or discount store, ?remember that it’s build-once-and-leave-it stuff. Regardless of the low cost,?I don’t recommend it for people who are still in the nomadic phase of life, especially?if re-using the piece in a new location is a consideration.
The wire mesh cubes however are a new acquisition, and bode to be both durable and capable of being taken apart and put back together many times. Last week?these?units?were on special at Target. One box of them makes a stand-alone six cube unit, and the cost (on sale) was just under ten dollars. I snapped up two boxes in white (they also come in black). They can be assembled in any of a number of ways. I’ve done my installation in 2, 4, 4 stacks to work around the?large gas pipe on that wall. Because of the geometry of the thing, I’ve got two mesh units left. Not enough to make another cube, but enough to jury-rig two half-height shelves or dividers in existing cubes by using?some nylon cable-tamers to do the attachments.
The stuff in?my cube unit isn’t there for any particular reason. Mostly it was miscellaneous knitstff that got packed separately from my storage tubs. There’s my swift and ball winder; my collection of single-malt Scotch containers housing needles and other tools (upright on the white dresser, and horizontal in a top cube); various UFO bags; a stack of some rustic-type wools that in violation of my own stash-management rule, has overflowed it’s allowed tub. My small black box of sock yarns; and various coned oddiments. I believe that cone of raspberry is in fact Believe, a find from the Classic Elite mill ends outlet up in Lowell, MA. Books, mags,?and leaflets are elsewhere in the house, in their own bookcase; with mags and leaflets?sorted more or less haphazardly into several plastic magazine files.
Eventually I’ll sort through the tubs and pull out Yarns of Immediate Inspiration to put on these shelves; stowing the ones I don’t plan on using in the next fifteen minutes. My stash management rule??
If it doesn’t fit in my existing containers, I can’t buy it.?
That means I either have to knit up new acquisitions immediately, or make room in a tub by using up something that’s already there. However, eyeing the tubs I see that they are increasingly filled with odd lots of leftovers rather than full-project amounts. Perhaps it’s time to organize a yard/yarn sale/swap meet, and invite the world over so we can all redistribute our holdings to better effect. Hmmm….
GALLERY
Remember two days agoI said I’d be delighted to show off any projects that other people did either from or inspired by my designs? I’ve started the blog category "Gallery" for just this purpose. First off, here’s a nifty example of a piece adapted from a stitching design in my book:
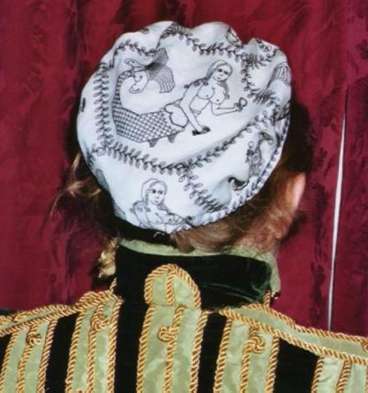
This hat is part of an Elizabethan costume made by a fellow participant in greater Boston, MA area SCA activiites. The stitcher’s SCA name is Lady Lakshmi Amman, and the recipient (and model) is Mistress Morwenna Westerne. Click on the photo for more detail shots ofLakshmi’s work, including graphs forher adaptations ofmy winged undine from Plate 75:1 of The New Carolingian Modelbook. (Lakshmi’s photo appears here by permission.) Because the piece was made to celebrate the artistic accomplishments of Mistress Morwenna, Lakshmi’s undines each carry something associated with Morwenna’s favorite pursuits. There’s an embroidering mermaid, a cooking mermaid, a performing mermaid, and several others. Very clever!
More on Crochet
I’ve gotten some more feedback and help on ways to attach edging and borders to pre-existing filet pieces; and advice on how to better keep 1:1 true square proportionality when forming meshes.
First, advice from Vaire, the Innocent Abroad onmaking my squares square. She says that try as she might, she was never able to achieve true squareness using the base-4 style mesh I’m using. Instead she switched to base-3. That’s one double crochet between the legs of the mesh to form a filled square, and one chain stitch between the legs of the mesh to form an open one (I do two of each right now). She said that this reduced the width spread of her squares.Vaire went on to suggest another method of increasing mesh size: using 3 ch betwen trebles, instead of 2 ch between doubles. This makes a larger, more airy mesh, and opens opportunities for partially as opposed to solidly filled squares (tr, ch, tr, ch, tr). Thank you, Vaire! Both are intriguing ideas, well worth experimentation.
My pal Kathryn also continues to ply me with great ideas too numerous to all list here. Several have been for methods of joining filet sections. There’s been a step-style join that makes a mitered corner. I need to try that one out before I can explain it better. At first I was afraid that my not-square squares would throw the miter off, but used in combo with Vaire’s base-3 idea, it sounds like it would work quite well. She’s also sent me quotations from pre-1920 books that discuss methods like overhand basting to hold sections together; and picking up and working an edging in another style of crochet.
Finally Vaire also suggests using double crochets as horizontal "brides" (reseau) to attach the new bit to the old. This is also a nifty idea, and one I considered, but I was doomed by a poorly planned design choice. I want a two-mesh strip of empty meshes all the way around the piece. I’ve already made that. To do the bride method, I’d have to have done only one, as the row of attachment would provide the second. Since I want most of the joining row to be solidly worked, were I to do it with horizontal double crochets I’d run afoul of the proportionality problem again. Again, thank you! A good idea for a future project, but I’ve pretty much painted myself into a corner on this one.
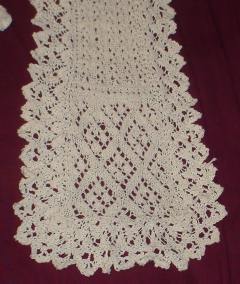
WORKING REPORT – FILET OF DRAGON
More progress.
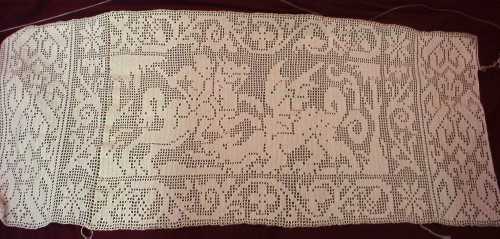
I’m only three rows from being done with this side panel, so I turned my attention to figuring out how to join the top and bottom strips. I think I’ll end up doing something like this:

I’ll be working this strip the long-narrow direction, joining it to the side of the existing piece. I think the joins will be visible if you know to look for them, but they shouldn’t be too distracting because except for the first two and last two rows of the piece, the column of meshes thatis being attached are all filled in, and any additional heaviness should be visually lost in that solid line.
In the mailbag I had a couple of questions on why I thought that filet crochet is clunky and heavy looking. The people whowrote thought my piece was anything but. However, to me filet isheavy by comparison to Lacis – the style it emulates.
Lacis is worked by darning in the meshes on a hand-knotted net background. You start with a netted ground, then with needle and thread, weave in the meshes that need to be worked solidly. There’s a wonderfully arcane logic to designing one’s path of stitching so as to minimize ends. If you like themental excerciseof working double-sided blackwork or cross stitch, you’d really enjoy Lacis. For delicacy though, filet crochet just can’t compare:
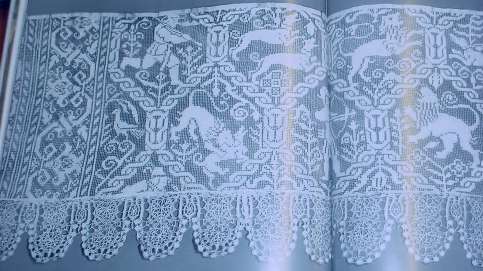
This photo is froma photo catalog of household and decorative arts held by the Hermitage Museum in St. Petersburg, Russia. The book is in Russian and French, published in 1974. It identifies this piece as being Italian, 16th century, but says very little beyond that.
To my amateur eyes, it looks like this piece of lace was cut down for re-use, because not only are motif roundels rudely interrupted, both the tape at the top and the applied needle lace lappet edge at the bottom are sewn on to roughly cut edges that in some places slash meshes in half. Even so, look at the extreme contrast between the darned solid bits and the spiderlike open areas formed by ever-so-thin single thread mesh ground. Now THAT’S delicate! You can also see yet that the use of the borders and centralpanel areais yet another bit of inspiration that stewed around beforethe idea for mydragon curtain was birthed.
This designs in this particular pieceare on my "to-do" list to graph up for Ensamplio Atlantaea. My postulated but not yet realized sequel to The New Carolingian Modelbook. Little things are holding up that production – like the lack of a good graphing platform, not having a publisher, that so many other people are now plowing the same turf and I don’t want to repeat material others have issued.
How did I lay hands on the Russian decorative arts catalog? It’s amazing what you can findin the damaged goods deep-discount boxes at some Cambridge, Massachusetts used book stores.
MELTING
It’s hot and I’m melting. I’m glad I’m working with cotton on my filet project, as the thought of even the lightest, smallest woolen project in 90-degree F humidity makes me twitch. Work continues on several fronts. I’ll have more Dragon postings tomorrow or Tuesday.
Lightning Strikes
Right now though, I’m busy writing up the Summer Lightning lace scarf pattern for inclusion on wiseNeedle. Here it is again:
If I miss an odd day or two here and there on the blog, it will be because my web-time quota is being used up drafting out this pattern. I’ll post again when it goes "prime time." Once it’s up, I’ll enjoy hearing from people who try it.
Since I’m (obviously) not in this for the massive bucks,readingabout the fun people have with my stuff is my prime reward.Seeing pix of it is even morenifty.I was ultra tickled to see this hat adapted from Knot a Hat by Australia’s ZenKnits, back in June. There’s a nifty armwarmer on I’d Rather be Knitting, also back in June that used the doodle cable I posted here on String. I’ve also heard from a couple of people who have used the Mountain Laurel counterpane pattern and my various sock patterns. In fact, if you’ve knit something from one of my designs I’d be delighted to show off your work. Feel free to write to meso we can discuss file formats and the like.
Eye Candy
In the general eye candy department, I stumbled across this knitted pin ball. It’s an egg-shaped pincushion, knit in silk and dated 1801. It’s offered for sale by an antiques dealer specializing in samplers. Given the excellent condition I’m not surprised at the high price, but it makes me wonder. Did Elizabeth Searle ever envision her humble gift of friendship lasting out the years? 200 years from now will any of our works be offered up to avid collectors?
WORKING REPORT – MORE FILET
Still plugging away on the dragon:
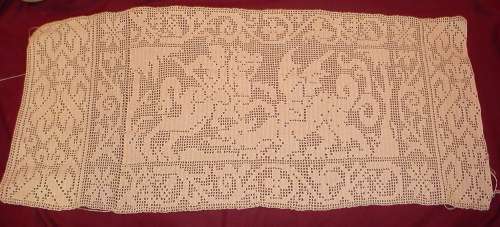
Thanks to my friend Kathryn Goodwyn (who many of you may know from historical needlework mailing lists as Kathryn Newell) I’ve got a couple of ideas on how to do a surrounding border in filet. Unfortunately several of the methods can’t be backwards engineered at this point, but the core concepts are very strong.
One very promising method she sent to me involves working stepwise at the corners, forming a piece mitered more or less on the diagonal. I played with it a bit last night, and found that my rather squished ratio of height to width for my meshes doesn’t behave nicely with the concept. Plus I’d need to rip back the end bits and start them again. More tinkering is in order because this technique has real potential, but I think I’ll settle for butted strips on the top and bottom.
I have to admit, when I started this piece it seemed like a long slog was ahead. While it has taken longer than I anticipated, I’ve enjoyed the processmore than I thought I would (I was rather product-centered at the outcome). I’m definately thinking of doing more with filet – perhaps combining it with knitting into garments.
General Questions:
I know there are knitting purists out there that recoil in horror at the thought of knitting patterns/mags including crochet, let alone combining the two crafts in the same piece. I’m less parochial in my views. Would you be interested in wearable pieces that combine both? I’m talking delicate and fine gauge stuff, as opposed to some granny-square travesties I’ve seen lately.
With all the blather about quick-to-knit and one weekend pieces, is there interest infiner gauge, greater effort projects? Or is everyone interested in producinghats, scarves,or felted bags that can be finished before the credit card bill carrying the yarn charge arrives? Is thecohort of new and returning knittersthat started with those projects ready to "graduate" to larger efforts?
YARN ACQUISITION ALERT
Schoeller-Stahl Big
I know I have a strict no-endorsement policy on wiseNeedle. But this is my blog and I’m totally unpaid in all accounts.
I’m not a big on-line yarn orderer. I’ve got to fondle the stuff myself. However many people have written to me to ask where they can get Big – the yarn that my Firefighters Socks pattern was written for.

Bigwas originallya Stahl yarn, it’s now listed as Schoeller-Stahl, but it looks like the same stuff.Big has beenhard to find. Sohard in fact that I thought it was totally discontinued. Itjust so happens that today it popped up on Elann.com. [More yadda, yadda – no affiliation, etc.] If you’ve been looking for it and your LYS wasn’t able to supply the need, you might consider looking there.
ROMILLY AND NOT (GADGETS – BREAD TAGS)
Firefighters Socks
Several people wrote to ask where they could buy my Firefighters Socks pattern. You can’t buy it. No one can. It’s not for salebecause I give it away free at my wiseNeedle website. The links here (and in yesterday’spost) will take you directly to it. It’s written for worsted/heavy worsted yarn, and if you’ve never done toe-up socks with a Figure-8 toe or short-rowed heel, being at such a large gauge is a good pattern for a first attempt.
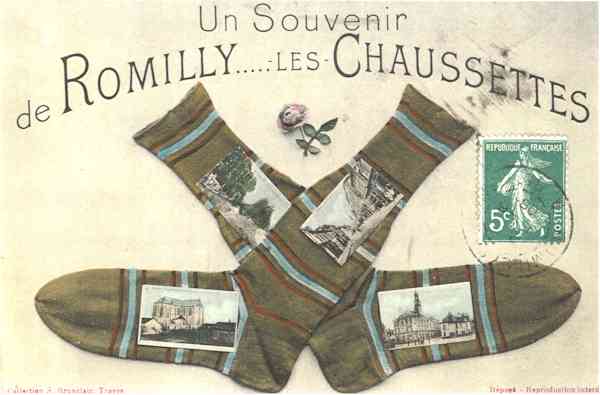
Romilly-les-Chaussettes
Thank you to everyone who wrote to say that thepostcards I posted yesterday were printed around WWI. I thought that was rather obvious, so I didn’t bother to note it. Most of the others on the site I mentioned were of the same vintage, with a smattering of earlier and later cards.
And a BIG thank-you to Spinnity, who was intriged enough by the sock card to comb through history sites (in French) to find out more about Romilly and its curious link to socks. She left a nifty comment. I’ll summarize her theories:
Romilly was a center of sock manufacture, with at least two large factories nearby producing socks and stockings. This line of regional specialty continues to at least March of this year, when Jacquemard, a major sock factory, closed. The town apparently has had the name “Romilly-les-Chaussettes” (Sock Romilly) for a very long time. Here’s her link detailing the passing of Jacquemard mills(for some reason it didn’t come through on her comment post): in French; in machine-mangled English.
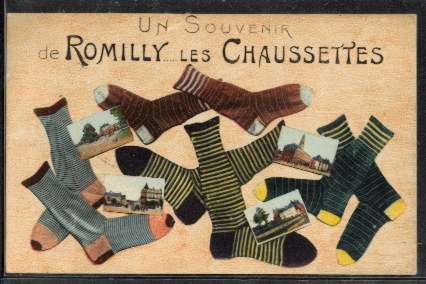
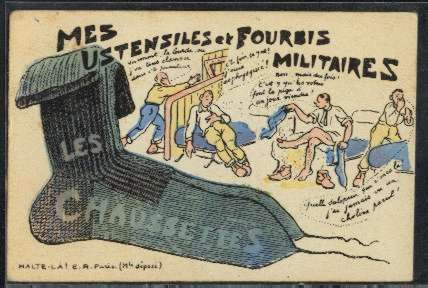
Here’s another Romilly-les-Chaussettes postcard:
Again we see the stripes passing north and south of the heel. But the heel isn’t a short-rowed one of the type often seen on machine-made socks. It has a wide heel flap that wraps around the entire back of the foot, then a cupped bottom area. It looks like after the heel unit is finished, stitches are picked up along the heel’s foot-side edge, and the foot is continued tube-like from that point, incorporating live stitches from the top of the foot.
Apparently the tradition continues. I found mention of at leasttwo more sock factoriesstill in operation in the area around Romilly surSeine (Olympia, Aube Chaussettes); plus in true French fashion – a regulatory board or committee overseeing standards of manufacture and appelation.
Not in France Anymore
Having had a brief whirl through France, I turn to something that causes shudders of horror in every visitor I’ve ever had from that land: American packaged bread. Well, not the bread itself, but the little plastic tags used to close the bags. Continuing the series on indispensible but free knitting gadgets, I put forth the humble bread tag:

What use are they? Well, you can write on them then clip them onto things.
Have you ever been working on a garter stitch piece and forgotten which is the front? While you could remember that the front is the side that has the cast-on tail at the right or left (depending on your method of casting on), I for one can never get that straight. A bread tag with an “F” on it, placed on the front of the work can be a lifesaver.
Need to track the point where something tricky has happened? Bread tags can mark armhole decreases, sleeve increases, buttonhole locations, and the like. They attach firmly to your work, and rarely fall off. Safety pins work well, too but the coils of standard safety pins can get tangled in the knitting yarn, and not all of us have the fancy coil-less safety pins sold in knitting and quilting shops to hand.
I’ve used them for marking yarns in my stash. If I’ve swatched, I’ll scrawl the acheived gauge and needle size on a tag and affix it to the ball. I’ve used them to identify or otherwise mark swatches submitted to pattern publishers as part ofmy designproposals.
Bread tags arefree and completely disposable. You can break them to remove them from your knitting, and not feel you’re tossing away a good tool. (In my house at least they are a constantly-renewing resource and rank up there with wire hangers and AOL CDs.) They also come in lots of colors – good for any color coding scheme you wish to devise.
In a non-knitting mode, I’ve also found them very useful for marking the cables that plug into my routers. I know know exactly whom I am disconnecting when one gets unplugged, even if the shout of dismay wasn’t audible.
Finally, I know people who use them to mate socks before laundering. A bread tag through the toe keeps the pair together, andavoids thatdreaded One Sock Syndrome.
So if you’re looking for a way to make in-work/on-work notations, don’t pass up this humble resource. After all, it’s not like you have to rush out to buy some.
GOODIE ALERT – TRADITIONAL SCANDANAVIAN COLORWORK
Each week Dover books sends out several sample pages of (mostly) kids’ books as come-hither advertising. This week’s freebies include four pages of illlustrations from Sheila McGregor’s Traditional Scandanavian Knitting. They offer up two pages of colorwork photos, and two pages of small graphed patterns for Setesdal jerseys. You canleaf through all four image sets here.
These samples only stay up for about a week, so if you’re tuning in later than the beginning of September, you’re out of luck.
INSPIRATION – HISTORICAL NEEDLEWORK POSTCARDS
In answer to yesterday’s questions – yes, the two sleeves of the Sad Little Object are very different. Plus one is fully seamed front and back, and the other is only fastened to the front. Even so, themeasurement across the upper arm on the sleeve on the right (the skinny one) is two inches narrower than the measurement across the same spot of the one on the left. Truly a disturbing little piece… I will however save it as a cautionary lesson. Perhaps just seeing the mismatched upper sleeve colors will scare someone into springing for that extra "insurance skein" the next time they make a closely esitmated yarn purchase.
Needlework postcards
I was out web-walking late last night and ran across some amusing offerings. Please excuse me if I’ve linked to these in some sort of etiquette-violating manner. I’ve got two impulses here – the first is not to unduly burden someone else’s server; the second is to respect their ownership of these materials by not duplicating their files on this site. That being said, here aresome nifty bits. They’re part of a collection of vintage postcards being offered for sale by Postcardman, a collector. [No affiliation, yadda, yadda]. The site is being hammered right now because it was mentioned on Boing Boing (where I found it), so both patience and coming back later might both be in order if the images are slow in retrieving. UPDATE: I’ve gotten so many notes already asking for me to post these directly that I’ve done it.
First, here’s one that makes me want to sharpen my historical investigative skills:
Why was this Romilly, France associated with these socks? Anyone know? It’s also interesting that the stripey ones look a lot like Regia Mini Ringel if one did toes and heels in a contrasting color. Plus there may even be more than one working method shown. The yellow heeled pair and the gray pair with the apricot/brown toes/heels look like they’re worked similarly. But the blue/yellow stripey pair in the center looks a bit different. Examine the way the stripes terminate even with the heel on the yellow toed pair. They don’t do that on the center one. That one looks a lot like the short-row heel socks I make from Ringel, with the stripes "splitting" around the whole heel unit.
Then there’s this one. If you’re more musical than I, please enlighten us all on the nature of this little knitting song. (The image is too big to post conveniently, so you’ll have to click on the link.)As far as translating the lyrics, I get something like:
Song of the Needles
Knit, needles of France
Start ?
Knit with martial cadence
For the heros, the sons of France
Who fight and die down below
Countrywoman or grand city lady
In salons and in ??
Knit the same wool
Without knowing whomyou will clothe.
It goes on from there to speak of fears for the loved ones, that all should undertake this work in the hour of fraternal/patriotic spirit, and ends up with
Inch by inch, stitch by stitch
We repel the German forces.
Everyone is onthe battlefield,
Needles of France, go forth!
Of course my French is mighty rusty, so if anyone else makes more sense out of the thing, please let us know.
Other curious needlework and knitting related cards include Socksof the French Soldier:
The big caption works out to something like "My tools and army-provided kit." Again, if you can get this photo to load, look at the way the socks are made, with a ribbed top and top of the instep; a heel of a different texture, and what I suppose is a stockinette foot part, ending in a pointed rather than grafted toe. It even looks like the stockinette foot part is of a lighter weight yarn. The strings at the end of the toe aren’t there because the knitter forgot to end them off. They were deliberate additions, intended to make keeping a pair together and hanging them out to dry easier.
There are also quite a postcards having to do with embroidery, spinning, weaving,sheep, and more. The knitting ones came off a miscellanous textiles grouping.
Again, apologies if these pix don’t load. The links are VERY slow. You may wish to save them to look at later when traffic has subsided somewhat.
CHEST OF KNITTING HORRORSTM – NOT MY PROBLEM
Remember I wrote about a trove of patterns from the ’50s and ’60s, given to me by someone here in town who knew I was interested in knitting? Well that priceless box was accompanied by the remnants of yarn stashes she had picked up at local yard sales. It was a huge bag, mostly ’70s vintage acrylics, andis now destined for charitable donation. Schools in particular are always happy to receive acrylics for weaving and crafts projects. Other causes I’ve donated to include groups knitting for Project Linus; local elder care day centers and residential homes; and groups associated with hospitals and animal rescue leagues.
Buried in the bottom of the yarn bag were a couple of sad little UFOs (unfinished objects). This one in particular is worthy of inclusion in someone’s Chest of Knitting HorrorsTM for many reasons:
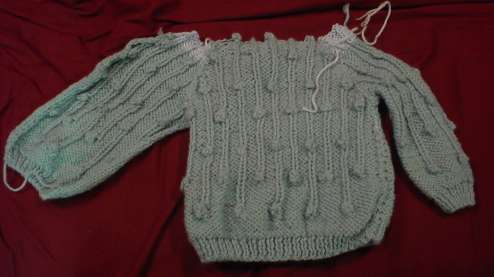
First, lest you think I’m picking on some poor unfortunate unknown knitter, I really do feel sympathy for her (or him). I do think though that the best purpose this toddler-size piece can serve is as an object lesson because it embodies SO many problems.
Yarn Choice. You can’t touch this item, but if you could you’d be surprised at how coarse and scratchythis yarn is for an acrylic. It’s a standard Aran weight of the type that gauge creep in the lower priced yarn bracket is now calling "worsted." However, the hand is harsh and stiff, especially for a little kid’s sweater.
Yarn amount. Yup. You spotted it. The knitter ran out of the original yarn and tried to use another yarn to finish the top of the raglan sleeves and to seam the piece together. This second yarn is VERY different in color and gauge from the first.
Gauge. The yarn should probably be knit at around 4.5 to 5 stitches per inch, especially for a design with embossed patterning like these bobbles. It’s knit at a very uneven 3.75 to 4 stitches per inch. On the inside of the (mostly) reverse stockinette body you can see the giant gaps left by unevenly worked knit and purl rows. The purl rows are MUCH looser and gap.
Texture pattern. Although all the bobbles look to be there, they are not all formed in the same way. The knitter apparently forgot to do the extra bulk-building rows on about a third of them. In others she or he forgot to do the closure stitch that gathers the thing together neatly, opting instead to drop the stitches or put them on a holder, then go back later and do the gathering with a needle and thread.
Garment pattern. I don’t have the original pattern for this piecein the box of goodies, so it’s tough to say how off it really is. Thelength and width are about right for a 4-T/size 5 kid’s sweater, although the sleeves are a bit short for that size. The front and back however are of different lengths, even without taking the neckline cut into consideration. I haven’t counted row by row, but it does look like the knitter forgot a couple of rows after the ribbing on the front. There’s something screwy going on in the raglan decreases, too as the sleeve raglan areas are three inches longer than the front or back.
Knots. Everywhere two strands of yarn meet, they’re tied together in a loose knot, and clipped about a half-inch away from the knot. Even if you wanted to untie the knots and end off the danglers properly, you couldn’t as there isn’t enough left to darn in.
Seaming. The seams are sewn haphazardly, with no attempt to match sides, stitches, or pattern. In some spots, they’re just overcast (in the contrasting color yarn). In others they are back-stitched. In a couple of places, an attempt was made at Mattress Stitch, but it was done inside-out so that the seam allowance ended up on the outside of the work. The extra length of the raglan areas on the sleeves were squished down to fit on the shorter raglan areas of the front and back.
Spill. Again, you can see the color variation on the unseamed sleeve. I don’t know what spilled on the piece (possibly bleach), but there are discolorations up and down that sleeve. It also smells terribly of mildew.
Now I have no idea whether this piece was produced by the lady whose box of vintage patterns I received. I rather suspect not, as the piece doesn’t belie skills commensurate with her level of interest. It might be a kid’s project, rescued by Grandma and lovingly stored away in spite of its flaws. It might have been a beginner’s first sweater, abandoned but never tossed that eventually ended up in a yard sale. Whatever the provenance, you have to agree it’s a bittersweet little piece. I have no idea what I should do with it. The yarn can’t be saved (even if I wanted it); the piece is unfinishable. Perhaps I’ll stow it away to illustrate Things That Go Wrong when I teach. I have to admit, I am tempted to toss it.
Moral of the story: Buy enough yarn; work hard to get gauge; follow the instructions; seek out help for the hard spots, like seaming if you’re not sure how to go about them; and don’t be afraid to rip back and start again.
