SEE YOU ON THE FLIP SIDE
That time has come. Tomorrow is the beginning of The Great Eviction, in which my invader and I will be separated. I am ready, packed, prepped, and armed with great ferocity and the single minded determination to overcome, outlast, and outwit my adversary and come back as unchanged as possible (except for the obligate scars, of course).
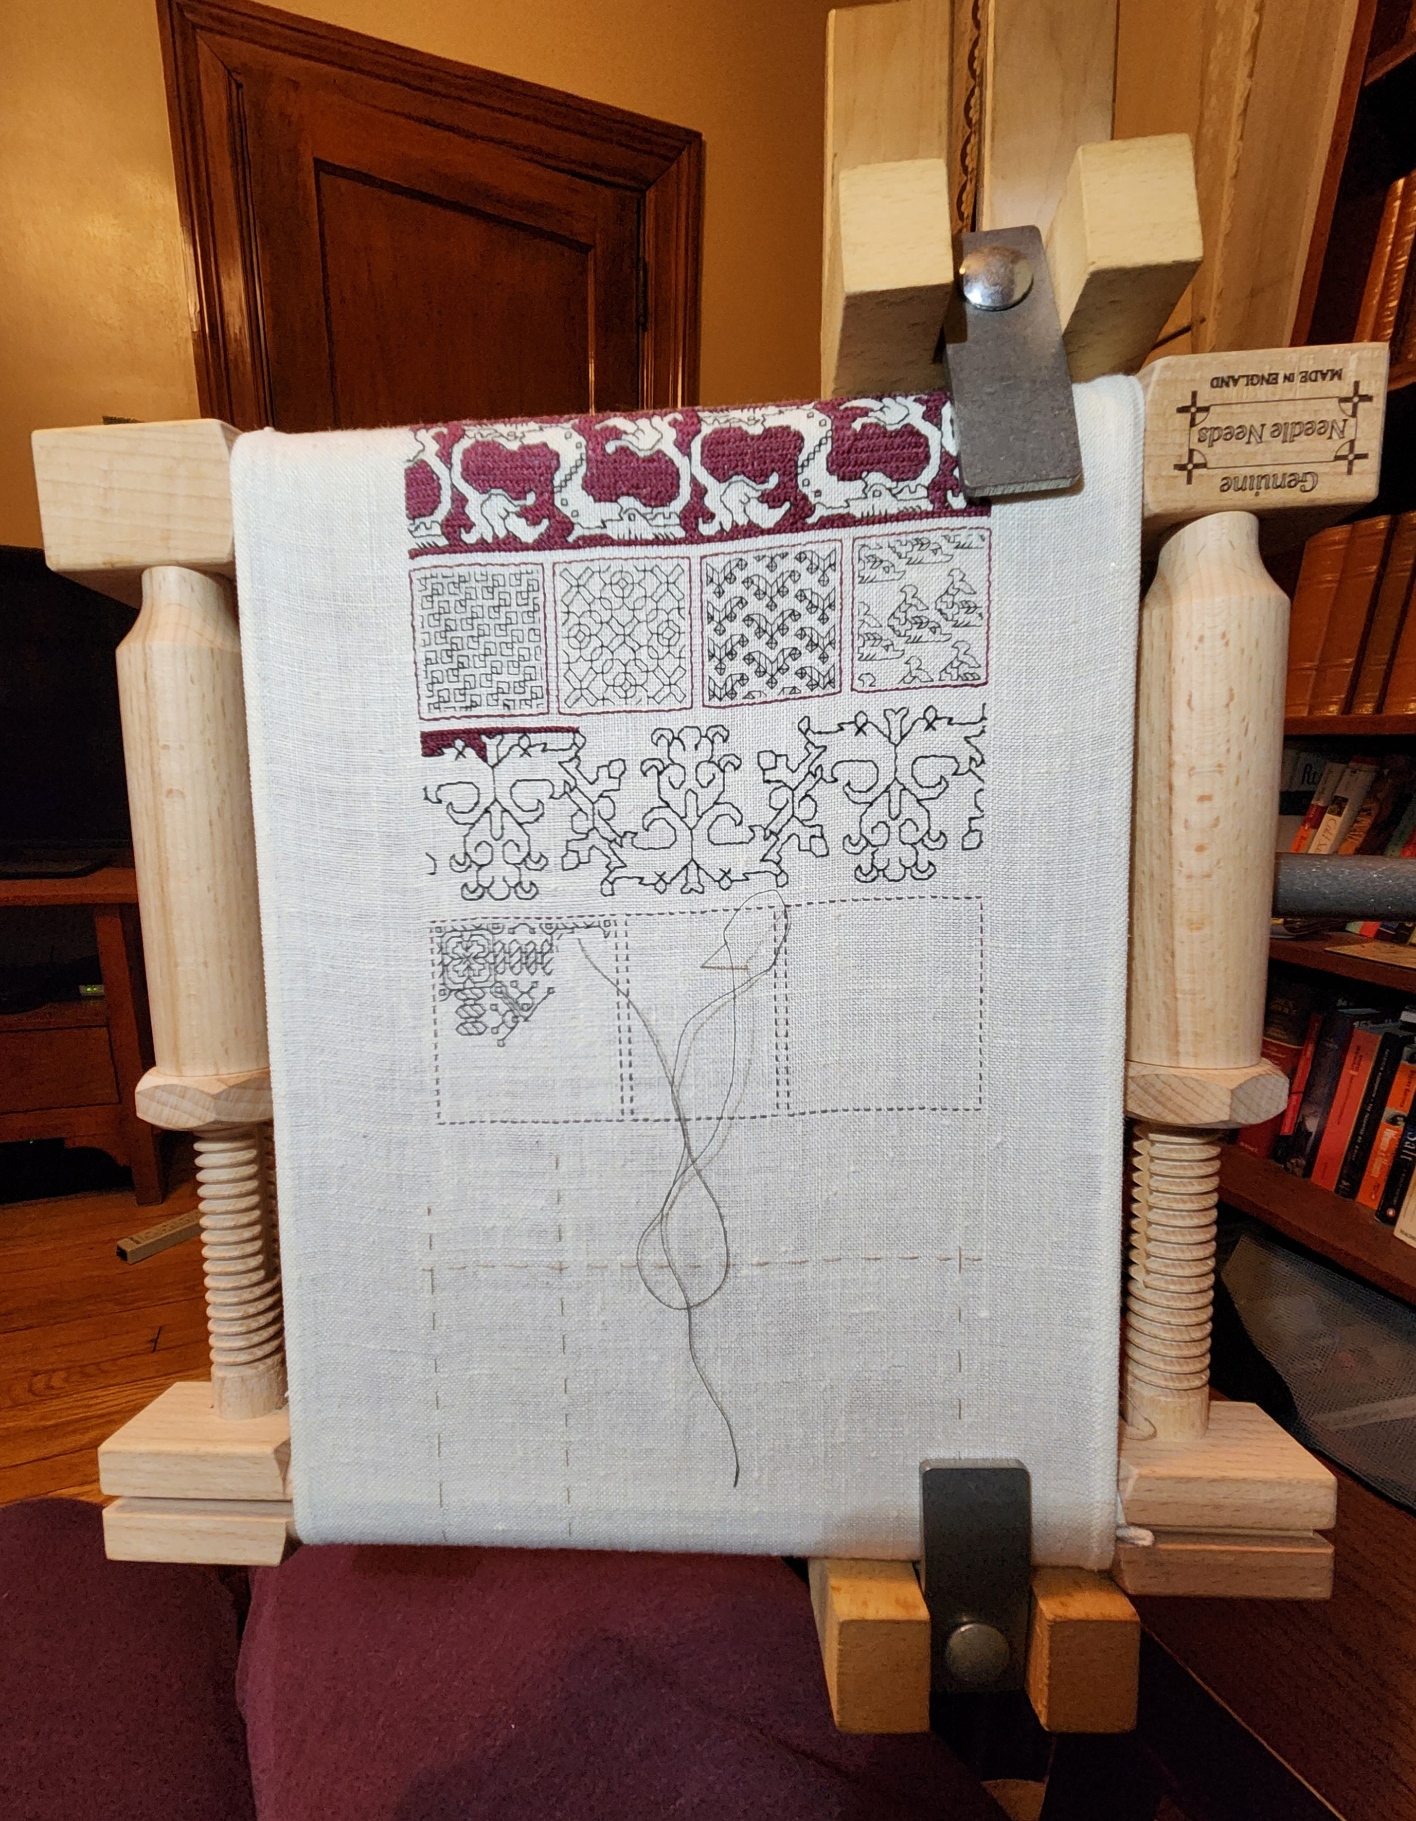
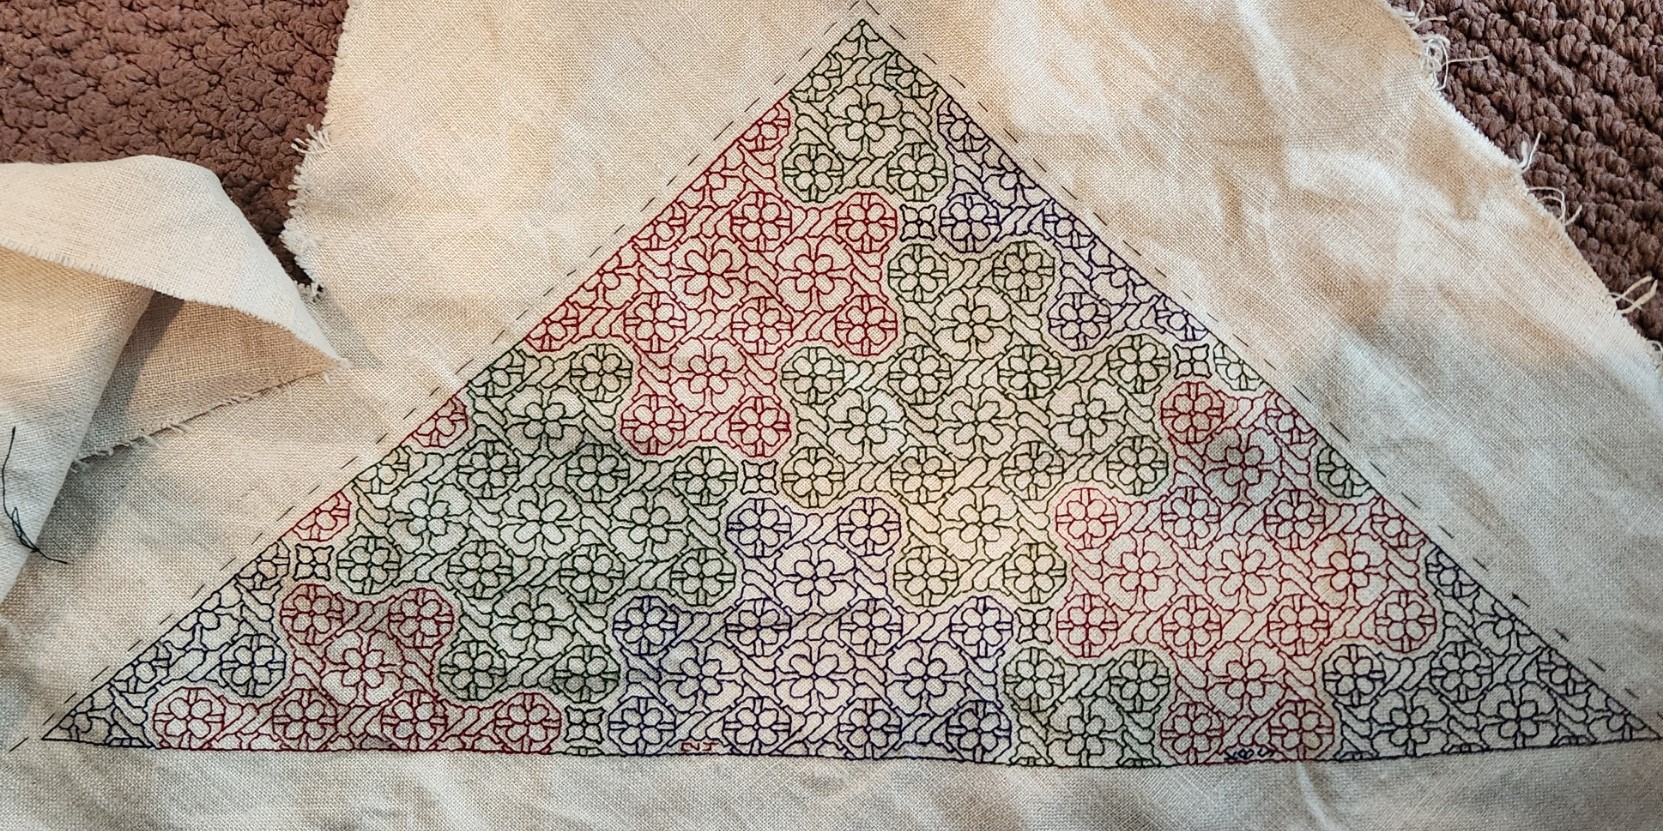
I’ve marked my level of optimism on my latest sampler. I haven’t mentioned progress in a while, but it quickly became my Emotional Support Embroidery after receiving my diagnosis last month. Not ironed, but as a WIP, it’s too early to think about doing that.

Yes, it’s still unfinished. I’ll do some more on it later today of course, but I won’t be done. That’s on purpose. I have every intention of future completion. And note the victory wreaths on the top as-yet-to-be-background-stitched strip. That strip is also deliberately placed skew to the centering of the rest of the sampler. My life has been tilted akilter, so this bit is, too.
I’d also like to everyone for the unexpected outpouring of support. I am overwhelmed by the vast number and generous sentiment of the comments here, on various social media platforms, and sent to me personally by direct message and email. I had no idea I had reached so many people around the globe. I am not a spiritual person, but I can say that if Providence can be petitioned, perhaps the wide ecumenical spread and volume of promised prayers in every major worldwide religion (and many of the less well known ones) will tilt the odds even more in my favor.
See you soon!
-Kim
SERIOUSLY, FOLKS…
This is post that’s not easy to write.
Some of you have wondered about my rush to release both Ensamplario Atlantio III, and the single-download edition of my Epic Fandom Stitch-Along. And there may be more coming out in the next few days. There is a reason.

In gamer’s parlance, sadly I’ve rolled a 5. Not a 1, thank heavens, but nothing good.
I join the legion of folks who have been handed a surprise cancer diagnosis. In my case it’s another over-engineered and uncommon Salazar project – not breast, lung, or any of the usual suspects. I’ve got a chordoma – an exceedingly rare form of bone cancer that’s eating my tailbone (coccyx) and the area immediately above.
The bad news is that I’ve been subject to this invader for a while, with the symptoms it generated being masked by the all too normal day to day annoyances many post-menopausal women have, most notably lingering lower back pain. (Side hint – if you have pain that the oft resorted to palliative modalities like physical therapy and medication don’t address, insist LOUDLY that your doctor engage diagnostic mode. I it would have been better off had I done that earlier.)
The good news is that while my growth is large, it’s contained, has not spread, and is operable. I will be headed to the hospital later in March to have at it. Best outcome is that I although I will be physically diminished, I will regain basic mobility. With healing I should be able to sit, stand, walk, and climb stairs. Some bodily functions and systems will also be compromised, but nothing that modern medical technology cannot address.
I choose to fight, and fight hard. I will not let this thing daunt me. I will pass through, and emerge much as I am now, although I will be moving more slowly, and with more care.
What can you do to help? There’s not much, but I know I will appreciate your companionship, dark humor, and distraction as I move through post-op and rehab. I will especially enjoy seeing what you’ve been up to playing with my knitting and stitching “pattern children.”
I know folk feel awkward at times like this, but please don’t be shy about contacting me. I might not answer right away (especially in the weeks just before, during and immediately after the procedure), but your notes, memes, embroidery/knitting/crochet/other hobby pix, and assorted shenanigans will brighten my day. One thing though, please don’t send flowers. The sentiment is deeply appreciated, but they make me sneeze.
Oh, and look out for Fernando (aka, The Resident Male). He’s going to be especially grumpy.
I leave you with a thought from the science fiction TV show Babylon 5, from the character Ranger Marcus Cole:
“I used to think it was awful that life was so unfair. Then I thought, ‘wouldn’t it be much worse if life *were* fair, and all the terrible things that happen to us come because we actually deserve them?’ So now I take great comfort in the general hostility and unfairness of the universe.”
EPIC FANDOM STITCH-ALONG NEWS
Just a quick post to let folk know that the Epic Fandom Stitch-Along from several years ago is still free, and available for download here at String-or-Nothing. AND I’ve made it much easier to do so.
I have consolidated all of the individual week by week releases along with the general info provided before the project began into a single 50-page PDF document. No more hunting for the single page you need in a forest of other pages! It’s now on the My Books tab, and I’ve added a link to the top of the SAL tab, as well.
Or you can click here to hop directly to the PDF.
As ever, enjoy! I do hope some folk are brave enough to try this one. And like always, nothing brings me more joy than seeing the pattern children out at play. Do the whole SAL, cherry pick the panel you want to do.
Same restrictions as my other offerings – personal use only, and please respect my copyright. Other than that, have fun. 🙂

ENSAMPLARIO ATLANTIO VOLUME III!
I am delighted to announce that the third volume in my free-to-download series of blackwork pattern booklets is now up and available here on String-or-Nothing.

Like the previous two volumes, Ensamplario Atlantio Volume III contains original (and a very few redacted) filling designs of the type used in inhabited blackwork. That’s the style that fills outlined shapes with fields of diapered fillings, as seen in my Unstitched Coif project submission, and in my current sampler. The new fills I created or redacted for the Coif are all in here (I had to do more – I actually ran out of suitable ones!)

It also contains most of the strips found on the several tribute and protest samplers I’ve done over the past several months – the various mythical beasts, interlaces, swords, and other fantasies in thread. (The ones not found in here are from Ensamplario Atlantio II, The New Carolingian Modelbook, or The Second Carolingian Modelbook.)


And to top that off, there are lots more designs in there I haven’t stitched yet, including tunic yokes and pieces with corners that could be used for framing necklines, or table linen. For SCA folk there are a few items of special interest – the populace badges of the East and Atlantia, and a belt motif that can be infilled with the colors that signify patronage relationships (squires, protegees, apprentices).
In truth, I’ve rushed this one to release. I apologize if there are errors or inconsistencies. I plead time pressure. If major errors turn up and I get a chance, I’ll go back and fix them. However, the very few source attributions in it have been thoroughly confirmed and are genuine. Except for those redactions, all of the other material in there is my original output.
Why free? Why not? My goal is to promulgate the spread of stitching, and to make it easy to do so. Yes, I could have bundled these books up and sold them on Amazon, like the Carolingian Modelbook series. But in truth, the yield is a pittance because I am under pressure to price the books low enough to discourage massive piracy. Higher pricing restricts access and defeats my goal of spreading the joy.
For the record, The Carolingian Modelbooks are the product of a lot of research, exacting redaction, writing, and indexing. The Ensamplario series is a lark. Largely just my doodle notebooks, produced with minimal effort. I felt justified in asking for recompense for them on the basis of labor alone. But EnsAtl books are candy to be shared just for the fun of it. You can pay me back by sharing photos of works you’ve done using these designs, teaching someone else to stitch, flaunting blackwork-embroidered garments or accessories in public to increase appreciation and awareness, or just by doing a good deed for someone in need (I release my pattern broadsides as Good Deed Ware, too.)
HOWEVER I retain copyright of my drawings, and release these designs for PERSONAL USE ONLY. For any other uses including including duplication, inclusion of the patterns on patterns or finished items for sale or charitable distribution, I request you contact me privately. I’m not an ogre, but neither do I want to see my goodwill answered with appropriation. My terms (if any) will be mild, and reasonable. Oh, and feeding them into AI for training is total anathema, and is expressly forbidden.
You can download Ensamplario Atlantio Volume III by clicking the link below, or by hopping to the MY BOOKS tab at the top of every page here on String. The earlier EnsAtl volumes are on MY BOOKS, too.
>>> CLICK TO DOWNLOAD THE PDF FILE OF ENSAMPLARIO ATLANTIO III <<<
Comments? Questions? Random remarks? Go right ahead.
DEJA VU, BUT WORSE
A serious digression from stitching, knitting, crochet, and general blather.
Back in 1981 I was an eager young space cadet, a staff technical writer in the employ of The New York Institute of Technology. I was working on grant proposals and on research contracts the school had, mostly with US Federal agencies.
Among the proposals and grants were ones that funded the NYIT computer graphics lab – the staff of which eventually moved up and on to become Pixar; and a fantastic early intervention math and sciences augmentation program aimed at assisting minority kids, but especially girls and young women from middle school, then up and into college for tech/science/math. It included full NYIT scholarships for those who prospered in the program. Sally Ride was the speaker at the initial kick off banquet for that one. I’ve always wondered what became of those kids…
On the general editing/compilation side beyond LOTS of grad school grant requests and assorted small publications, this one really stood out.

The effort was led by Dr. King Cheek, a dean of NYIT and brother of the then president of Howard University. Dr. Shannon was a noted researcher in labor economics and education. I was the foot soldier going where they sent me, collecting data on index cards, alphabetizing, condensing abstracts for inclusion, and typing the volumes for printing on a Selectric (this was before NYIT got early DEC word processors). For this they both graciously suggested my name appear first because their reputations were already established – another publication wouldn’t mean much; but for me as a 25 year old, it would be quite valuable.
It was 1981, still in the pre-Internet, pre-automated/accessible collections era. Annotated bibliographies on specialty topics were quite common, as were resource lists. The two volume set was intended to be updated annually, and was funded by the US Department of Labor, Office of Youth Programs.
All well and good. The bibliography clocked in at 363 pages, with about 1560 entries. The resource list, 159. Both volumes were indexed. The set from kickoff to print took about 18 months to achieve. Other than a temp typist to help in the last three weeks to make deadline, and copious guidance/improvement suggestions from my leaders as they read through each day’s additional content, it was all me. We printed something like 750 sets, with the Office’s intent to distribute to DOL locations, academic libraries, and other stakeholder/interested parties.
While the books were being duplicated and bound, then President Reagan abolished the Office of Youth Programs.
While we had gotten paid for the contract, there was no one to whom to submit the books. We were directed to box them all up and ship them to a Federal Archives location. And so with the exception of my two copies (one my mom has for bragging rights); the copy retained by each of my co-authors, and (possibly) one at Howard University, these books were never distributed, in fact – never seen again.
So for me at least, current events bring a wave of deja vu. But not the pleasant, nostalgic kind. The kind that sizzles against antagonistic blundering about, and produces intense anger.
We’ve been here before. It wasn’t as blatant then, but it isn’t new.
Something has to change, and change can’t happen soon enough.
MORE GOODIES FOR THE CHATELAINE
The second half of my 2025 Toy Allowance has arrived! I bought more pieces for the stitcher’s chatelaine Younger Spawn gave me for the holiday in 2023.

Here’s a roundup of all of the components.
First, rose pin and majority of chains. Not sure where the Offspring picked that up. I noted several vendors selling near identical unpopulated chatelaines last year, but this year the rose design isn’t popping up.
First on left – the laying tool. This is a standard steel laying tool, not a fancy one made for display wearing. The Resident Male gave it to me about 5 years ago, along with the super-precise sharp scissors that are also on this chain.
Next, up by the rose is a needle threader. It’s a fine wire style threader encased in fancy findings. This is a new purchase from Beaddoodads, an Etsy shop based in Australia. It’s lovely and works quite well. A much welcome addition. I have a note in to the seller to find out if the threader can be replaced when it eventually and inevitably breaks (those skinny wire ones are only good for a year or so). In the mean time I’m literally keeping it on a short leash and will look to see if there is some sort of protective sheath I can devise for the working end.
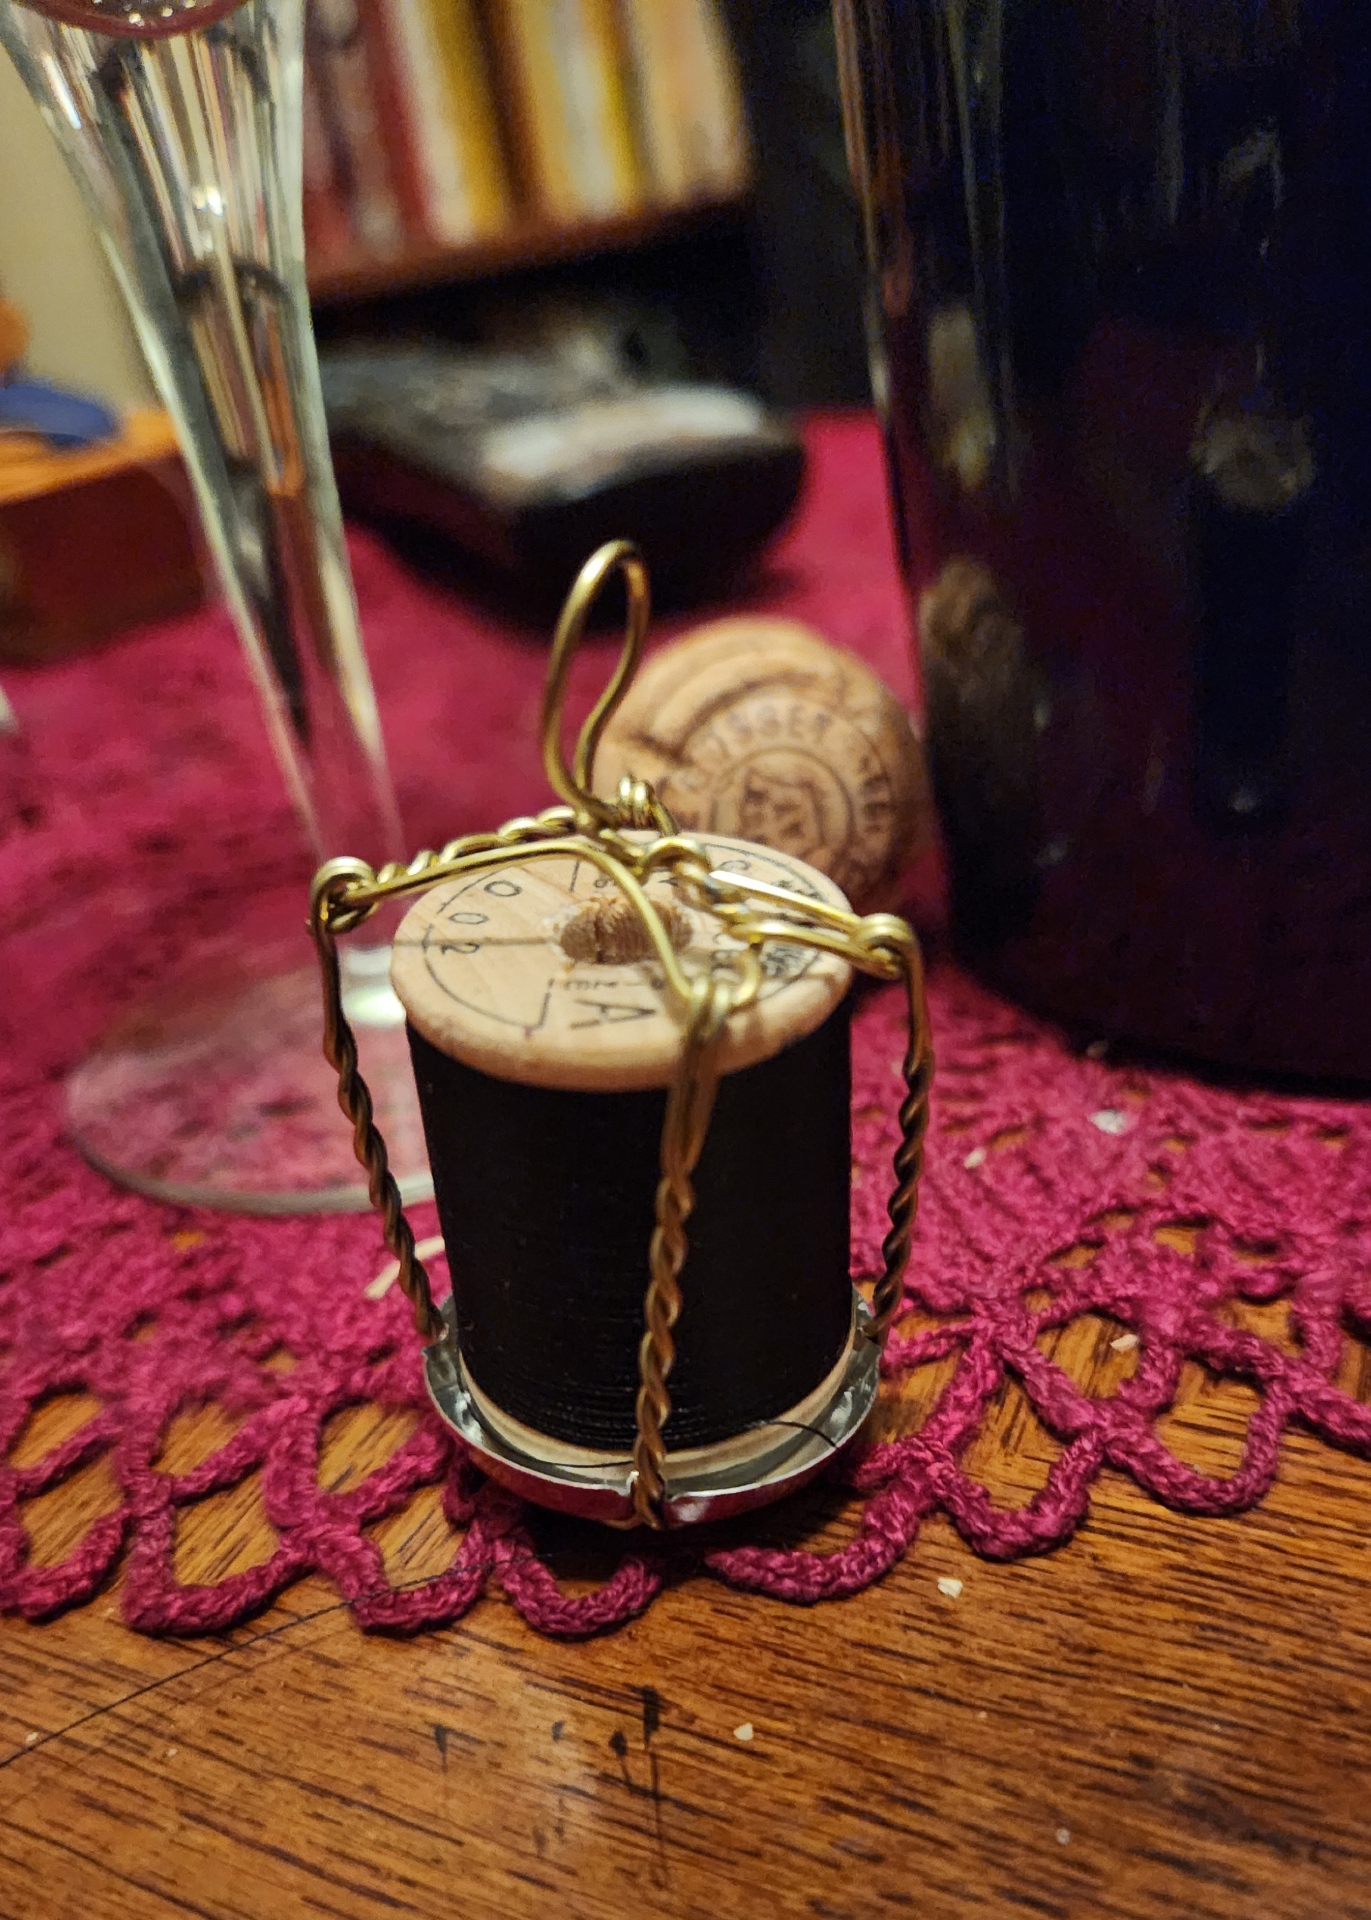
On the long dangle next to the threader is my spool cage. This is also new, and as you can see, is home-made. I twisted it from the protective cage or bail that holds champagne corks in place before the bottle is opened. I may go back and do another. This one is from our New Years Eve bottle. Our anniversary bottle was silver tone instead of brass color. It’s just big enough to hold a full spool of the Corticelli silk I’m using now, and snug enough to keep it from unsupervised unreeling.
Back up we find a needle case, also new, and also from Beaddoodads. It has three small rubber or silicon gaskets that keep the slip on top securely in place, even while hanging.
Next over the the little purse accessory that Offspring included with the original gift. I softened some beeswax generously shared with me by a hyper-local beekeeper (Hi, Kevin, who lives around the corner!), and then molded it into one side of the snap enclosure holder.
Up again towards the rose is the last of the three new bits from Beaddoodads – the bobbin reel. It’s the long pin-like object holding the bobbin of plum color thread. In theory it is long enough to hold three metal bobbins. I only had one empty one to hand. I’ll probably replace it with three inexpensive generic metal bobbins. This one is for my ancient Elna SU sewing machine. Klaatu is very finicky about bobbins, and Elna ones of the correct vintage are hard to come by. It’s also worth noting that the bobbin reel is long enough to use with one of the little wooden Corticelli spools. Once one of those is empty, I’ll probably be using it instead of metal bobbins.
And last on the right is the pair of embroidery scissors that I got from the Resident Male along with my laying tool. Notice how it is chained. If I attach the lanyard clasp to just one of the scissor’s finger holes, gravity and movement eventually open the scissors. Those blades are stabby, plus I don’t want to damage them. By threading the chain through both loops, the scissors stay closed after use. And doing so is no impediment to ease of use.
Finally we have the ribbon to which this weighty seven-armed octopus is pinned. Together with all of its parts, my chatelaine is quite heavy. The needle case is surprisingly weighty, and the little purse is no feather, either. I find pinning the thing to a waistband to be uncomfortable, and don’t want to tear holes in my tshirts, blouses, flannel workshirts or sweaters (I’m usually in one of those). So I took a length of evenweave fabric ribbon I bought at Sajou during our Paris trip, designed a custom pattern and stitched up an alternate solution.
I doubt I will add other bits. I have a very elegant silver framed mini-magnifying glass. But it’s way too good and way to fragile to add to the rest. Plus I I don’t reach for it every time I sit down to work. I’d like to add the electronics tweezers I use when picking out, but there’s no easy way to modify them with a metal chain loop or bail for hanging. And I feel that the weight of the thing as is now is pretty much maxed out.
As to the utility of this portable toolset – I really like it. No more setting bits down on the table or chair arm beside me, then sweeping it off as I get up. I will still use my pirate lunchbox to carry the larger kit (more backup needles, my lint-trapping wad of silly putty, the magnifying glass, tweezers, more thread beyond the current skein-at-use, and the like), but for wandering around the house, sitting out on the porch or on the beach at the Cape, the chatelaine is all I need.
I even used it while we attended panels and readings at the Arisia science fiction convention in Cambridge, MA last weekend. And I don’t mind jingling like a belled cat as I wander around, although at Arisia I did wear a two-pocket workshirt, and stuffed the pin and its dangles into one of the pockets when we were in motion, mostly to keep the noise down, and to prevent anything from snagging on passers-by.
THE SYMMETRIES OF LINEAR STITCHED FILLS AND STRIPS
As promised here’s a rundown on pattern repeat type, and centering fills and strips in designated spaces on your project. For one, there’s really very little need to sit down and stitch-by-stitch completely graph out the design to your final dimensions. In general knowing where the edges and centers of your space, plus the pattern repeat type is all that’s required. These hints go for both fills in regular and irregular shapes, and for strip or band type designs that march along the width of your project, or decorate the edge of a garment.
And a note on grounds, if I may. Aida, Hardanger, Anne Cloth, and Monks Cloth are types of purpose woven grounds used for modern countwork. They feature prominent holes outlining their base size units. Departing from that established grid can be very difficult and involve piercing the fabric in the solid spots between the built-in holes. Partial stitches do exist in the purpose-woven world, and are much despised by stitchers. Working multiple grids skew to each other on the same piece of purpose woven ground is almost never done. I’d say never-never, but somewhere it might exist, although I haven’t seen it nor the rants of despair from folk who have encountered it.
Evenweave (or near-evenweave) is a bit more flexible. Since the stitchers count threads on evenweave instead of hole-defined units, they can employ multiple grids on one piece. If the stitcher decides to work their unit over 2×2 threads, two adjacent spaces can use different grids, offset by one thread so long as the juncture where they meet is taken into consideration. I did this on my Two Fish piece, using the skew alignment to hint at undulating motion. Note the knot and grid filling. Not only is it stitched discontinuously across the bel, I also interrupted the grid. Both sides are worked 2×2, but NOT on the same 2×2 grid – the tail section is displaced one thread up and over.

So when you see me talking about skew grids or using partial stitches when centering various types of symmetry on a single piece, please know that the ability to do this is mainly something that can be done on evenweave. Purpose woven grounds like Aida will limit the way patterns of differing symmetries can be centered against each other. It’s just a fact of life.
Before I begin, all of the fills and bands charted on this page are available in my Ensamplario Atlantio series, my Epic Fandom Stitch Along, or previously shared here on this blog. All are available as free downloads for personal use. Links are provided.
OK. Finally getting into it. Patterns can be grouped into a few basic clusters, with some caveats.
Center Line Repeats
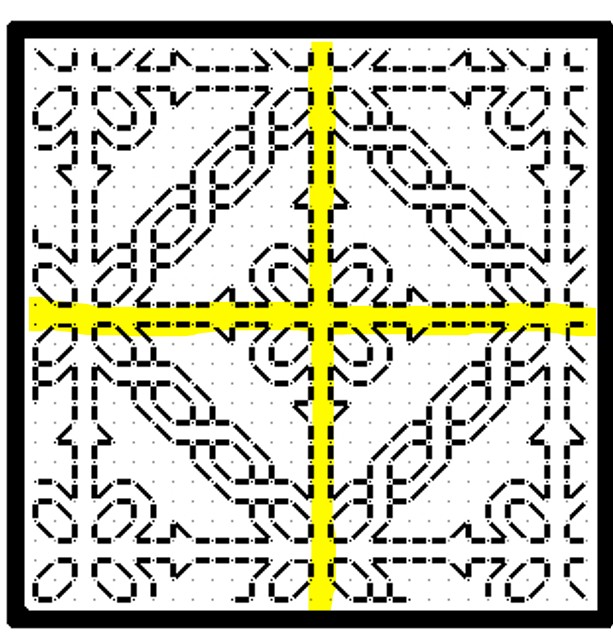
First we have simple line-center repeats. These are designs that cover even numbers of units, and mirror along a center line. The chosen pattern may be a band or strip, with one vertical line where the design mirrors to its left and right. Or it might be an all-over design or fill, with at least one vertical and one horizontal mirroring line.
This blackwork fill/all-over design has both a horizontal and a vertical center line, marked in red. The motif tiles into square blocks of 14 units. The easiest way to use it is to either count to or (if irregular) eyeball the visual center of the space to be filled, then begin stitching the design at the spot where the two center lines meet. Even if the space to be filled is NOT a multiple of 14 but is any other even number of stitches, if centered this way the design will truncate neatly around the edges, as it does in the sample from Ensamplario Atlantio Volume 1, below.
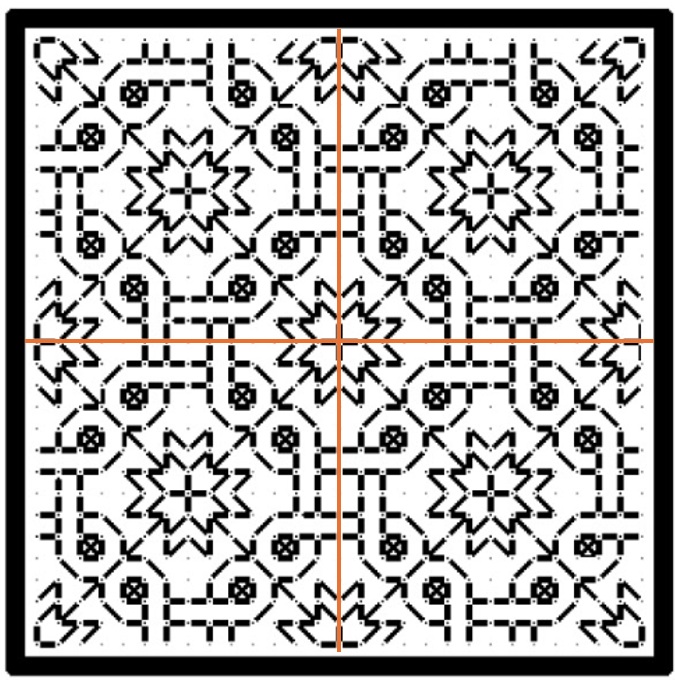
But if the space to be filled contains an odd number of stitches you will either have to displace the center lines so that there is one more unit to one side or the other, or you might have to work partial stitches all the way around the perimeter for full coverage.
Some people insist on using a single grid for ALL of the fills on an inhabited piece. That means that even if they are working over 2×2 threads on evenweave, where adapting the grid you are using to the space at hand would be quite easy, they choose not to. They end up having to either accept minor misalignments between adjacent patterns, or employing partial stitches to eke out the design. That can be avoided by NOT mixing fills or bands with this type of symmetry with some of those discussed later in this article.
Here’s the same type of symmetry expressed in a band pattern. This one is from my Epic Fandom Stitch Along. Note that in this simple meander there are two lines of symmetry (sometimes called mirror or bounce lines). The pattern replicates in mirror image on either side of them, just as it does in the all-over fill. One full repeat is 36 units, and alignment in your desired space can be focused on the center/mirror/bounce lines of either the up or down facing fronds.

Regardless of symmetry type, if you are filling an irregular spot, and you are eyeballing the center alignment point you might end up having to work half stitches around the edge of your area, again to eke out the coverage. This is one reason why some instances of inhabited blackwork (the kind with the freehand drawn outlines infilled with counted geometrics) rely on heavily stitched, thick outlines. Those “fig leaf” the offending partial stitch spots and make the work look neater.
Here’s a bit on my Unstitched Coif, where I eyeballed the alignment of the fill, worked a ton of half stitches (a challenge on 72-74 count near evenweave, stitched over squares of two threads), then went back and put in heavier outlines to hide irregularities. Zoomed waaaaay in like this you can see them around the edges. For scale, that little bud at the upper left is smaller than a US penny.

Now there are some exceptions and complications. We’ll get to those later.
Center Unit Repeats
All well and good you say, but the symmetrical repeat I want to use doesn’t meet up neatly at a center line like those. In most cases your repeat has a “spine” of a single unit rather than a center line. That column or row of units is repeated only once, and is not mirrored, although the design itself does mirror left and right (or up and down) that non-repeating column or row. That means that a full repeat of the design includes two symmetrical wings, plus that pesky center unit – an odd number of units, total. Here’s a fill/all-over design that features center units. In this case one full repeat is a square of 23 units (one center unit, plus 11 more units to the left, and to the right of it).
And here’s a strip repeat, also with a simple center-unit style symmetry. Like the line unit band above, there are two possible centers. Either one can be used, although convention on band samplers is to feature two main motifs in the center of the stitched area – in this case the pair of beak to beak chickens.

The strip above is from my Workshop Handout broadside, another free download here at String you can access via this post or via the Embroidery Patterns tab at the top of every page.
Hybrid Repeats
Some designs display a delightful flexibility when it comes to centering because they incorporate BOTH a center unit and a center line bounce point/mirroring. This happens with fills/all-overs and for strip/band patterns.
Here’s a sample of a fill that includes both. I’m only marking one repeat of each type on it, otherwise the thing will end up looking like a swatch of plaid.

This design can be aligned either to the center lines (red), or center units (yellow). And here’s an example of the same type of pattern in a strip or band. The center can be the red line or one of the yellow columns.

Again, if a combo of center line and center column symmetrical strips are used on a band sampler in a mixed environment that doesn’t deviate from one universal grid note that true center alignment will not be possible. The even-number repeat centerline bands will all line up with each other. But if you insert a design with center unit/column symmetry but have to use the same “stitch holes” in Aida as the rest of your project, that center column will not line up with the true center of the rest of the piece. Which may or may not matter to you. Food for thought.
Staggered Drop Repeats
Now it gets harder to identify these. This style of repeat is common in fills/all-overs, but less common in strips/bands, but they do occasionally pop up. For the most part they employ mini-motifs, sometimes in straight-on replication, sometimes with mirroring or rotation; and use regular offsets to place them. Sometimes its a simple half-drop, sometimes it’s a larger interval or not regular when the horizontal and vertical offsets are compared. Most of the time these staggered or evenly scattered mini-motifs do resolve into very large area true repeats, with the same motif repeating in the same relative position in the field, but it’s rare to use these in areas big enough for that resolution to happen. How to center them? It’s a bit more complicated.
Here are three with different rates of periodicity (how big the sample has to be before it manifests a true, full repeat), presenting different problems. These are all from Ensamplario Atlantio Volume 1, Second Edition.

The flowers at left can be centered in a panel in one of two ways. Either using the regular center-line symmetry of the very simple little four petaled flower, or by counting to identify the centerpoint of the more complex sprigged flower. Either way will work, although I think using the smaller mini-motif would be visually more pleasing. Note that regardless of the size or count of the space you use these repeats “walk” and will always truncate around the edges.
The snail garden square at the right is a hybrid. It can be effectively centered either on the tiny squares and on the larger snail-bearing unit. Both work nicely. Which I would choose would depend on the size of the space I wanted to fill with it. If the space was large enough to accommodate four of the snail gardens without truncation, I’d probably use the tiny squares as my center alignment point. The snail gardens rotate around them, and optically form a flower-like shape when viewed from a distance. If the space was small, I’d put the garden in the middle to ensure at least one full iteration of it was represented.
The griffin/dragon beastie in the center presents a harder problem. There’s only one element here, and it has no clear center line or center column/row. Additional complications come from the rotation and offset of the beastie motifs. The easiest way to center this one is to find the center point of the beastie itself, match that to the center point of the area to be filled, and work the others around the first, completing the truncated ones as possible. In the photo below, this is what I did with the wing like bits, second from the right in the photo below, and what I SHOULD have done with the little dolphins in the box next to them, but obviously didn’t.

The myriad mistakes in my current piece are what inspired this post. In addition to the errant dolphins in the latest section, you can see that the voided bit currently underway wasn’t properly aligned. It’s a center line repeat, I have an even number of units across, but if you compare the left and right edges, you’ll see that the design is shifted two units to the right. The center of that strip does not align with the center of the set of boxes, above. The dolphin box is intentionally shorted one unit compared to the others in its row because my count across is not divisible by four (available area minus 6 units total for the gutters between the boxes). There are more similar mistakes in the previously completed part, now wound around the roller bars of my stretcher frame.
I confess to making many alignment sins on this one that together have landed me in this predicament, including initially basting the center guideline that runs the entire length of the piece offset to the right by three units; never going back and measuring, but instead working the other vertical guidelines off that one; starting the first blocks and not bothering to confirm centers or edges until it was too late to pick out and start again; fudging everything in to try to compensate for the pile of errors that was accumulating behind me; and not paying enough attention to centering the various fills in their boxes.
I will continue on to completion with this one, warts and all, but I may revisit the base concept of voided strips alternating with boxed fills in a future work.
ANOTHER NEW TOY
If you’ve been reading here over the past month, you’ll have seen me working the current project in a hand held hoop. I love hoops, especially their portability and versatility. But I vastly prefer the “real estate,” tautness, and ability to use two hands that using a scrolling frame gives. I’ve had two sizes of the Needle Needs Millennium frame for quite a while. I tend to pull those out for the big projects, especially those with metal threads, or that feature easily crushed or disarranged stitches (satin stitch, knot stitches). I also have a sit-upon hoop. I do use that extensively for the smaller pieces with less fragile work on them. It has some of the advantages of the other two types, but as a compromise, with less ability to place the piece in exactly the optimal spot and angle for visual acuity and best lighting. The hands down most efficient way for me to stitch is the big Millennium on my Lowery stand.
After months of hoop-in-hand, I was yearning for the scroll frame experience. I heard that Needle Needs had a new junior size frame, and was also offering smaller roller bar and side extension pieces for the Millennium system. So I sat down and weighed price, stitched area size, and the fact that pieces from the new junior frame are not compatible with its larger brother, then splurged on a pair of new extenders and roller bars.

I have two sets of the older 8-10″ side stretchers. I got that relatively small size because I realized that the bigger ones would produce a stitching area that would be difficult to reach. That bore out when I was working the coif using the 24″ roller bars and the 8-10″ extenders. My behind-the-work left arm could reach only 60% of the available area with it set at full extension – barely making it to the top edge of my piece, and I had to flip the frame over to work the remaining spaces. But while I might have gotten the even smaller 5-7″ sides this time around, I had the feeling that a space that small in combo with the Lowery frame extender arm would be less than optimal.
Obviously the new components arrived yesterday and were immediately deployed:
And I was right. You can see how much of the available area is “eaten” by the width of the gripping Large Frame Extender. Even if I position the frame so that the clamp is grasping the corners of the roller bars, it’s awkward to work right up against the Extender’s upright. But just like with the larger set-up for the Coif, I can flip the frame upside down to work that side of the piece.
I know that not all my new projects will be narrow band samplers, but between the new short roller, and the new short side stretchers, plus the pieces I have on hand used in new size mix combos, my toolkit has valuable extended capability.
As for more on the design on this sampler, the types of symmetry often seen in fills and how to best center them depending on the type of symmetry, that will have to wait until the next post. For some reason the blogging software is having indigestion, and I’ll have to cut today’s intended post into two. Will finish that one out and get it up by the end of the week.
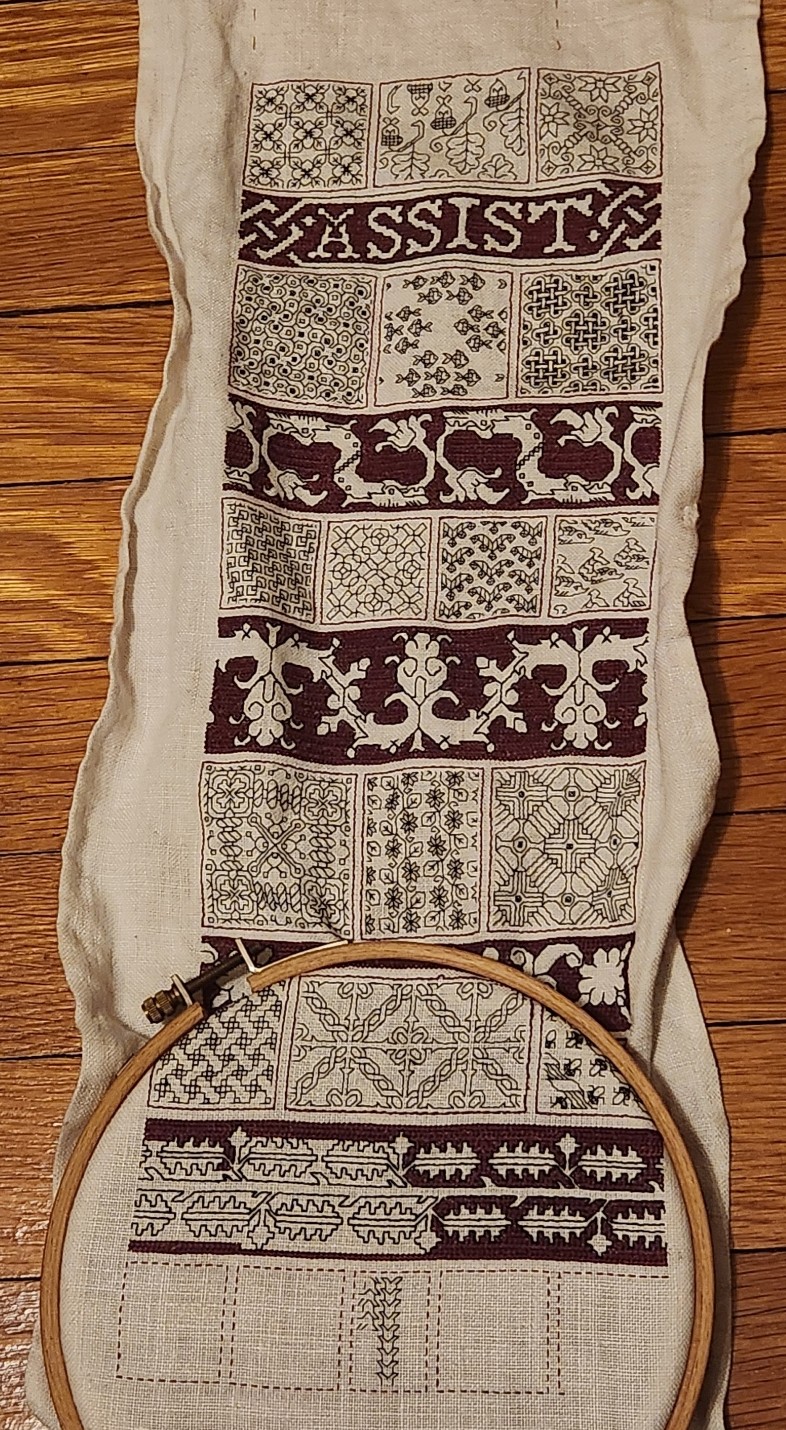
CATCHING AN ASSIST
According to the posting date, it’s been about 10 days since I last reported in on progress on Assist. I’ve had a couple of mis-alignments due to low lighting and inattention. Some I’ve picked out, others I saved as cautionary lessons. And I’ve taken a slight departure from my usual working cadence.
Here’s the latest in-hoop view.

Obviously I’m working voiding on the row of snaky, vaguely draconic S-shaped flowers. But I’m only half-way done with that, yet I’ve gone on to start (although not finish) the row of smaller fills underneath.
Why the partials?
Because it’s very likely I’ll be attending Arisia over the weekend. It’s a big science fiction convention here in the Boston metro area. There will be discussions, panels, and lectures to attend. I like to keep my hands occupied at such things, so I can better follow along without distraction. Therefore to minimize lap clutter and make this project more portable I want to have enough started with established repeats, so I can work “off book/screen” for the balance of the weekend. That plus using the chatelaine means quick convenience – nothing can be dropped or left behind as we migrate from one panel room to the next.
As far as difficulty, the voiding requires no pattern reference once the foreground repeat is established. The partial fills each have enough detail that I don’t need to refer back to those patterns, either. I can just copy what I’ve already worked. Note that that second one is rather far along. In that case I DID get lost and decided to finish that square out here at home and not trust to luck on the go.
I’ll probably start on the foreground of the next voided strip, too. Either below the four-box fill row, or above the three-box fill row that sits on top of the motto (seen peeking out at top, from the folds underneath the frame). Which one I’ll do will depend on which design I pick next. I think one that’s as wide as or very slightly narrower than the Assist strip will sit nicely at the growing pile north of the motto. Something wider and more demonstrative for below. How wide and how demonstrative is going to be a function of the very narrow nature of the composition as a whole. I only have 102 units across to play with. Lots of my drama queen voided/double running strapwork strips have repeats significantly wider than that. We’ll see.
And a working hint. You can see that I’m not stitching up to the red double-running stitch boxes outlining my fills. I’m leaving a one-unit strip of unworked linen between the red outlines and the fills. Usually I “fig-leaf” any partial stitches when working fills in spaces buy doing them first, then stitching a heavy outline around the fill area to cover all sins. This time I opted for a lighter look. The hint is if you look at the on-deck set I’m currently stitching, and the two completed sets above (visible as partials in and above the hoop) you’ll see that I lay down the first pass of double-running, then work the fill, then go back and complete the double-running by stitching the second pass. I’m doing this because counting those little dashes is immensely easier to do than trying to navigate by counting the stitches in a completed line.
The uncorrected mistakes to date? There are four, and I hang my head in shame.
First, my original basted guidelines were off by three units. The natural vertical center of the piece is three units to the right of my first go at basting. That I didn’t catch until I had finished the voiding on Assist. Voiding is not something that should be picked out by the faint-hearted, especially in silk on somewhat fragile vintage linen. So I adjusted my alignments rather than picking out. When I frame or finish this up as a scroll there will be some compensation to keep the final field even all the way around.
Second, I’m off by an entire unit somewhere between the vertical center and right guide line, probably with two one-thread width displacements in an earlier slubby or worn/fuzzy bit on the vintage linen. There I didn’t catch that until the first row of fills and Assist were done. Oops.
Third, that interlace box. The interlaces are not centered, again they’re off. This error I blame on SWI – stitching while intoxicated. We had a lovely bottle of champagne that evening, to celebrate the close of the holiday season, consumption of the last of our leftovers and cookies, and (in passing) to toast our 43rd wedding anniversary. Obviously it went straight to my head. I left that one in to warn me against similar excesses in the future.

And last, the width of the rightmost box on the current fill line. All of the ones in this row are supposed to be squares of 24 stitches. Except that one. There was only room for him to be 23 units wide. Now four boxes of 24 units plus three separators of two units each equals 102. But there he is, one stitch unit narrow. So it goes. I’ll pick a nice scattered fill with a half-drop repeat and no one will notice. Plus an added benefit of the strident, visually distracting alternating strips is that they break cadence. I can correct the count after the next one is done, and the correction will be difficult to see because of the solid red mass separating it from the fills above.
Oh. I did get a side benefit from the dissolute evening of sodden stitchery. I took the cork cage/bail from the bottle and twisted it into a spool holder for my chatelaine. I may go back and redo this with a silver tone one I had saved from last year’s bottle, but for now, it’s working well. The tiny spool of Corticelli Size A embroidery silk spins with little effort; just enough to make inadvertent unwinding unlikely, but easily enough to reel off what I need.
Will this piece be absolutely perfect? Nope. Far from it. And that doesn’t bother me because I have the next stitching project already in sight.
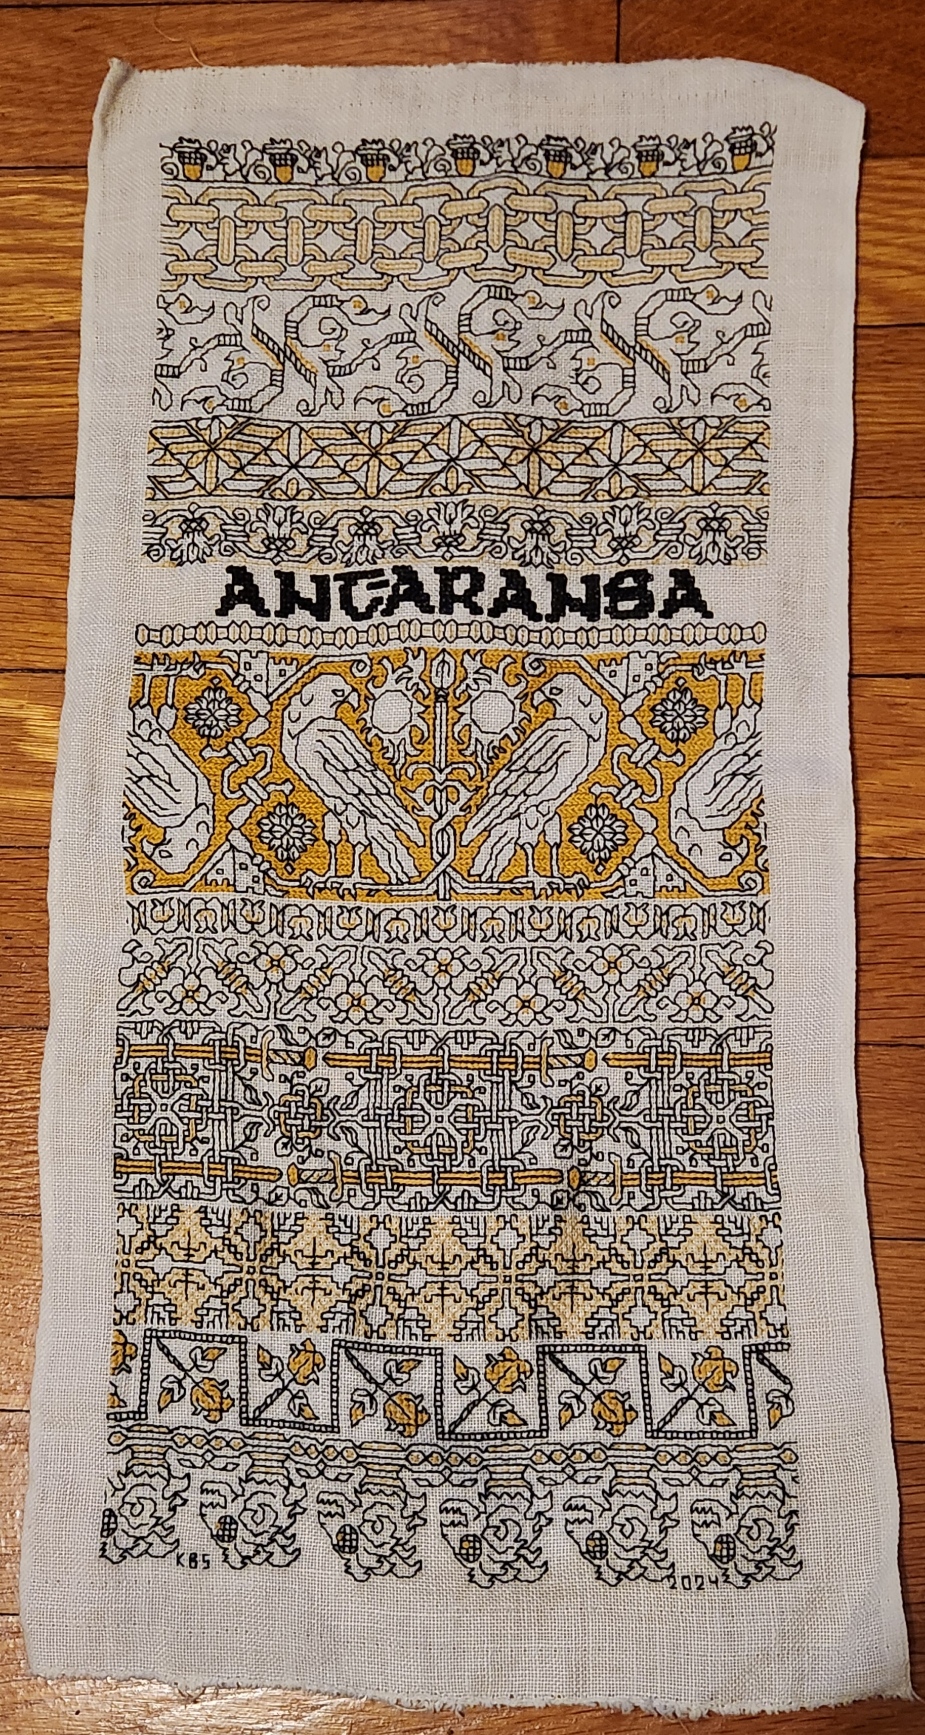
ASSISTANCE AND ACCOMPLISHMENT
I’ve started the third sampler in the PERSIST – RESIST – ASSIST series. Persist happened several years back. The other two are recent reactions to the greater world and everything in it. Assist is longer and wider than Resist. It’s approximately 40 threads per inch x 46 threads per inch. I didn’t have a selvedge edge on this remnant, so I’m unsure if it is more densely packed in warp or weft. I’m assuming weft. It’s long – roughly 23 inches after hemming. Subtract about 1.5 inches for margin all the way around and that’s a stitching length of 20 inches. Lots.
I’ve decided to use some of my stash threads, a mix of the the Cifonda Art Silk I brought back from India, in a plum color; plus some very fine Belding Corticelli silk, size A in black. The plum works up a bit more on the red continuum than purple. This is what I have so far:

And a closeup of the work completed so far:

My intention is to fill the cloth with voided for heavy foreground pieces in the plum and black, alternating with boxed squares or rectangles of fill samples. The heavy solid foreground/voided pieces will be done in two strands of those threads. The fill samples will be outlined in double running using two strands of the plum. The fills so far have been worked in one strand of the black. I might do some fills in two strands as I go along, for increased line weight contrast, but there’s an equal chance I might not. Two strands produces a muddy look, and I want to emphasize the airy laciness of the fills with the densely stitched solid bands.
Oh, that bare bit below the knot to the right of the T? That’s an artifact of a big mistake. It’s very hard to rip back long armed cross stitch neatly, and by the time I discovered I had mis-counted the black outline for that knot, it was mostly embedded in the background stitching. So I am leaving that line blank, and will be using it at project completion to house my initials and date. And I bet if I hadn’t ‘fessed up, you’d never have noticed.
As for my productivity round-up for 2024, finished items inclusive of knitting, crochet, crafting, and stitching, this is what I can show.
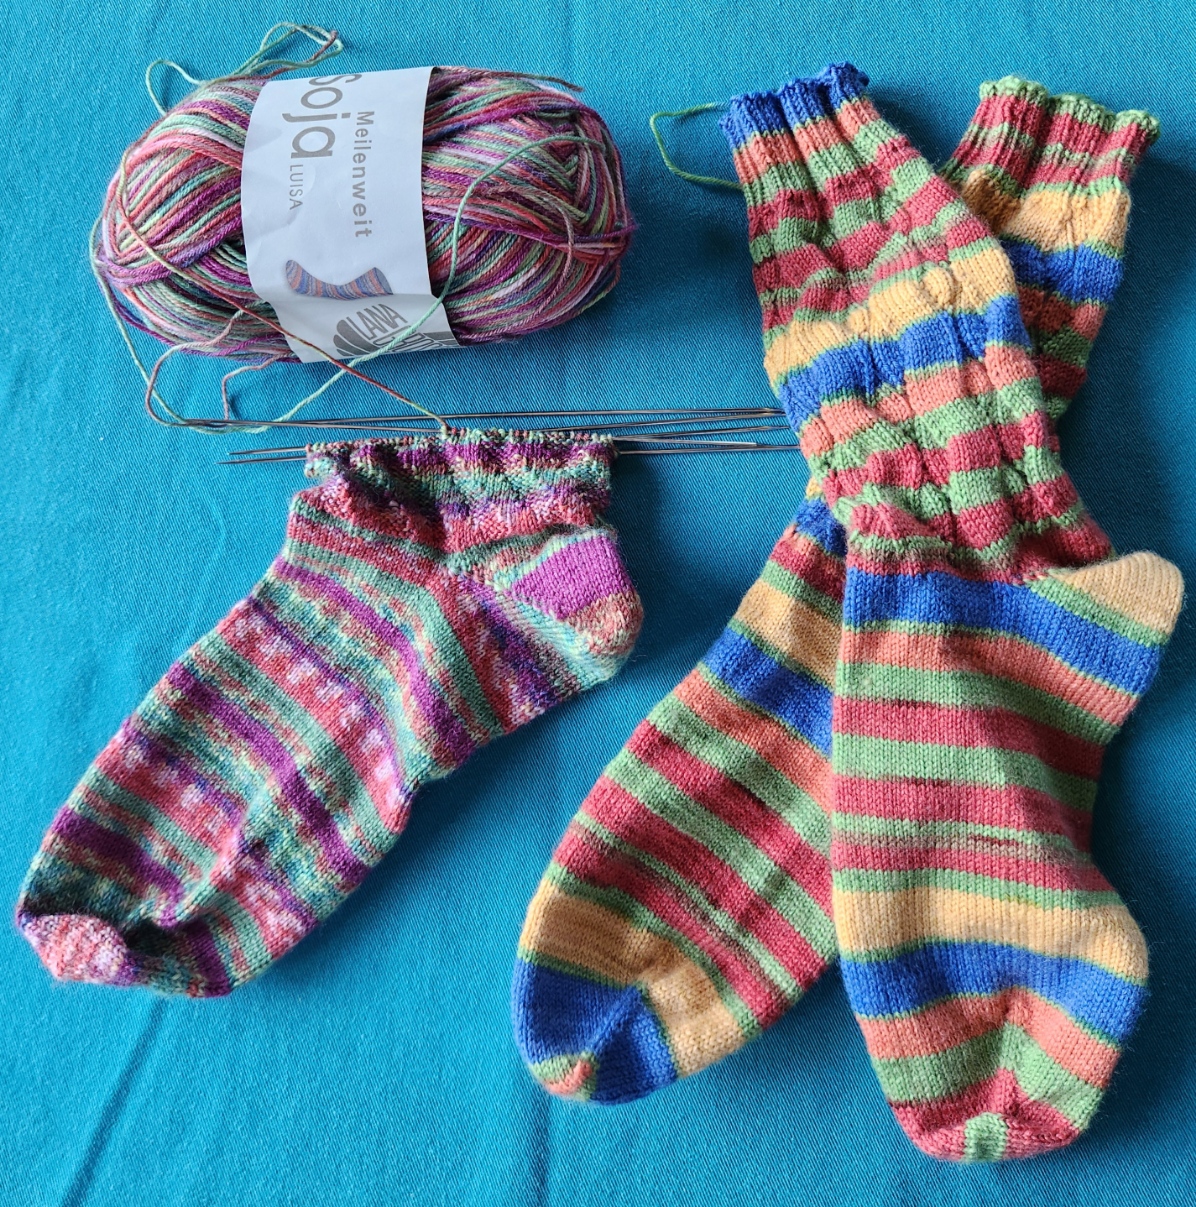


Above are a couple of pairs of socks representative of the seven pairs I finished this year. The rest were distributed before I remembered to take photos. Also above is one of two knotted fabric scrap garlands, made to increase festivity levels at the kids’ homes; the companion stocking to the one I made for Elder Spawn (the wolf turned out a bit wonky, in a loveable sort of way); a set of 12+ crocheted snowflakes, also for Elder Spawn’s new home; and a shoulder shawl from luscious Australian possum fur yarn (the yarn was a gift from an old pal and was too yummy NOT to use immediately upon receipt.)

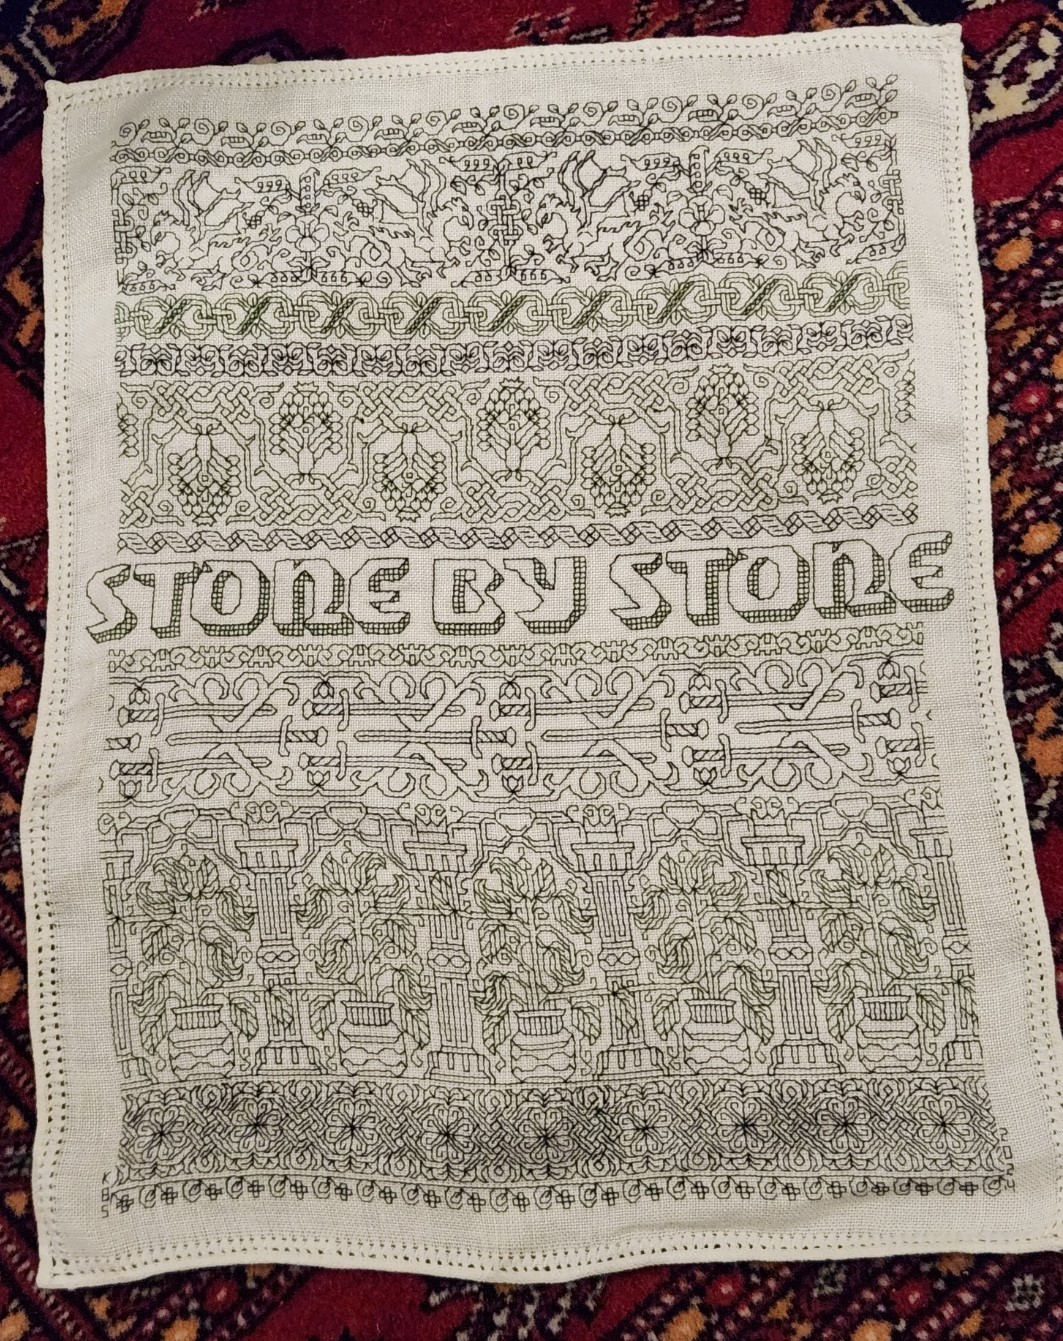
Above are the three samplers in the series honoring the Resident Male’s literary output, plus RESIST; the triangular headscarf (aka forehead cloth) I finished and gave to another dear friend (again, distributed prior to finished item pix), and the ribbon I stitched for my chatelaine, so its weight would not tear my favorite shirts.
Obviously there are also WIPs – things begun but not yet done. Chief among them are the sashiko covers for my thrifted Arts and Crafts style chair frame and my vintage barrel chair. These bits will be cut apart and reassembled as part of a pair of recycled denim patchwork cushion sets/upholstery. Lots more on this to do, but the project turned out to be less portable than I wished. Our nomadic summer interrupted. I’ll try to get back to doing more pattern snippets before the spring, with luck to get at least one of the cushions done by summer.

No. I don’t spend all day doing these things. I’ve got plenty more to keep me occupied during daylight hours beyond writing these posts. I’m at work on THREE books/booklets – Ensamplario Atlantio Volume III; The Third Carolingian Modelbook; and composing all of the charts, articles and commentaries on my Epic Fandom Stitch-Along into one downloadable (free) booklet, to make it more manageable for those who might wish to belatedly join in the fun. There are other things in the works, too – some volunteer assignments, charting that isn’t destined for inclusion in the books, mending or making other stuff as needed, and gardening (we grew a ton of peppers and eggplants in a small raised bed, this summer past.)
The projects seen above were all done mostly in the hours after dinner, while watching TV or playing video/console games with The Resident Male. With an extra hour or two stolen on weekends after chores are done; or an hour here and there when we are at the beach place. It’s not in my nature to be bored in retirement.
