OUR NEW HOBBY!
Excavation!

Greetings from snowy Massachusetts.
GUEST OF HONOR
We’re slowly getting back to normal here at String Central, but I am still woefully behind on posts. The holidays were a bit squished due to work pressures, but fun none the less. Apologizing for tardiness, I present some highlights.
Here you can see the resident staff getting ready to welcome the guest of honor. This includes basic decorating:
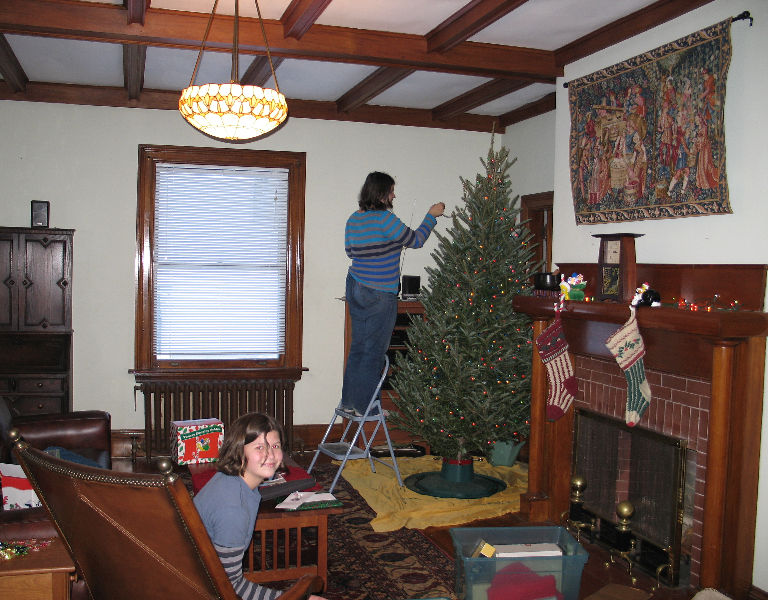
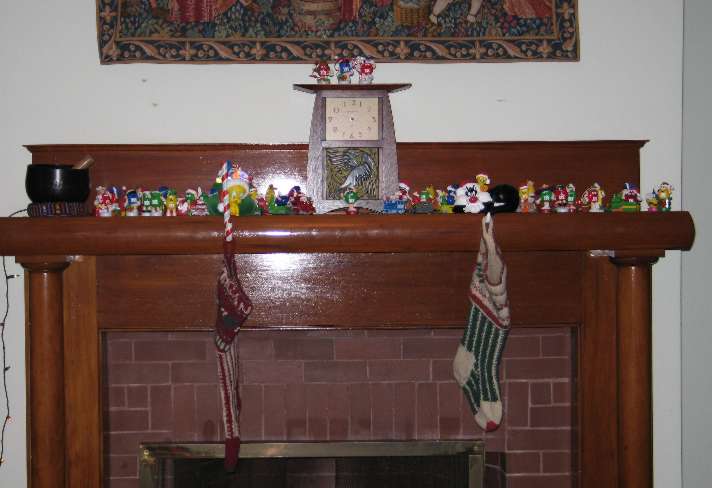
Deploying the M&M army, provided over the years by Good Friend Jean:
And finally welcoming Gaston, who came to dine with us:

Or rather, whom we came to dine upon. Here’s another glamor shot:
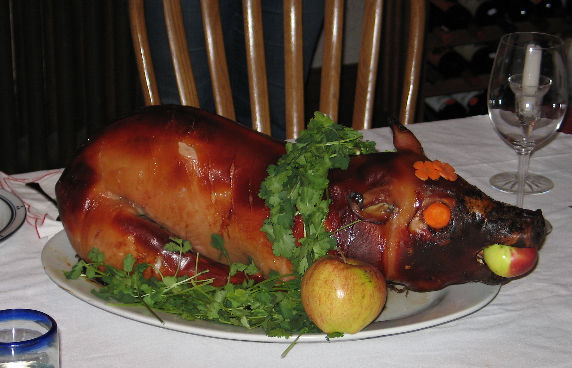
Gaston was slow-roasted very simply, with sage, onion and apple inside for flavor. I can say he was simply delicious, served with creamed onions and celery, plus red rice with wild mushrooms. We picked him up, dressed from Savenor’s in Cambridge on Thursday, then brined him in cider for a day before he went into the oven for dinner on Christmas Eve. Over the course of the week we consumed him entirely, saving hocks, extra skin, and bones for bean pots to come, and making a terrific terrine out of the liver. We will miss Gaston, but we’re very happy that our paths crossed.
Speaking of happy, the usual holiday triumphs also occurred:
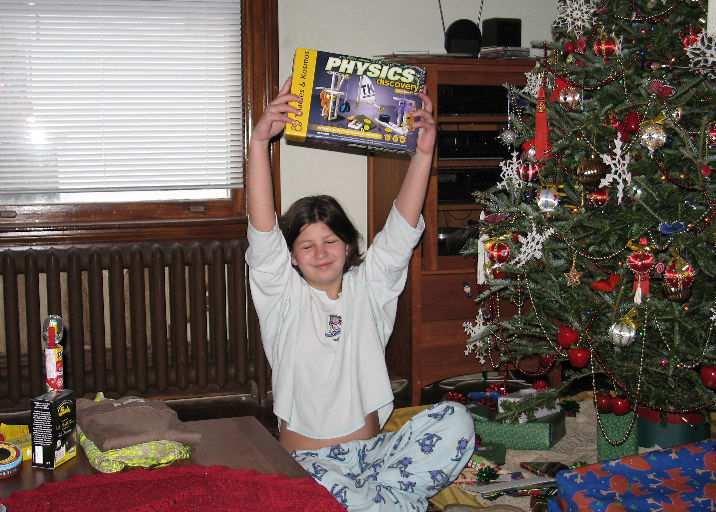
Every girl should have a gift pile that includes jewelry, fun clothes, books, games, and own physics discovery set. The kids are now thoroughly spoiled by family, friends, and their parents alike.
All in all a good holiday!
PATTERNS PLATE 25, GIMP HINT 107
Taaa Daah! The last page of my pattern collection – page 25:

All are new for this collection. #146 was inspired by an original pomegranate border I published in TNCM. #148 was similarly inspired by the beaded border from TNCM that I have previously shared here (repeated below, click on image to get it larger):

#149 was inspired by an edging in Schonsperger’s 1526 Ein New Modelbuch. His was a strip. Mine takes the main motif from his strip and inserts it into a lozenge. #147 builds on the interlace construction principles in pattern #67 of my first booklet, although this one is rendered as a line unit design instead of in block like square units.
So there you have it. 150 different blackwork filling patterns; some simple, some complex. And I could easily come up with another 150. But it would be more fun to see what others devise. I hope to have the PDF format booklet, with cover and intro essay out by the end of the holiday season. It will be available for free download here.
GIMP 107 – PRINT HINT
Printing or Saving: If you print out the pages constructed by the method in my tutorial you will probably find that the designs are rendered too small for easy use unless you use an enlargement factor via your printer driver dialog (the print settings dialog invoked when you issue a print command). BUT if crop your pattern, removing any unused page area, then you save your piece as a *.jpg or *.gif, like I did for the individual squares, the pattern won’t shrink down to teenytiny, and will be as readable as mine.
IN SUMMARY
Please let me know if you’ve found these pages or the GIMP tutorial to be useful. I’d especially enjoy seeing works done using one of my 150.
However, I do request that all users abide by the restrictions noted in my kick-off post. If you are using these patterns for your own personal enjoyment or as a gift, have fun!
If you are intending on selling works derived from them – including stitched finished pieces, or issuing kits or publishing your own patterns using any of these designs – either for profit or charitable sale or donation for eventual sale – please do me the courtesy of sending me a note prior to doing so. In all probability I’ll be delighted and ask nothing more than a bibliographic source statement in your pattern’s literature or hang tag noting the source of some of your fillings, and providing link back here. As soon as the book is up and the link is stable, I will be happy to provide the bibliographic citation’s format. But asking permission first would be a positive, noble and honorable act, for which I thank you in advance.
PATTERNS PLATE 24
The penultimate page! Here’s page 24:

All are new on this page. #139 and #140 are close cousins, sharing a central motif. The strawberries in #143 have their pips marked by little circles. I’d use very tiny knot stitches, an X over a 1×1 thread intersection or possibly even seed beads for them.
PATTERNS PLATE 23
Just two more pages after this one. Here’s page 23:

All of these are new doodles, although #137 is a truncation of the framing device I used in my Buttery pattern. #133 and #134 are almost identical. The only difference between them is a second double running stitch line, turning the diagonals between the eyelet stars from steps to little squares. You can never have too many interlaces. #137 and #138 aren’t the last one in the collection, I promise.
PATTERNS PLATE 22
Getting close to the end. Here’s page 22:

All of the patterns on this page are my own. Two of the smaller fillings in #131 are in my coif. Like my snails which I’ve recently found have crept all the way to Finland, the gnats in #128 were inspired by the period English embroiderers’ love of insects (related thought – look into this worthy cause). I’m also fond of #130, which would be a wonderful all over or strip panel treatment for chemises, perhaps mirrored down the center of the garment.
PATTERNS PLATE 21
Here’s page 21:

Pattern book junkies will recognize #124 and #125. Yes, that’s Schonsperger’s acorns (1524) in #125. I’ve altered the scale of #124 to make it more compact for use as a fill.
Thanks to all who have sent me thank-you notes, posting here, on various chat forums, or by direct mail. It’s a delight to know that others are finding these patterns useful, and that delight is my chief motivator in sharing all of my patterns – stitching, crochet and knitting alike.
PATTERNS PLATE 20
And on to page 20:

Yes, more interlaces, and there are more to come, too. #119 appeared on my underskirt, but the others are new for this collection. #115 and #116 share a fundamental architecture. Try #116 either with the squared corners on the “in between” links, or with the softer edges resulting from a single diagonal stitch instead of the two that meet at right angles.
To echo Jenny, who posted on the Blackwork Yahoo group – simple geometrics are simple geometrics. They transcend any one craft. People who quilt; who build mosaics, marquetry or stained glass; or who crochet, knit or weave will all recognize commonality in these designs. I sincerely hope to see some wholesale cross-pollination here, with folk reporting back that they’ve found inspiration in this pattern collection for all sorts of uses I never imagined.
Use one of these designs in your original piece? I’d love to see it. I always enjoy seeing what my pattern “children” are up to out there in the wide, wide world.
PATTERNS PLATE 19 – GIMP CHARTING TUTORIAL 106
And page 19:

More doodles from my notebooks, both old and recent, but I have not published any of these before.
The interlace in #112 reminds me a lot of some of the more famous portraits of Henry VIII, but there’s nothing on any of them that is a direct parallel, and nothing about it that would limit its use to Henry’s lifetime. It would be killer done either infilled in gold, or on a voided background, perhaps on a book cover, pouch or sweet bag. Sweet bags were sort of like Elizabethan/Stuart gift wrapping. They were little decorative purses used to convey small presents. Similar small stitched bags were sometimes used as needlework tool kits (occasionally they come with a matching pincushion), or to hold mirrors or other grooming aids.
On the charting tutorial, other than a couple of install queries and a nastygram noting that I’m an idiot for giving away the pattern pages, I’ve had almost no feedback, so I am unsure of what problems folk are facing. I can’t say I can answer every question and I certainly am no computer expert, but I’ll try. And I do have evidence that people are finding these posts useful, so nastywriter – take a hike.
In fact, if anyone is or has done stitching based on these patterns, please feel free to send me a picture or a link. With your permission, I’ll repost the image or the link here in the gallery of works done based on my patterns.
GIMP Charting Tutorial 106 – More Drawing Hints
By now everyone playing along should be able to draw. Here are some more methods and hints:
A way to erase: Select the Pencil tool from the Toolbox. In its settings window, choose
Mode: Color Erase
Now draw a new line on top of the segment you want to disappear. This is very useful for small touch-ups rather than wholesale deletions.
Another way to erase: Select the Eraser tool from the Toolbox (looks like a little piece of pink bubblegum). Set the brush size to something larger than the Circle(01) setting we use for drawing. Make sure the Hard Edge box is checked. Drag the eraser over the part that needs to go. Not quite as fine-tuned as the method above, but effective.
Yet another way to erase: Use one of the selection tools (the square, circle, lasso, wand or color select icons at the top of the Toolbox) to highlight the offending bit. Hit your delete key.
To flip (aka mirroring):
Select the bit you want to flip. <ctrl>C to copy and <ctrl>V to paste. The area selected will look all twinkly, and you’ll note the creation of a new temporary layer in your layer toolbox:

Now with the area to be flipped all twinkly, click on the Flip icon in the Toolbox:

Note that I’ve got the first option under Affect selected – that flips the entire (temporary) layer where the bit I just pasted lives. That flips my image over. Now comes a tricky bit. One would think that once the bit has been flipped, it can be easily dragged into place. Not reliably so. I’m not sure why, but switching to the Move icon (the four-way arrow) and trying to drag the bit around doesn’t work. What I usually do is after flipping the image so that it’s in the orientation I want, and while it’s still twinkly, I use <ctrl>X to cut it into the paste buffer, then paste it back into the drawing with <ctrl>V. NOW I can mouse over it until I get the movement icon (looks like a four-way arrow) to drag it into position.
Here’s the result of copying, pasting, flipping, then re-cutting, pasting and finally nudging into place a simple heart:

It sounds complex, but since most of the work is control-key or arrow presses (see tweaking, below), it’s really quite quick and easy.
To tweak alignment:
Sometimes when a pasted, rotated, or moved bit is inserted into the drawing it ends up being out of alignment on the grid. This is because the selection box is constrained in size so that even if its origin is on the grid, its termination is one pixel shy. However, fixing minor alignment problems is easy. Select your offending bit (the lower heart in the sample below), and use your keyboard arrow keys to nudge it into place. Again, like in Flip, I have the best success doing this by selecting, <ctrl>X to cut, <ctrl>Y to paste, then using the arrow keys to nudge the pasted bit into place. Please don’t ask me why the Move command doesn’t seem to work reliably for this. I haven’t a clue.
Rotating:
Again similar to Flip. Select the bit to be rotated and copy/paste it to create a temporary layer. Click on the rotate tool, then on the twinkly selected pasted area. The rotate dialog box will appear:

Rather than drive myself nuts trying to freehand rotate, I type my desired angle into the Angle box in the rotate dialog. In our case that’s an easy 90, 45 or 180 degrees. Usually 90. Then I click on the “Rotate” button in the Rotate dialog box.
The selected bit will appear in its new orientation. For whatever reason, moving the image post rotation is better behaved than moving it post-Flip. I can usually click immediately on the rectangular selection tool (first in the Toolbox), then mouse around to get the move indicator, and arrow the still twinkly rotated selection into place. Here’s the just rotated image, prior to final tweaking:

And here’s the same image, after I’ve nudged the two new petals (at 9:00 and 3:00) into final position using my arrow keys.

Anchoring temporary or floating windows: Sometimes I end up with a floating or temporary window that I want to merge into my main pattern area. Easy. <ctrl>H nails it down.
Deselecting all selection boxes: Sometimes I want to pencil in a line, but click as I might, no line appears. What’s usually happened is that I’ve got a selection box active somewhere. <Shift><ctrl>A will turn off any that might be in use.
So ends this basic GIMP charting tutorial. We’ve only touched on some of the simplest options and commands available in GIMP, but covered most of the tools needed for this type of charting. I will leave color selection to you, but I’ll report back when I’ve figured out cloning via the Stamp tool. Please let me know if you have found this to be useful.
PATTERNS PLATE 18 – GIMP CHARTING TUTORIAL 105
Here’s page 18:

#103 and #108 are fillings I’ve stitched before on my underskirt, coif and other projects. The rest are new. To be immodest, I’m quite fond of my acorns (#105). I think that will have to end up on my current work in progress. Yes, I do have another work in progress, and no – you haven’t missed it. I haven’t previewed here yet.
GIMP Charting Tutorial 105 – Finally! Drawing The Design.
If you’ve been following along, you should now have a GIMP document with four layers in it, a background, a dots layer, one called PATTERN HERE, and one entitled Donuts.
We’re now ready to draw.
Using the Layer Navigation window, click on the PATTERN HERE layer. Obviously, all drawing will happen here. If you’ve saved, quit then re-opened your work you’ve probably noticed that Snap to Grid has turned itself off. Double check and make sure that it’s selected: VIEW-Snap to Grid.
NOTE: THE FOLLOWING INSTRUCTION STEP HAS BEEN EDITED TO WORK BETTER WITH EDITIONS OF GIMP AVAILABLE IN MARCH 2015:
I prefer a thicker rather than thinner line when I draw my pattern. I think it’s easier to see and count. To get it, I select the Pencil tool in my Toolbox and use the following pencil settings:
Mode: Normal
Opacity: 100.0
Brush: Circle (02, Hardness 100)
Scale: 1.30
Dynamics: Basic Simple
(None of the other settings should be checked off)
Making sure that my Color Specification boxes are set up so that the color I wish to draw with is in the top (overlapping) box, I can now draw.
With the pencil selected, I click on a dot, then holding down the shift key to constrain my line to be straight, I click on the dot marking the end of my run of stitches. What I end up with is one straight line, divided up into individual stitch units. In the example below I’ve drawn a four-unit stair step by making six clicks:

So we’re now off and running. Some things to remember as you draw your designs:
1. If you’ve got the pencil tool selected and you think you’re drawing but no line appears, check to make sure that you don’t have an active selection window. To close any that might be open, use A.
2. To cut, you can use the selection box in the upper left corner of the Toolbox window or any of the other selection tools. The box is easiest to use because you can constrain it to snip out pieces even with the grid, making pasting on the grid easier.
3. It’s a bit easier to copy an area, then paste it immediately (using V) and then drag the result to its final resting place than it is to copy an area, reselect the original and THEN paste. If you do this, the new bit will end up in the middle of the active screen and grabbing it can be difficult.
4. If you paste something and wish to move it, mouse around until your cursor turns into a four-way arrow. If you don’t see the four way arrow and try to click and drag the newly pasted bit, you’ll excise and paste a small area of it in the current location instead. If this happens, remember that Undo Z is your friend.
5. OH NO! My drawing disappeared! No problem. You probably killed the entire PATTERN HERE layer by hitting X instead of Z. Undo with a real Z.
6. Moving using the Move tool (the little four-way arrow in the Toolbox) is manipulating the layer rather than the bit I just pasted. If this happens, check the options box for the Move tool. There’s a row of icons across its top. One is labeled layer, one is labeled selection (mouse over to show labels). Make sure selection is highlighted, not layer.
Tomorrow we’ll cover image manipulation – flipping, mirroring and rotating. At that point we’ll have pretty much covered all I know about using GIMP for charting these patterns. If you have any questions on the material in this series, please feel free to post them here.
