CONTINUING EXPERIMENTS
The Grand Experiment of splitting the individual plies of my vintage six-ply Pearsall’s silk floss into component strands continues. So far it has worked out. I’ve only lost one of the separated strands, and that was to it catching on something after I had unwound it, but before I restored some twist by finger spinning, and a very light application of beeswax to set the new spin.
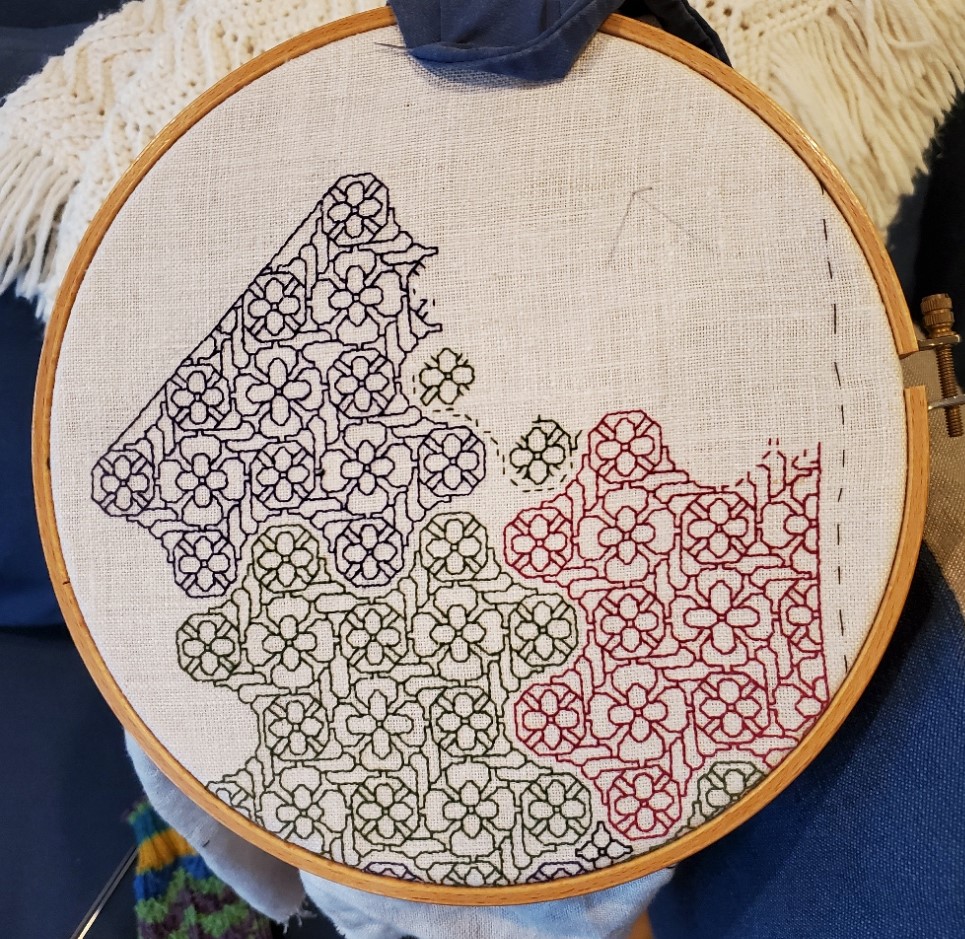
I’m liking the look of the separated strands. Very much a historical look, with the long staple fibers being shown to advantage, and the occasional thick-thin variance of the finger-spun strands. Note that in the photo below in the salmon thread you can see the kink set by the original spinning, but that the kinky texture is not evident at all in the stitched diamond filling. A win.
Too bad the Pearsall’s is such a discontinued unicorn. I don’t think I could do this with Au Ver a Soie’s Soie D’Alger. The staple isn’t as long, and the twist is both different and tighter.
One thing I did to eke out my colors was to work with two at the same time, alternating color stitches on the baselines, and working sprigs and inner ornaments in one color or the other. I hadn’t tried this parlor trick before.

You can see at the bottom of the motto rectangle that I hop-scotched the two colors – working one a bit along, then filling in the other. There are also TWO baselines in this strip due to the use of two colors. One handles the edge along the diamond infilling, plus the alternating squares-and-diagonals inside the border strip, and the other handles the top line and alternating sprigs. That’s because logic prevents doing the top and bottom edge PLUS the sprigs in two colors off of one baseline. In alternating colors you have to keep going forward along a line unless you want it to be solidly one color or the other. I could do the single color wreath sprigs easily, but those three stitches between them (or between the bottom legs of the squared diagonal boxes) would also have to be a single color because they would require doubling back to fill. Therefore, two baselines. Not a problem, and pretty easy to parse for quick stitching, once I realized the problem and stopped stitching myself into cul de sacs.
Except for the dark outlines of the letters, all of the stitching so far has been done with the split strand Pearsall’s. And I intend to continue working that way for the rest of the project, because of the look, my need to stretch my very limited quantities, and the challenge of doing something new and unexpected.
The next design will be one I’ve done quite recently, but worked up a bit differently. I did this Tolkein-sketch-inspired strip on the sampler I did in tribute to the Resident Male’s novel Treyavir. I worked the outlines in navy blue, and then went back and filled in selected areas of the design with squared filling, in a deep gold-tone yellow.

This time I’ve added a corner (very easy to do because of the clear diagonal elements). I’m plotting out a way to do it in multicolor because I don’t really have enough of any one (or two) colors to ensure that I can stitch the entire thing all the way around as a full frame. And I certainly don’t have enough of any one color to do a fill treatment as I did before. Doing multicolor will be problematic because of the design itself, too. The long diagonals “cap” the petal like elements. Possibilities include:
- Skipping over the end cap petal stitches and using a separate color for the top and bottom lines, and to work any stitches between petal caps on the diagonal. All petal elements will be entire, with no truncated end caps.
- Dividing my colors into two groups – possibly cool (blues, greens, purples) and warms (oranges, salmons, tan – no true reds in the pile to speak of). Working triangles in one direction in cools, in succession, alternating with warms, BUT letting the cool color triangle edges dominate, letting the warmer colors recede.
- Working the top and bottom baselines and hard diagonals in the same color throughout (possibly two very close shades of the same color, alternating stitches), then filling in the rest of the triangle patterning in alternating warm and cool colors. All cap stitches will be done in the outline colors.
- Some variant of 1, 2 or 3, with the smaller center triangles being worked in a different tone or possibly even the opposite color group from the larger, outer triangles.
Now to finish off the salmon diamond fill behind the letters, plus the remaining bits of the wreath sprig two-tone edging on that box. Then on to the outer frame.
Also, I will write more on two-tone double running history in the next post (with special acknowledgement to the ever generous Melinda Sherbring who shared copious notes and examples with me) – but I can only sit for so long at a time, and that’s an entire saga all on its own.
THINKING, BUT KEEPING BUSY
A couple of people have asked if I’m taking a break from needlework in the aftermath of the great coif project.
Nope. To be truthful, I am filling my time with far less challenging pieces while I contemplate the next big project.
First, I’ve returned to the third forehead cloth. I’ve done two before and love wearing them instead of bandannas to contain my hair on windy days. I do a little bit on them in the afternoons, and in the evening catch up on my sock knitting.

The socks are my standard issue toe-ups on anything from 76 to 88 stitches around, depending on needle size; figure-8 toe (an technique unjustly despised by many), plain stockinette foot, German short row heel, then something interesting for the ankle. Mostly improvised. The only hard part is remembering what I did on that ankle so I can repeat it on the second sock.
The forehead cloth is fairly flying. It’s all one pattern, on cotton/linen yard goods that works out to about 32 threads per inch. That’s as big as logs compared to the coif’s linen. I’m trying out Sulky 30 thread (two strands). It’s ok, but I am not so fond of it I’d throw over softer, more fluid flosses. I am betting though that it will stand up to hard laundering better than standard cotton floss. The stitching on my other two forehead cloths, done in silk, has survived quite nicely. Unfortunately the ties – folded strips of the same ground – have totally shredded and been replaced twice on each. I may move to narrow store-bought twill tape for the ties, instead. Jury on that is still out. Oh, and yes, there are mistakes on this. Some I’ll fix, and some I won’t. Have fun hunting for them. 🙂
While I’m here, I’ll share a tiny blackwork hint.

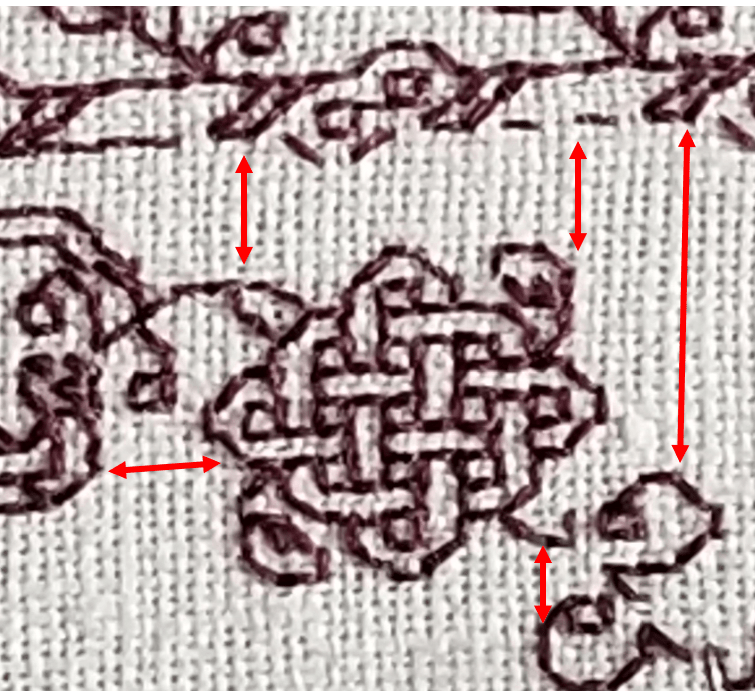
I’m doing double running but this will be relevant to those who favor back stitch, too. See those “legs” sticking out in the photo above? As I passed those junction points I knew I would be coming back again, from a different direction. It is far more difficult to hit the exact right spot when joining a new stitch to an existing stitched line (both perpendicular as here, and diagonally) than it is to mate up to a stitch end. Those legs are there so when I come by again I have a clear and simple target for the point of attachment. This saves a lot of time, minimizes my errors and helps keep my junctions as neat as possible. Try it, I think you’ll find the trick useful.
What am I contemplating for my next project? Possibly a blackwork/sashiko hybrid. I have a barrel chair, a wreck salvaged from the trash, that I had recovered in Haitian Cotton back in the early 1980s. It has survived four house moves and two children, but although the back and sides are in good shape, the seat cover and the area just under the seat are both shot. I still adore the thing even though it doesn’t really fit in with the rest of the house’s style. So it’s going up into my office. I plan on recovering the shredded areas with patchwork denim overworked in white running stitch. The denim will be reclaimed from various outgrown and destroyed garments I’ve held onto against just such a future need. Since I do not plan on replacing the rest of the upholstery, I’m counting on those flashes of white to bring the seat and the rest of the piece together.

PROOFING
And we march around the perimeter, making skeleton after skeleton.

I’m just shy of half-way now, and I had to extend a tendril out to that point to make sure that I’m hitting my center mark. And I did!

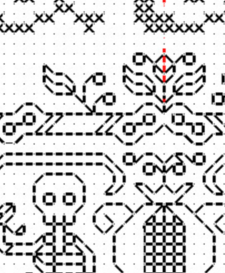
As you can see comparing the blue line on the photo and the red line on the snippet of my chart, I’m spot on for alignment – not even a thread left or right of my center line.
One question I keep getting is how I maintain my location and ensure everything is in the correct spot without pre-gridding my work (without basting in an extensive set of guidelines to establish larger 10 (or 20) unit location aid across the entire groundcloth). I generally reply, “By proofing against established work,” but that then generates the second question. “How?”
So I attempt to answer.
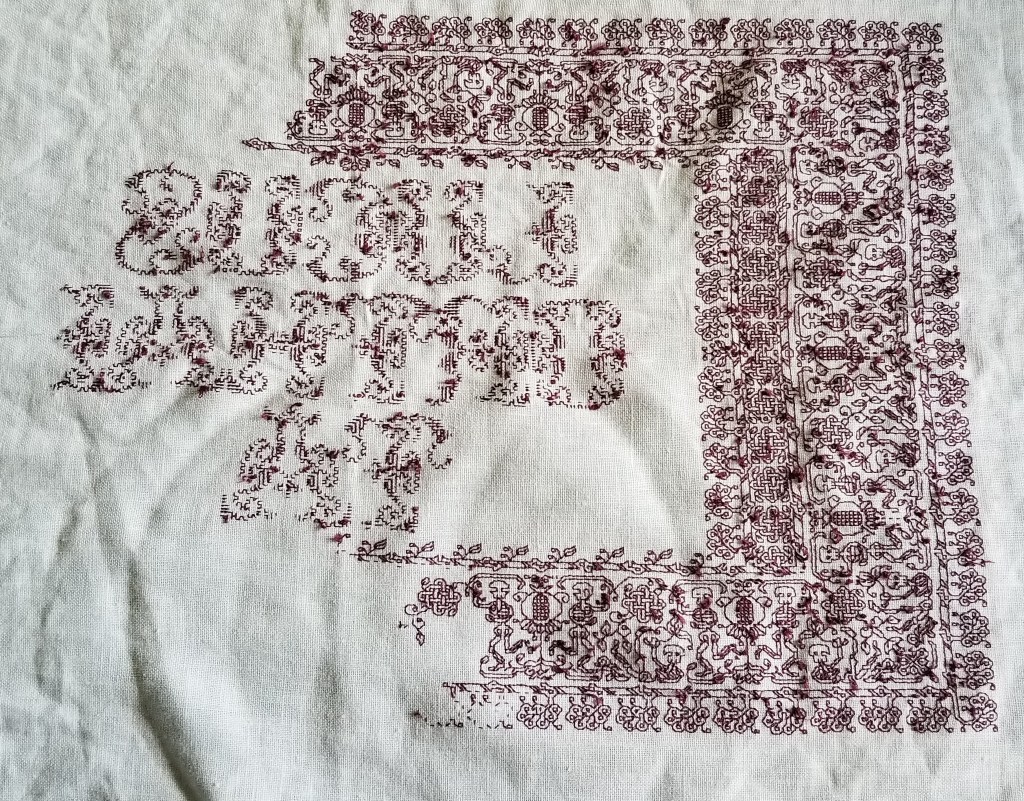
For the most part I almost never work on fully charted out projects, with every stitch of the piece carefully plotted in beforehand. I compose my own pieces rather than working kits or charts done by others, and as a result I never have a full every-stitch representation as my model. My working method is to define center lines (and sometimes edge boundaries), but I pick strips or fills on the fly, starting them from my established centers, and working from smaller charts that are specific to the particular motif or fill that’s on deck. However, if lettering is involved I am more likely to graph that part out to completion prior to stitching, to ensure good letter and line spacing. (Leading, spacing, and kerning are close to my heart both as someone whose day job deals in documents, and as a printer’s granddaughter.)
For this project I DID prepare a full graph to ensure the centered placement of my very prominent text motto against the frame. I also wanted to miter the corners of the frame (reflect on a 45-degree angle) rather than work strips that butt up against each other, AND I wanted the skeleton repeat to work out perfectly on all four legs of the frame. To do that I had to plan ahead more than I usually do. (Note that the repeat frequency of the accompanying smaller edgings are different from the skeleton strip, so I also had to “fudge” center treatments for them so they would mirror neatly – another reason to graph the entire project).
But even with a full project graph available against which work, I didn’t grid – I worked as I always do, relying on entirely on close proofing as I go along.
The first step is a “know your weaknesses” compensation. To make sure I am on target I almost never extend a single long line ahead of myself, especially not on the diagonal because I make the majority of my mistakes miscounting a long diagonal. Instead I try to grow slowly, never stitching very far away from established bits, so I can make these checks as I work:
- Does the stitching of my new bit align both vertically and horizontally with the prior work? Am I off by as little as one thread? Am I true to grid?
- Is my new bit in the right place? Does the placement of the design element align with what’s been stitched before? For example, in this case, is do the toes of the mirror imaged bois back to back to the pomegranates match in placement in relation to each other and to the bottom of the pomegranate’s leaves?

Are my motifs in the right place?
- Am I working properly to pattern? It doesn’t matter if I am using a small snippet with just the strip design or fill that’s being stitched, a full project chart, or (as I am now) using prior stitching as my pattern – copying what’s been laid down on the cloth. Am I true to my design as depicted?


(Note the compression due to uneven thread count of the fabric.)
As I work, I constantly proof in these three ways – checking to make sure that my work is true. And if I discover a problem, I trace back to see where I went wrong, and I ruthlessly eliminate the mistake. For the record – there’s nothing to be gained by letting off-count stand in the hope of compensating later. Trust me – you’ll forget, mistakes will compound on mistakes, and you’ll end up wasting even more time, thread, and psychic energy on the eventual fix.
I hope this explains what I mean by proofing as you go. I know for most of the readers here, this will be second nature, and they won’t have thought of it as a disciplined approach, but for newer stitchers the old maxim “Trust but verify” should become a mantra. Verify, verify, verify. The sanity you save will be your own.
Finally, for Felice, who doubted I was using double running stitch for such a complex project in spite of the in process photos that showed the dashes of half-completed passes, here’s the reverse.
Yes, I do use knots for work with backs that won’t be seen, but I do it carefully so that the knots don’t pull through. Point and laugh if you must, but I reserve the right to ignore you.
