Continuing on with boring embroidery posts.
A good many people will recognize this pattern.

I stitched this snippet from a chart I did in TNCM (Plate 64:1). A simplified chart for the same design also exists in Pesel’s Historical Designs for Embroidery, Linen, and Cross Stitch.
The original for my graph is a handkerchief in the Victoria and Albert Museum, Accession T.133-1956. It’s current attribution is circa-1600, England, although that designation has changed over time. It used to be called out as 1580-1600. I’m delighted that museums are revisiting the dates, stitch descriptions, and materials info for their smaller textile holdings. These listings are bound to improve as the methods and technologies (and available funds) to assess them improve. I do not think that Pesel used the same artifact as her base. There are some departures in her graphing from the V&A example, and her marginal notes cite a sampler source, from 1658.
Another reason that this design is so familiar, is that the V&A handkerchief is near iconic, and shows up in several influential stitching history books, including Digby’s Elizabethan Embroidery, and King and Levy’s The Victoria and Albert Museum’s Textile Collection: Embroidery in Britain from 1200 to 1750. But in all of the secondary source representations, it is rarely shown with all four corners. In fact, it used to drive me nuts that I couldn’t see them all. But thanks to the V&A’s site archival image updates, we can enjoy completion. Here is their own photo of the entire artifact:

and a color snippet, quoted from the V&A images, for good measure, since repros in the stitching history books often show the original reds:
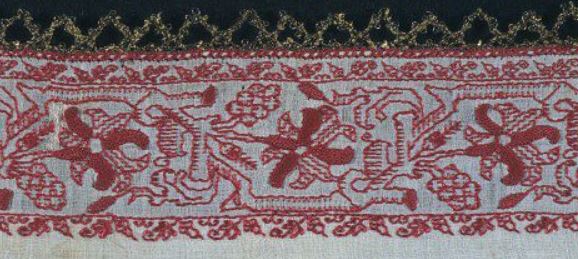
Gorgeous.
But look at the corners!
I’ve had many people ask me about how to create corners for strapwork, to go around the perimeter of linens, or to anchor a dress yoke. Much fretting over exact matches happens. Even the choice of mitering or bending the work around the angle (as opposed to butting the design up without mating the two directions) causes anxiety. In truth all of these methods appear, although the exact mitering thing is the least commonly seen.
This is one way to treat those corners. Four ways, to be exact, because no two of these corners are exact matches. And it doesn’t matter that they are not.
Numbering clockwise from the upper left, we have 1,2, then 3 and 4, respectively. I’ve taken the liberty of rotating (but not flipping) these so that they are easier to visually compare:
Upper corners, #1 and #2:


and lower corners #3 and #4:


There are three rough treatment styles. 1 and 3 are distinct, and #2 and #4 are similar but not the same. #4 has a fat twig interlace to the left of the flower, to fill in space. In #2 there was less space to fill, so that twig is smaller. The area at roughly noon above the flower is different between #2 and #4 as well. On the others, #3’s flower is squished up against the border, with no surround to its left, and all manner of arabesques fill up the extra space below the flower in #1.
It’s always a matter of personal opinion and borderline heresy to use these cues to try to deduce working method, but it’s clear while our anonymous stitcher may have had a visual guide to the strip parts of her or his design, the corners were fudged in, ad hoc. The narrow companion border’s corners – both inner and outer – are improvised, too.
If I were to be so bold as to speculate, I’d pick the lower left edge as the starting point, with the work starting at the indicated line, and progressing around the piece in the direction indicated (note that the V&A says that the monogram is EM, so that we’re actually looking at the reverse):

The stitcher worked to a convenient point to form a corner, keeping it as much in pattern as possible, turned direction, worked across the top edge, turned, and so on, until the starting point was achieved – at which point the “terminal fudge” was needed to finish the work. It’s also vaguely possible that the finished size of the piece was determined in an attempt to make the the repeats (mostly) work out, rather than the square being laid out first, and the repeats being fitted into it. At least that’s the way I – an improvisational and slightly lazy stitcher – would do it.
So. If you are making a historically inspired piece, do you need to meticulously draft out exact corners first, then follow your chart with fanatical purpose?
Not really.
Just go for it. Much as they did roughly 460 years ago.
PS: Eye training: Bonus applause to the person who spots my departure from the original in the companion border. 🙂

Boring, never! Fun educational reading written by an expert in the field, yes! Looking forward to more “boring” reading about my favorite style of needlework!
I really appreciate your posts. Thank you. From each one I learn and gather gems. Kind regards,
Ocksana.
>
[…] chose to do butted borders on this piece. Neatly mitered, squared, or fudged border corners do exist on historical pieces, but they are in the minority. Even though my self-designed border […]
[…] Cornered! Possible working direction and four different corner treatments of a famous, oft photographed handkerchief in the V&A. […]