More progress on the Unstitched Coif project.

As for “Time Captured” – that’s what this piece is. Time ensnared by thread.
That raven-like bird took about six hours to stitch. The big carnation at the lower right took roughly 18, exclusive of its stem, leaf and tendrils. I took my first stitch on the coif on 16 April. A little over 7 weeks ago. I’d estimate that over those seven weeks I’ve put in between two and five hours a day stitching. The average is probably around 4 hours. So by conservative estimate, what you see here is over 225 hours of my time. And looking at the whole piece, I’m only about 20% complete. I’ve got to speed this up if I want to hit the deadline for submission to the exhibit. Oh, and for the person who brusquely offered to buy my coif when it’s done, I point out that I only have one rate for my time – my fully burdened professional hourly consulting rate. I hope you are prepared to spend in the six figures.
But I’m not complaining about the time spent. Every second has been fun, and a good deal of it has been spent “in the zone” where tedium and cares do not exist. For that it is a remarkably efficient source of centered self-therapy, that I am enjoying immensely.
And all in all, I am pleased with what I’ve put on the cloth. With the exception of the simple boxed filling for Big Bug’s head, which I also used for one petal in the half carnation at the top edge, I haven’t repeated any fills. I’m happy with the mix of light/dark; dense/sparse; and curved/angled fills. There’s one fill done at 3×3 threads, the first leaf I did, but it’s not a glaring problem and I won’t bother reworking it to the same 2×2 thread scale as the rest of the piece.
A few of the paillettes might have been better placed, but I’m not going to take the time to do it. I still need to add gold accents to the viola flower in the center, and to the wings of the largest insect. And I am considering picking out the gold bug antennae and bird feet. While they looked great before the great spangle-flood, they do get a bit lost amidst all the bling. If I do that, now is the time. There are only four bugs and two birds, with lots more to come in the remaining 80% of the piece left to go.
Working with the gold has been a challenge. It’s unruly, for starters. I had hoped to do one of the narrower Elizabethan plaited stitches for the stems and tendrils, but after blowing my budget on the Official Linen Ground, I couldn’t justify the expense of the amount of passing thread I would probably need, or the cost of “auditioning” several alternatives before I hit on the one best suited for the project. So I stash-dived and made do with the Japanese Imitation Gold #5 I bought and used for my Two Fish project. (The same project that introduced me to the 2mm spangles).

I tried, but couldn’t get the Gold #5 to work properly as a passing thread on this closely woven, fine ground. The metal strip around the outside unraveled and shredded, exposing the inner silk core. So I resorted to couching, and even that can be problematic.
While working it single or double stranded around the curves isn’t easy, it’s much easier if I employ the natural bend of the stuff instead of working against it. It tends to curl in one particular direction, and have a tighter bend radius in that direction. So I try to lay the thread to take advantage of it’s natural directionality.
Plunging – taking the ends of the stiff, couched gold from the front to the back of the work – can present problems. It’s especially difficult for tiny lengths of the gold, like the ones I did on the aforementioned antennae.
In plunging, you thread a “service needle” with a looped length of sturdy thread. You insert the service needle at the point where you wish the gold to end, catch the gold thread’s tail with the service needle’s loop, gently draw it tight, then make a short, sharp yank on the service needle, using the loop to pull the thread through to the back.

Above are two of the needles I use for this, with both the tiny #12 blunt point beading needle I’m using to stitch the fills, and the US and UK pennies I use for scale. I experimented with several, including larger tapestry needles before picking these. Not sure what they are, though. I found an unmarked paper of six of them in a box of assorted needlework oddities I found at a yard sale. The extremely smooth eyes plus is a bit of tiny variation in the size of the eyes and taper among them, which makes me think they might have been hand-finished, but I’ll never know. The polyester carpet thread I use for the plunging loop is extremely strong.
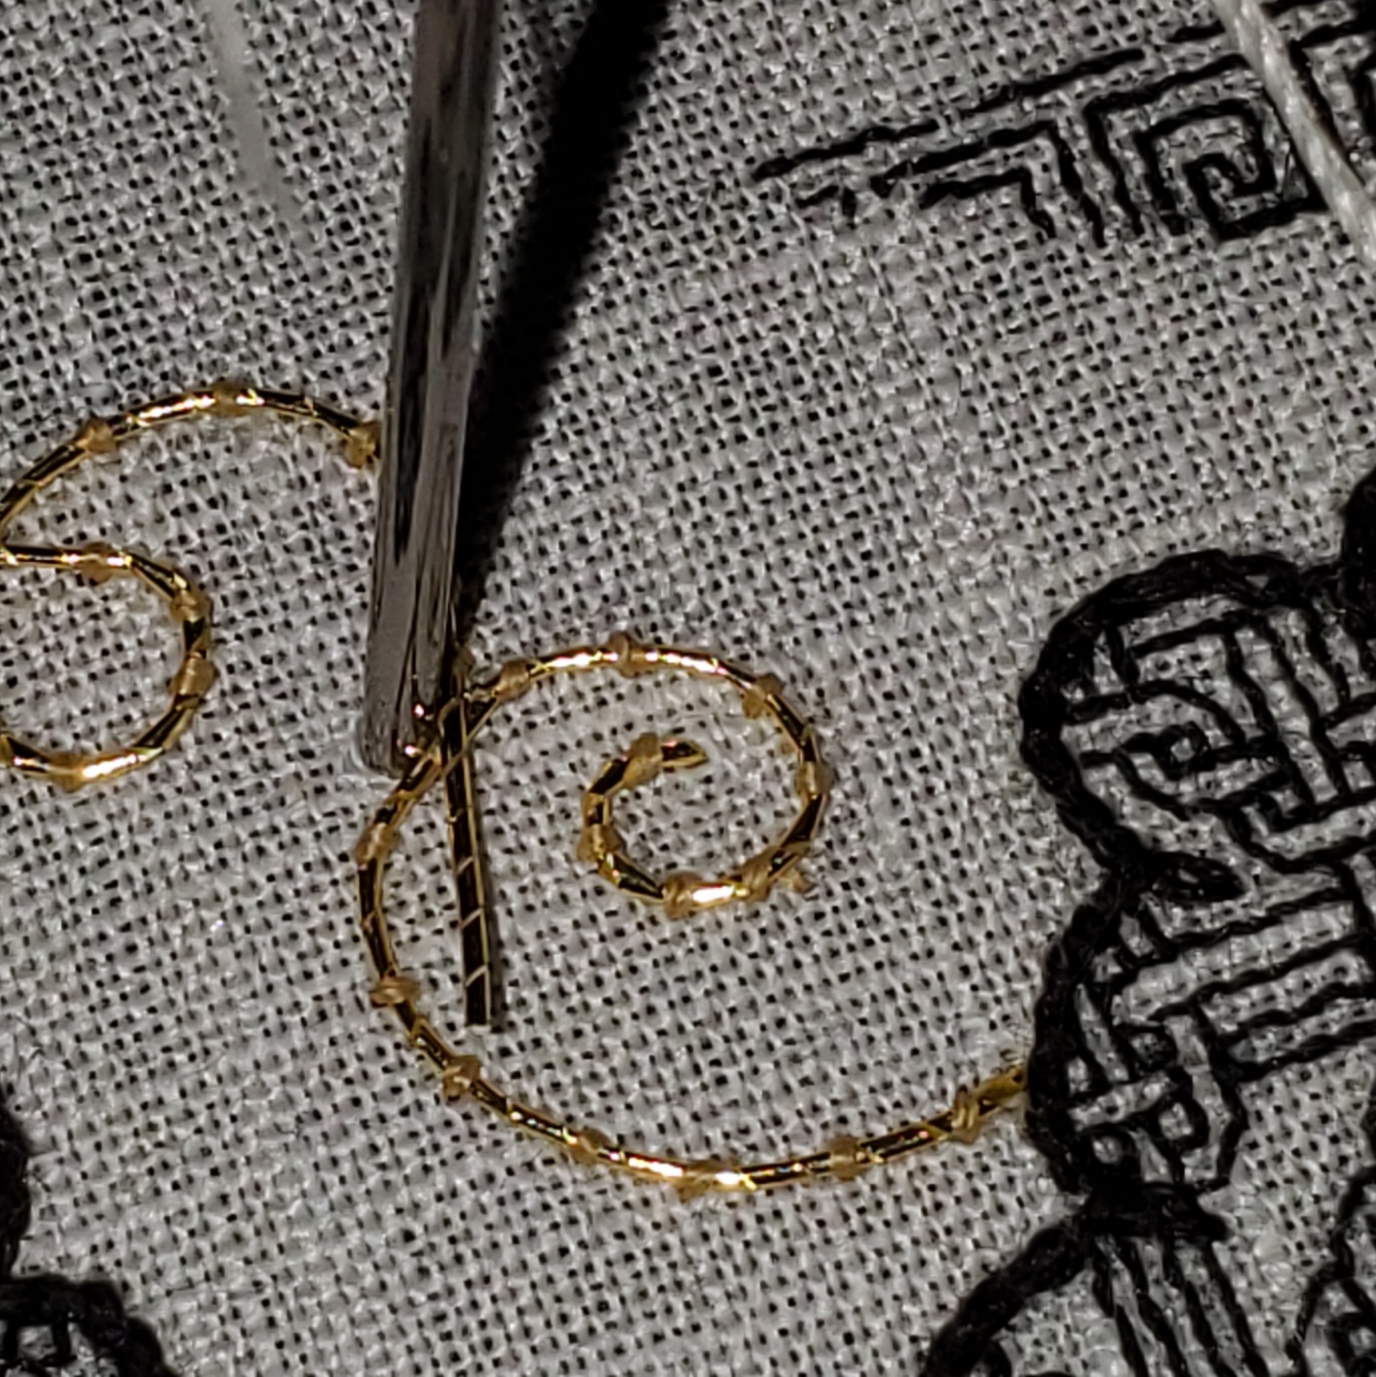

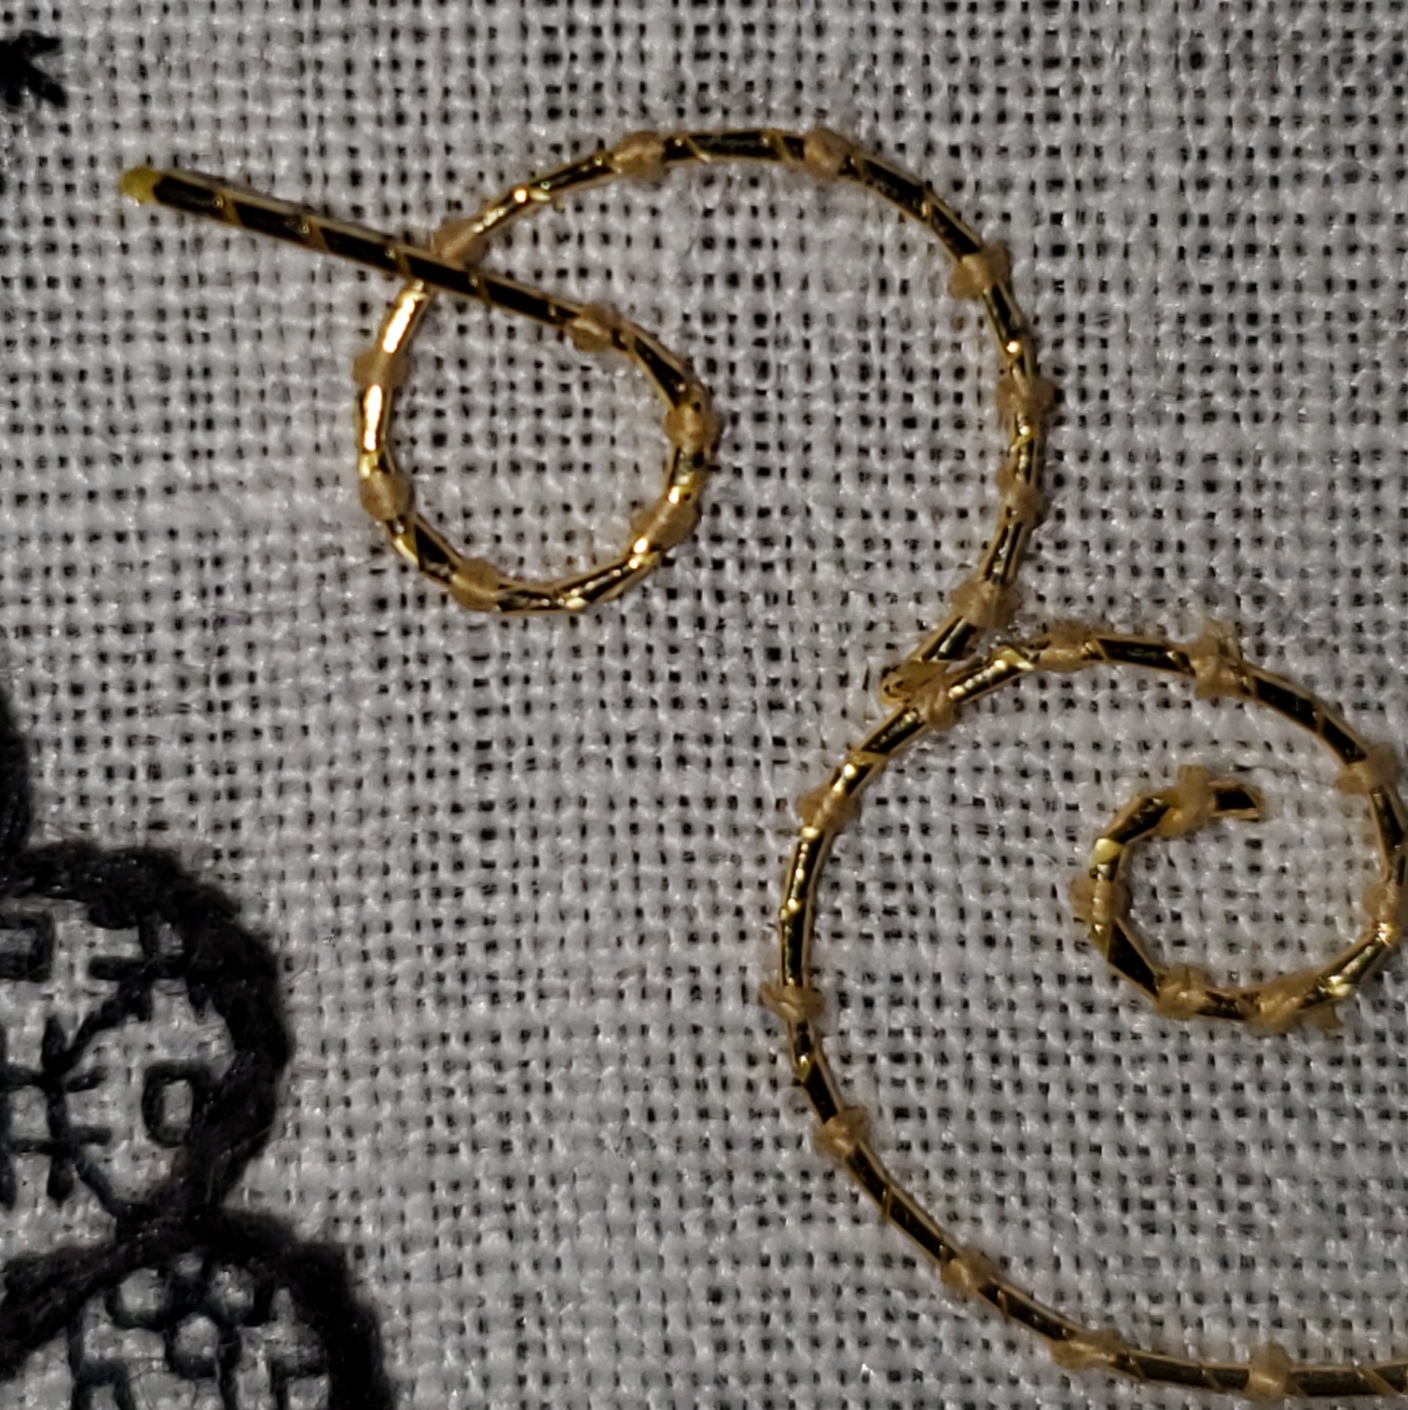
And an action sequence. At left, inserting my gargantuan needle into the spot where I want the gold to terminate. You can see how huge it is in comparison to the ground cloth weave. I go slowly, with the intent of pushing the weave threads aside, and not piercing them. The tail I am about to hide is the vertical bit adjacent to the plunge point. In the center, I’ve lassoed that tail and pulled it through my super-size, distended hole. The size of the hole helps avoid abrading and shredding the gold thread’s outer layer. And at right, the final result. I’ve used the tip of the plunging needle to ever so gently, stroke the ground cloth threads back into position. You’d never know that I had opened up a yawning crater there.
Why show all of this? Well, first to help those who might be considering using gold thread, but have had problems sewing with it. At no point in this process is my gold passed through the eye of a needle, nor is it dragged repeatedly through the cloth to form stitches. I hold it on the surface of my work, and use a needle with yellow silk to make tiny silk stitches, affixing the gold to the ground. I leave about a half inch (roughly 1.5 cm) gold tail when I begin my line of couching, then snip off the excess when I am done, leaving a tail of about the same length at the terminal end. Then I plunge both.
Second, to help explain why I am thinking of re-doing the bug antennae. Those are teeny tiny bits, most not even as long as the tails I leave to end off. No matter how tightly I stitch the yellow couching thread, about 75% of the time the act of plunging itself rips the whole bit of gold through the exit hole, right out of its affixing threads. It’s a major pain and production bottleneck. So in addition to those tiny bits visually disappearing into the spangled ground, I have great motivation for cutting that bit of detail from the rest of the work. I will replace it with the same simple reverse chain stitch in black silk that I used for the rest of the outlines.
Now to work up the courage to perform the surgery…

Thanks for being so detailed about time expenditure. It’s hard to convey to folks just how long this kind of stitching takes!Rachel Braun
Amazing! Such beautiful work.
Thank you for showing how you plunge the ends of the couched gold threads. I’m working on my first ever gold work and have been putting the large needle into the linen, then putting the gold thread through the eye and *gently* pulling through. I’m going to try the thread loop on the next one. Have you shown in a past post how you finish the tails of the gold thread on the back?
I’m waffling on my opinion, not that you asked for it, on redoing the bird feet and insect antennae. They do get a bit lost, but the bird feet are the ones that are most lost IMHO. I might redo those first and then re-evaluate if I were stitching this.
Interesting on the time so far. Good for you to put the same time rate on your stitching as your consulting work. It is frustrating when people tell us to turn our hobbies into a job and then not want to pay enough to cover materials, let alone fully replace whatever we earn from being employed.
After looking on your tutorials, and doing a search here, I saw one of your past posts had a link to Mary Corbet’s blog to make a plunging loop. So I went there to check on a tutorial to finish the plunged ends. Found it!
Glad you found it. I admit laziness. While I should capture those ends as I work, I often wait and do a whole bunch of them at once. Right now I’m more focused on laying down the stitching than neatening everything up. As a result I apologize for incompleteness – for not having the end treatment in the this post.
For anyone looking, there’s the Mary Corbet piece on ending off gold threads that JustGail mentions:
https://www.needlenthread.com/2011/12/how-to-end-goldwork-threads.html
I seem to remember reading somewhere that the Elizabethans didn’t plunge their gold threads, but simply cut them close and stitched them firmly. Is this something you’ve read, or am I imagining it?
But I think the design reasons for doing the insect legs in black silk are overwhelming anyway!