STARS OF THE BLOGIVERSE
I’d mentioned knitting the 42-stitch hats earlier. I’ve got them, they’re cute, but I thought they needed a certain something to make them truly special. I’ve got six now, two each of red, purple, and blue because each skein of Brown Sheep Burly Spun makes two hats with a tad left over. So I went looking for inspiration in several spots that have trims, embellishments and the like.
Of course I checked out Epstein’s Knitted Embellishments and her new Knitting on the Edge. I won’t be buying On The Edge, too much duplicates the KE book already on my shelf, plus I have most of the sources she drew upon, so there’s very little there new to me. Nice photos, though. Useful if your library isn’t as out of control as mine, or if visual inspiration is key to your thought process.
I also looked through Thomas’ Knitting Book to check out picot point knitting, and a couple of other books that had tassels or other freeform motifs. I even dipped into my crochet resources, but crochet in finger-wide bulky yarn looks ridiculous to me. I tried out several knit flower and leaf type motifs, but nothing quite hit the spot as being bold enough for the ultra-bulky hat.
Then while taking my daily blogstroll, in a fit of serendipity, I hit on Nanette’s Knitting in Color (she of the stranded colorwork book and bunny haven). There she’d posted some directions for knitted stars, worked from the outside edge in. Even in supergiant yarn with a distinctly ruffled look her stars are perfect for my hats!

I played with them a bit, working them up in the round instead of flat to spare myself the joy of a purl side double decrease and a seam, and using a double decrease that leaves the centermost stitch on top. (This first pilot star was done with the decreases as described in the original directions). I had just enough left over from each skein of my Burly Spun to make two stars, plus have a bit extra for sewing and surface embroidery.
MORE SOCKS
More holiday gift socks. Nothing special, nothing exciting (and nothing learned).
I knit these last night from Schoeller+Stahl’s 6-ply version of Fortissima Colori/Socka Color. It’s a smidge lighter than DK weight. I’ve added into on the length of its color cycle to the striper repeat chart I posted earlier. All in all a very quick and satisfying pair. A bit heavy for my own sock wearing preferences (I prefer 4-ply regular sock weight yarn knit at tiny gauges), but nice none the less. Another blurry photo:
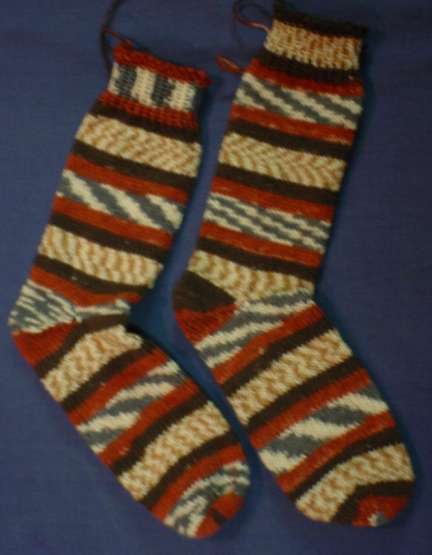
I find it easier to knit self-stripers when I’m watching TV or a computer game. Otherwise I’m tempted to watch my fingers and micro-adjust my tension to modify the striping effect. That never quite works out right. So I save this type of autopilot knitting for when I’m otherwise distracted.
Cookies
I’ve gotten some good-natured ribbing back on the cookies. For the record, I’m no domestic diva. Martha Stewart makes me think of those Victorian women’s magazines, filled with advice on decorating a status-conscious parlor, complete with directions for crocheted chair leg cozies and decorated cardboard toothpick holders. Then I shudder.
I’m more of a tallish, glasses-wearing, workbooted, aging grrlnerd with a weakness for needlework, history, books and good food. Not necessarily in that order.
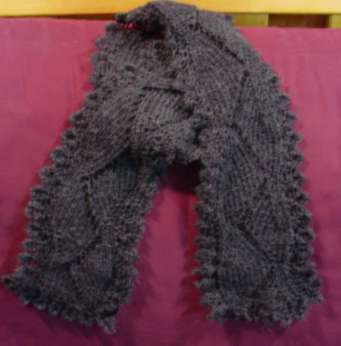
SCARF-A-RAMA
My holiday knitting. I’m pleased to say the Hannukah socks were graciously received by someone who both knows and appreciates hand knitting.
The scarves aren’t scheduled for distribution until later this month, but as all are to be mailed, should be boxed up as soon as possible. Here they are:
First, the blue one for which I offered up the texture pattern earlier in the week.

Not terribly exciting, but soft and warm. And blue. I’m debating whether or not to fringe this one. Fringes aren’t my favorite edge treatment as they often look ratty too quickly, but I have a feeling that this recipient would like them.
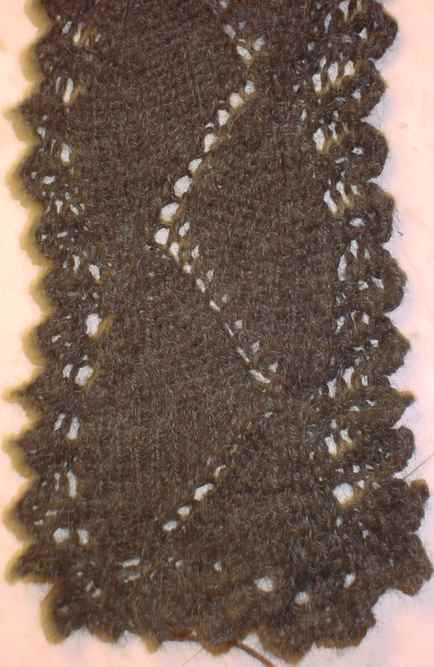
Second, the gray alpaca Kombu scarf is finished. Here’s another blurry photo to prove it:
And finally, after sitting completed (but never used) since earlier this summer, the Spring Lightning scarf joins its siblings in this year’s gift parade:

I love it, but I think the intended target will love it more. Plus, I can always make another. I did however want to take a final good picture of it for use in the pattern I plan on posting on wiseNeedle (which I’m still writing).
Two more hats and two more pairs of socks and I can return to my regularly scheduled knitting.
THE BEHINDER I GET
I can’t say I’m going any faster, but I’m in the swim of things with my gift knitting. I have to admit a tinge of guilt this year. In years past, I’d done a fair bit of it far in advance, sometimes using especially mindless gift knitting (like socks or scarves) as bliss-out-on-the-beach pieces during our summer vacation. Or I’ve doodled up little projects between larger ones, while I was waiting for my ideas to set. By this time I’ve usually got a basket of goodies ready for holiday giving. Unfortunately, this year nothing got done ahead of time, and I’ve been forced to do something I detest – knit to deadline.
I hate knitting to deadline because in my professional life, all I do is march to deadlines. I’m a proposal manager, and I’ve lived my career in 30-day increments. Other people will say things like, “Dear, remember ’91 – that was the year little Brunhilde was born,” or “Yeah, 91. Cousin Ildefonse was in Desert Storm.” I say, “Fall ’91. That was that big military IT/hardware support proposal, we had an extension that got eaten up by the sheer bulk of the revised reporting schedule requirements.” From this you can well deduce the heart-stopping excitement of my daily life.
Knitting has always been a blissful interlude, a no-deadline finish-it-whenever sort of pursuit. That’s one of the reasons why I’ve shied away from pursuing commercial publication for my patterns. Squeezing my knitting life into a tight deadline sucks all the joy out of it.
So here I am. Doing frantic knitting on a couple of Hannukah presents (it’s early this year, adding further complications). The Kombu scarf, four hats, and two pairs of socks are done. That leaves three scarves, two more pairs of socks, and possibly couple of kid’s size earwarmer bands to go.
Today I plan on casting on for a very simple scarf done in Sandnes Lime (a mostly cotton, very soft yarn) for a friend who is wool-sensitive. I’ve used and reviewed the stuff before and not been wildly pleased with it, but for a scarf it should work out fine. Although most of the detail will be obscured by the textured yarn, I’ll probably work it in this simple knit/purl pattern – just to give it a bit more interest:

I like this one for scarves because it adds a bit of loft and like all patterns with near equal amounts of knits and purls on each row – it lies nice and flat without curling.
WORKING REPORT – KOMBU SCARF
I’ll try to get a good shot of this one. It’s in a charcoal-grey alpaca, a notoriously difficult color to photograph.
The stuff is sport weight. I mentioned before that I got it at a Maryland Sheep and Wool Show, circa ’95 or ’96. There was a big rainstorm that year, and many of the vendors in outdoor tents were soaked through and/or blown over. The Tess Designer Yarns booth was particularly hard hit. Sunday afternoon as the owner was packing there was still a large pile of sodden yarns laid out on a tarp that were being sold as-is. I bought this one-skein orphan, took it home and dried it out and wound it, and have been trying to figure out what to do with it ever since. There’s a ton of yardage on this 8 oz. ball. I’ve barely scratched the surface and could probably do another three or four scarves with what’s on there.
My gauge over my Kombu is K1, P1 rib is roughly 6spi , on US #4 needles. This gray scarf is about 6 inches wide, measured point to point. I’ve completed about three feet so far, averaging about eight inches per hour. Both the center pattern and lace edges are quick to memorize and knit. Alternate rows of the center are K1, P1 rib; alternate rows of the edgings are all knit. Because the scarf is based entirely on a combo of ribbing and garter stitch it lies absolutely flat, without curling.
I hate to brag, but I really like this pattern – even though it’s one of my own. It’s rare I go back and do another of anything I’ve finished. Even that Dreaded Second Sock can be agony, but this is the fourth Kombu I’ve done. Two were done in Little Lola (including the same photographed on the pattern website) at a slightly smaller gauge (befitting the slightly thinner yarn). The other was done on US #7s and a 4.5 spi in pink/turquoise/yellow/lime green Red Heart variegated, picked out by a (then) 4 year old. Both my eyes and fingers hurt doing that one, but the kidlet was delighted with the all too bright result after she decided that the yarn wasn’t so scratchy that she couldn’t wear it as an "outside the coat" type scarf.
WHAT’S A 42-STITCH HAT?
Several people wrote to ask about the 42-stitch hats I mentioned yesterday. I attempt to answer.
The pattern (such as it is) is widely available. Cleckheaton has a version that they authorize yarn shops to give away with purchase of Gusto 10 that’s written to be specific to the yardage of that product. I’ve also seen very similar hats in several of the beginners’ books so popular now, distributed as shop patterns by LYSs, and posted other places on the Web. Basically, it’s a hat boiled down to its barest essentials – a very large gauge stockinette tube with a crown formed by simple decreases. The brim is formed by the natural tendency of stockinette to roll.
1. Find at least 55 yards of yarn that knits up to about 9 or 9.25 stitches = 4 inches. I got 9 with Cleckheaton Gusto, and 9.25 with Brown Sheep Bulky Spun. The Bulky Spun hats measure a bit under 18.5 inches around the lower edge, and stretch for a comfy fit on adults. The Gusto hats are just under 18.7 inches around the lower edge.
2. Cast on 42 stitches, and knit stockinette in the round. I used plain old half-hitch cast on to avoid a tight edge, and to conserve yarn. I did the whole thing on a set of four size US #13 DPNs, but if you hate double points you could do it on two circs, or start on one short circ, then move to DPNs.
3. Knit tube until it’s long enough to both cover your ears and reach just under the crest of your head. That’s about 7.5 to 8.5 inches, including the rolled brim (which should be flattened out to measure). If you’ve only got 55 yards of a superbulky, don’t make this part deeper than 8 inches.
4. Divide the stitches into 6 groups of 6. If you’re on DPNs, that means placing a marker (or remembering the spot) in between the two center most stitches of each DPN. Finish the hat by working six consecutive rows of knit with decreases, always working a decrease just before a marker or (if you’re on DPNs), the needle’s end – that’s six decrease points around the hat. You can work either K2tog or SSK, as you prefer, choose one and work it throughout the piece. If you pick K2tog, the decreases should stack up and spiral in counterclockwise to the center. If you pick SSK, the spiral should end up running clockwise. When you’ve got only six stitches left, thread break off the yarn and thread them up on the tail, drawing them up purse style. Darn in ends.
Note that you can make this hat larger or smaller by adding multiples of six stitches. A little kid size hat out of the same weight yarn would start out on 36 stitches.
If you pick a lighter-weight yarn, increase the cast on number by units of six, how many will depend on your yarn. For example, if you’re using a yarn that’s 10 to 10.5 stitches = 4 inches, 42 stitches would probably be a bit small, I’d aim for 48 stitches and hope that the fit wouldn’t be too large.
I wouldn’t attempt this hat with yarn that’s much lighter than 2.75 stitches per inch (11 stitches = 4 inches) for two reasons. First, much of the charm of this rustic-looking funky hat depends on the bulk and body of the yarn used. The silky firmness of dense Gusto is more satisfying than the less-dense Bulky Spun. Lighter weight yarns would be even more floppy. Plus I’d need to do more experimentation to satisfy myself that every-row ratio of crown decreases would work out as nicely as it does on the heavier-yarn hats.

Finally I have to note that I don’t like knitting yarns at these huge gauges. I can knit non-stop for hours on sock weight yarn, but this big stuff tires out my fingers. Also this is the first project I’ve ever worked on DPNs where if you look closely, you can pick out where my DPNS met. Feh.
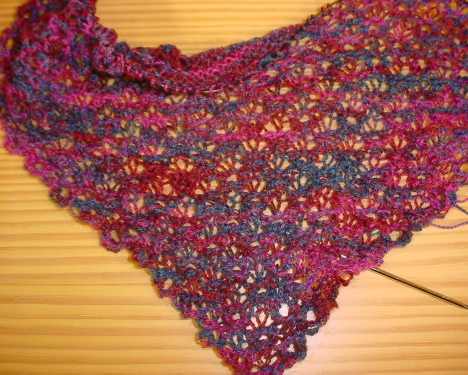
WORKING REPORT – BIRDS EYE SHAWL
It’s growing on me. I like it more now that there is more of it done. I’m still not 100% pleased, but I’m no longer at the edge of the rip back and start all over mindset.
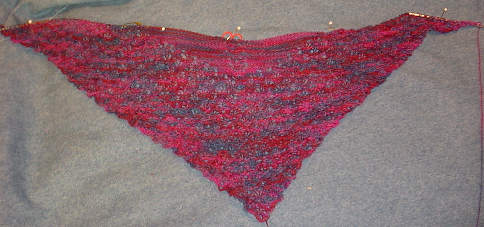
I think I made the right call by not continuing with the birds eye pattern uninterrupted for the entire piece. I’ve switched over to plain garter stitch for the center, ornamented with a coordinating band of eyelets marching up the spine.
For the record, I’ve made a slight change in the Birds Eye pattern that I think looks just a tad better. On the chart provided, on rows 3, 7, 11, 15, 19 (etc.) I work the ssk that forms the right hand corner of the big eyelet as a K2tog. This gives a slightly better definition to that corner of each ring.
I tried to abstract out just one column of eyelets from the main design for my spine, but I didn’t like the look. Because the original does that half-drop translation thing (staggered like brick walls are stacked), the eyelets ended up being spaced too far apart. Instead I used a similar design lifted from one of the edging patterns in Miller’s book. It’s from "Ring Shawl Lace Edging with Spider Insertion." I’m using just the Spider insertion strip. It complements the all-over Birds Eye pattern in that it’s also ring based, but it’s slightly different. Spider is one row shorter than the Birds Eye, and the eyelets stack directly one on top of each other. In BE, the slightly embossed eyelet rings all appear on the same side of the piece. In Spider, they alternate front and back. It’s still good looking and being airy, matches nicely, but the ring units ARE different.
Now I’m looking at my shawl and I’m beginning to think that with this growing plain garter stitch area something interesting floating in it might be quite effective. Or maybe not (that variegated yarn color problem again.) Hmmm…..
WORKING REPORT – BIRDS EYE SHAWL
Just knitting along on the Birds Eye shawl. I’m not entirely pleased with the way the color interferes with the eyelet patterning. Perhaps I should rip back and make something plainer.
You can best make out the eyelets near the bottom point. For the record, I’m knitting on 2.5mm needles. Without the jumble of color, both th eneedles and the eyelets would be more visible. For all the complexity of the chart, the repeat is actually quite easy to? memorize. It’s 4 rows x 6 stitches, with a half-drop translation.
I’ve now worked into the spot where I’m modifying the pattern by inserting a region of plain garter. As soon as I have more of that done, I’ll take another photo to see if the difference in texture is worth the effort. Or perhaps I’ll throw in the towel and find or create another visually simpler pattern.
PONCHO FINISHED!
The blue poncho is done!? I had wanted to do something more elaborate with the crocheted border, but the Target Daughter reminded me that it being for her, I might like to hold off on the wild part. I had forgotten that as an early teen one wants to be different from everyone else in exactly the same way as all of one’s friends. Target Daughter thought that too much crochet would make the piece too frou-frou. and requested something simpler.

I ended up using the chain selvedge edges as my foundation, and working with only one ply of my de-plied yarn (in contrast, the knitted part is worked with two plies). Into each of the existing?elongated selvedge edge stitches I did?this unit:
2 double crochet, (chain 3 slip stitch in base of chain to make picot), 2 double crochet

I fudged as best I could along the cast-on and bind-off edges of the rectangles. This made a very simple slightly scalloped edge, with little picots marching along it. Using the thinner yarn kept it delicate and in proportion to the lacy bits made by the knitted drop stitch technique.
While this wasn’t my favorite project ever knitted, my dislike for this project was mostly due to the interminable un-plying. The piece itself knit up and trimmed out extremely quickly. I really like the post-wash softness of the wool I used, and the airy drape of the finished poncho. If you wanted to achieve a similar effect, use a yarn that’s thinner than the one called for in the original Classic Elite pattern. Although the yarn as a whole before I unwound the plies knits up like a heavy sport weight (not quite DK), my unspinning it made it alot more lofty My extracted single plies?are about a fluffy as opposed to hard-twisted?fingering weight in thickness, two of these fluffy beasts knit on conventional as opposed to the wildly large needles I used would knit up at standard DK gauge (22 st=10cm or 4 inches, probably on a US #5 or so).
Birds Eye Shawl
On to the next project. My Birds Eye shawl, done in Lorna’s Laces Helen’s Lace in purples, and adapated from the free pattern posted by Sharon Miller on her Heirloom Knitting website. I’m about?6 inches into the thing, measured from the starting point at the triangle’s tip. I’m having fun with it, but I think the variegated yarn is overpowering the eyelet design. Since it’s turning into massive effort for less of a return than I had originally hoped, as described before I’ll work a wide band of eyelets left and right, and a single eyelet column as a spine up the center back. The rest I’ll do in garter or stockinette. I’ve started on this modification, but have had to rip back a few times because I hadn’t quite gotten the math right on the pattern transformation. I was ending up with too many stitches because I was including some YOs that had no accompanying decreases. More charting is my next step. I’ll report back on this in my next post.
More on Blocking
A couple of people have asked where I do my blocking, or if I use a blocking board. I have to admit that I’m not that organized. Until recently I didn’t have a place to stow a piece of wallboard or a commercial blocking board. We have a mostly bare floors house, with?8×10-foot rugs in only a couple of the rooms. Two kids, but no free-range pets. Depending on traffic, whether or not the piece might bleed dye, I throw some beach towels over either the white Berber style rug (my bedroom) or blue fake oriental?rug (family room)?and pin out on the towels.
General Kvelling
See this??
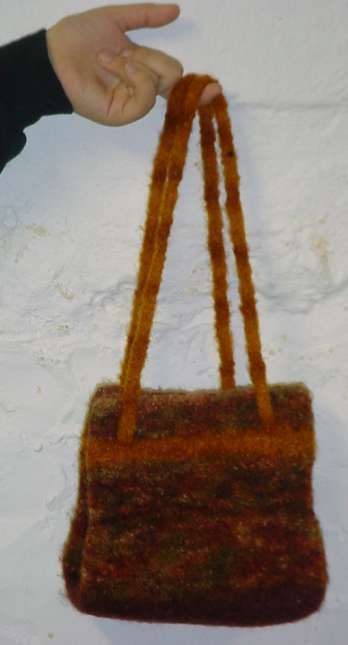
Aside from a couple of fuzzy narrow scarves in garter stitch, it’s Target Daughter’s first knitting project!? She used some bits of leftover Manos del Uruguay?from my stash, and we started with the Booga Bag pattern. I admit we didn’t actually follow it, but we did borrow its general idea – a rectangle of garter stitch, pick up around the edges and work a tube in the round, in stockinette. Make I-cord for handles.
In total I think there’s about skein and a third of the brown/paprika Canyon color, a third of a ball of dark brown (the bottom of the bag, plus the first three or so rows of the tube); and a third of a skein of gold (the stripe and the handles). It’s hard to give exact totals though as all was in little balls and I didn’t bother to weigh it first. We fulled?the bag?in the washing machine by tossing into two hot wash/cold rinse loads of dark colored towels.
Her next project is the one-skein Gusto 10 hat, and mastering double points and decreases. After that it’s on to purling, and wherever else knitting takes her. She’s muttering things about replicating sprites from her GameBoy games, so perhaps it will be Intarsia or stranding…
RELAX. YOU’RE BLOCKING
From my inbox, based on yesterday’s post:? Does knitting really need to be blocked?? It seems so inconvenient to take all these finishing steps when we all want to get the current piece (finally)?done, try it on, and cast on for the next.
It’s?up to you. I find that while blocking is far from an absolute remedy for all knitting ills, it does even out stitch imperfections, improve drape, and even does a little bit to help tame curl. I do a wash/wet block, in which I wash the garment as I intend to for the rest of its life, then pin it out to dry. I never use any of the steam blocking/finishing methods. You can set yarn for life using steam, a mistake is yours forever. But wash/wet blocking can be undone by another trip through the laundry.
I don’t block everything I knit, but I almost always block wool or wool-blend things larger than socks. I also almost always block things I intend on sewing together. If I’ve knit in the round, I’ll block the body and sleeves before attaching them. If the sleeves go on early (like on a Wallaby, where they are joined before the yoke is knit I’ll block the sleeves first, attach them, then block the entire garment when again when all the knitting is done.
I always block lace and cotton knitting – especially counterpane motifs before assembly. Yesterday’s poncho looked MUCH better after it was stretched to even out and maximize the spread of the laddering.
I rarely block hats unless they require post-knitting shaping (like stretching a tam over a plate to give it a beret fold). Some synthetics I block, others not. I didn’t block my Suede T because it was heavy enough to lay flat without encouragement, plus I’d heard that immersion in water changes the yarn’s drape. (I’ll probably dry clean that piece). I did block the Waterspun poncho. Classic Elite Waterspun?is a yarn that looks worlds better after washing and blocking. I’ve made several things from it and always block it before assembly.
So. Do I always block?? No. Do I think blocking is worth the effort?? For most, but not all pieces.
