NOT QUITE EXACT, BUT GOOD ANYWAY
So. More examinations of the corners of the big towel from the MFA, and my first corner. Here are the four corners of the original
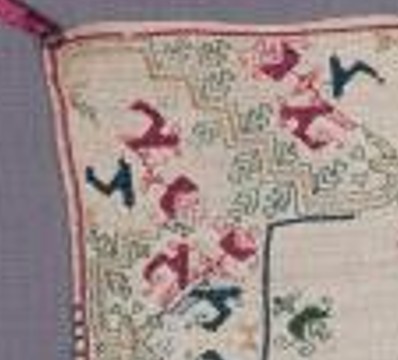

Not quite aligned but all there. Now my stitched corner as of this morning:

It’s closest to the one on the lower left, above. But not exactly. Look at this bit.
That’s a clear kludge. Not to brag, but my join is cleaner than this. I can’t deduce where the stitcher (or stitching team) began, but it’s clear that either the vertical bit on the left side of the photo, or the horizontal bit on the right was already laid down when that corner was rounded. The stitcher did their best, but the pattern doesn’t line up. For that matter, no two of the original corners ARE the same. But I bet you didn’t notice when you looked at the thing as a whole.
I will continue around on my mini-version. I haven’t decided yet if I will limit the width to multiples of the whole design, so I can replicate my corner exactly for the remaining three. Or if I will just make do, in a celebration of the heedless joy of the original.
And how far do I have to go to get to the next corner? Here’s my full cloth, so you can see the proportion of as-yet-not-done to the bit completed:
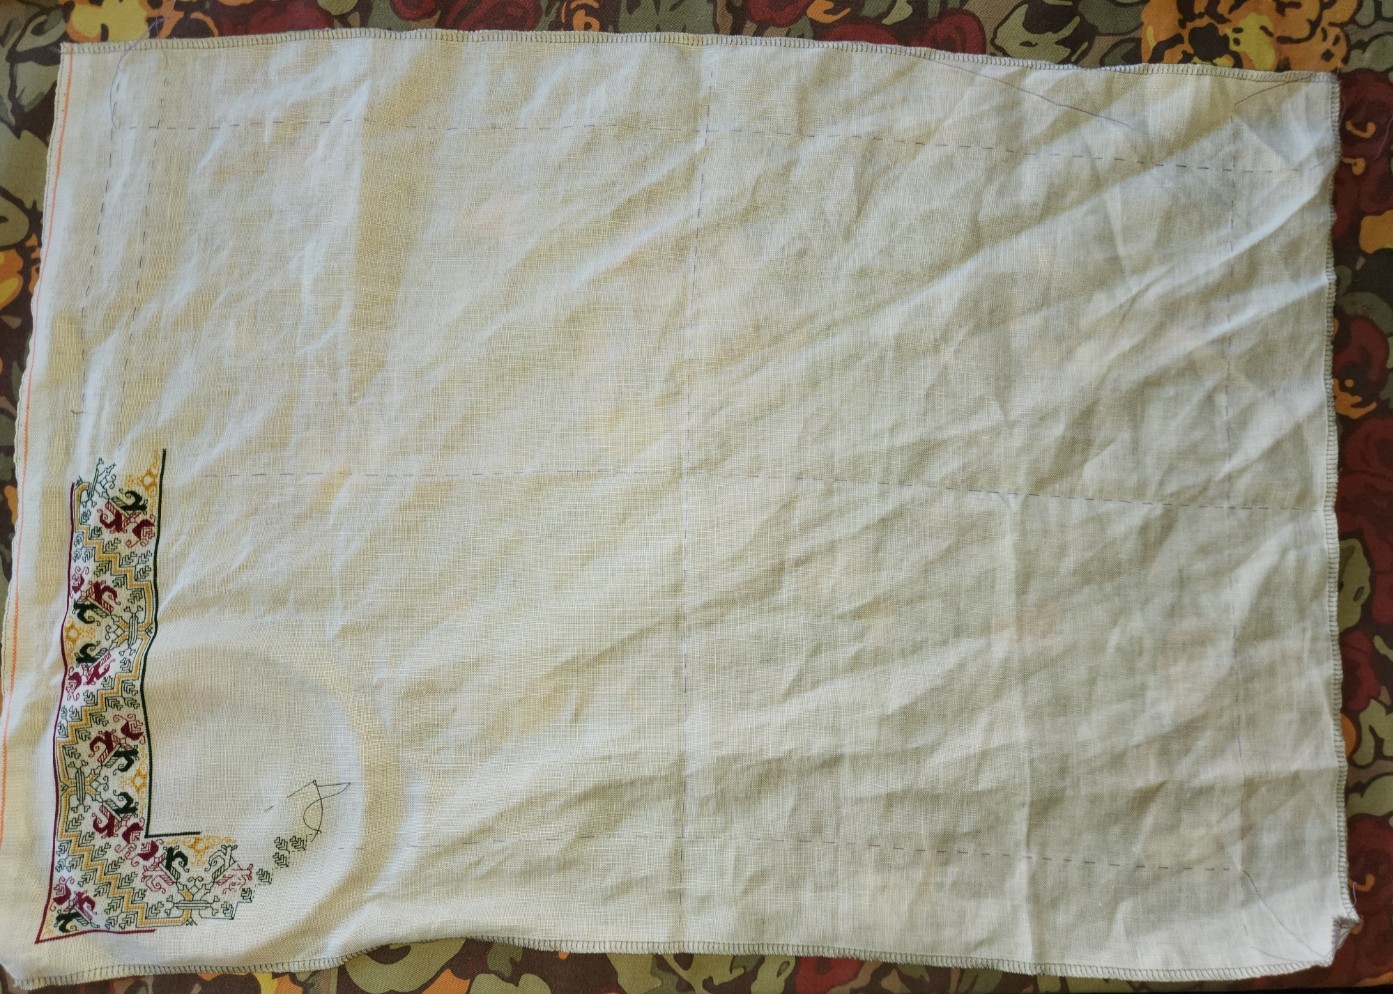
Quite a ways.
Aside from the corner challenge, upcoming decisions include a supplemental treatment spanning the center. Here’s the original again with two double width strips and two narrow single width ones across the center.

Examining those bars, I can conclude that they were done after the framing, and were aligned with the cloth’s horizontal centerpoint, because the band design is truncated (more or less) at the same point where it meets up with the frame, both north and south. But note that the centers of repeat along the long sides of the frame itself do NOT align with those bars, nor do they align with the measured center of the cloth. Again I bet you didn’t notice.
My smaller cloth may have enough room for one wide center bar; two narrow center bars; or one wide bar flanked with two narrow ones. Lots to think on there, but I won’t get to that part until after the frame around the edge is complete. And then there’s their alignment to consider. (I’m leaning towards filing them under Chaotic Neutral for the time being.)
On the healing front, I’ve completed Day 23 of radiation therapy. 17 more to go. No major perturbations, just the slog of rising before dawn to drive downtown and back before major traffic. Not that I’m counting or anything…
AND SO WE BEGIN AGAIN…
Never will I be someone who has a long hiatus between projects. Aside from the fact that I always have several concurrent ones, the final phases of any project are usually fueled by advance planning for the next one.
As I mentioned in the last post, I was prepping the ground for RELENTLESS FORWARD PROGRESS, the piece I am doing as a thank-you for the therapy and nursing staff at Vanderbilt Rehab/Newport Hospital. I’ve finished the truing, decided on a size, hemmed all the way around, and basted my centers and edge borders. I also completed the atypical (for me) task of plotting out 90% of the chart for the entire piece, and started in on the stitching:

I did the extreme layout because I wanted to center the motto properly, inside a surround that used as little fudging as possible. This meant working up corners, and making sure the repeat count was congruent with my usage, and with the available space. Oh, and the lettering. I didn’t find a vintage alphabet with the right flavor, so I decided to make the piece rather abstract, with a quasi-futuristic typeface, instead. I went looking for Just The Right Thing, and didn’t find it among charted alphabets, either. So I drafted up my own. Taking four or five different vaguely science-fiction-movie style typefaces, I rammed them together and drew up my own outline-only interpretation. Before you ask, I don’t have the whole alphabet – only the letters I needed for the motto. But except for an H and I, I have all of the top ten letters from the frequency table, and those two are easy extrapolations.
As the photo above shows, I’ve matched up the center of my chart with the center of my cloth, and started in on the stitching. If you look reaaalllly closely you will see the pink basting threads marking my center lines. And even just starting out I am loving the Pearsall’s. Smooth, sleek, easy to stitch – a dream to work with.
My intent is to do a narrow inner frame around the lettering. Inside that frame I will do very open voiding, possibly just diamonds in a complementary but lighter color. I might experiment with the Pearsall’s 6 ply floss. Each of the separable standard plies is clearly made up of two constituent strands. The silk itself is quite long staple and very strong. I may try to separate a standard ply and work those background diamonds with just one of those strands – what is in effect a half-ply of silk. That would stretch my limited supply, and keep the lettering in front as prominent as possible. Stay tuned for that experiment. I’m not there yet, and have to finish the motto first.
As for my continuing rehab from surgery – I am still improving. Every day a bit stronger and more capable. I can walk further, sit longer, and do far more things on my own than I could in May when I came home. At the end of this month I will start a program of Proton Beam Radiation aimed at eliminating any last possible but otherwise undetectable cancer precursor cells; to knock the chance of recolonization way down. It will run through October and be a daily appointment, Monday through Friday. An inconvenience for sure, but anything that tips the odds even more in my favor is most welcome. In the mean time, my job is to get as strong and as fit as possible prior to radiation commencement. I am taking that job VERY seriously.
PLAYING WITH TOYS
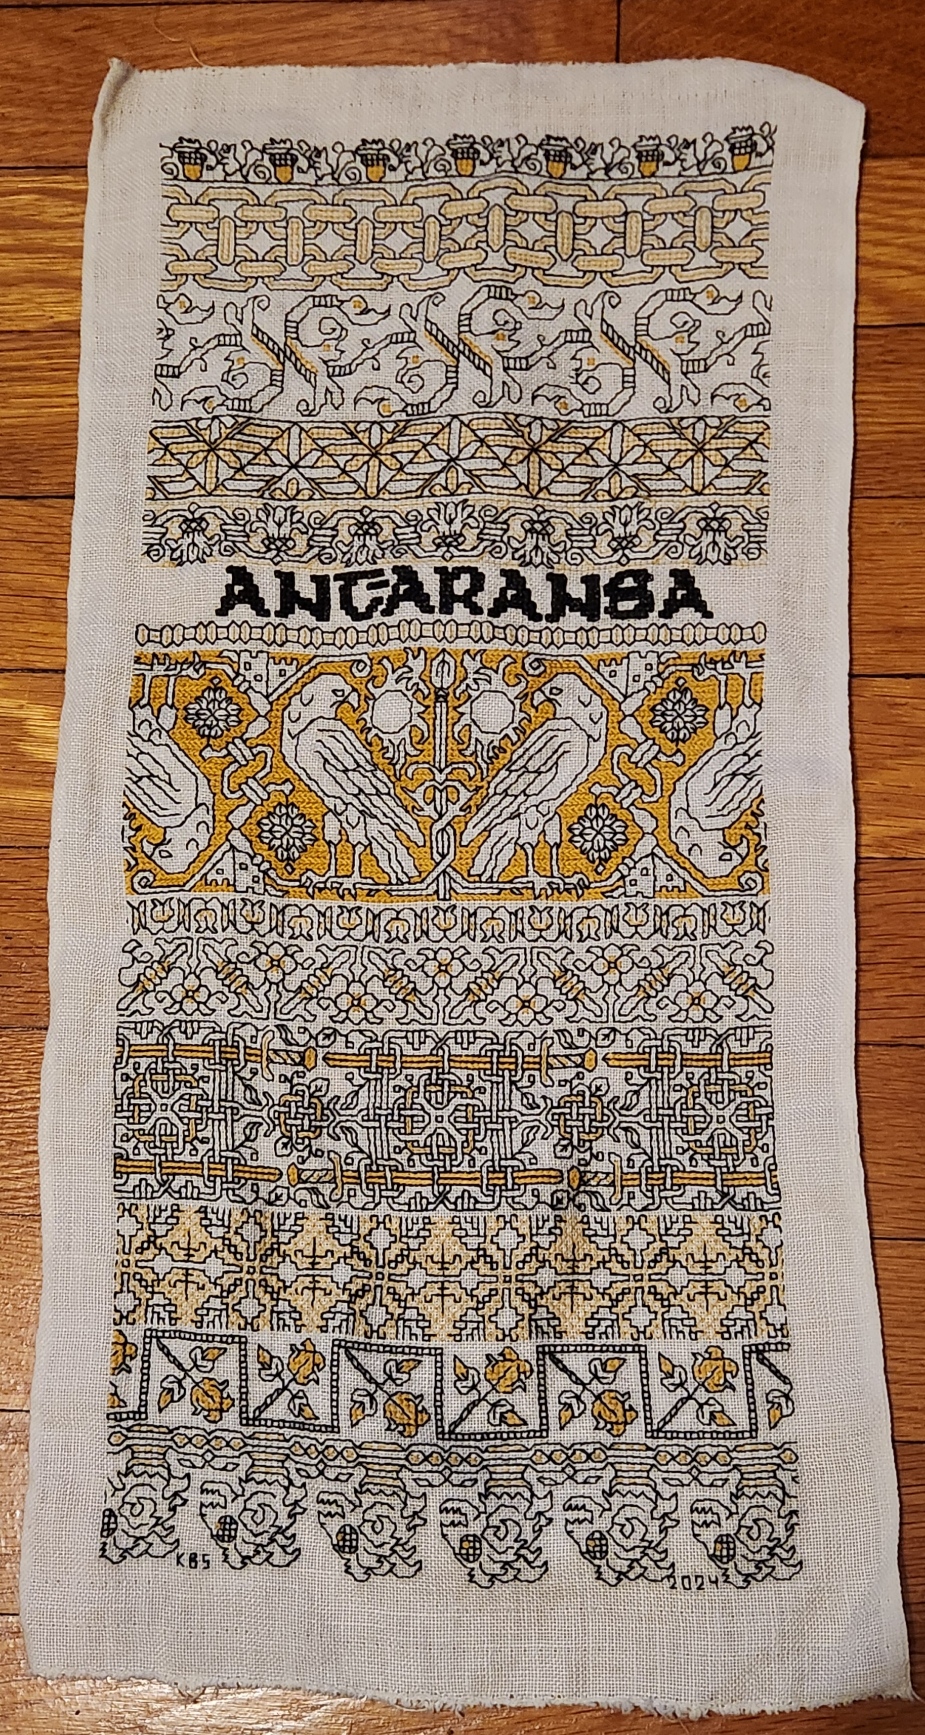
As I mentioned before, there’s no point in honoring a book called Forlorn Toys without showing some of the toys. So I drafted up a representative sample.

I’m still filling in the background stars, but that should not take long. Then another plain band of long armed cross stitch, and selecting the first of what will probably be the last two strips on this piece. The final touch will be to revisit the motto section, adding themed elements left and right of the lettering, and perhaps jazzing up JOY a bit so that it doesn’t look so pitiful against the darker typeface used for the rest of the lettering.
As to the remaining strips – I’m actually running out of material. I either have to spend more time drawing, or stitch slower. But in the interim I have decided that designs used on pieces I have given away, never to be seen again are now fair game for repetition. So if you see something that piques a sense of deja vu, you are exactly correct. Done before, but not precisely in this way. An old friend returning for a repeat visit.
After this one on to the next. No clue yet as to what that might be. I have a couple of outstanding promises in queue. Possibly one of those. And those teddy bears… I may doodle up a couple of strip variations featuring just them, for folk who want to do up birth commemoration samplers, or bibs and toddler clothing trims for particularly favored children. Provided there is interest, of course.
PROGRESS ON A WEALTH OF FRONTS
It’s been half a month since the last post, and all sorts of things have happened.
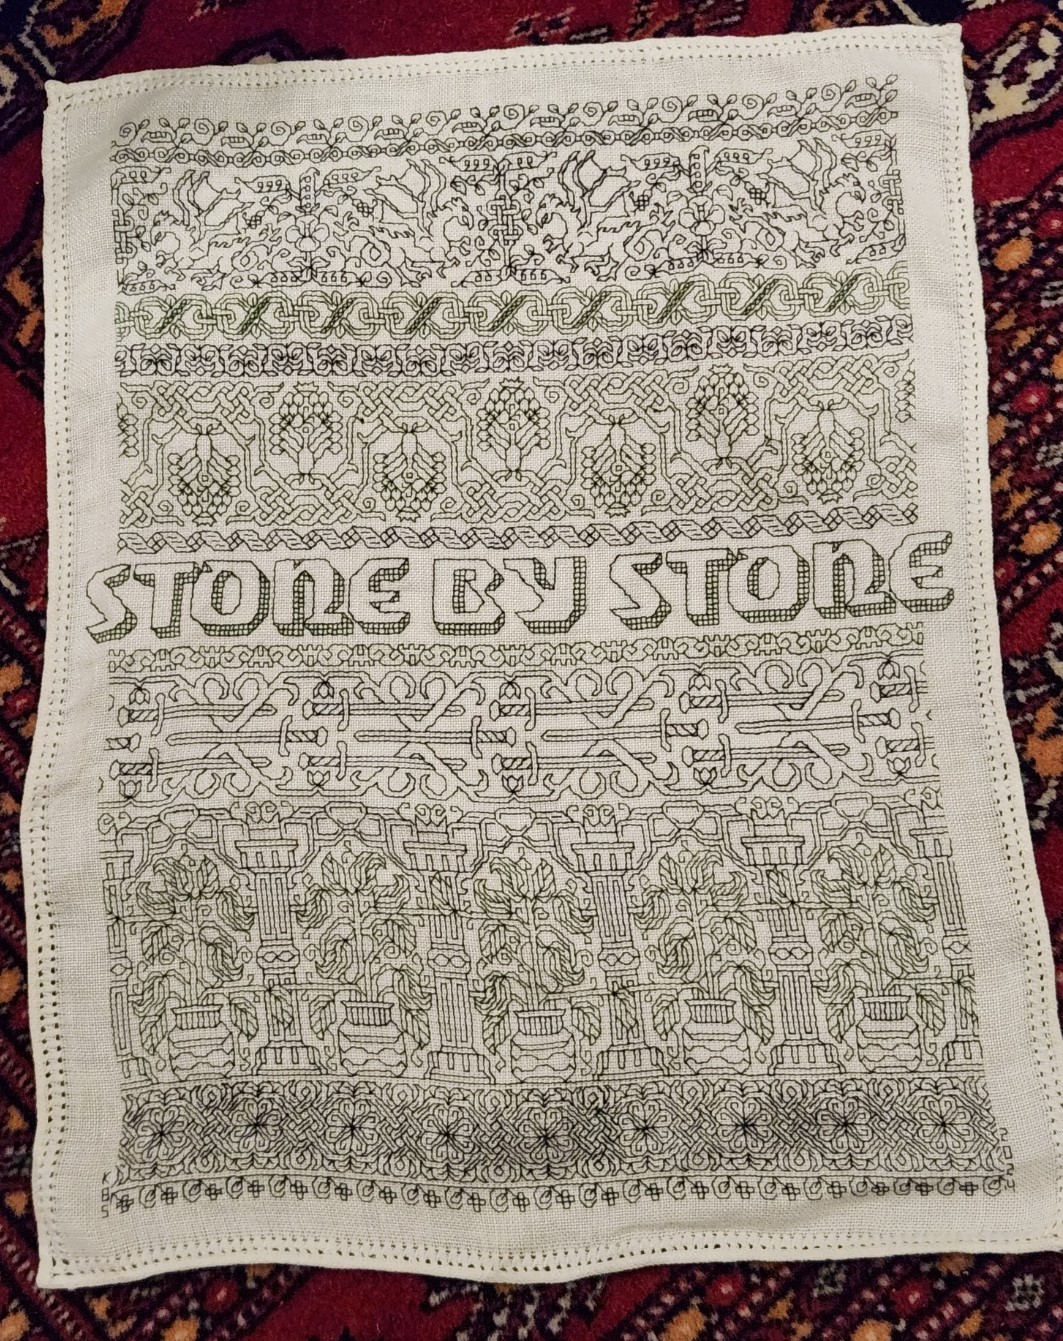
First, I’ve finished the wildly intricate interlace panel on my current sampler.

Second, as I was doing so I found an error in my chart for it as it appeared in the original edition of The New Carolingian Modelbook. The error was a minor one, a copyists/flip and mirror problem with two side by side crossings. It’s my guess that no one has attempted this particular design before, otherwise they would have either contacted me about it, or trumpeted my incompetence on social media. So of course I had to correct the problem. For a legible copy of the correction, including the original TNCM source attribution, and two chart versions – one for the border as shown, and one for a wider border or all-over design, please click here download a PDF file.

I have also been able to draft out a couple of tribute specific bands for this sampler, referencing the in-process novel Forlorn Toys in specific. They will be coming up after I finish the latest leafy strip. So stay tuned!
In other news, at long last, the Victoria and Albert Museum has updated all of the pages for the individual contributors under the Unstitched Coif Project. Again thanks to Fearless Leader Toni Buckby! My page can be found here, and has both the essay I did to accompany my work, plus ultra high resolution ZOOMABLE photographs of the back and front of the piece. For some reason the museum chose to lead with the photo of the backs of all of the pieces.

And for those of you who have asked about my personal health odyssey – I am improving. I’m in the middle of graduating from walker to cane. I can get around well with the cane, but I am still shaky with it over uneven terrain, so I mostly stick to it indoors, and continue to rack up practice distance. I have also been able to sit longer, as my stitching and blogging progress demonstrate.
There are still some hurdles to go, including a stint of proactive/preventive radiation to minimize any chance of chordoma recurrence, but I will take that in stride like all the rest. In the mean time, I’m feeling further along to being my old self than I have in months. No doubt due to the incessant care, coaching, and excellent cooking of my Resident Male.
OFF AND RUNNING!
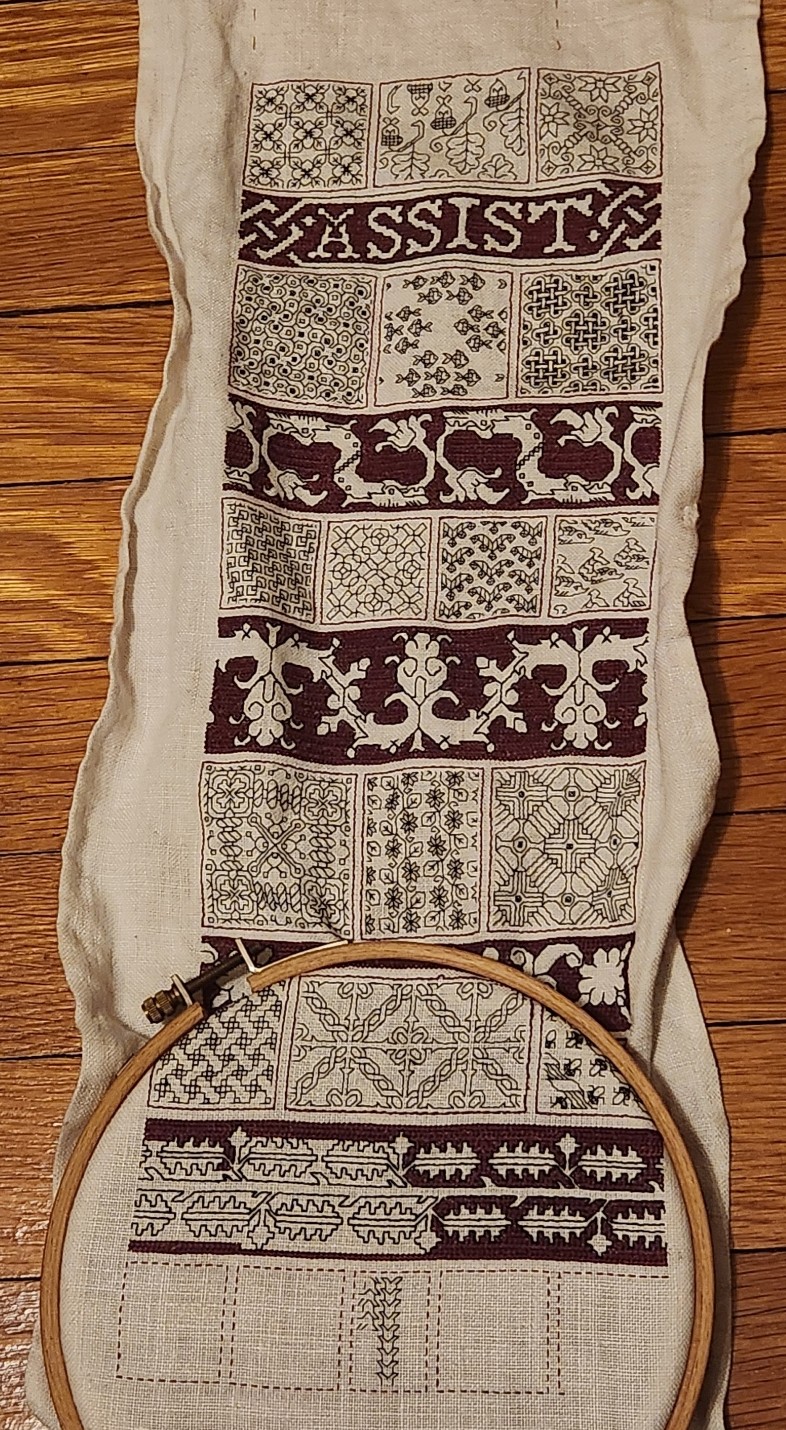
On the ground, it’s more like walking slowly getting used to the transition from walker to cane, but in stitching, we’re galloping. Here is progress since the last post.

Several strips so far, a combo of reach-backs to my older books, and to the more recent Ensamplario Atlantio Volume III. I am still drafting up the custom bands that are specific references to the content of Forlorn Toys, the book that The Resident Male is writing right now. When you see them you will realize what’s taking so long (other than limits on how long I can stand at the computer in a day).
I do have to report an oops. One that dates back to the publication of The New Carolingian Modelbook in 1995. I hadn’t stitched the current strip before, mostly for reasons of size. It’s quite tall. But this being a very long piece of cloth, I thought it would work well on this piece. Lo and behold. There is a small crossings error in the original. It’s small enough to be an easy fix, but I will put redoing that page in queue and eventually publish it in here, and on the errata section on the “My Books” tab elsewhere on this site.
In the mean time I’m at the point in this complex interlace that I can go off-book. I’m just copying what I’ve stitched to date now, flipping/mirroring/inverting the crosses as required. Yes, it’s an eye-bender, but each subsection is logical, and if I keep the precision up so that all of the subsections meet up nicely, no where near as difficult as it looks.
AND FROM THE FLIP SIDE
Here I am. A bit less than I was, in terms of body parts, weight, and height, but overall what remains is whole and mostly functional.
I am not going to go into the all the details, but I will say that I am incredibly lucky. So many things can go wrong during and after a 12-hour surgical procedure that involves many tricky bits near major nerve centers. But I am happy to say that my chordoma tumor was removed successfully, along with my coccyx and more than half of my sacrum. I will have to have a deep survey next month for surety, then be on lifelong watch to make sure it doesn’t recur, but for now at least I am cancer-free.
The surgical team was able to avoid some nerve damage, and to install a rather elaborate truss system to support my spine and hold my pelvis together. Those two things let me walk again, and even climb stairs – things I had hoped to be able to do, but realistically was accepting that I might not. I’m wobbly with a walker, and need a spotter on the stairs, but each day brings new strength as I exercise and practice. I am hoping that by the holiday season I will be off the walker and on a cane, headed to unassisted ambling.
The one area that is lagging behind is sitting. As you would expect, with that much alteration to my fundament, sitting would pose challenges. So far I am able to sit on a special cushion for about 4-5 minutes. I continue to train for improvement.
Weight is an expected loss during cancer treatment, and that did happen. But height? In my case because my lower spine was amended, a certain degree of shrinkage has occurred. I used to be 5’8″. I’m now 5’7″. So it goes.
And as you can tell by the presence of this update, I have computer access again. I’m using it as an inducement to get out of bed and stand, above and beyond the various exercise routines recommended by my physical therapist. Time however is limited. I can do a couple of short sessions a day, but no more. That means posts here will continue to be few and far between, and that no substantive work will be happening on The Third Carolingian Modelbook, or on corrections to Ensamplario Atlantio III (or for that matter EnsAtl IV).
I can however stitch again. I can do it laying in bed, sort of. Like the computer work, sessions are limited by endurance, so progress is slow. But there has been progress.

Compared to the last post, the dragon square is finished, and I’ve begun the voiding on the top strip. Nice and mindless, simple work.
So there it is. I’m still here, slowly recuperating. I do thank my spawn, siblings, mom, inlaws, and everyone else who sent encouraging notes, showed off their work from my designs, phoned, sent gifts, memes and silly bits to cheer me up, or visited. Your sharing buoyed me through a very challenging two months.
I also want to thank my surgical team, attending specialists, nursing staff, therapy staff, cleanliness/safety staff, and everyone else I interacted with at Rhode Island/Brown University Hospital, and in Newport Hospital’s Vanderbilt Rehab wing. That I write this at all is testament to the quality of their handiwork and care.
And it goes without saying that he who is precious to me – my Resident Male – deserves major thanks for his constant presence and support, gentle nursing, firm coaching, and patience. He drove hundreds of miles back and forth to Rhode Island between 17 March and 29 April, and has catered to my every petulant wish since returning home.
Stay tuned. I intend to keep these posts coming, and pivot away from tedious health updates back to the needle arts.
EPIC FANDOM STITCH-ALONG NEWS
Just a quick post to let folk know that the Epic Fandom Stitch-Along from several years ago is still free, and available for download here at String-or-Nothing. AND I’ve made it much easier to do so.
I have consolidated all of the individual week by week releases along with the general info provided before the project began into a single 50-page PDF document. No more hunting for the single page you need in a forest of other pages! It’s now on the My Books tab, and I’ve added a link to the top of the SAL tab, as well.
Or you can click here to hop directly to the PDF.
As ever, enjoy! I do hope some folk are brave enough to try this one. And like always, nothing brings me more joy than seeing the pattern children out at play. Do the whole SAL, cherry pick the panel you want to do.
Same restrictions as my other offerings – personal use only, and please respect my copyright. Other than that, have fun. 🙂

ENSAMPLARIO ATLANTIO VOLUME III!
I am delighted to announce that the third volume in my free-to-download series of blackwork pattern booklets is now up and available here on String-or-Nothing.

Like the previous two volumes, Ensamplario Atlantio Volume III contains original (and a very few redacted) filling designs of the type used in inhabited blackwork. That’s the style that fills outlined shapes with fields of diapered fillings, as seen in my Unstitched Coif project submission, and in my current sampler. The new fills I created or redacted for the Coif are all in here (I had to do more – I actually ran out of suitable ones!)

It also contains most of the strips found on the several tribute and protest samplers I’ve done over the past several months – the various mythical beasts, interlaces, swords, and other fantasies in thread. (The ones not found in here are from Ensamplario Atlantio II, The New Carolingian Modelbook, or The Second Carolingian Modelbook.)


And to top that off, there are lots more designs in there I haven’t stitched yet, including tunic yokes and pieces with corners that could be used for framing necklines, or table linen. For SCA folk there are a few items of special interest – the populace badges of the East and Atlantia, and a belt motif that can be infilled with the colors that signify patronage relationships (squires, protegees, apprentices).
In truth, I’ve rushed this one to release. I apologize if there are errors or inconsistencies. I plead time pressure. If major errors turn up and I get a chance, I’ll go back and fix them. However, the very few source attributions in it have been thoroughly confirmed and are genuine. Except for those redactions, all of the other material in there is my original output.
Why free? Why not? My goal is to promulgate the spread of stitching, and to make it easy to do so. Yes, I could have bundled these books up and sold them on Amazon, like the Carolingian Modelbook series. But in truth, the yield is a pittance because I am under pressure to price the books low enough to discourage massive piracy. Higher pricing restricts access and defeats my goal of spreading the joy.
For the record, The Carolingian Modelbooks are the product of a lot of research, exacting redaction, writing, and indexing. The Ensamplario series is a lark. Largely just my doodle notebooks, produced with minimal effort. I felt justified in asking for recompense for them on the basis of labor alone. But EnsAtl books are candy to be shared just for the fun of it. You can pay me back by sharing photos of works you’ve done using these designs, teaching someone else to stitch, flaunting blackwork-embroidered garments or accessories in public to increase appreciation and awareness, or just by doing a good deed for someone in need (I release my pattern broadsides as Good Deed Ware, too.)
HOWEVER I retain copyright of my drawings, and release these designs for PERSONAL USE ONLY. For any other uses including including duplication, inclusion of the patterns on patterns or finished items for sale or charitable distribution, I request you contact me privately. I’m not an ogre, but neither do I want to see my goodwill answered with appropriation. My terms (if any) will be mild, and reasonable. Oh, and feeding them into AI for training is total anathema, and is expressly forbidden.
You can download Ensamplario Atlantio Volume III by clicking the link below, or by hopping to the MY BOOKS tab at the top of every page here on String. The earlier EnsAtl volumes are on MY BOOKS, too.
>>> CLICK TO DOWNLOAD THE PDF FILE OF ENSAMPLARIO ATLANTIO III <<<
Comments? Questions? Random remarks? Go right ahead.
THE SYMMETRIES OF LINEAR STITCHED FILLS AND STRIPS
As promised here’s a rundown on pattern repeat type, and centering fills and strips in designated spaces on your project. For one, there’s really very little need to sit down and stitch-by-stitch completely graph out the design to your final dimensions. In general knowing where the edges and centers of your space, plus the pattern repeat type is all that’s required. These hints go for both fills in regular and irregular shapes, and for strip or band type designs that march along the width of your project, or decorate the edge of a garment.
And a note on grounds, if I may. Aida, Hardanger, Anne Cloth, and Monks Cloth are types of purpose woven grounds used for modern countwork. They feature prominent holes outlining their base size units. Departing from that established grid can be very difficult and involve piercing the fabric in the solid spots between the built-in holes. Partial stitches do exist in the purpose-woven world, and are much despised by stitchers. Working multiple grids skew to each other on the same piece of purpose woven ground is almost never done. I’d say never-never, but somewhere it might exist, although I haven’t seen it nor the rants of despair from folk who have encountered it.
Evenweave (or near-evenweave) is a bit more flexible. Since the stitchers count threads on evenweave instead of hole-defined units, they can employ multiple grids on one piece. If the stitcher decides to work their unit over 2×2 threads, two adjacent spaces can use different grids, offset by one thread so long as the juncture where they meet is taken into consideration. I did this on my Two Fish piece, using the skew alignment to hint at undulating motion. Note the knot and grid filling. Not only is it stitched discontinuously across the bel, I also interrupted the grid. Both sides are worked 2×2, but NOT on the same 2×2 grid – the tail section is displaced one thread up and over.

So when you see me talking about skew grids or using partial stitches when centering various types of symmetry on a single piece, please know that the ability to do this is mainly something that can be done on evenweave. Purpose woven grounds like Aida will limit the way patterns of differing symmetries can be centered against each other. It’s just a fact of life.
Before I begin, all of the fills and bands charted on this page are available in my Ensamplario Atlantio series, my Epic Fandom Stitch Along, or previously shared here on this blog. All are available as free downloads for personal use. Links are provided.
OK. Finally getting into it. Patterns can be grouped into a few basic clusters, with some caveats.
Center Line Repeats
First we have simple line-center repeats. These are designs that cover even numbers of units, and mirror along a center line. The chosen pattern may be a band or strip, with one vertical line where the design mirrors to its left and right. Or it might be an all-over design or fill, with at least one vertical and one horizontal mirroring line.
This blackwork fill/all-over design has both a horizontal and a vertical center line, marked in red. The motif tiles into square blocks of 14 units. The easiest way to use it is to either count to or (if irregular) eyeball the visual center of the space to be filled, then begin stitching the design at the spot where the two center lines meet. Even if the space to be filled is NOT a multiple of 14 but is any other even number of stitches, if centered this way the design will truncate neatly around the edges, as it does in the sample from Ensamplario Atlantio Volume 1, below.
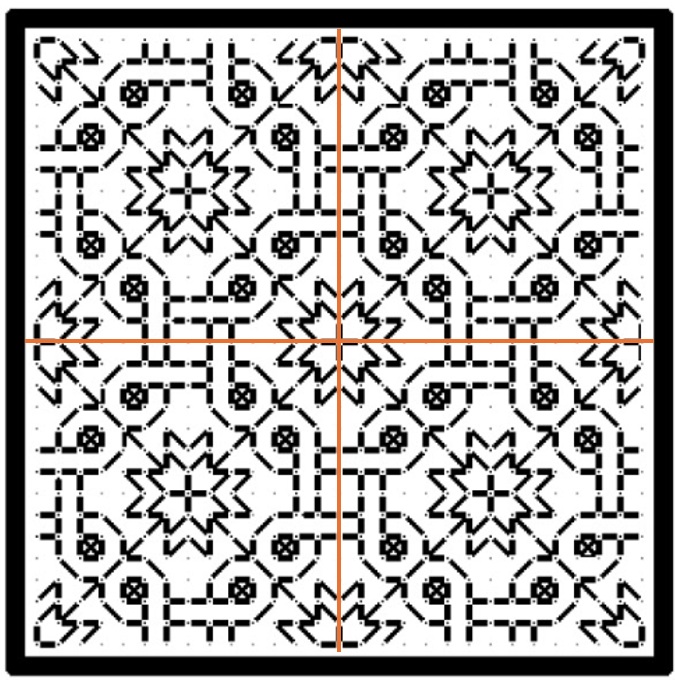
But if the space to be filled contains an odd number of stitches you will either have to displace the center lines so that there is one more unit to one side or the other, or you might have to work partial stitches all the way around the perimeter for full coverage.
Some people insist on using a single grid for ALL of the fills on an inhabited piece. That means that even if they are working over 2×2 threads on evenweave, where adapting the grid you are using to the space at hand would be quite easy, they choose not to. They end up having to either accept minor misalignments between adjacent patterns, or employing partial stitches to eke out the design. That can be avoided by NOT mixing fills or bands with this type of symmetry with some of those discussed later in this article.
Here’s the same type of symmetry expressed in a band pattern. This one is from my Epic Fandom Stitch Along. Note that in this simple meander there are two lines of symmetry (sometimes called mirror or bounce lines). The pattern replicates in mirror image on either side of them, just as it does in the all-over fill. One full repeat is 36 units, and alignment in your desired space can be focused on the center/mirror/bounce lines of either the up or down facing fronds.

Regardless of symmetry type, if you are filling an irregular spot, and you are eyeballing the center alignment point you might end up having to work half stitches around the edge of your area, again to eke out the coverage. This is one reason why some instances of inhabited blackwork (the kind with the freehand drawn outlines infilled with counted geometrics) rely on heavily stitched, thick outlines. Those “fig leaf” the offending partial stitch spots and make the work look neater.
Here’s a bit on my Unstitched Coif, where I eyeballed the alignment of the fill, worked a ton of half stitches (a challenge on 72-74 count near evenweave, stitched over squares of two threads), then went back and put in heavier outlines to hide irregularities. Zoomed waaaaay in like this you can see them around the edges. For scale, that little bud at the upper left is smaller than a US penny.

Now there are some exceptions and complications. We’ll get to those later.
Center Unit Repeats
All well and good you say, but the symmetrical repeat I want to use doesn’t meet up neatly at a center line like those. In most cases your repeat has a “spine” of a single unit rather than a center line. That column or row of units is repeated only once, and is not mirrored, although the design itself does mirror left and right (or up and down) that non-repeating column or row. That means that a full repeat of the design includes two symmetrical wings, plus that pesky center unit – an odd number of units, total. Here’s a fill/all-over design that features center units. In this case one full repeat is a square of 23 units (one center unit, plus 11 more units to the left, and to the right of it).
And here’s a strip repeat, also with a simple center-unit style symmetry. Like the line unit band above, there are two possible centers. Either one can be used, although convention on band samplers is to feature two main motifs in the center of the stitched area – in this case the pair of beak to beak chickens.

The strip above is from my Workshop Handout broadside, another free download here at String you can access via this post or via the Embroidery Patterns tab at the top of every page.
Hybrid Repeats
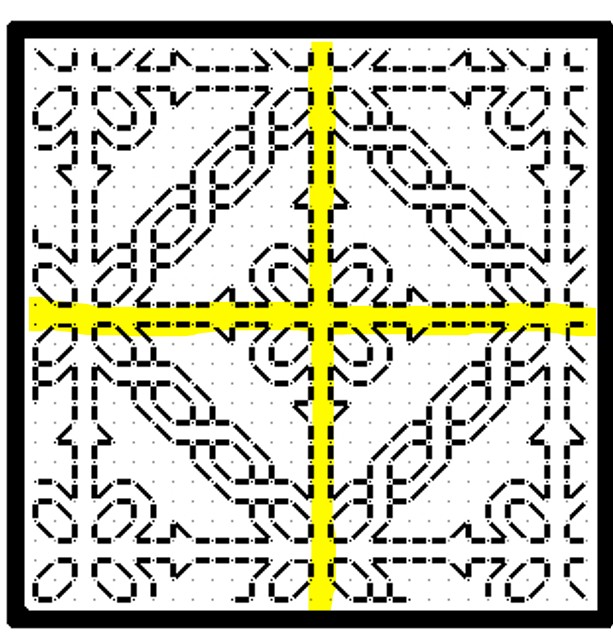
Some designs display a delightful flexibility when it comes to centering because they incorporate BOTH a center unit and a center line bounce point/mirroring. This happens with fills/all-overs and for strip/band patterns.
Here’s a sample of a fill that includes both. I’m only marking one repeat of each type on it, otherwise the thing will end up looking like a swatch of plaid.

This design can be aligned either to the center lines (red), or center units (yellow). And here’s an example of the same type of pattern in a strip or band. The center can be the red line or one of the yellow columns.

Again, if a combo of center line and center column symmetrical strips are used on a band sampler in a mixed environment that doesn’t deviate from one universal grid note that true center alignment will not be possible. The even-number repeat centerline bands will all line up with each other. But if you insert a design with center unit/column symmetry but have to use the same “stitch holes” in Aida as the rest of your project, that center column will not line up with the true center of the rest of the piece. Which may or may not matter to you. Food for thought.
Staggered Drop Repeats
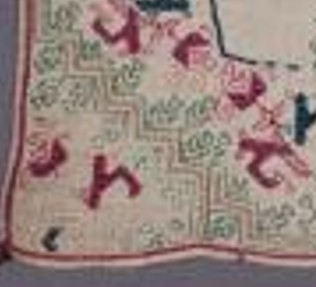
Now it gets harder to identify these. This style of repeat is common in fills/all-overs, but less common in strips/bands, but they do occasionally pop up. For the most part they employ mini-motifs, sometimes in straight-on replication, sometimes with mirroring or rotation; and use regular offsets to place them. Sometimes its a simple half-drop, sometimes it’s a larger interval or not regular when the horizontal and vertical offsets are compared. Most of the time these staggered or evenly scattered mini-motifs do resolve into very large area true repeats, with the same motif repeating in the same relative position in the field, but it’s rare to use these in areas big enough for that resolution to happen. How to center them? It’s a bit more complicated.
Here are three with different rates of periodicity (how big the sample has to be before it manifests a true, full repeat), presenting different problems. These are all from Ensamplario Atlantio Volume 1, Second Edition.

The flowers at left can be centered in a panel in one of two ways. Either using the regular center-line symmetry of the very simple little four petaled flower, or by counting to identify the centerpoint of the more complex sprigged flower. Either way will work, although I think using the smaller mini-motif would be visually more pleasing. Note that regardless of the size or count of the space you use these repeats “walk” and will always truncate around the edges.
The snail garden square at the right is a hybrid. It can be effectively centered either on the tiny squares and on the larger snail-bearing unit. Both work nicely. Which I would choose would depend on the size of the space I wanted to fill with it. If the space was large enough to accommodate four of the snail gardens without truncation, I’d probably use the tiny squares as my center alignment point. The snail gardens rotate around them, and optically form a flower-like shape when viewed from a distance. If the space was small, I’d put the garden in the middle to ensure at least one full iteration of it was represented.
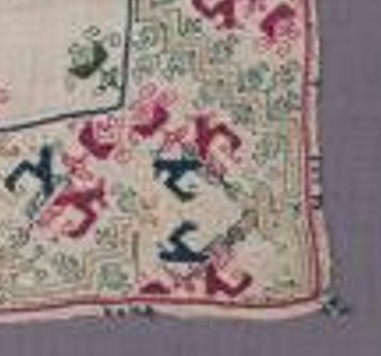
The griffin/dragon beastie in the center presents a harder problem. There’s only one element here, and it has no clear center line or center column/row. Additional complications come from the rotation and offset of the beastie motifs. The easiest way to center this one is to find the center point of the beastie itself, match that to the center point of the area to be filled, and work the others around the first, completing the truncated ones as possible. In the photo below, this is what I did with the wing like bits, second from the right in the photo below, and what I SHOULD have done with the little dolphins in the box next to them, but obviously didn’t.

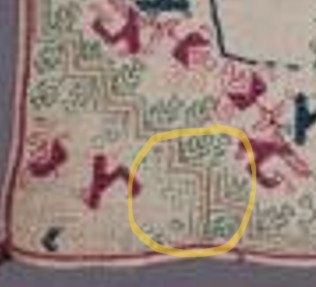
The myriad mistakes in my current piece are what inspired this post. In addition to the errant dolphins in the latest section, you can see that the voided bit currently underway wasn’t properly aligned. It’s a center line repeat, I have an even number of units across, but if you compare the left and right edges, you’ll see that the design is shifted two units to the right. The center of that strip does not align with the center of the set of boxes, above. The dolphin box is intentionally shorted one unit compared to the others in its row because my count across is not divisible by four (available area minus 6 units total for the gutters between the boxes). There are more similar mistakes in the previously completed part, now wound around the roller bars of my stretcher frame.
I confess to making many alignment sins on this one that together have landed me in this predicament, including initially basting the center guideline that runs the entire length of the piece offset to the right by three units; never going back and measuring, but instead working the other vertical guidelines off that one; starting the first blocks and not bothering to confirm centers or edges until it was too late to pick out and start again; fudging everything in to try to compensate for the pile of errors that was accumulating behind me; and not paying enough attention to centering the various fills in their boxes.
I will continue on to completion with this one, warts and all, but I may revisit the base concept of voided strips alternating with boxed fills in a future work.
ANOTHER NEW TOY
If you’ve been reading here over the past month, you’ll have seen me working the current project in a hand held hoop. I love hoops, especially their portability and versatility. But I vastly prefer the “real estate,” tautness, and ability to use two hands that using a scrolling frame gives. I’ve had two sizes of the Needle Needs Millennium frame for quite a while. I tend to pull those out for the big projects, especially those with metal threads, or that feature easily crushed or disarranged stitches (satin stitch, knot stitches). I also have a sit-upon hoop. I do use that extensively for the smaller pieces with less fragile work on them. It has some of the advantages of the other two types, but as a compromise, with less ability to place the piece in exactly the optimal spot and angle for visual acuity and best lighting. The hands down most efficient way for me to stitch is the big Millennium on my Lowery stand.
After months of hoop-in-hand, I was yearning for the scroll frame experience. I heard that Needle Needs had a new junior size frame, and was also offering smaller roller bar and side extension pieces for the Millennium system. So I sat down and weighed price, stitched area size, and the fact that pieces from the new junior frame are not compatible with its larger brother, then splurged on a pair of new extenders and roller bars.

I have two sets of the older 8-10″ side stretchers. I got that relatively small size because I realized that the bigger ones would produce a stitching area that would be difficult to reach. That bore out when I was working the coif using the 24″ roller bars and the 8-10″ extenders. My behind-the-work left arm could reach only 60% of the available area with it set at full extension – barely making it to the top edge of my piece, and I had to flip the frame over to work the remaining spaces. But while I might have gotten the even smaller 5-7″ sides this time around, I had the feeling that a space that small in combo with the Lowery frame extender arm would be less than optimal.
Obviously the new components arrived yesterday and were immediately deployed:
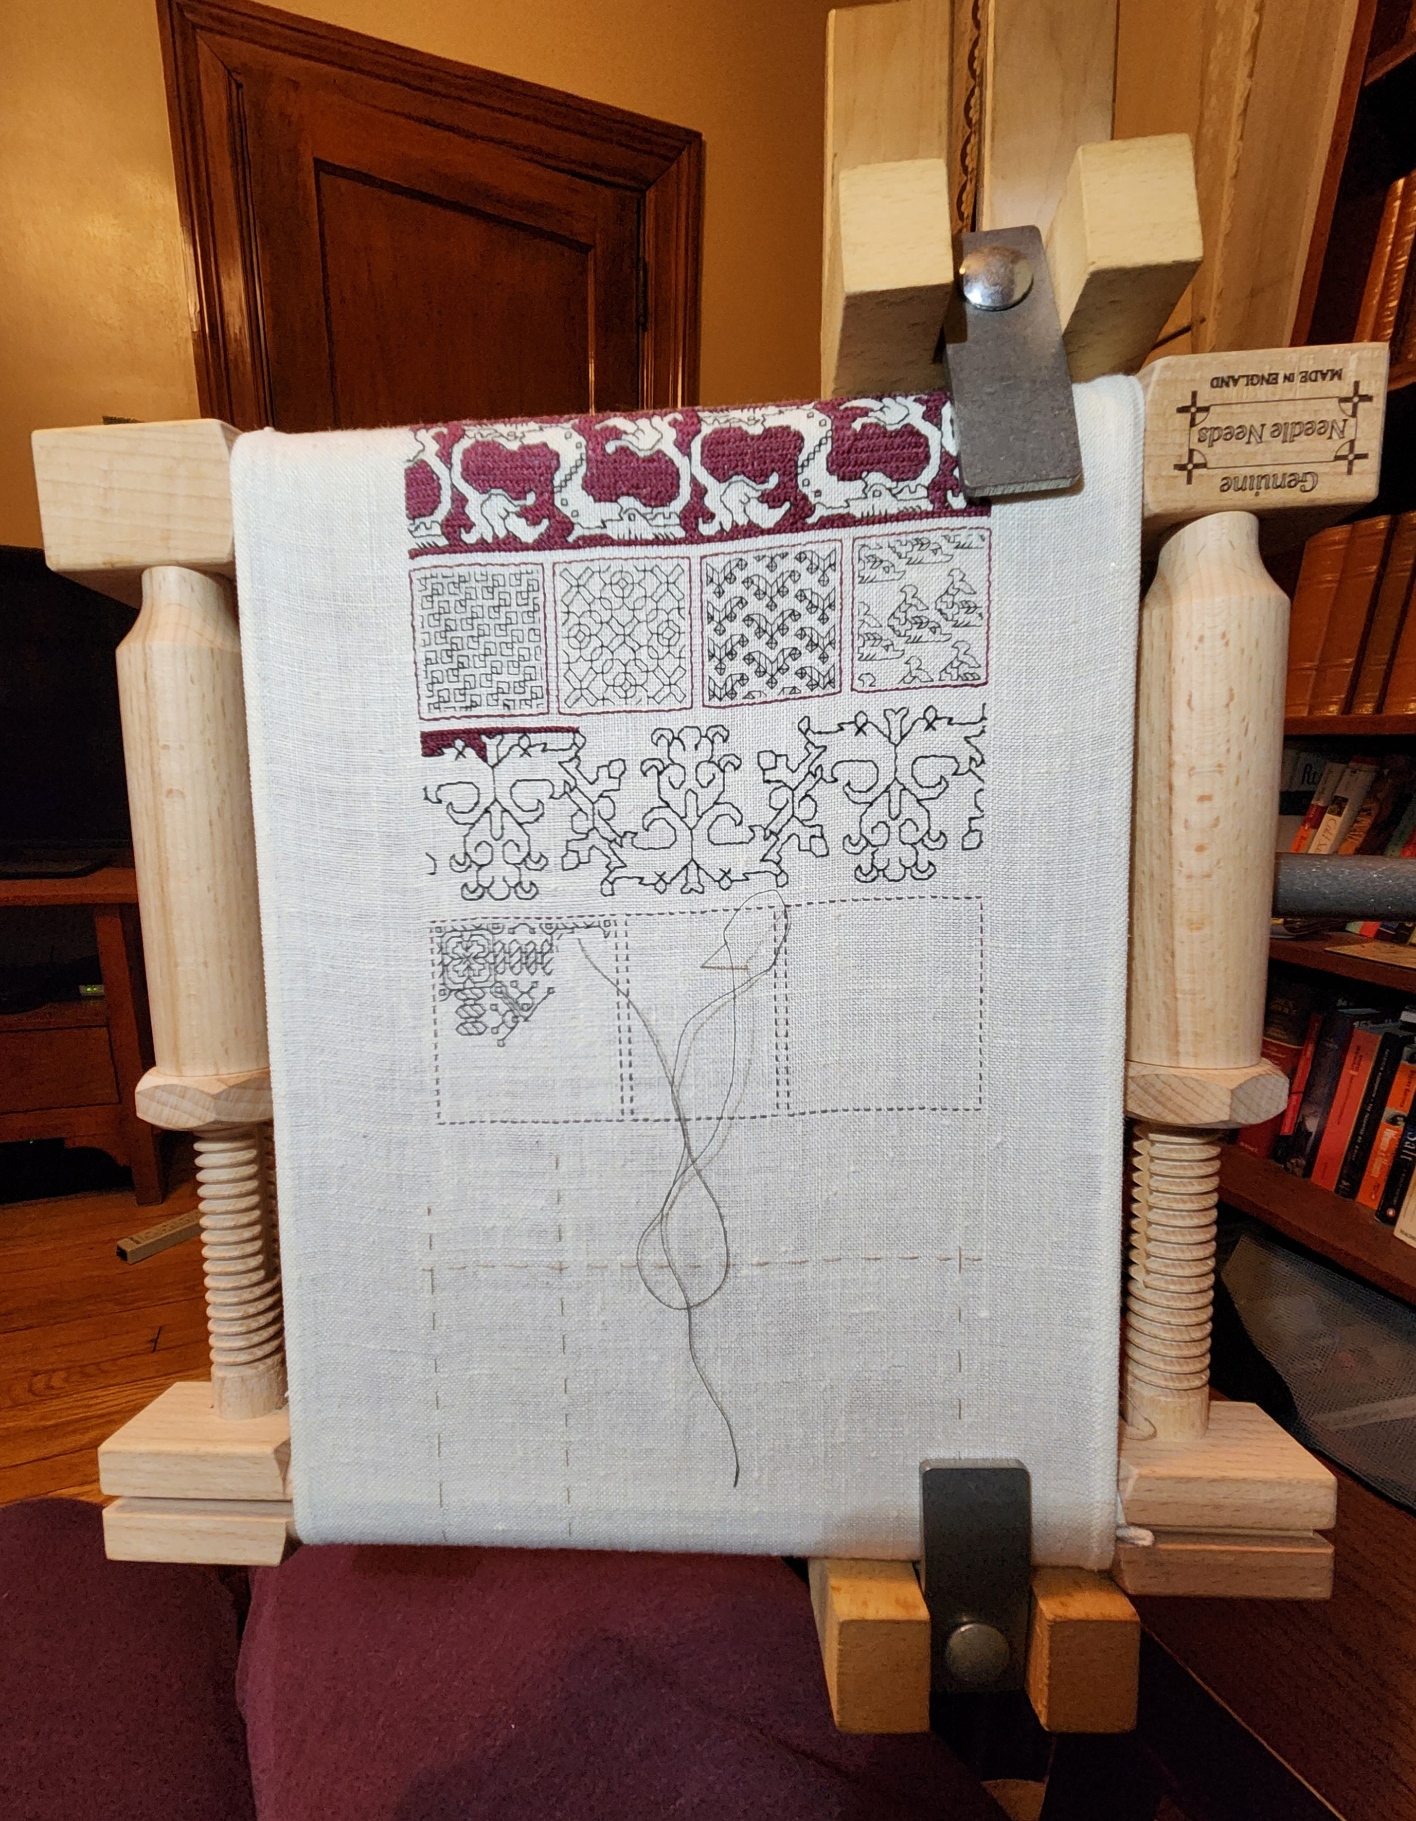
And I was right. You can see how much of the available area is “eaten” by the width of the gripping Large Frame Extender. Even if I position the frame so that the clamp is grasping the corners of the roller bars, it’s awkward to work right up against the Extender’s upright. But just like with the larger set-up for the Coif, I can flip the frame upside down to work that side of the piece.
I know that not all my new projects will be narrow band samplers, but between the new short roller, and the new short side stretchers, plus the pieces I have on hand used in new size mix combos, my toolkit has valuable extended capability.
As for more on the design on this sampler, the types of symmetry often seen in fills and how to best center them depending on the type of symmetry, that will have to wait until the next post. For some reason the blogging software is having indigestion, and I’ll have to cut today’s intended post into two. Will finish that one out and get it up by the end of the week.
