NEW TOYS!
I just got back from a quick business trip. Sadly, I came back with a hitchhiker – a bad cold. But to cheer me up upon arrival was my package from Hedgehog Handworks, with my new Hardwicke Manor sitting hoop frame:


As you can see, I was so excited, I had to try it out right away, even before wrapping the inner hoop in twill tape. I’ll do that this weekend.
First the specs of my long-coveted indulgence. There are two joints providing freedom of movement. Looking at the back of the thing, the first is a slider that regulates height. The turned barrel at the base of the main vertical has a wooden screw tightener, allowing the vertical arm to be raised and lowered. Minimum height (pushed all the way in, with the frame positioned parallel to the ground) is 13.5 inches measured from table top to BOTTOM edge of the frame. Max height on which the tightening screw can be brought to bear is about 18.5 inches. The vertical stick also allows the frame to be rotated left and right, provided the wood screw is loosened to avoid damage.
The second degree of freedom is the y-shaped joint at the top of the vertical stem. The fixed attachment piece from the round frame fits into the slit of the y-shape, and is tightened by a bolt with a metal wing nut. (I will probably replace the wing nut with something a bit more finger-friendly in the future). This allows the frame head to swivel up and down, allowing access to the reverse of the work.
“Orthodox” use position and all of the pix I can find on line show the large paddle piece at the bottom being slid under the left hip, so that both legs sit upon it, and the frame is presented across the user’s lap. Users are also shown sitting bolt-upright on a chair or a sofa.
I’m a bit more relaxed. My favorite stitching chair is a Morris chair, with wide wooden arms, like mini-shelves left and right. It reclines. Instead of sitting upright, I tend to stitch in the reclined position. I also don’t want to bark the chair’s woodwork with the frame, so instead I straddle the base, with the paddle-bottom underneath my right thigh. I can adjust the position of the hoop so that it’s perfectly comfortable and accessible in that position.
All in all, I am VERY pleased, although I may need to stitch myself a small bolster on which to rest my left elbow when working with that hand beneath the frame. The chair arms are too high for comfort, and some support would be useful for extended sessions. Oh heavens. A quick project to make something useful that I can cover with MORE stitching. However will I cope? 🙂
In the same order, I also received some tambour embroidery hooks. I won’t show them here, but will save them for a future piece. Hmm…. that elbow cushion… What do you think?
And finally as a cheer-me-up, Younger Daughter, Needle Felting Maven and all around good kid, saw that I was in need of a small, weighted pin cushion that was presentable to leave here in the library next to my chair. Although she usually does far more intricate shapes (dragons, tigers, airplanes), she made me a little sea-urchin, weighted in the bottom center with a couple of big rupee coins, for extra sentimental value. It’s adorable, simple, in colors that match the rug in the library, and at about 1.5 inches across, with the coins giving it a low center of gravity, so it doesn’t go skittering off – the perfect size and weight.

Finally, I have been making progress on Trifles. As you can see, I’ve got less than a quarter of the surround left to go. And every single gear uses a different filling.

BLACKWORK HERESY
We’ve all read about two stitches that are most commonly used in linear styles of counted stitching.
First comes double running stitch (aka Holbein stitch, Spanish stitch, and punto scritto, among others). Pretty straightforward and well known, it can be used with care to produce works that are absolutely identical front and back, although meticulous double-sided implementation isn’t mandatory unless there’s specific need.
 Double Running.
Front and back are identical
Back stitch is the other big technique used for linear counted work, with lots of historical examples. If anything its even more well known than double running. Its appearance is different front and back. On the front, it looks exactly like double running. But on the back, a much heaver and thicker line is produced. Depending on the care of the stitcher and the thickness of the thread it can look like outline or stem stitch if the needle is introduced (uniformly) above or below the previous stitch on the reverse; or even chain or split stitch, if the needle splits the previous stitch on the reverse.

Back Stitch.
Looks the same as double running on the front (top), but different on the reverse.
Now, why would one pick one technique over the other?
Sometimes it’s a good thing to try to economize on thread use. Back Stitch uses about a third again as much yardage per distance embroidered than does Double Running. Therefore, if I wanted to conserve thread I might opt for Double Running over Back. Double Running is also the stitch of choice if double-sided presentation is a necessity, or if the fabric is so sheer that the heavier reverse side of Back Stitch might show.
On the other hand, Back Stitch can be much easier to work, especially on long runs that can befuddle even those familiar with the there-and-back-again logic of Double Running. In Back Stitch, there is no retracing of the path to fill in every other stitch. Work proceeds logically down a single path. Branches mean starting a new thread, rather than departing from a baseline and working back to it. Many people prefer the “I’m here” certainty of Back Stitch to the puzzle path approach of Double Running.
So I present this stitch hack – one known to just about every counted stitcher, although few would admit using it openly. I will arbitrarily call it “Wandering Running Stitch.” I am sure this is an “unvention,” and I’ve just promulgating something that’s already described under another name. For example, I would not be surprised to see this documented as a technique for quickly stitching durable seams in plain sewing.
Both a bit of heresy, and a chimera of sorts, Wandering Running Stitch neither plain Double Running, nor is it true Back Stitch. Advantages are that it looks like Double Running on the public side of the work; uses the same amount of thread as Double Running; and avoids now-how-do-I-go-back problem. It’s main disadvantage is that like Back Stitch, the reverse side looks different from the front. In this case, the reverse shows a discontinuous, dashed line of double-thickness. The overall effect is a bit heavier on the reverse than is plain Double Running, but is not as massive as Back Stitch.
 Wandering Running Stitch
Looks like double running on the front, but leaves spaced, doubled dashes on the reverse.

All three methods, for comparison. Front sides on left, reverse on right.
From top down – Double Running, Back Stitch, Wandering Running
The following sequence illustrates the stitching order.


Now. How to use this hack.
First off, it’s not for reversible work. Nor is it for use on pieces sent to juried panels, where rules favor the use of traditional/historical stitches, and the state of the back side. There is NO precedent for or documentation of using this stitch in history that I know of, so I would not advise it for SCA pieces destined for Arts & Sciences competitions. However, for single sided work, or lined pieces, or items done for your own pleasure, or a project to help you get into the swim of a style that has frustrated you in the past – why not use an unorthodox approach if it makes life easier?
Because the active area is always at the needle with no half-worked baseline to retrace, Wandering Running would be especially good for stepped or continuous line patterns with no branching. It would be very useful to people who stitch in hand without a hoop or frame, and also for those who use a particularly small or round frame. In both cases, there’s no moving back over previously stitched paths, making it easier to tension in hand; or minimizing the need to remove and relocate a small hoop to revisit prior paths.
I think Wandering Running will be especially useful for people who have given up on blackwork because they find double running logic daunting, and have problems remembering where the baseline of their design is, or what direction they were heading. I also think that people who have tried Back Stitch instead of Double Running, but who were displeased with the heft or thickness of the reverse side might also find this technique interesting.
Another use is in completing the filling patterns used in inhabited blackwork, which are often not entirely suitable for full reversible treatment in the first place. I occasionally resort to Wandering when I’m working a filling into an oddly shaped area, and need to advance the working thread. I will plan out my path of attack and use Wandering to “walk” my working thread to the new area to be completed rather than ending off the thread and re-starting in that location.
In addition to the uses above, Wandering Running can be employed to render complex linear designs, in combo with more traditional Double Running. I can see using Wandering on the main baseline, moving along it until one encounters a side branch, then veering off to complete that side branch using traditional double-running methods, and returning to the baseline to continue on to the next point of departure. The biggest difference between this and a full Double Running treatment of the same design would be no “dashed line” of semi-completion along the baseline, making it easier to see where along the design path one is.
So. Have you seen this hack before? Does it have a name? Does it have a place in your repertoire, or does the merest thought of such heresy inflame you to the point of whipping out your Embroidery Voodoo Dolls* and using poison-tipped #24 tapestry needles to condemn me to my fate?
[*If demand is sufficient, I will consider sharing a design for Embroidery Voodoo Dolls. Suggestions for appropriate historical periods of attire for EVDs will be considered.]
SPLURGES
Aside from the weakness for yarn common to all knitters, I don’t often spoil myself buying things for my own use. But given just a nudge, I have given in and have treated myself to two things:
A Hardwicke Manor sit-on round frame (aka a fanny frame), and a tambour needle set (not shown in proportion to each other).

![]()
I’ve wanted to try the round sit-on frame for quite a while. I like using my flat frame on its holder. Doing so allows me to position one hand above and one hand below the work, and stitch more efficiently, without needing to conjure a third hand to hold the frame in place.
For smaller pieces in non-fragile threads and stitches, I do prefer to use the smaller hoop though. But using it does raise those same third-hand issues. I am eager to experiment with the sit-on, and hope that I don’t miss the agility of being able to rotate the hoop in hand for optimal stitching direction at the same time as I appreciate having both hands free to work.
A fixed position frame is one of the things that enables use of a tambour needle. Again, one hand uses the needle on one side of the work, the other is positioned on the opposite side, and feeds thread to the hook, using up my quotient of hands before holding the frame in a convenient position is achieved.
I looked for a tambour hook in India. One would think that given the staggering array of tambour-produced textiles there, finding one would be easy. Indian Ari hooks are (in theory) slightly longer and finer in diameter than hooks made for the Western market. Sadly, I never saw one myself. In my region there were few shops that offered needlework supplies, and the ones that I found catered to ladies of leisure rather than people doing embroidery to make a living. Clerks in those shops either didn’t understand what I wanted (although I was armed with the correct name and drawings); or they didn’t carry them because they were “working” rather than “leisure” tools.
What sort of things are embroidered using an Ari? The overwhelming majority of stitched textiles offered in traditional crafts markets. Not all – running stitch quilting, satin stitch, poorly done Shisha, and pattern darning were also present, but tamboured pieces that looked like chain stitch predominated, especially in the better quality works that interested me most. Here’s a smattering of what we brought back:

")


The cushion cover on the left that we had made into the chair seat is densely stitched in wool on a cotton backing. I believe it’s from Kashmir.
Also from Kashmir is the rug in the center. Yes – that’s 6’ x 9’ (1.8 x 2.7 meters), totally stitched in tamboured cotton, with no ground showing. I had it professionally cleaned when we returned from India because it had been in daily use there. I’m not sure where we will eventually put it, so it’s rolled up in safe storage right now.
The third thing is our Dodo Curtain – a large cotton panel covered in tamboured metal threads, with probably man made silk (rayon) accents and paillettes. It’s covered with roundels featuring this bird, giving it a very Medieval appearance. I have plans to back this cloth with linen, then hang it as a portiere curtain between my living and dining rooms. We got this piece in Agra, but its ultimate province of origin wasn’t noted.
The jacket is also Kashmiri. It’s fine Pashmina, entirely tambour-worked using the same fiber. Even the plackets and hems that look like trim are densely packed tambour chain. This is probably the most extravagant thing The Resident Male bought for me on our stay, and wearing it makes me feel like royalty.
A side trip into literature and symbolism for those who wish to hang around for such things:
Some folk have told me that my curious dodo hanging may show the Garuda Bird, the king of birds, champion of justice, and celestial mount of Lord Vishnu, but I am doubtful. The noble Garuda is usually shown in with wings outspread, robust and fearless, often with a human face and limbs.

These big-beaked, comfortably round, bald birds, if not dodos, may represent vultures.
There are several vultures in Hindu epics. One is the mount of the deva Shani, revered as a teacher and righteous judge, punishing evildoers and betrayers. But Shani’s mount is rarely pictured alone. Other famous vultures in the story cycles appear in the Ramayana – two brothers, Jatayu and Sampaati. They figure in several tales, including one that echoes aspects of the Icarus myth, with Jatayu flying so high he was seared by the sun, but rescued by his loyal and courageous brother Sampaati who used his own wings to shield Jatayu from the sun’s fury. Unlike Icarus, Jatayu survived, and is not a symbol of the folly born of overconfidence. Jatayu also plays a supporting role in the story of Sita’s abduction by the demon Ravana, flying to Rama with news of Ravana’s escape route.
One last possibility – dodos were giant flightless parrots. If these birds are parrots, we veer off from justice and bravery into the worlds of compassion and love.
Origin stories vary, but Sukadeva was a parrot, and pet of the gods, particularly befriended by Krishna, who showed mercy and compassion to it when Sukadeva fluttered away from his mistress Radha. I’m not clear on the relationship between that story and others, but Sulka the parrot is often painted in henna on the feet of brides, in recognition of his service as the sacred mount of Kamadva (also known as Mandan and Mara) the god of sensual love.
While not as lofty as Garuda, if my dodos are the vulture brothers, they are still exemplars of bravery and self-sacrifice. However, if the bird shown is Sulka, the connection with love might make my curtain more apt for the bedroom than the dining room.
EVERYTHING OLD IS NEW AND OLD AND NEW AGAIN
Sometimes we forget that not everything we do is original, unique or never-before done. Here’s a case in point from the world of needlework research, presented as an example that we are not unique, and as a mildly cautionary tale.
There are hundreds of folks out there delving into the historical needle arts – some to research and re-create the techniques, some to make investigation into the aesthetic, artistic, or symbolic aspects, and some to profile the creation and use of artifacts within their social and cultural context.
We are not the first to do this. I have stumbled across an article from June 1909, written by Kathrine Sanger Brinley, published in The Craftsman magazine – a product of the Gustav Stickley Arts and Crafts movement (and his commercial empire). That issue of The Craftsman is available on-line as part of the Digital Library for Decorative Arts and Material Culture, maintained by the University of Wisconsin.
The article is entitled “Needlework Designs from Old Paintings,” and describes Brinley’s observations on a tablecloth edging that appears in daVinci’s famous painting “The Last Supper.”
Her description is rather florid, although it is in keeping with the philosophical bent of The Craftsman. She concentrates on the embroidery on the tablecloth, and provides a black and white photo that appears to reveal slightly different detail of those panels than do modern photos. On the left is a snippet from her photo, on the right, a snippet of the original daVinci, as found on Wikipedia.


Brinley discusses a copy of the work, done by d’Oggiono, in the collection of the Louvre, but does not directly identify that copy as her source. D’Ogginio is considered to be one of daVinci’s personal pupils. I do not see a copy attributed to him listed in on-line sites detailing the original painting, nor do Louvre on-line searches turn it up, so I do not know if current scholarship still recognizes the piece.
Whether or not this piece has been discredited or lost, I can’t determine. I am no art historian, so I can’t say when in history Jesus’ feet were replaced by a door lintel. I can only observe that there are many more differences between the two than the presence of feet. In just this little snippet, the side figural band appears to have migrated from one side of the bread roll to the other. The modern photo also indicates the presence of a few more bands of patterning than does hers.
Brinley plunges full ahead with the assumption that the tablecloth’s patterning is embroidered, not woven, and attempts a reproduction of the design. Now to my eye, it’s more probable that the cloth shown was inspired by Perugia style weaving, and that it was not a depiction or conjecture of an embroidered textile. But let’s set that aside, too.
She posits a counted thread technique for the bands, due to their linear character (also an artifact of weaving), and cites the prevalence of cross stitch in Italian embroidery history. She concludes that the piece was originally worked in cross stitch, stroke stitch (aka double running), and point Lance (short, straight stitches); also double Italian cross stitch (which she calls out as double-sided cross stitch).
She gives a drawn diagram for the design, and displays her own flat frame, with its in-process snippet.


Interestingly enough, while she cites the work as being counted, her own renditions are not. They’re penciled onto the ground cloth and stitched free of count.
Having graphed over a hundred patterns of this type myself, I can say that if in fact the original was embroidered, Brinley’s chart is a probably a vast simplification of what the original design might have been. Even if the original was woven, how it is shown in the painting is not a photographic depiction. It is another victim of the fidelity and resolution that results when a fine stitched or woven piece is rendered in paint – especially when that detail is not central to the composition’s central subject.
So.
What we’ve got is a historical-historical embroiderer, bent on re-creating a pattern from what she believed to be a period artifact, and making an assumption that the original was stitched and not woven; and that the fidelity of the source painting was true. She went on to suppose that the piece was produced using methods contemporary with modern stitchery (informed by some historical examples). She created an eyeballed redaction inspired by the artifact and presented it as accurate; then rendered it using her own methods.
Is her chart faithful to daVinci’s original? I can’t say. Obviously, I am leaning towards a Perugia-style tablecloth and not a stitched one. I’m also not inclined to accept her design version as accurate. But I can say that I feel for her efforts, respect her attempt, and hope to avoid her pitfalls in my own redactions of other works.
DATING DILEMMA
Sorry folks. This has nothing to do with anyone’s search for companionship. Be warned, it’s all about embroidery, and this is a post that only a stitching geek will love.
As I fill out the last few pages of The Second Carolingian Modelbook, I’ve decided to take a stab at a design that seems to be everywhere. Except modelbooks, that is. I call it “Pelican with Harpies and an Urn.” It is one of a set of patterns that crops up again and again in museum holdings worldwide, most often as a fragment. It’s clear that unlike many other snippets, these all came from different works, often executed in different styles or stitching media. I’ve posted about this before, but my collection of examples continues to grow, and with it, the general confusion level.
The dilemma comes in because (to my knowledge) there is no existing printed pattern to establish a point of temporal or geographic origin. But there are lots of examples and they all express the details of the design slightly differently. Now if there was an authoritative point source that became unavailable, one would expect later iterations to be less detailed, or details to become blurred, through succeeding generations of copyist errors. We can see that with the oft-studied “boxers” sampler motif in Colonial American samplers – which probably started out as a cherub bearing a flower, but over time became less specific and more stylized, until what remained was a barely discernable chubby humanoid with a club fist. But I can’t arrange the Pelican/Harpy/Urn designs in an ironclad continuum of graduated detail.
Here’s the parade. The thumbnails are not clickable, please visit the links to see the museums’ higher resolution images.
CH-1. First is this example from the Cooper-Hewitt’s collection (Accession 1931-66-144). They date it as being a 17th century work, but do not offer a provenance. It’s done in silk on linen, with a characteristic tightly drawn background that produces the appearance of mesh, but does not involve withdrawn threads. Details are rendered in straight stitches, and may include double running or back stitch (it’s hard to tell without seeing the reverse). The museum acquired it in 1931, as a gift from Sarah Cooper Hewitt.

CH-2. The Cooper-Hewitt has another example (Accession 1931-66-142). This one is specifically called out as being Italian, and is also dated to the 17th century. It’s a particularly prime piece because it is a full span cut across the end of the towel, cover or cloth it came from. We see the orientation, the top and bottom borders, and how the slightly different side borders framed the work. The museum acquired it in 1931, also as a gift from Sarah Cooper Hewitt.

HERM-1. The Hermitage Museum has two examples. This one is entitled “Valence Embroidered with a Grotesque Motif (fragment),” but the on line page has no accession number. The full description calls out the linear stitching as being double running (Holbein), and the background as being drawn thread. They attribute it to Italy, and the 16th century. The museum got this piece in 1923, via the Stieglitz School, and ultimately from D. Flandin, an antiquarian dealer in Paris.

MET-1. Yet another example in the same style. This one is from the Metropolitan Museum of Art (Accession 14.134.16a). The MET cites it as being Italian, and 17th century. Although this one is at a different museum, and is clearly not a separate piece of either artifact, there’s a connection with the two above. It was acquired in 1914, via the Frederick C. Hewitt Fund.

HERM-2. On to another stitching style. “Valence Embroidered with a Grotesque Motif” from the Hermitage also has no listed accession number. This piece is lacis (darned filet net). It’s dated 16th century and placed in Italy. Although filet work doesn’t allow for the linear details of the red examples above, it’s amazing how much fidelity to the design can be included. Like the other Hermitage piece, it entered their collection via the Stieglitz School Museum in 1923, but came from the collection of J. Kraut, in Frankfurt-am-Main.

MET-2. More stitched net, and not another piece of the one above. This one is also from the MET (Accession 06.582). It’s cited as being Spanish, from the 17th century. This piece was acquired in 1906, via the Rogers Fund.

My Opinions
First of all, I’d agree that the source for these was probably Italian, regardless of where the final objects were collected from. I’d also agree that very late 16th century, but more probably the early 17th century is reasonable for the whole pattern family based on the style, usages, media, and iconography, plus parallels to other contemporary designs.
On to the motifs themselves. The version with the most minutely rendered detail is CH-1. Here are close-ups of the birds/urns and harpies from the five, presented in the same order as above

CH-1 presents the most detailed urn and pelican of the set. Both are encrusted with small linear features, although the placement of those features is not always symmetrical, nor is it identical from repeat to repeat. Feathers on the harpy’s body are shown in neat rows, but her wing feathers are very stylized, using right angles rather than diagonals. I’m unsure what she’s holding – a cup or panpipes (perhaps a fancy on my part, to think of that flower as the music of the pipes). From the patterning, it’s clear that the thing across her middle is her tail, wrapped up from between her legs.


It’s hard to see clearly, but there are lots of differences between the urns and pelicans in CH-1 and CH-2 (blurry pix above). It’s clear that both have less detail. But one of Mother Pelican’s chicks has moved up near her bent head, and another now floats over her back. The nest detail seen in CH-1 is now symmetrical right and left at the top of the urn, instead of looking like leaves on one side, and scrolls on the other. The sprouts on either side of the urn’s bulbous body have changed attachment points, and now hang down, instead of growing up as pomegranates.
CH-2’s harpy has retained her hairdo, but her wings are a bit more gracefully rendered, employing 45-degree angles to round off some of the shapes. Her feathers are more evenly spaced, but her tail is less pronounced, and whatever small markings covered her haunches have been lost in favor of more, smaller feathers. The thing she’s holding has lost its hatching, and now looks more like a cup than panpipes. She has also inherited another wayward pelican chick.


MET-1’s urn is in between the other two in terms of detail. The nest/scroll unit at the top underneath the big pelican has transformed into a chick. The stitcher chose not to fill in the background in the loop defined by the pelican’s neck. There is something unidentifiable between the pelican’s legs, and her fathers are somewhat simplified compared to CH-1. The lower ornament is again descending from the bowl of the urn as leaves, rather than rising from the base.
The harpy too has changed a bit. In this case, I’d say the sipped/sounded thing has parted company from the hand, and now looks more like panpipes, vaguely supported rather than held. She’s gotten a bit more balloon-like, and her breast feathers now march row by row. Her wings however have gotten a bit stunted, and return to a stepwise rendering similar to CH-1, but slightly more clumsy. The tail is suggested, and the haunches have been returned to stippling rather than feathers.


OK. It’s clear that detail is going to be lost when you move from ornamented surface stitching to the negative/positive lacy mesh look of the all-white technique. But even so, a tremendous amount has been preserved. We see the plumage of Mother Pelican, and even some details on her brood (she’s managed to gather three of them together on top of the urn). Her nest is symmetrical. The urn preserves the shapes and proportions of the red stitched pieces, and has grown back the two small pomegranates that grow from the base.
The harpy too preserves a lot of detail, down to the proportions and shapes of its flight feathers, and a bit of the detail inside of the wing. She’s lost some weight, although her hairdo is less detailed. Breast feathers are present, as is a pretty clearly defined tail. Stippling on the haunches looks different from the breast plumage, and her feet are now nicely shaped lion paws.


The final example, MET-2, the Spanish piece, is a bit simplified. The harpy is less prominent, and the largest space is given over to the urn and pelican, and to the foliate ornament between the repeats. Mother Pelican’s brood is more suggested than rendered, although her feathers are nicely done. The urn has the two upward growing pomegranates emerging from the base.
The harpy’s cup/instrument has become less detailed. It’s unclear what it might be. Her feathers have given way to geometric ornament, and her tail is suggested in shadow rather than being clearly defined. Her wings are somewhat like the Hermitage example’s, though. It’s worth noting that her proportions and body shape are more like CH-1 than the other examples.
One other thing that’s of interest is the presence of the little filled boxes that bead the motif’s edges. You can see them along the curve of the pelican’s neck, along the harpy’s breast, and lower legs. They give a lacier appearance to the composition. I also find little protrusions like this to be extremely valuable as I stitch my motifs because they help me confirm counts and stay true to the design. Note that they are absent in the other renditions.
Now, having our fill of urns and harpies, what can we say about them?
It’s obvious that there is an as-yet unidentified but unifying source for this design. I posit that there might originally have been a broadside or model sheet that showed the composition. I guess that it may have been on the count, and that its broad outlines were used to establish the placement of the main design elements. But I don’t believe that it was followed exactly. Instead I think each stitcher used it to establish the first iteration of the design, filling in the details and roughly eyeballing their placement, taking inspiration rather than ironclad direction from the model. Once the first repeat was worked, subsequent repeats and mirrorings were copied from that, with no more call to look at the original. That’s why the baby birds wander around, while the relatively easy to place urn decoration remains more stable.
Because of the different media and slightly different interpretations of the pattern (especially the pomegranates on the urn, and some differences I didn’t detail in the filler between the main motifs), my guess is that the same design branched into two slightly different but recognizable pattern “traditions,” which in turn spawned child works of their own. One of those traditions (marked by the upward pomegranates) made the leap from surface work to darned net.
Now. Which came first? I can’t say. On intuition alone I’d go with the fat, balloon-bodied harpy (MET-1) being later than CH-1, and the two white filet pieces belonging to the same “tradition” as CH-1. That leaves MET-1 and CH-2 as child works of the other branch.
Which came first? What chronological order can be used for these pieces? Aside from these idle thoughts, your guess is as good as mine. If you’ve managed to make it this far, please feel free to differ. Without detailed analysis or forensic investigations into fiber and dye, we’re all just speculating, anyway.
NOT HOME FOR THE HOLIDAYS
Whether you’re living abroad, in a dorm, newly moved to a new location, or spending time away from friends and family that you’d normally spend with them, there’s nothing like time zone and distance separation to make one feel disconnected.
It’s Passover time. We generally don’t make a huge deal of it in our house. Some years we celebrate the Seder with friends, or travel to Florida to do it with my mother and extended family down there. But even if we are having a quiet year with minimal fuss, to me at least Passover foods and at the bare minimum – a special dinner – are sure signs of spring and the comfort of home.
I am sure that somewhere here in Pune, matzoh can be had, along with macaroons and other seasonal goodies. There is after all a Chabad House here in town. I haven’t found these things yet, but to be fair, I haven’t conducted an exhaustive search, either. Instead, I improvised our own special dinner last night, roasting a tiny chicken in our Easy Bake Oven, making potatoes and onions, plus a sort of a ratatouille with the local baby eggplants. We talked about the holiday and the special significance it has to us this year, as literal “strangers in a strange land.”
However I can’t let the holiday time slip by so unmarked. To make up for that I present some stitched historical artifacts found in museum collections, with direct connection to either the Jewish community of the 1500s, or to the Passover story itself.
First up is this bit of stitching, a Torah binder in the collection of the Jewish Museum in New York:
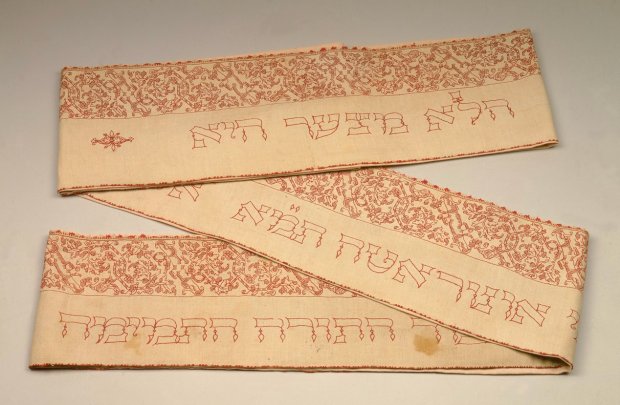
F 4927, Torah Binder, , Photographer: John Parnell, Photo © The Jewish Museum, New York
The full citation for this object is here (accession F-4927; the photo above has been shamelessly borrowed from that website). In short, it is dated on the artifact itself – 1582/3 (Jewish calendar 5343), and was donated by a woman, Honorata, the wife of Samuel Foa, to a congregation in Rome. It’s unclear if she stitched this herself, or if she commissioned it, because the inscription can be interpreted either way: “In honor of the pure Torah, my hand raised an offering… it is such a little one.”
The pattern is so typical of its time: double running stitch (or possibly back stitch, we can’t see the reverse), counted, in silk on linen. It might be modelbook-derived, although I haven’t spotted the exact source yet or found the same design on another artifact. I will continue to look for it. The museum does mention that the Sephardic community of Italy and Turkey commonly used secular design elements for devotional items, and that donation by a woman without a specific dedication in the name of a male child was also a normal practice.
Was this was in fact done by Honorata Foa herself based on a published or copied design? Did she stitch this as the donation of a home-needlewoman; or was she somehow part of an embroidery atelier or other enterprise, and used her professional skills to make it? If the latter – was the Roman Jewish community in the late 1500s involved in the production of counted embroidery as a trade? Obviously, more research here is required.
I have graphed this pattern and will include it in T2CM. I may also pull together a separate project instruction sheet for a matzoh cover using it and its lettering.
UPDATE: YES! I knew I’d seen something like this before. This pattern is a very close cousin of the Large Grape Repeat with Matching Border, presented in Plate 71:1 of The New Carolingian Modelbook. It’s not spot on the same, but the leaf shapes, the berries, the crosshatched angular stems joining to a more organic trunk – they are very, very close. That one is also illustrated in Pauline Johnstone’s Three Hundred Years of Embroidery, Wakefield Press, 1986, on page 17. No modelbook or broadside sheet source yet. Here’s my rendition of 17:1, on a sampler I did back in 1989:


My stitched version of TNCM 17:1 My rough plot of Torah binder’s design
One curious note on the Johnstone citation, she notes that the piece she presents was done in chain stitch on the reverse side, to give the appearance of double running or back stitch on the front.
UPDATE UPDATE: Chris Berry of Glasgow, former Chairman of the Embroiders Guild has sent me a delightful note of clarification. She has examined the artifact pictured in Ms. Johnstone’s book, and is convinced through close observation that the chain-like appearance on the reverse was in fact a by-product of back stitch. The point of the needle split the floss on the reverse as the back stitches were formed, giving the reverse the look of split or chain stitch. But it’s back stitch, all the same. Heartfelt thanks for this information!
Here’s the second share. This is a series of Italian voided work panels depicting scenes from the Passover story. They are collected at the Cleveland Museum of Art, dated to the 16th-17th century. I’d guess from the inscriptions that they were not made for a Jewish audience.
The final plague, on the first-born (accession 1939.355):

Preparing unleavened bread and crossing the Red Sea (1939.353):

Baking of unleavened bread: (accession 1939.354)

The Red Sea overwhelming Pharaoh’s army (accession 1939.352):

It’s pretty obvious that these are all fragments of the same work or pieces made and intended to be displayed together – a series of panels with vignettes of the story, spaced out with floral ornament between. As to technique, there were several ways to produce a voided piece. One was clearly counted, with the design elements being plotted out on the ground cloth based on a full graph of some sort, and replicated true from repeat to repeat. These panels weren’t made that way. Not even the narrow borders are count-true. I would hazard that the images were sketched onto the cloth, then outlined in double running or back stitch. After the lines were established, the background was filled in using long-armed cross stitch. I would also guess that the lace applied along the bottom edge is needle-made, not bobbin lace.
So there you have it. Pesach far away from home, enlivened by holiday-themed needlework.
Happy holidays, Chag Sameach! Enjoy.
RECENT FINDS
Of course, you can’t be in Another World without exploring the retail options. India is a textile lover’s paradise, with all sorts of fabrics both hand and machine woven, ranging from the humble to the outrageous. I can’t buy it all. In fact, I can’t buy very much, especially compared to the vast volume I covet. But I am keeping my eye out for special items, with special purposes in mind.
First, I’ve written about Kasuti embroidery before. I’ve been on the lookout for an example, but so far, I’ve not seen anything. Not so much as scrap. Perhaps when we go to Kerala next month we’ll see some, but I suspect that given its intricate nature and simple presentation, it is not being made in quantity for sale any more, because other more showy work of less labor can sell for more.
But I did find this piece. It’s NOT hand-made. It’s machine embroidered sari, using traditional colors and patterns on an all-cotton ground. In terms of scale, the stitches are about twice as large as the museum pieces I saw here in Pune, and in Delhi. But it’s unmistakably part of the heritage, and the seller was very surprised that I recognized it as such.

I have also found some trim for my long-delayed library curtain project. The 1 inch wide red paisley at the bottom is actually hand-stitched. I’m not sure what to do with the blingy gold at the top, but it was so over the top and of such a typical Renaissance configuration, that I had to buy it. A use will present itself, I am sure. Aside: most borders and trims here in India are sold in single piece 9-meter lengths, the optimal length for application onto a standard sari.

Also at the same store as the red trim, I found some silk embroidery floss.

This stuff is quite fine, with the individual strands being significantly thinner than Soie d’Alger, my go-to silk for countwork. I got a bunch in assorted colors, each big bundle containing 10 skeins, and the skeins being 10 rupees apiece. That’s about 16 cents US at the current exchange rate. I will probably go back and get more, although the range of colors was rather attenuated.
And finally, I got a yard of real silk canvas. My signet ring is shown for scale. 
What to make of this? Given the silk threads above, I’m thinking of something along the lines of this piece:

This is a 17th century sampler in the collections of The Art Institute of Chicago (Museum #2008.627). It’s worked on a gauze ground in darning and double running stitch (among others). It’s not going to happen any time soon, but the materials are now in my hands and ready.
FOR SOMEONE DOING NOTHING, I SURE AM BUSY
It’s a fair question – “Where have you been?”
The answer is “Busy.”
I’ve been out fabric shopping with friends; trying to establish a regularly meeting needlework circle at a local mall on Fridays; battling the Sacred Dust of India as it tries to repossess the flat; writing a presentation and workshop on the style intersection between Kasuthi embroidery and Renaissance counted work; dealing with assorted technology annoyances; working on TNCM2; trying to parse out more interesting blog entries from my London pix; and playing with various stitching and knitting projects.
First off, I’ve taken up Big Green again. It’s tough to do here. I need very strong light, and even with a small task spot in the living room, the only place bright enough is next to a window in the middle of the day. I long for my comfy chair and spotlight at home.

It’s hard to spot the progress on this strip because it advances at such a slow rate, but it’s there.
Then there’s a new stitching project, as leggy and coarse as Big Green is fine. I bought a pack of ultra-cheap dishtowels at the supermarket, because I always seem to have run out of non-terry ones when I am looking for something to toss over rising bread. One quick wash later, and as expected for bargain basement Indian cotton – they’d faded and shrunk. But wait! That dark indigo one is now a pleasant, mottled chambray. And it’s almost even weave:

So into the stash for some ecru DMC linen floss (which I’ve now learned has been discontinued. It figures…) Because I’m stitching over 3×3 threads to even out inconsistencies in the weave, and because the linen thread is fuzzy with its own rustic character, I decided to play on that folksy appearance rather than going for crisp, tiny detail. The pattern is yet another one that will be featured in in TNCM2. This, when finished out, will be a strip decorating a pocket edge of a zippered stitching caddy. The entire outside of the case will also be worked in one of the larger all-over patterns in TNCM2. Without cutting up the dishtowel, I intend to origami it into a series of graduated pleats, then stitch perpendicular to the folds to make pockets opening “up” and “down”.
The final step will be to fold the entire thing in half, then take an over-long large-tooth jacket zipper (toddler size), and run it around three sides. This should make an organizer pouch that when zippered, lies totally flat. I may sew one of the smaller interior pockets shut, stuffing it with some sort of padding to make pin cushion (perhaps with a finer gauge fabric as liner, so I can put emery into it). And I may also stitch in a couple of pieces of sturdy felt, so it has an integrated needle-book on the inside. The details of this finishing are still idle speculation at this point. Right now, it’s just a quick doodle.
I’ve been busy with knitting, too.


I’ve finished the body of the beaded red lace scarf. I’m drafting up the companion edging, with more beads and mitered corners. I also have to “kill” the acrylic yarn so that it lies flatter. Not quite sure how I’ll achieve this, since the beads make ironing problematic. But I’ll figure it out, even if I have to do up a couple of sacrificial beaded test swatches.
Also in the photo above is the latest pair of socks. That’s pair #5 in the past two months. I work on them while we wait for the school bus in the morning, or any other time I’m waiting on a line, for a car, or find myself idle outside the apartment. After this pair I’ll have to get creative in combining the leftovers on hand. I’ve gone through most of the sock yarn I brought with me. I have a couple of balls of Noro sock yarn left, but I’d prefer to use that for some other accessory. The yarn is beautiful but I prefer wearing (and washing) other sock yarns, for comfort and durability reasons.
METAL LACE
Quality ironwork,, armoring, weapons work, and smithery fascinate me. Especially wrought, as opposed to cast iron. I am also fond of arms and armor. The precision, tracery, and especially the contrast between the hard medium and delicate forms speaks to me, with parallels to textiles and couturier design. Oh and the elements of fire and danger. Let’s not forget the purpose…
While there were many other famous textile examples on display at the Victoria & Albert Museum, The Tower of London, and the British Museum, most of my embroidery and stitching readers have already seen them. They’re the examples presented in just about every textbook or reference work on stitching. Instead, I’d like to take a cross-craft side trip and look at some of the things we saw that are less well known or documented in the hope of kindling some cross-pollination.
Today is wrought iron. The V&A has a magnificent hall of ironwork. How could one not adore this dolphin, so much like a calligraphic image?

It is one of a pair. The V&A’s citation is Number 280:7-8-1879, and from that citation, it is dated 1520-1530, of Spanish origin, by Juan Francés, part of a larger altar screen.
I also love this pair of window grilles:

The thin bars that form the center diamonds are all independently forged to the frame and are formed and spaced with great precision. The contrast of geometric and organic traceries in the side triangles and arch are blackwork in iron. This piece is V&A Number 125-c-1879, from Italy, dated 1575-1600.
I fell down on the job and didn’t get the annotation for this piece, and I can’t find it in the on-line photo collection to provide provenance and date, but it’s in the same gallery as the grille above.

The play of curves and symmetry fights with my mental preconception of iron as unyielding and linear.
Finally two figural pieces. Fear the iron chicken, and the lion key-master!


The weathercock is French, dated around 1700-1725, made of wrought iron and copper. It’s Museum number 909:1 to 3-1906, and bears evidence of gilt and polychrome finishes. The wrought iron locksmith’s standard is German, dated around 1760 to 1800, and is Museum Number 545-1869. I would have thought that elements of the lion would have been cast iron, but no – they’re all wrought.
Now – why the side trip through metalwork? Because I want to show that the aesthetics of historical embroidery are even better appreciated in context. The forms of the late locksmith sign mimic those of Rococo laces and goldwork stitching. The earlier grilles echo contrasts, shapes and lines of Italian and French strapwork embroidery, done at around the same time.
Finally, imagine the shadows thrown by those window grilles – sitting in the afternoon sun made lace as it sifts through the iron, stitching oh-so-similar shapes until it is too dark to see.
CROSS STITCH
Stitching geeks – like those immersed in every esoteric discipline – love to argue; even when an issue is settled. Sometimes assertions bubble up again, are discussed with passion, and then go into remission. Occasionally these debates cycle back, usually because reference materials with outdated opinions are found by a new generation of hobbyists who take the authors’ words at face value.
One of these oft raised/oft settled debates involves the use of plain old common cross stitch in historical eras: was or was it not done before 1600. And the answer isn’t crystal clear, nor does it come with hard boundary dates. Let’s look at modern stitching and a dated example from the late 1500s.
Figural cross stitch isn’t new. It isn’t modern. But it has morphed into a recognizable modern style that has migrated from its pre-1600s cognates. The photo below is of a contemporary sampler designed by Marilyn Leavitt-Imbloom, for Lavender and Lace. It’s entitled “Angel of Dreams” and is widely available for purchase (a quick Google search will turn up retailers):

Ms. Leavitt-Imbloom’s work is pretty much the poster child for the modern needle-painted cross stitch style. Note the fluid forms, the subtle shadings that mimic painting, the half and quarter stitches and sparing (though dramatic) use of double running stitch outlines.
By contrast, here is one of the Oxburgh Hanging panels dated circa 1570, stitched by Mary, Queen of Scots (and/or Elizabeth Talbot, one of her ladies) during captivity. The first photo is shamelessly borrowed from the artifact’s Victoria and Albert page (Museum accession #T.33JJ-1955). The detail shots below it were taken by Elder Daughter on our visit there. If you click on the details, you’ll be taken to larger versions for closer inspection (patience please on the download, some are huge).


Now, the official descriptions cite “tent stitch” for all of the Oxburgh hangings. But if you look closely at the insect being inspected by the sea monster, it’s pretty clear that cross stitch was employed on this particular slip. Also note that the different parts of the insect were stitched with no regard for maintaining “the same leg on top”. Although some unworked bits just north of the Monster’s head can be seen and counted, we can’t rely on that because the bright white cloth peeking through the stitching is conservator’s ground, onto which the fragile stitching has been affixed. Fortunately, there is a small damaged area just north of the insect where we can see the original fabric:

Yup. Cross stitch, worked over a 2×2 thread grid.
On style – yes there are shadings, produced by marling a small number of colors of fine floss-fiber together to make threads of intermediate hues, rather than selecting pre-dyed solid threads of graduated color. But the shadings are far les subtle than the modern work. There are strong outlines also worked in cross stitch, probably related to the drafting methods of the time, in which the design was drawn directly on the linen prior to stitching. It is possible that black outlines were worked in part to cover those inked or otherwise drawn lines. I also think the outlines were worked first, based on the way that other stitches encroach upon them, with the colors added later – first to the foreground items, and finally to the background areas. Note that the lines do break in a couple of places, but I can’t say whether that is due to differential thread wear or they were truly omitted.
Now these all-over figural embroideries like the Oxburgh slips are not the only form of historical cross stitch. In fact, pictures like these are among the minority of surviving examples. Far more represented in artifact collections today are borders and strips in long-armed cross stitch or its variants. They’re not common, but cross stitched pictures did exist in the world of of the 1570s. And they looked rather different from contemporary figural cross stitched pieces.
