CORNERED AGAIN
I’m still doodling on the Stupid Cupid sampler, having fun with some of the larger strip designs that will be in The Second Carolingian Modelbook.
As usual, I’ve leapt off into the deep end with no particular plan. I know that some people hyperventilate unless they have drafted out every stitch of a piece or are working from a fully graphed kit, but I have more fun improvising as I go. I have learned to leave myself as many options as possible as I work, so that I don’t “paint myself into a corner.” I’ll try to explain…
Ground Prep
The first thing I did was standard prep. I like to hand-hem all four sides of my ground cloth, cutting off any skew-to-weave edges before I hem. I also lay down minimal guidance lines. At the minimum I will use a light color/barely visible standard sewing thread to baste a line of demarcation across both the horizontal and vertical center lines of the piece. Sometimes I also add a perimeter line, measured from the cloth’s edge, to mark the edge of the area to be worked. I don’t count the threads I go over as a baste (the basting stitches are not uniform in length), but they do follow the weave exactly. This gives me a nice, stable piece to work on, with pre-defined center points and stitching boundaries.
Thread Selection
I pick a thread color (or colors) that work well with my ground. If multiples, I try to pick colors from stash that are in quantities that would allow me to make my selection on the fly, rather than limiting what can be done to fit what’s on hand. Depending on the size of my piece, the fragility of the threads to be used and whim, I drag out either my flat scrolling frame or my sit-upon round frame. In this case, I picked the green DMC floss (#890) I had left over from my tablecloth, to coordinate with the natural light brown of my linen.
Design Selection and Placement
Then I begin thumbing through my design notebooks and collections. Sometimes as I prep my ground, an idea of what to do is already forming. If it does, I may add some additional guidance lines to help reserve areas for words, or to further subdivide the available area – but to date I have never laid down a grid over the entire piece, nor have I ever outlined specific counted-out areas in which to place particular strips/fills/motifs. Others may wish to do those things, but I don’t find it necessary.
Once I find my first pattern, I decide where on the cloth I want it to go (top, bottom, centered, offset from the center a bit), find that design’s calculated or motif-visual center, and start. I always begin at one of my center lines and work from there.
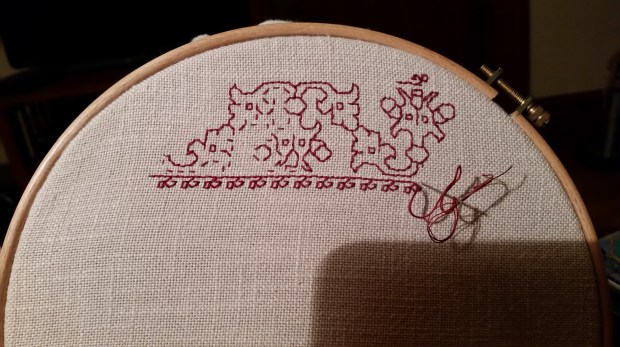
Here’s the current piece at this stage of work.

You can barely see the pale blue threads that mark my centers and my margins. That “tail” hanging off the bottom of the piece is part of one. They don’t live long. I never stitch over them. As I encroach upon my marking lines, I pick them out and snip the about-to-be-crossed bits out.
At the point above, I hadn’t decided on what to put north and south of this bit. I hadn’t even decided up and down because this design is north/south symmetrical. And I wasn’t thinking yet of any framing mechanism. But that didn’t last long.

As you can see in the bit above, I decided on a second strip, and decided to separate them with a narrow barred border, stolen from the stems of the first pattern. I began adding the bars north and south, but not knowing what was coming next, or in fact where the roly-poly cupid/cockatrice bar would end relative to the first strip, held off adding them to the left and right.
And here I found my first problem. I had aligned the center of the vase between the first cupid and the cockatrice with the center of the symmetrical strip, above. But I didn’t notice that the areas bearing the figure and the creature were not of equal width. Because the cupid’s alcove is wider than the cockatrice’s, the left and right ends of that strip did not end neatly aligned to the area already worked.
What to do?
Ignore it and keep going.
So I did. I added the third major strip, the cupid/lion/fleeing boxer/dolphin panel. It’s a VERY wide repeat, with no exact center, but I aligned the visual center of the featured cupid with the already established center line.

Again, the design repeats, but the counts are not exact, so worked my piece left and right to a “good stopping point.” As I did so, I noted that the bottom strip would probably be the widest, so I added the bars left and right to finish out the frame around that section.

I then continued the bar north from the surround of the bottom strip. And encountered the second challenge. How to deal with the empty area to the left of the center strip?
I thought about several possibilities including finding a one-word motto to stitch vertically; continuing with the center strip design to fill out the area; or making this bug into a design feature. I chose the lattermost.
At the bottom left of the photo below you can see it. I continued my outer bar north, but added a second one, that defined a narrow strip. Then I improvised a standard acorn meander. I didn’t even bother to draw it out. I just found my center point, replicated an acorn from the top strip, and stitch-doodled up the linkage.

Then I took a stand-back look and decided that I didn’t want to add more strips to this piece. But a deeper, coordinating yet frilly outer companion border would work. So I flipped through my to-be T2CM collection and picked one out. I started in the north/south center of the left edge and stitched it until I got to the corner, then rounded the corner and continued on, spacing the edge of the first plume on the top roughly equally far away from the exact corner point as the bulk of the foliage on the left.
This time to fill in the empty space between my top stitched band and the newly established border(s), I decided to eke out the existing design. That’s what I have on-the-needle in the photo above.
Purists will note that I am using Heresy Stitch for the baseline of my frilly plumed border, rather than sticking to strict double running. I’m going back and adding a narrow border, using Heresy I can move along faster with minimal re-setting of my hoop.
Challenges yet to come….
- How will the plume border butt up against the three corners to come? Will I be able to round them as gracefully as this one?
- Will I go back and engineer some sort of corner treatment for the point of the plume border after I get all four done? Will I be able to use the same one for all four?
- The center strip is short on the right-hand edge, too – but not as short as on the left. Will I have room to add another supplemental bar and narrow border there? Will I do something else?
- Where will I sign and date this thing?
Now these burning issues may not seem like the epitome of suspense in your world. But in mine, they are fraught with danger and excitement.
FRAMED!
At long last. Framed and hung up in the bedroom.

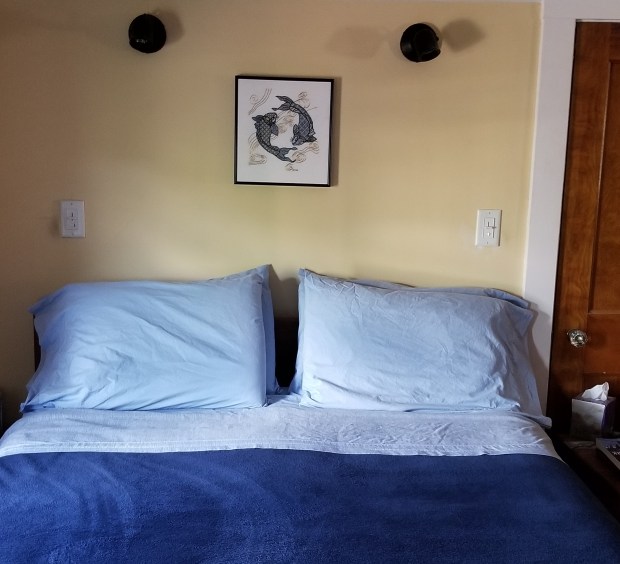
Obviously I now have to paint the bedroom walls…
I’m quite happy with the way this turned out. The frame is simple enameled steel, in deep navy. I ended up going to Walden Framer in Lexington, MA. Mr. Ed Pioli, the owner and artisan in chief, did an excellent job at a reasonable price. I will be bringing my other as-yet unframed pieces there, too.
To answer more questions on the piece’s composition, mostly from other people outside the framing shop when I was there. No, neither of us is a follower of astrology, and it’s not a panel depicting anyone’s sign. It’s just two koi, in a traditional arrangement. And no – there isn’t a boy-koi, and a girl-koi (or any other manifestation of yin/yang) intended. It’s just two koi swimming in a circle. And no, that’s not real gold thread. It’s high quality imitation gold sold for Japanese embroidery. And no, I didn’t sew it on a machine, I did it by hand. Really and truly. (People are curious about the strangest things.)
What am I working on now? Well, the Great Tablecloth/Napkins project is done, but I still itch to stitch. So I’m just doodling. Filling up a small piece of linen, waiting for the Inspiration Fairy to chuck a brick through my mental window.
I’ve written about this design before. I think this time I’ll circle the center panel with other, narrower bands. Again, no set plan, I’ll just pick them as I go along, with no composition agenda in particular in mind. Eventually I’ll figure out what to stitch next.
UPDATE
It’s taken me a week or so to get this post up and out. In the mean time my doodle has grown, but still has no plan.
The lower design is a curious one. Although it’s a clear repeat with the rather bulbous naked cherub alternating with the cockatrice, there is little symmetrical inside the repeat. Close attention has to be paid to this one because even the internal framing mechanism (the bar and beads below the feet of each) has a different counts in each of its two instances, and the usual urn or leafy unit between the creatures also exists in two incarnations. It’s a curious one, for sure, but fun, and is keeping me on my toes.
Both of these designs will be in T2CM, which is moving again towards release. No date yet, but watch this space.
ANOTHER ENDING
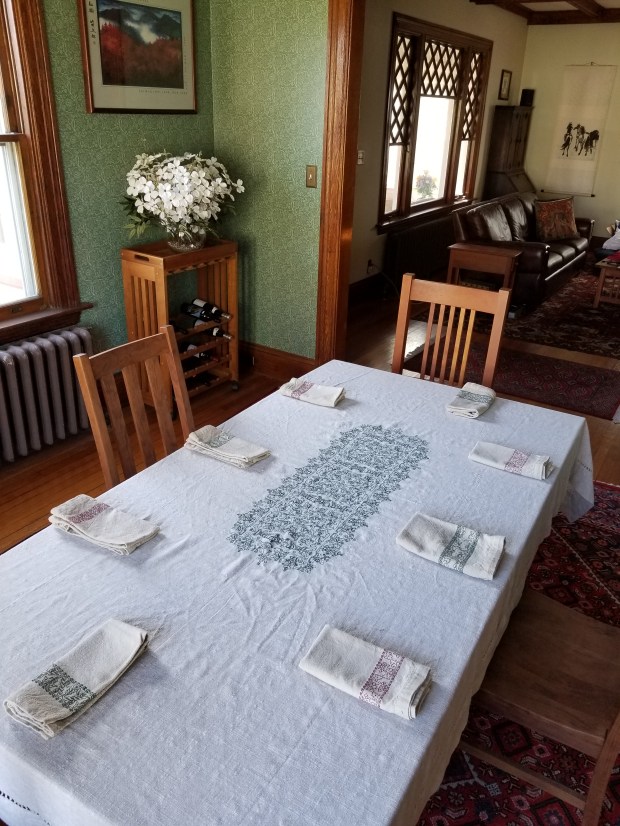
Within a general miasma of the-project-is-over-what’s-next blues I present the tablecloth and napkins set:
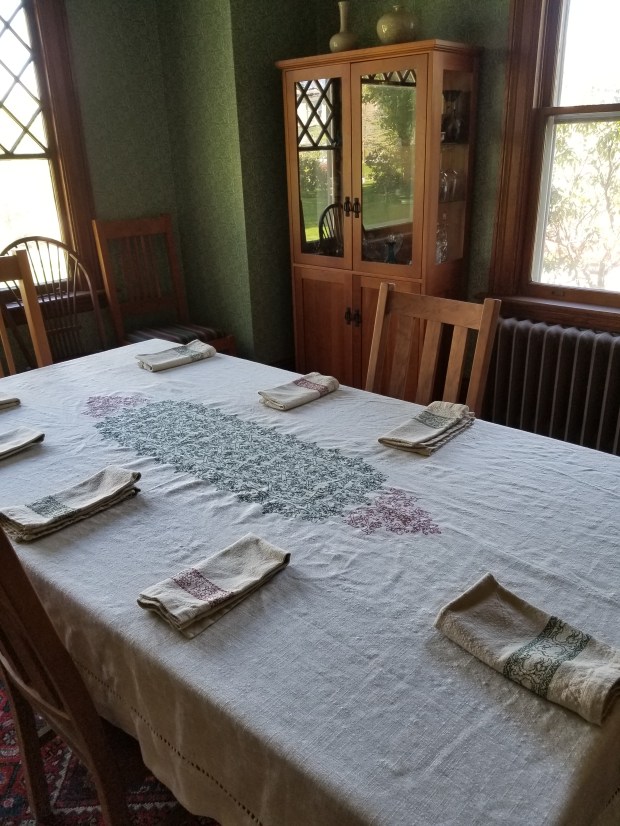
Yes, I will iron the thing before I set a formal table with it, but there’s no point in doing it right now.

I left the areas close to the place settings bare so that in the absolute eventual occurrence of gravy spills, it will be easier to treat the stains.

Special thanks to Elder Daughter for these shots. She’s much better at general camera, even cellphone camera than I am.

Now.
What’s next…
I feel the need to keep stitching. If I can find my stash of green silk I may go back to my Long Green Sampler. But I put it away in a Safe Place; that classic Safe Place that is now out of memory. While I keep hunting for it I might do a quickie, improvised project, then turn it into something useful, like a carry bag or zippered pouches. So many patterns to try out, and so little wall space at this point.
Now in summary and project post-mortem.
I started by buying a plain pre-finished cloth and separate set of napkins from Wayfair.com. I wanted a “rustic linen look” and intended to use them as-is. But when they arrived I noted that the thread counts on both were close enough to even weave to be usefully stitched, slubs and all. I used a mix of threads – a red Sajou embroidery floss #2409, and DMC 890 green floss for the napkins; and (having run out of my souvenir Sajou) DMC 815 on the tablecloth. For the various flosses, I used three plies of both kinds, even though the Sajou was marginally thinner than the DMC.
I started with the napkins, doing one at a time, half red and half green, for no other reason than I thought it would be fun:

The designs are primarily from my ever-forthcoming Second Carolingian Modelbook. After the napkins were done, I wanted to make a coordinating cloth, similarly mismatched in the same two colors.
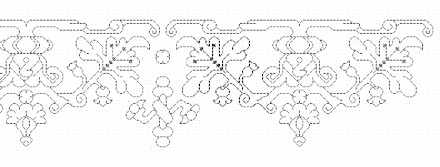
I started with the center panel design which I graphed up, also for T2CM, from an artifact in the collection of the University of Rhode Island. While it is voided here in the photo provided to me by Christine Lee Callaghan (SCA – Lady Cristina Volpina), I chose to work it outline-only for this piece.
Riffing on the motifs in the historical artifact, I designed a companion edging and end-triangles to complement. Those designs aren’t in T2CM, but as soon as it is released, I will post them here.
All in all, I am quite pleased with the result. Now to figure out what to stitch next, because I find stitching more relaxing than knitting, and the need to stitch is still upon me.
TABLECLOTH MILESTONE!
I have finished the center panel of my mismatched-napkin-accompanying tablecloth.
And on the table with the doodle napkins:
Now comes the hard part. I want to add some red to the cloth, to coordinate better with the napkins. I don’t want to stitch on the pre-hemmed “skirt” part of the cloth that hangs down from the table. Not only is the fake Italian hem quite deep and double thickness, but also I want the embellishments to show on the table top, and not be obscured by place settings. There are a couple of possibilities here.
- Subsidiary motifs “north and south” of the main panel:

2. Subsidiary motifs in the corners:

3. Another border, concentric to the main panel:

Not sure yet, but itching to design it and stitch it up, whatever it might be.
UPDATE:
Why stick to original thoughts? This is what I’ve settled on for now. At least until I get enough done to let me see whether I like it or not.


FINAL FUDGING
I’m pretty far along with the tablecloth now, having completed the center panels, and most of the edging top and bottom. Now time to plan out the edging on the two narrow ends, left and right.

Being a bungee-jump stitcher, when I improvised the companion edging I did not bother to consider how wide it would have to be to repeat evenly across. I just went for it, figuring that because I started at the center, each corner would end more or less in the same place.
And when I got to the corners, lo and behold! They are spot on. Here are the three that are done, the other one is still in the frame.


Perfect alignment.
So I’ve taken my border, looked at what’s been stitched, aligned the center of the border with the center of the main motif (and adjusted because the center in this case is a block unit, not a single stitch), and doodled up a juncture.

I’ve taken some liberties, joining the main motif to the side border – not a historically accurate practice – but since I am not making a historically accurate reproduction, why not? Also note the center. I’ve elongated the wrapped scepter motif used elsewhere in both the main and companion designs. We will see if I like it when it’s stitched up.
What’s after this?
I’m still thinking of adding secondary smaller medallions at either end of the cloth, in red. Another design, probably, but I have to either find or think one up that plays well with the established stitching.
TRY, TRY AGAIN
Back from the drawing board. I plan to try this version out tonight. (Quick and dirty plot, not neatened up for general consumption).
You can see how it is wider, more open, and looser than the last version, below

Both are original compositions, incorporating and adapting motif bits from the main design, but they have very different movement and feeling.
My fellow bungee-jump stitchers, note that I also decided that aside from centering the companion border’s repeat on the midpoint of the established work, I am totally unconcerned with how the longitudinal counts of the two interact. This border will not end “neatly” at a corner. I will have to improvise something on the fly when I get there, so Off-the-Cuff Design Fun hasn’t officially ended yet.
I can sense the rising collective gasps of horror from the mass of people who prefer the entire project to be complete and neatly charted prior to being worked on a basted, gridded ground. I understand you and respect your ways, but I enjoy the frisson of danger inherent in my method, and accept that picking out is always a a looming possibility.
And for those of you who want to know what I’m using to create these, here’s a link to my tutorial series for using the free drafting program GIMP to set up and work charted designs. I’m afraid that due to the vagaries of blogging software indexing, the lessons are in reverse order. Go all the way to the bottom of the page, and start with the entry,
“Squares!”
Stay tuned for results of this experiment. At the worst, it’s picking out, and back to the drawing board. Again.
UPDATE
Its a keeper!
Now on to finish out the leftmost repeat, add the one on the right, and add the now-established edging. Also to noodle out how to treat the corners… Adventures in needlework, for sure!
TABLECLOTH PROGRESS, FORWARD AND BACK
On to the tablecloth!
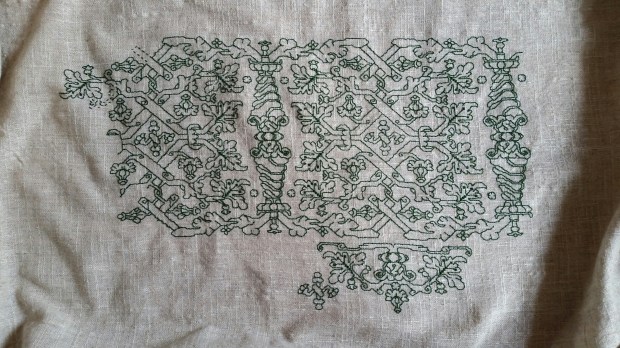
Here’s one full repeat of the pattern I am using for the main lozenge in the center. It’s one of the largest I’ve found. Not the longest – several of the narrower strips beat it there, but certainly with length and width taken together the one with the largest area north/south plus east/west.

I am in the process of adding another panel of the main design (the section between the “ice cream cones”) left and right of what you see here. Possibly two. We’ll see how I feel about proportions after I’ve finished the initial center set.
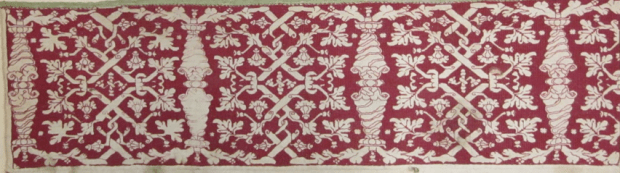
And I decided to draft my own companion border for this panel, after looking through and discarding others in my collections. While coordinating borders are less common compared to ones that have absolutely no relation to the design elements in the main panel accompanied, they do exist. Here’s an example (Metropolitan Museum of Art, Accession 79.1.14):

I doodled up a couple of possibilities. One didn’t make it off the drawing board. The second I was more pleased with, and began trying it out:

But once it began to make the transition from paper to stitching, I decided I didn’t like the way it was turning out. It’s too tight, dark, and linear. Plus I don’t like the proportions against the main pattern.
So I will pick out this little bit of companion border, and go back to the drawing board. The goal is something lighter, looser, with more white space. And wider – probably twice the width of what I had doodled up before.
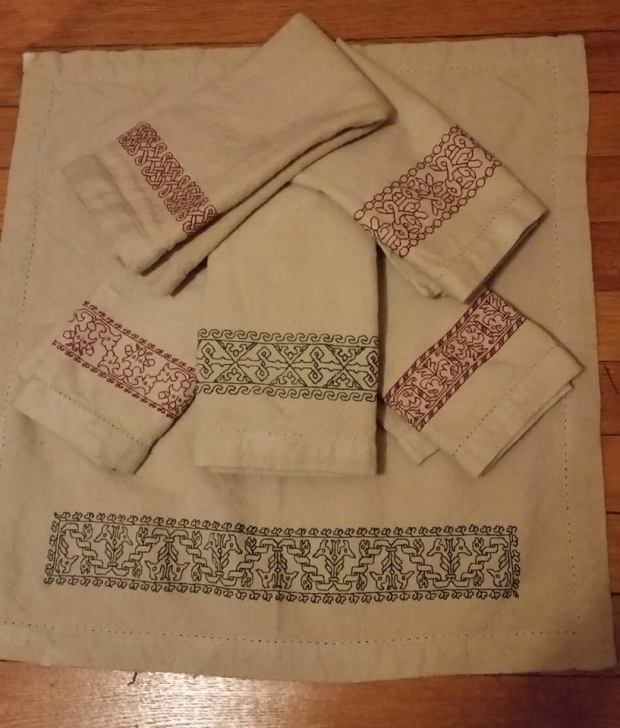
EIGHT IS ENOUGH. ALMOST.
My doodle napkins. All eight complete.

Overall, I’m quite pleased. They were each individually fun and quick to stitch. I did not agonize over them (although there are no mistakes). Napkins are transient goods, destined for hard use, gravy stains, and wine spills. Therefore I did them “quick and dirty.” I used knots, rather than agonizing about ending off my double running stitch invisibly. I used launder-me DMC and Sajou cotton threads, not silk. And the napkins themselves after shrinking in the machine, sometimes through multiple washes, are all slightly different sizes, with almost a full inch of width/length difference between the smallest and the largest. Frankly, I don’t care – they will all serve their purpose quite well.
This shot is for Anne, who asked to see how I was wrapping the borders around the corners of the main motifs:
I’m not going back and adding a secondary border to the first one I did. Or at least today I’m not thinking about doing it. The others were exercises in educated fudging. I was thrilled that the border on the last one (lowest green one on the right) worked out perfectly, both horizontally and vertically, to make four neat and symmetrical corners. That was serendipity, not planning.
Now on to the tablecloth. This one is going to be a challenge. I’m using my sit-on hoop, with the bulk of the cloth gathered up and stuffed into a pillowcase that sits on my lap behind the hoop while I stitch. Not optimally comfortable, but necessary to keep the thing quasi-clean while I work. The cloth itself as a ground is not as easy to count or as forgiving as were the napkins. The threads are quite spindly and rather slubby, but I’m managing.

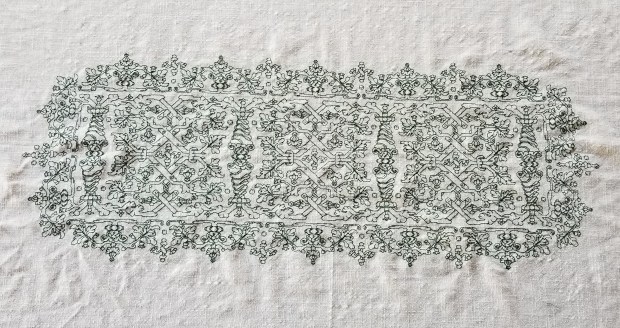
The design, like those on the napkins, is from my ever-forthcoming Second Carolingian Modelbook. This one in particular is a challenge. What you see here is less than an EIGHTH of the total repeat. This pattern is the largest all-over I have encountered. The artifact I charted it from (below) showed it in voided form, with the background filled by a heavily overstitched and meshy effect ground. I am only working the foreground in double running. Time is too short and tablecloth-hazard too likely for me to invest months in the very labor-intense original treatment of the background.
Special thanks to Christine Lee Callaghan (SCA – Lady Cristina Volpina), who unearthed the artifact from the collections of the University of Rhode Island, and provided spectacular photos of it to me, a byproduct of her own academic research. The image below is hers, appearing here by permission
© 2014, Christine Lee Callaghan, of University of Rhode Island Accession Number 2003.12.286
THE DOODLE NAPKIN PROJECT
A few of you have asked about the doodle napkins – a set of eight, all coordinating, but each one different. With six now stitched and number seven on my frame, I attempt to answer.
A while back I wrote about the pre-finished napkins and tablecloth I bought from Wayfair. While I note that neither the KAF Fete napkin set nor the Toscana tablecloth is still in their inventory, there are several similar products available from them and from Target, Overstock, Amazon and other sources.
Be warned! Prewashing these is an absolute necessity. They are linen-look cotton, or linen/cotton blends, and can be expected to shrink appreciably. So toss them in a nice, abusive load – like a hot wash with some other light color towels or sheets, and have at it. Compare them when they emerge, and if some are not quite as shrunken as the others (as happened to me) run them through again just to be sure.
My almost even weave napkins firmed up quite a bit, becoming even closer to a true even weave count, which was a surprise. But I didn’t change my plans for all of that. I always intended to work my stitching along one edge only, eliminating the need to turn corners, or worry about skew counts. I’d present them at table as shown, folded in quarters.
Now. How to begin…
First, I had to have designs. Simple for me. I am drawing mostly from my forever forthcoming The Second Carolingian Modelbook, playtesting more of the designs, and using the experience to flog myself towards getting over the hurdle of publication. I’m working directly from those pages, and am not bothering to rechart anything specifically for this use. Not even the narrow companion borders (more on this below).
I am also being quite cavalier with layout on the napkins. They are pre-hemmed. I am trying to use the same north/south orientation for all of them, keying off the placement of the brand tag on the back, but I am examining the two candidate ends closely, to pick the one that is the most “true”. By that I mean the one whose hemming runs closest to being true on the count. There are a couple of napkins that are hemmed slightly skew, and I wanted to make the stitching on them look to run as parallel as possible to the edges.
OK. With my chosen side to embellish identified, I folded the napkin carefully in half, and used a pin to mark the center point. Then I measured in from the inner edge of the machine-stitched hemming detail, and placed another pin perpendicular to the first. I admit I eyeballed the first one, then just used it as the paradigm for placing the second pin on the subsequent napkins (no actual measuring tape was involved). Pin placement is shown below, with the napkin mounted on my sit-on hoop.

Once the center point and work boundary are established I begin. That’s it. No basting guide lines, no other prep. Just grabbing my threads and going. I admit that others may enjoy working with basted guidelines, but for something this small, where the only point of reference is the center, I don’t bother. Feel free to castigate me for lazy prep.
Threads… Hmm. Which did I use?

The red was easy. When we were in Paris, I bought a box of Sajou four-strand cotton embroidery floss in red. I had always intended on using it for a set of napkins. I had bought linen there, too, but decided that I wanted to use that linen for other pieces that would be less “endangered” by gravy than dinner napkins.
The Sajou Retors du Nord cotton floss is put up on cards of 20 meters. I am using a red, #2409. I started with a box of five cards, and have used about half of my yardage on just the four napkins. For the green napkins, I’m using plain old DMC cotton six-strand floss in #890, in standard pull skeins of 8.7 yards (just shy of 8 meters). I am stitching with three plies of each thread, even though the Sajou is a tiny bit thinner than the DMC. I am enjoying using the Sajou because it is finer, shinier, and smoother, but I am simultaneously disappointed in the maker’s quality control. Each of the three Sajou cards I have used so far has had component plies with knots, shredded sections, or snags – where the individual plies are kinked and not all of the same length in a given span of thread. While the DMC thread is more matte and a bit rougher in finish, in over 50 years of using it, I have never run into a less-than-perfect skein. It’s possible that I bought a box of Sajou made on a bad day, but three out of three cards with faults is not what I expected.
OK. The thread is ready, I’ve got my main design in hand, I’ve got the napkin mounted on my frame, with the center point and top limit of my design marked. Now what?

Starting at the center (red arrow above on Napkin #7, showing the point indicated by the now removed pins), I begin playing with one of the narrow edgings – usually something less than four units tall. I pick one from the book, or I make on up on the spur of the moment. In this case, I’m using a pretzel edging of my own devising, also in T2CM.
Using a separate thread for the companion edging, I work three or four repeats off in one direction – usually to the left (for no reason in particular), then I move the working thread out of the way (sometimes winding the excess on a temporary pin), and using another thread, begin my main motif strip – also working out from the center, stitching over a 2×2 thread grid. In the example above, the weird double leaf meander. The threads trail off at the upper left because I don’t want to re-position my hoop until I absolutely have to. Once I move it over, I’ll take each of those stragglers up in turn, and use it to completion.
After I’ve gotten a bit laid down, I re-evaluate the narrow companion border. If I don’t like it, I pick it out and work another of the same width. Once I’m happy with it I also work it below the main motif. It’s obvious in the photo above, that I tried out the pretzels, liked them, and went on to stitch up my first length of thread in the strip of it above the main motif, and am now working on its sibling, below.
After I’ve gotten my design established continue on, happily, working my main motif, and eking out the companion borders as I go along but lagging a bit behind, until I’ve stitched the main motif close enough to the end. Once a full repeat of my main motif is on the fabric, I rarely refer to the printed pattern again, working instead from the already-stitched bit.
When I get to the leftmost edge, I take up the companion borders again and improvise a corner turn for them. If I’ve kept count true the upper left and lower right corners should be matches, as should the lower left and upper right. Or if I’m very lucky, all four will match. Or if my improvised corner is looking awkward, I’ll just butt the ends. In any case, I am not agonizing about the corner treatment. I’ve seen enough period artifacts where it’s clear that the historical stitcher didn’t invest much agony in them either. (When I’m done with all eight napkins, I’ll post on improvising the corners, because this note is getting too long.)
As to which patterns to do on the next napkin, or what to use on the coordinating tablecloth – it’s all whim. For the tablecloth, I will probably pick one or more of the largest all-over designs from my books, either to work as a large rectangular medallion in the center or three evenly spaced smaller areas, but I won’t be working strips around the entire perimeter, nor will I be working stripes across the whole width of the table. And that’s the only advance planning I’ve done so far.
Stay tuned!
MUDDLING THROUGH MIDWINTER
It’s doldrums here at String Central. Younger Daughter is back to university. Others are back to work. I fill my time with nosing around for grant and proposal contract assignments, and my various projects.
First, my sanity project – the doodled decoration on the pre-finished napkins I bought on sale from Wayfair, using the cotton four-ply embroidery floss I picked up when we visited Sajou in Paris (stitching with three plies). I can show a modicum of progress. I’m just picking out random designs from my books and doing them rather informally, with a different design along a single edge of each of eight napkins. The first of my mismatched set is complete. The second in process.
The linen is soft and once washed, a bit mushy. That makes count work a bit more troublesome than it otherwise would be, especially on so coarse a ground. But it’s still rather quick work. The first napkin with the interlace took three evenings (about half shown). The in process photo shows only one evening’s worth of work.

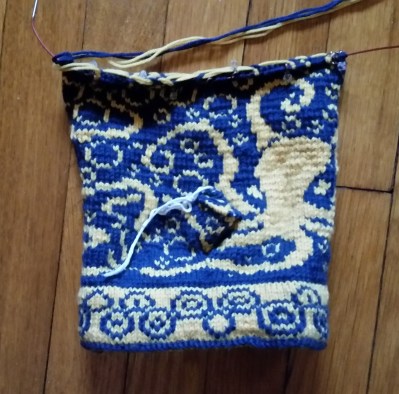
On to knitting. I finished a pair of socks, packed up and sent to the recipient before I remembered to take a photo. They were my “briefcase project” – the thing I always have with me to work on while I wait on telephone hold, on line at the post office, or for appointments. Since I ALWAYS have a pair on the needles, the next pair is already cast on and sitting it its bag, itself waiting for me to be waiting. This pair however is special. Younger Daughter picked out this yarn with the proviso that I knit something for myself with it. I comply.

And my project of long suffering guilt. I promised these Octopus Mittens to my niece late last winter. It was inadvertently destroyed, then was re-started with new yarn, and is now sitting next to my project chair, chiding me that it is being neglected. I plead laziness, lack of inspiration, and frustration with stranding using two strands of DK, knit at sock yarn gauge for warmth.
I MUST finish these. I promised.
How do you flog yourself back into working on a sidelined project? All suggestions gratefully accepted.
Oh, And if you know of anyone looking for a project manager/writer/editor specializing in high tech grants and proposals – send them my way, please.
