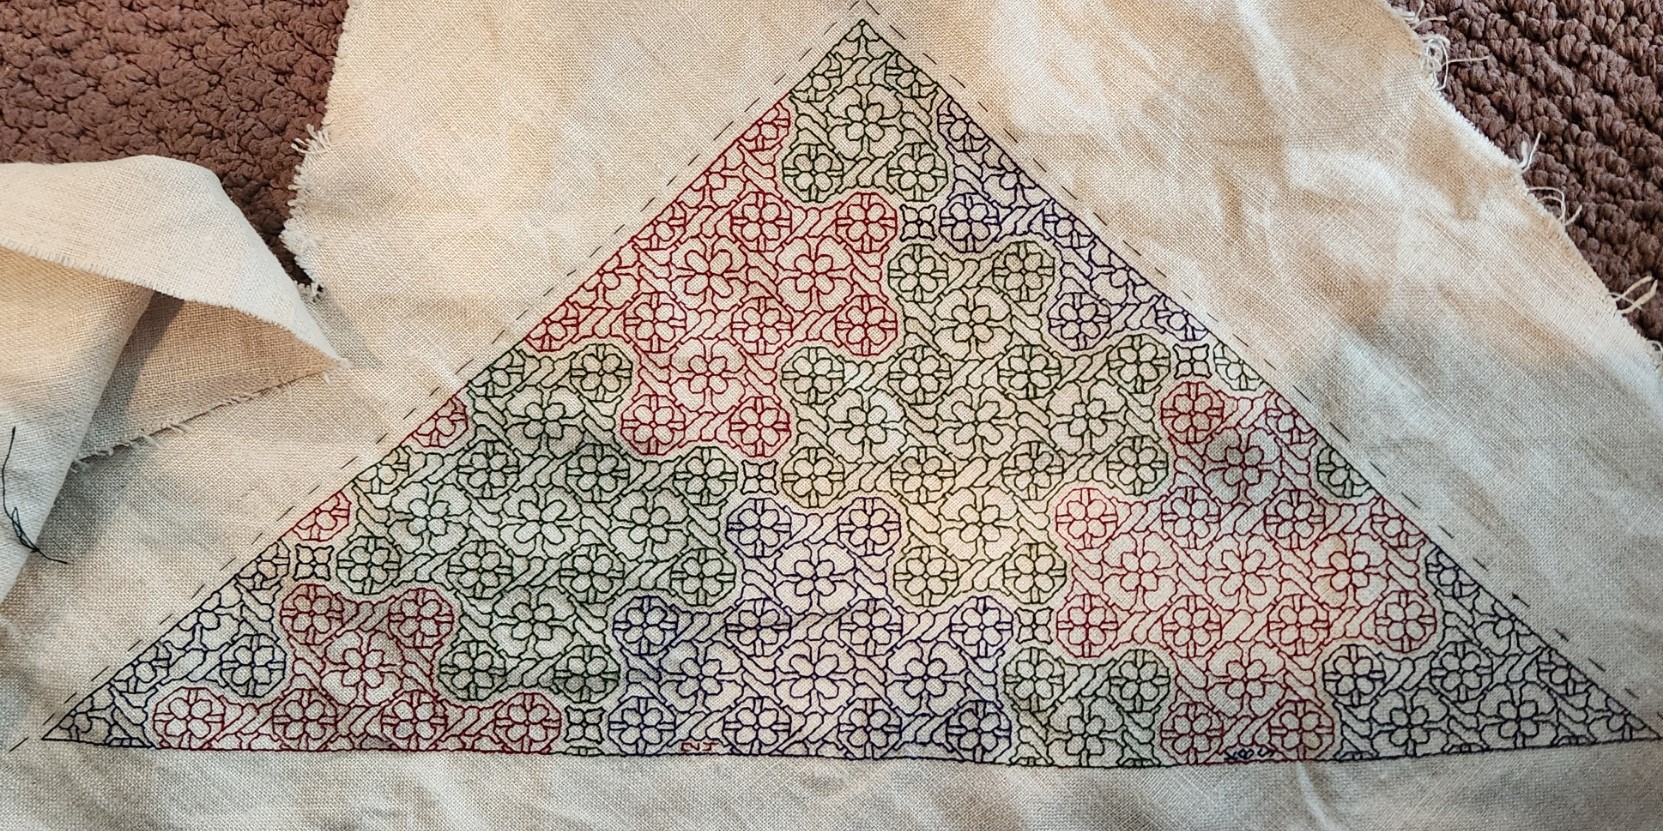
MINI-SAMPLER PROGRESS
Munching along on my portable summer project, sized and scoped for on-the-go production. I’ve completed the first band and have started on the second.

Both of these original designs will be in Ensamplario Atlantio Volume III. As will (in all probability) the others I use on this thing.
Yes, I’ve chosen a second color – this piece will be in black and deep green. There’s a reason for that which I will reveal in the fullness of time. I’ve also chosen a motto for it – again for a specific reason that I will describe when appropriate.
I had begun this in part as a test of the single ply of Sulky 30 on this ground. While the thread is performing well in terms of ease of stitching, I’m not entirely happy with it. It’s too thin and weedy for best presentation, and two plies would have been overly massive. Here’s a discussion of thread thickness and grounds that will help you understand why I am less than pleased.
How big will this entire piece be? It’s a second-hand store piece of hand-hemstitched linen, a bit more rectangular than but about the same size as a dinner napkin.

You can see here how I tease out my guidelines as I progress, so that I never stitch over them. I know people who do full coverage cross stitch sometimes don’t bother to remove them, but since my style includes so much “white space” I find it better to never encroach on the lines. That makes picking out easier. For the record, I baste with some ancient 100% cotton machine sewing thread from my grandmother’s stash. It’s too fragile to use for structural sewing, but being non-crocking and very smooth, is extremely easy to pull out cleanly.
You can also see that I start in the middle. I worked the dragon strip right, to the guideline at the right edge. Then I filled in the top companion border to end to mate up with the line established by the dragon strip. After that I did dragon to the left, finishing up at the same point already established at the right edge. Since the strip is symmetrical, it terminates at the same distance from the hem on both sides of the work. Again the companion (non-symmetrical) narrow edging at the top was worked to the same point. Now that I have my edges established, I will work all subsequent rows aligned to the first one, using my basted center line for guidance, and finish them left and right in line with the previous work. Really and truly, this is MUCH easier to do than some folks think. Plus working this way does NOT require drafting up the entire strip to fit the available area. The only thing I WILL be drafting out custom will be the motto, so that I can determine its center. Since it will be narrower than the stitching area, I may go back to the doodle board and figure out what I can use to eke out that row left and right. Or maybe not. Another narrow strip after this one, and then we’ll find out…
LOWERY STAND HACK
In one of those “this never happens” moments, I ran across a Lowery stand being offered on my local freecycle exchange. Of course I leapt on the opportunity. Although I have one I now have a second to use in another room, or to leave at our Cape hideaway, so I have less to schlep when we visit.
This one is a bit older than the one I bought several years ago. It came with two attachments – a plastic tray in daisy form meant to hold stitchers’ oddments, and a bar with a pincushion, plus a crosspiece of unknown purpose. I took off the tray because it was very awkward and space-inefficient.
Some digging led me to the answer for the crosspiece bar – originally it held a plastic comb-like attachment, over which waiting threads were to be draped. But this re-homed stand has seen some hard use, and the plastic comb insert was long gone. And for me – not missed. I generally do monochrome or limited color set pieces, and have no need for an extra set of fingers to hold my rainbow of threads.

But the crossbar did suggest something to me. I have always wanted to display a design page alongside my work. Using my big scrolling frame mounted on the Lowery large frame extension, this wasn’t a problem. I could easily affix a page to my working surface or to a little magnet mounted on the end of the frame’s stretcher bars, using a magnetic needle minder. But if I plan on employing the Lowery to hold a smaller hoop, there isn’t enough real estate for that.
I have a flat metal magnet board of the type commonly sold for stitching. But the angle and aperture of the crossbar’s slit were wrong. The board didn’t sit well, nor was it at a useful angle. And it wobbled in the stand. So I went looking for something that might help.
More serendipity. This is the plastic “zipper style” cutting slider strip that comes with large boxes of Stretch-Tite brand plastic wrap. I find them pretty useless for their intended function, but being a packrat, I tend to keep the slider bar in the drawer with the box of wrap until the wrap is used up and the box is consigned to recycling. Here you see it clipped onto the leading edge of the crossbar. I haven’t pushed it all the way on so you can see how they engage.

Obviously I will eventually cut the plastic to length and discard the blue thumb slider. But here is the magnet bar, mounted behind the now-thicker/plastic covered front edge of the crossbar, wedged between it and the crossbar’s back. Nice and secure. At a useful angle, and ready for pattern page deployment.

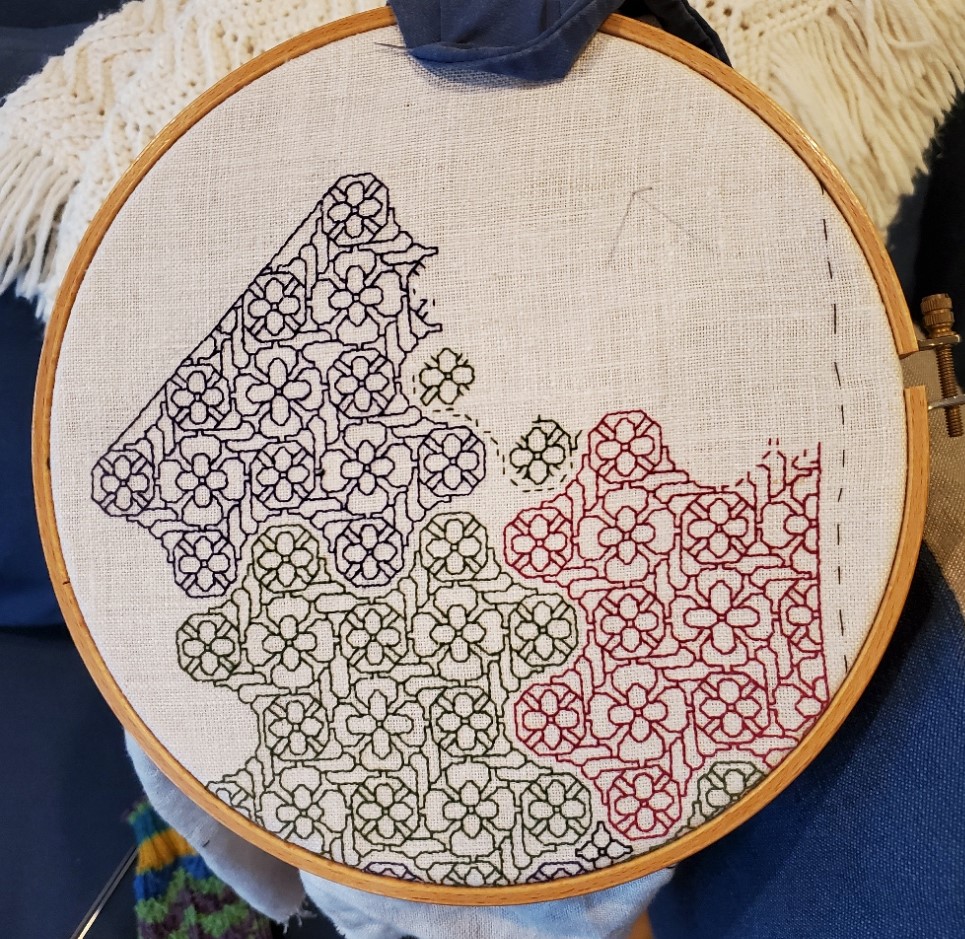
Oh. That thing I’m stitching? A very small piece of linen I rescued from yet another estate sale. It came neatly hand-hemmed. It’s too small even for my hoop-on-a-stick sit-upon, so I had to pull out my hand-hoop for it. It’s exceptionally nice fabric, with evenly spaced, easy to count warp and weft. There’s a couple of minor stains on it, but once it’s stitched they won’t be noticeable. I’m looking forward to working a hoop on my hand-me-down Lowery. It will be a first, since I usually only pull it out for larger pieces.


The count on this is roughly 33.25 threads per inch in each direction (penny count method – 25 threads covered x 1.33). I’m using this doodle piece to test if I like using Sulky 30 as a single, and to beta some of the designs that will be in Ensamplario Atlantio Volume III, which I’m composing right now.
You can see my basted guidelines marking the center, and on two sides, marking about a half-inch in from the edges. That’s all I need. Gridding for this isn’t necessary. I will stitch out from the center to the right edge, and note where in the pattern I am when I reach my edge-mark guideline. Then I’ll go back and stitch to the same point at the right. For the strips symmetrical to a center line that will be the same point left and right. For strips that are centered on a box unit instead of a line, that will be within one box unit further than the iteration on the right (assuming I center the left edge of the central box on my based centerline). And for non-symmetrical or unidirectional borders like the one I’ve established on top, I’ll just work in the general direction left/right but wait until I’ve established an edge with the symmetrical strips, then I’ll “catch up” to them and make the edges even.
Do I have any idea what strips I will be using? What the overall design will be? What motto or word (if any) this will bear? To what use I will put so fully an embroidered small cloth?
Nope.
No clue as to any of those things. But that hasn’t stopped me before. Like I said – this is an experimental doodle, a portable bit of amusement to eke out the summer’s migrations. Not a deathless Project For The Ages, or an incipient family heirloom. Stay tuned to see how this one evolves. If nothing else, it will be a bit of bungee-jump stitching fun.
A BUSY JUNE SO FAR
Who said that retirement would be boring? Wrong, wrong, wrong.
We’ve spent the last month quite busy, buzzing back and forth to the Cape to escape the heat and enjoy the late pre-season quiet of the beach. We’ve kept at the garden I detailed in the last post. So far everything is surviving. Bushes and flowers bloomed and my tiny raised bed garden is beginning to offer up a small, but appreciated harvest of peppers and herbs. The eggplant will catch up eventually. And of course I’ve been doing needlework projects. The chair recover is in hiatus until the fall – too much infrastructure to schlep around, but smaller, portable projects have been thriving.
First up, a stitching finish on a WIP that’s been bopping around since before the Unstitched Coif. This is a forehead cloth, in more modern terms – a kerchief. I had made two some years back, and have loved them to pieces. The stitched body of each is still in perfect shape, but the ties on them have died. Here is the new one, not yet assembled into final, wearable form.
This is a doodle of a pattern that will be in Ensamplario Atlantio Volume III. I’ve been working on that, too and have about 20 plates of new fills. I’m planning on including several pages of larger patterns, strips, and even yokes, too. I am still dithering about including the free patterns that make up my Epic Fandom Stitch Along in it, too. It’s already a wildly anachronistic work, and it might be handy to have all that content in one place. In any case, EnsAtl III is very much a work in progress, and will be out as soon as I can manage it.
Back to this piece. It’s an experiment. I wanted to try out Sulky 30, a spooled thread sold for hand and machine embroidery. I’m working on 32 count linen, and two strands of the Sulky work nicely in terms of coverage and line depth. There are four colors here – an almost-cranberry red, a forest green, a navy blue, and (hard to see) small motifs filling problem spaces, worked in black. There are LOTS of mistakes in this. Places I missed a stitch, or substituted the wrong twist or size center flower, but since this is a quick stitch, meant to be worn to death and not a future heirloom of my house, I didn’t bother to go back and pick them out. I did fix mistakes that would have thrown off the design as a whole, though.
My thoughts on the Sulky? Not my favorite. It’s very hard twist and dense. While that makes a nice, clean line, it does make intersections a bit more difficult to keep even. Plus when picked out, both the blue and the green crock a bit – leaving color residue on the cloth independent of fiber crumbs. I’ll probably use up what I have on things I intend to wash savagely, but I won’t be buying more. The Unstitched Coif project spoiled me. Silk over cotton, any day.
I can’t report on the origin of the ground. It’s a scrap left over from something else. A garment has been cut from it. I did get a pile of linen scraps from someone here in town, via one of the local waste-nothing exchange groups. I’m pretty sure this was one of the pieces. So my guess is that it was yard goods, not custom-sold for needlework. Even so, the count is remarkably even. There’s some slubbing but not overly much, and the thread count is something like 32×33 threads. No selvedge left so I can’t guess about warp vs weft counts.
I am going to investigate narrow twill tape for the ties this time – both for this forehead cloth and to replace the now frayed and ruined ties of the older two. I had used the ground itself, double folded and seamed for the ties on the old one. Better I should use something more densely woven and robust, and that can be easily replaced.
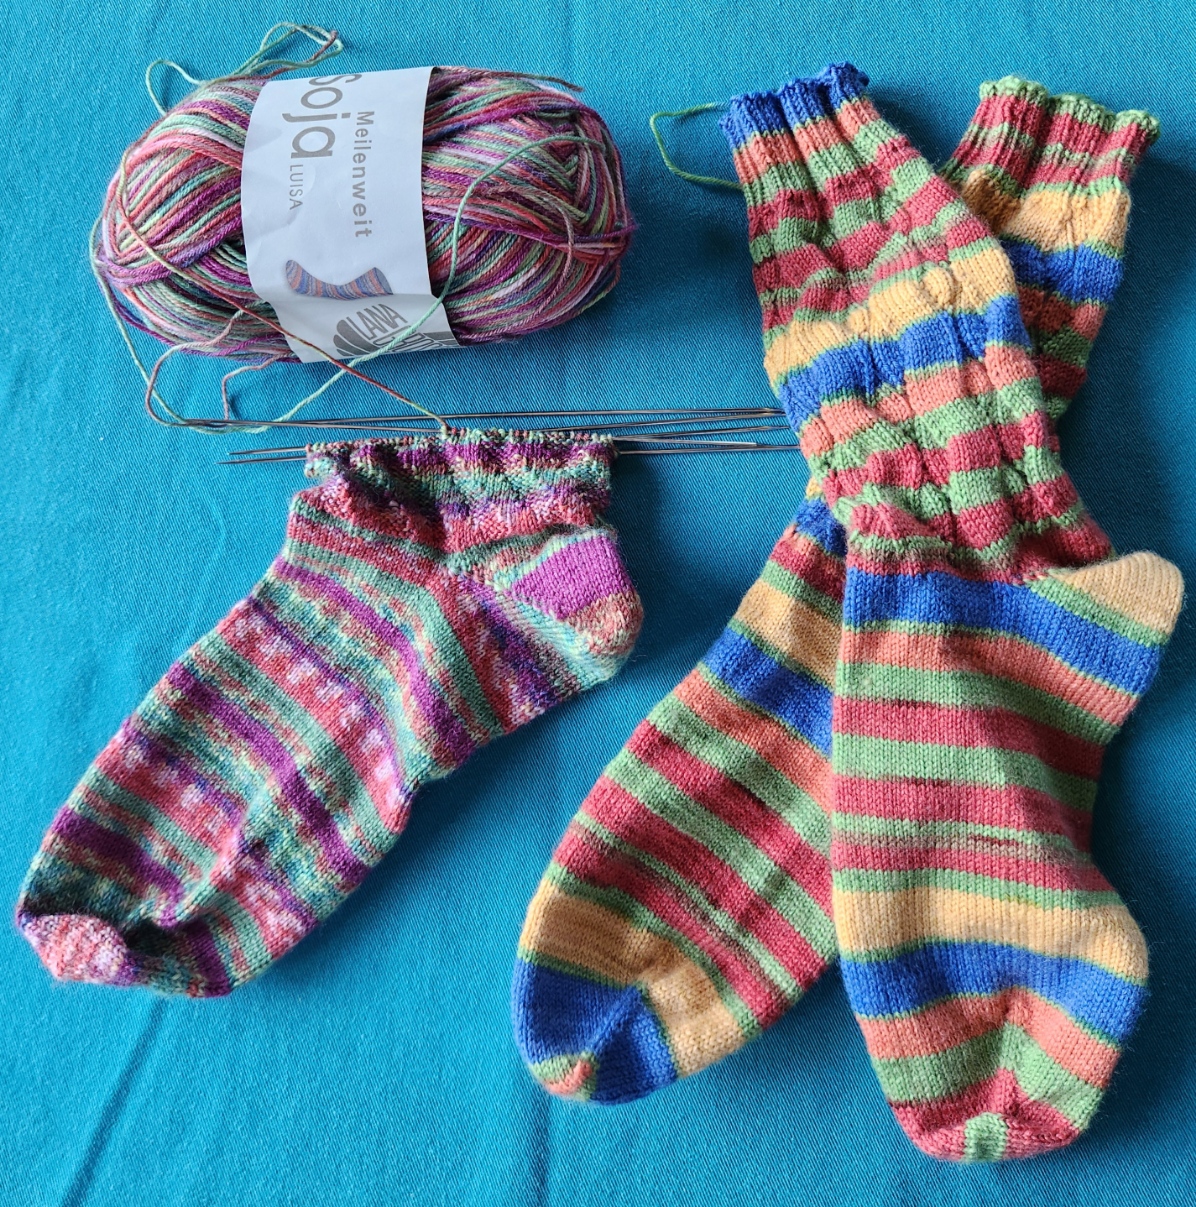
I’ve also been knitting and crocheting. Here are July’s socks. Not sure what made me knit the wide-stripe pair so tightly, but I did. They are the same stitch count around as the other pair, but are significantly narrower. I can wear them (just), but not all of my target audience can. So they will either stay home with me or find a narrow footed new friend with whom to play.
And I’ve been crocheting snowflakes. Not to keep cool but as a probably-the-case present for Elder Spawn, who has moved cross-country. It’s unlikely that we will be able to enjoy the family tree together this year come holiday time. A first for Casa Magnifica. So I have promised to make new snowflakes for what is now Casa Magnifica del Oeste, and ship them plus some of the family ornament stash, to furnish the new tree. I’ve got a half dozen complete. Six more to go, plus pin blocking and stiffening them for best display. Here are the first three, still looking sad and crumpled, right off the hook.
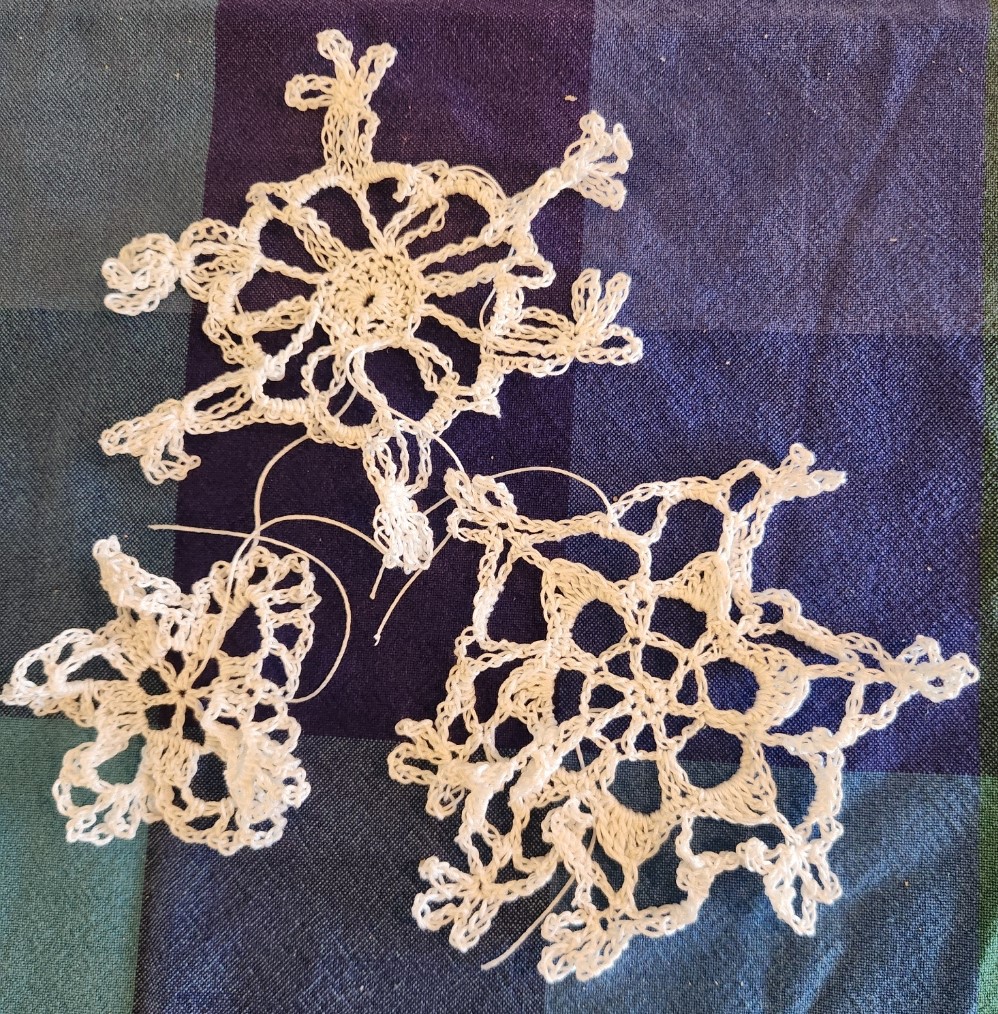
All of these are from this book. I have another one with better patterns. Someplace…

What’s next? Another stitched doodle on a thrifted linen rectangle, possibly to use up some of that black Sulky on a higher count ground. But more on that later this week.
A NEW CLUSTER OF HERESIES
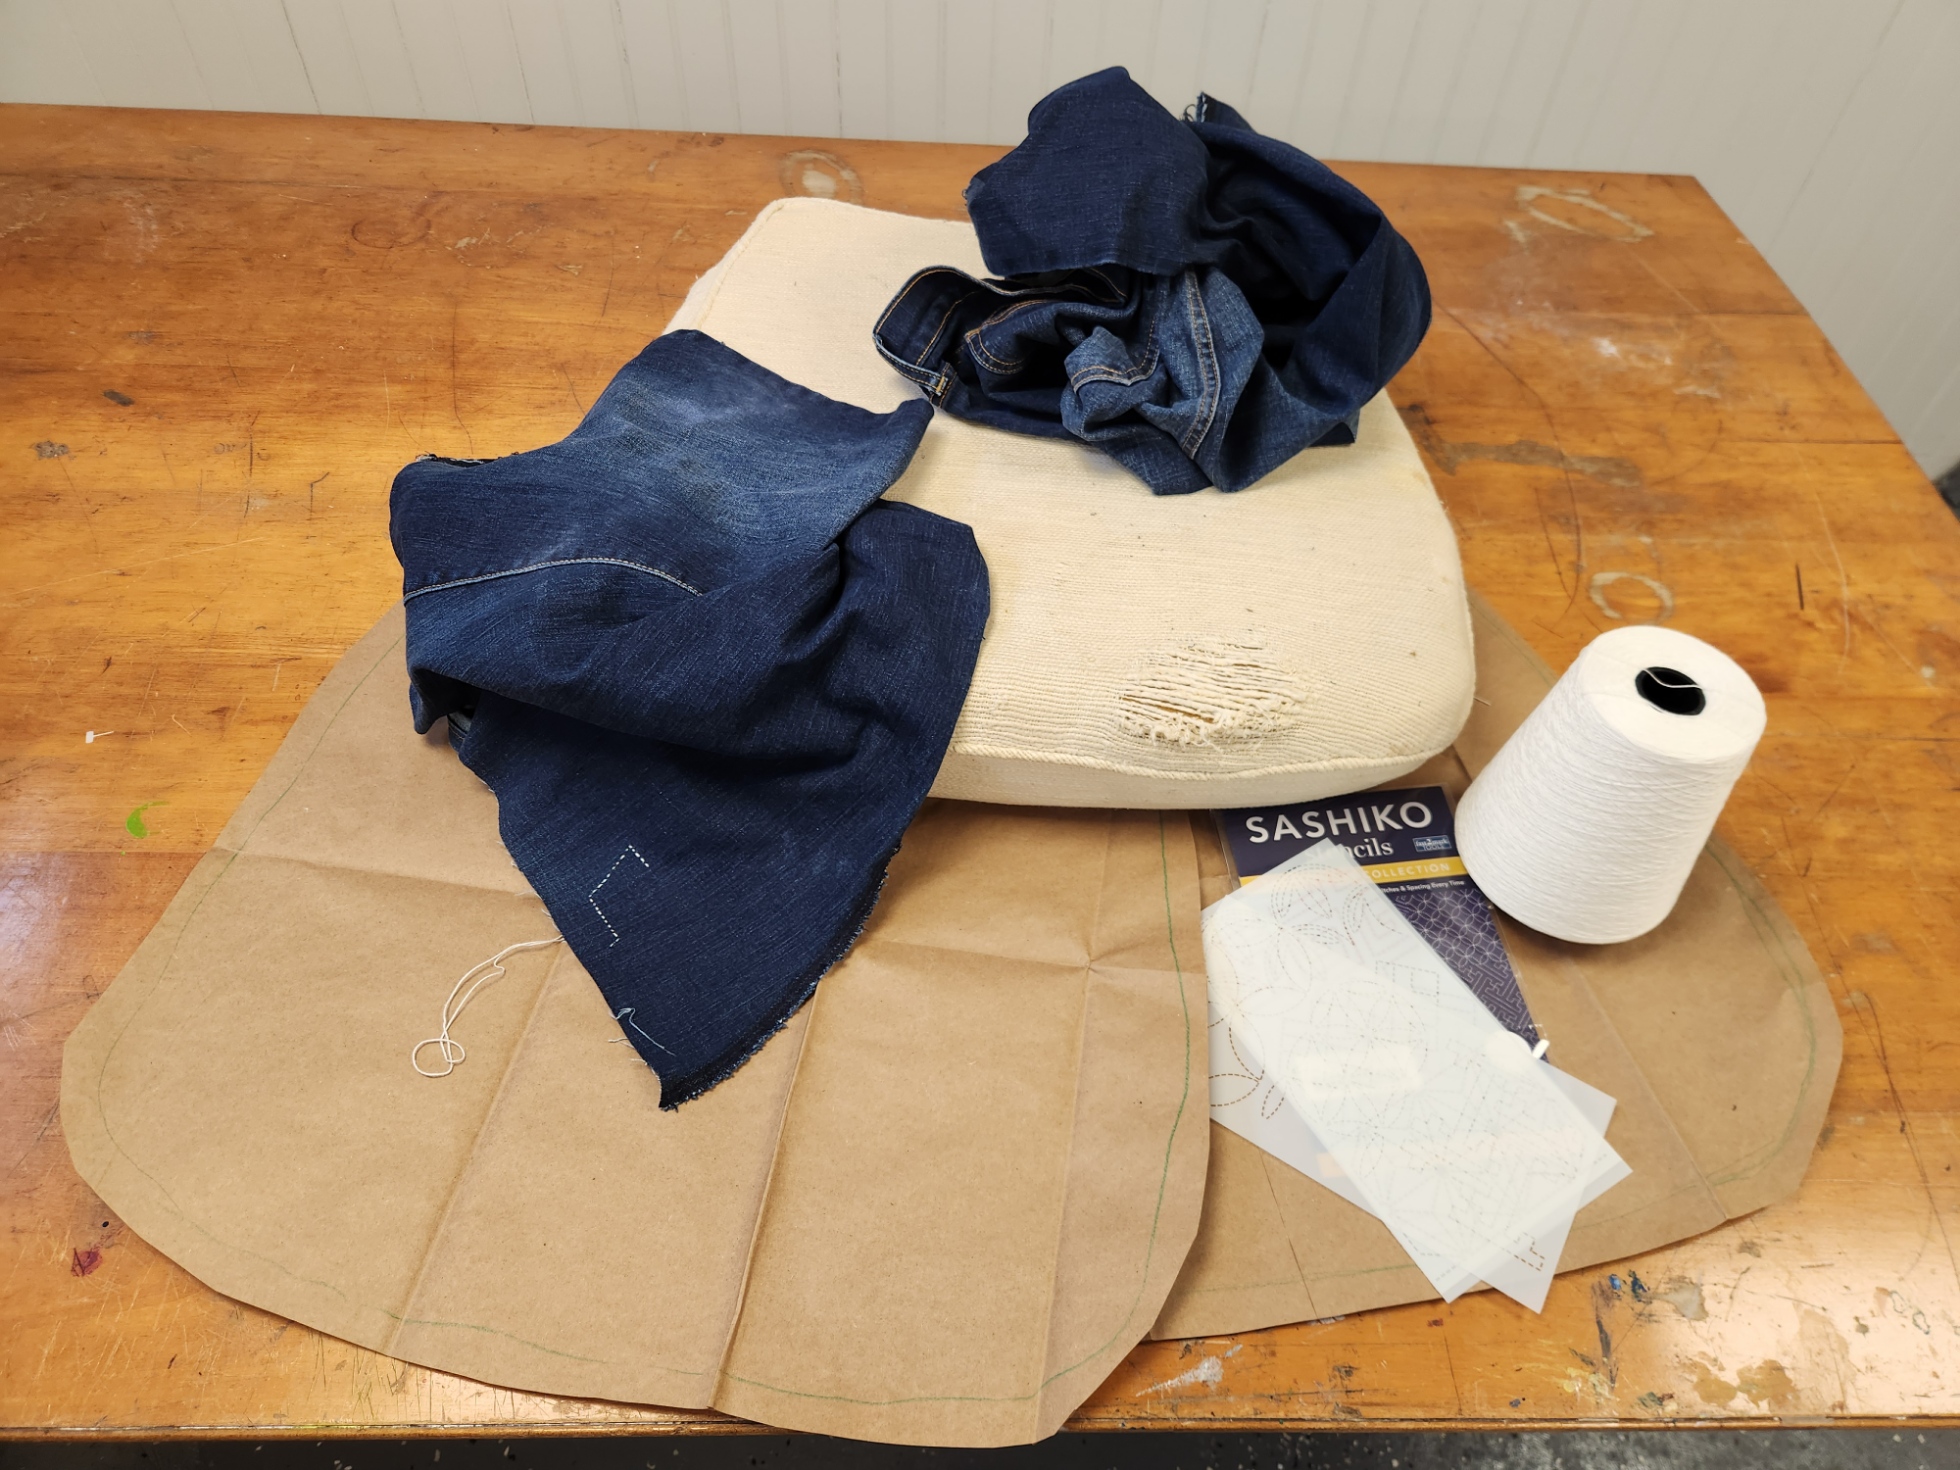
I’m working happily away on what will become my replacement cushion cover. I decided that rather than cutting shapes and then stitching them, it would be easier to stitch on a larger piece of reclaimed denim, and then cut it into haphazard shapes bearing the stitching later. The denim is particularly thick and heavy, which has posed some problems.

The traditional Japanese method of working this style of running stitch embroidery is to use a relatively long needle, stitch in hand without a frame or hoop, and pleat the fabric onto it, such that the visible stitches on the front are roughly twice as long as the gaps between them.
This type of stitching isn’t easy because the denim resists the tiny folds and scoops needed for evenly placed and correctly sized stitches. I’ve tried, and would probably “get it” on a different ground. Eventually I will do another project in this technique with proper materials, but for now this is what I am committed to, and my goal is more important than the way I get there.
So in the long tradition here at String, Here’s a run down of what I am supposed to be doing, or what would make this a truly traditionally produced piece, along with my confessed heresies.
Needles
I am not using traditional Japanese-made needles, specific to hand sewing, and especially Sashiko.
I have a long steel needle, sharp and stout enough to pierce the denim, with a small eye. I found a paper of five of them in a box of miscellaneous threads and notions I picked up at a yard sale. No name, brand or date is associated with them, and they are not quite uniform. The eyes are very smooth, but there’s a bit of variation on eye placement and point taper. It’s remotely possible they are antique and hand-made. I use another of these as my plunging needle because the small eye retains the loop of strong carpet thread I need to capture goldwork ends and pull them to the back. In any case, these needles are almost two inches long, certainly long enough and easy enough to maneuver for the technique. It’s the stiff denim that’s the problem.
Thread
I looked at various thread options. The threads marketed specific for Sashiko are imported and not exactly inexpensive. From what I gathered, they are unmercerized cotton, nicely twisted, and not as “hard finished” as commercial threads sold for crochet. So I went hunting.
I cast about and eventually ordered a big spool of weaving cotton from Webs. It’s their Valley Yarns “Valley Cotton 10/2.” It was a risky purchase because it’s a large quantity, but I happened to hit a weaving yarn sale. And if the stuff didn’t work for my cushion project, I would be happy to knit lace with it.


I’ve got roughly 4,200 yards. Plenty. On the right above is a comparison shot of some threads next to a metric ruler. Apologies for the lousy photography. From top to bottom we have
- Valley Cotton 10/2 – a two ply matte finish cottom
- Coats & Clarks Knit Cro Sheen – a four ply shiny finish yarn. Much rounder and heavier that the Valley Cotton.
- Standard DMC 6 ply cotton embroidery floss. I didn’t have white to hand, so this is yellow. Six two-ply strands. The Valley is equivalent to about four plies of the DMC.
- Long discontinued DMC 6 ply linen embroidery floss. This I did have in white. It’s a mite heavier than the cotton floss, and the Valley Cotton is equivalent to about 3 plies of this.
I’m pleased with the Valley Cotton’s usability, its proportion in relation to the stitch length I’m using, and it’s appearance against the denim. It also coordinates well with the remaining Haitian cotton upholstery fabric used on the parts of the chair I do not intend on recovering.
Pattern Sources and Preparation
I tried to use straight drafting – laying out the geometry and drawing directly on the fabric. I also tried printed paper designs, employing tracing paper and pouncing to move them from paper to the cloth. Neither was satisfactory. Then I stumbled across some commercially sold plastic templates, and decided to take the short-cut.


Stencils opened up another experimentation hole. What writing instrument to use with them. I tried all of the standard pens and pencils intended for fabric marking. Some were too crumbly to achieve the fine point needed to use the stencils. A highly regarded pen drew clear, with the ink “blooming” into visibility over a 15 minute period. That was better, but it was difficult to see when ink was poorly laid down and needed retracing, or what had and had not been marked. It was even more difficult to realign the stencil to do a repeating pattern because of the wait and imperfections due to poor ink flow. (In fact I haven’t succeeded doing that yet, but I am still trying).
I settled on an unorthodox inking approach AND a non-traditional marking method. I am using these easily found Crayola wash-out fine point markers with the stencils.

I am also marking on the back, stitching the piece from the back, with starts and terminations on that side, but taking care that the reverse when I am working (which is the public side) shows the longer stitch length as opposed to gap length. Running stitch is running stitch. If you are careful in working, either side can be manipulated to be the public display side. Even in this style where the public side is characterized by longer stitches than there are gaps between them. And that’s why the photo at the top of the page shows the public side of the denim leg I’m stitching, but you see the twill tape wrapped inside unit of my hoop.
Heresies
So to sum up – my heresies are:
- Using a hoop and not stitching in hand
- Stabbing vertically rather than pleating the fabric onto my needle
- Using weaving cotton instead of Sashiko thread
- Using some unidentified vintage needle instead of the recommended long sharps
- Using stencils instead of drafting out the designs by hand
- Stenciling on the BACK rather than the front of the piece
- Stitching from the back, with the reverse side of my work actually being the side on public display
I pause now so the traditionalists can catch their breath, take a sip of tea or coffee and revive themselves.
With luck all hyperventilation and shock have passed.
More unorthodoxy
To add another dimension of complication, I am also hoping to use Western linear stitching on this piece. I plan to use standard double running stitch, and some of the fills or strapwork patterns that are oh so familiar to anyone who has followed this blog. But there is no grid on this denim, and it’s not countable.
Again I am going to cheat, and stitch on the reverse. I am going to use my markers and this piece of plastic canvas to make a dot grid, and then use that dot grid to place my stitches. Double running is the same on front and back. If I stitch with care and make no skips, there should be no telltales in front to betray my working method.
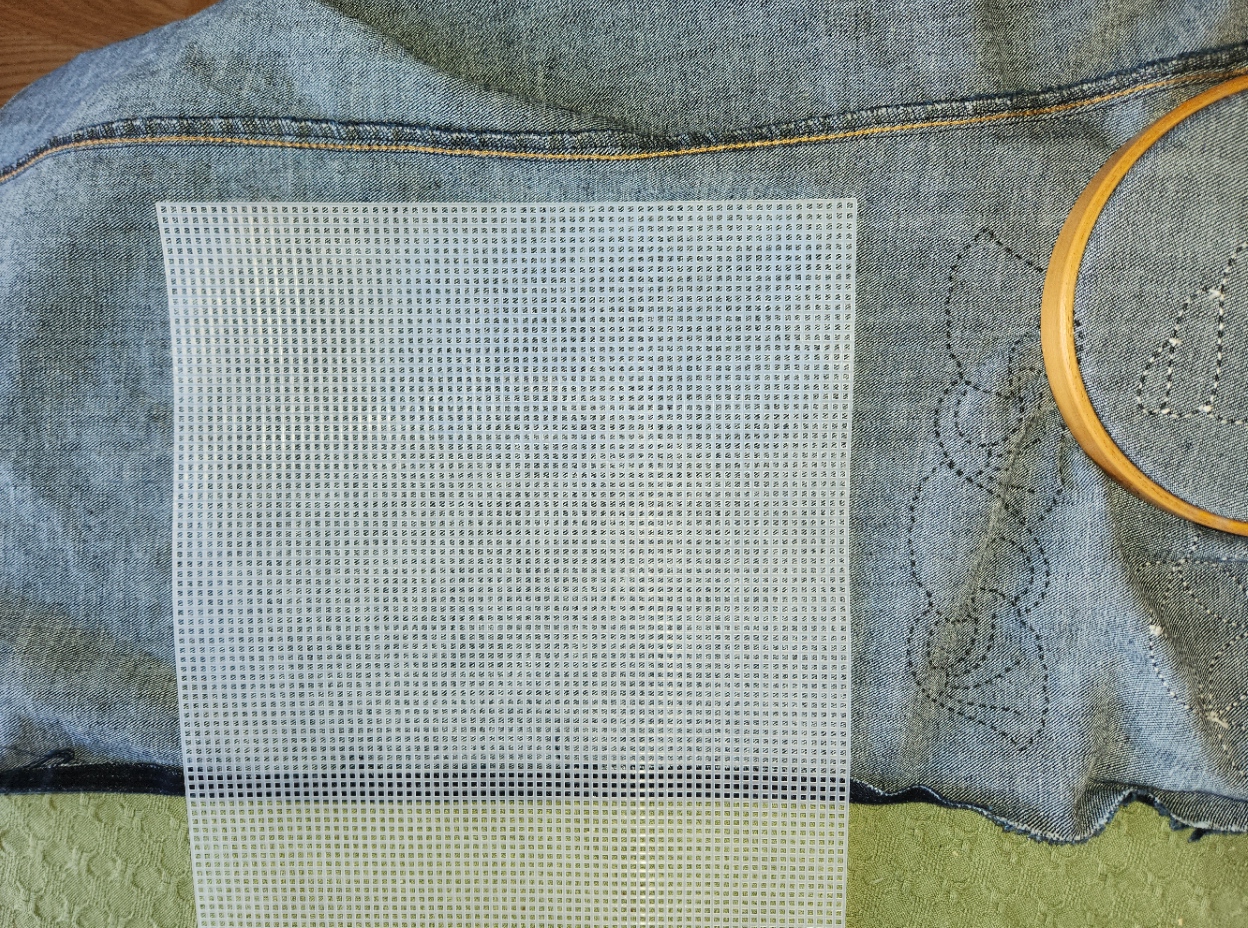
Cheaters may never prosper, but on rare occasion a shortcut or labor-saving method is warranted.
BEGINNINGS – CHAIR RESCUE IN USED DENIM
Now that the spawn are off on their own, I have been able to claim one of their rooms as my office. I’m especially lucky, I know because I also have a room in the basement dedicated to sewing and crafts. But the upstairs room has the computer, my needlework library, and space to relax.
The office is the room with the hanging tambour carpet, and is largely furnished in mismatched Trash Panda style – a couple of purpose-purchases like my standing desk and an OttLight, plus items reclaimed from local everything-free groups, curbside abandonment, and opportunity shops/consignment/resale stores. These include two low end Arts & Crafts style cabinet bookcases, a barrel chair I’ve been hauling around with me since 1978, and the most recent addition, a reproduction Arts & Crafts reclining chair.

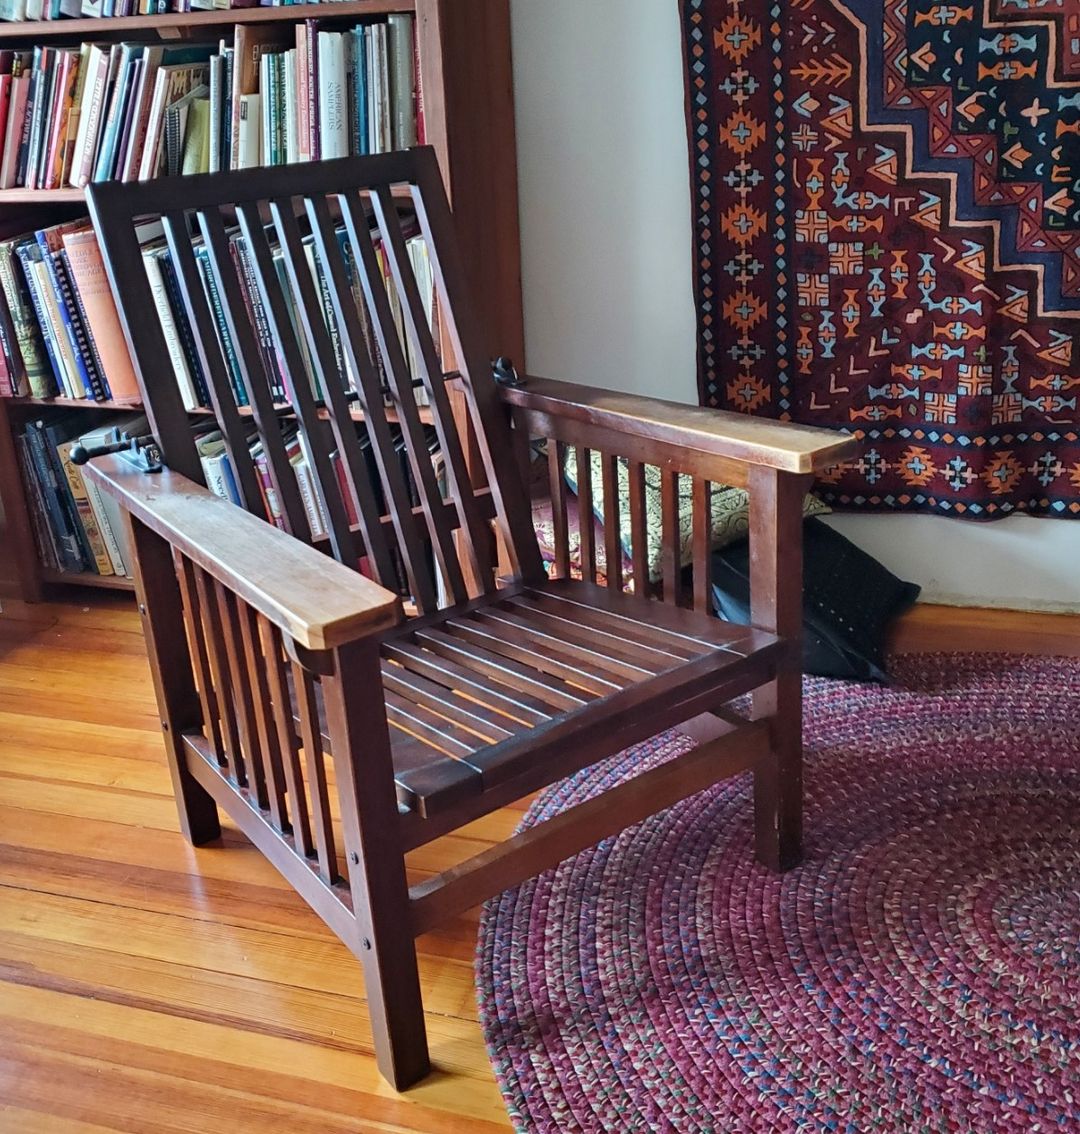
The barrel chair is in acceptable condition except for the horribly worn, stained and snagged cushion, and the little apron just below it. The recliner came as-is, without any cushions at all. Right now I have an old zabuton floor pillow and a couple of throws tossed on it to make it sit-able.
My next project is a massive multipart effort:
- Recover the barrel chair’s seat cushion recycled denim. The denim will be pieced crazy-quilt style with exposed seams. Some of the denim bits will sport sashiko stitching.
- Buy foam and create a thick, resilient seat cushion and backrest cushion for the recliner.
- Cover the recliner cushions with similar pieced and embroidered recycled denim.
- Figure out how to fig-leaf the wear on the barrel chair’s under-cushion apron, again from the used denim, but without embroidery.
To start, I’ve traced the existing cushion onto brown paper (a giant yard waste bag was sacrificed for this), and cut out patterns for the top and bottom. The sides are just a four inch strip wrapped around, so a pattern isn’t needed. I plan to sew random size/shape denim pieces onto the brown paper using my ancient Elna SU sewing machine, employing various wide stitches and exposed edge seams where denim patches overlap. Some of those pieces will be pre-embroidered by hand, taking advantage of some templates to lay out the traditional geometric patterns. And some might be stitched using waste canvas in double running designs. My whim will rule.
Once each of my brown paper mock-up patterns is completely covered with securely stitched denim, I will tear off the paper. The goal is to have the two sides, add a four inch strip running around the edge, winkle in a zipper on back edge, and then stuff the existing pillow, ratty cover and all inside. If necessary I will strip off the old cover and just use the inner foam (probably with a new inner cover I’d have to sew, too.)
I have lots of denim discards in the house, and can always find more if needed. The big cone of thread I’m using is from Webs – their 10/2 Valley Cotton, intended for weaving. Its a matte finish two ply, and coordinates well with the well-worn Haitian cotton of the barrel chair’s back and sides. The back and sides aren’t being touched in this partial re-do. I’m not worried that I’ll have a ton of thread left over. It’s also useful for lace knitting.
I’m using the stencils to mark the BACK of the denim, and am stitching on it upside down. It’s much easier to see the markings on the back, and I don’t have to worry about the marked lines showing.
Right now I’m attempting to stitch without a hoop, in the scooping style that’s traditional for sashiko, but we’ll see how long that lasts. Denim is thick and scooping those tiny bites evenly in a heavy ground with a needle sharp and sturdy enough to penetrate the denim and with a hole large enough for the thick thread is proving to be a challenge. I may end up using my sit-upon or hand-hoop and stabbing vertically as is my habit.
While I have built cushions from scratch and recovered simple upholstered cushion covers before, there’s a lot here that’s new to me. If you are an old hand at this type of upholstery repair, sashiko, quilting (especially crazy quilting), or repurposing denim and you have advice, please chime in. Your hints would be most welcome.
I expect to be working on the barrel chair through the spring and into summer. Building the cushions for the other chair should take me into fall. And covering the cushions for the second chair will probably fill my time up until mid 2025.
Am I daunted by this timeline? No. I’ll get it all done.
Eventually.
CHATELAINE RIBBON FINISH
A super-quick project for sure. Younger Spawn gave me a chatelaine with a little metal purse for the holiday. I quickly attached my existing tools, put a piece of beeswax in the purse, and set out to use it. But I found that the thing was a bit heavy, likely to injure standard t-shirts and blouses, and pinning it to the waistband of my jeans wasn’t a feasible solution. But it’s a tremendously handy thing.
Stash to the rescue!
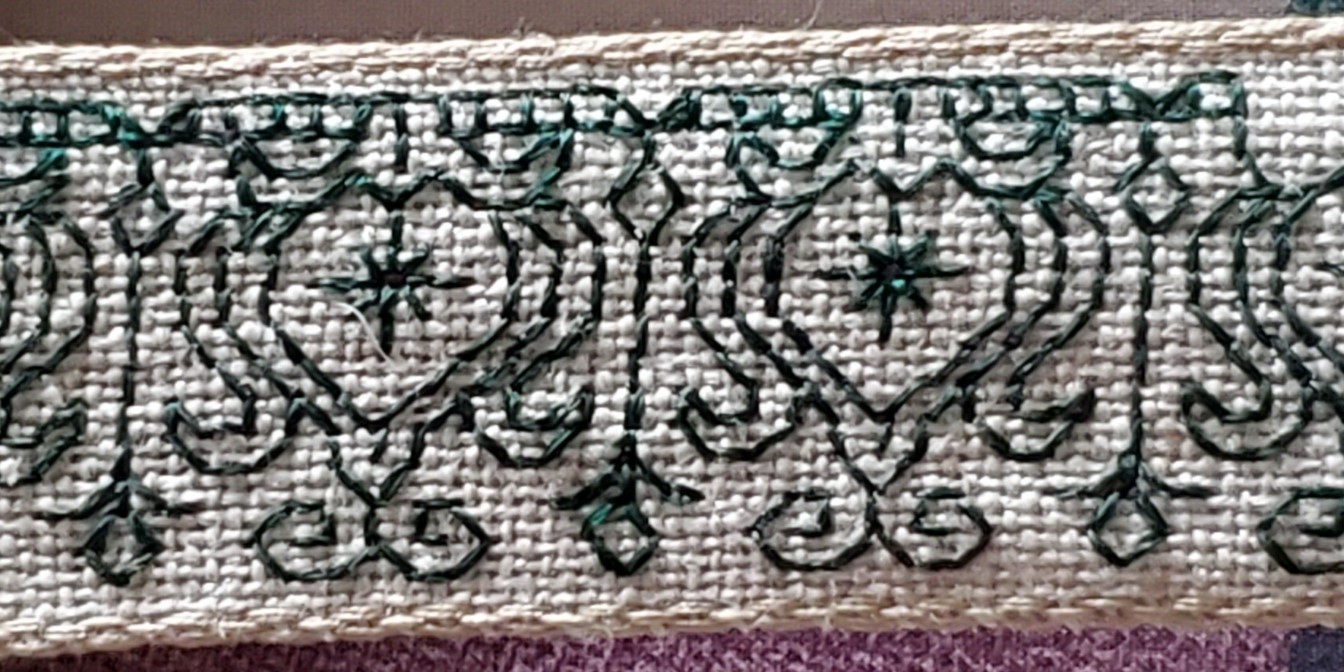
I had a length of evenweave linen ribbon I bought at the old Sajou store during our April in Paris trip a few years ago. I’ve been saving it for the right application. This was it.
I cut a length, charted out a new design specific to its width, and set out to stitch it more or less double-sided (not entirely so, but close enough) to use as an award-style neck ribbon to which the chatelaine could be securely and safely pinned. I started stitching on it on 5 January. And in less than two weeks, I have my first 2024 finish.

This is it, upside down so that the signature in the center back reads in the correct orientation. Note that I’ve left the overlap area free from stitching. It’s actually four layers of the ribbon linen thick – the ends folded over each other and securely stitched down. On top of that I also reinforced the back to prevent it from snagging on shirt buttons, and to give the chatelaine pin even more to grab onto.
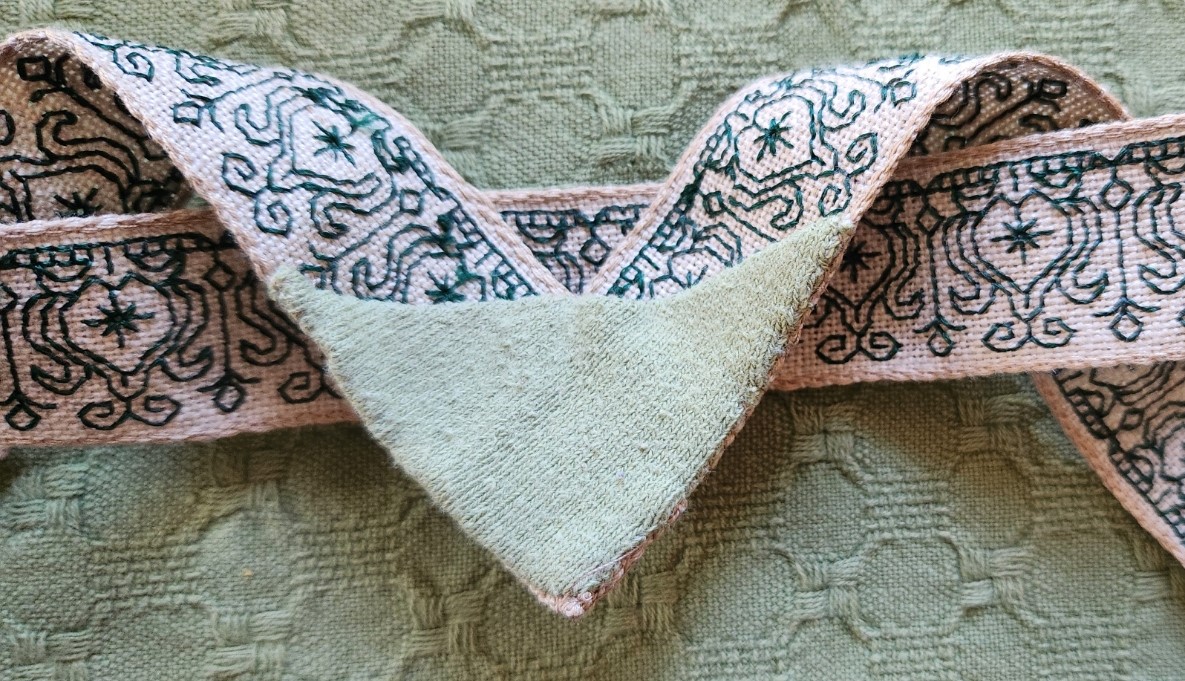
Yes, that’s the same bit of nylon jersey fabric I used last week for mending. (Waste not, want not.)
Here’s the whole thing with the very appropriate rose pin in place, neatly figleafing the bald point center front:


The extra fluffy pullover doesn’t make an attractive backdrop, but I plead the current cold snap. I’m comfy. And now armed for my next stitching battle!
UPDATE:
The doodle page for the pattern I used on the chatelaine is now available on the Patterns tab here at String. Click below and scroll down to the bottom of the page.
BUSY END TO THE YEAR
No doubt it has been a hectic end of year, what with the standard end of year activities plus the finish on the coif project, and the lightning trip to the UK to view the final exhibit. But that doesn’t mean that other things have languished.
First, because the holiday can’t happen without cookies, even if I am not around to make them all, I present our 2023 cookie plate. Some slimmed down to lower carb versions (with varying levels of success), and some expertly baked by Younger Spawn, whose oven-acumen now far exceeds my own. Luckily Spawn’s job is work-from-anywhere remote and allowed early arrival the week before Christmas. While we were in Sheffield we had a happy house-sitter, tree waterer, and master baker in residence. And said HHS/TW/MBIR had run of the place, its kitchen, library, and media without clumsy parents cluttering available time and space. A win all the way around.

Starting from around 11:00 and spiraling into the center we have:
- Brown butter chocolate chunk cookies. A specialty of Younger Offspring, with grated chocolate bits, chunks and dust instead of commercial chips. To die for.
- Low carb peanut butter cookies. After all sorts of failures trying customized Keto recipes I fell back on the old reliable Joy of Cooking one, but subbed in King Arthur Keto flour and monkfruit-based sweeteners. I have always used Teddy no-sugar peanut butter, too. A slightly stickier dough than usual because the KA Keto flour and it isn’t as absorbent as regular all purpose flour. A bit more oil release on the baking pan, but this time the cookies turned out pretty close to usual – not dry and crumbly, although I couldn’t get the cookie stamp I usually use to work well and fell back to the traditional fork-tine checkerboard. They were pronounced acceptable by my core audience.
- Earthquakes (our name for chocolate crinkles). Full octane. These were made by Younger Offspring, and are especially luscious this year because the batter became the receiving point for ganache left over from another recipe. Not to many fault lines in them this year, but oh so good.
- Mexican Wedding Cakes. Another old family favorite done perfectly by Younger Offspring. Lots of pecans in a buttery shortbread base.
- Lower carb Buffalo Bourbon Balls. This is a family recipe that usually starts with a box of Nilla wafers or other similar vanilla or chocolate flavor plain commercial cookies buzzed to fine crumbs. But commercial low carb cookies are hard to find and maddeningly expensive. So I improvised my own, making large blobby plain cocoa cookies using the Keto flour and fake sugar, plus butter and Dutch process cocoa. Then the next day I ground them up and made the usual, but rolled them in a mix of the cocoa and granulated fake sugar instead of the confectioner’s version of the same monkfruit sweetener. (I wanted to save the powdered stuff for other baking because it works better for most of it than the standard). I used agave syrup in place of corn syrup for these. Plus bourbon this year instead of rum, mostly because that was what we had on hand. These actually turned out to be the best lower-carb cookie I’ve made so far. I will have to do it again so I can write up the recipe because it’s worth sharing and replicating in the future.
- Jam thumbprints. Another winner from Younger Offspring, who has sneaky ways of setting the raspberry jam in the shortbread base so that it is a neat, non messy, intensely fruity bite.
- Slimmed down Oysters. A take on my own invention, using my usual recipe but subbing in the King Arthur Keto flour and monkfruit sweetener into the standard along with the usual avalanche of ground hazelnuts. Those were hard to come by this year, but luckily I had some in the freezer, left over from last year. I was very happy at how the batter worked with the cookie press. And these were a collaborative effort. I did the cookies, but Spawn did the ganache and filled the sandwiches. The ganache is full octane.
- Lemon macarons with lemon curd. All Younger Span, all the way. These are classic, intensely lemony, and lighter than air. An accomplishment far beyond me. Again, to die for.
- Lower carb triple gingers. Obviously the white chocolate chips in the cookies are not slimmed and there is minced candied ginger in there, but the rest of the cookie is my usual recipe, subbing in the low carb flour and sugars. I’m a bit disappointed in these because as a drop cookie they are supposed to spread. These didn’t, remaining the rocky shapes in which they were spooned onto the baking sheet.
- Lower carb chocolate chip with cocoa nibs. This is new this year. I started with a keto shortbread cookie recipe, and added keto chocolate chips, plus no-sugar cocoa nibs (left over from last year). The result is pleasing but also a bit disappointing. The texture and taste of the cookie part is too much like a store-bought Chips Ahoy. I had hoped for something more like a home-baked Tollhouse. But they are not too sweet (a common problem with keto baking because the fake sugars are more intense than their standard counterpart). Good enough, but not great.
- Unseen – a keto lemon cheesecake in place of our standard Panforte, which could not by any means known to man or woman, be slimmed down. In fact, if I went on a forced march through Middle Earth and could pick only one food substance to sustain me, the Panforte, packed with nuts, dried fruit, and carbs would be a space/weight efficient substitute for Lembas.
Obviously for cookies to happen we also had to hit Max Festivity. Again Younger Spawn leapt in and took over the orchestration of the tree, and deployment of the M&M Man Army:

And to round it out, presents were exchanged. I was well prepared with gift socks, mostly knit since I mailed the coif. This photo omits the two last pairs, along with a nifty folding basket that was a present last year, and has been adopted as my knitting bowl for sock production.

Not to brag, but I am delighted that my family knows me so well. Among the puzzles, wearables, and adornments they gave me this year, were stitching things: a quarter yard of 40 count cream linen, a sweet little tabletop caddy box for needles and pins (I will use it for needles and orts), a small cigarette box that is a perfect traveling needle and thread safe, and a chatelaine.

As you can see I’ve already put my favorite laying tool, fine needle threader, and scissors on the chatelaine. I put a slice of beeswax in that little snap purse.
The rose header for it has a sturdy pin on the back. But since I am usually found in T-shirts these days, the weight of the thing might be problematic. This gave me an excellent reason to go stash diving and retrieve a length of evenweave stitching ribbon that I bought at Sajou in Paris when we visited there about seven years ago. A quick trip to the computer to doodle up a new pattern for it, and I’m off and running. It will be an award-ribbon style around the neck piece, with a 90 degree angle in front where the ends overlap. The chatelaine will be pinned to that triple layer of sturdy linen, and the loop will go around my neck. Problem solved. Or it will be as soon as I’m done with the stitching and assembly.
THE UNSTITCHED COIF EXHIBIT
As promised, here’s a recap of the exhibit. It was an immersive whirlwind of talent, exuberance, and fun. I am very happy we were able to go. I just wish we had longer to chat with all the delightful, creative folk in attendance. But first, here’s a run-down of the displays. Note that while the Unstitched Coif was well represented, it isn’t the only project Toni Buckby is doing. More on those other efforts after the coifs…
The Unstitched Coif
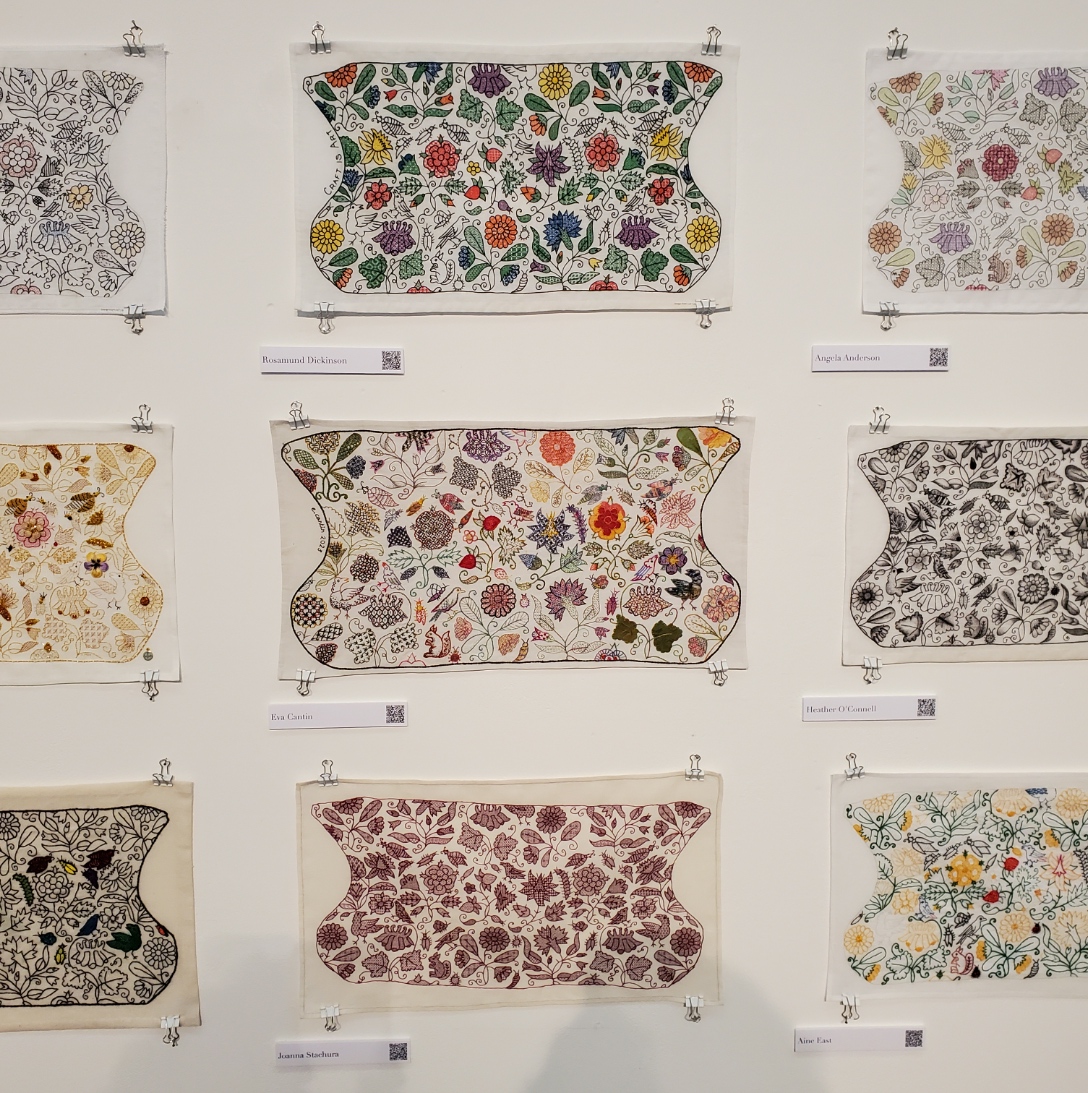
I tried to take photos that showed the individual displayed pieces in situ, among their neighbors. The official website http://blackworkembroidery.org is hosting stitcher-provided blurbs and supplemental photos – the same info that is in the official exhibit book. This linked page indexes all of the stitchers alphabetically by first name. I provide the names of the stitchers for each photo below to save squinting. Pop over to that official site page for high-res closeups of any coifs that catch your eye.
First, the introductory material – a brief on the project, plus a sample of the pattern transcribed onto cloth (but not stitched) and made up into wearable configuration. If you open the poster photo in another window you may be able to zoom in enough to read the text.


And on to the coifs, in groups of three as displayed. There is an amazing variety of techniques, approaches, color interpretations, embellishments, and general artistic vision. The little QR codes on the name tags led to the stitcher’s personal submissions referenced above. Again, if you see something that you want to examine in lovely detail, go to this page and click on the stitcher’s name to read that material.
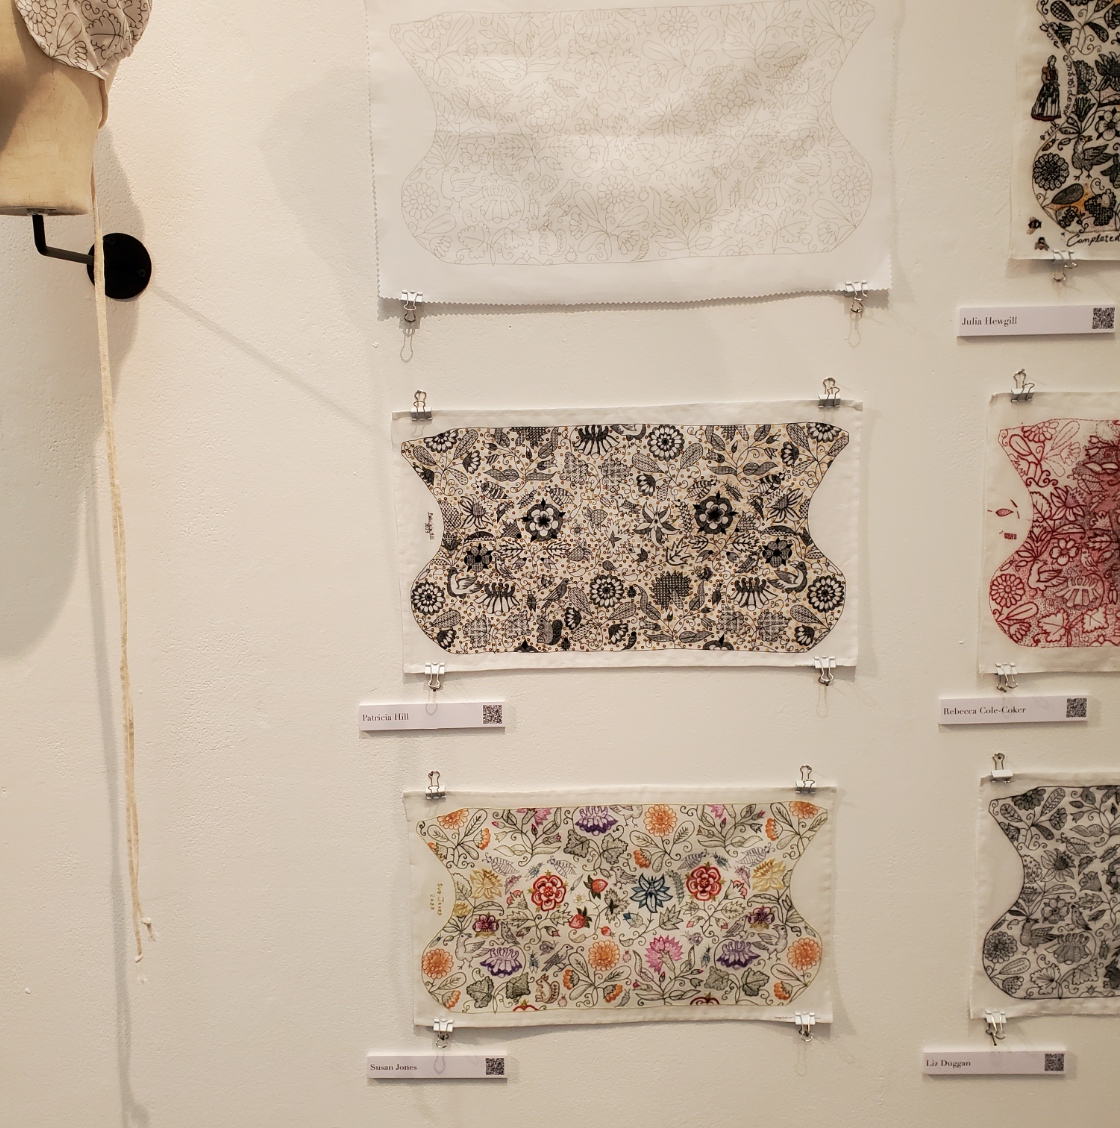
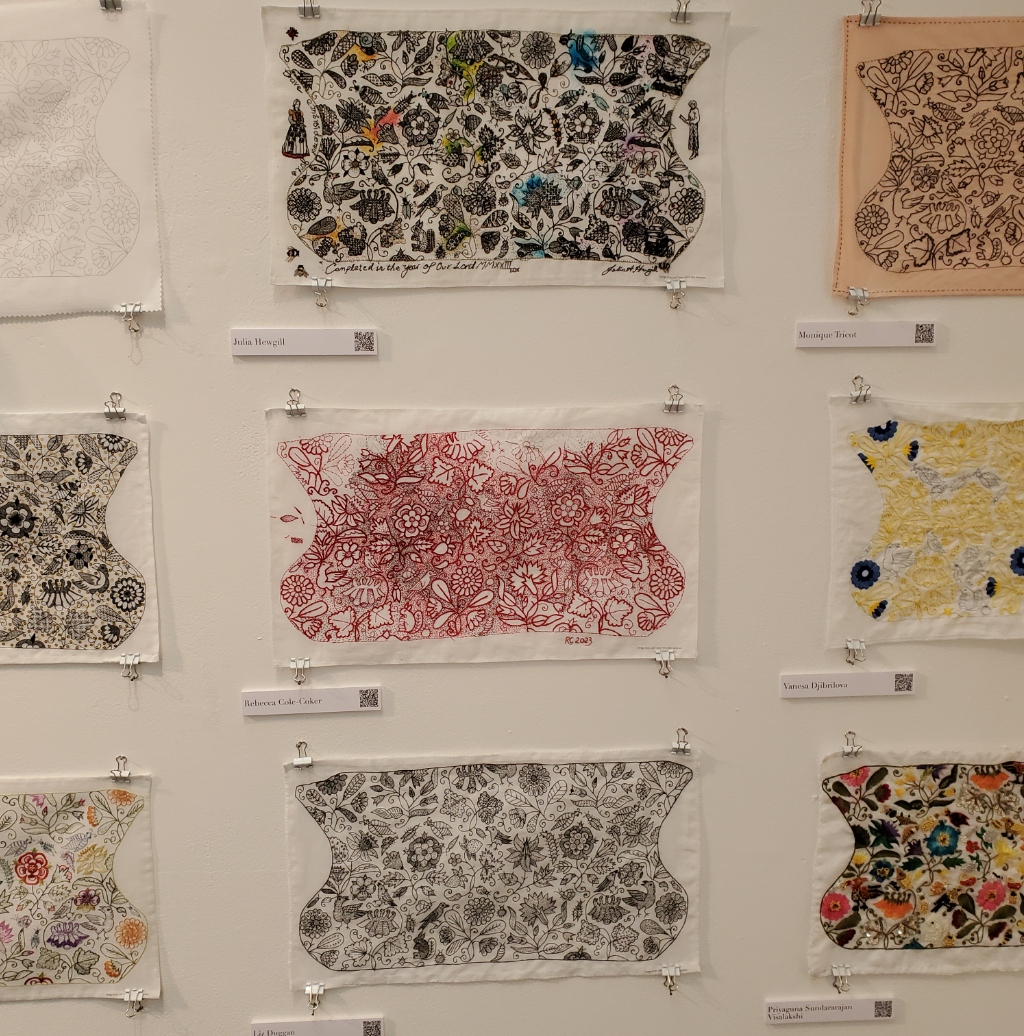

| Unstitched cloth Patricia Hill Susan Jones | Julia Hewgill Rebecca Cole-Coker Liz Duggan | Monique Tricot Vanesa Djibrilova Priyaguna Sundararajan Visalakshi |
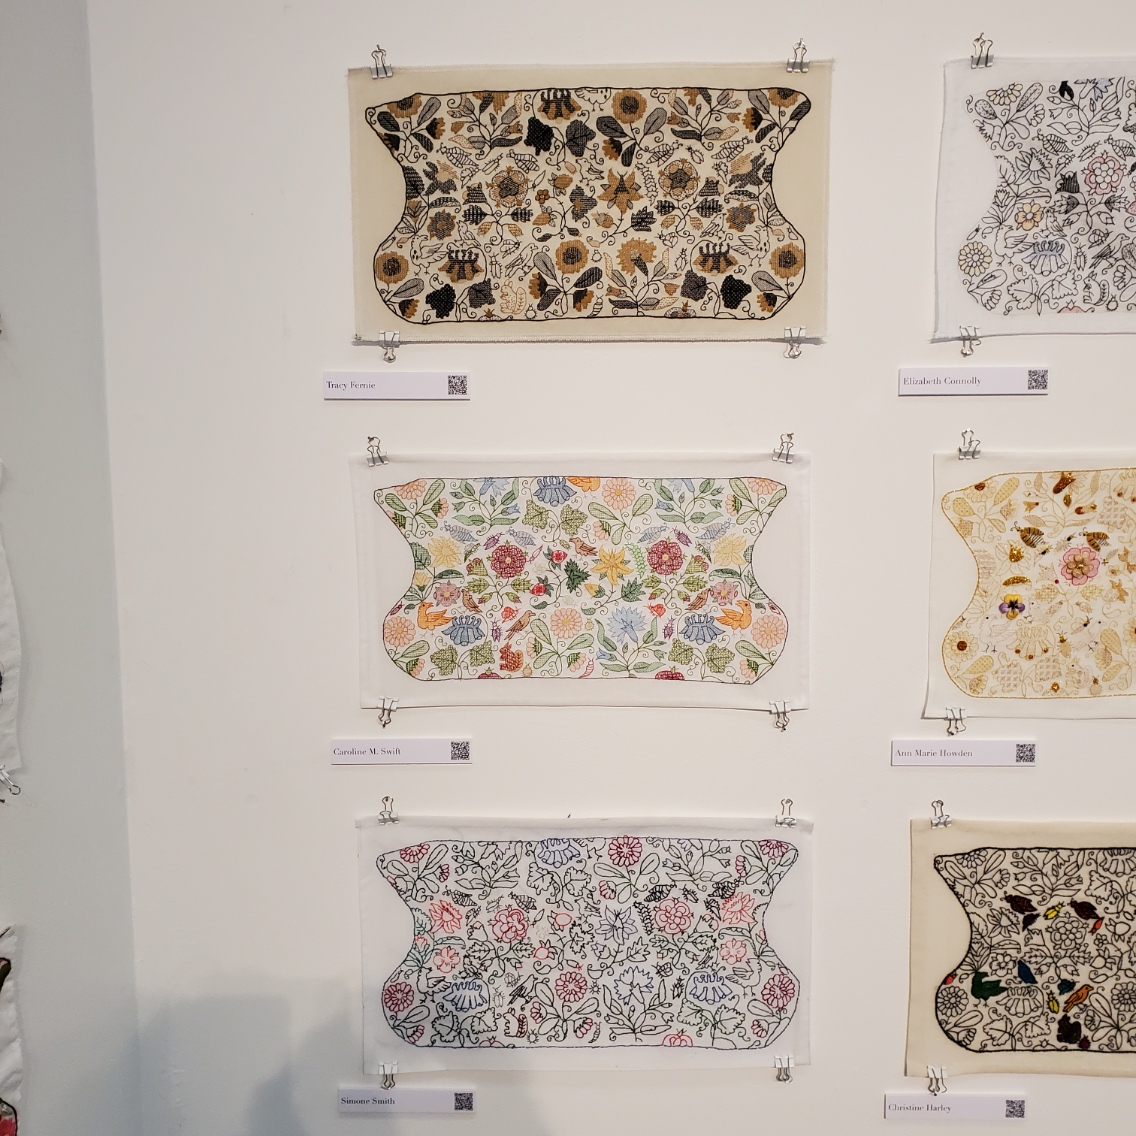

| Tracy Fernie Caroline M. Swift Simone Smith | Elizabeth Connolly Ann Marie Howden Christine Harley | Rosamund Dickinson Eva Cantin Joanna Stachura |
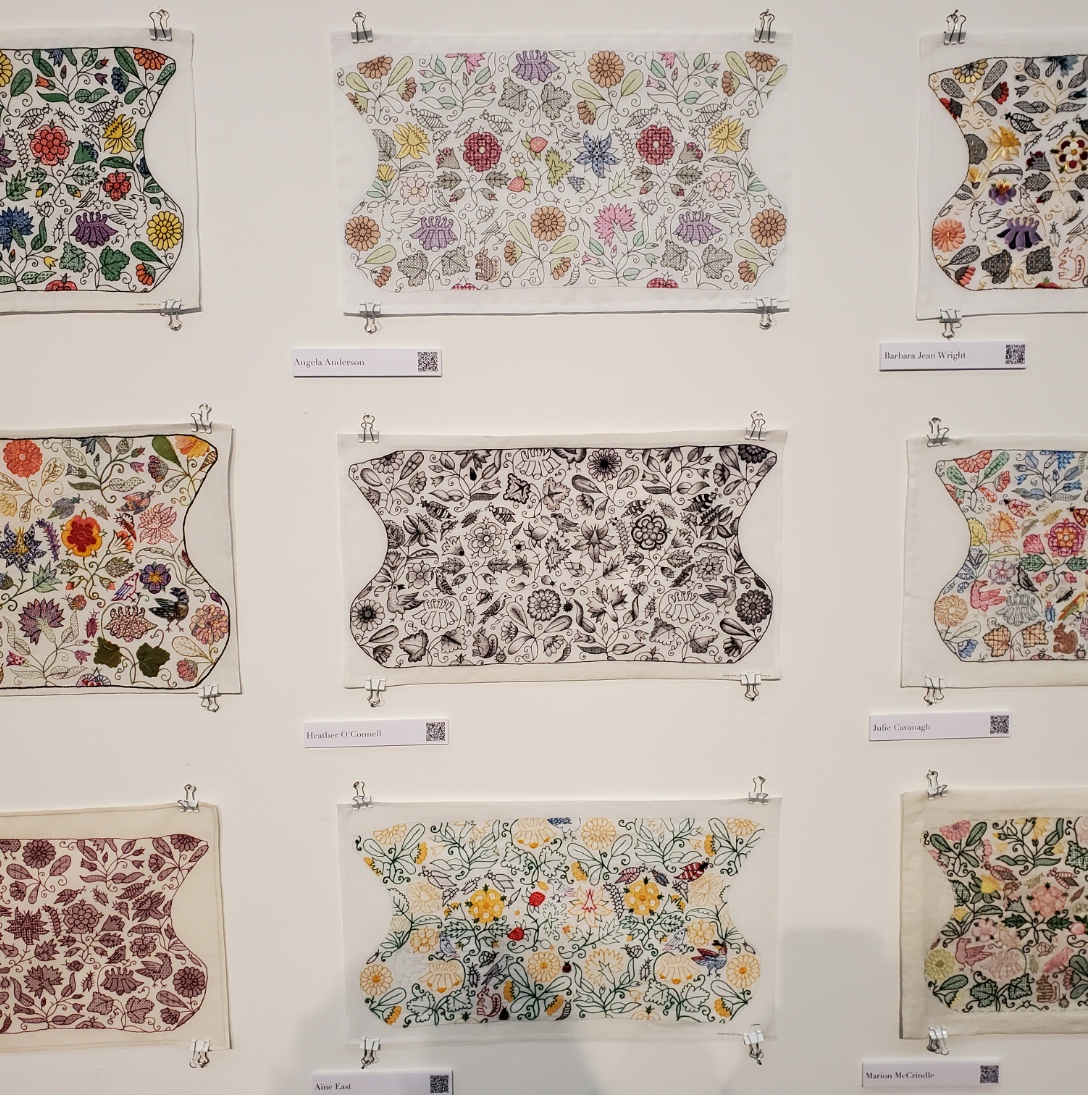


| Angela Anderson Heather O’Connell Aine East | Barbara Jean Wright Julie Cavanagh Marion McCrindle | Elizabeth Dymond Holly Searle Margery Dickson |


| Jane Burnham Vicki Parsons Jen Cable | Anna Tagg Sue Critchley Becky Stewart | Louise Goult Jill Kipnis Sarah Capel |


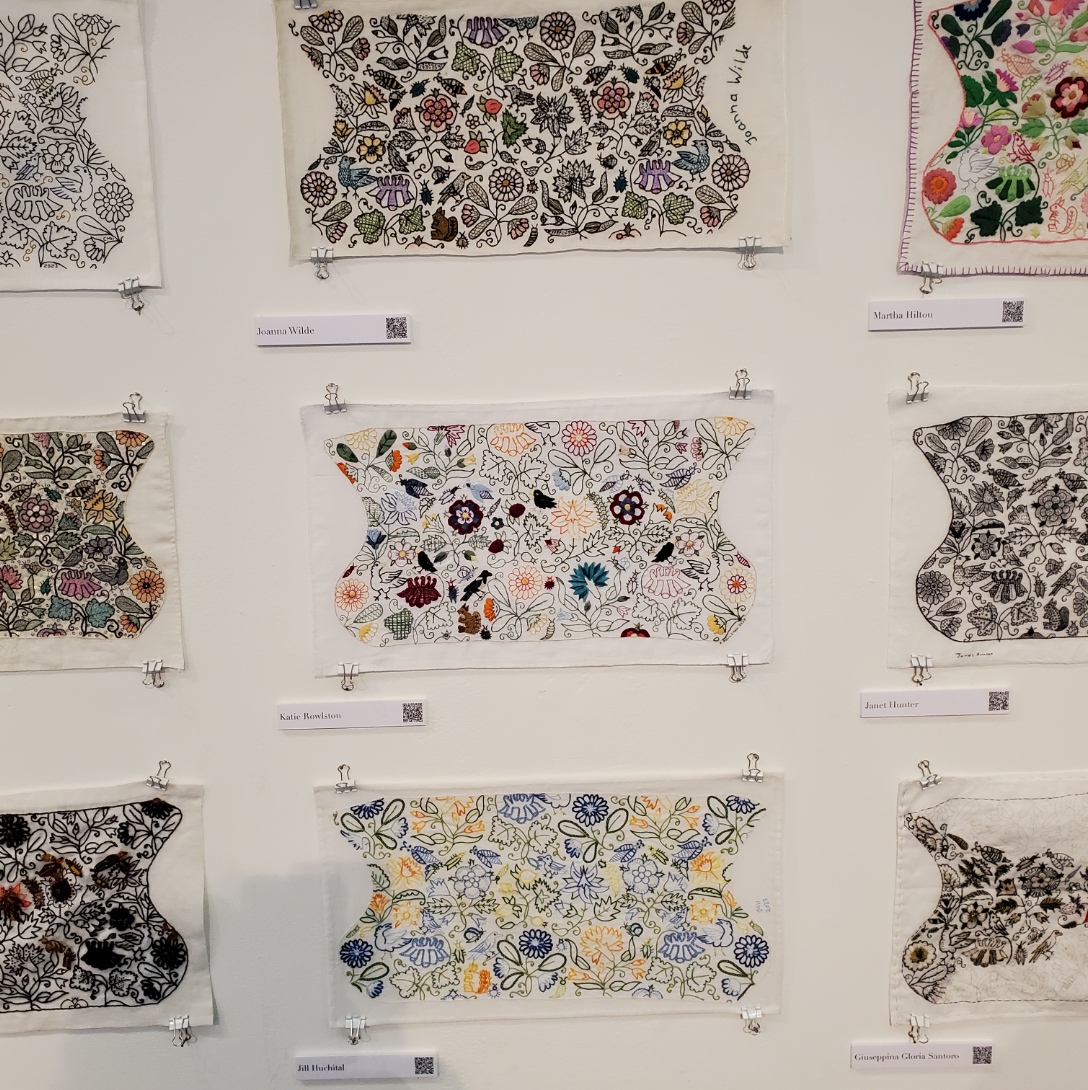
| Catherine Hill Kim Brody Salazar Jen Best | Christine Hillman Jo Tyrrell Victoria Keech | Joanna Wilde Katie Rowlston Jill Huchital |
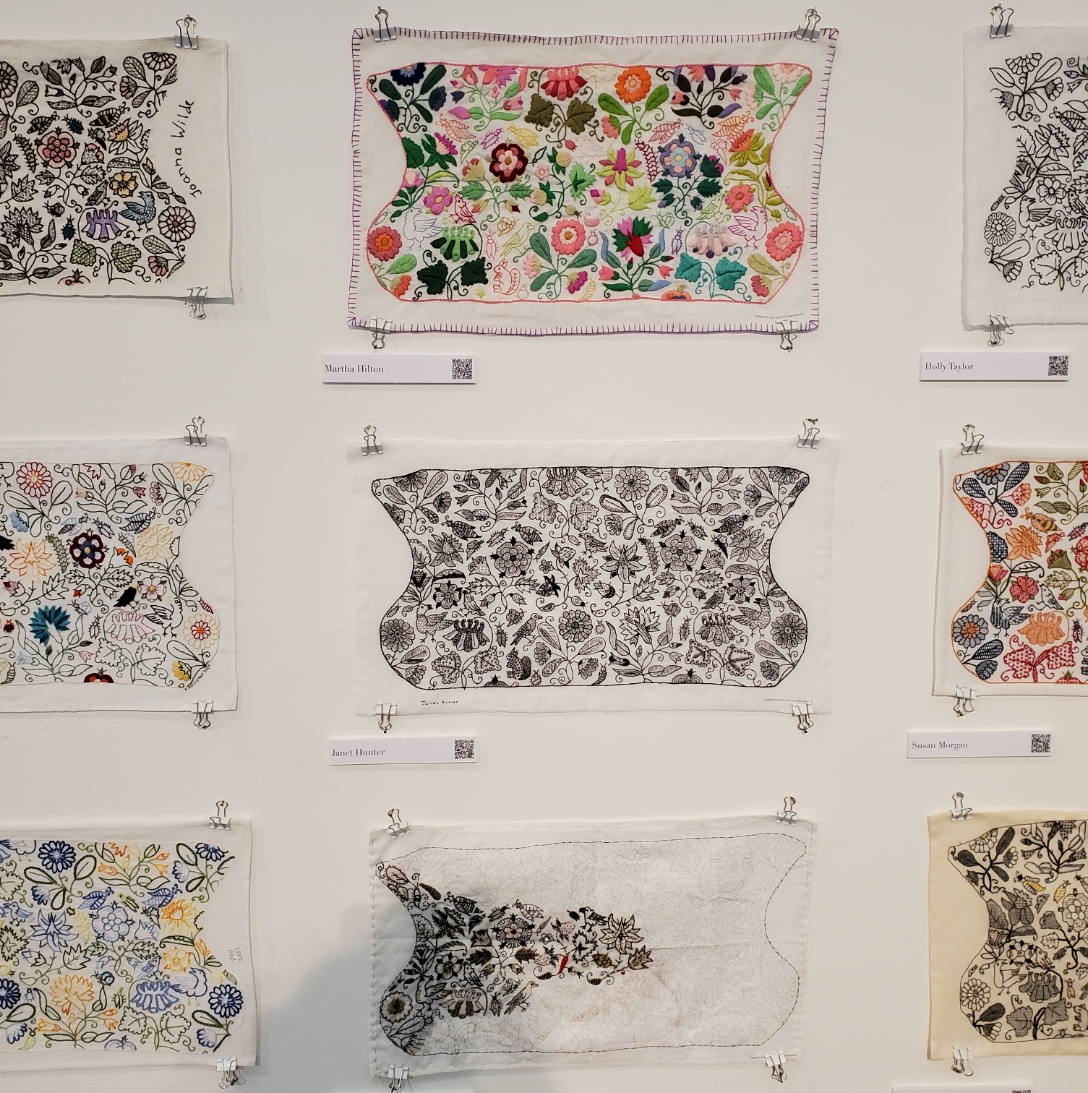

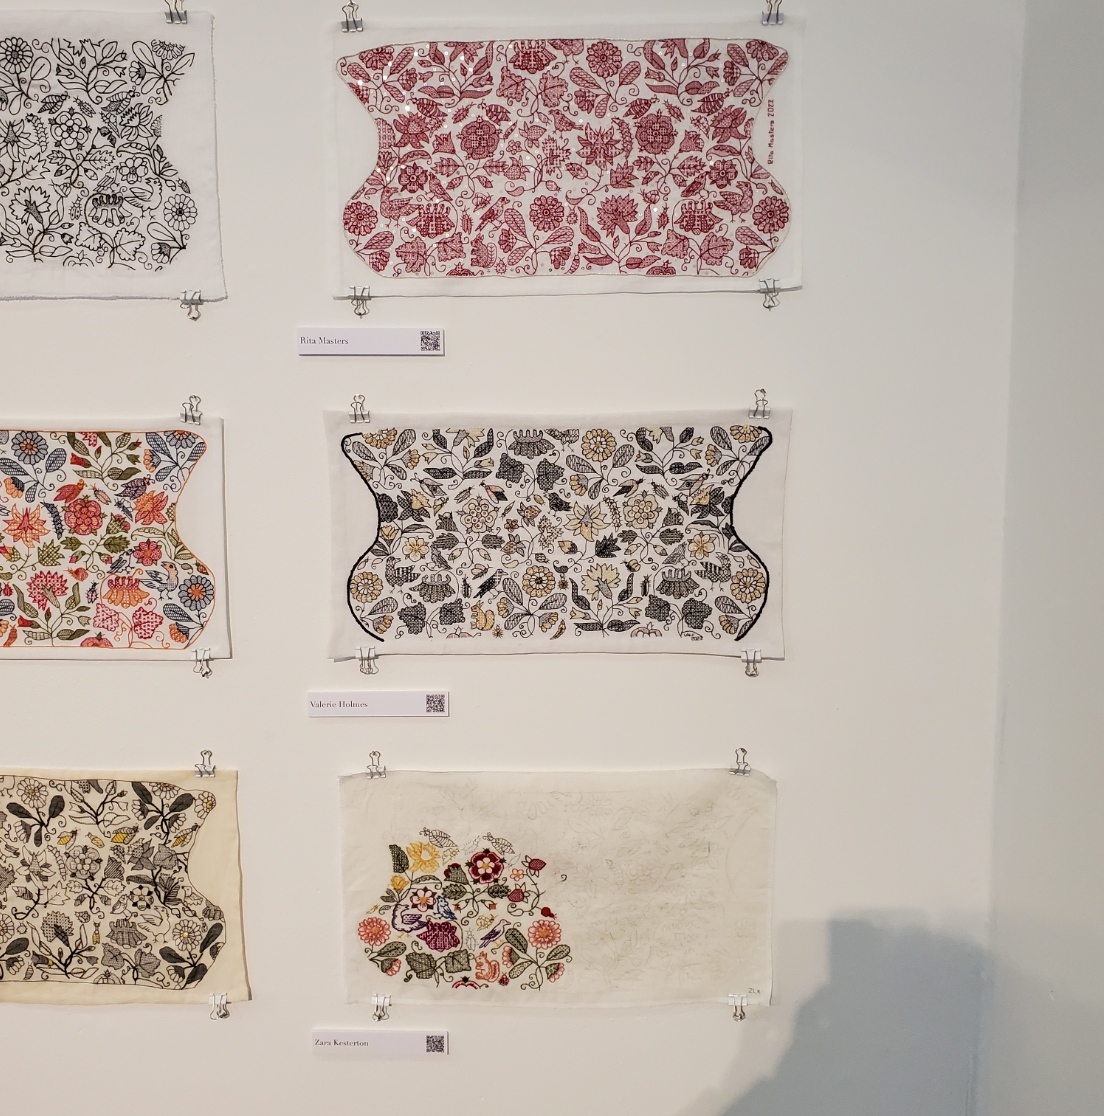
| Martha Hilton Janet Hunter Giuseppina Gloria Santoro | Holly Taylor Susan Morgan Leila Scott | Rita Masters Valerie Holmes Zara Kesterton |
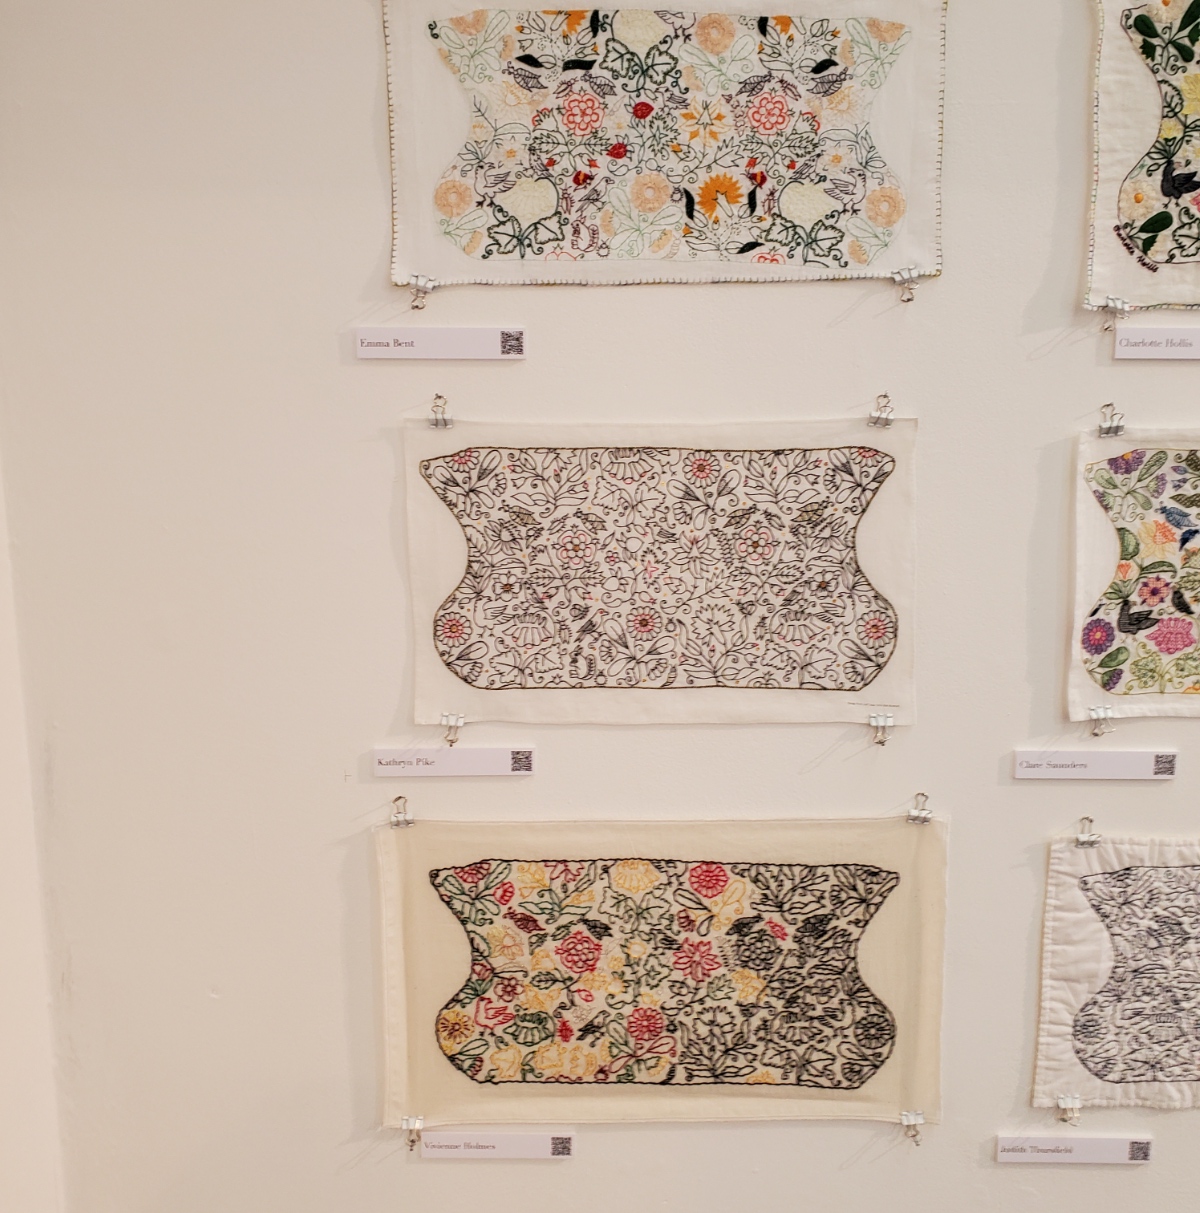
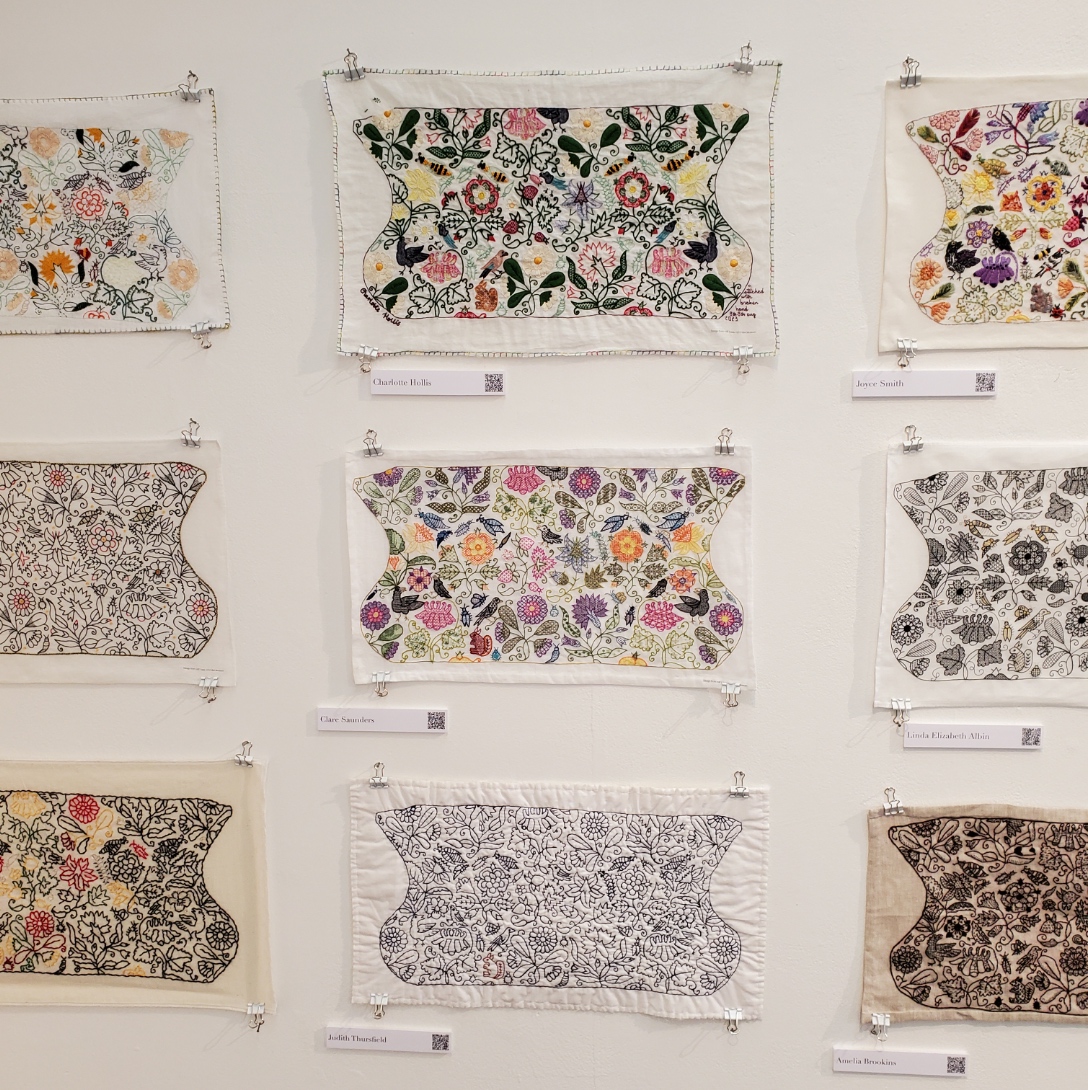
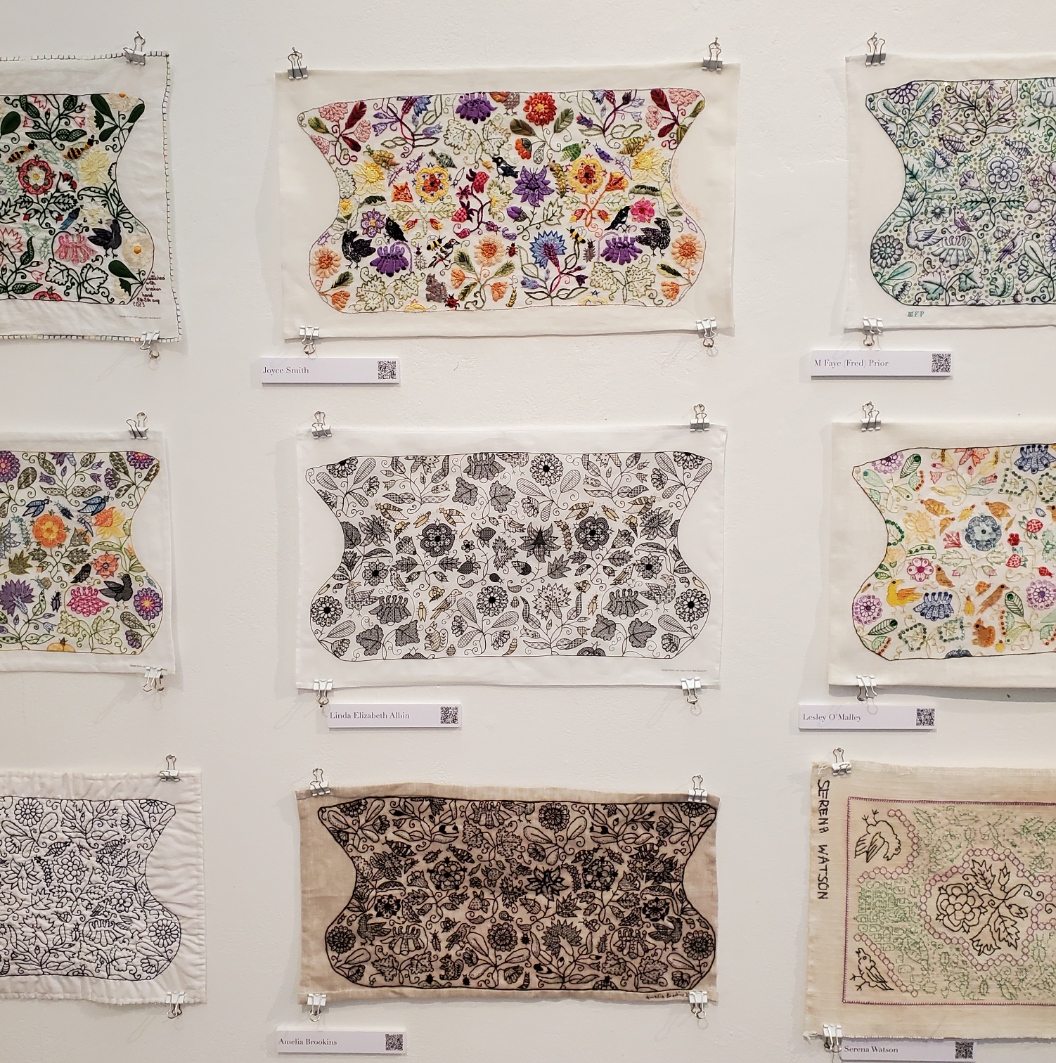
| Emma Bent Kathryn Pike Vivienne Holmes | Charlotte Hollis Clare Saunders Judith Thursfield | Joyce Smith Linda Elizabeth Albin Amelia Brookins |


| M. Faye (Fred) Prior Lesley O’Malley Serena Watson | Isabelle Verny Mathieu Anna Vereker Fiona Johnston | Bridget Marrow Ann Fitzgerald Debbie Gonet |

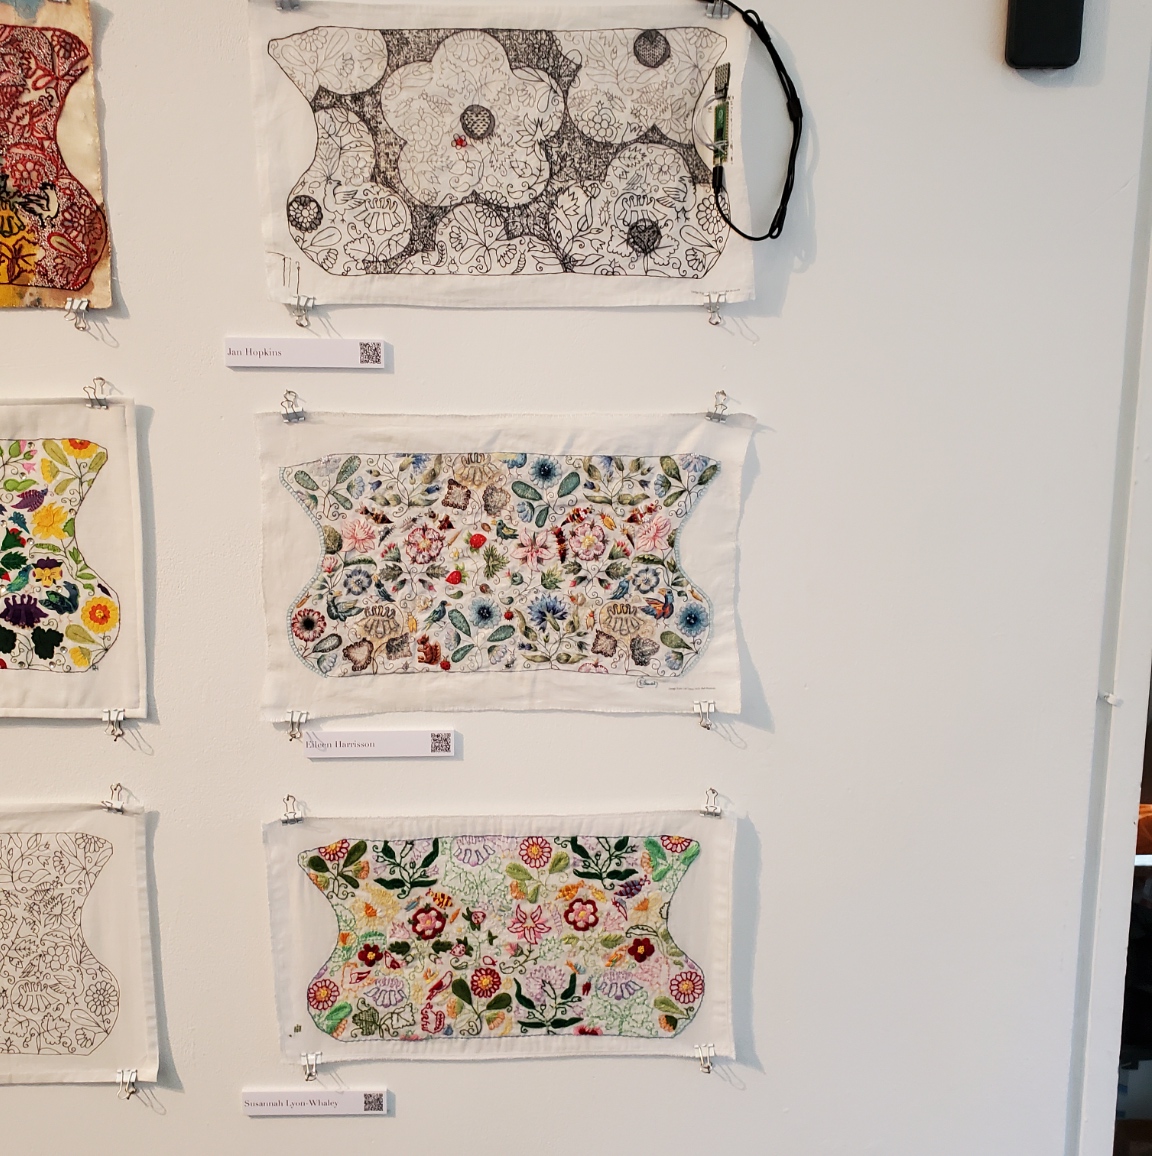

| Duwenavue Sante Johnson Rebecca Harrison-Page Linda Hadden | Jan Hopkins Eileen Harrisson Susannah Lyon-Whaley | Long wall photo to round out the set. |
Coif Replication
As she describes it, Toni Buckby hit upon the idea for the Unstitched Coif project while working on a replication assignment for the Victoria and Albert Museum. They have many pieces of blackwork that are literally eating themselves to death – the tannic black dye used on the silk threads turns them brittle over time. Now, some 400-500 years after they were stitched they are crumbling, leaving only the holes in the ground behind. But these pieces are still sought after for research by visiting enthusiasts/scholars. Toni was commissioned to do a full stitch by stitch reproduction of V&A accession T.12-1948, a well known and popular (although rapidly disintegrating) piece. Her reconstruction is intended for use in educational and outreach efforts because the original is now to fragile to be handled for view.
Toni sourced modern materials as close as possible to those of the original (the 72/74 threads per inch ground is the same one recommended for use on the Unstitched Coif project). She used forensic investigation of the “fossil” piercings and older photos to work out the now crumbled fills and outlines that can no longer be seen on the artifact itself. Her repro is at right.


Other Forensic Analyses and Reproductions
Toni is mapping out another very famous bit of blackwork in the V&A’s collection – the Falkland Pillow Cover, Accession T.81.1924. (In coincidence, this is the piece whose tiny thumbnail photo in Mary Thomas’ Embroidery Book set me off on my own blackwork journey back in the early ’70s). She is using layered drafting methodology to posit the placement and patterning of sections that have now largely disappeared.


Toni is also in mid-project of an ambitious effort to map the patterns on the three dimensional Falkland Waistcoat , V&A Accession T.80-1924, also a victim of thread degradation, plus other distortions and alterations. The goal of this effort is to chart the 3D design and translate it into flat patterning on garment sections that can be replicated and reassembled into a full reproduction. As you can see, exploring the garment shape by modeling is already underway. (Again, click on the photos to open in a new window, so you can enlarge them to read the text).


There was much more to the exhibit – a series of photos and explanations on materials suitability and choice methodology, and samples of the stitches used. But I’ve gone on long enough.
Suffice it to say that it was total immersion in the subject matter that sings to me, surrounded by people who understand and appreciate the artistry, time, and technique it requires. I met so many people, so talented and so gracious, who took time to chat with me, share their insights, and to mutually giggle in joy of finding others of the like mind. I’ve learned a lot from this project both in my own stitching, and from each and every version displayed here. I am deeply indebted to Toni for pulling the community together, orchestrating the effort, inspiring us along the way, and pointing the way forward, beyond. I do hope that this stitched together fellowship persists, and joins forces on future efforts. I know my needle is sharp and ever ready.
MORE ON THE UNSTITCHED COIF EXHIBIT
It’s coming! Here is the official flyer.

The stitching on the flyer is by Toni Buckby, the Unstitched Coif Project’s Fearless Leader. The original she reproduced under the auspices of the V&A is in their collection, It’s rather well known, made between 1570 and 1599 (Accession T.12-1948), but is rapidly deteriorating because the dye used on the black silk continues to eat away at the fiber. The thing is extremely fragile these days, with the stitching crumbling, leaving only needle holes behind. As a result, the museum commissioned a stitch-perfect duplicate for educational outreach, to limit handling of the now endangered original artifact. Toni undertook this assignment, performing forensic analysis of the damaged bits, and examining old photos to puzzle out missing patterns, then sourcing materials and employing methods as close as possible to those used in the 1500s. Toni says that the reproduction informed the Unstitched Coif project concept and planning. The linen sourced for that is the same 72×74 count recommended for Coif participants.
In addition to the gallery exhibit Toni plans to update the Coif project’s official website with photos of all 130 submitted pieces. Each one is a different interpretation of the same drawn outline. Some are monochrome, some are multicolor; some include counted fillings, others use freehand fillings; some are surface embroidery of other styles; a few sport beads, paint, or other inclusions. The website has already been updated with a suite of downloads of the drawn outlines, prepared for several paper sizes. Toni is also exploring the possibility of a printed book, with photos and accompanying blurbs for each coif, as supplied by its stitcher. I do not know if the book will be a limited circulation run or if additional copies will be available for non-participants to buy.
I am looking forward to seeing the exhibit in person. I will be flying to the UK from Boston, to be at the opening event and at a private reception for participants later in the week. I will be taking a lot of photos of the coifs plus other exhibits in situ. If you are among the overseas participants who won’t be able to attend, and you want to see how your piece is displayed, please message me. If I know what to look for (a photo would help), I will try to find your coif and take a picture of it as it hangs in context with its neighbors.
THINKING, BUT KEEPING BUSY
A couple of people have asked if I’m taking a break from needlework in the aftermath of the great coif project.
Nope. To be truthful, I am filling my time with far less challenging pieces while I contemplate the next big project.
First, I’ve returned to the third forehead cloth. I’ve done two before and love wearing them instead of bandannas to contain my hair on windy days. I do a little bit on them in the afternoons, and in the evening catch up on my sock knitting.

The socks are my standard issue toe-ups on anything from 76 to 88 stitches around, depending on needle size; figure-8 toe (an technique unjustly despised by many), plain stockinette foot, German short row heel, then something interesting for the ankle. Mostly improvised. The only hard part is remembering what I did on that ankle so I can repeat it on the second sock.
The forehead cloth is fairly flying. It’s all one pattern, on cotton/linen yard goods that works out to about 32 threads per inch. That’s as big as logs compared to the coif’s linen. I’m trying out Sulky 30 thread (two strands). It’s ok, but I am not so fond of it I’d throw over softer, more fluid flosses. I am betting though that it will stand up to hard laundering better than standard cotton floss. The stitching on my other two forehead cloths, done in silk, has survived quite nicely. Unfortunately the ties – folded strips of the same ground – have totally shredded and been replaced twice on each. I may move to narrow store-bought twill tape for the ties, instead. Jury on that is still out. Oh, and yes, there are mistakes on this. Some I’ll fix, and some I won’t. Have fun hunting for them. 🙂
While I’m here, I’ll share a tiny blackwork hint.

I’m doing double running but this will be relevant to those who favor back stitch, too. See those “legs” sticking out in the photo above? As I passed those junction points I knew I would be coming back again, from a different direction. It is far more difficult to hit the exact right spot when joining a new stitch to an existing stitched line (both perpendicular as here, and diagonally) than it is to mate up to a stitch end. Those legs are there so when I come by again I have a clear and simple target for the point of attachment. This saves a lot of time, minimizes my errors and helps keep my junctions as neat as possible. Try it, I think you’ll find the trick useful.
What am I contemplating for my next project? Possibly a blackwork/sashiko hybrid. I have a barrel chair, a wreck salvaged from the trash, that I had recovered in Haitian Cotton back in the early 1980s. It has survived four house moves and two children, but although the back and sides are in good shape, the seat cover and the area just under the seat are both shot. I still adore the thing even though it doesn’t really fit in with the rest of the house’s style. So it’s going up into my office. I plan on recovering the shredded areas with patchwork denim overworked in white running stitch. The denim will be reclaimed from various outgrown and destroyed garments I’ve held onto against just such a future need. Since I do not plan on replacing the rest of the upholstery, I’m counting on those flashes of white to bring the seat and the rest of the piece together.
