SWIRLY!
People who know me know that I sit still badly. I have to have something in hand to do when waiting, watching TV (or listening to music), or while on planes or trains. Or on vacation. Nothing says vacation to me like sitting somewhere beautiful and taking in the scenery, abetted by needlework.
The past several weeks have been quite a rush, tumbling together major triage on our Pune apartment, pre-packing, relocating back to the US from India (sans The Resident Male, who follows next week); then having only a couple of days home to set things to partial rights, before heading out with the kids and a kid-friend for our annual week on Cape Cod. Now it’s pulling up the reins on our primary residence and getting it back under saddle, fixing two years of little annoyances, putting the cars back into full health and legal compliance, and the mother of all spring cleanings to dispatch the carnivorous dust bunnies now lurking in every corner.
So who has time for knitting? Well… I do. It’s mindless knitting, but it’s a comfort none the less.
I present Swirly – my own off-kilter take on the standard 10-stitch modular concept. Except that instead of one color, endlessly spiraling around itself in 10-stitch wide strips laid out in a base square, I’ve made some changes.

First, I’m using two yarns, one multicolor (Poems Sock), plus one variegated green (Zauberball), using a US #5 needle to make a light and airy garter stitch throw – a perfect “small something” to have on one’s lap while reading. For the record, both are machine washable/dry flat wool/nylon blend yarns, so laundering will be easy.
I started with the multi, working a 10-stitch wide strip, eyeballed for length. Then, leaving my active multicolor stitches on a holder, I worked a four-stitch wide strip of green around three sides of the multi. Then I put the green on the holder and switched back to the multicolor, working a short-rowed mitered corner, then two rows of plain garter, and another short-rowed mitered corner to establish one end of my center area. Then it was marching down the length of the green-outlined strip to the other end, working across the end (with mitered corners where appropriate). When I caught up to myself, I resumed the green, also mitering its mini-corners where needed. And I’ve kept going ever since.
What you see here is almost two balls of the Poems Sock, plus almost one Zauberball – all I had left in India, the last of the sock yarn stash I brought with me. When we got back to the US I managed to order more of each (lucky me – three more balls of multi, one more of the green!), so the blanket will continue to grow. As is, at this point, the thing is plenty big enough to be a baby blanket, so if anyone is looking for an unusual shower gift for parents who are not enamored of traditional pastels or sex-assigned color sets, 200 grams of multicolor sock yarn plus 100 grams of solid color are sufficient, provided no edging or supplemental finish is desired.
I’m not sure how big it will become. It will be done when I think it’s big enough. And I’m not sure how I will finish it off. The slip stitch selvedge edge stitches are a bit flabby to leave all on their own. I’ll either do I-cord all the way around, or invent (or find) a nice, simple edging to give it a more polished final appearance.
So far I’ve enjoyed this mindless bit of knitting immensely. I worked on it in the evenings while I was packing. I knit more on our flights back home. It was already large enough to cover my lap when we were stranded in Heathrow and spent the night perched on chairs in the main International ticketing hall. I kept going with it on the Cape, watching the tide march in and out, measuring the time intervals by garter stitch production. And I’m still working on it, relaxing with it on my favorite chair each night. (I missed that chair while we were away).
There’s no moral to the story here, other than suggesting that in uncertain and confused times, an anchor – even a soft fuzzy one – can keep one from drifting.

SOME MORE SAMOSA
The Samosa Vest is marching along quite nicely. I’ve done it entirely ad hoc – no advance planning, no writing anything down (which is refreshingly liberating, for a change). It’s been sort of sculptural, with problems worked out on the fly. Still – there weren’t many. Here are the front and back views:


You can see that I’ve finished the body strips, wrapping the three primary ones around the front. I did some minor shaping on the fourth, to add a bit of of a bust dart to the general shape. Then I filled in two little patches under each arm. After that the front was substantively done. The next step was to pick up and knit the next strip, which outlined the upper back. I continued on from there, until the space in the center became too small for two mitered corners. At that point, I winged it – filling in the center back with a smaller shape, partially contoured with short rows, and a center-back join. The result is rather like a racer back, and is quite flattering on Younger Daughter (modeled pix when done).
I grafted off or picked up and knit the shoulders. Finally I worked an i-cord edging around the entire outer edge to give the body a bit more firmness, and for a more professional finish. It’s much nicer than the flabby chain selvedge edge that was there before.
Now I’ve got one last problem – there’s a Romulan (or Fire Kingdom) point at the top of each armhole. I picked out one side and re-knitted it, but the point remains. Time for some more noodling on possible fixes. Once I’ve got that repair done, it’s i-cord around the armhole edges, and I’m finished.
Suggestions for possible fixes would be most graciously accepted!
SAMOSA VEST PROGRESS
As you can see, I’m making quick progress on my Samosa Vest. Right now it’s just a single confusing strip of garter stitch knitting, with a couple of mitered corners and some angles thrown in. But when you pat it into shape, the concept emerges:

Ignoring the confusing letters for the moment, you can see the basic outline – the vee-neck, and the bottom edge that defines the width of the finished piece.
I cast on 13 stitches at A. I knit a garter diagonal band, increasing on one side of the strip and decreasing on the other every other row to achieve the angle. When my neckline was deep enough (B), I switched to working straight – a plain old 13-stitch strip until I was about 2 inches shy of my desired length. Then I worked a wrapped short-row miter, making the corner at C. I then knit across the bottom edge of the front, across the entire back (unseen, from D to E), then back across the front to the center point. Again, about two inches shy of the center point, I did another miter (F). After that I worked straight up to point G. I reversed the shaping of my initial angled strip to create its mirror image, from G to H.
Then exactly as I did in my Motley blanket, I cast off 12 stitches, added 12 and proceeded to work the second strip, knitting it onto the established edge strip as I went along. I worked miters again at points K and N. You can see I’m past O, headed back up to the shoulder where I initially cast on.
I will continue in this manner for one more strip. That will make the shoulders of the piece about as wide as the shoulders of the target tee-shirt I am using as my size model. At that point I’ll have to figure out how to fill in extra bits on the sides and in the center of the back. But so far the thing has come together exactly as I envisioned. And quickly, too!
JUST BECAUSE IT’S ALMOST DONE…
…is no reason to rip it out because some other fool idea has wrestled you to the ground, wrapped yarn tendrils around your brain, and has refused to let go.
So.
I started making a Lightning Shawl, one of the 10-stitch variant family of patterns posted by Frankie Brown.

I only have two skeins of Noro Taiyo Sock yarn. That’s barely enough to make a skimpy shawl. You can see I’ve got five strips done. I have enough yarn to complete about eight pattern strips (and maybe a bit more) – a couple strips narrower than the ten strips specified by the pattern.
You can see that I was pretty far along, well into my second skein, and the growing shawl looks pretty good. The drape is nice too. In fact I’d recommend this yarn for the Lightning Shawl, but preferably 2.5 or 3 hanks, so that the final piece is of generous proportion. But I digress.
This afternoon after knitting on the thing for a whole week, I ripped it out. Every stitch. All that’s left is a pile of yarn balls and my two needles.
I’ve got this mad idea that I have enough yardage here to make a cropped, boxy vest type thing. And I want to do it somewhat along the lines of my Taco Coat:


Now this isn’t going to be as huge as the coat (that’s big enough to be a blanket with sleeves); and I probably will make it in one piece rather than a right and left, joined at the spine. But it will use the same idea of the outside edge and in working logic. The first strip will proceed from the shoulder into a wide V-neck, and down the front center, then mitered at 90-degrees, across the bottom of the hem and all the way around the back, returning to the front, climbing back up the front center and ending at the opposite shoulder. If I do this right it will work out not unlike a Surprise Jacket, with the only seaming being across the top of the shoulders..
I have no idea if this is going to work or not. Nor am I going to draft up a pattern before I begin. I’m going to cast on for that outermost strip, and as I go, compare it to a t-shirt with the boxy fit I am looking for. And then just wing it.
If nothing else, this project (code named Samosa Vest*) should make for some entertaining reading here, with lots of Doh!-moments and a few painful lessons learned.
* Just because. I am in India, after all, and a first cousin to the Taco Coat should also have a wrapped-snack-food name.
NOTHING IS PERFECT
And foremost among the imperfect is me.
Case in point:

Here you see my beaded red lace scarf. I wanted to relax it a bit prior to adding on the deep lace edging, in order to make doing so easier. So I began pinning it out for steaming. Pressing it is right out because of the beads, but steaming should have set the acrylic nicely, smoothing out the selvedges for ease of access.
AAAGH!
It’s obvious that I as I was tooling along nearing the finish line I didn’t pay attention. I missed catching all three loops of a tricky double decrease. When I applied light tension with the pins, the unsecured stitches popped out.
The lace patterning is a bit complex here, otherwise I’d consider just mounting the fallen stitches on DPNs and re-knitting that little bit, securing the final stitch with a bit of darning. But I think that I’ll probably have to unpick the cast off row (here at the bottom of the photo), then unravel the final half motif or so, remount all the stitches, and re-knit. Provided of course that this is the ONLY mistake of this type in the entire 5.5 foot long piece.
Moral of the story – overconfidence is bad. Check your work. Give a light tug every now and again to make sure your stitches are true.
FOR SOMEONE DOING NOTHING, I SURE AM BUSY
It’s a fair question – “Where have you been?”
The answer is “Busy.”
I’ve been out fabric shopping with friends; trying to establish a regularly meeting needlework circle at a local mall on Fridays; battling the Sacred Dust of India as it tries to repossess the flat; writing a presentation and workshop on the style intersection between Kasuthi embroidery and Renaissance counted work; dealing with assorted technology annoyances; working on TNCM2; trying to parse out more interesting blog entries from my London pix; and playing with various stitching and knitting projects.
First off, I’ve taken up Big Green again. It’s tough to do here. I need very strong light, and even with a small task spot in the living room, the only place bright enough is next to a window in the middle of the day. I long for my comfy chair and spotlight at home.

It’s hard to spot the progress on this strip because it advances at such a slow rate, but it’s there.
Then there’s a new stitching project, as leggy and coarse as Big Green is fine. I bought a pack of ultra-cheap dishtowels at the supermarket, because I always seem to have run out of non-terry ones when I am looking for something to toss over rising bread. One quick wash later, and as expected for bargain basement Indian cotton – they’d faded and shrunk. But wait! That dark indigo one is now a pleasant, mottled chambray. And it’s almost even weave:

So into the stash for some ecru DMC linen floss (which I’ve now learned has been discontinued. It figures…) Because I’m stitching over 3×3 threads to even out inconsistencies in the weave, and because the linen thread is fuzzy with its own rustic character, I decided to play on that folksy appearance rather than going for crisp, tiny detail. The pattern is yet another one that will be featured in in TNCM2. This, when finished out, will be a strip decorating a pocket edge of a zippered stitching caddy. The entire outside of the case will also be worked in one of the larger all-over patterns in TNCM2. Without cutting up the dishtowel, I intend to origami it into a series of graduated pleats, then stitch perpendicular to the folds to make pockets opening “up” and “down”.
The final step will be to fold the entire thing in half, then take an over-long large-tooth jacket zipper (toddler size), and run it around three sides. This should make an organizer pouch that when zippered, lies totally flat. I may sew one of the smaller interior pockets shut, stuffing it with some sort of padding to make pin cushion (perhaps with a finer gauge fabric as liner, so I can put emery into it). And I may also stitch in a couple of pieces of sturdy felt, so it has an integrated needle-book on the inside. The details of this finishing are still idle speculation at this point. Right now, it’s just a quick doodle.
I’ve been busy with knitting, too.


I’ve finished the body of the beaded red lace scarf. I’m drafting up the companion edging, with more beads and mitered corners. I also have to “kill” the acrylic yarn so that it lies flatter. Not quite sure how I’ll achieve this, since the beads make ironing problematic. But I’ll figure it out, even if I have to do up a couple of sacrificial beaded test swatches.
Also in the photo above is the latest pair of socks. That’s pair #5 in the past two months. I work on them while we wait for the school bus in the morning, or any other time I’m waiting on a line, for a car, or find myself idle outside the apartment. After this pair I’ll have to get creative in combining the leftovers on hand. I’ve gone through most of the sock yarn I brought with me. I have a couple of balls of Noro sock yarn left, but I’d prefer to use that for some other accessory. The yarn is beautiful but I prefer wearing (and washing) other sock yarns, for comfort and durability reasons.
KEEPING BUSY
In all of this observational and research posting what’s been missing has been reporting on my own projects.
I’ve been busy since finishing the Ganeshji piece. I’ve finished Younger Daughter’s red pullover:

Purists will note that we ended up eliminating the belled lower sleeves. They ended up being a bit too much for India’s climate. The thing fits quite nicely. My only caution is that in the chosen cotton DK it’s quite warm.
I also knit up a small teddy bear as an as-yet ungiven gift. I used the free Berroco Foliage Bear pattern, and Bernat Mosaic on US #9 (5.5mm) needles. There’s enough in one skein of multicolor Mosaic to knit at least one more bear of this size. Stuffing was cannibalized from an inexpensive throw pillow bought at the local supermarket; crafts stores and virgin stuffing materials not being exactly common in Pune.

Special thanks to long time needlework pal and multi-century enabler Kathryn, who gave me this wildly bright acrylic skein to share with my kids. I sheepishly admit that it crept into my backpack, and I diverted it to my own use.
I also finished yet another pair of socks. I’ve taken to knitting at the bus stop while waiting with Younger Daughter in the morning. This pair is done, and there is another behind it, well along on the needles:

It’s my standard figure-8 cast-on, toe-up sock, but done on log-huge US #1s – 64 stitches around. The lacy meander on the side is from the first Duchrow collection (page 35). I’ve used it before on a baby blanket. These stripy blue socks are also meant as a gift, along with the men’s pair I’m working on now.
And I’ve started doodling with Kasuthi embroidery. I’ve got a large piece of somewhat even-weave fabric. Big enough to make a half dozen napkins. So I am doing a different motif, totally double sided, on each one. I will stitch all six motifs, then cut apart the cloth and hem the napkins. Motif Number One is complete:

You can see the stepwise logic of the filling pattern in the star flower’s petals. The resemblance to stepwise Western band patterns (like Jane Seymour’s famous cuffs and Anna Meyer’s sleeves) is even more pronounced in Kasuthi border/edging designs. A couple of those are on deck for future napkins. But first, I’ve GOT to do one of the traditional elephants…
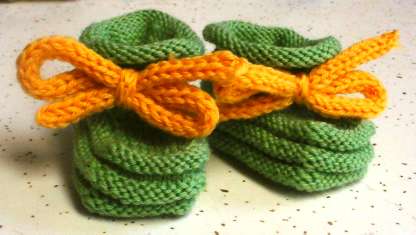
WOOLWORKS AND ANN KRECKEL’S “JANE’S BABY BOOTIES”
As folks here know, I adore this little pattern. It’s not mine, but I’ve knit at least sixty pairs for friends and family. Ann Kreckel posted it to the Ancient KnitList mailing list in 1995 (in its pre-Yahoo academic server days). It is Ann’s redaction of an older pattern passed down to her from her mother. There’s also a similar pattern that appeared a couple of years later in Threads Magazine (before they abandoned handwork), sent in from a lady then in her 90s, who said she learned it as a girl. I’m still looking for the ultimate source of both her and Ann’s mother’s pattern, probably in a women’s magazine or knitting booklet published before 1920.
In any case, for the longest time, this pattern has been available in the archives of the KnitList, and later on the now apparently defunct Woolworks.org website. Most of Woolworks’ content can be found here on the Internet Archive, via the Wayback Machine, a nifty tool for exhuming dead websites.
Ann’s pattern for Jane’s Baby Booties is here at this link, in full.
Here is my mini tutorial on knitting her pattern.
Here is my hat pattern to match her booties (PDF).
Woolworks disappearance is a shame, especially in that it appears to have happened without comment. Woolworks, compiled and maintained by EmilyWay, was one of the first comprehensive knitting sites on the ‘Net, and Emily should be one of the Internet knitting community’s patron saints.
In any case, having tried but failed to find Ann herself, I’ve shared the link above, but am loathe to repost her pattern verbatim. It’s hers, and I respect her copyright. If you know Ann, please match-make the two of us together, because I’d like to host the full text of her excellent design here.
LAST LEGS (OR IN THIS CASE, ARMS)
What is this wadded, folded red object?

The red top-down pullover, of course. I’ve finished both sleeve caps. They were worked onto the body rather than seamed on later, and were done both using the short-row method described in the pattern. More or less. There was some fudging and work-arounds to maintain the lacy rib pattern, and I ended up having to do an extra row after pick-up because try as I might, I could not pick up as few stitches as were specified without leaving unsightly gaps and puckering. So, I picked up an appropriate number (mid way between my chosen size and the next one up), then worked an additional row of strategically placed decreases to slim the count down to the pattern’s number. That means my lacy rib starts one row after the seam instead of butted up against it, but unless I point that out, it’s not noticeable. (Oops. I just did.)
Why is it all folded up? Because now that I’m in the post sleeve cap arm section, I am knitting both sleeves at the same time, using the two-circ method. This will guarantee that they are both the same length and configuration.
I often do the same thing for socks, mittens, or other things that come in identical or mirrored pairs. I even knit cardigan fronts side by side when working flat, for the same reason. You can barely see a pink stitch marker attaching the two sleeves together in the center, just above the working needles. This is a small trick I stumbled on that has eliminated hours of grief for both two-circ and flat production of side by side pieces. Securing the two pieces together in a fixed orientation helps me keep on track, knitting both items in the same direction and minimizing the “Drat! I just loaded everything onto the same needle” mistake.
RIGHT ON TRACK
The red top-down pullover is growing at a good pace. I’m finding the Cascade Yarns UltraPima to be a very easy cotton to knit – easy to keep tension, non-splitty, and fast to work. I’m averaging about 3 inches per evening.
The true color is rather more tomato than fuchsia, but you get the idea:

The pattern is of the type I haven’t seen for quite a while. It’s not written for new knitters. As I warned before, if you are intimidated by things like “repeat as for left, reversing shaping,” or if you have problems calculating back to add panels of an established pattern to newly cast-on stitches, you will want to sit down with this one first, making plenty of notes and figuring out what is meant before you plunge on ahead.
One extra hint – the increases and decreases in this piece happen at long intervals, for the size I’m working in one case every seven rows, in another, every 14. Keeping track of that can be a pain, but I use one of my Stupid Stitch Marker Tricks to do it. I have a marker indicating the first stitch of the round. I take a contrasting color marker, and advance it one stitch away from the first-stitch marker on each round. When seven stitches have accumulated between my first-stitch marker and my counting marker, I am ready to do my decrease. I find this method more immediate and less difficult to forget than using tally marks on paper, counting stones, or a stitch counter gizmo.
But I’m past the tricky bits now. I’m into the section below the empire waist, where the “skirt” area is slowly increased to make a baby-doll A-line silhouette. Easy. The next tricky bit will be the sleeves, which I intend on making shorter than the original.
On yarn consumption, I’ve just wound and tapped into Skein #3. I figure one more after this one on the body, then possibly 1.75 to 2 per sleeve. I’ve got plenty and should not have to dip into the odd-lot extra skein in my mixed dye lot bag.
I’ll post more on expat life this week, once I’ve retrieved the pictures from family cameras.
