MORE CHALLENGES, MORE EXPERIMENTS
A bit of a challenge here, and almost like I invoked it through charms.
After making the big eyeball cushion and then these little crocheted cotton eyeball appliques abstracted from the big cushion, yesterday I was diagnosed with Shingles, and the point of invasion is around my left eye. It’s like I leaned out the window and yodeled the Elf Knight’s name. So summoned, he came.
I have been to doctors and am under the standard regimen to ameliorate and contain the infection, but the inconvenience of one-eyed stitching remains. Luckily, so far focal length complications have not set in. Still, I can’t just sit here, I have to be doing SOMETHING, so I soldier on.
And so today we have more experiments.
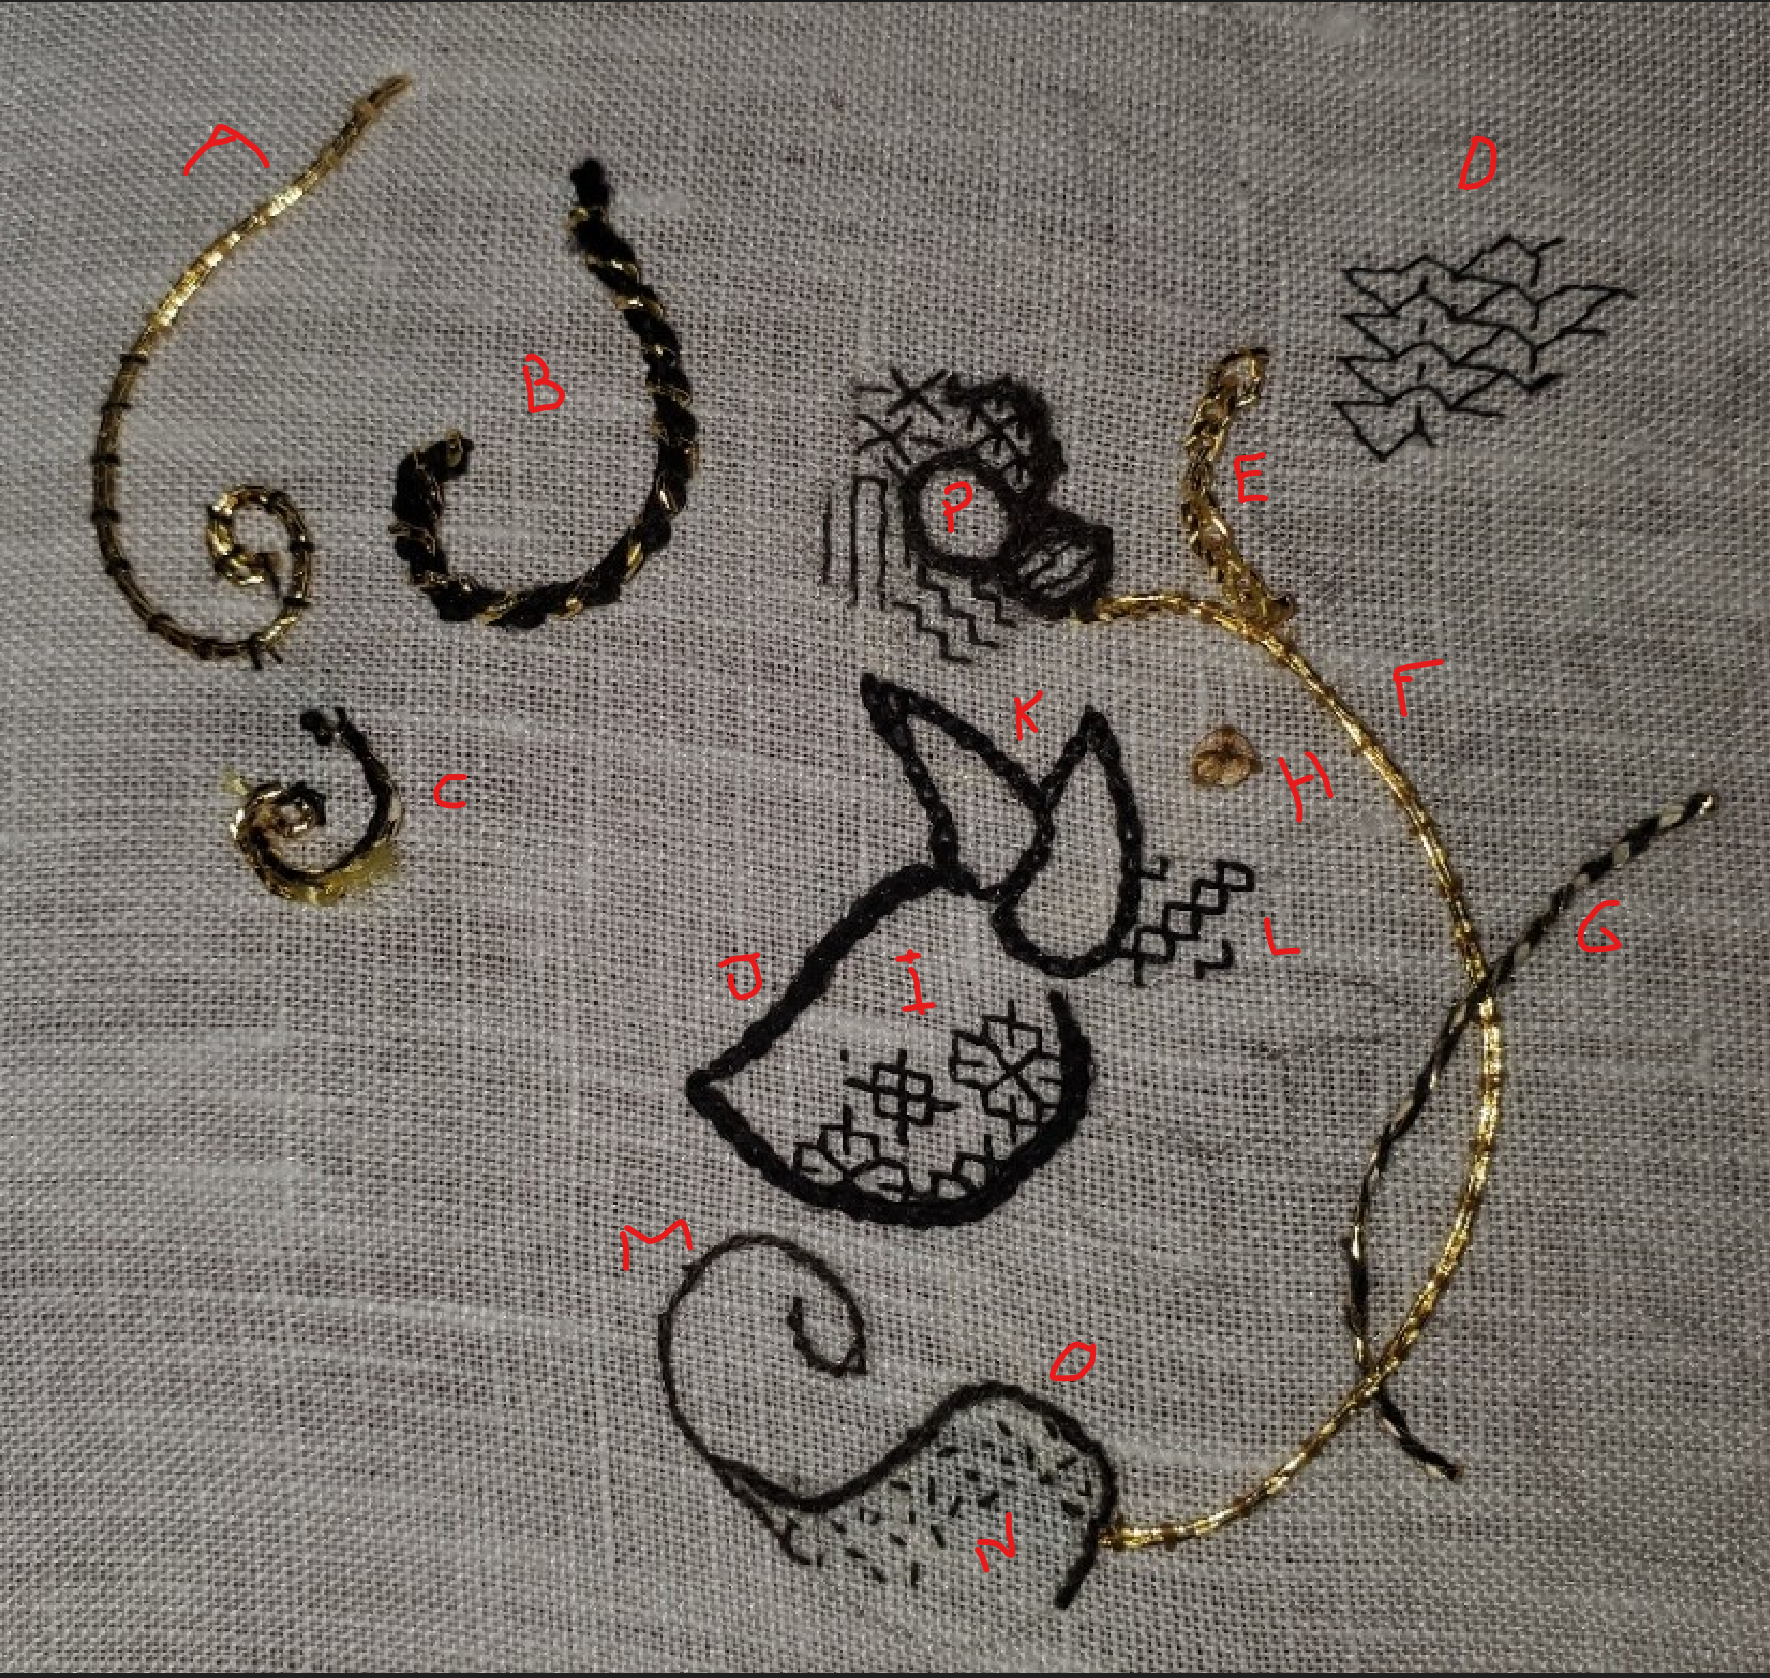
It’s getting confusing, so to supplement the last post, I have added identification letters. Items not discussed in today’s note are in the last one.
First off, the other fine silk and specialty needles aren’t here yet. Sadly one of the threads I ordered is a long lead item, and will not be available until after the September submission deadline for this project. So it has been nixed. With luck the rest of the order should be here by the end of the week. And on to this crop of equivocal results.
Gold Swirl A – I liked the two strands of couched gold I did (Item F), but wondered how three would look. So I tried it, both with the gold color silk couching stitches and black ones. I couldn’t get the three strands to lay as neatly as the two, and the bulk just made handling and plunging them more difficult. So if I use couched gold, it will be the two-strand bit. And I am not that fond of the black threads holding down the gold, so I will use the gold color faux “art silk” I brought back from India.
Heavy Whipped Black Swirl B – This is two threads of my heavier unnamed silk, worked in reverse chain, then whipped with one strand of the Japanese gold. Love the look. Hate doing it because as I found before, the wrapped gold shreds itself. Plus the line is too heavy in company with the others.
Pekinese Stitch Black Swirl C – This started out as two threads of my heavier silk, a line of back stitch. Then I attempted to thread the gold through the stitches, in swirls. Bad idea, as this sorry little twisted tentacle shows. After this bit I have given up all thought of using Japanese Gold #5 as a passing thread, and will stick to couching it. That’s what it does best.
Counted Fills I and L – Two strands of the YLI 100 weight silk. It quite hard spun which works nicely for stitching over 3×3 threads. I think I have a winner here for the counted bits, pending receipt of my other candidate, still in the mail.
Heavy Black Outline J – Two strands of my unnamed silk, worked in reverse chain. I like the bolder line made by reverse chain over that produced by chain the “normal” direction. I do not pierce the fabric as I go under the legs of the previous stitch. I find that gives a more fluid line that better follows curves. There’s more on this stitch here. I like the stitch, but it’s too heavy in this particular thread. The motif outlines should not twice the thickness of the stems. If I go for the stems in the couched gold, this one just won’t do.
Lighter Black Outline K – Two strands of my Golden Schelle silk. This thread is only a fraction thicker than the spooled YLI, but it is more lofty. Two strands of it done in reverse chain is a much more suitable thickness for motif outlines. Again, I think I’ve got a winner. This is a hand dyed thread produced using recipes contemporary with the design of this coif, and my stash is largely from their initial dyeing experiments, therefore in some of the skeins there is a tiny bit of variation in the depth of the black achieved. The later Schelle skeins I have are a luscious, uniform and saturated black, but I am choosing to use the early ones. I won’t go out of my way to maximize the mixed tonality effect, but I do think that just using it naturally as it reels out will lend a very subtle historical look to the stitching.
Skinny Swirl/Outline M – Stem/outline stitch, in one strand of the heavier unnamed silk. First, I find it far harder to achieve a smooth and sinuous line in stem/outline than in reverse chain. And this is just too thin and wimpy for this design. I need a bolder outline than this stitch/thread combo can provide.
Slightly Thicker Swirl/Outline O – Same stitch and thread combo as M, but using two strands. Better. But K just looks better to me.
Stippled Fill N – One strand of the YLI, taking tiny dot straight stitches. A very common treatment found in historical blackwork pieces. No counting required, the stippling is usually used to model the roundness of the shape being filled, with denser and less dense areas. While I’m not a big fan of this treatment I will probably use it on some areas that need filling but are too small for easy use of a counted design.
Am I now ready to go? Almost. I still want to get my hands on the remaining silk, plus the tiny blunt beading needles. But I think I have identified my preferences. I may start in on the big piece tonight, working a counted fill in one of the larger areas. Now which fills to use….
It’s a darned good thing that I have two free books full of them, plus more in my as yet unpublished doodle notebooks. And if you are following along and want to use those fills – a note of caution that I do include in the foreword of both of them. The overwhelming majority of those fill designs are NOT taken from historical works, and in fact have ZERO historical precedent. In general, the more complex, the more likely it is my own flight of fancy. But even my flights of fancy stick to the design precepts of the historical fills. I use only 45, 90, and 180 degree angles – simple straights and diagonals. No “knights move” stitches over 2×1 units. No other elongated stitches, either. One unit = 1 stitch. Those things are wonderful addition to the designer’s vocabulary, adding all sorts of new angles to play with. But they are also absolute markers for the modern style, and I leave them to others.
I will certainly try to stick to fills that are “historically plausible”, but if I transgress and include an identifiably anachronistic one, well, time (and with luck those who cast an appraising eye on the finished work) will forgive me.
INITIAL EXPERIMENTS
I’ve started in trying out various approaches and threads for the Unstitched Coif project. Here’s last night’s progress on my sidecar companion piece. It’s the same ground and threads I will use on the main project, but done to keep mistakes off “center stage.”
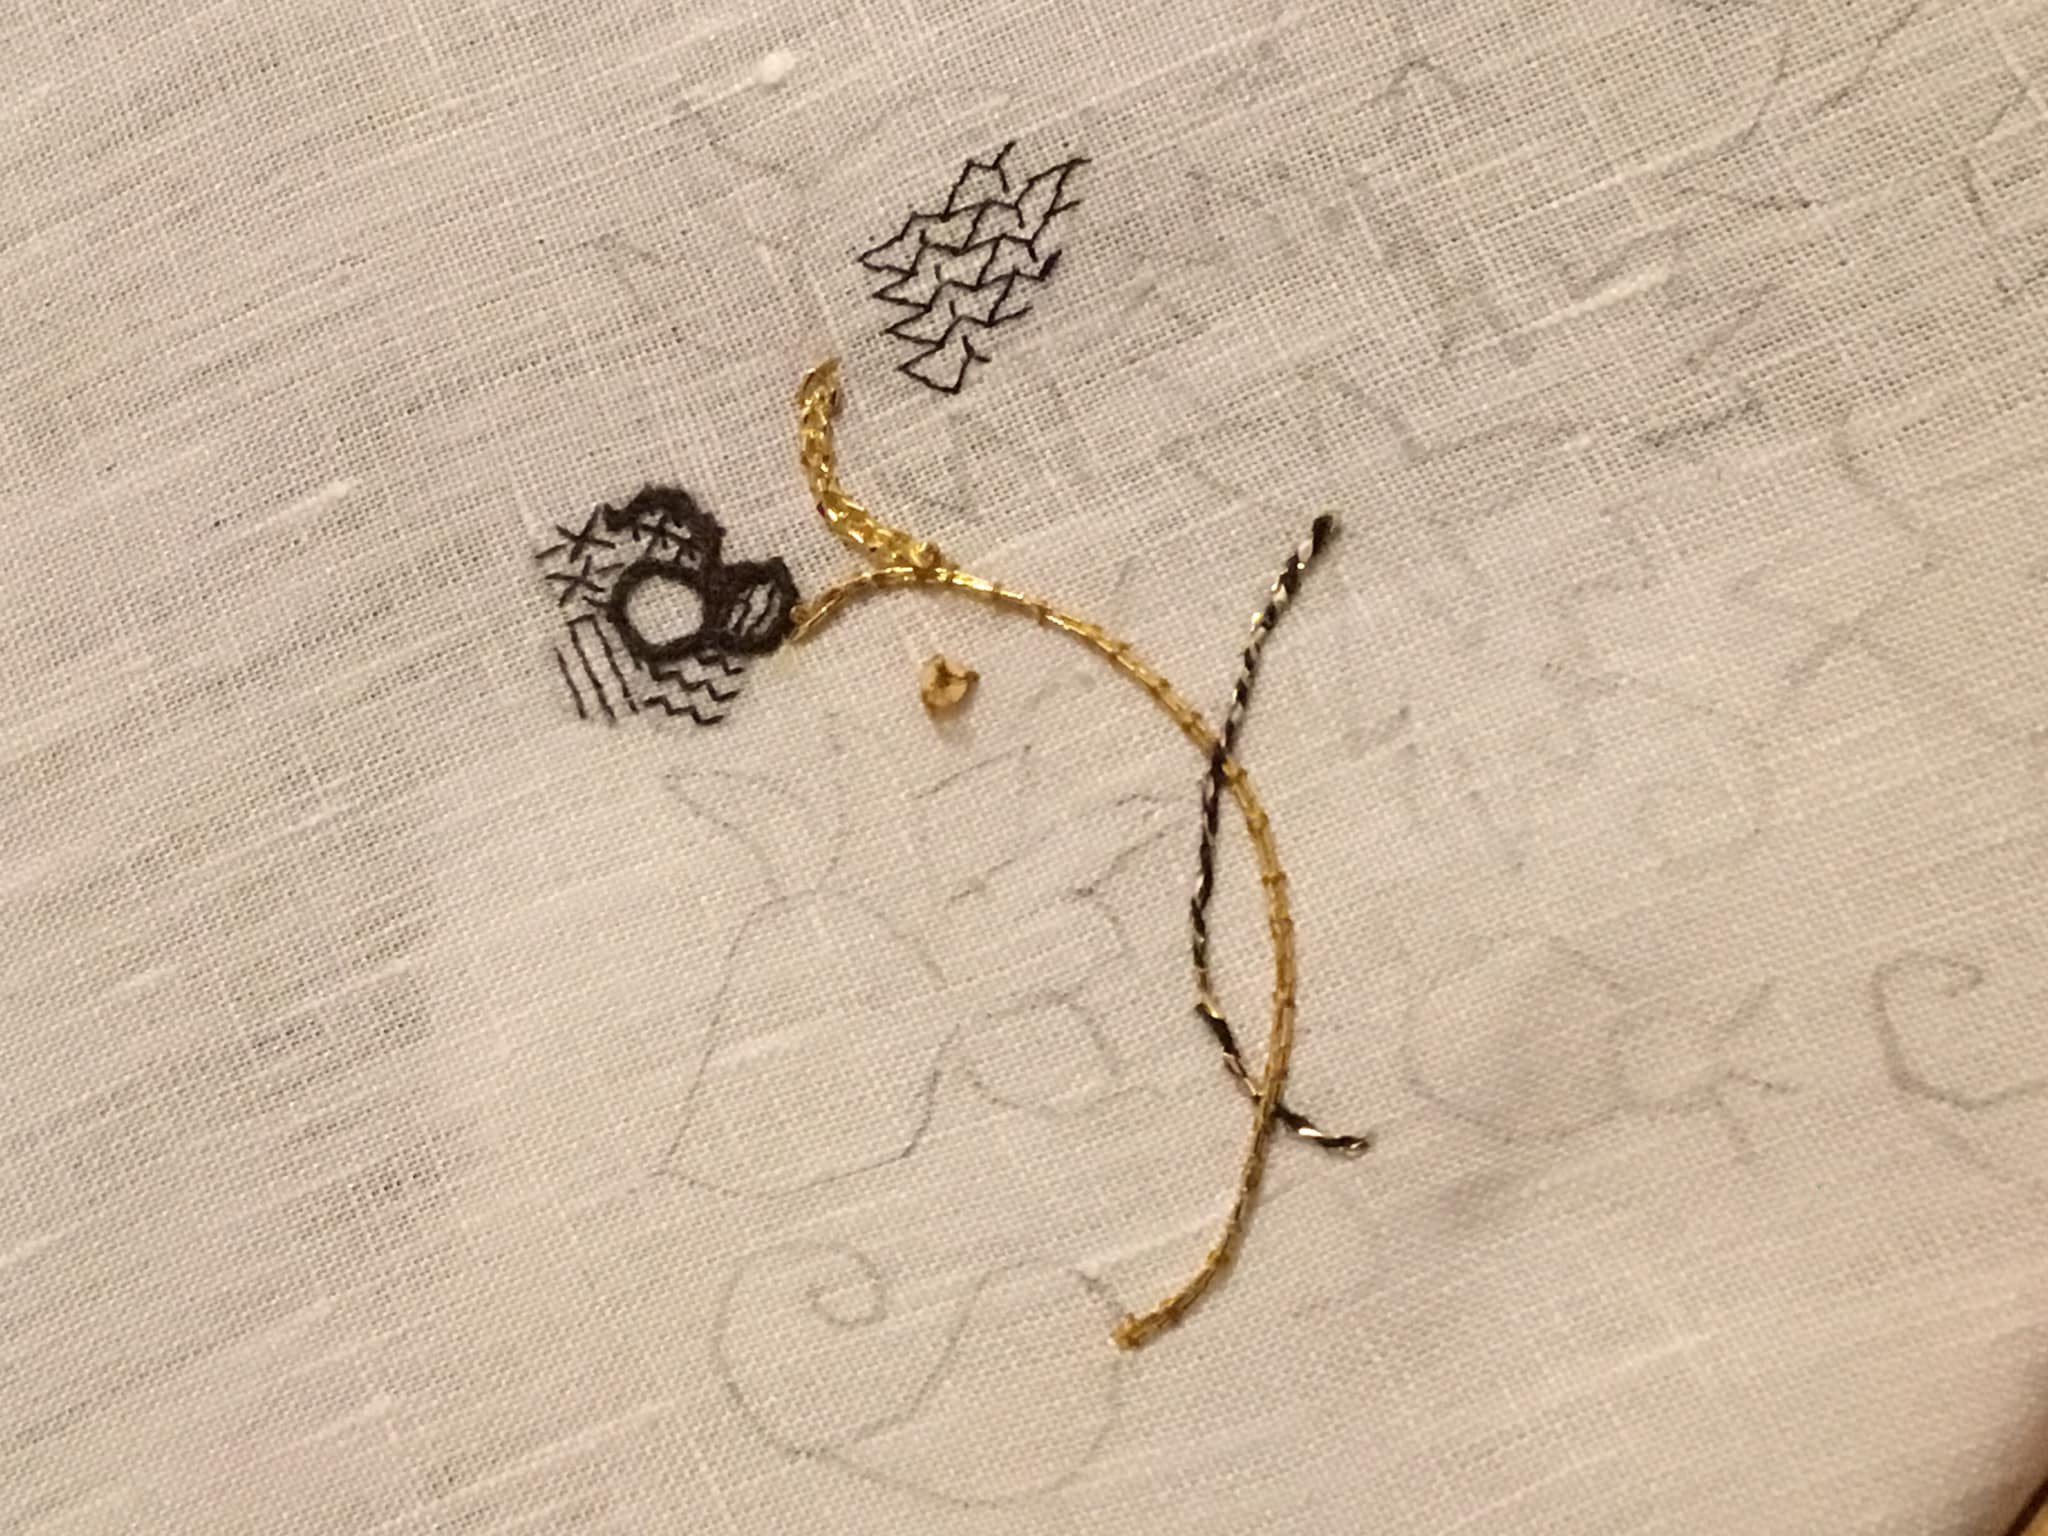
This isn’t final work, just doodles. I am not proud of it, there are lots of things that are sub-optimal. Let’s go through the bits.
First, the couched double strand of Japanese Gold #5. Still getting my mojo back with metal thread couching, I did cross my strands at the beginning of the bit up near the sad little flower, but by and large it worked. And it’s much easier on the flat frame where I can use two hands to stitch, rather than on this little round, where one hand is used to hold the frame itself. If the other hand manipulates the couching thread, I still need a third to tension and bend the metal thread around curves. Sadly, I am only equipped with two hands.
I used a gold color “art silk” for the couching threads, and was able to plunge the ends neatly using a loop of polyester sewing thread to capture them. That thread does not remain in the project. I thread a folded strand into a needle that’s slightly larger than what I would use to stitch, and with the loop trailing, pass it from top to bottom through my ground, then use that loop to nab the metal threads’ ends and pull them through to the reverse.
As far as appearance, not bad. I’ve managed tight curves using this stuff before, and I am confident that I could do it again. But the contrast between the blackwork and the many gold stems might be too great. We will see….
The 2mm paillette sewn just south of the gold stem. It works. It’s the right size for the uninhabited spaces between motifs. I will probably use them to spangle the piece once the majority of the stitching is done. And yes, I used the same faux gold tone silk to affix it, with three stitches.
The thicker gold sprig at the top. Again, that’s the Japanese Gold #5, but used as a passing thread. Only partial success with this bit. I used a reverse chain stitch, and passed the chain loop underneath the legs of the previous stitch, but did not pierce the fabric. While I like the sparkle it adds, it was not easy to do. The wrapped thread denatures, and the #28 needle was impossible to thread. I most definitely need a different needle if I want to use this stuff as a passing thread. Still even though it’s not a heavy plaited stitch and may not be exactly documented as a specific stitch used on historical coifs, the texture sings to me, as an echo of Elizabethan/Stuart era aesthetic. If I can figure out a better needle size, I may use it for some of the logically thicker stem sections. But like the plain couched bit, I am afraid of overwhelming the blackwork. Even more so with with sparkle.
The black and gold stem. Two strands of one of my thicker, stash-aged filament silks. Very fuzzy and prone to catching. I tried out both regular chain stitch and reverse chain (top and bottom of the stem respectively), then I whipped the entire stem with a single strand of the Japanese Gold. Again I had problems with the gold thread unraveling, even though the only place I pierced the ground was at the beginning and end of the stem. Different needle, for sure. And possibly doing it in the other spiral direction. Perhaps I was unknowingly adding to the metal thread’s twist by working in the established direction. But if I can make it work, I do like the look. Perhaps as shown here, I could vary stem treatments, twining full gold with black/gold. Or I could try out a line of double running, back or outline stitch done off count, and whip that, or work another threaded-behind surface treatment with the gold. More thought (and a better needle) is required.
The sad little flower. Been over this one before. My initial stab at counting on this ground. Working over 3×3 threads with one strand of Golden Schelle thread. Not pleased. Nothing wrong with the thread but it but a touch too heavy for the effect I want. That plus my own eyes, the needle size and unfamiliarity with working so fine a count make this bit suboptimal. I also tried using two strands of my slightly thicker stash silk for the outlines, in reverse chain. Too thick. Good for stems at that thickness. Have to experiment with using only one. Or perhaps using two of the Schelle strands for the outlines. More work is needed before I settle on “just right.”
The bit of fill at the very top. This is the debut try-out of one of the finer, newly purchased threads. This one is the one I got off Amazon – YLI 100 weight silk. The tiny spool holds 200 meters.

It has a very smooth finish compared to the others I have, and is quite ethereal. I waxed it with beeswax (as I do all of my threads used for countwork), and that helped give it more body. It was difficult to keep my needle threaded though, because being that fine it could have held a state banquet for fifty more threads of its diameter in the ample eye space of my #28 tapestry needle.
On the effect achieved – yes, I made a mistake in the fill design I was playing with (Ensamplario Atlantio II, #29). I chose that one because it would magnify differences in warp and weft stitch length, both straight and on the diagonal. I am getting more used to working with the magnifier three inches from my nose, and although I have some stitches wrong, they are all in the right spots. The effect though is rather leggy and spider like. This thread may be too tightly spun and smooth for best effect. I will try it out with a double strand next.
So there is my first round-up of experiments. Nothing done yet on the main project. Some food for thought. Some nope. And I am on tenterhooks waiting for the other two threads and the finer needles. But until they arrive, back to the lab for more bench tests!
ALL DRESSED AND READY TO GO
… Just waiting for my thread to arrive.
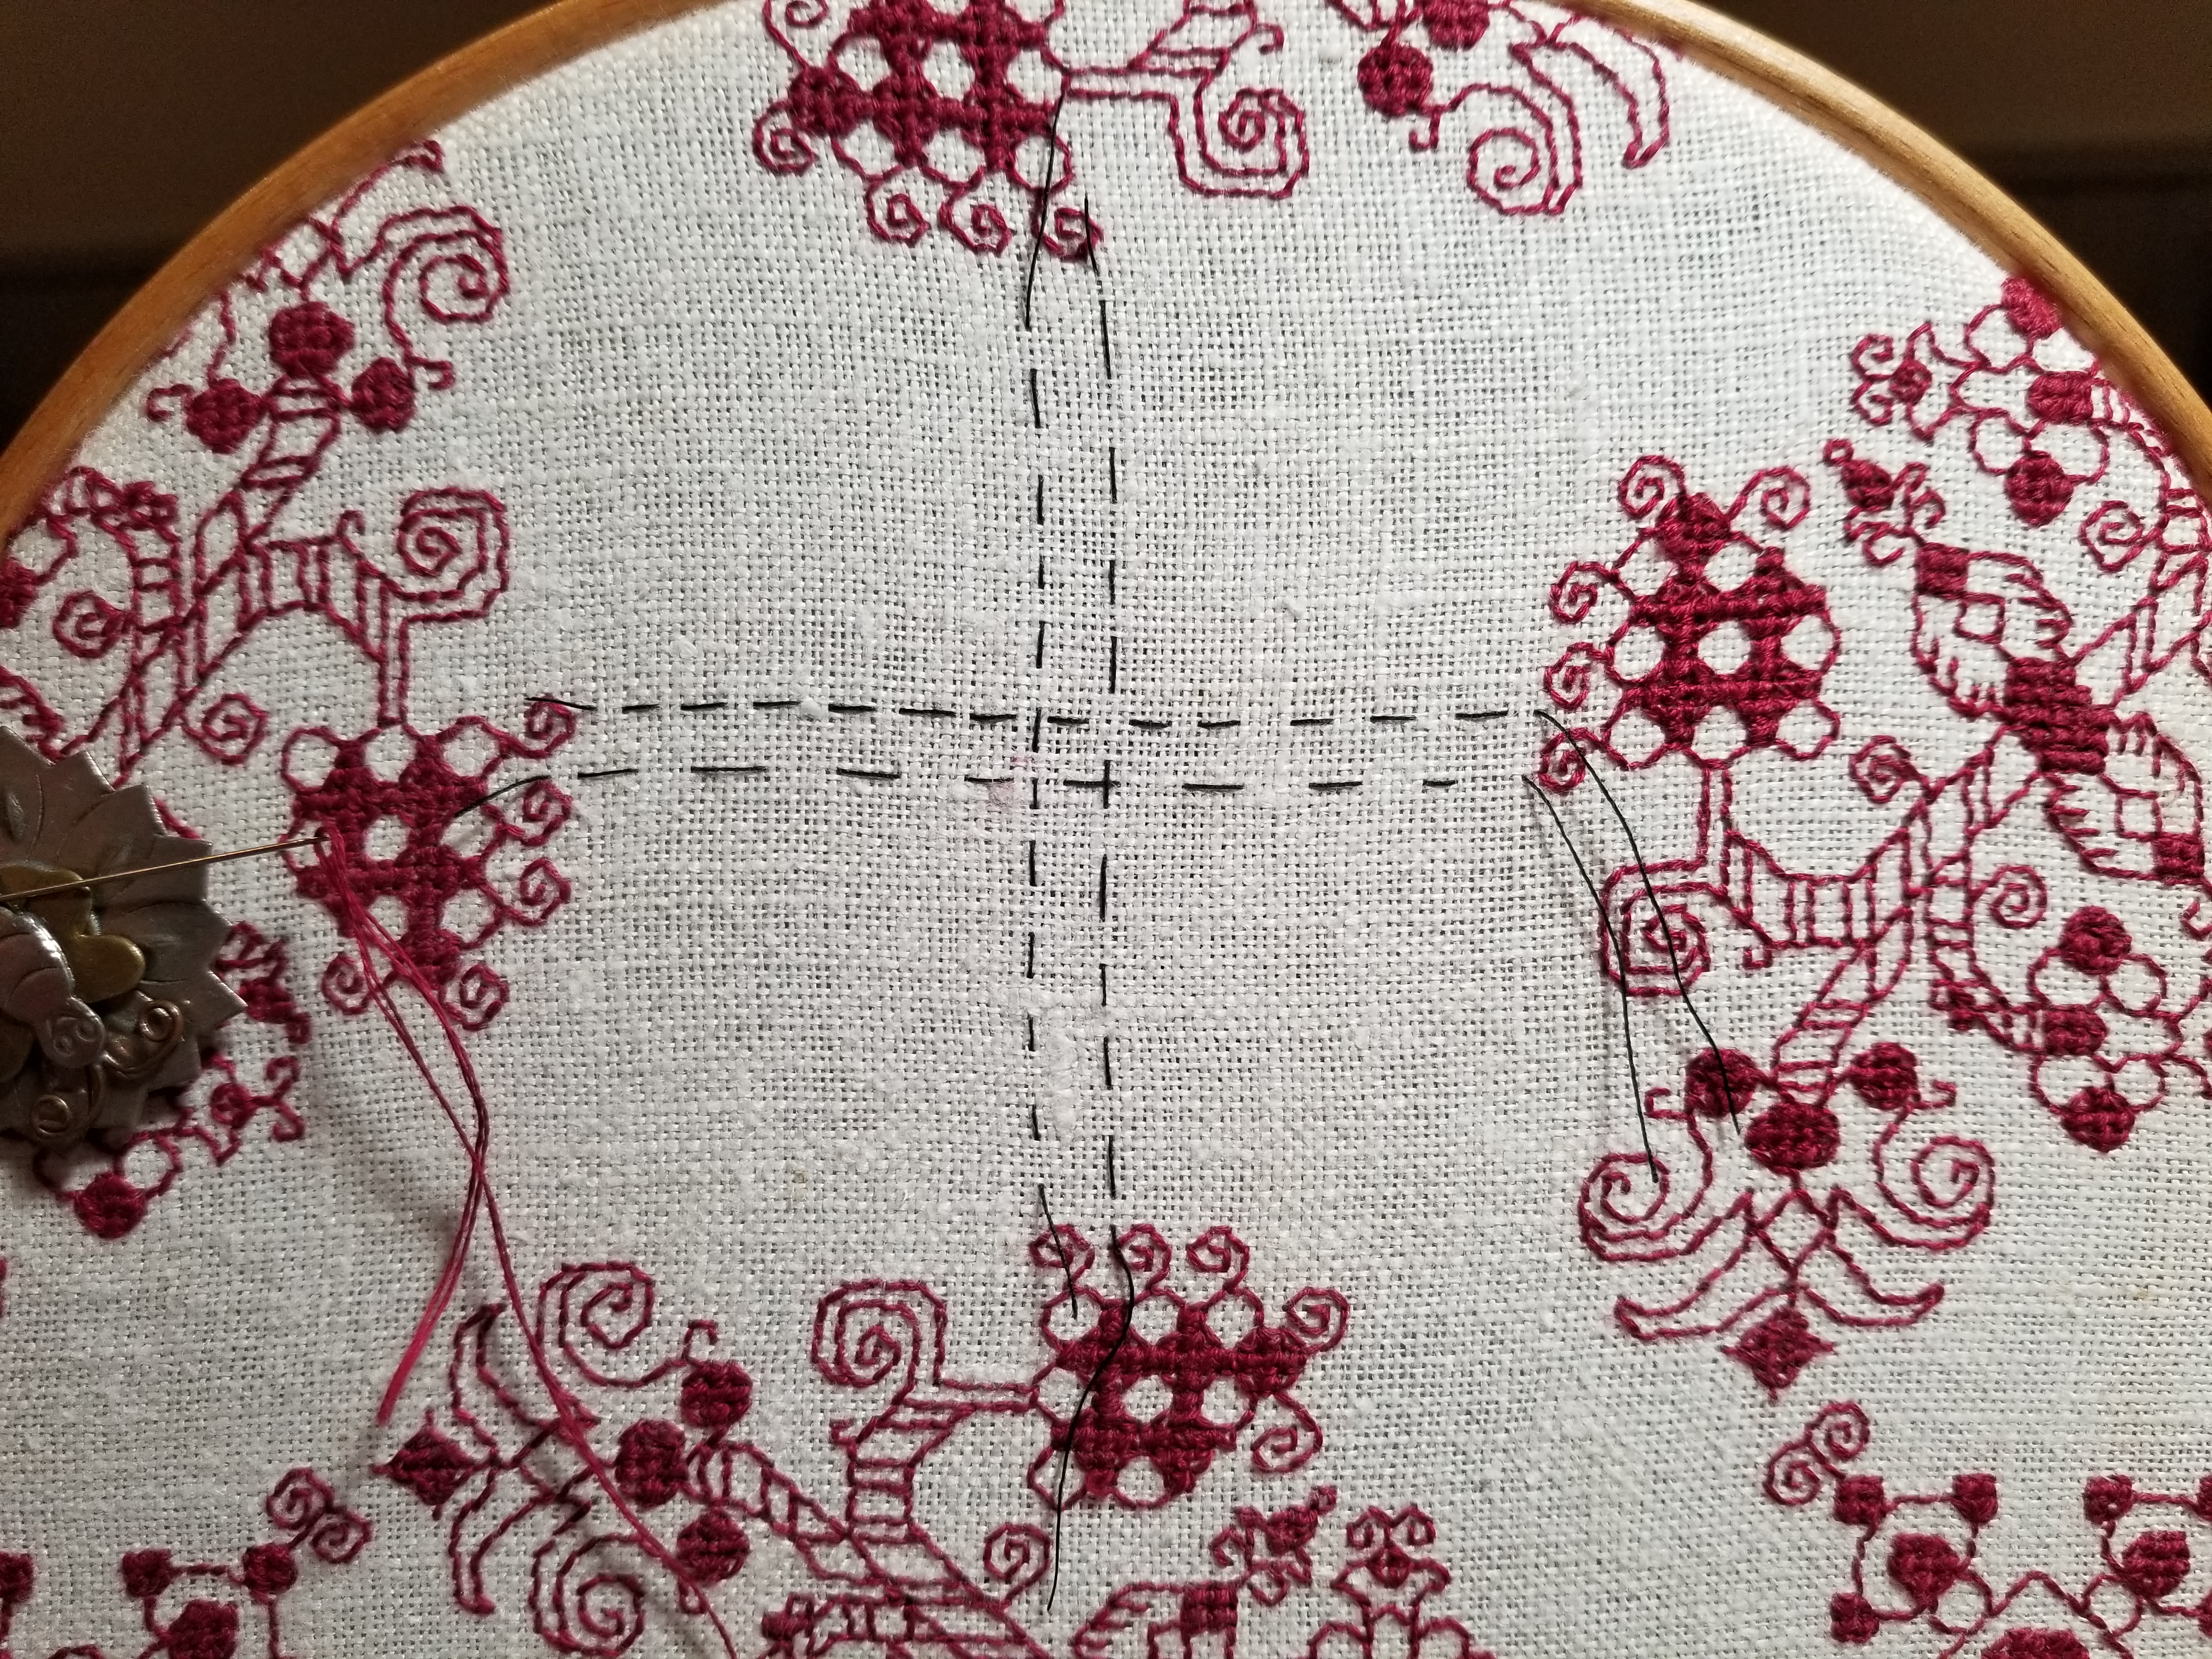
As I planned, after tracing the Unstitched Coif pattern onto my linen, I cut the cloth and hemmed the top and bottom of the piece (left below). Then I trimmed the left and right edges with a folded and ironed piece of wide cotton twill tape offset a bit from the linen itself, so that any side lacing would have something to bite into that would not distort the ground. That’s sewn on with simple running stitch.


Once the ground was prepped, I mounted it on my largest scrolling frame. Because the entire coif fits in the frame’s center, I don’t need to employ any scrolling functionality. That’s why I made advance accommodation for side lacing. I used plain old heavy cotton crochet string for the lacing. The ball of it lost its label long ago, but I think it’s Coats & Clark’s Speed-Cro-Sheen. Here’s the entire thing, set up on my stand using the large frame extender (the wooden arm with the metal tabs grasping the work), and laced tighter than most costume-drama heroines.
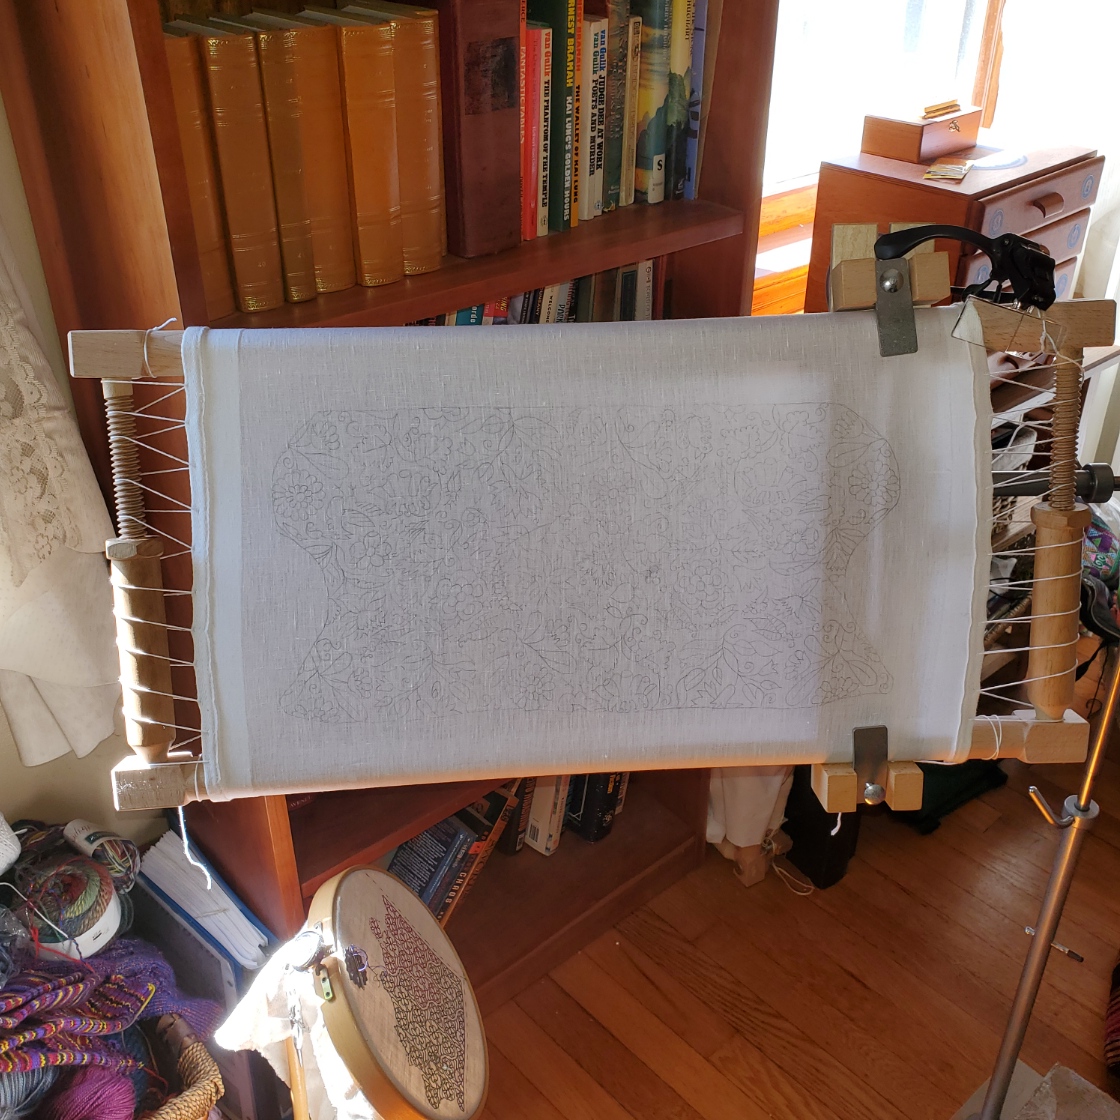
Note the brick just barely visible at the bottom right corner of the photo. Because I swing my frame out like a barn door to exit my knitting chair, two bricks of extra weight on the paddle foot of my stand are necessary to counterbalance the mass of this large frame when it is positioned perpendicular to the foot. Someday I’ll knit or crochet neat little covers for them as yet another household whimsey, but for now they’re kept tidy with plastic wrap.
Because so much of this is a trip into the unknown, I took the side slice of linen left over after I cut my project piece, and traced a couple of motifs onto it. That’s going to be my “sidecar” – an as-I-work sampler used to try out ideas before I trust them to the main project. I didn’t bother hemming this bit. You can see it on the arm of my stitching corner chair.

I’ve begun playtesting countwork on this linen on the sidecar, but I haven’t received my ultra-fine thread or needles yet. One ply of the Golden Schelle thread is almost fine enough for fills, but I want to see the others in comparison because my first efforts with it are wobbly enough to be unacceptable. Plus stitching on this stuff with a #28 tapestry needle is like passing a log through a window screen, and I am still adapting to the magnifier; both of which complicate matters somewhat.
I know one of the threads I ordered will be here later today, and hope the other two plus the blunt beading needles will arrive some time this week. For the record none are the Piper 30/2 that others are using – the cost of overseas sourcing plus the time to ship made me look for a domestic equivalent. More on all three when they arrive.
For journalistic veracity, I present the shameful and discreditably woebegone initial counted bits, and threaded #28 needle, plus a US penny (at 7:00), and UK penny (at 12:00) – both for scale. Be kind, I hope to work out the kinks before attacking the project, proper.

I will be testing out the Schelle silk, plus the Tied to History Allori and my other unnamed stash-aged silk in the mean time, trying out various treatments for the outlines and possibly the stems. I am still hoping to incorporate metal threads in the stems, but plain couched doubles of the #5 may be too stark.
Obviously for me at least having the sidecar is a total necessity on this one.
INCHING TOWARD THE GATE
I amass materials for the Unstitched Coif project.
First, the recommended linen has arrived. It’s very densely woven, and fabulously fine. So fine in fact that my thinnest silk is way too heavy to work the fills. It’s even fine enough to make counting the threads with my Penny Method difficult.


Squinting as hard as I can, at max magnification, I really can’t parse out the count from my photos. I need a better photo set-up, but I can say that it’s significantly finer than 40 count (above).

What thread to use? I went back and asked Ms. Buckby, the project leader what was recommended for fills. She said that on her own piece she was using a a strand of 6 thread (120 denier) silk. So I went hunting for it here in the US, to save the overseas shipping cost.
No retailer of fine embroidery supplies I was familiar with listed denier on their catalogs, so I asked the wise folk at Needle in a Haystack if they had any recommendations. They did, and I ordered two possible candidates plus some wicked tiny #10 and #12 beading blunts to manage them. More on these threads when they arrive and I can beta test them. I will probably still use the silk I have for the more prominent outlines. Thankfully there’s plenty of linen, so I will probably mount a “sidecar” for experimentation, before making major commitments on my main piece.
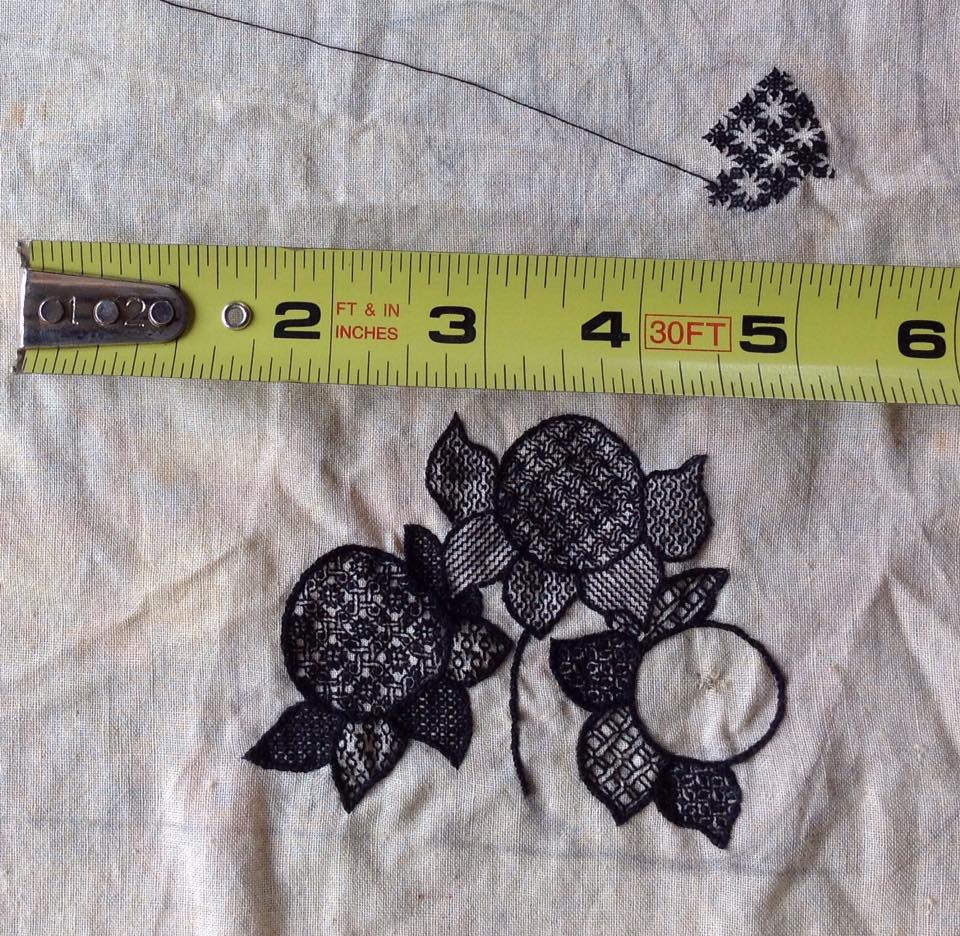
I also ordered more of the 2mm paillettes I used on Two Fish. That’s only on 40 count, the leftover of which is what’s shown above, and you can see that they are just a smidge larger than the 2×2 thread cross stitches in the fish’s cheek. I am not sure that I will use them, but if I do, these tiny guys are about all that will fit in the “white space” of this intricate coif design.

I also ordered and received an adjustable head-mounted magnifier, much better suited to use with bifocals than the one I had. Thanks for the lead, Callie! I would not attempt countwork on this one with un-augmented vision.

Now while I wait for the threads, the next step is prepping the linen and transferring the cartoon’s outlines onto the fabric.
I did not wash this fabric prior to stitching on it. The weave is already so tight that stitching will be a challenge. Washing tightens linen. It may be a major faux pas, but I don’t want to take that risk.
I thought about using prick and pounce (stabbing tiny holes in the paper, affixing it securely above the fabric and sifting dark powder – usually crushed artist’s charcoal through the holes, then connecting the dots with drawing or painting), but in truth I have had a dismal track record with that method. Instead I am tracing, using glass and a strong light source. I usually do this by taping the design to my big dining room window, then taping the linen on top, but this time I am afraid that the piece is so large that even if I tape it, the weight plus the pressure of tracing will stretch the cloth.
Instead I have improvised a light table, using an old storm window, a utility light, some package padding I saved for no special reason, and some fabric scraps to keep the linen clean in case some basement filth remained on the window and sawhorses after I de-spidered and washed them down.

It worked well enough, although I kept knocking into those splayed sawhorse legs.
Next up was to align the grain of the fabric with the cartoon. Since it seems to be a bit more dense in the weft than the warp, I chose to align the design perpendicular to the selvedges. I’ll have to do some cutting and hemming, but we’ll get to that another day. And once the fabric was aligned, I had to decide on my framing method. I have two Millennium scroll bar sets. I could run them along the short edges of the design or the long edges:
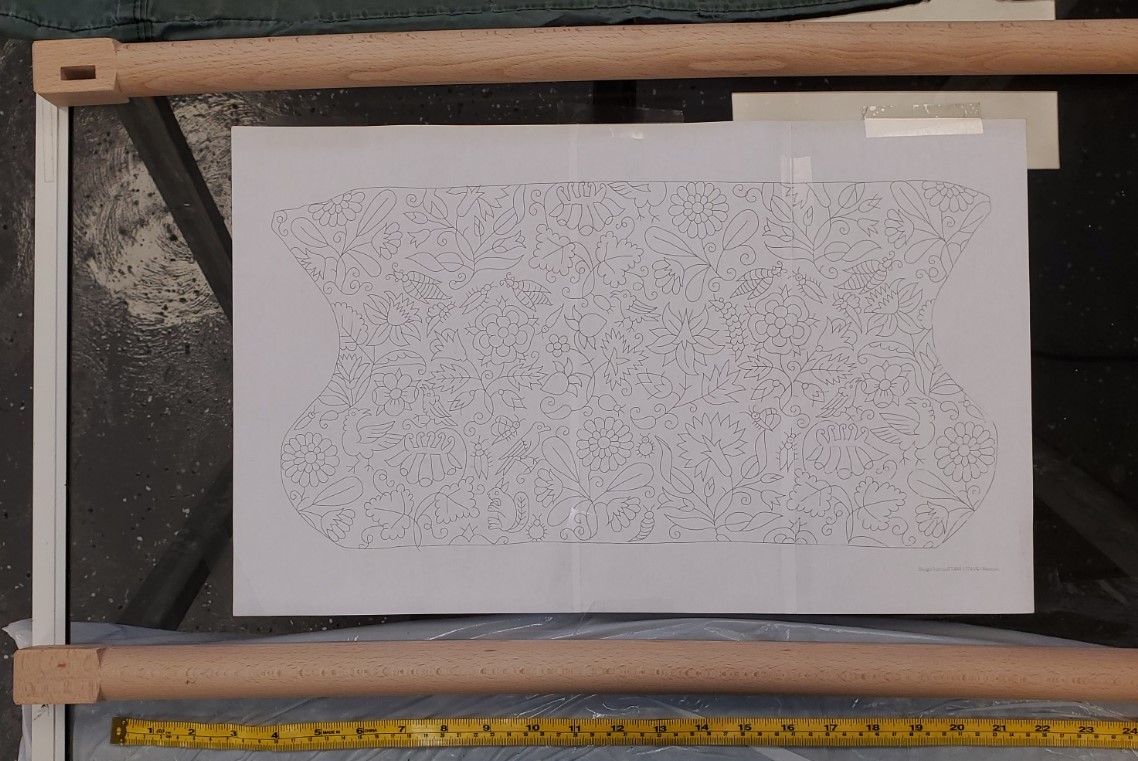

Obviously if I did them the short way there would be lots of stitched fabric being rolled and stressed as I worked. Not optimal. Especially not so if I go through with my impulse to incorporate metal threads and paillettes. So long way it is with the design fully splayed out using my largest set-up.
Starting in the middle, I traced out the design using a plain old mechanical pencil with a thin lead. It’s not perfect. I did my best to secure the fabric, and it sagged/stretched far less than it would have had I taped it to a window, but I admit some of my lines are a tiny bit off. And then there’s that unfortunate bit I tried to erase. I’ll attempt to spot clean or camouflage that later. But the design is now on the cloth.


Tomorrow I cut my piece, and hem, with an eye to mounting on my frame. Since the entire thing will be laid out without being eaten on the scroll, I may even try edging with twill tape and lacing the sides for additional tension. Provided I can find the twill tape.
Stay tuned!
“AN UNSTITCHED COIF…”
Those of you who are tuned into various historical embroidery info feeds may have seen a call go out a few weeks ago. Toni Buckby, a serious embroidery researcher and PhD candidate was looking for volunteer embroiderers to join a blackwork project that will lead to an exhibit at the Victoria and Albert Museum, plus provide fuel for her dissertation. I’ve long been a fan of Ms. Buckby, having first seen her work on the animated Wet Nuns music video “Why You So Cold?”. Her piece was one of the inspirations for my own static Memento Mori strip of dancing skeletons.
I am delighted to report that I raised my hand and was accepted. Obviously being a US resident, I’m not at liberty to attend the in-person workshops, but I hope to attend the project’s Zoom meetings.
Now for the specifics.
The project’s title is “An Unstitched Coif…” There will be an official website, but at the time of this post, it is still under construction. Ms. Buckby’s goal is to collect experiences, plus process info and images from the army of 140 volunteers. There will be both in-person workshops for folk resident in the UK who can attend face to face, and remote sessions for we further flung folk. At the conclusion of the effort the completed pieces will be displayed for a time at the Victoria & Albert. Those that are not kept by the museum will be returned to the stitchers.
What are we making?
Our own renditions of this coif (V&A accession number T.844-1974 in case the link breaks, image quoted from their website). The original shows evidence that someone indeed did begin working on it, but the threads of the stitching have been lost. I am really looking forward to Ms. Buckby’s forensic observations on the holes left behind.

The dimensions of the stitched area are approximately 44 x 25 cm (17 1/3 x 9 5/6 inch), and the project is to be completed by September. I will be working like a demon, for sure.
The instruction packet with a full size cartoon of the stitching design landed today. The workshops and zoom meetings begin in late April. I have ordered the linen recommended for folk interested in doing historically-inspired stitching. With luck it should be here next week. It’s moderately pricey, and shipping from Italy doubles the cost. Still, if I’m in for this, I’m gonna do it full on, although if the shipment is delayed I’ll have to find some other ultra-fine ground. Fingers are crossed. Still, I’ve always wanted an excuse to work on 70 count. Now I have a very good one.
As far as techniques and materials go, guidance is “use of historic Blackwork techniques is encouraged…but final choice of technique, colours, stitches in-fills and other embellishments are up entirely to you.”
I’m not sure exactly what I will do. Yet.
I need to see the ground and figure out whether or not countwork over 3 or 4 threads is feasible for me. I have experience working over 2×2 on muslin at that gauge (below), and based on that that I can say the effect of the fills is lost any further away than about six inches – they blur into indistinct gray scale notes. Three or 4 should be much more visually appealing. Plus, my eyes are no longer 25 years old.
If countwork is precluded, I will use freehand fills and/or stippling: the other popular historical modalities for working blackwork foregrounds.
If I do go with black thread (highly likely), I will be experimenting with my stash of finer silks. They are thinner than cotton floss strands, and probably better suited for the finer ground, whether they are worked counted or freehand. I have two lots of black filament silk I have been saving for The Mythical Perfect Future Project. I think it’s their time. One lot is Allori Silk (from Tied to History). The other looks very similar but its provenance has been lost to the erosion of time. I also have a small quantity of the historical recipe spun silk hand dyed by my no-longer-stealthy stealth apprentice. It’s fine enough for this, and I would want to honor those efforts by including it in the piece. (Note that being small batch produced and very popular, it flicks in and out of availability, please don’t be disappointed if you hit the website and it’s not there. It’s worth waiting for.)
Depending on scale and stitch experimentation, I might also include passing gold stitch work on the stems. Possibly a narrower one like Elizabethan Twisted Chain from Carey’s Elizabethan Stitches. I have some Japanese #5 gold in my stash. It plus a few 2mm paillettes are left over from my Fishies piece. That one was done over 2×2 on 40 count, so over 4 x 4 on 70 count should visually present just a smidge larger. The paillettes are AWOL right now, but I think I can lay hands on them with a bit of searching.
And to round it out, I have a pair of magnifying goggles. Not optimal since I like to stitch and watch TV at the same time, but if visual acuity stands between me and completion, they WILL be deployed. I don’t remember where I got these though. Possibly a gift or hand-me-down from a pal. They’ve been sitting unused in my gear boxes for several years at least.

So there you have it. New project. I am bound by word and honor to complete. And I will.
GALLERY OF APPRECIATION
UPDATE: 6 FEBRUARY 2024 – I’ve added a permanent page for the Gallery of Appreciation. Click here, or find it in the tabs listing, above.
——-
I adore it when I see projects folk have worked up from my designs. I’ve shown off a smattering of them here on String under the tag “Gallery” on the categories list, but I have fallen behind of late. I will try to be more timely posting these fabulous finishes (and works in progress), as tribute and thanks to the creative people who have returned joy to me.
Right now I have several such submissions lurking in my email inbox. Apologies if you have sent photos to me that haven’t appeared yet. It’s a big inbox, and I am combing back, looking for the flags. Names and photos appear here with the permission of those who sent them. I also have some requests out to folk who have sent me photos, but from whom I do not yet have express consent to post. And if you’d like your work to appear here in a subsequent gallery post, please drop me a line. My Gmail address is kbsalazar (in the usual email format).
So in no particular order other than my stumbling around in the dark, I present the first of what I hope will be a renewed series of proud pieces.
The Second Carolingian Modelbook
Sent in by Alex Logsdon, a genuine original composition featuring many motifs from T2CM, selected, snipped, and arranged in true “bungee jump stitcher” mode – picked on the fly and fitted to the space available. There haven’t been many finished objects from my latest book, and this one made my heart sing.

The New Carolingian Modelbook
Elaine Cochrane is working on a big purple band sampler, and has included in it some strips from TNCM. Elaine is also choosing designs on the fly in bungee-jump mode. I love seeing her piece evolve with the addition of each new bit.

Ensamplario Atlantio, Volumes I and II
It’s hard for me to separate out the fills in the two volumes in the EnsAtl series. With only a few exceptions, even I can’t remember which ones are in which book. V Louise Behrman is working on a couple of projects using the patterned fills from the books. One is a lovely bit of inhabited blackwork – panels for a casket (a small fabric covered keepsake/display box), the other is destined to be made up into an adorable needle book (a small fabric folder to keep needles safe, dry, and at hand). Both images below are (c) V Louise Behrman, 2022, and appear here with permission.


Epic Fandom Stitchalong – Adaptations
Long time friend and occasional SCA mentor Robert Himmelsbach was a stealth beta tester for some of the bands appearing as part of Epic Fandom. He used the dinosaur strips to make collar and cuff ornamentation for an otherwise historically accurate Renaissance era shirt, proudly proclaiming his ancient lineage and participation in that group’s pre-history (provided you look closely enough at his outfit). He is intending the pirate strip for a second shirt.
Links and/or info about the books mentioned are at the “My Books” tab above. The Stitchalong also has its own tab, above.
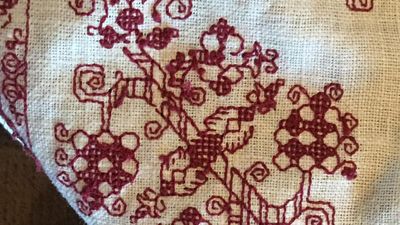
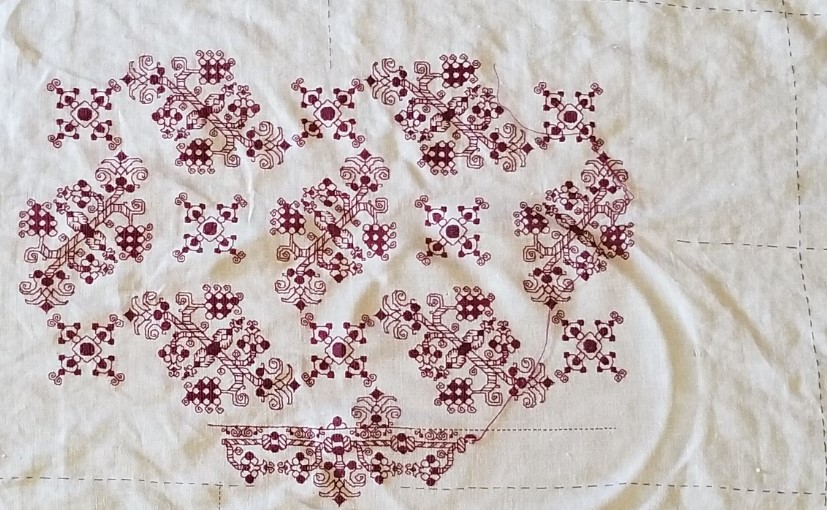
DIZZY GRAPES DONE!
A finish. I began at our Cape place around 14 July, and finished last night at the Cape place on 25 September, about 73 days of stitching, working an average of about 2 hours per day.

To recap, this was a vintage dresser scarf, clearly cut down and re-edged from some older piece of linen. It was very well washed, and although it had no broken warp or weft threads, there was a lot of blooming, where the linen breaks down a bit, with threads fused together and some slubs. The count wasn’t consistent, with some threads being much thicker than others, but spot measurements ranged from 28 to 34 threads per inch, mostly averaging out to between 30 and 32. It was ever so slightly skewed, but no where near as badly as other non-evenweave grounds I’ve worked lately.
The pattern has two parts – the main field which I redacted from a 17th century Italian cushion cover held in the Hermitage Museum, shown below (Accession T-2736 in case the link breaks). The companion border I doodled up myself.

Amusingly the skew count of the ground used in the original is greater than the skew of my vintage linen. You can see that clearly in the smaller motifs which chart out as squares, but appear taller than they are wide. Also my redaction norms the spacing of the motifs, which in the original does vary by quite a bit. But I preserve the “creep”. Look at the partials around the edge of my piece. They rise from/sink into the static edge line, each iteration of the swirl being offset from the previous one by a stitch or two in each direction. You can see the same thing on the original.
I stitched the design in garnet cotton (DMC #815). It took almost all of seven skeins. I worked the linear bits in double running, and the solid bits in a variant of Italian four sided cross stitch (basically cross stitch, but in a box). The version I chose is NOT double sided, instead it produces a grid on the reverse. The only reason why I chose that version is that I hadn’t attempted it before. I have no historical reason to pick it over the more usually done fully two-sided version. The full double sided version is more or less the same stitch that forms meshy totally overstitched grounds, but done “gently” as surface stitching, and not pulled to the max to both totally encase the ground threads and produce the characteristic mesh ground found in so many museum artifacts. Here’s my back showing the grid structure of my single-sided interpretation.
On the whole I am quite pleased. My goal of making a splendid runner for our sideboard has been achieved, and I can retire the old, ratty placemat that’s there now. It’s The Resident Male’s favorite spot for opening bottles of wine, and now he can do so in a style appropriate for a Renaissance princeling.
Things I would do differently. Hmmm…. I now wish I HAD done the solids in the reversible variant. Not because I want to have a true double-sided piece, but because I want to play with the challenge of that stitch some more. (Additional future experiments are warranted.) I’m also not entirely pleased with leaving the original dresser scarf edging on this. For one, the non-rectangular nature of the cloth is more evident with my on-grain, symmetrically sized stitched area. It bothers me. But consensus seems to be to leave it alone. So I will. For now at least.
And so I move on to an interim project. I have a wild departure queued up for my next big thing, but the materials to do it aren’t here yet, so I digress.
I want to make another forehead cloth. I really enjoy wearing the two I did a few years back. They are more fun than bandannas or scarves, and do a good job of keeping the hair out of my eyes. I have a piece of linen scrap I am considering. It’s very densely woven though at about 32 threads per inch, and I am not sure that it will show off my chosen design to good effect. (I do have an airier alternative, but I prefer the look of the scrap.) I don’t remember whose leftover this is, but send thanks again to The Anonymous Donor. As you can see I’ve plotted out the corner of my triangle.
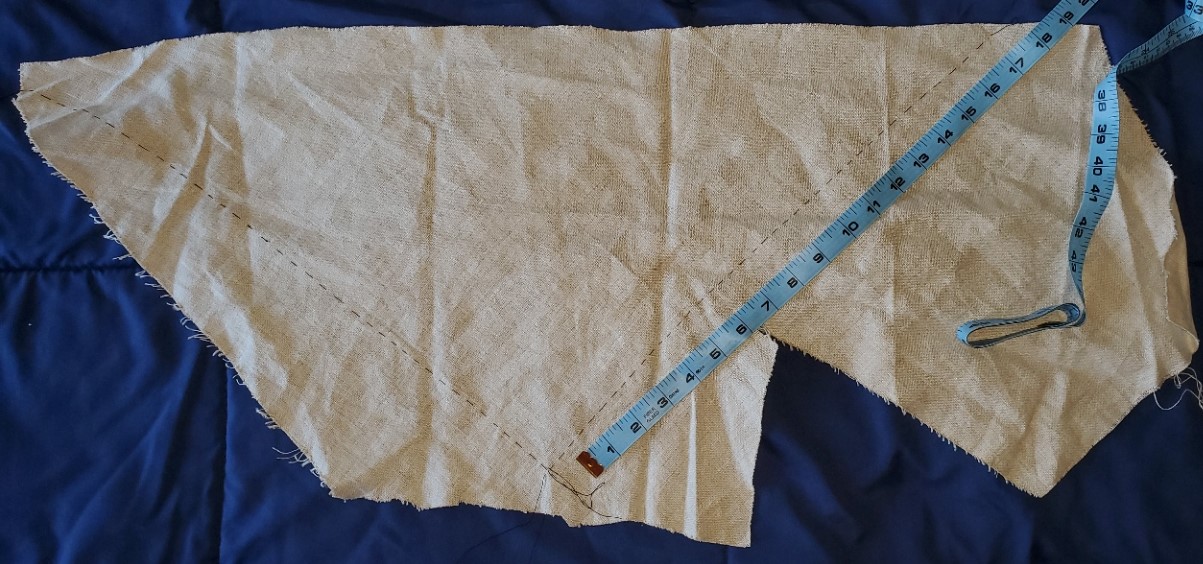
There is plenty of real estate on this piece of spill, left over from Anonymous Donor’s sewing project. I’m aiming to make something midway in size between the two forehead cloths I already have. Something in the range of 14 inches for the non-hypotenuse sides.

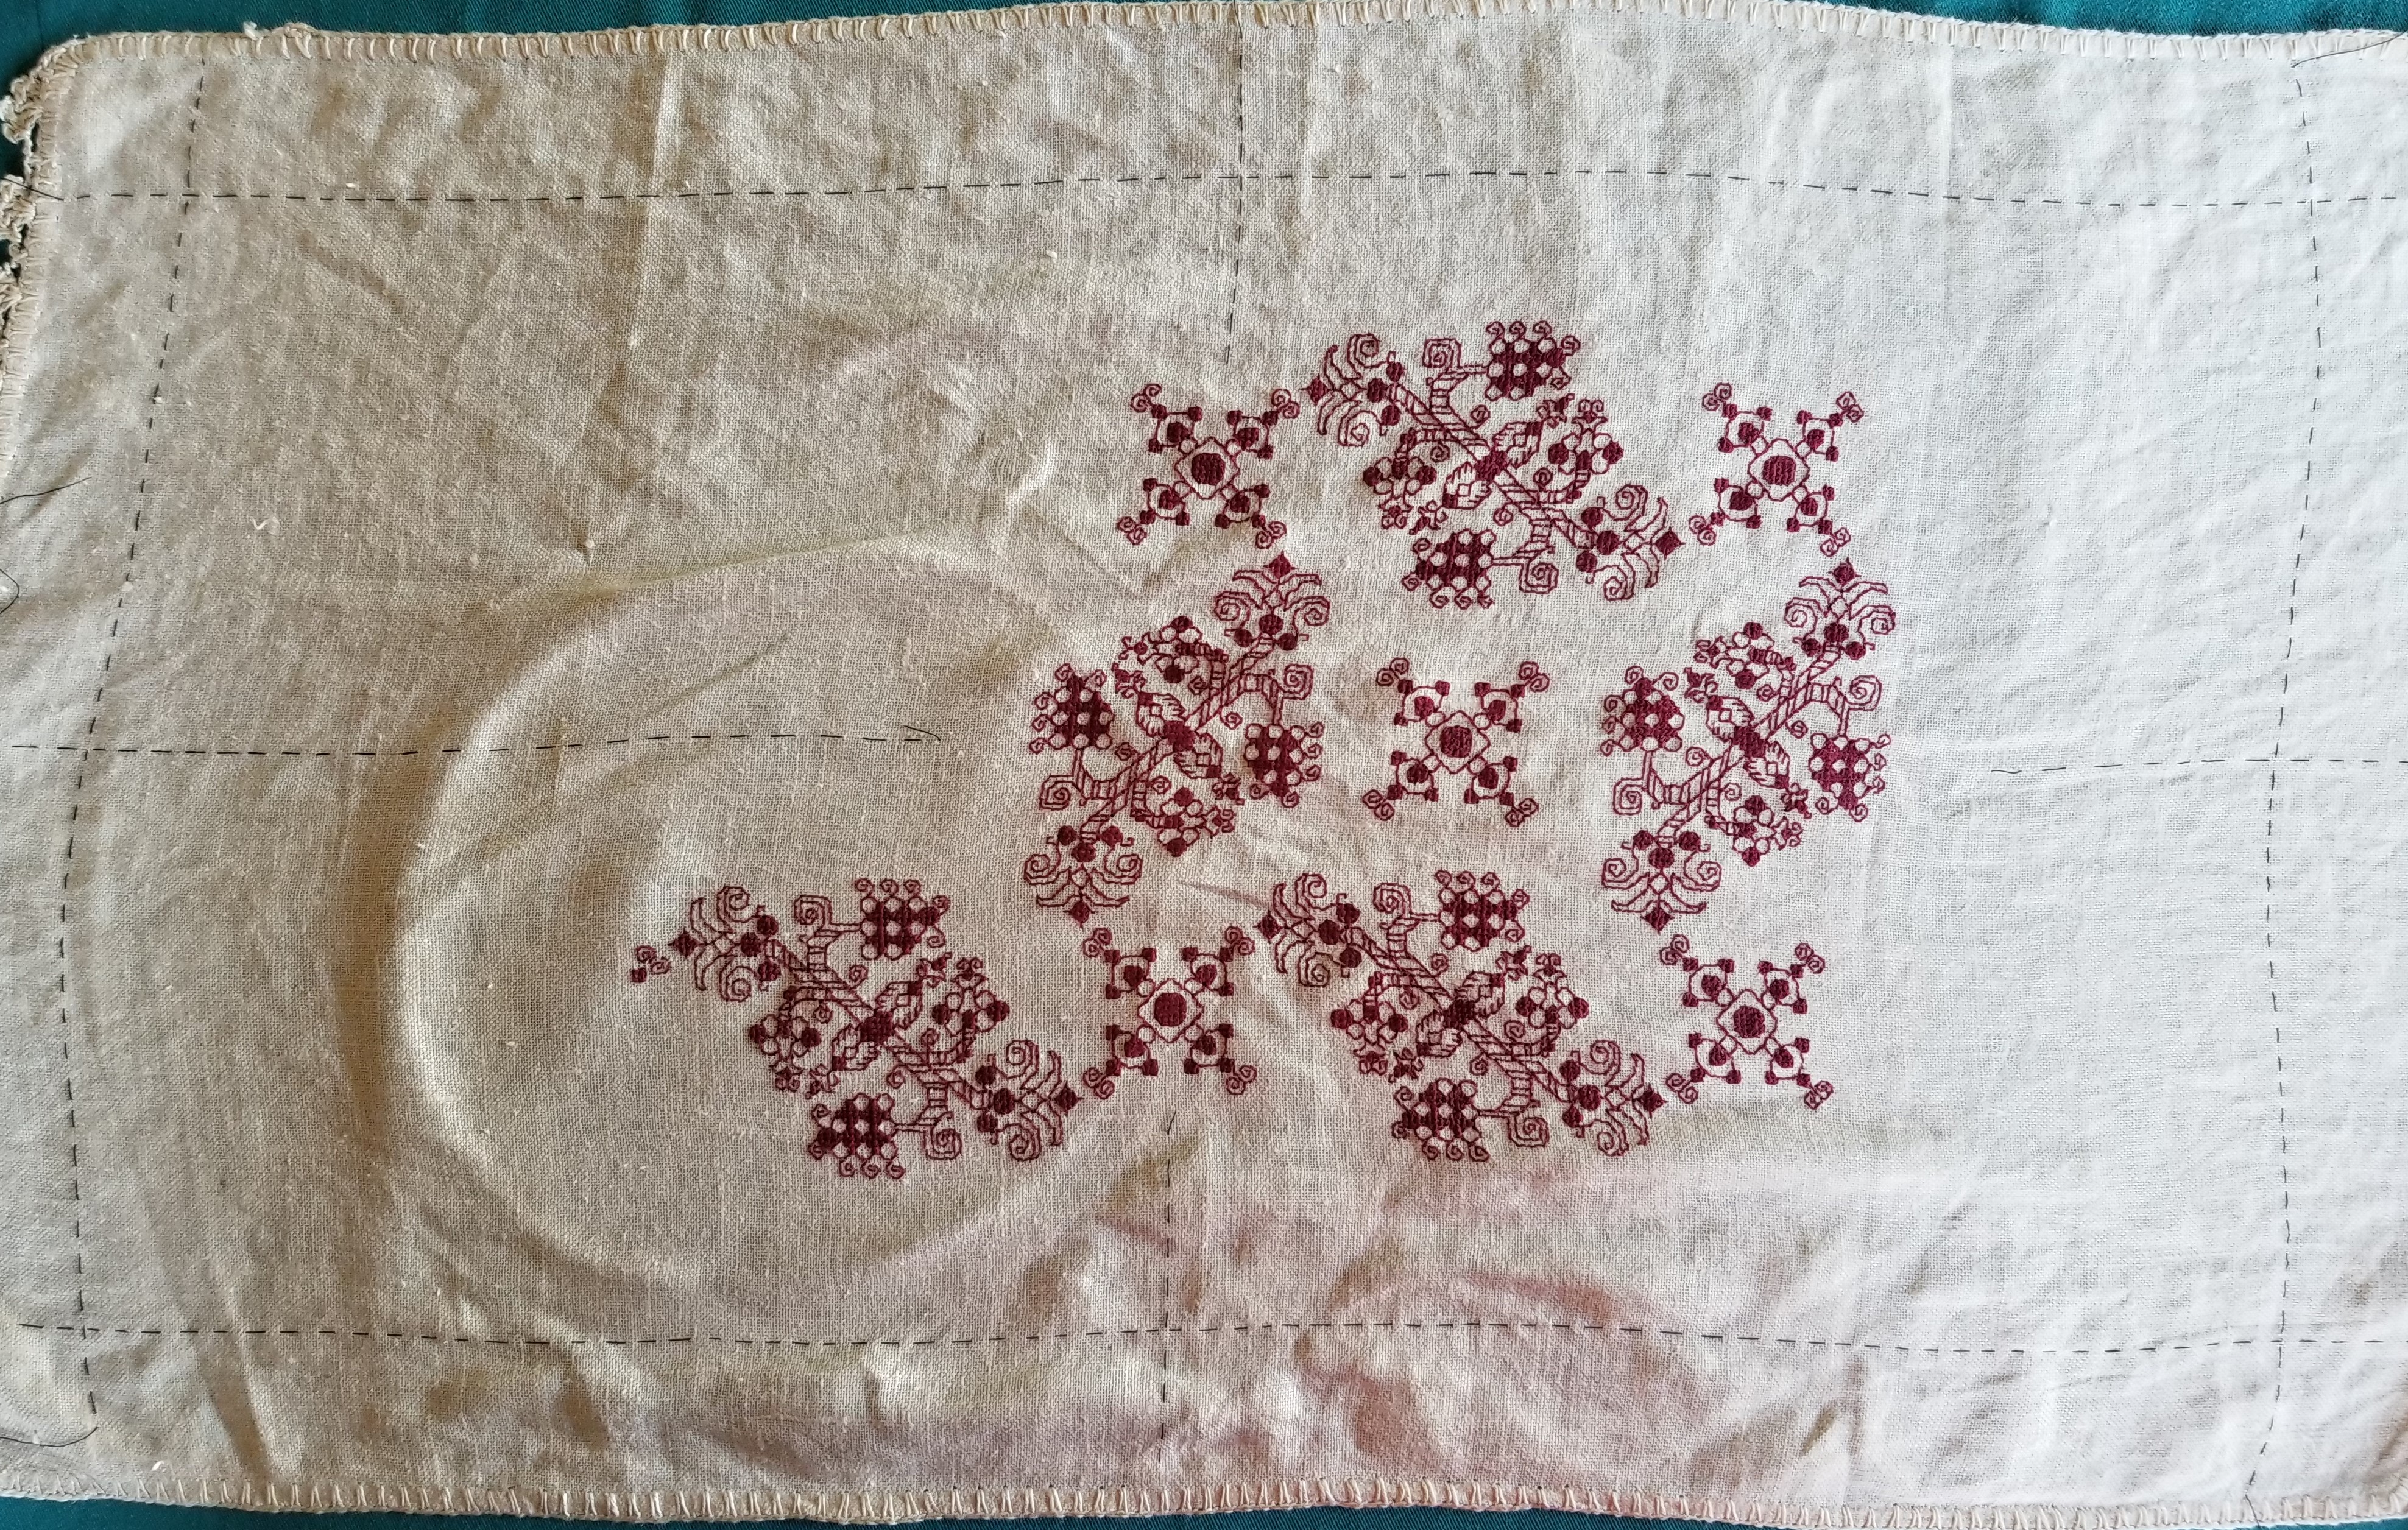
Shameless plug department: These two pieces have been worn heavily and washed without mercy for the past three years, as can be seen by the frayed ties. But look at the stitching, it’s as good as the day I finished. I did it in the stranded silk thread hand dyed by my apprentice using a historical recipe. NO fading, no breakage in spite of the ground’s distortion from being stretched in wear. No harm to the ground beneath the stitches from the dye used. It’s a small batch item, and not always available, but when it is, it’s worth it. Highly recommended.
Back to the project at hand. I will be stitching a rather dense design I recently doodled up. I’m working on Ensamplario Atlantio III, and that pattern will be part of it. And I will be trying out Sulky thread, a spooled mercerized single strand cotton sold for hand and machine stitching. Possibly in polychrome. I have black, red, blue, and green, so I have scope to play.
More on this one as it develops, of course…
INTO UNKNOWN SEAS – METHOD DESCRIPTION
A couple of people have sent me private notes asking about how I go about designing a larger project without graphing the entire thing. I attempt to answer, using the current Dizzy Grapes sideboard scarf/placemat as a possible approach.
It’s true I didn’t know how I was going to proceed when I began this project. I had a graph for the main field repeat, but only one iteration of the design, but not a chart for the entire area that design would inhabit. I didn’t have a border (yet). I had a piece of cloth of dubious cut and unknown count, and I had picked a thread well represented in my stash, with known easy-care laundry properties. I knew I wanted to make a large placemat type sideboard scarf, as big as attainable given the materials on hand.
The first thing to do was to figure out the largest possible area I could stitch on my unevenly hemmed ground. Leaving a bit of a margin around for easy hooping, I took plain old sewing thread and basted in a to-stitch area, with a bit of a margin. In doing this I discovered that the person who had reclaimed this bit of antique linen and done the crocheted edge treatments had a rather liberal interpretation of rectangles in general. Once my edges were basted in, I used simple measure/fold to determine the center lines, both north/south and east/west. Those were basted, too. Here’s that first step:

I also determined the thread count of this well washed, buttery soft vintage linen. It averages about 32 threads per inch, but is quite uneven, ranging from 28 to 34 in places, but didn’t dwell on that beyond satisfying myself that there was enough “real estate” inside my designated area to accommodate at least two full repeats of my chosen design across the narrow dimension.
Having the dead center of the piece determined, I chose a center point on the field design. I could have used the center of the smaller motif. That would probably have been easier, but I wanted the large rotating floral shapes to dominate instead of the largely unworked area surrounding the smaller motif. That was a bit tricky because the motif has a square unit in the dead-center, but I worked that straddling my basted center mark. Then I began working, snipping back my basted center guides as I went. (From here on the piece is shown rotated, with the narrow dimension north/south and the wide one east/west).

The shot above shows that first center motif in process, with the center guides being snipped back as the work encroached.
From there it was a simple matter of adding more floral motifs and the smaller X motifs they spiral around. Then after a group of four florals were complete, defining the space between them, centering the free-floating X in that area. Here are shots of those two processes. Note that as a Lazy Person, instead of tedious counting in from the established stitching, I used temporary basting to determine the centerpoint for the free-floating X motifs.
How did I know where to stop? No clue initially. I figured I’d get as close to the edge of my defined real estate as I could with full motifs, then pause to assess. It’s clear in the left photo that another full cycle of the repeat would not fit neatly between the established work and the basted guideline. But that area is also a bit wide to be entirely border. The proportions would be off. Plus that small X motif in the center bottom looks odd without at least a partial snippet of the floral motif spinning off its bottom leg.
So I did a rough count of the width left and decided I wanted a border that was about two inches wide at its widest (about 5 cm). Back to the drawing board to draft out something that complemented the design, and was somewhere around 30 units tall. I doodled up a couple of possibilities before settling on one. One strong consideration was the use of an inner line to contain the field pattern, so it had something even against which to truncate.
Once I had my border in hand, I decided that a bit of the center flower in its repeat could scallop below the basted edge line, so allowing for those 6 units, I counted up from my basted edge guide, and beginning at the center point I started the border of the first side. Then I worked right and left until I got to the edge of the “uncertainty zone” – the area as yet unworked at the left and right of the piece. Here’s the first side’s border in process.
As I established the border’s top edge (that field containment line), I went back to the main field, and worked the truncated snippet of the floral motif to fit. You can see that first snippet in the photo above.
Now on to that second side. But I had a cheat! Instead of starting it by counting down, I looked at that center floral snippet on the first side. Then I worked the floral snippet on the opposite side to the same point. That established the containment line on the second side, and I began the border at the center of the second side, working out to the left and right.

Now on to the ends. You can see now that I’m making these decisions on the fly. When I started I had no clear idea of what I was going to do beyond “Field. Border. Big.” I’m handling the problems and decisions as they are encountered, with minimal fretting about perfection along the way.
I chose to do butted borders on this piece. Neatly mitered, squared, or fudged border corners do exist on historical pieces, but they are in the minority. Even though my self-designed border isn’t particularly period representative (those repeating centered units with their own bounce repeat, as opposed to simple twigs all marching it the same direction), I wanted to use a non-mitered corner. I could have ended each off, designed a separate corner square, but I didn’t want to introduce another design variant – the border was already too busy.
Where to start that side border? What happens to the longer top and bottom borders? Do they just end or should I try to end at a visually logical place? Well, I chose the latter. I kept going on the bottom border to the right until I ended at the center of the bounce repeat. It’s just a few units shy of my designated basted edge. Not a lot of waste there. And knowing the height of the border, I established my north-south containment line.

You can see that I’m working on the first of the two spin-off floral sprigs along this side. When that’s done I will go to the centerpoint of the right hand edge and begin working the border from there, headed back to the corner shown. The side borders will end where they end. They will truncate oddly for sure, but having made the bottom and top congruent, what is on the sides, will be what it is. The side as a whole however should truncate in the same spot where it meets up to the border on the top. But no one is perfect. If it’s off by a unit or two, I will have accomplished the same degree of precision as most of the Ancients. They weren’t perfect either.
Stay tuned! The Grand Excitement of seeing the final product remains; and with it how things meet up, how close to symmetry I achieve, and how any as yet unknown problems are solved. And that’s before I decide how I’m going to edge and trim the piece out. Needle lace and/or a withdrawn/pulled element hem are both possibilities I haven’t yet ruled out.
So there you have it. Another adventure in bungee-jump stitching – starting a project with little or no detailed planning, no full project chart (just a partial chart showing the minimum needed), and no clear idea at outset on handling challenges encountered en route. I hope sharing this process inspires folk to take up their own self-composed projects.
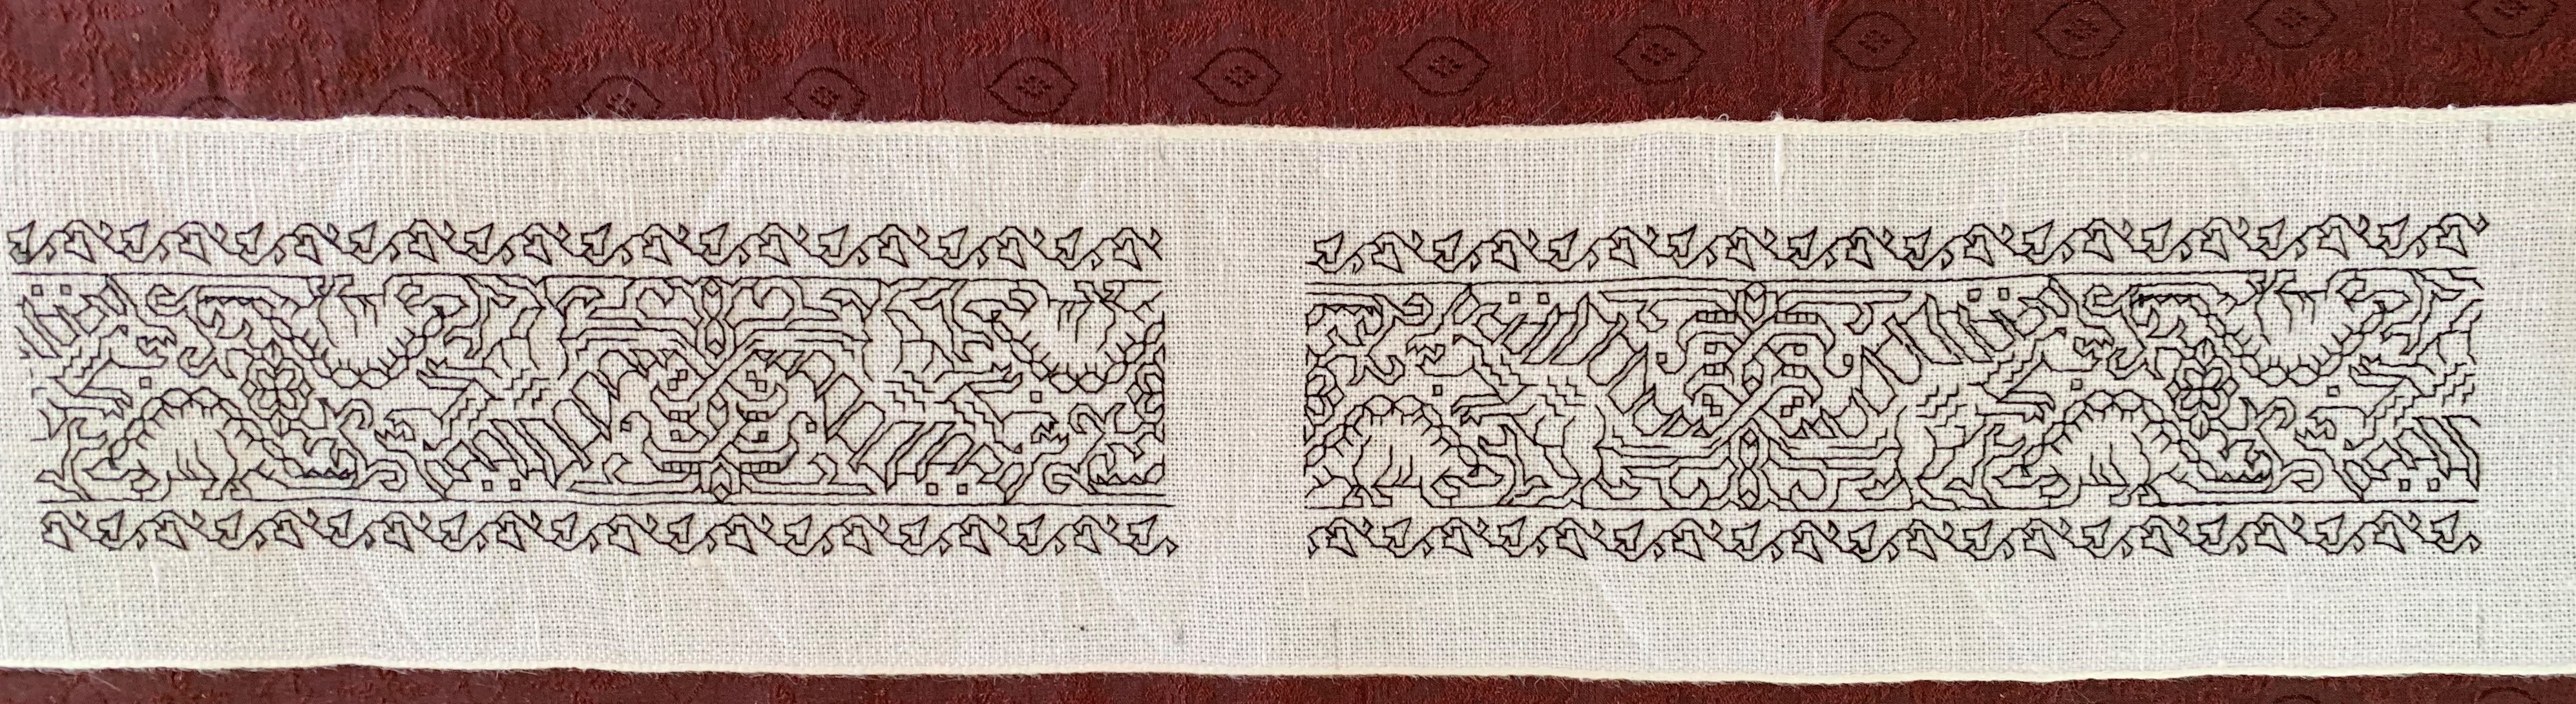
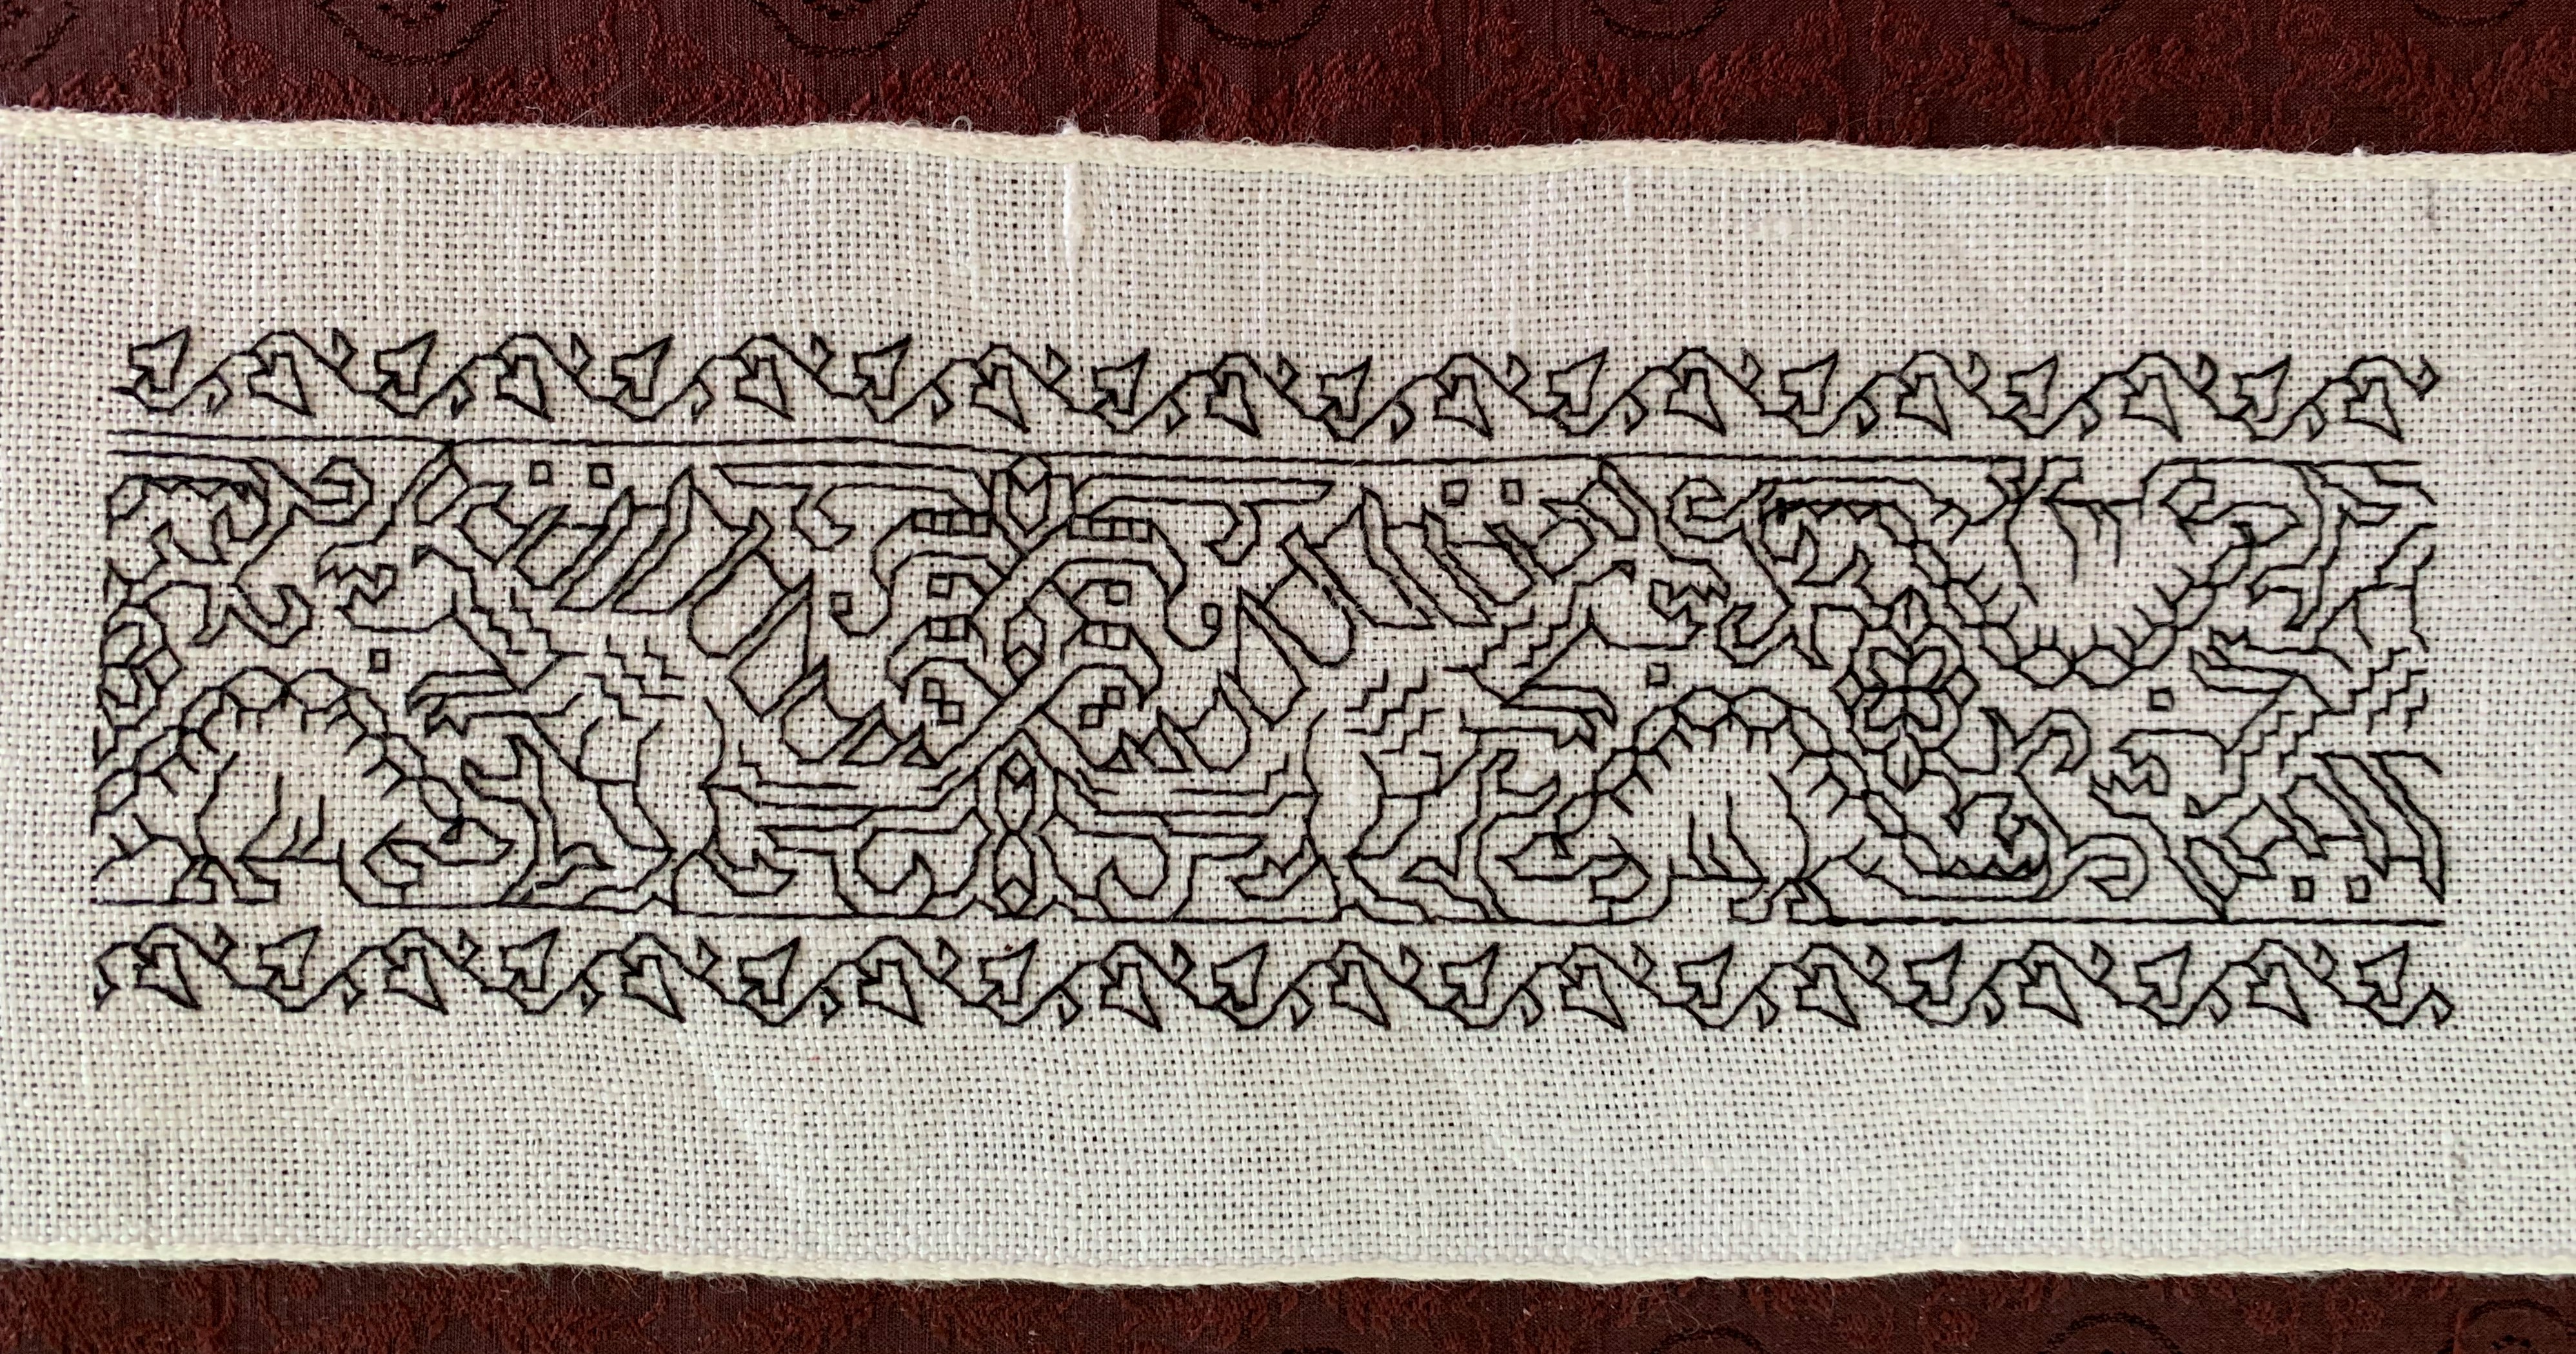
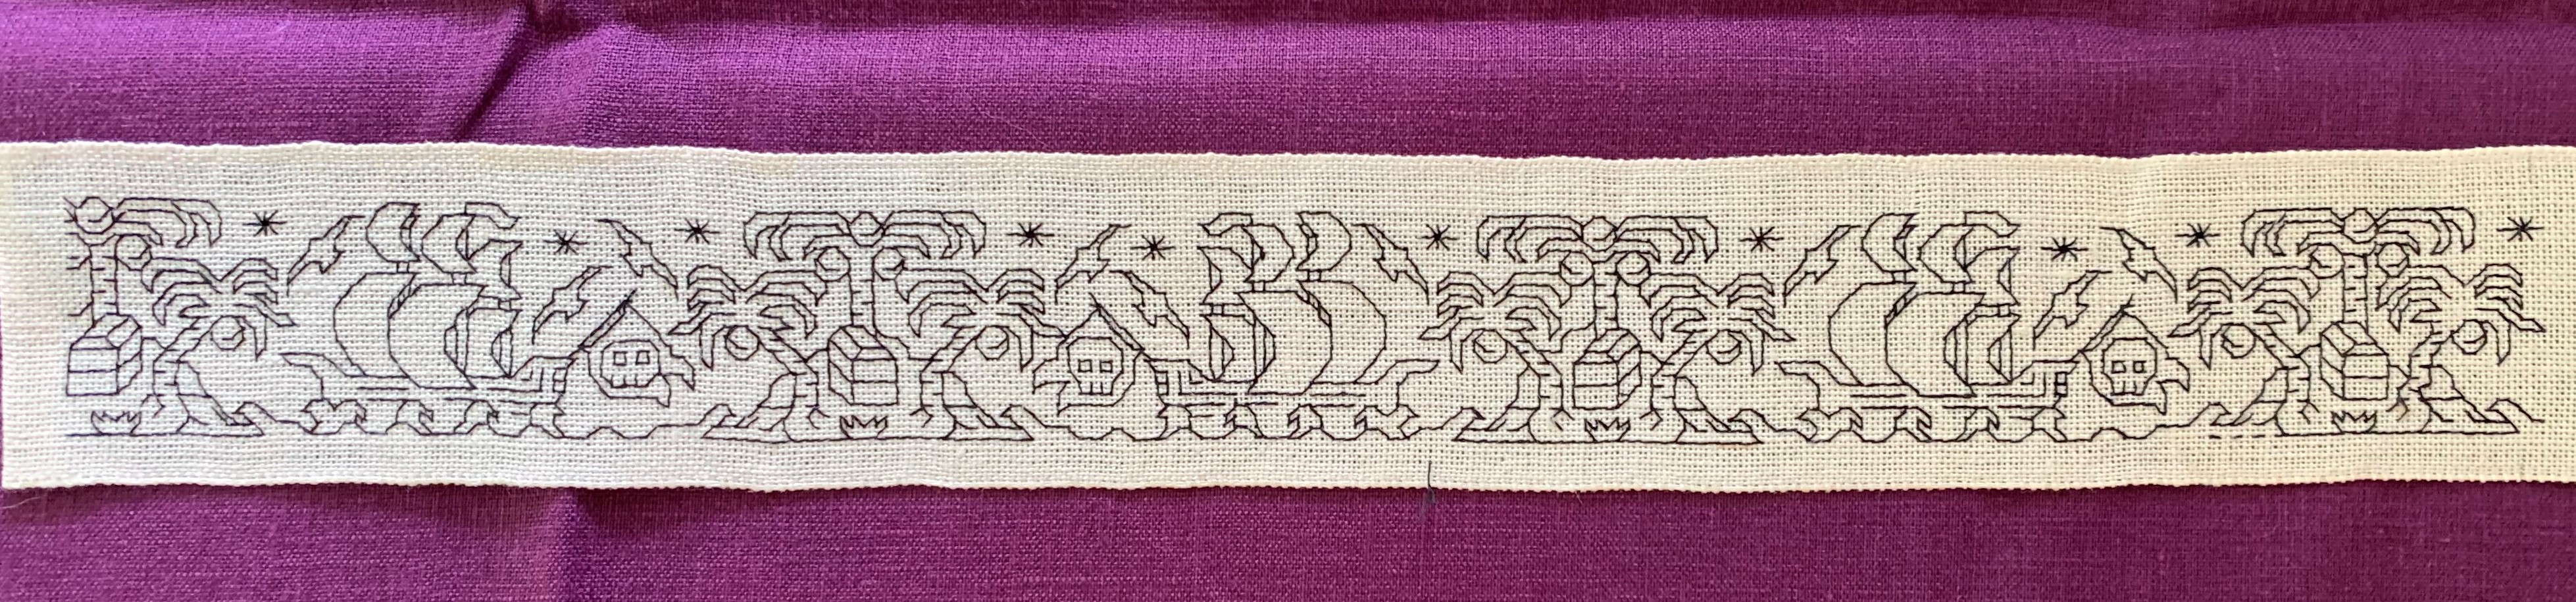
EPIC FANDOM STITCHALONG – BAND 19
WHOVIAN NIGHTMARE
Too late. You peeked.
After more than a year since Band 1 was debuted, we go out in style. And I know that a lot of you were waiting for this one in particular. In this design you never know what’s lurking in the interlaces, waiting to trip you up.
Like the other panels that feature shading, this one can be worked voided if you so desire and the grey area on the chart indicates the logical areas for that background’s inclusion. However the design is a bit full, so if you do opt for voided, I suggest something that’s quite open, or is done with thinner threads than the main outlines, so that the foreground motifs, sprigs, and twigs are not obscured.
Time Factor 5, mostly for size. Time factor 5++ if you choose to work this voided with a background fill, but by now you are old pros at this and nothing I say will daunt you.

Use one color, multiple colors, or variegated threads, as you prefer. As with the rest of Epic, there are no rules or must-do approaches.
As usual this band plus working notes and hints has been appended to the bottom of the write-up on the SAL page, accessible via this link or via the tab at the top of every page here on String-or-Nothing.
If you are working our Epic Fandom SAL either as a whole or as a strip excerpt, please let me know. It gives me great joy to see how my “pattern children” fare out in the wide, wide world, especially when they meet up with creative, playful people. And if you give permission, I’d be happy to share your pix of this developing sampler, it in its finished state, or derivative projects including one or more of the Epic bands here on String, in a gallery post, with full credit to you as interpretive artist.
This is the last band of the project. I sincerely hope you have enjoyed it. For those who haven’t started yet, these files will remain here as long as String-or-Nothing persists.
GALLERY
That photo display opportunity mentioned above is a real offer. I will be starting a stand-alone gallery page here on String to celebrate progress and finishes of works inspired in the whole or in part by patterns from this SAL and from my books and single sheet releases. The new Gallery will replace the gallery tag in the general subject index. I would be happy to post any pix of anything derived from my designs, including projects knit from my patterns.
If you do send me photos, please indicate that you are giving permission to post your material, and let me know whether you want your name (or any nickname you choose) and/or a live link to your own page or website to appear alongside. I am happy to withhold names on request (not everyone wants fleeting Internet fame). And thanks for helping me spread the fun!
#EpicFandomSAL
LOOKING EAST AGAIN
Back when we were doing the expat stint in Pune, India, I wrote about Kasuthi (aka Kasuti, Kashida), a blackwork cousin that deserves to be better known by Western double running stich aficionados. I recently stumbled across another sample of related stitching, this time from a bit further north.
The Hazara people, mostly in Afghanistan, but also present in Pakistan practice an interesting and related form of linear geometric stitchery. It’s hard to date beyond “traditional,” and given current geopolitics, deeper investigations are unlikely. But here is the limited info I’ve found, plus some examples, and some sources of additional information.
The Hazara are known for several forms of stitching, mostly but not exclusively counted styles using satin stitch, straight stitch, double running stitch and cross stitch, and is better known for phulkaris (large shawls often worked in geometric, counted straight stitches). These double running stitch pieces in particular are probably made by women of the Wardak Hazaras, who live mostly southwest of Kabul. This style is usually worked in cotton or silk on linen or cotton grounds. These double running stitch pieces are often finished out as small mats, bags, shawls, prayer cloths, and other covers.
First is the artifact that piqued my interest.

This is piece in the collection of the George Washington University Museum, Accession T-1240. They note it’s provenance as being Hazara from Afghanistan, probably sometime between 1880-1920. That mushy date range is the earliest and although it’s only semi-hard, is the only date I’ve seen for this style. Note the fields of diapered patterns stitched on the count on a not-so-evenweave ground. The designs skew east-west compared to north-south due to there being more ground fabric threads per unit measurement in one direction than the other. But skew or not I love the repetition and color usage. So I went looking for more.
This artifact is probably the best represented on line for the style, and shows up in most on-line photo collections of Afghan embroidery, although not always with attribution. It is nicknamed “The Snowflake Shawl” and was collected by Jania Mishra, the author of the art blog/sales gallery Woven Souls. She places it as Hazara, but does not opine a date. Still it’s clearly antique/vintage. Her write-up includes lots of close-up photos, and notes the relationship of this style of stitching to mathematical theory. Pop by her blog to truly admire the diverse detail of this piece.

More examples. On the left is a bandanna size prayer cloth that was sold by a textile/rug auction dealer, and on the right is what’s described as a Hazara napkin in the Galerie Ariana ethnic textiles sales site. (No affiliation with/endorsement of these sellers – I find dealers’ on-line photos and attributions an occasionally useful research supplement, although not all dealers’ listing data are of the same quality.)


What can we conclude about dissemination and influences?
Very little.
Double running is one of the simplest, oldest and most ubiquitous of stitches. The scholars of Kasuthi posit a vague “Persian origin” before adoption, mention of in literature, and refinement of the style in the Deccan area Chalukya dynasty courts of the mid 500s to mid 700s, and that dynasty’s later resurgences through the end of the 1100s, culminating in the disciplined style and vocabulary of traditional motifs that are known today through surviving examples dating to the 19th century. Overland trade routes have connected Northern India and Afghanistan and beyond going back to antiquity. The the flow of both peaceful and aggressive contact is also well known, as is historical trade that connected the northeastern African coast with India. Egypt’s Fustat region is another area where visually similar double running stitch artifacts from the Mamluk era (1200s-1500s) are found.
Is this another survival of some sort of time-lost tradition that also gave rise to Kasuthi, the Mamluk works, and by extension over time and geography (and by direct quotation noted by others as well as myself), the stepwise and geometric designs found in early European modelbooks at the dawn of the popular print era (early 1500s), and on to early European blackwork and strapwork? It’s tempting to speculate so, but we have absolutely no proof.
These Afghani pieces could also have been a product of later cultural influences, as waves of association washed back and forth along time’s shores. But the clear correspondences, whether they can be affixed to defined family tree, or are just casual correlations due to the limits of geometry and the simple stitching style itself, are to me are a source of endless fascination.
Here are a couple of sites with additional information on Hazara embroidery in general:
Source material for the Mamluk styles mentioned
- Marianne Ellis. Embroideries and Samplers from Islamic Egypt, Asmolean Museum, London, UK, 2001. ISBN1-85444-135-3.
- Ashmolean Museum Yousef Jameel Center for Islamic and Asian Art, Newberry Collection of Islamic Embroideries
And there are more traditional regional counted styles to explore in this area of cultural confluence. I promise to keep digging.
