TIME CAPTURED
More progress on the Unstitched Coif project.

As for “Time Captured” – that’s what this piece is. Time ensnared by thread.
That raven-like bird took about six hours to stitch. The big carnation at the lower right took roughly 18, exclusive of its stem, leaf and tendrils. I took my first stitch on the coif on 16 April. A little over 7 weeks ago. I’d estimate that over those seven weeks I’ve put in between two and five hours a day stitching. The average is probably around 4 hours. So by conservative estimate, what you see here is over 225 hours of my time. And looking at the whole piece, I’m only about 20% complete. I’ve got to speed this up if I want to hit the deadline for submission to the exhibit. Oh, and for the person who brusquely offered to buy my coif when it’s done, I point out that I only have one rate for my time – my fully burdened professional hourly consulting rate. I hope you are prepared to spend in the six figures.
But I’m not complaining about the time spent. Every second has been fun, and a good deal of it has been spent “in the zone” where tedium and cares do not exist. For that it is a remarkably efficient source of centered self-therapy, that I am enjoying immensely.
And all in all, I am pleased with what I’ve put on the cloth. With the exception of the simple boxed filling for Big Bug’s head, which I also used for one petal in the half carnation at the top edge, I haven’t repeated any fills. I’m happy with the mix of light/dark; dense/sparse; and curved/angled fills. There’s one fill done at 3×3 threads, the first leaf I did, but it’s not a glaring problem and I won’t bother reworking it to the same 2×2 thread scale as the rest of the piece.
A few of the paillettes might have been better placed, but I’m not going to take the time to do it. I still need to add gold accents to the viola flower in the center, and to the wings of the largest insect. And I am considering picking out the gold bug antennae and bird feet. While they looked great before the great spangle-flood, they do get a bit lost amidst all the bling. If I do that, now is the time. There are only four bugs and two birds, with lots more to come in the remaining 80% of the piece left to go.
Working with the gold has been a challenge. It’s unruly, for starters. I had hoped to do one of the narrower Elizabethan plaited stitches for the stems and tendrils, but after blowing my budget on the Official Linen Ground, I couldn’t justify the expense of the amount of passing thread I would probably need, or the cost of “auditioning” several alternatives before I hit on the one best suited for the project. So I stash-dived and made do with the Japanese Imitation Gold #5 I bought and used for my Two Fish project. (The same project that introduced me to the 2mm spangles).

I tried, but couldn’t get the Gold #5 to work properly as a passing thread on this closely woven, fine ground. The metal strip around the outside unraveled and shredded, exposing the inner silk core. So I resorted to couching, and even that can be problematic.
While working it single or double stranded around the curves isn’t easy, it’s much easier if I employ the natural bend of the stuff instead of working against it. It tends to curl in one particular direction, and have a tighter bend radius in that direction. So I try to lay the thread to take advantage of it’s natural directionality.
Plunging – taking the ends of the stiff, couched gold from the front to the back of the work – can present problems. It’s especially difficult for tiny lengths of the gold, like the ones I did on the aforementioned antennae.
In plunging, you thread a “service needle” with a looped length of sturdy thread. You insert the service needle at the point where you wish the gold to end, catch the gold thread’s tail with the service needle’s loop, gently draw it tight, then make a short, sharp yank on the service needle, using the loop to pull the thread through to the back.

Above are two of the needles I use for this, with both the tiny #12 blunt point beading needle I’m using to stitch the fills, and the US and UK pennies I use for scale. I experimented with several, including larger tapestry needles before picking these. Not sure what they are, though. I found an unmarked paper of six of them in a box of assorted needlework oddities I found at a yard sale. The extremely smooth eyes plus is a bit of tiny variation in the size of the eyes and taper among them, which makes me think they might have been hand-finished, but I’ll never know. The polyester carpet thread I use for the plunging loop is extremely strong.
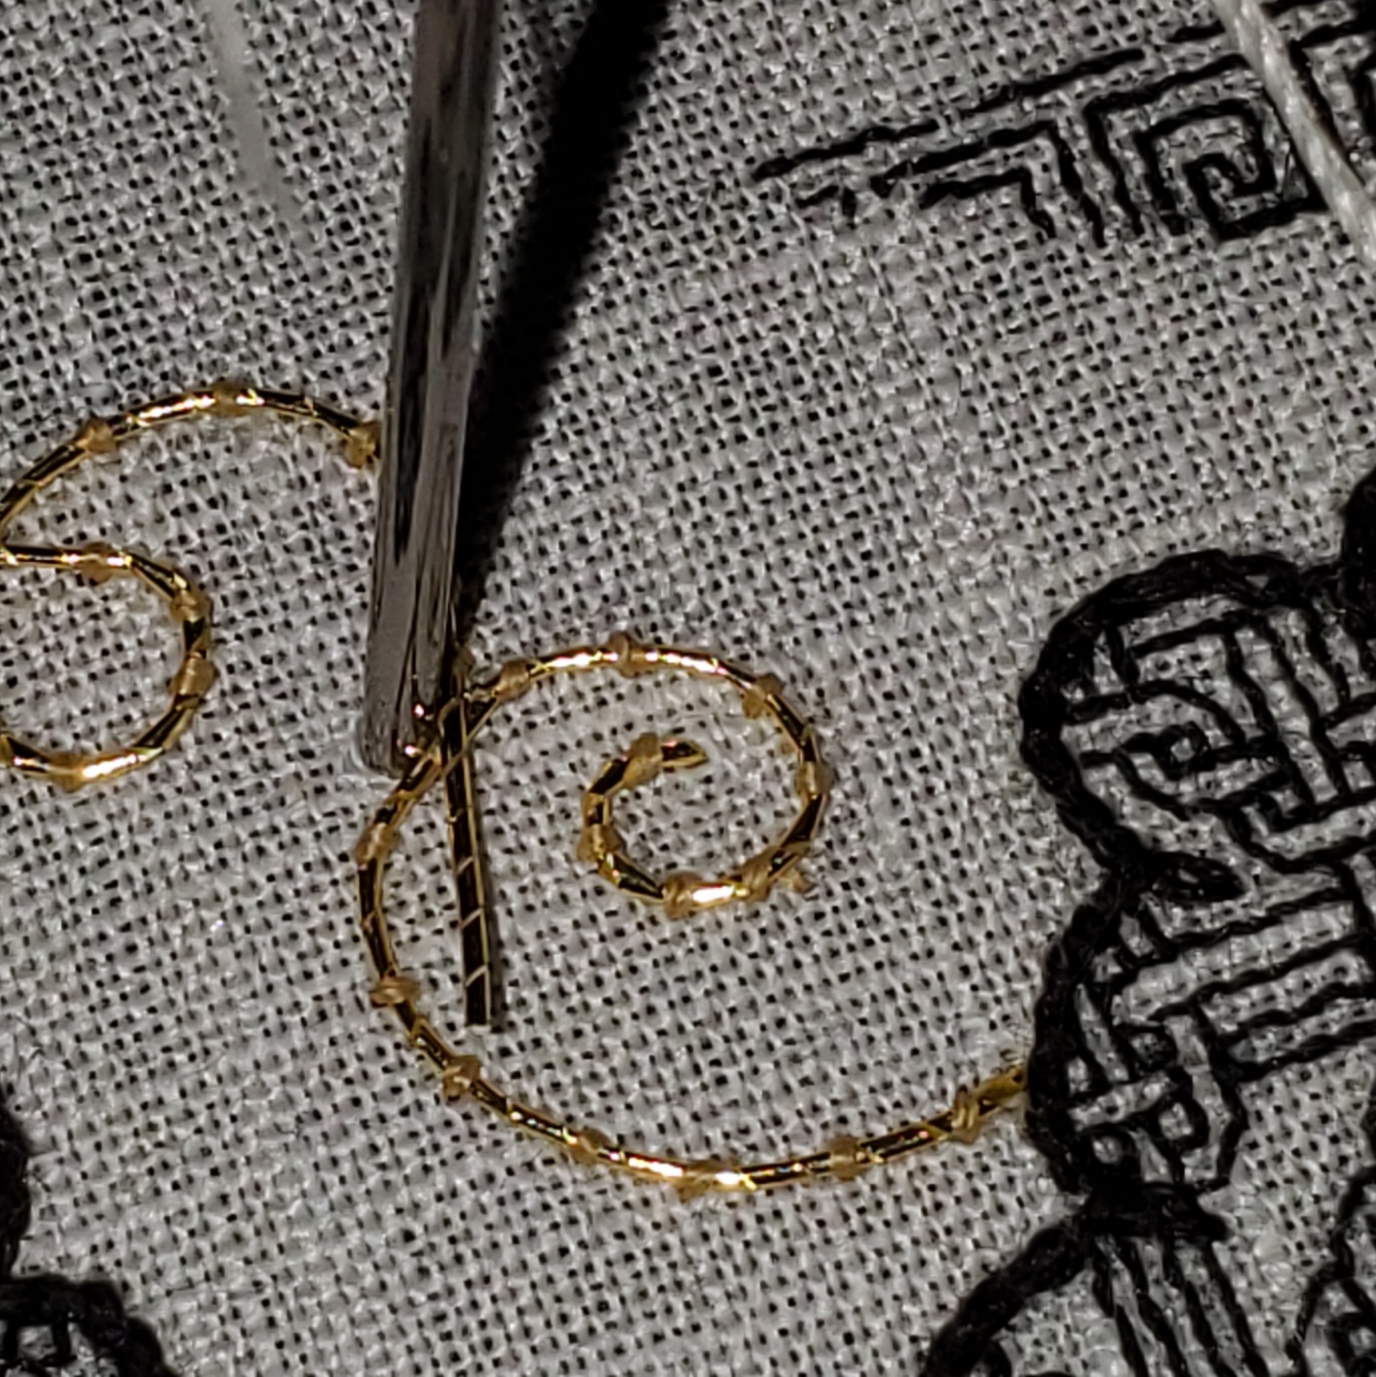

And an action sequence. At left, inserting my gargantuan needle into the spot where I want the gold to terminate. You can see how huge it is in comparison to the ground cloth weave. I go slowly, with the intent of pushing the weave threads aside, and not piercing them. The tail I am about to hide is the vertical bit adjacent to the plunge point. In the center, I’ve lassoed that tail and pulled it through my super-size, distended hole. The size of the hole helps avoid abrading and shredding the gold thread’s outer layer. And at right, the final result. I’ve used the tip of the plunging needle to ever so gently, stroke the ground cloth threads back into position. You’d never know that I had opened up a yawning crater there.
Why show all of this? Well, first to help those who might be considering using gold thread, but have had problems sewing with it. At no point in this process is my gold passed through the eye of a needle, nor is it dragged repeatedly through the cloth to form stitches. I hold it on the surface of my work, and use a needle with yellow silk to make tiny silk stitches, affixing the gold to the ground. I leave about a half inch (roughly 1.5 cm) gold tail when I begin my line of couching, then snip off the excess when I am done, leaving a tail of about the same length at the terminal end. Then I plunge both.
Second, to help explain why I am thinking of re-doing the bug antennae. Those are teeny tiny bits, most not even as long as the tails I leave to end off. No matter how tightly I stitch the yellow couching thread, about 75% of the time the act of plunging itself rips the whole bit of gold through the exit hole, right out of its affixing threads. It’s a major pain and production bottleneck. So in addition to those tiny bits visually disappearing into the spangled ground, I have great motivation for cutting that bit of detail from the rest of the work. I will replace it with the same simple reverse chain stitch in black silk that I used for the rest of the outlines.
Now to work up the courage to perform the surgery…
I THINK I’M ON THE RIGHT TRACK
The Unstitched Coif project continues.
After some experimentation, mostly documented in prior posts, I think I’ve hit on what will probably be the combo of threads and techniques I am going to use. I am still waiting for my fine beading needles and one last fine filament silk, which I may or may not work in. I like the look of mixed threads in a project, even mixed blacks, so even if that thread is late to the party, it still may be incorporated.

As usual, both US and UK pennies provided for scale.
Obviously I am going to be using counted fills for most if not all of the blackwork fields. I may do a few areas in a freehand fill, but probably not speckling. I like the look but find execution of those tiny dots very boring.
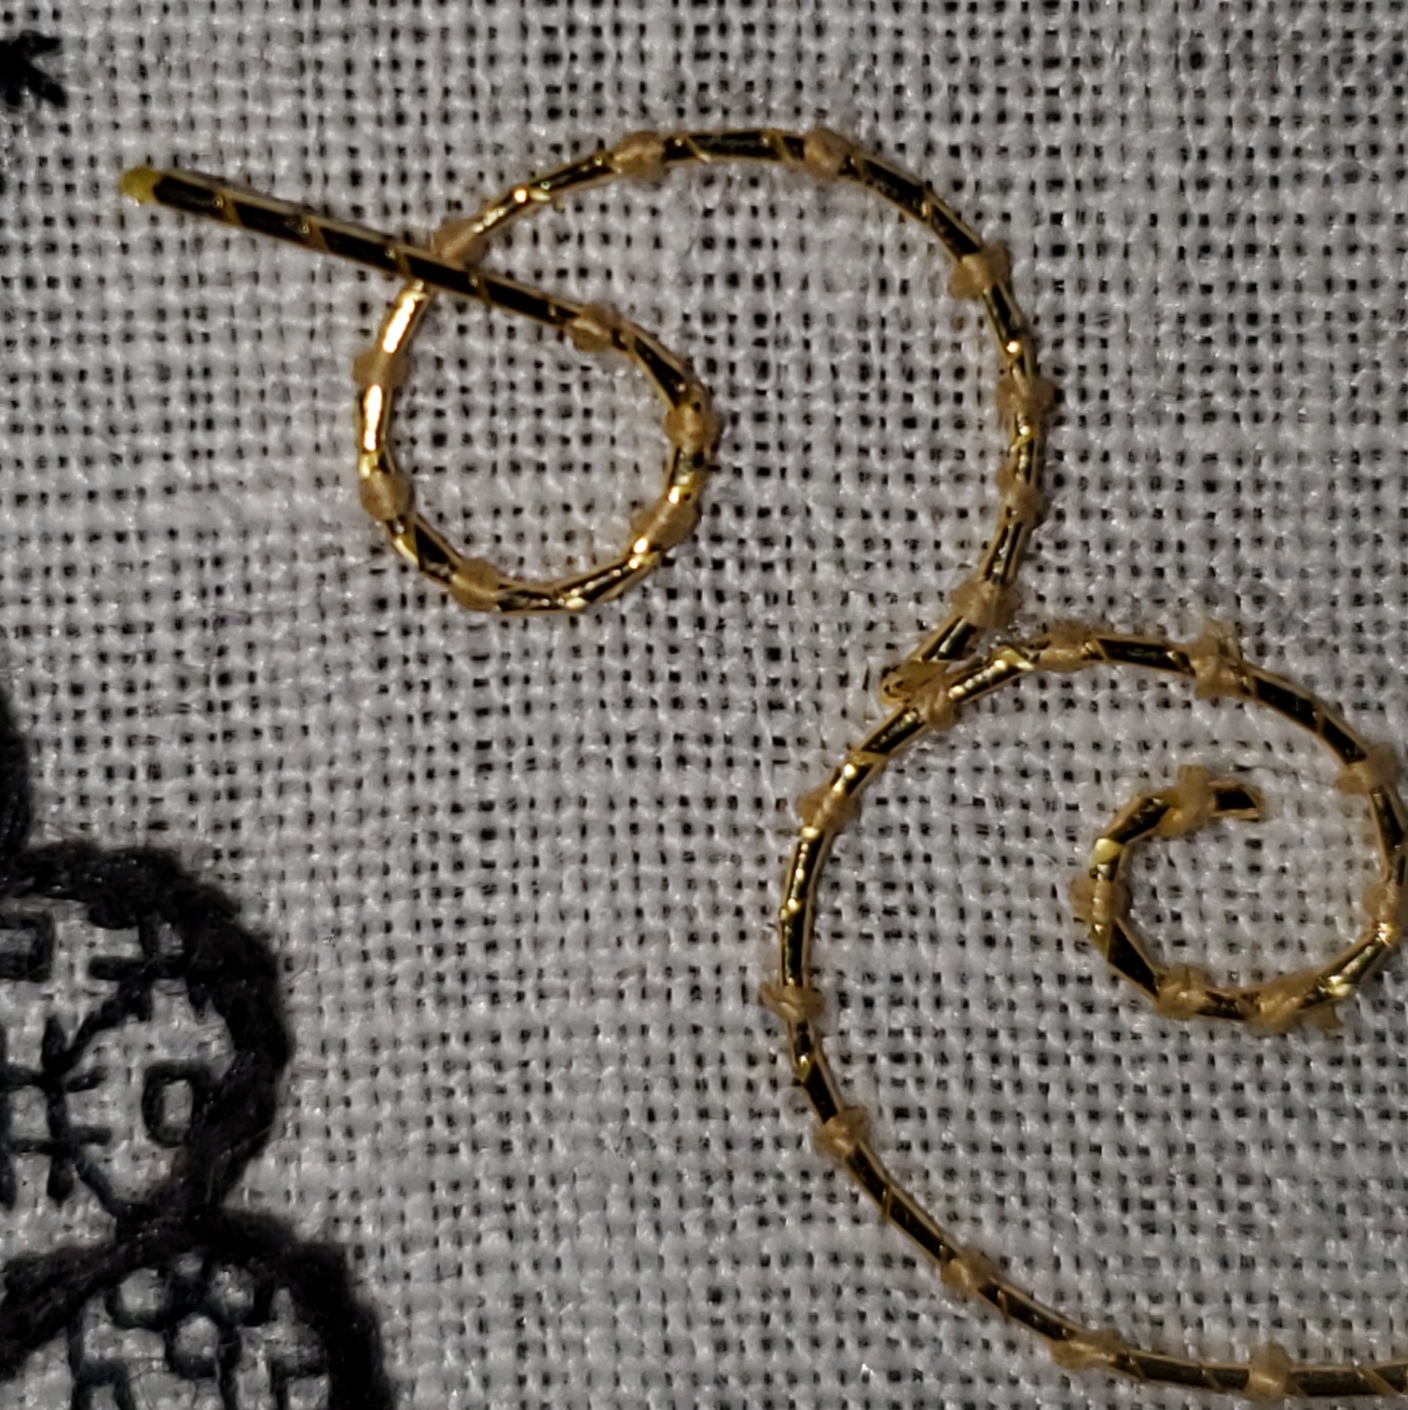
Having tried multiple times to whip the gold around silk, I finally realized that whipping silk around gold is much easier to do. I used a double strand of the Japanese Gold #5 for the stems and leaf veins, in simple couching. But I thought that the plain gold lines looked quite wimpy for the stems, and the visually dense bits of blackwork look stranded, and not unified into a design. So I will be whipping just the exposed stem areas with silk. I experimented with two different silks in the bit above, the longer stem being the Golden Schelle hand-dyed, and the shorter one being the unidentified small batch silk I had in my stash. Both use two strands. I may end up using them both, with the Golden Schelle for wider, more prominent stems, and the other for smaller offshoots. Time will tell.
The curly tendrils are single strand Japanese Gold #5, again simply couched. The half-flower center (cut off by the edge of the coif) is the same gold, double strand, again couched. I will do the full circle flower centers in spiral couching. I thought about a spiderweb, but as I found out this wrapped gold does not play well as a passing thread, so I will stick to couching.
And the paillette. I know he’s all by himself right now, but as I finish areas I will be peppering the between ground with them, just for the fun of added bling.
To answer questions and issues from my inbox:
- Are you planning or plotting out all of your fills beforehand?
No. I’m just picking them at random whim, at most considering if I want a dense or a lighter one for the spot I am about to stitch. Since picking out on this fine ground is not fun, even if I am not 100% satisfied with my choice, I will keep going with any fill started, once committed. In general if a fill has an identifiable motif in it I try to center that bit in the “meatiest” part of the area being stitched, then work from that point out to the edges, but I don’t plot out the exact placement ahead of time, and fills in adjacent units can end up skew on count to each other. Sometimes I even do that on purpose to increase visual movement in the composition. - Where are you getting your fills?
Well, if you know me you know I have endless notebooks full, some of which I have shared for free elsewhere on this site. Plus I have been known to make them up on the fly. But I do not intend to use this project as personal advertising, and won’t be mentioning them again. - Can you send me the pattern?
It’s not mine to share. I’ve put in feedback to the project organizer suggesting that once the official website is up and running later this month, that the design be made available there. - How can you see to do this so small?
Waybackwhen, my 25 year old eyes could do this un-augmented – nearsightedness being a bit of a natural magnifier. But that was long ago. I am using a lighted magnifying aid which can be worn over glasses. It does take a bit of getting used to, so it’s not a perfect solution but so far it’s working for me. Again, I am uncomfortable being a product shill, but the thing made by Beileshi, is easily found on Amazon, and is reasonably priced. - Where did you get the linen?
I’ve posted the link before, so here it is again. It’s not exorbitantly priced for linen but shipping to the US doubles the cost, which makes it a bit spendy, and there’s no real break in the shipping surcharge for buying larger amounts and sharing the bounty. As far as quality, in my piece at least there is a fair bit of slubs and really fine threads, that makes counting a bit harder. The weave is also off a bit – you can see that my motifs are stretched a bit north-south as opposed to east-west. But at this scale I doubt anyone will notice. - Are you stitching 1×1?
No, that would be a bit much even for me. I’m doing mostly 2×2 because I find it easiest to count, but the butterfly squares fill above was done 3×3. I may mix up the counts to achieve density effects. Again time will tell. - Where did you get the spangles? Are they handmade?
No, they are not. They are tiny 2mm center-hole gold-tone circles, flat (no cupping like a faceted sequin). These are the same ones I used on my Two Fish piece. I will share the source again because I know paillettes this small are very hard to find in the US. I ordered them from General Bead in San Francisco, California. - Too bad, looks nice but I’m disappointed. You know you aren’t being historically accurate, right?
I don’t pretend that I am. The base pattern cartoon provided by the Unstitched Coif project certainly is. The general aesthetic is. The project leader assures me that this particular linen is the closest she has found to the linen of museum artifacts. But this is my modern interpretation of that museum original, and I do not claim it to be a fully documented representation of a specific historical style or period-limited materials/technique set. Here are my aberrations:- My thread mix – For black, partially filament silks with modern dye, partially spun silks in a mix of modern and historically documented dyes. The gold tone thin silk I am using for couching and affixing the paillettes is “art silk” – rayon, that I found in India. I had it on hand, and it’s largely invisible in this project. I spent enough on the linen and other materials that I feel justified in economizing here.
- The gold thread. It’s got the look (more or less) and is a thin filament of metal around a silk core, but it’s not exactly what was used contemporary with the base design, and is unsuited to use as a passing thread on a ground this dense. But again, I had it on hand and it is affordable.
- The paillettes. Machine made, probably mylar painted gold. Again I plead my pocket.
- [UPDATE] The density of the paillettes. Some people have stated that my use of them is too tightly packed
- The fills. I know my fancy will run away with me (it already has), and my fills will be my own choice and largely of my own devising. I will not be able to be individually documented one by one to specific historical artifacts or blackwork depictions.
- The stitch used for outlining. I’m using reverse chain. Yes, I know that Jacqui Carey specifically points it out as a modern stitch in Elizabethan Stitches, but given its gently raised line, speed of accurate execution, ease of handling tight curves, and its vague similarity to Elizabethan Twisted Chain (also cited by Carey), I can be forgiven this time- and effort-saving sin.
- The whipped couched gold. No historical source for this I know of, but I also admit I am not posessed of encyclopedic knowledge.
FRAMED!
At long last. Framed and hung up in the bedroom.

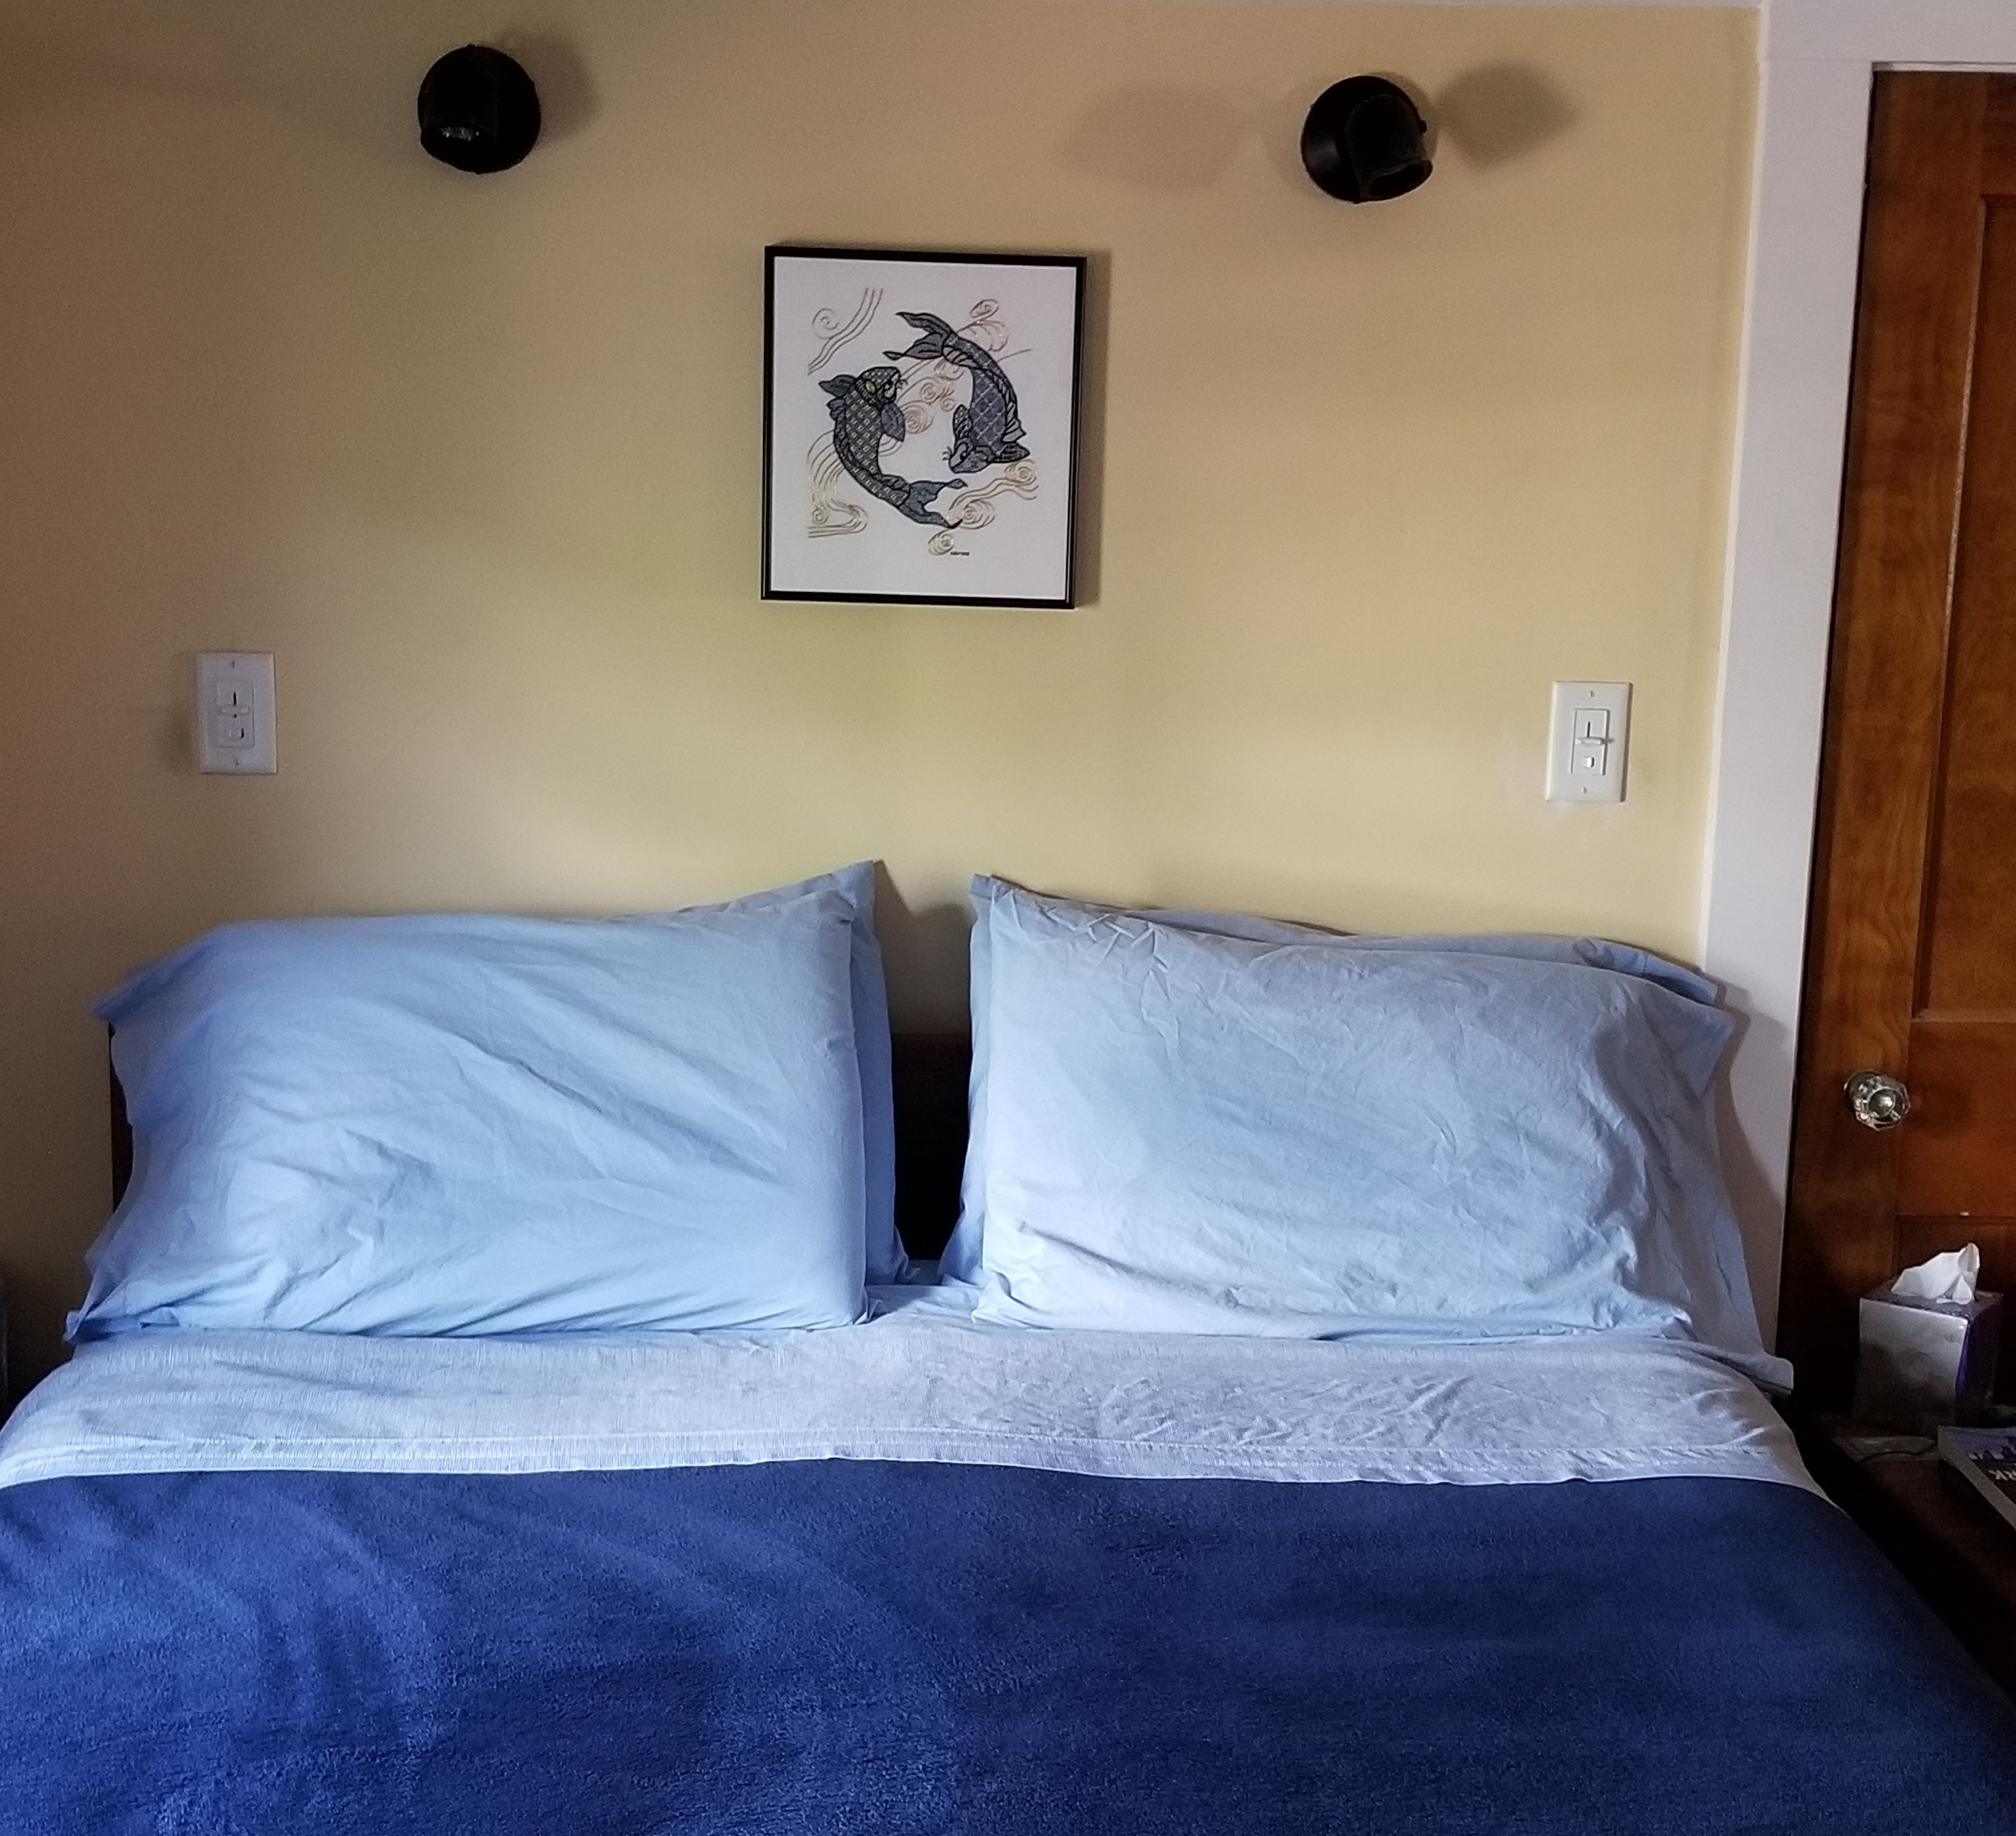
Obviously I now have to paint the bedroom walls…
I’m quite happy with the way this turned out. The frame is simple enameled steel, in deep navy. I ended up going to Walden Framer in Lexington, MA. Mr. Ed Pioli, the owner and artisan in chief, did an excellent job at a reasonable price. I will be bringing my other as-yet unframed pieces there, too.
To answer more questions on the piece’s composition, mostly from other people outside the framing shop when I was there. No, neither of us is a follower of astrology, and it’s not a panel depicting anyone’s sign. It’s just two koi, in a traditional arrangement. And no – there isn’t a boy-koi, and a girl-koi (or any other manifestation of yin/yang) intended. It’s just two koi swimming in a circle. And no, that’s not real gold thread. It’s high quality imitation gold sold for Japanese embroidery. And no, I didn’t sew it on a machine, I did it by hand. Really and truly. (People are curious about the strangest things.)
What am I working on now? Well, the Great Tablecloth/Napkins project is done, but I still itch to stitch. So I’m just doodling. Filling up a small piece of linen, waiting for the Inspiration Fairy to chuck a brick through my mental window.
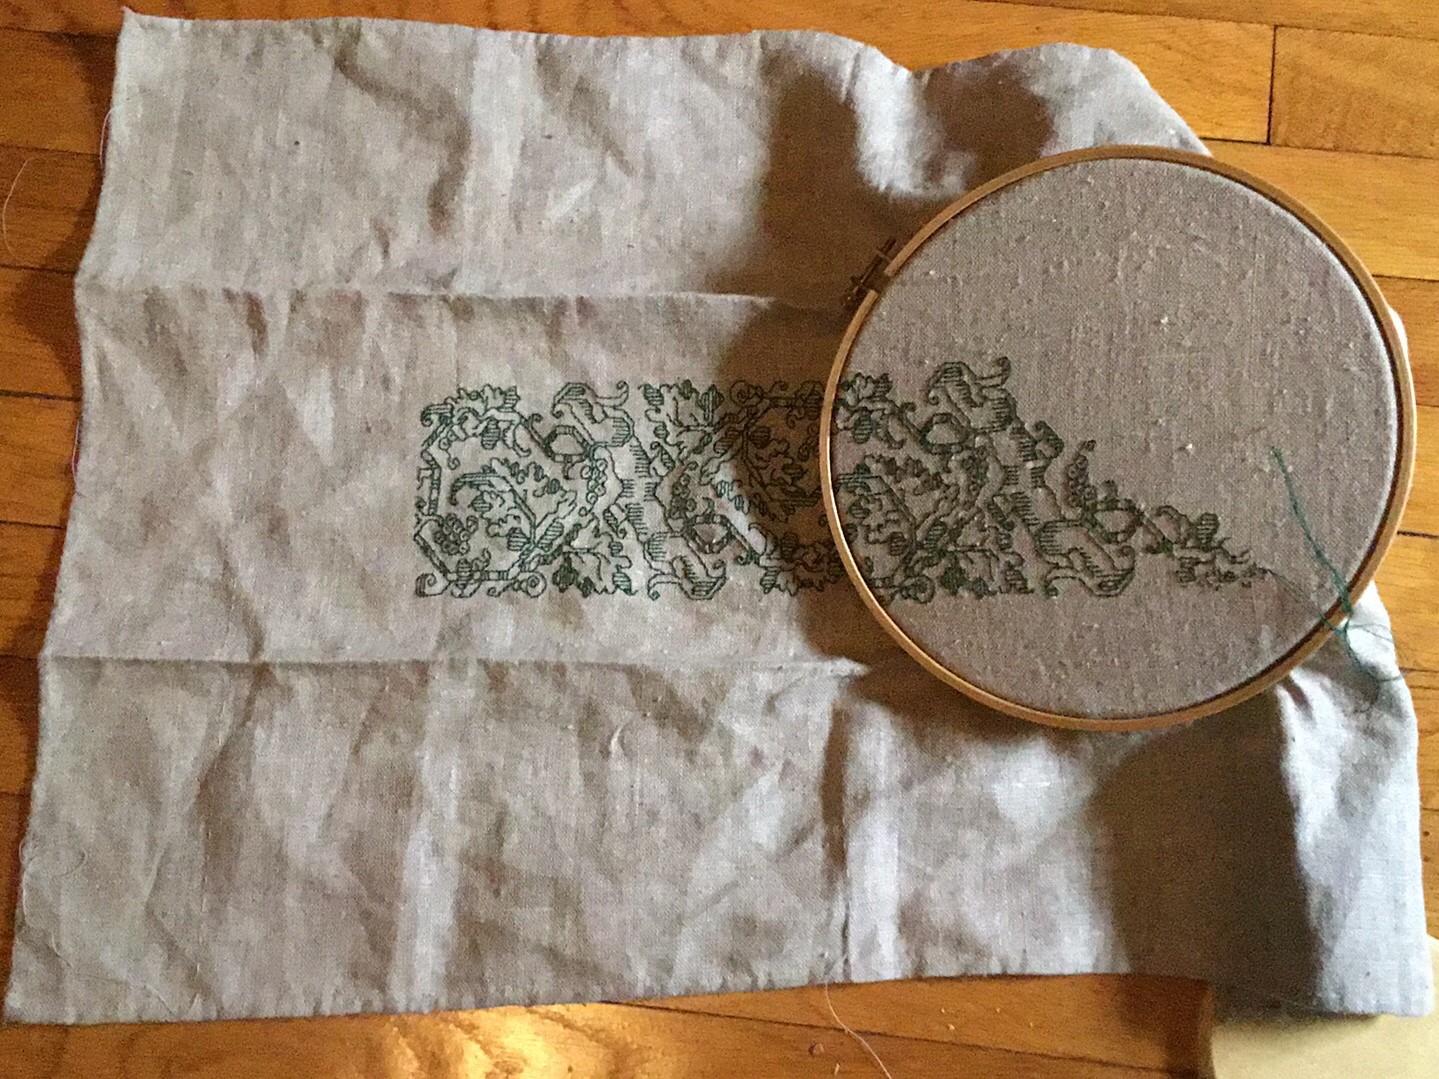
I’ve written about this design before. I think this time I’ll circle the center panel with other, narrower bands. Again, no set plan, I’ll just pick them as I go along, with no composition agenda in particular in mind. Eventually I’ll figure out what to stitch next.
UPDATE
It’s taken me a week or so to get this post up and out. In the mean time my doodle has grown, but still has no plan.
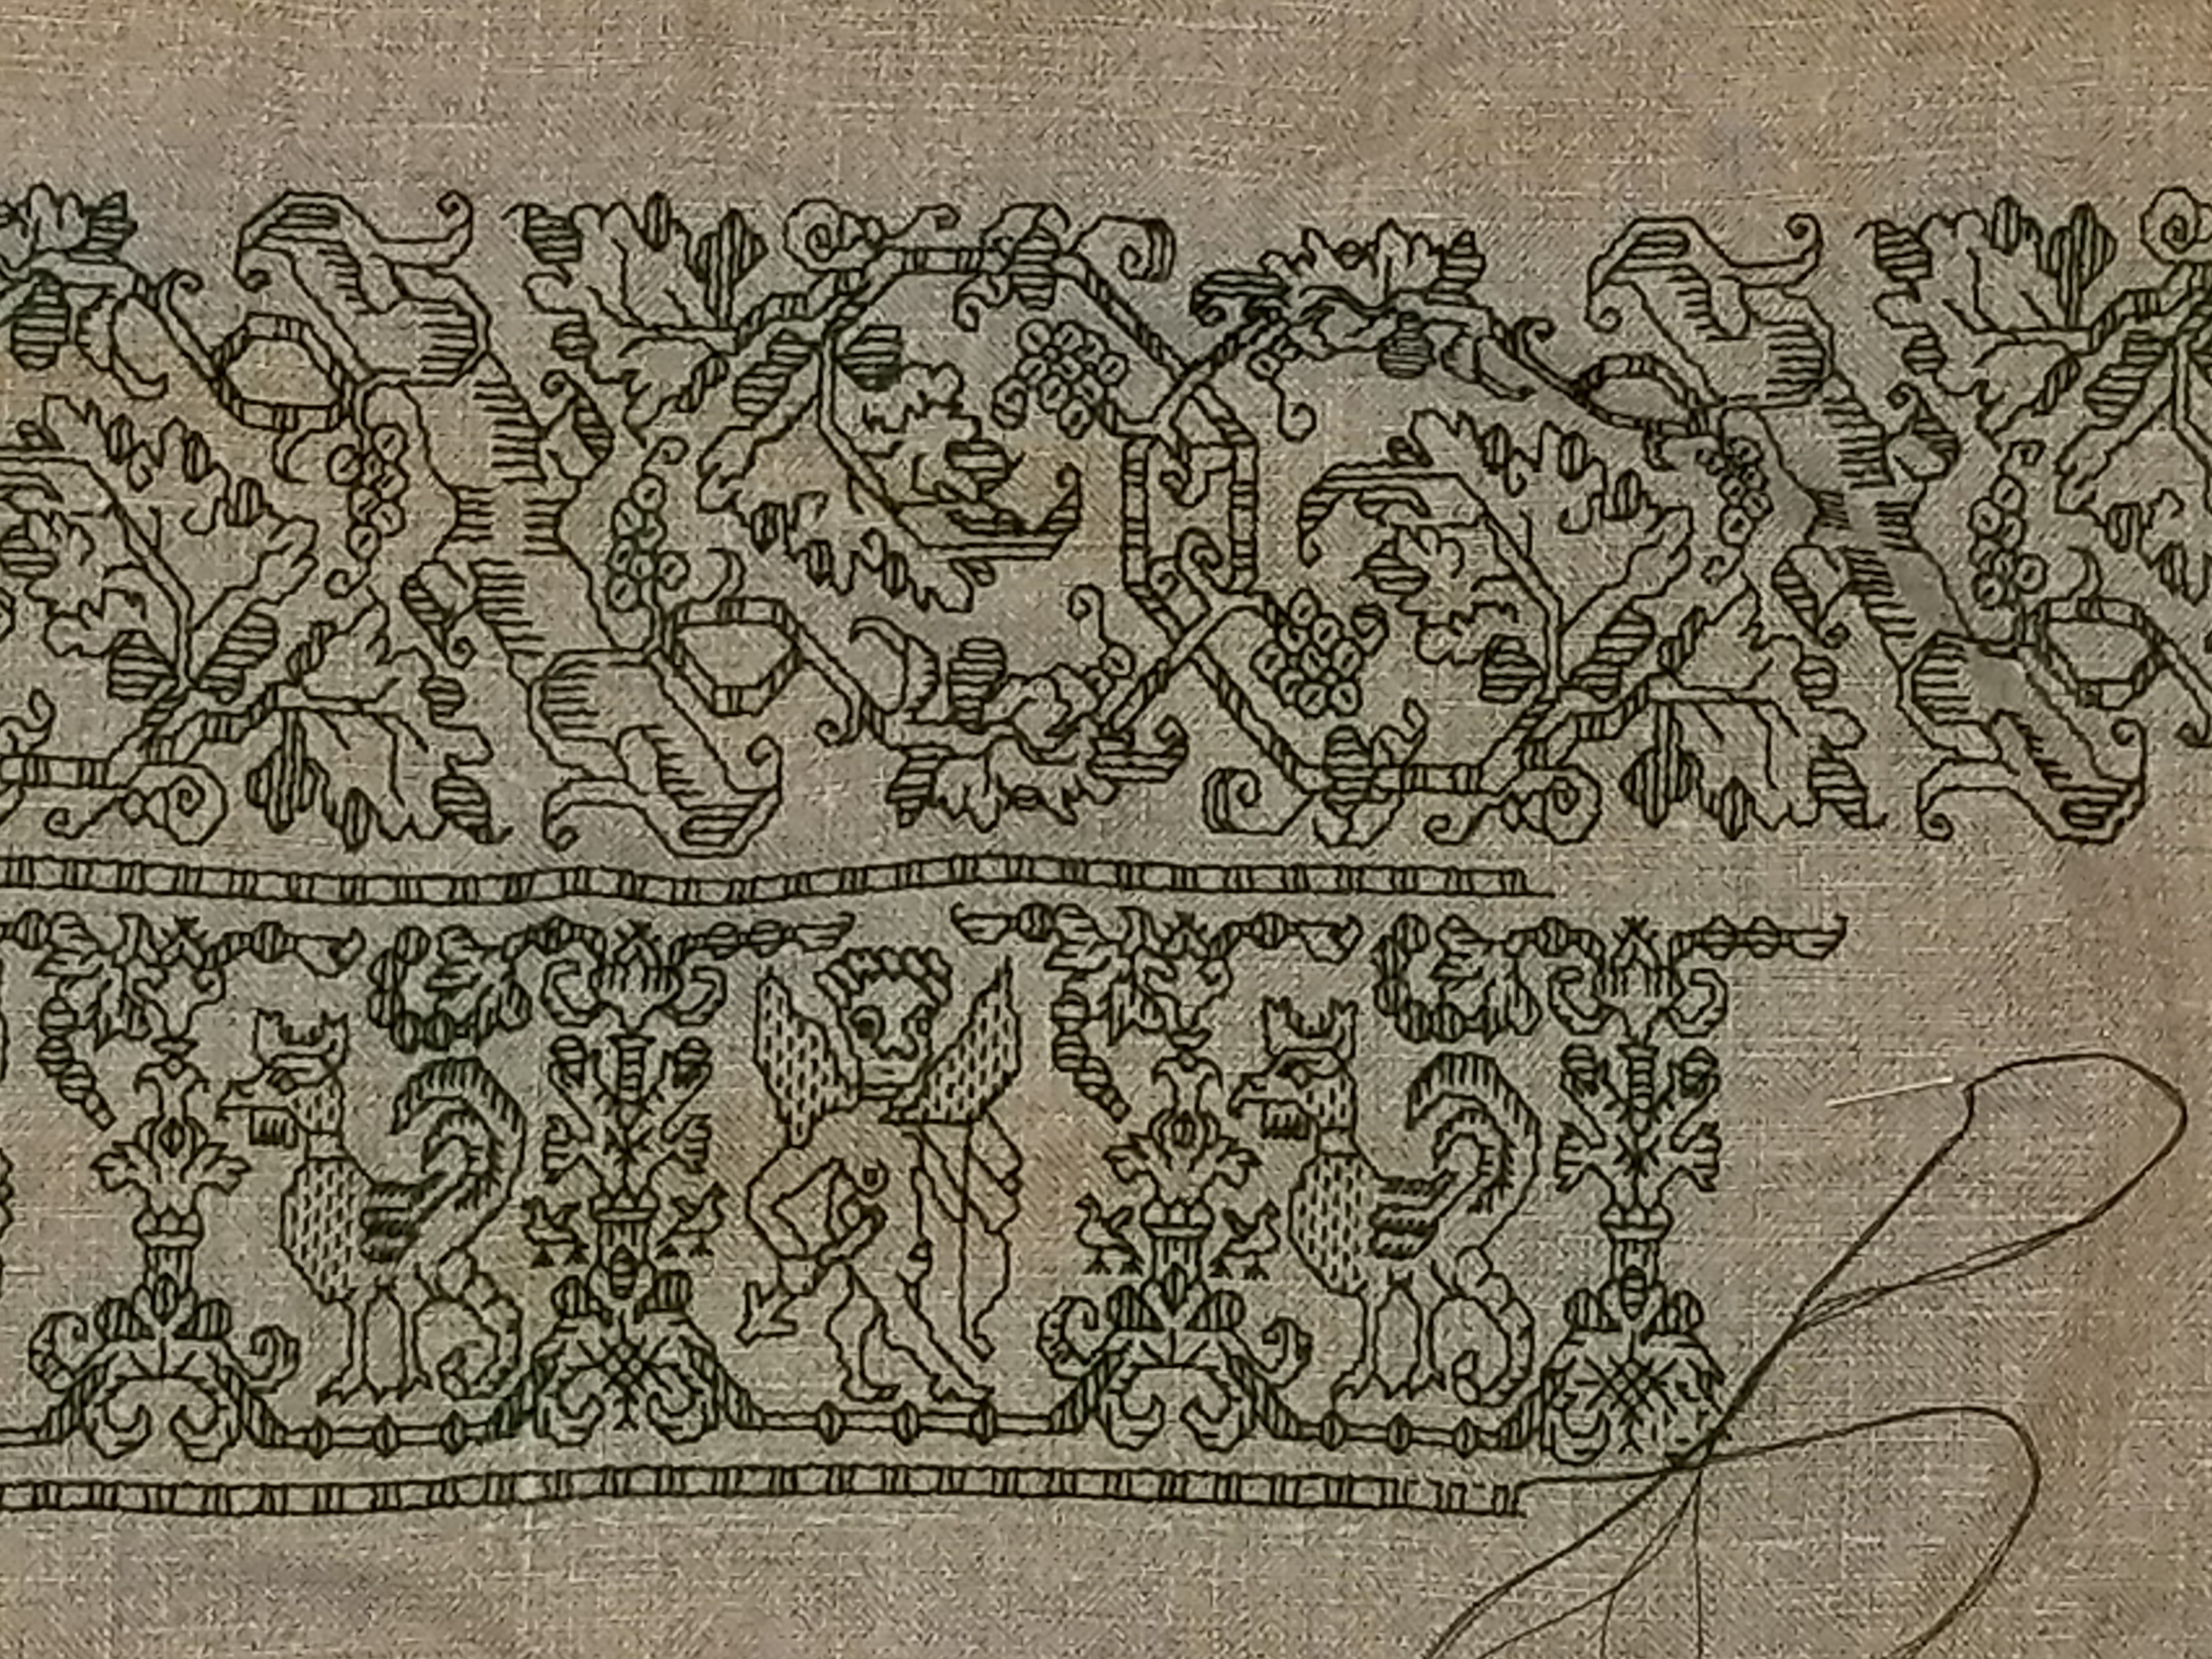
The lower design is a curious one. Although it’s a clear repeat with the rather bulbous naked cherub alternating with the cockatrice, there is little symmetrical inside the repeat. Close attention has to be paid to this one because even the internal framing mechanism (the bar and beads below the feet of each) has a different counts in each of its two instances, and the usual urn or leafy unit between the creatures also exists in two incarnations. It’s a curious one, for sure, but fun, and is keeping me on my toes.
Both of these designs will be in T2CM, which is moving again towards release. No date yet, but watch this space.
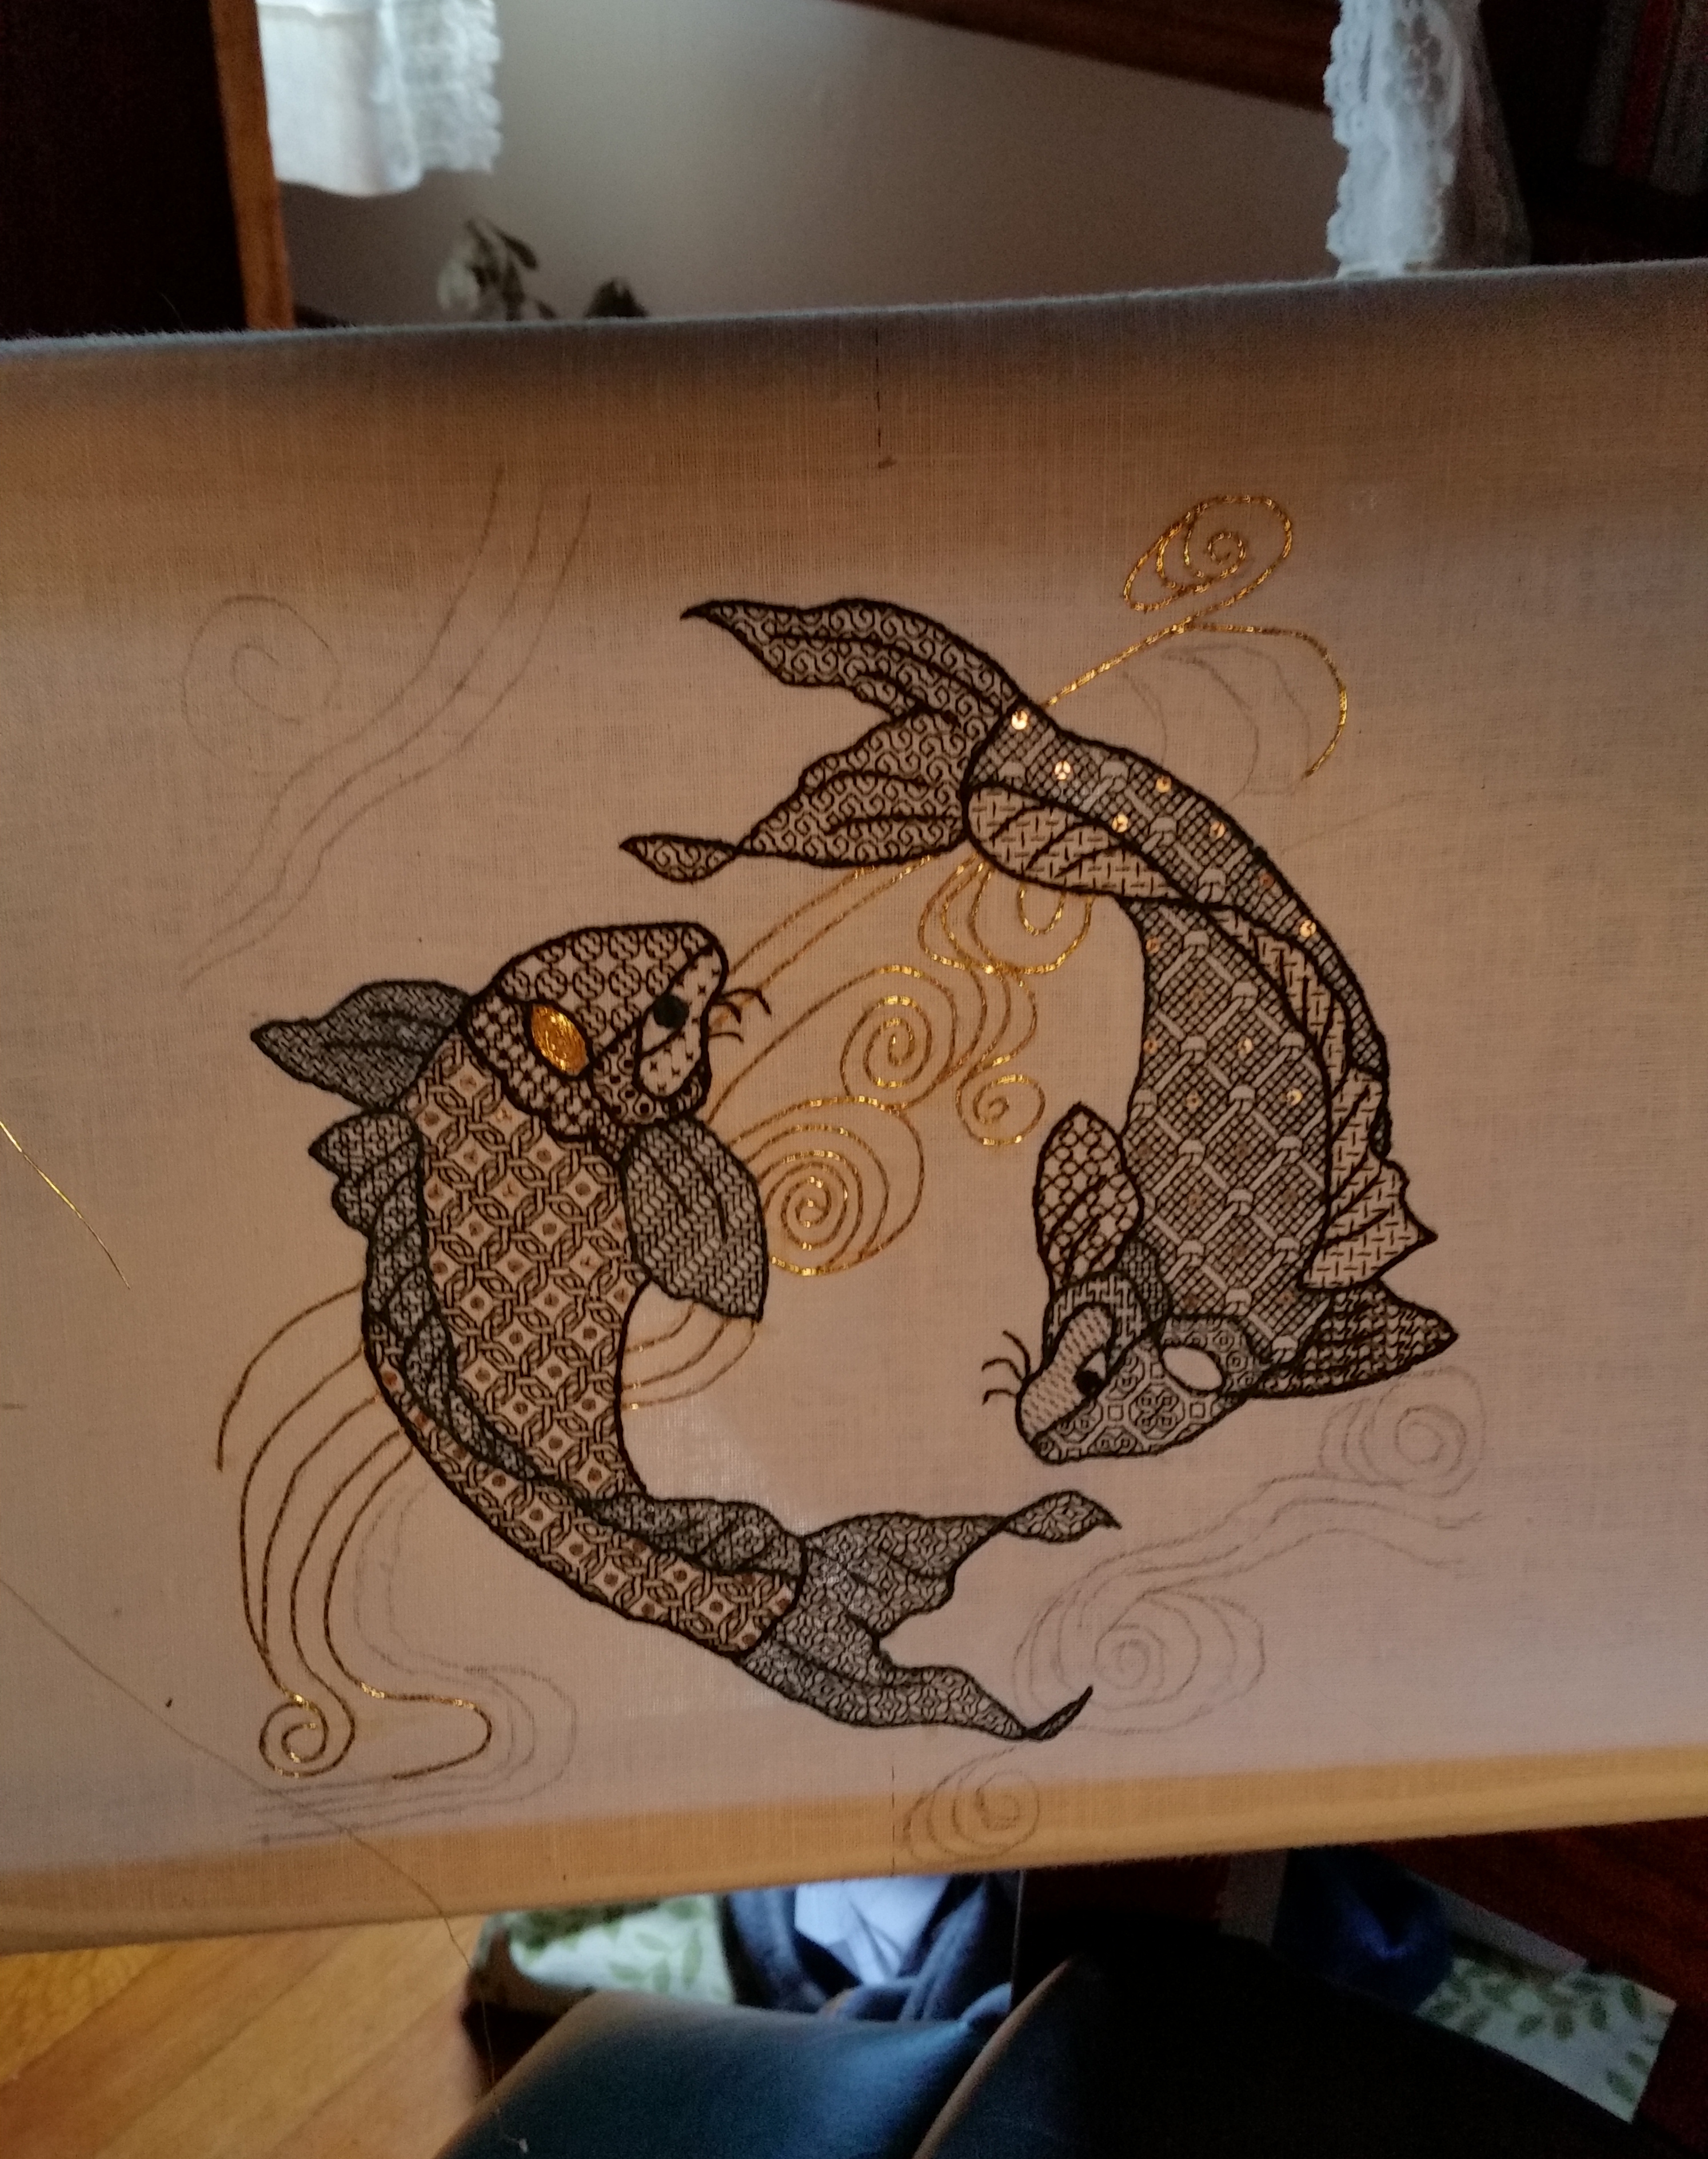
FINISHED!
The stitching on my Two Fish piece is now complete. The only things left to do are to iron out the pleats from mounting on the stretcher bars, and having it framed. 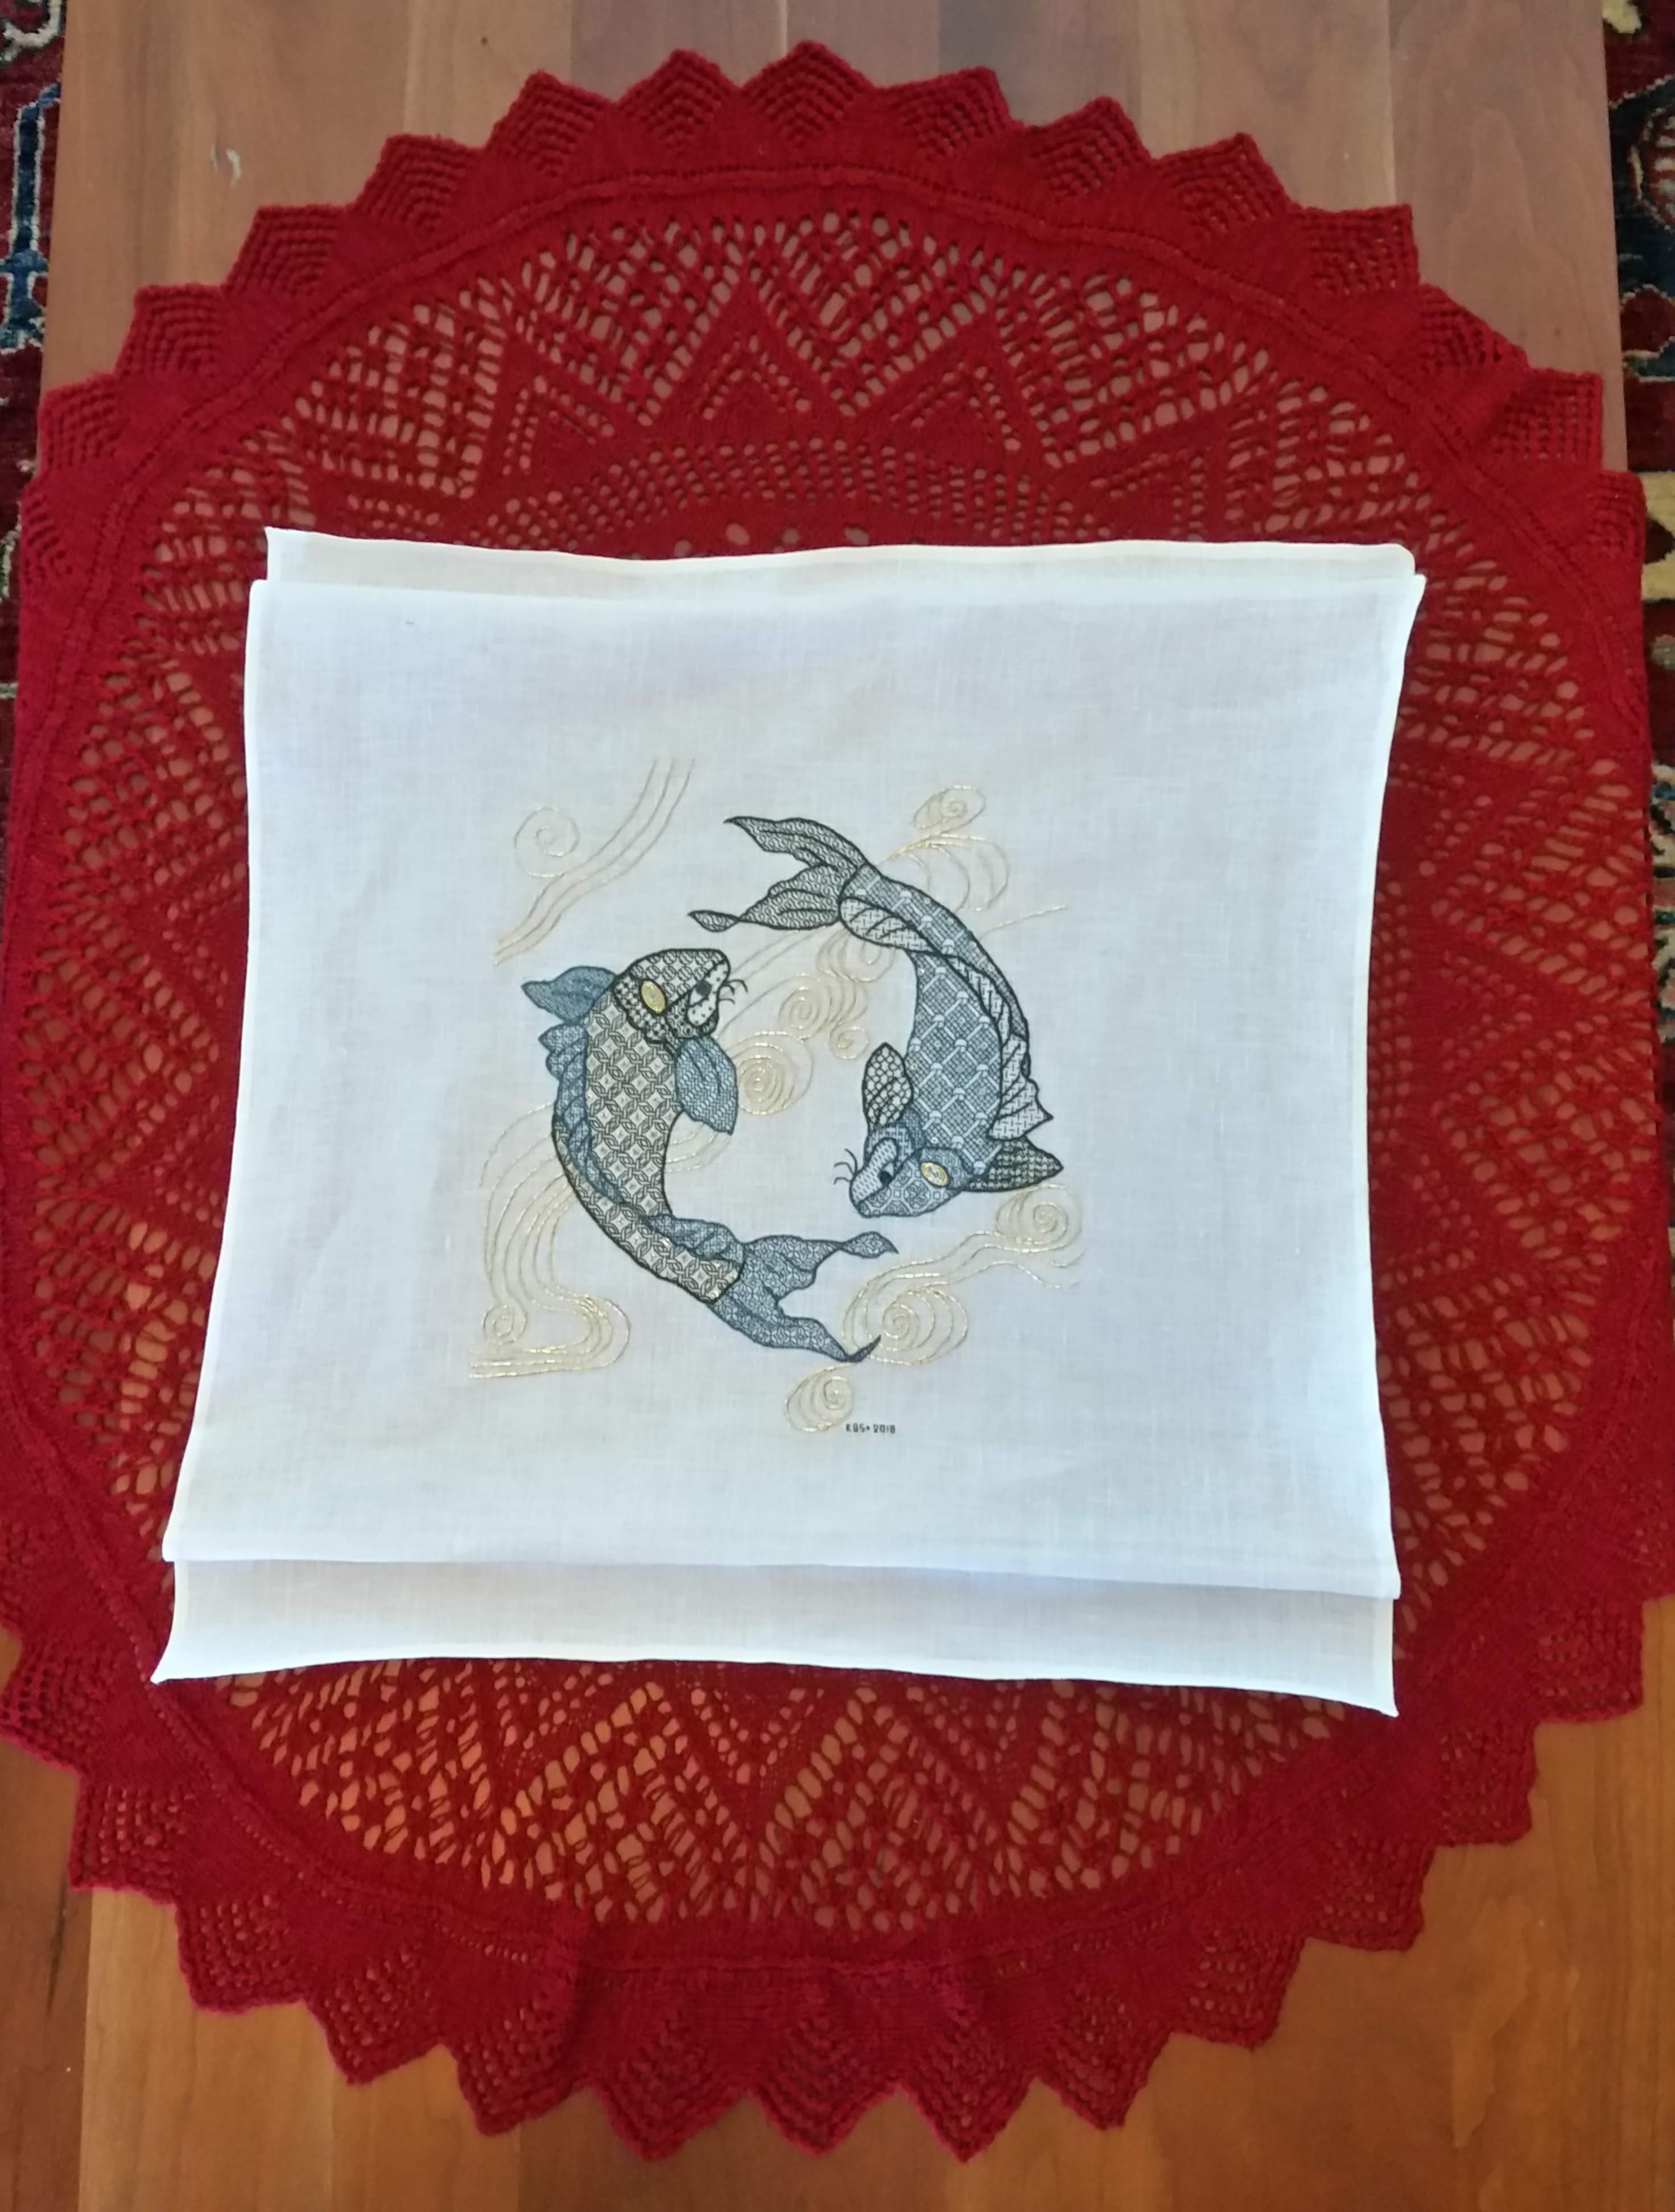
And a close-up:
For those who wanted something to better illustrate the scale of the stitching, here’s a standard US penny on the work:

For the record, the recipient is so pleased with the thing that we’ve decided to keep it here in the house, rather than consigning it to the beach place. Eventually, after framing, it will end up in our bedroom.
SWISH BY SWISH
I continue to make slow progress on my Fish piece. Again, I plead the heat, the general malaise it creates, my unwillingness to sit under a hot halogen work light, and a reticence to stitch with sweaty fingers. But as you can see, I’m almost done with the center area gold water swirls. Just a few “echo lines” are left to add to the group below the head of Fish #1, then I will have to advance the scroll, to get the remaining bits at the top and bottom. (Swirly lines that currently go off the edges of my stitching area have been saved until the work area is realigned, even if they go over by just a little bit.) And of course, sign the thing with my initials and the date.
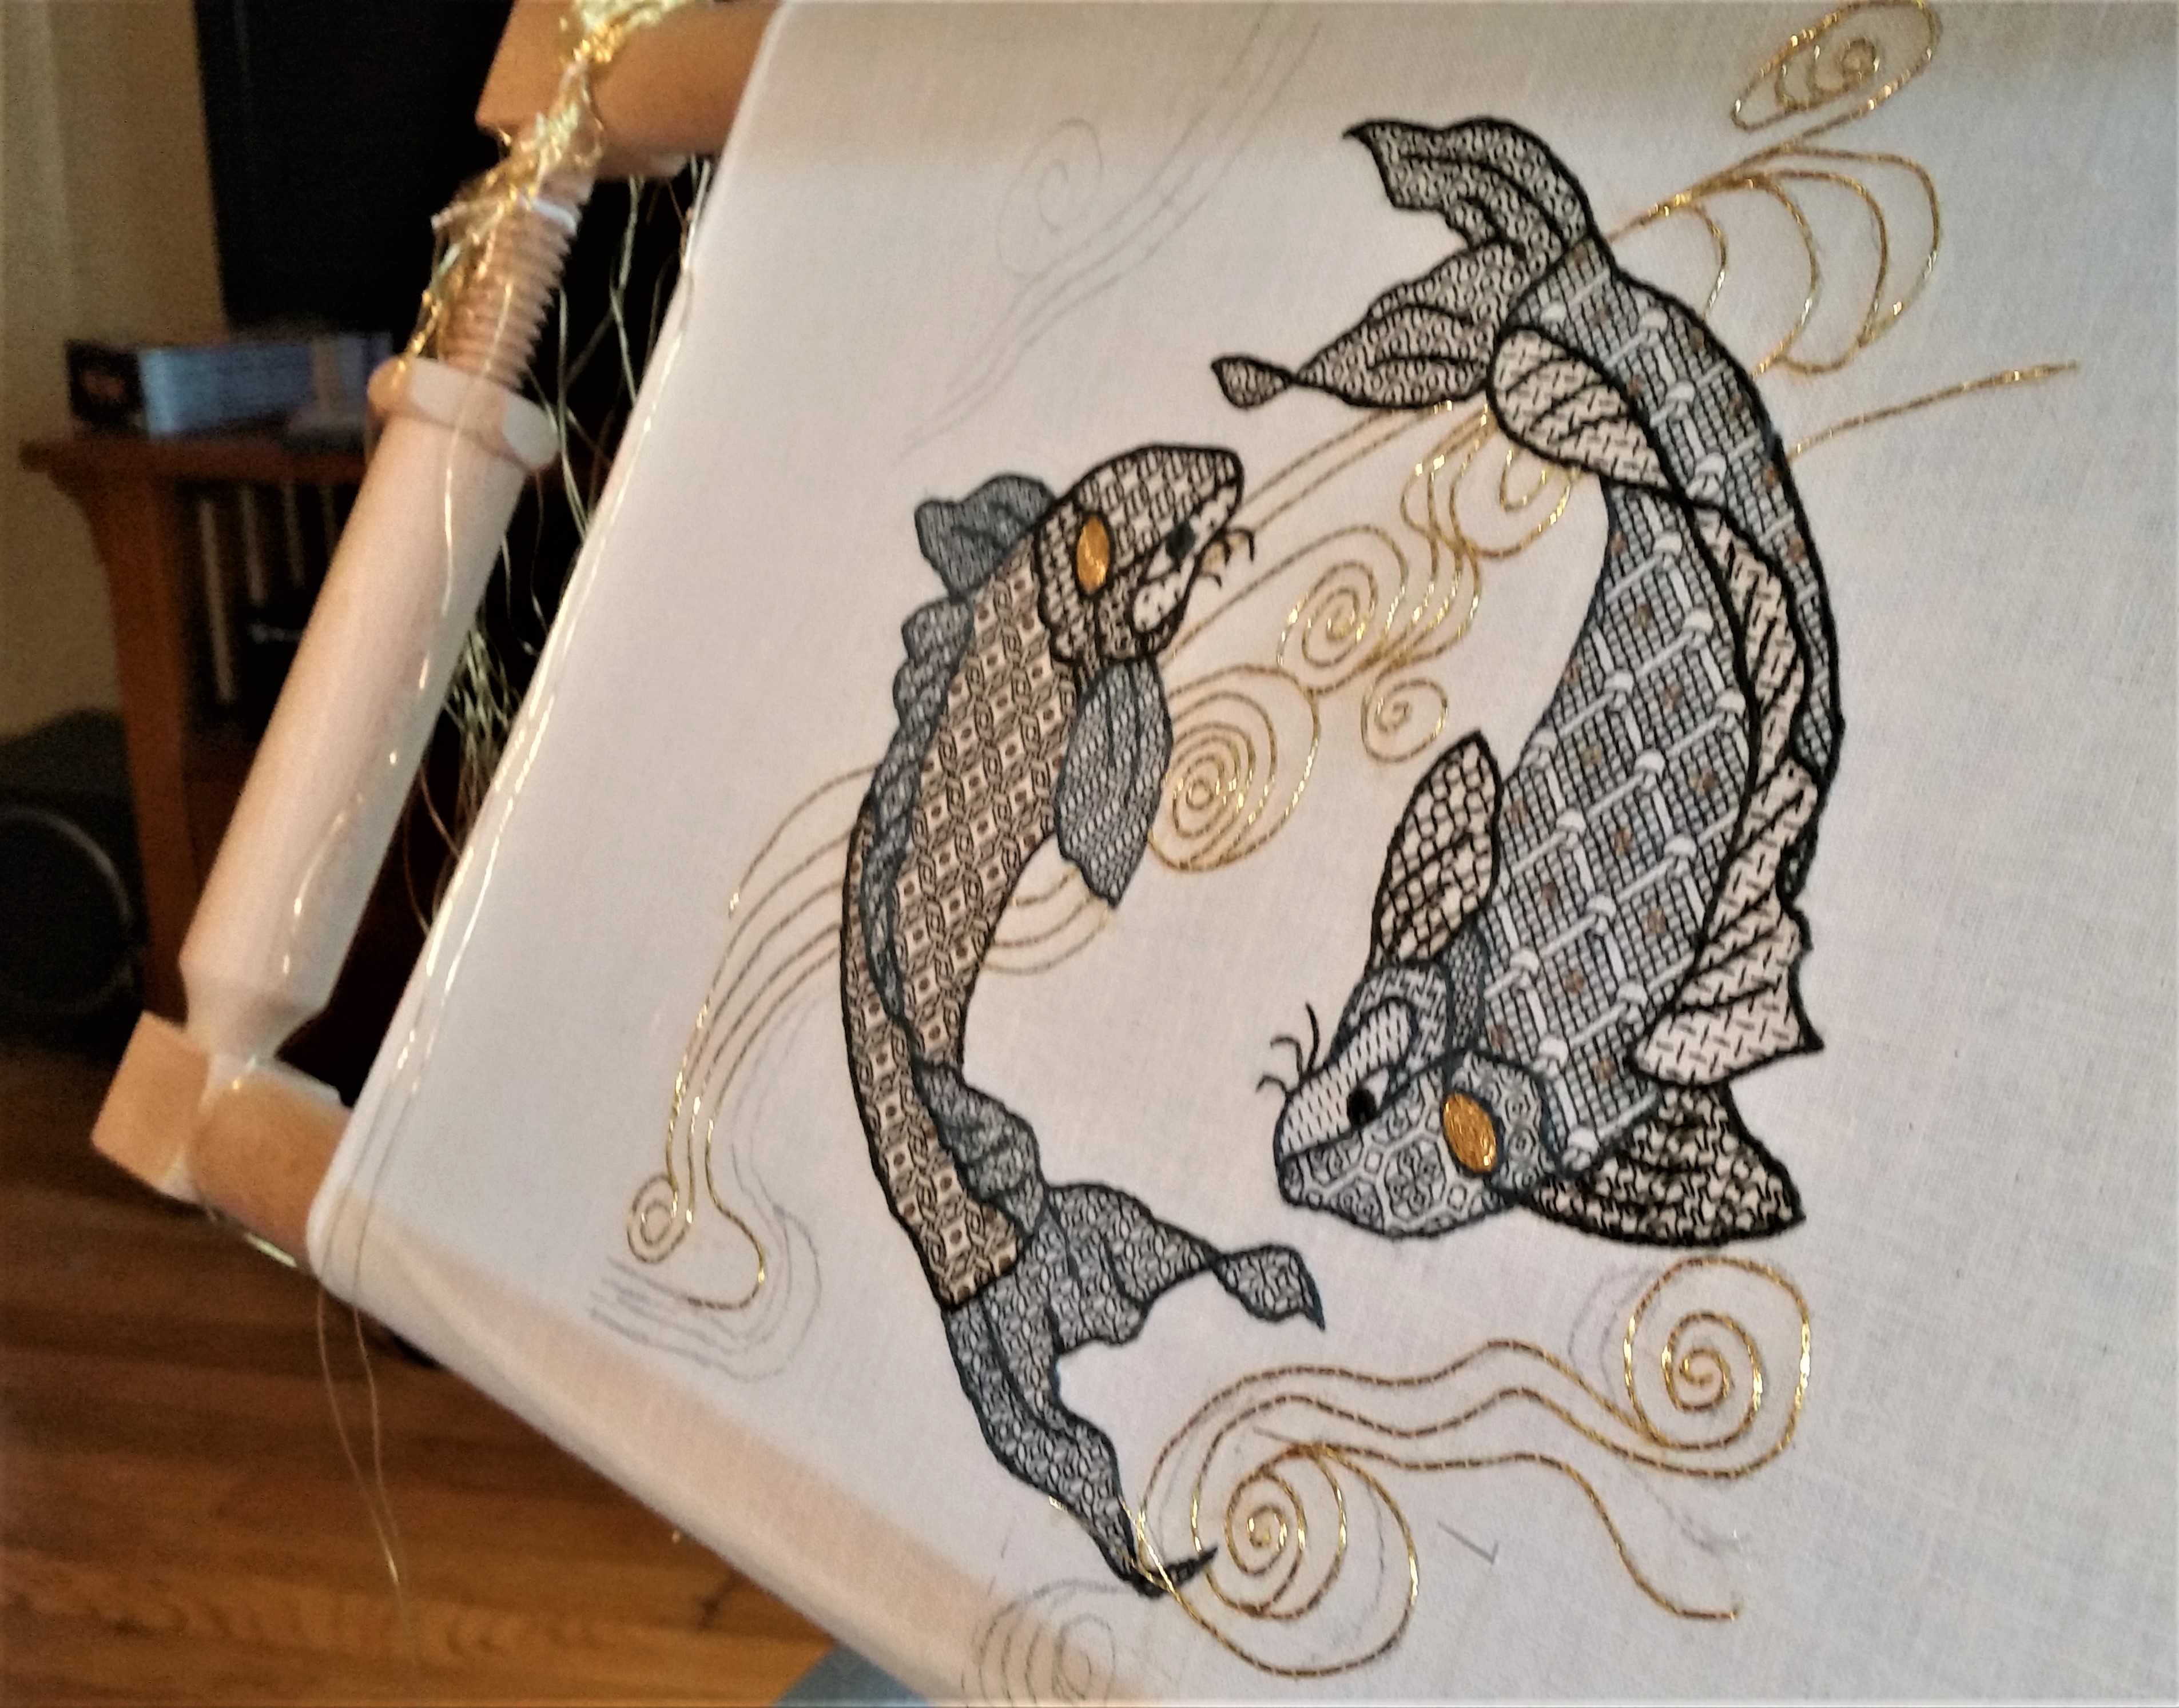
I do like the way the spirals of gold in the head spots turned out.
More answers to inbox questions:
Where did you get the gold and sequins?
The #5 imitation gold thread came from the Japanese Embroidery Center, in Atlanta Georgia. The 2mm gold tone pailettes came from General Bead, in San Francisco. Both were ordered off the ‘net sight-unseen.
How are you sewing down the gold?
Standard simple couching, of two strands held together, flat and parallel (not twisted around each other). I’m using one strand of gold-tone silk, heavily waxed, taking little stitches across the gold. The stitches get closer together as curves are formed, and further apart on the straight runs, but generally don’t exceed about 5mm (3/16ths of an inch) apart.
The no-hands frame is an absolute must for this type of work. I hold the gold and bend it into a curve to match the sketched lines with my left hand, then use the right to form the affixing stitches, taking care not to pull so tightly that I deform the line. After the length is stitched down and the end cut, leaving about 3/4 of an inch on the surface, I plunge them to the back. I do this with a heavy, antique needle threaded with a loop of strong carpet thread, and lasso the ends, pulling the loop gently around the waving ends, then quickly yank them to the back of the work. After I finish an area I bundle the plunged gold ends as neatly as I can, mostly trying to keep the resulting bits small and camouflaged as much as possible. Note that on shortest line segments care must be taken when plunging NOT to end up pulling out one or both of the stitched down gold strands. Much colorful language ensues when that happens…
How will you finish this piece off?
I really don’t know. I don’t want to do a fabric scroll or hanging style finish on this one. Although that would be congruent with the subject matter, I feel it would be too cliche, and take up too much space on the beach place wall where we intend to hang it. Instead I may opt for a spare non-matted/no glass modern frame. Possibly a near-invisible thin black one. But in any case, I suspect I’ll splurge and have this one done by pros instead of my usual dinking around above my competence.
What’s next?
Not sure. I still have a stitch-itch, although I have a couple of projects lined up to knit once fall weather kicks in. Possibly a return to my big green sampler, now that I have a reliable stand for it. Possibly a smaller something-else.
SLOW PROGRESS IS STILL PROGRESS
Inching along here on my fishies. Yes, did end up getting the Lowery stand last week:

I really like it and am glad I splurged when I did. For those looking at the photo, trying to parse it out, the stand itself is the grey metal armature – from the heavy base plate, up to the gripper jaw holding on to the wooden cross piece, to which my stitching frame is attached.
The wooden piece with its grasping flanges that engage my frame is a supplemental purchase – the “Long Frame Extension.” I strongly recommend it if you have a Millennium or other scrolling frame, especially if it’s large/heavy, or has wide bars. Because the stand clamps down on the solid wood of the extension, I do not have to worry about overtensioning the jaws and harming the delicate stretcher arm, with its reamed out internal screw threads.
Now, as to actual progress, it’s been hot, and since I sit under a halogen work lamp, and we are not air-conditioning-enabled – I admit slacking off on most hot evenings. In response to questions about my comfy chair, I post this photo, complete with orb-of-the-sun heat-source mini floor-lamp, Morris style recliner, and frame (supported by its new stand.)
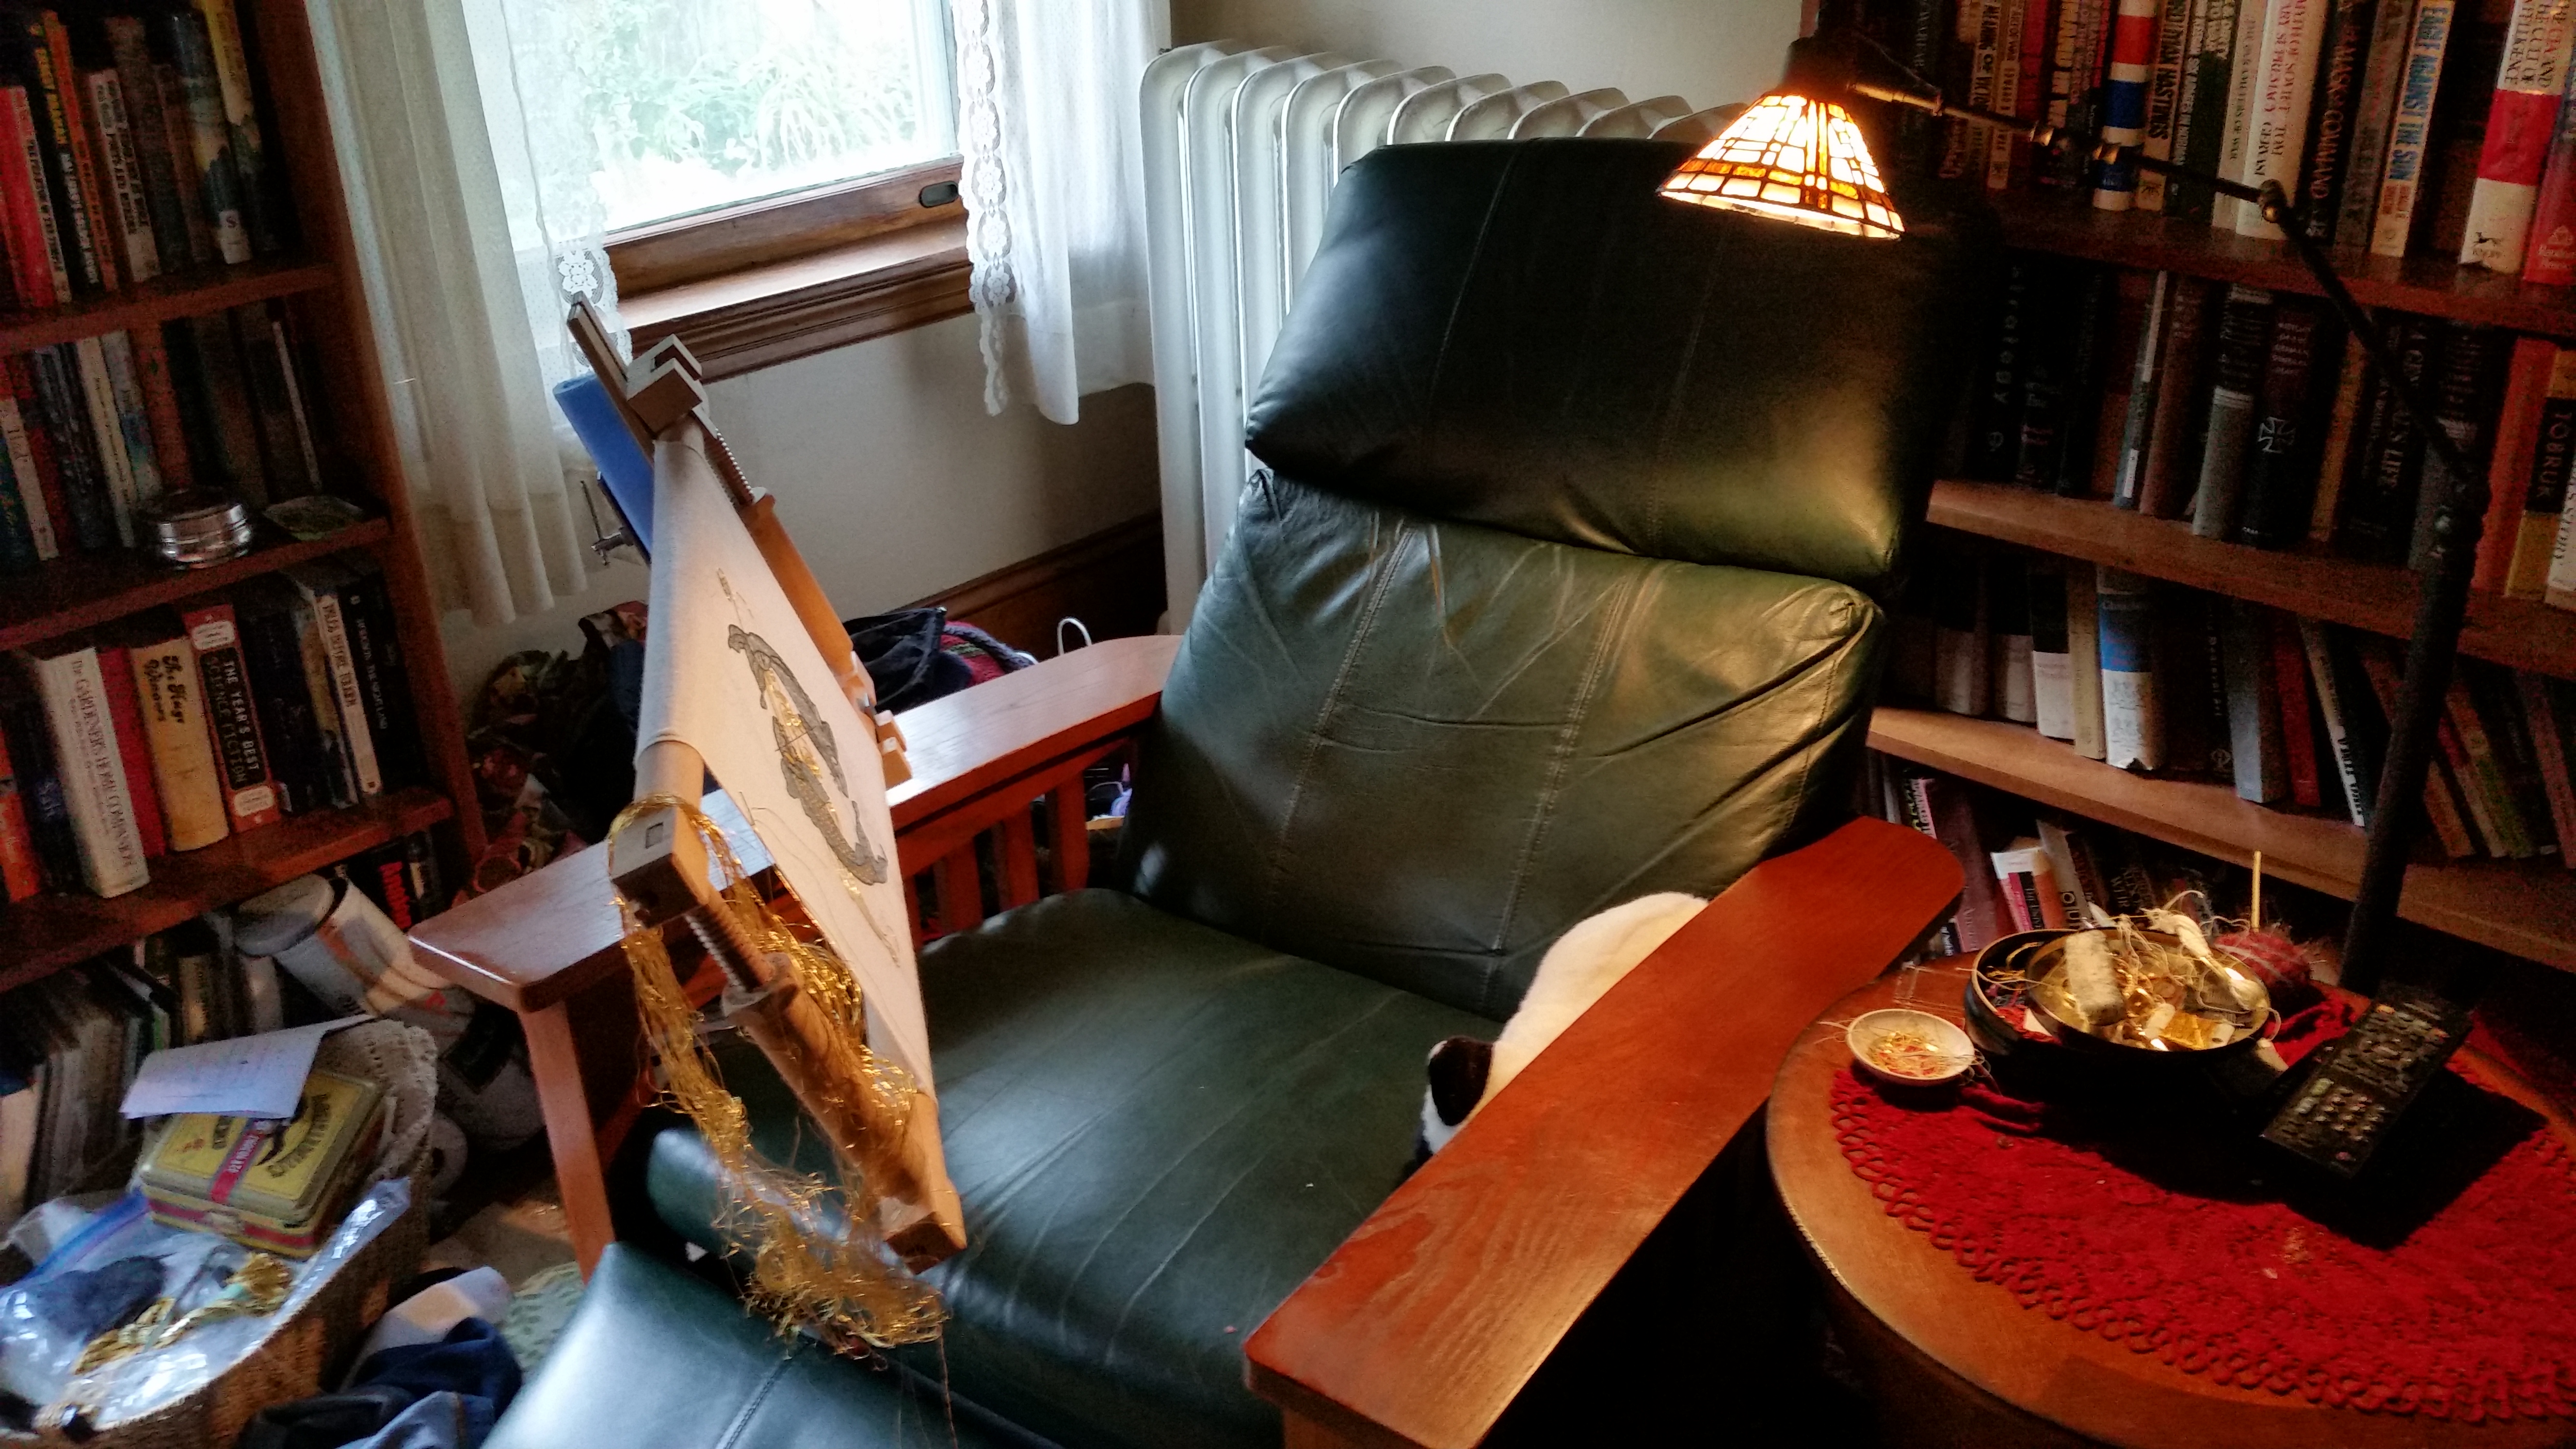
No, that’s not a real cat in the chair. It’s a conveniently sized stuffed-toy cat, liberated from the kids’ collection. It serves as a nice, soft supplemental elbow rest. You can also see the embarrassing midden of supplies and in-progress projects, heaped into baskets between the chair and the bookcase, and the ever-encroaching box of on-deck items that is slowly taking over the small table.
The floor stand’s foot is tucked underneath my chair, with a couple of bricks on it for good measure. The extra weight allows me to swing the frame out of my way like a door, so I can exit the chair without having to move the entire set-up, or shimmy under it.
Finally, here’s the paltry progress itself:
I’ve added sequins to the previously un-sequined Fish #1, who was feeling very jealous of Fish #2’s bling. The light is angled to make some of them sparkle, but there is a sequin in the center of each grid area in the body. I’ve also made progress on the gold whorls. Next are finishing the couched gold lines above Fish #1, doing the spot on his head, and starting on the whorls below him. Eventually I will have to scroll up and down a tiny bit to access the remaining swirly bits at the very top and bottom of the piece.
And then I’ll be done.
Next project? Not sure yet. I have a couple in mind. Possibly return to Big Green. Possibly another smaller sampler. Possibly a cushion to replace the stuffed cat. Maybe playing with tambour and wool… There’s no need to rush, I’ll be working finishing up my koi probably until September.
GOLD FISH!
After an annoying lapse of personal preparedness, I am now back from vacation – at home where I left my gold thread. Sadly, no fish-stitching happened during my break because I was without it.
Goldwork is temperamental, exacting, and oh so rewarding. I don’t pretend to be very good at it, especially compared to The Masters. I bumble around at best.
I did play with metal thread embroidery decades ago, when I first encounted the SCA and began looking into historical styles. I did couched work, direct embroidery with passing threads, and or nuée – a style that involves laying the gold threads across the entire width of the image-to-be, then overstitching it with colored threads to create pictures, almost in raster style, that glimmer as the gold peeks through. But I had a goal back then – to advance embroidery in that organization, and all of these styles have a high learning curve. Happily, I stumbled across blackwork – something that’s easy to learn and easy to teach. I haven’t climbed back out of that hole in the years since.
Back to the project at hand – it’s clear that hooping over gold would destroy it, so for this phase of the work I have moved Two Fish to my flat frame.
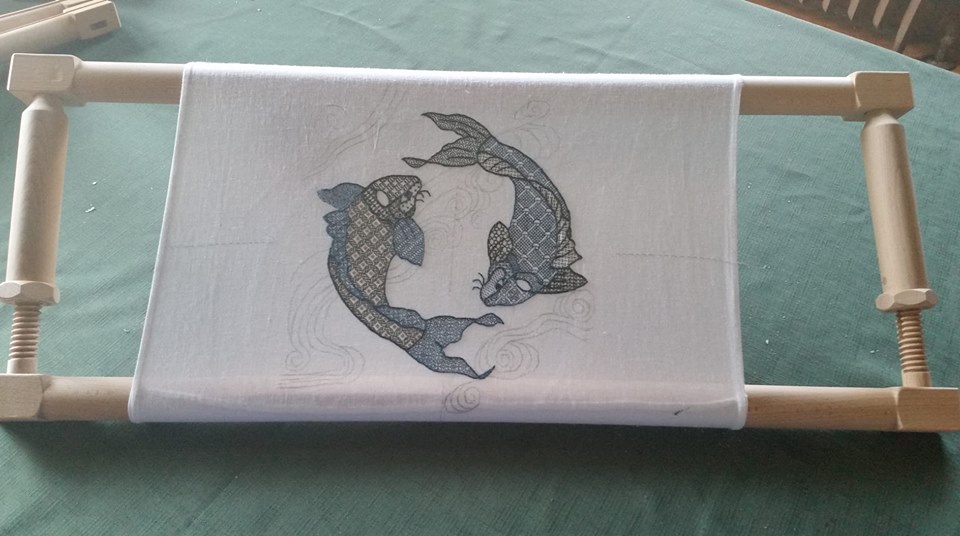
The rather unusual scrolling flat frame is a Millennium from Needle Needs in the UK. It’s a bit on the pricey side, but worth every penny. Although the design isn’t centered in this early fit, I do not think that the minor bit of scrolling I may have to do will damage the work – for example, there’s no point where I would have to lap stitched fabric entirely around the top and bottom bars.
It became evident very quickly that an extra hand would be needed to do this part of the project. Or two. So I hauled out my ancient Grip-It floor stand. I prefer a side stand rather than a trestle or tilt-top support that sits in front of the worker, and but side-supports are hard to find.
Ancient Grip-It works ok, but its main two drawbacks are that is easily overbalanced by a large frame like this, even when front mounted; and that the jaw is wimpy and doesn’t hold very well – and at the same time, I am concerned about pressure it puts on the finely turned wood sidebars of the Millennium. Here’s my sadly overmatched Grip-It in action on an earlier piece on this same frame. You can almost hear the joints squeaking as it strains to keep itself upright. To be fair, since I sit in a Morris style chair as I work, the off side of the frame does get extra support from my left side chair arm.

I’m on the hunt for a replacement floor stand, so if you have a candidate to recommend, feel free to post a comment.
As far as the stitching itself goes, I’ve begun. Even with the floor stand, I find I need additional hands.
I want hand one to manage the stitch-down thread (one strand of gold-color silk floss, well waxed) poised on top of the work; one hand to receive the stitch-down thread’s needle below the work; one hand to provide gentle tension on the gold threads to keep them flat and even as I go along; and one hand to manage a laying tool to keep the two strands being couched in flat alignment to each other, and not crossing over each other. That’s two more hands than I currently have…
I can double up the stitch-down needle hand, stabbing the thing into the work on each stitch, then re-positioning the hand above or below and drawing the thread through the ground; but I haven’t found a graceful way to tension and direct the gold yet. Since I haven’t worked this way in over 20 years, extensive re-training/re-familiarization is needed, and the going is slow but steady.

