HEADING FOR THIRD
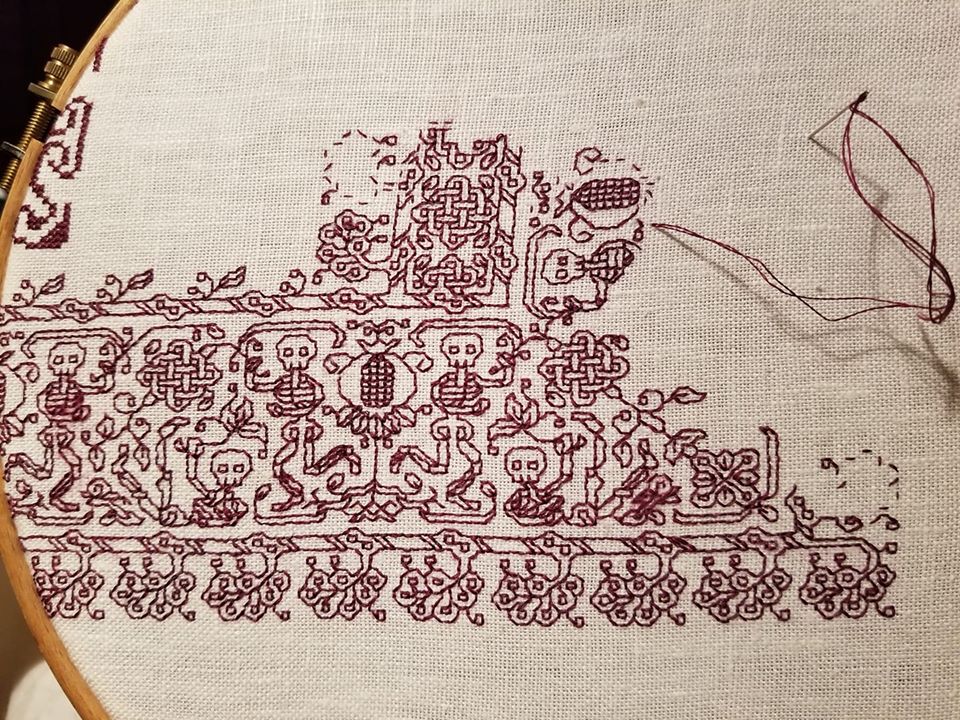
I’m finishing up the second corner on my sampler, and beginning the strip across the bottom of the piece, headed for the bottom center, then on to the third corner.
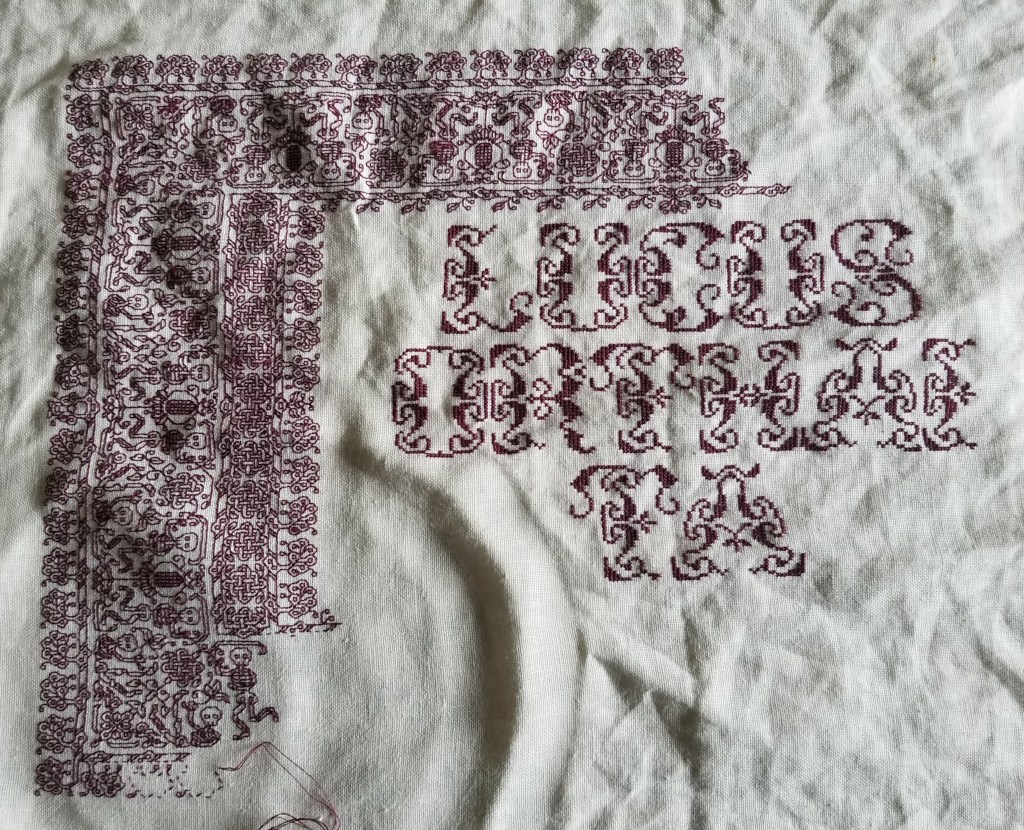
It’s going faster now because I’m free of the chart. I’ve (mostly) memorized the design now, and have ample reference stitching to refer to if I need reminders. The remaining two sides are just mirrors of what’s there already – with the corner and both centers established, there’s nothing on the chart that I haven’t already worked.
Questions from my inbox:
Why aren’t you working on a grid/why haven’t you basted guidelines every ten stitches so you can keep your place?
I don’t need to, although I do have two basted guidelines that mark the center of the piece, one north/south, and one east/west. I proof carefully of established stitching. That’s why you never see a long run “out in front” of the design as I work. For me, that’s a recipe for disaster.
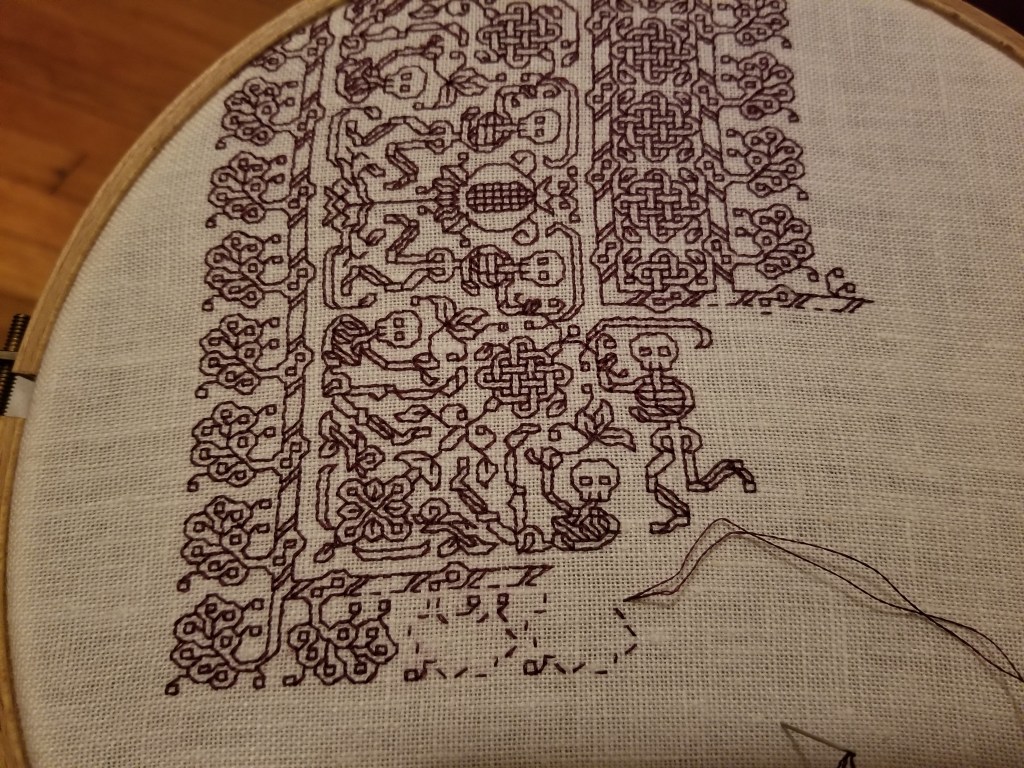
I AM working in double running stitch. You can see the baseline for the bottom plume border in process. I will keep going in this direction until I finish this piece of silk. Then having established the bottom border (note that I work the branch from which the plumes bloom as I go), I’ll switch to the center strip and do more of the skeletons. When I catch up, I’ll hop up to the top border and do more of that. The whole design progresses more or less evenly across the design, keeping pace with itself as I go.
Why are you working left to right?
I’m right handed, and stitch with my right on top and my left below, using (in this case) a sit-upon hoop so both hands are free for stitching. I keep a very bright light over my left shoulder. By working left to right, I can see the previously worked bits (they are not covered by my right hand), so I can keep check on alignment of the new stitching, plus there is no shadow from my hand or shoulder occluding the work in progress. And when I start not at the left or right edge of my piece, but at the center, I often flip my work upside down, so I am also working the second half of my strip from left to right. Were I left handed or favored my left hand for the top when working two-handed, I would probably work from right to left, with the light over my right shoulder.
Can this piece be done double-sided?
Yes and no. Right now it can be done mostly double-sided in double running stitch (aka Holbein Stitch, or Punto Scritto). But not entirely. The skeletons and the pomegranates are their own units, large enough for burying the ends invisibly on the reverse. Not so the snail – he’s rather small and would be difficult to stitch on his own, with invisible starts/endings. There is also the problem of tiny isolated elements. The eyes are the most obvious example, but the plume border has that little skew two-box spot at the base of each plume, plus a floating square in one of the lobes of the plume.
If I were to set this up for totally two-sided work, I would run a single unifying baseline across the entire bottom of the piece, and adding a stitch to tie the ribbons held by the skeletons to the side curlicue of the pomegranate. I’d also add a brow line to the skeletons, and anchor down the floating spots in the plume flowers. The red stitches below show the general idea:

With the red additions, all floating elements have been locked into the main trace. There are no islands left, large or small. The bois can now be done entirely double sided. And if contemplating another design with isolated bits, similar additions will render it likewise. (The astute will note that this doesn’t contain the snails in the as-stitched piece – I improvised them on the fly, and never bothered adding them to my quick and dirty project chart.)
Why didn’t I do this in the first place? It didn’t occur to me, and I like the rather puzzled look of the browless, wide-eyed bois.
Where can I find the pattern?
Look here for the broadside that contains the dancing skeletons and plume border, plus the reason why I don’t think they are morbid or creepy. And if you want to see all previous posts on this project, here’s the link.
No Cerberus?
One observant reader noted the skeletons and pomegranates and suggested a Cerberus (three headed hell hound) as the logical thematic accompaniment. Not a bad idea, and more grist for my imagination mill. Thanks!
Questions, comments, derision, criticism, suggestions? Send them in either in the comments here, or to the contact address alluded to in the About tab, above.
TAKING IT IN STRIDE…
See this egg?

It’s the one on my face. And deservedly so.
A quick recap:
- I’m working a project on skew count linen – with a different number of threads in the warp and weft. – Confirmed, that’s a fact.
- If a design is worked on such a ground, it will be compressed – shorter in the direction that has the higher count, and stretched out in the direction that has the lower count. – Again confirmed. That’s also true.
- I counted my threads, and planned out a design that featured “padding” on to compensate for anticipated compression, so that the difference between the proportions of the strips going across the top of my work, and down the side of it would not be so evident. – Yup. I did that, and I like the extra wide knot strip that I doodled up to use there.
BUT
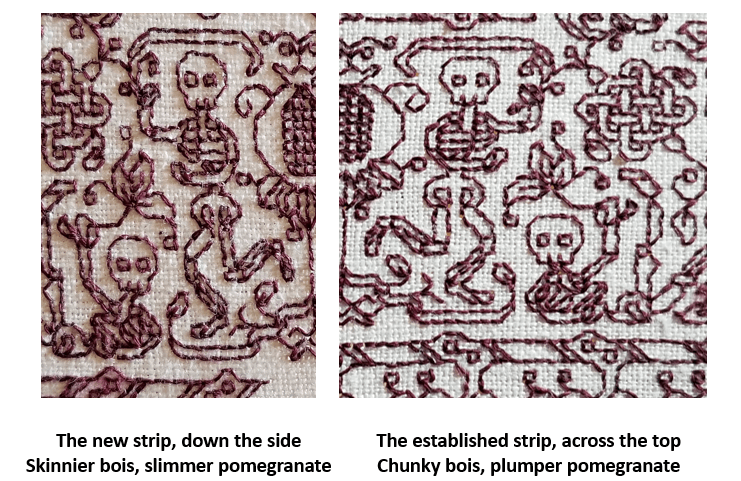
Major snafu. I did not properly record my count/measurements and reversed them, attributing the denser count to the wrong direction. Instead of the new strip ending up with squatter, flatter skeletons after I rounded the corner, close comparison shows the new bois to be leaner and lankier than the ones previously stitched. Even more embarrassing, I did not notice the problem until I had a fair bit worked up.
So it goes.
Obviously I have a good lesson-learned on this one to add to my roster of mistakes as teaching moments. And I’m not going to go back and rip anything out. (I may have a second lesson on finite stash supply vs. thread consumption rates to painfully experience, too.) So my piece stays as is, and I get to look like an idiot in front of everyone. While this isn’t going as planned, and I did make a giant mistake – it’s not totally fatal. I declare myself just a tiny bit sadder, but wiser, and will keep soldiering on.

You may point and laugh now.
DANCING AROUND THE CORNER
Having gone on and on about straight repeats as my bony bois march across the top of my piece, we have now come to the first corner.
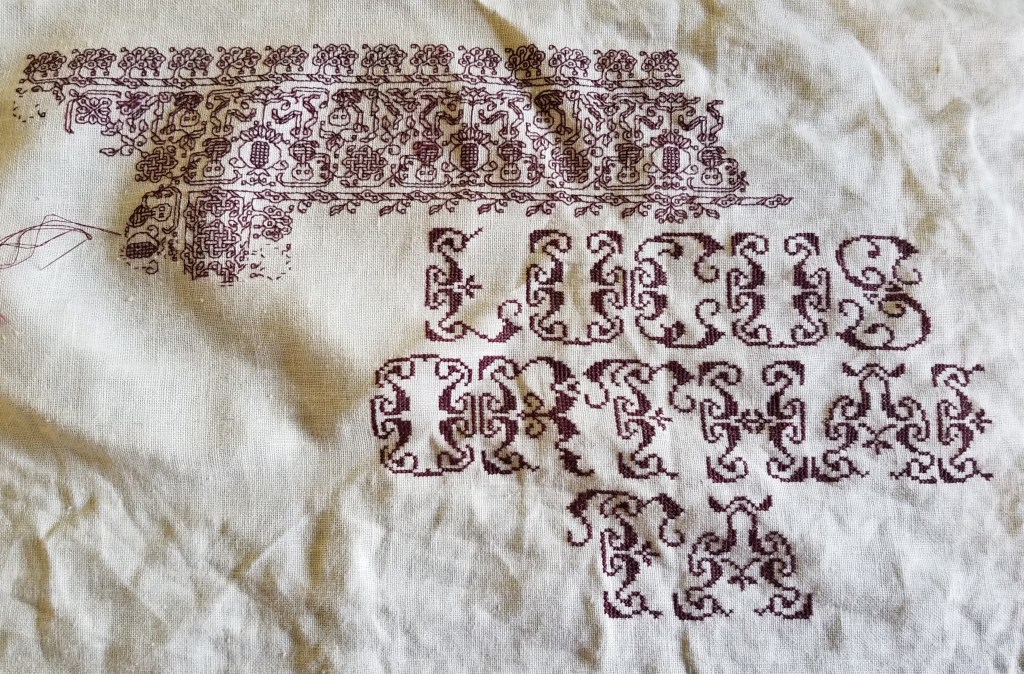
Thankfully, my count is spot-on and everything is in place.
But why did I start with the strip of skeletons doomed to dance upside down? Because I knew that I would probably make some tiny adjustments to the design as I went along. The viewer’s eye is drawn to the closest point of the work, and the most logical part – that’s always the strip across the bottom, where the motifs are all right-side-up.
It’s unlikely that any small tweaks would be noticeable in the upside-down part at the top. So being too lazy (and waaay too short of thread I can’t replenish) I started there, knowing that I would not be ripping back vast regions to norm those tweaks.
Closer up, in a more normal orientation:
My last post discussed the non-historical use of the same framing element on either side of a mirrored repeat with horizontal directionality. Here’s another feature of this strip that’s not often seen in museum artifacts – the mitered corner.
The majority of corner treatments in surviving historical fragments have butted-up or improvised corners. Carefully plotted mirror images across a diagonal (mitering) are quite hard to find. But I decided to do one anyway. You can spot the diagonal running through the center line of the rightmost internal knot, down through some leafy bits, and into a flower-like shape. I’ve also established the beginning of the 90-degree flipped border, with the upper part of that skeleton plus the first pomegranate underway.
I’ve also rounded the outside corner. In a serendipitous happenstance (I can’t claim I planned it ahead of time), the width and height counts of my marching plumes are equal, so I was able to fudge the corner with one last plume on a long stem.
Side note: At this point I really don’t need to refer to my printed pattern any more, I am mostly working off prior stitching, with occasional glances back at my chart to make sure all is aligned and true.
But that inside edging – it’s different. I’ve introduced another element, playing with the eternity knots and tying them into the plume strip. I did this because the thread count of the warp (the threads that stretch up-down in the detail photo) is denser than the thread count of the weft (those that go across in the detail photo). The closer together the threads are, the more compressed the design will be in that direction. My skeletons marching up/down the sides of my piece will end up looking ever so slightly shorter and chunkier compared to their more lanky brothers that tumble across the top and bottom. BUT I can draw the eye away from that difference by adding the additional knotwork strip.
So it turns out that my design is all about insouciance, breaking historical composition precepts, and visual deception. Still for all of that I think that its look is more closely aligned to the aesthetic of historical blackwork rather than more modern pieces. Just my opinion, feel free to differ.
Class Handout Page
And for having the patience to read down this far, here’s another present. I was going through some older files and came across this class handout page. I’ve taught several workshops using it. The last one I came equipped to do was for a public SCA demo in Rhode Island, although the circumstances and attendees made just sitting and chatting about the stitching a better option. Still, I did update the handout, and it may as well be of use to someone.
The patterns are (more or less) ordered in level of complexity, and are intended to be a self-tutorial in double running stitch. When I teach I provide the page below, a strip of Monk’s cloth and length of standard embroidery floss and needle, plus an inexpensive hand hoop (if I have some to spare). Depending on prior experience, stitching proficiency, confidence level I encourage the participant to select one of the designs from the leftmost two columns, to try out face-to-face in the workshop. Then I encourage everyone to use the rest for self-study at home.
For self study, what I suggest is to just grab a piece of cloth and begin – no need to plan an intense, composed sampler. Pick a point anywhere on your chosen ground, then starting at the spot in the upper left column where you feel comfortable, continue down that column to the simple acorns. Then keep going. The next design in the complexity sequence is the flower spring at the top of the next column. Go down that column to the folded ribbons.
After that, I’d suggest attempting the birds at the bottom left. From there the vertical star flowers, then the knots, four-petal flower meander, and the design immediately above the title. Once you’ve done all that the remaining four intermediate patterns on the page should be well within your grasp (the heart flower all-over, fancy acorns, geometric strip, and oddly sprouting peppermint-stick squash blossoms).
Of course you can be totally random and just use these designs as you will. No need to march in lock step with the protocol, above.

Download this handout in PDF format from my Embroidery Patterns page. It’s the last one listed (click on the thumbnail there to get it, then save it locally).
As ever, if you stitch up something from any of my designs, please feel free to send pix. I always get a big smile out of seeing you having fun with the pattern children. And if you specifically say so and give permission to re-use your photo, I will be happy to post it here and index it under “Gallery”.
 String-Or-Nothing