REVISITING THE STUPID CUPIDS
Remember this sampler I completed early last year?
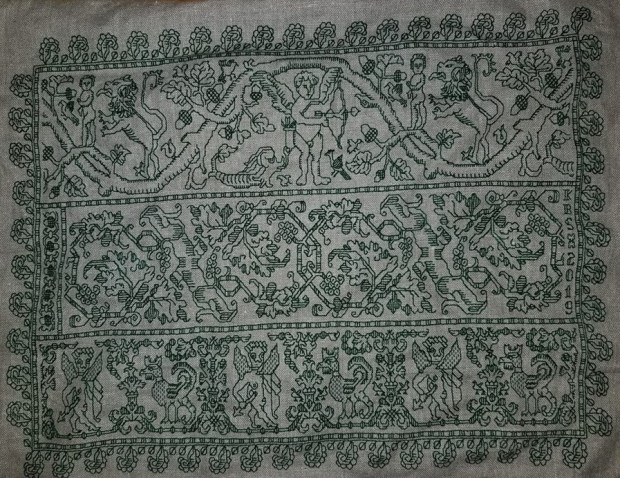
I went on at length about the rather goofy looking cupid strip at the bottom, and about the cousins of the middle strip, but I never discussed the top strip – the cupid and oak branch meander that includes the poor little guy being menaced by the lion.
I haven’t seen this cupid strip in any modelbook (yet). But I’ve found several examples of it in museum collections. My rendition is more or less a “moving average” of all of them, and will be in my ever-forthcoming T2CM.
This design is notable because of the multiple ways in which it has been rendered. Here are five. I’ve got another two someplace in my notes. When I find them I’ll update this post.

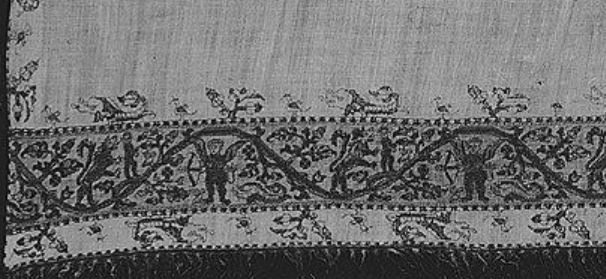
First, there’s the standard single strip with edging representation above, marked as 16th century, Italian – double running in silk, in red – one of the most common colors for this type of work. It’s in the St. Gallen Textilmuseum in Switzerland, and can be found in their on-line collection, Accession 23760 (you probably will have to search for the object by accession number because their links are dynamic and break).

This is the same pattern doubled and turned into a frame. It’s also sourced as 16th century, Italian. Note that the design is butted, not mitered, with an interesting truncated bit to fill in the left and right sides. There is no accessible link for this piece at the source I stumbled on – 1st Dibs Antiques, but that appearance was within the past year. All I have is a screen cap, and the photo is long gone from the sales site. However complications ensue. It or something practically identical was offered at Bonham’s site several years ago. Thistle Threads did an excellent write-up of the Bonham’s offering 2016. (She’s got some up close photos, too).

The blue sample above is from the Hermitage Museum, It’s dated 16th to early 17th century, Italian, double running, with the voided ground worked in squared filling. It’s accession number is T-2799. (If the link breaks, search there for “Bad Spread” (sic).) This is the piece on which my rendition is most closely based.
The black and white image above is hard to make out, but it’s clearly the same cupids, done in polychrome AND with a worked ground. It’s not really voided because the foreground isn’t left plain or minimally adorned. There’s not much elaboration on the Metropolitan Museum’s page, but it is attributed as Italian, of the early 17th century. It’s accession 68.145.6. I hope some day they go back and take another, better photo.
And lastly, there’s this one. The most unusual of them all. Here is our friend (blindfolded for a change), done using red silk outlines, but then infilled with couched gold metal thread.

This example is in the Cooper-Hewitt Museum. Its citation is Band, 16th century; silk, metallic yarn on linen; H x W: 110 x 90 cm (43 5/16 x 35 7/16 in.); Gift of Richard C. Greenleaf; 1954-167-2
Now. Why post all of these versions? First, because they are interesting. Second, to refute a commonly held belief that there is only ONE right way to execute these designs. Stitchers took the same base pattern and used it in many individual ways. Monochrome, polychrome. Plain ground, voided, or totally overstiched. There is no canon.
Be historically faithful and execute historical designs in any of the myriad styles contemporary with the base pattern. It would be very difficult to make the case that any one of those treatments was never used. Or take the same pattern and reinterpret it using modern styles, scale, or materials. There are no Embroidery Police who enforce historical precedent over individual expressive creativity.
Which is a long-winded way of saying that if a pattern sings to you, just go for it.
WOOLLY THOUGHTS
I’ve started on a promised project – a rendition of my Harsh Language piece, as a gift for a friend who prefers to remain anonymous. They survived Covid, and made a special request. I honor their determination. The objectionable word has been zealously cropped out of the image below to prevent irritating the easily-offended.

Although this is a small, quick-stitch, simple piece, I couldn’t resist using it for testing and learning. The Stealth Apprentice’s specialty is researching and recreating historical dye recipes – trying them out on yard goods, threads, and yarns. Of late, she’s been working on a group of dyes derived from lichens and mushrooms, with spectacular results. Sometimes when she’s working on a new recipe, she lets me beta-test her end result. I’m supposed to look for handling properties, color-fastness during stitching (crocking on fabric, or reside left on hands), and the like. And I am very happy to oblige. It’s fun to play with new materials and give useful feedback.
We chatted about this project, and Stealth Apprentice suggested a purple, dyed using “an uncertain lichen – probably a Parmotrema species”; and a mustard gold, dyed using “a dyer’s polypore mushroom”. The purple is a deep claret, and the yellow is a sunny mustard. They are equally saturated, so one doesn’t eclipse the other. I had no idea that these hues could come from lichen and inedible mushrooms, both which I will now view with greater respect. The purple is more true to the snippet above than the magenta it looks like on the winder below, but you get the general idea.
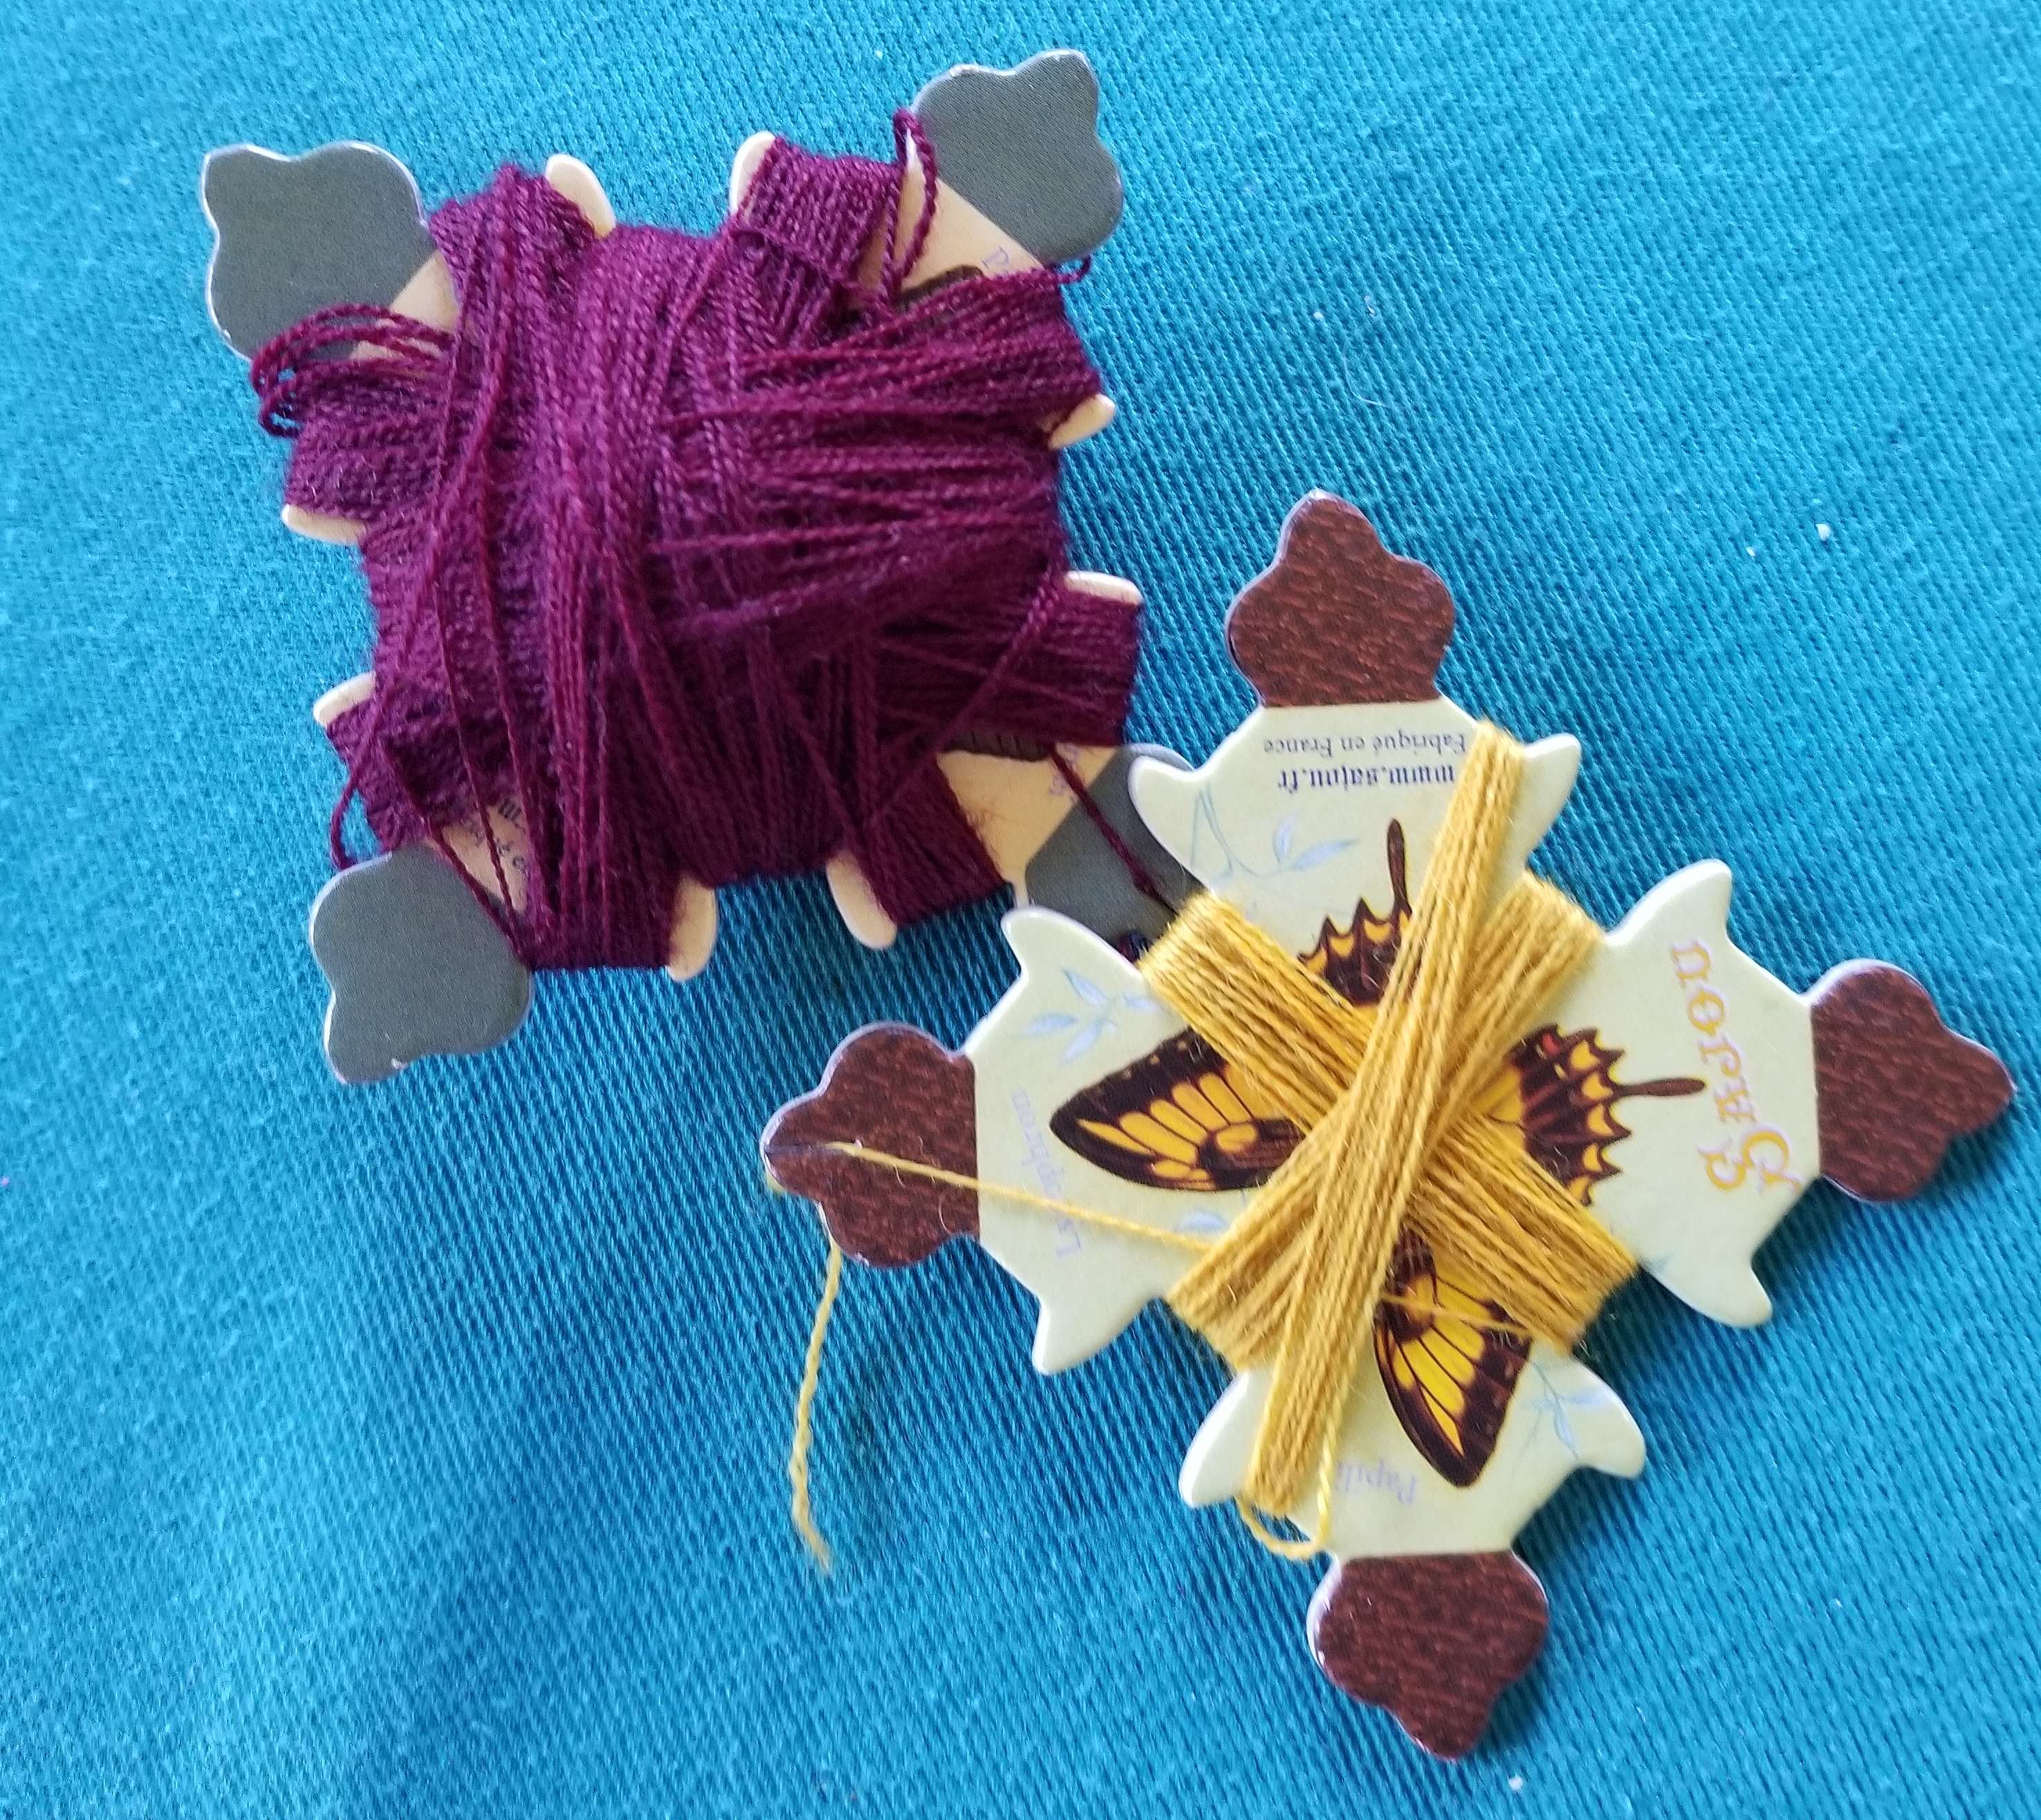
Both wools are of the same base stock prior to their color baths. They are of very soft and fine fibers, a single strand of two tightly twisted plies (which cannot be separated), about the thickness equivalent of three plies of standard cotton embroidery floss. They’re more plush and rounder, of course, with the stretch you’d expect from wool.
For this counted project due to fact that the wool thread is more robust than the cottons, silks, and faux-silk (rayons) I usually use, I’ve picked a ground cloth that’s far coarser than ones I usually use. Coarser in that it has fewer threads per inch – not that it’s harsh to the hand. This well aged bit from my stash is about 24 threads per inch, give or take; with slightly more threads per inch on the warp (parallel to the selvage) than the weft (perpendicular to the selvage). Since I’m stitching over two threads, I’m at 12 stitches per inch – big as logs to me since I’m used to working at 18 to 25 stitches per inch. But the result is spot on what’s required if one strand of this wool is used. If I were to double the strands, I’d probably be looking at working at 10 stitches per inch or fewer, probably down around 6-8 stitches per inch for better, less crowded effect.
Working with the wool and how it differs from cotton, silk, and rayon:
- Needle size: Obviously the tiny eye, round point needles I usually use are too thin for this and their eyes are way too small. Instead I’m using a tapestry needle. I think it’s a size 22, but it has been long divorced from any packaging, and has been living in sin with its mismatched fellows in one of my needle cases.
- Needle threading: Even with the larger size needle, threading is still not easy. Wool fuzzes (obviously) and waxing is right out (also obviously). My little bee needle threader is an absolute must for this project.

- Frame: I am using a hoop. The piece is small, so most of the area to be stitched fits inside it. But not for long. Eventually I will need to re-hoop over previously stitched bits. I will try to avoid doing so as much as possible, but right now I don’t have the option of moving this over to a flat frame. If I have to hoop over the letters in particular, I will be covering them with a soft fabric as padding, to prevent crushing or skewing the wool threads. I’d recommend flat frames, slate frames, or scrolling flat frames for countwork in wool, and will make sure to avoid my hoops in the future.
- Thread abrasion: This is much more pronounced in wool than cotton, rayon, or silk. Drawing the fluffy thread through the tiny holes of the ground cloth’s weave does degrade the strand over time. Spare yourself waste, agony, and an uneven appearance on the front – use shorter strands than you would with any other thread. And yes – if I were to be working on Aida or a ground cloth with larger holes, or using a larger needle this would be abated somewhat. But I much prefer the uniform look of a nice, tight even weave ground over the scattered holes presented by the purpose-woven stitching fabrics, so I am bringing this bit of extra work entirely on myself.
- Stitching technique: Even more so than with cotton (the most forgiving), silk, or rayon (the most unruly), wool needs to be worked in double running or back stitch with vertical passes of the needle through the cloth – not with a “sewing” or scooping stitch. Working with one hand in front of the work and the other behind means that care must be taken not to snag the working thread when the needle is returned by the unseen hand. It’s all too easy to pierce the working strand (it’s fuzzy and soft) and create an headache to untangle later.
- Tension: Wool is springy and stretchy. Cotton is not. Silk and rayon are even less elastic than cotton. It’s easy to stitch the less elastic threads quickly, and getting the feel for how tight to snug them up on a nice, taut, hooped ground is relatively quick. Wool by contrast stretches and then bounces back. It’s VERY easy to stitch it too tightly – stretching it as the stitches are formed, only to see it bounce back later when the ground is released from tension. Save yourself a headache and only draw the threads as tightly as it takes to make them lie flat and even, which will be significantly less tight than you are used to with other fibers.
- Ripping back after mistakes: Don’t count on it. The fuzzy nature of the thread makes it far more likely that stitches will pierce those laid down before, rather than slide alongside them. Ripping back will be painstaking, and the thread that’s recovered (if you are able to do it at all) will be seriously damaged by the removal, too much so for invisible difference re-use. Unless it’s just going back one or two stitches, treat mistakes as lost causes and sacrifice the strand. Snip on the front and withdraw the ends from the back to minimize fibers left on the front.
I’ll continue on with this, learning as I go. For all of the differences, I am enjoying working with wool and look forward to doing more of it in the future. I’ll continue to post (fig-leafed) progress on this piece. Like I said – it’s small and will be a quick finish. I’ll have to put it on hiatus for a few days at the end of next week for another obligation, but even with that should have it done and on its way to my convalescent friend well before mid-September.
COMPLETE!
All stitching is finished on my bony boi piece! Next it goes off to the framers. This one deserves a nicer finish than I can do myself.

And having played Thread Chicken, this is all I have left.

First sincere thanks again to Paula from Austin, who staged an intervention and shared her own stash. Since the thread I was using is not generally available, her generosity was key to this finish.
And a close-up of one of the “islands,” designed and added at last minute because the composition needed them:

Let’s see… Lessons learned. There are always lessons learned.
First and foremost, the obvious one – double check thread quantities, color numbers and dye lots. While I had two large hanks of multiple skeins of red, both with the same color number, it’s now obvious that one of them was either mis-numbered or a different dye lot. Or perhaps a lot older than the other. They didn’t match. Not only were the colors different (especially in natural light), the thickness of the individual plies also varied, with the “bad” stuff being just a tiny bit heavier. I ended up marling together the last of the “good” color (abetted by Paula’s donation), with the “bad” stuff, and making do.
I tossed caution to the wind in my hurry to get started and did not hem the edge of this cloth. But I did plan an extra generous blank area around the entire piece for later framing, so this ended up not mattering. Other than the annoying shed of edge threads, of course. I have to force myself to edge-control discipline. Hem, hem, hem.
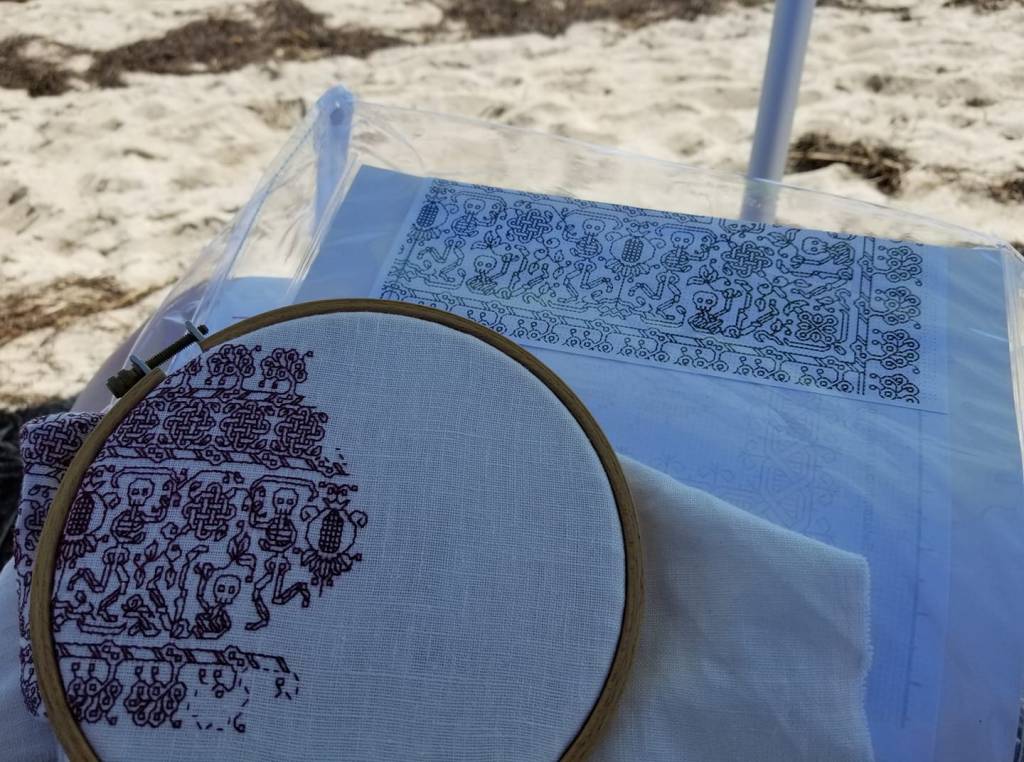
I didn’t grid the piece prior to stitching. Yes, I know others do and find it helpful, but aside from marking my center north-south, and east-west with a line of basting thread, I don’t really feel the need. I went “around the world” on this one. I started the center top and continuing the border counter-clockwise, and had no problems mating up perfectly when I joined back up with the start after my journey. I proof constantly, and I admit a fair bit of picking out and re-doing to stay on count and true.
You CAN stitch outdoors in high winds. Hand held hoops work better than flat frames that can act as a sail when it really starts blowing. One of those zippered clear plastic cases that new sheets and blankets come in helps, especially if it has an inside pocket where the product info used to be. That works great for keeping a chart clean, dry, and away from the wind; and the zippered part is great for containing your threads and other essentials away from sunscreen and salt spray, (and holding the project between working sessions, too). You can even use two magnets to keep place on the chart without removing it from the pocket. Tethering your snips with a retractable badge holder works nicely. But at the beach on on very humid days, watch out for the damp! Some threads may crock or leech dye.

In a rare departure for me (although more common if I include text), I graphed out the entire project. I wanted the corners to miter nicely, which means I had to compensate at the centers of each side (12, 3, 6 and 9 o’clock as you go around). That meant I had to lay out my design against actual count, so I could fudge the centers. And I did the fudging on graph, rather than on the fly as I stitched.
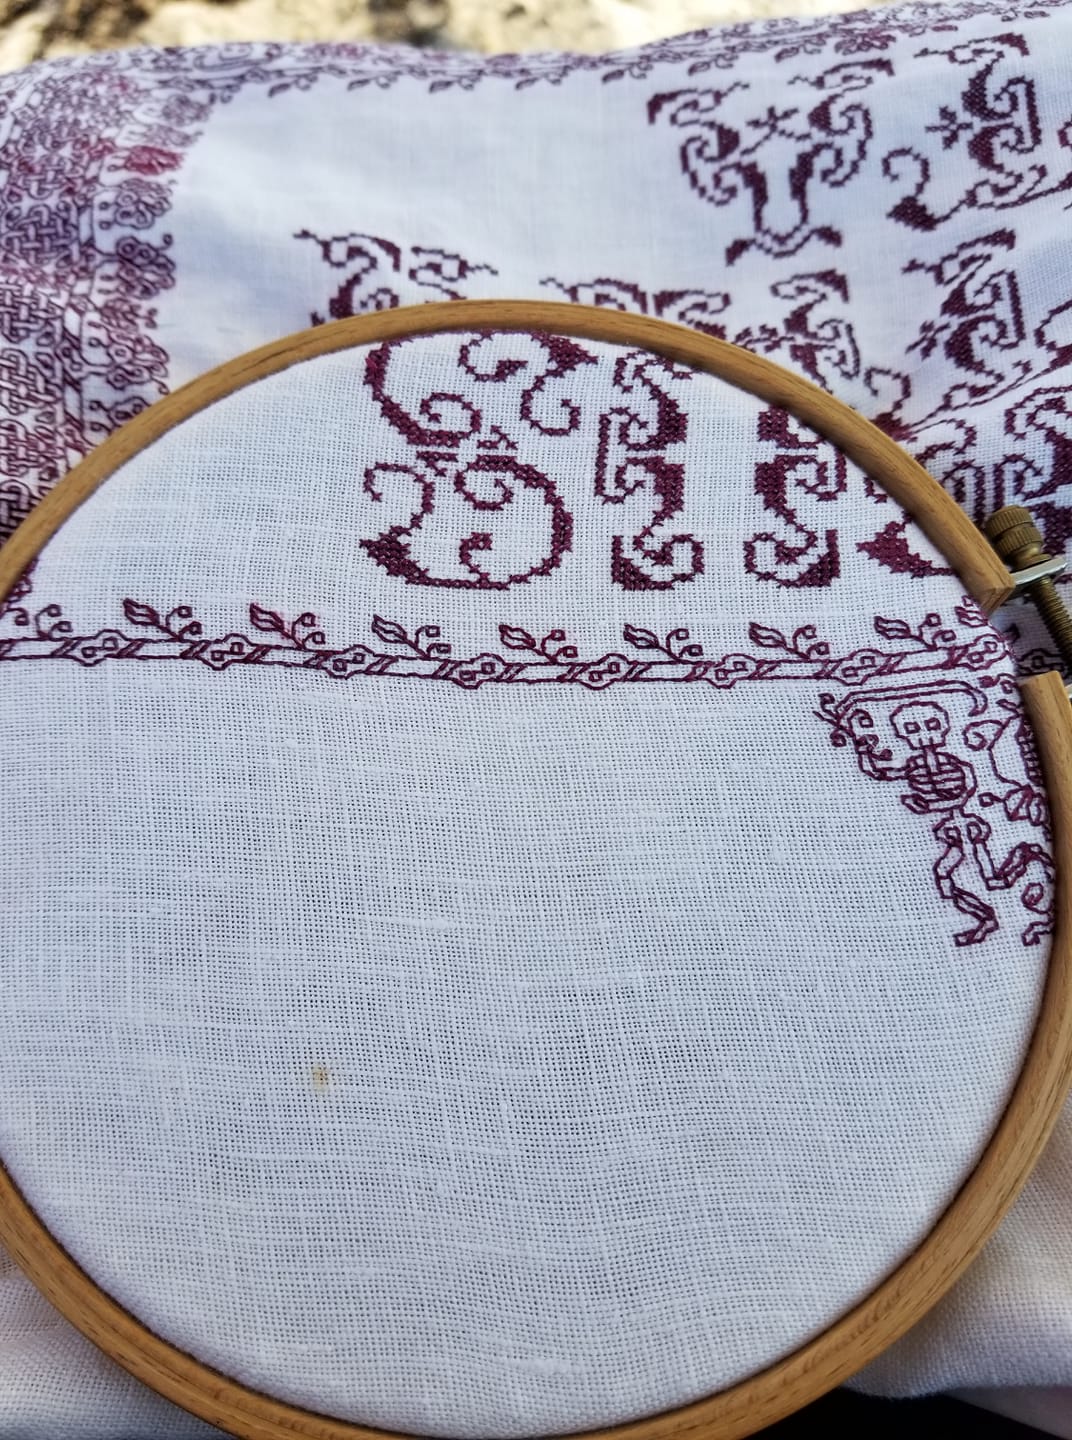
But having drafted out the entire thing doesn’t mean I stuck entirely to the pattern I had drawn out. Those snails… My original stuck to the small twig and leaf of The Dance, the skeleton pattern I shared. I picked out that first twig and improvised a snail, then kept using the little guy on every repeat after. I also altered the plume flower slightly, taking out a couple of extra bars inside the outline that muddied the design. I did NOT go back and rip out the first two plumes. Those bars are among the mistakes I left in.
I will probably not be going back and ripping out that one very red plume, where I discovered the inadequacy of my “bad” batch of thread. Another difference batch to batch is that the “bad” stuff crocks like crazy, and oozes dye when it’s damp. If I get up close and personal I can tell which bits I stitched at the beach or during our weeks of high humidity and summer heat, just from the halos around the stitched bits. I will NOT be washing this piece. Ever. And I will not be perturbing already-stitched bits, lest I exacerbate the haloing.
Now on to my next piece. I have promised a rendition of my Harsh Language design to a good friend who is a virus-survivor. This friend prefers to remain anonymous.
This should be a quick stitch after Lucus Orthai Ta, and I will use it to test out some new threads received from The Stealth Apprentice. She asks me to trial run some lichen-dyed wools that she dyed herself and is currently evaluating as a potential product for her Etsy shop. I am happy to oblige, doubling the value of the new piece.
And again because someone WILL ask about the meaning of the motto on this one…
The Resident Male is an aspiring science fiction and fantasy writer. He’s getting attention for Fractured Symmetry, the first book in a series featuring a classic detective pair – a grumpy, reclusive genius, and an hands-on action assistant. Only in this case, the genius is Terendurr the Blackstone, an imposing alien; and the assistant is Blair MacAlister, a woman you wouldn’t want to trifle with. The mysteries allow fascinating trips into off-world cultures (his universe is populated by many species, each with their own ethics, biases, strengths and weaknesses). He’s working on a second volume of stories right now. No spoilers – this phrase is a motto of a group that figures prominently in those stories. It’s not in any Earthly language, and translates roughly to “Life’ll kill ya.” So as his #1 fangrrl, I made this piece up for him. Yes, a bit quixotic I admit, but I do believe that he will find his audience, and I won’t be the only fan for long.
STUMPWORK PEN DRAWING
A while back I posted about a drawing that came to me from my grandparents. It hung in their dining room/library. As a kid I adored it and since it was hanging so far up on the wall, was especially delighted after I finally got glasses, and discovered all the details – the flowers, bugs, and little goodies hidden in the piece.
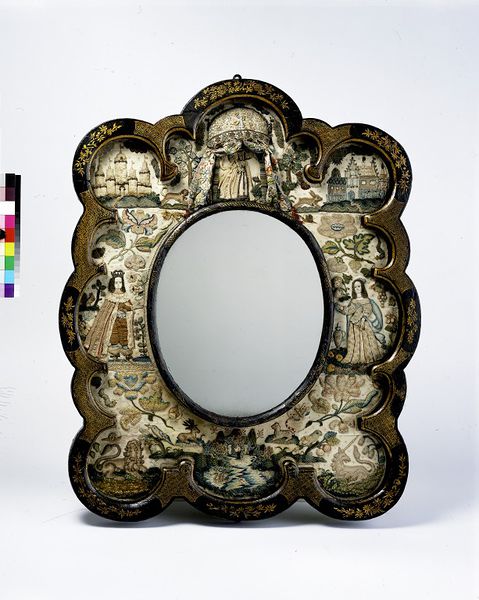
I am convinced that my drawing is a rendering of an actual artifact. The sketch probably dates to the 1920s or 1930s at the latest. The artifact itself is clearly a stumpwork piece of some type – a style dating to the 17th century. Possibly a mirror, possibly a bookbinding. Possibly a combo of motifs from more than one piece. But I don’t think it was just dreamed up by the artist.
I’ve gone looking for the thing several times. I’ve hunted in on-line photo collections and books cataloging famous embroidery collections. I’ve paid special attention to items in New York City area museums because I have a hunch that “art student selling on the street” was more in my Brooklyn dwelling grandparents’ budget than was purchasing from a gallery. And an art student might well have sketched something seen on display in a local museum.
I even read about a collection of stumpwork pieces being acquired by the Brooklyn Museum in the 1920s, so I wrote to the curators and asked if it was still in accession, and if anyone dealing with it might recognize my piece. Sadly, not. But they were very gracious and wished me luck in my hunt.
Recently I was part of an on-line discussion among historical needlework enthusiasts, and posted my (not very good) photo. Several folks there requested higher resolution pix. So in the hope that I can enlist others in my hunt, or provide inspiration to someone wanting to stitch their own stumpwork frame, I post some here.

Bottom center – note the shark-like fish, and detail that looks very much like the artist was trying to depict actual stitching. Hills with an ocean or lake in front are very common center bottom treatments on mirror frames.
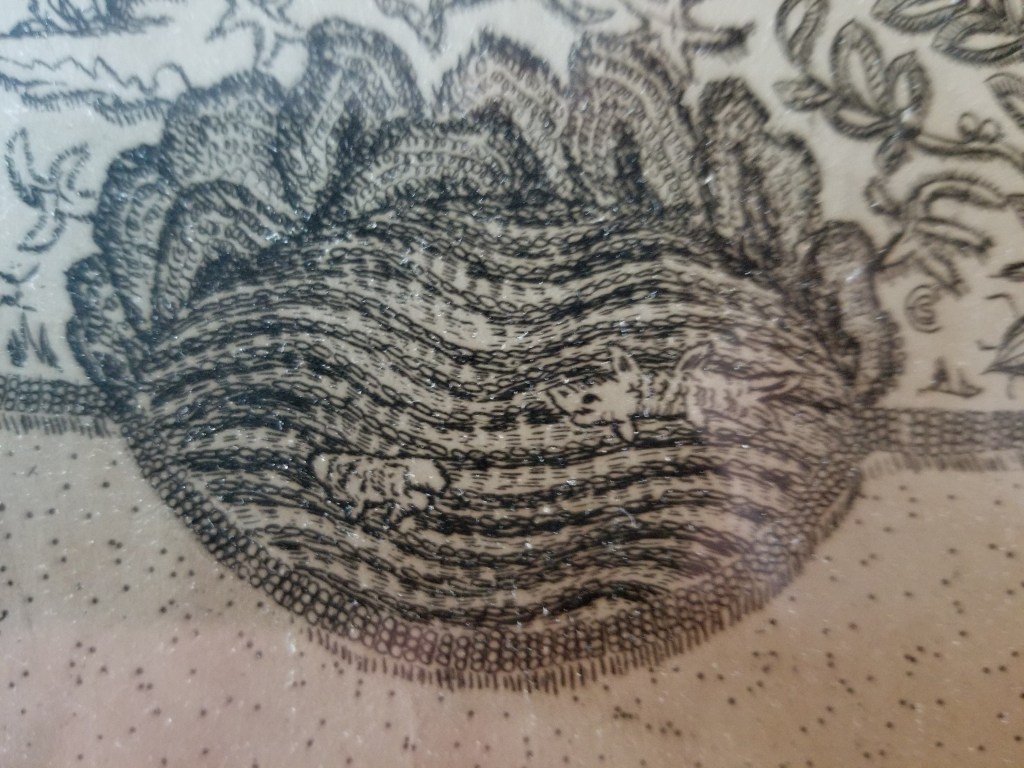
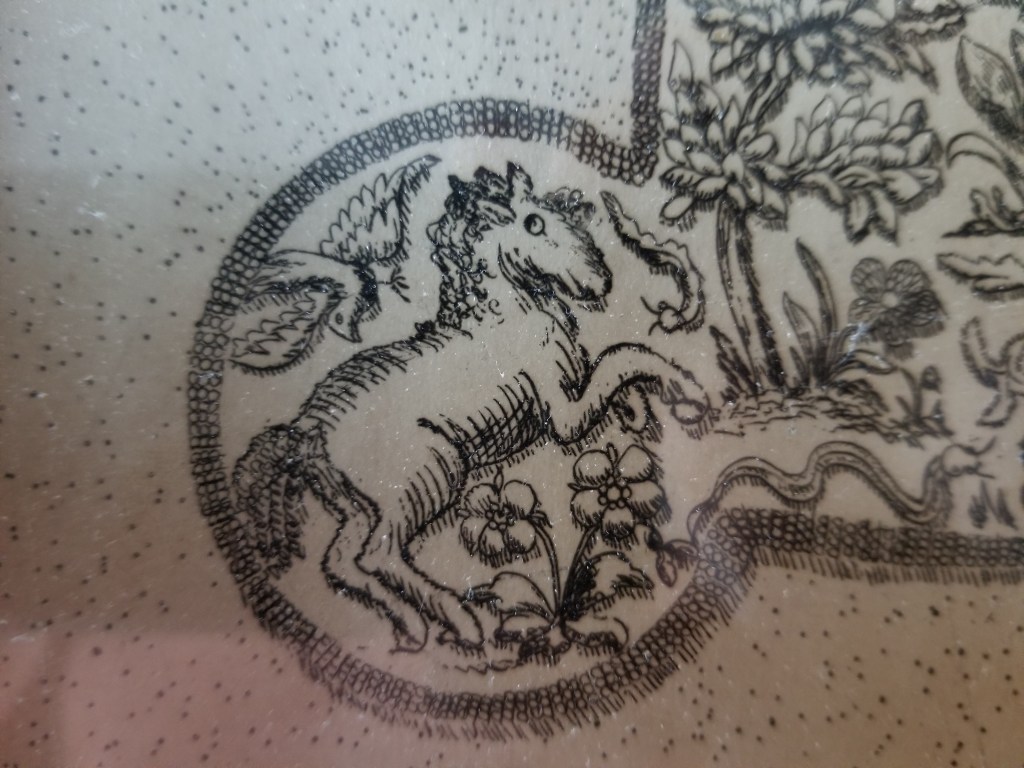
Lower left corner – the pony, plus a dove(?), a snake, and a centipede. And flowers. There are always flowers.
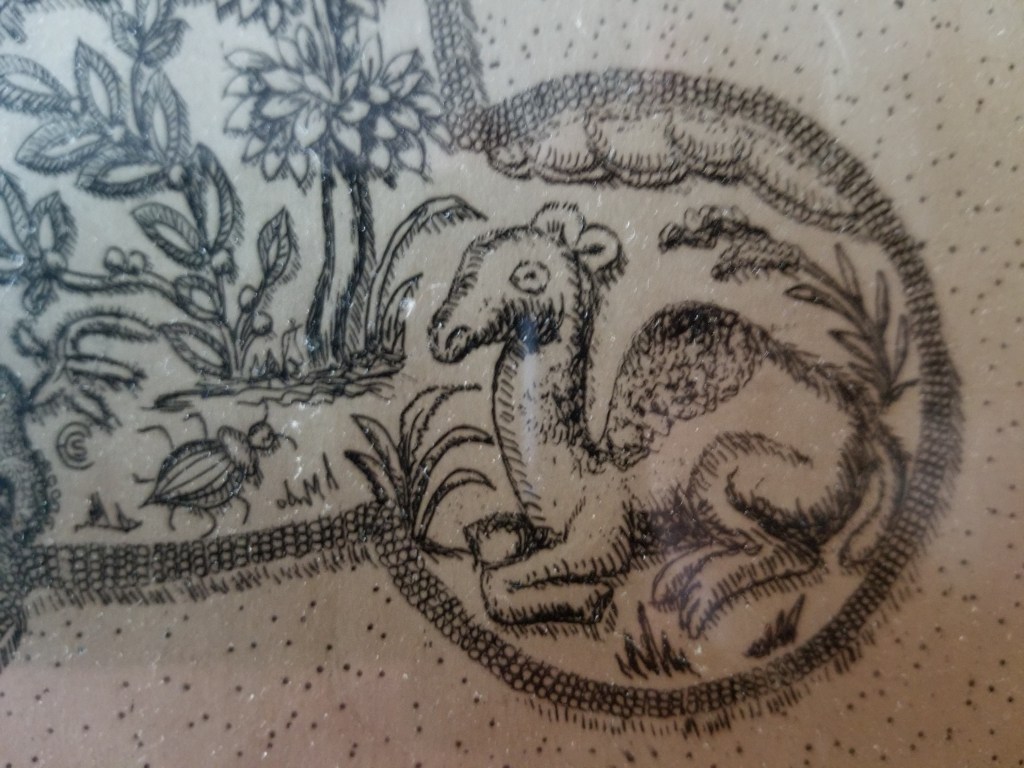
Lower right corner – the camel, and a beetle. That hump looks like turkey work to me. Also what might be a partial signature at the left of this detail shot – a little roundel that might be CCS or HS, or HCS.
Upper left corner – the leopard, with a caterpillar a bird, and a worm. Leopards (and lions) are common corner residents.

Upper right corner – the moose-nosed stag, with the worm and a two small snails. (Hmm… Maybe this is why I often include snails in my own work.) Stags show up often on similar pieces, too.

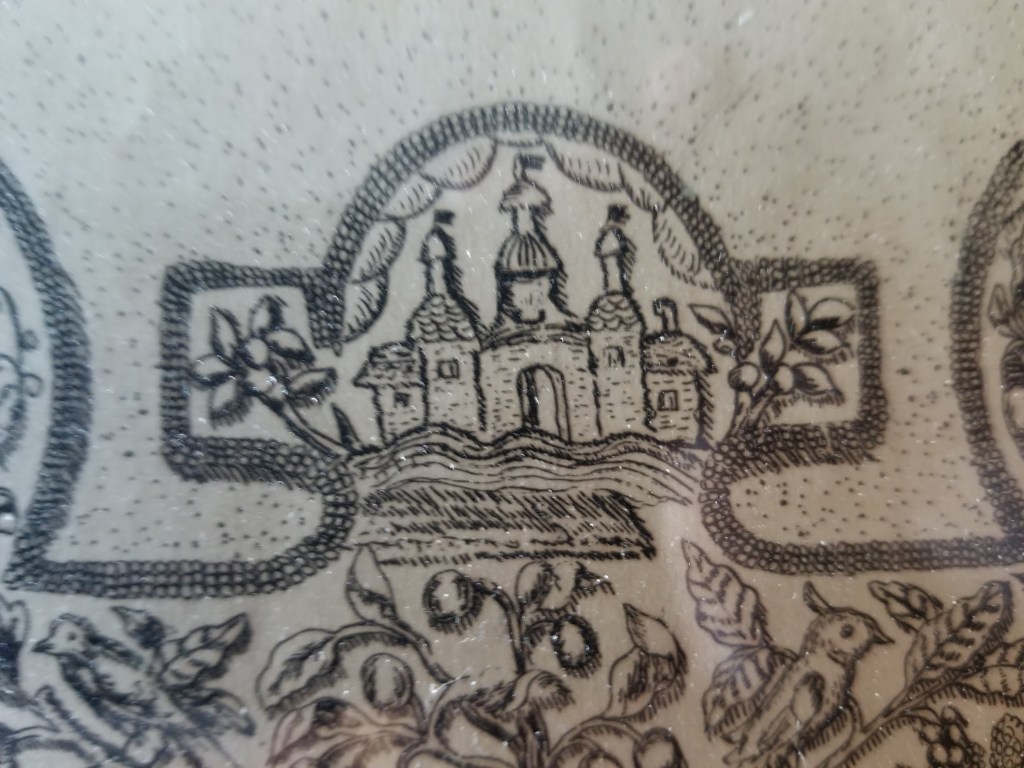
Center top – buildings, plus fruits and birds, below. Buildings, perhaps visions of Jerusalem or the city of heaven are also a standard feature of stumpwork mirror frames.
Left edge – Now this is where it gets complicated. On mirror frames there is often a couple – a king on one side and a queen on the other. Family folklore (with or without any reason) claims that in this drawing the center figure, a queen, is in fact Queen Esther, and this guy on the edge with the wide collar is King Ahasuerus. Whoever he is, he has bugs, a bird and a bunny to keep him company.
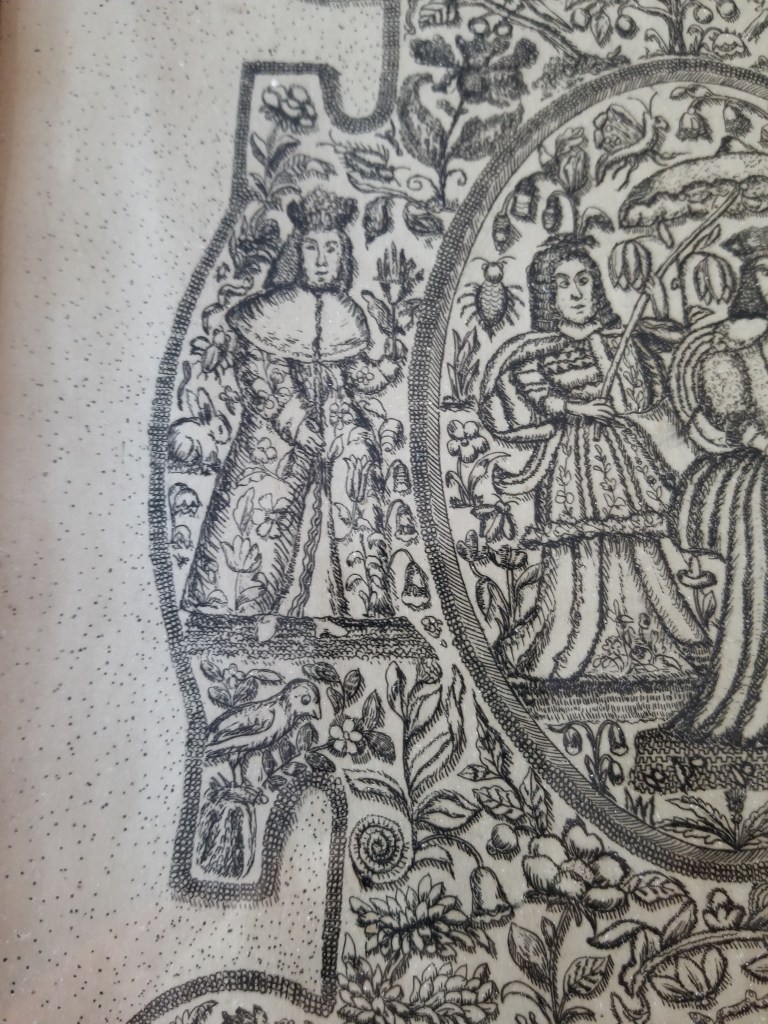
Right edge – If the Esther interpretation is correct, this would have to be Mordecai. Not quite as sumptuously robed as the King, but escorted by a bird, grapes, and another caterpillar. (Haman, being the bad guy gets no depiction.)

Center – Finally we get to Queen Esther and her attendant. And her own bunny, worm, and bugs, plus even more lovely flowers. From what I’ve seen it’s unusual for just a queen to be shown alone in these English stumpwork pieces – more often a couple was shown, usually in homage to the sitting monarchs.

So there we have it. If you look closely at these pix you can begin to see stitch detail – a raised braided stitch of some type as the heavy outline, the mentioned turkey work on the hump of the camel, a three-D thrust on the parasol, satin stitch and shading on some of the flowers and fruits (either to indicate depth or stitches – I can’t tell).
So now the APB is truly issued. Seen these characters, or pieces like this one? Let me know. If the link is accessible, I’ll post it here.
Adapting one of these pix for your own raised work piece? Let me know! I’d be happy to post that, too. (I think the corner animals in particular would make lovely tops for small, round boxes).
Museum Examples
Metropolitan Museum, Mirror Frame, Third quarter 17th century, British. Accession 64.101.1332: Leopard at lower right, pond or sea with fish at bottom, couple left and right.
Victoria & Albert Museum, Mirror Frame, 1660-1680, British. Accession 351-1866. Lion and unicorn in lower corners, couple at left and right, pond with mountains and fish at bottom.
Drawing presented on Lizapalooza/Elizabethancostume.net’s blog (photo borrowed from that site, I hope they forgive me).

OCTOBER ISN’T ALL THAT FAR OFF
So for those of you who favor seasonal stitchery, here is a suitably spooky present:
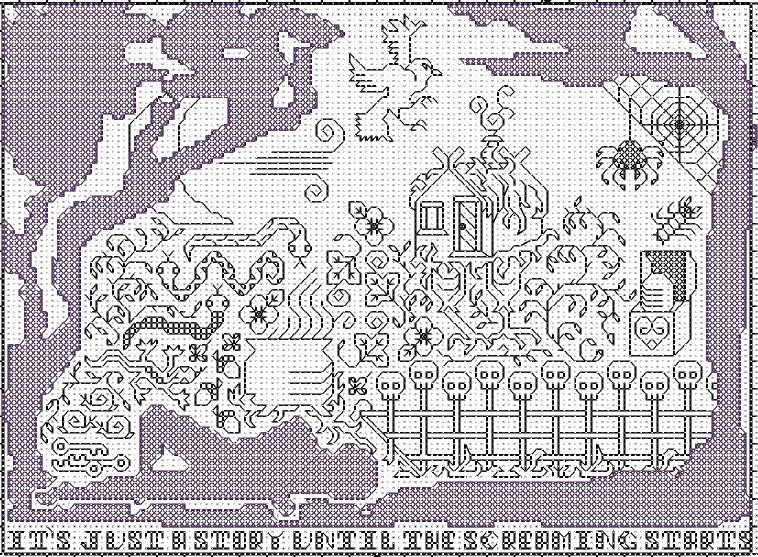
The inspiration for Baba Yaga is courtesy of my pal and former co-worker Laura Packer. Laura is a storyteller by trade – an unusual occupation these days, but one she does splendidly. You can sign up for notification of her public tellings at the link above, or you can subscribe for all sorts of creative goodness at her Paetron link.
Laura had sent a much appreciated surprise to me, so I doodled up the main Baba Yaga chicken-leg hut motif in return. She swooned over it, and suggested further additions from the story cycle – the chest with the egg/heart; the fence of bones (I stole my bony boi’s faces for that), the moon, three keys, a cauldron, a forest of briers, wind, a raven; and keys, creepy crawlies and other things in sets of three. I put in as many as I could, adding the motto across the bottom and the dreamer frame (in silhouette, intended to be stitched very densely for added mystery).
When we were both happy, I went final with it. And gave full rights to the design in perpetuity to Laura. She returned the favor by allowing me to post it here.
Please note that this is just a chart – not a full project described in detail. I suggest work in one or two colors on even weave or one of the higher count Aida fabrics, but I do not give thread consumption estimates. Linear elements can be done in double running or back stitch. The silhouette frame can be worked in long armed cross stitch, four sided cross stitch, or plain old cross stitch – your choice. There are gaps in places between the solid dark areas of the silhouette frame and its outline. Feel free to fudge those in with partial stitches if you like. I didn’t want to add visual complication by including the partials. It’s going to be hard enough to count as it is.
I don’t even have an as-stitched example to post (yet). If you beat me to that and feel so inclined, please send a photo and I will showcase it here.
You can download Baba Yaga from my embroidery pattern page (tab above or click here). While I am not charging for the thing, I do release it as “good deed ware.” Subscribe to Laura’s channel, or make a donation/buy a thing/otherwise subsidize the creative professional of your choice.
Artists – and especially face to face performance artists, actors, and musicians – are having a very hard time of it right now. But it’s art that keeps us anchored and sane in times of stress. If you can, please be a true patron and lend a hand. After all, doing good for those touched by the the spirits of creativity can only bring good fortune in return. Often in very unexpected ways. Let me tell you a story…
ROUND THE BEND
Yes! I have successfully rounded the corner, and reached out a tendril that confirms that the entire piece is spot on count and accurate to the repeat.

Now it’s just a matter of filling in that little bit at the upper right.
Of course, now I may go in and add something on either side of “TA” just to balance out the design. Still thinking on that, but in any case, the finish line is palpably near. Here’s the proof of alignment “tendril” – the inner border along the top edge fits perfectly, mating with the work I laid down at the very start of my journey around the edge (the bony boi and the border above his head, at the hoop’s right edge).
To put this in perspective for my non-stitching pals, this rendezvous is like marking a chalk X in front of your house, standing on it then putting on a blindfold and dancing wildly around the block nonstop until you decide you’ve gone far enough; then taking off the blindfold, looking down and realizing you have arrived exactly back on your point of departure.
Why not so much progress this week past? It’s been hot. We got back from our week on the beach in the middle of the heat wave. Like many in the northeast US, we have no air conditioning. Sitting under a halogen work lamp in the evening was more than I could contemplate in temps of 85 to 100 deg F (29.4 to 37.8 C), with high humidity.
I’ve been marling the offending brighter red (glaringly odd third inner plume flower up from the bottom of the right inner border) with thread in the color (or closer to the color) I have been using. By using one strand of “good” and one strand of “less optimal” together major color discontinuities are not so evident. I may go back and replace that offending plume flower. Or not. The “bad” red seems to crock considerably more than the other batches, and removal will leave a very evident halo.
Before I forget, extra special thanks go out to new stitchpal Paula from Austin, Texas. She read about my thread shortage problem and dug into her own stash, sending me oddments of various colors in and around the values I needed. Her generosity is what has enabled me to pursue the marled thread strategy.
Paula, I truly would not be able to finish this piece to my satisfaction without you help. My gratitude is eternal. When such things can happen again, the next time we are down that way visiting family, I reserve the right to drag you out for a special treat!
