POST SHRINK POST
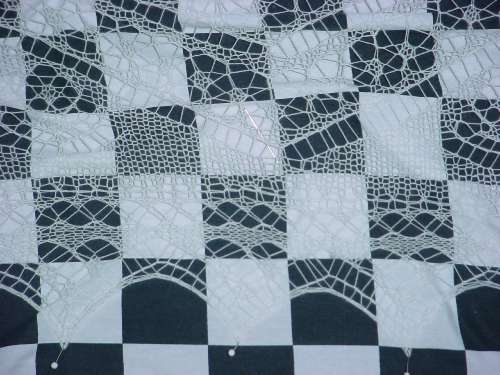
Over the weekend I fulled the swatches from Wednesday’s post, with only
equivocal success. The washing machine in this house isn’t very good.
As you can see, there’s a little fuzzing, some uneven shrinkage, and no
loss of stitch definition, even after trips through the wash/dry cycle
with all six of the family’s weekly loads.
 |
 |
Swatch 1: Double strand, knit on US #10.5, 3.75 spi, 8 rpi. 15 stitches cast on.
- Pre-wash: 12mm wide x 10mm long.
- Post-wash: 10.5mm wide x 9.5mm long
Swatch 2: Double strand, knit on US #11, 3 spi, 6 rpi. 15 stitches cast on.
- Pre-wash: 13.5mm wide x 11mm long.
- Post-wash: 11.5mm wide x 9mm long. Very distorted
Swatch 3: Double strand, knit on US #13, 2.75 spi, 5 rpi. 15 stitches cast on.
- Pre-wash: 14.5mm x 12mm long
- Post-wash: 12.5mm wide x 9.5mm long
Swatch 4: Single strand, knit on US #10, 4 spi, 9 rpi. 18 stitches cast on.
- Pre-wash: 12.5mm wide x 10mm long.
- Post-wash: 10mm wide x 8.5 (to 11)mm long. Most distorted of all
Swatch 5: Single strand, knit on US #9, 4.2 spi, 10 rip. 18 stitches cast on.
- Pre-wash: 13mm wide x 9mm long
- Post-wash: 10.25mm wide x 8.5mm long
As to texture – all of the swatches firmed up somewhat. There was
very little difference in drape between #4 and #5, although of the two,
#4 was the more fulled. It had spots where the stitches were
almost melded together. Unfortunately it was also the most
unevenly treated, to the point where getting an accurate measurement on
it was very difficult.
I was surprised at how the heavier two-strand swatches turned
out. I really expected to see more shrinkage, and a tighter,
denser fabric with less stitch definition. While they’re nice and
dense, I haven’t lost the corrugation of the original garter
stitch. I also expected the swatches knit on larger needles to
shrink more in relation to their original size than the ones on smaller
needles.
I wouldn’t consider any of the results I got suitable for producing a
knitted bag, but I also don’t think my swatches have fulled to their
limit. I am going to try again tonight, working by hand with a
pot of boiling water and a pot of ice water, and see what I come up
with.
One aside – the color in today’s swatch photos is much more accurate than the earlier photo.
EIGHT (GIVE OR TAKE) PLUS ECONOMICS
Although I was out of town tending to family matters last weekend,
knitting was accomplished – mostly on the flights and in the airports
as I waited between planes. In addition to yesterday’s swatches,
I did some work on my counterpane.

As you can see there’s a pie slice that’s missing from the leftmost
motif. My guess is that my missing triangle is now loose in the
Orlando airport – a stopover on my way to my final destination. I
doubt my feral triangle will cause more than a moment’s pause as it is
swept up and tossed away. So it goes.
As this piece grows larger, I can say I’ve definitely overbought my
white cotton coned yarn. I have four enormous cones. I’ve
gone through about a third of just one of them. I think I’ll end
up using just two of them to make the whole thing. Here’s
consumption so far. The untouched cone on the left weighs
1250g. It’s the smallest of the four, with the others ranging up
to about 1300g. The nibbled into cone on the right weighs 825g,
and started out at around 1300g. Which all makes sense because my
blanket so far weighs about 475g. (It’s always pleasing when the
math actually works out).
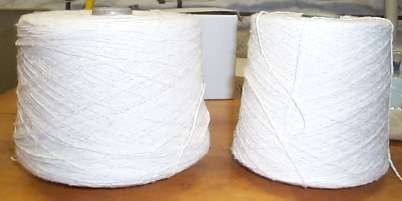
Since I’ve got about 20% of my estimated total surface area done, but
have used only about 8.3% of my yarn (a third of one of four cones –
roughly a 1/12 of my total available yarn), I’ll have LOTS
leftover. Still, I don’t mind. It’s nice yarn and there
will be enough for another project (perhaps another counterpane).
As an added bonus, the stuff was a very inexpensive back room find at
Webs. I paid about $10 per cone for it. Since this project
will last for about eight months at the current rate of production and
I anticipate using only two cones, that works out to $2.50 per month of
knitting enjoyment. It doesn’t get any more economical than that.
How to knit on the cheap?? Don’t buy what’s trendy. Big fat
yarns and glitzy yarns command a premium, but plain finish yarns, even
first quality good wools and cottons can be had at very reasonable
prices (even without resorting to reclaiming yarn).
Think smaller gauges. This stuff isn’t particularly small being
very close to DK weight (5.5spi), but even DK is lighter than many of
the more favored yarns today. And think of? projects that
get their zing from the knitting rather than from the yarn. Yes,
they take a bit more time and attention than some plainer pieces, but
isn’t the entire idea to have fun knitting? No, if you are
on a limited budget you won’t be able to knit that fancy fulled
cardigan from imported Japanese hand-dyed, but I bet with a little
effort you could find a 100% wool sport weight yarn that would make a
smashing texture stitch or stranded colorwork jacket and not break the
bank – especially if you consider how many weeks of knitting time you’d
get by investing in such a project.
MYSTERY PROJECT
I’ve decided while I can’t write about everything, there are some bits
of my Mystery Project that I can discuss. Especially in the early
stages. I’ve already said that it’s a commission for Classic Elite, and
that it’s going to be fulled.
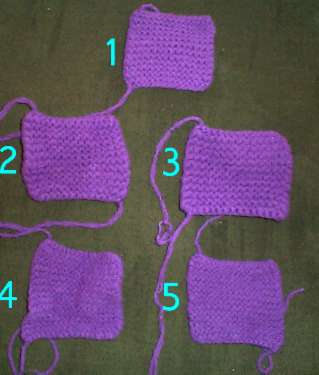
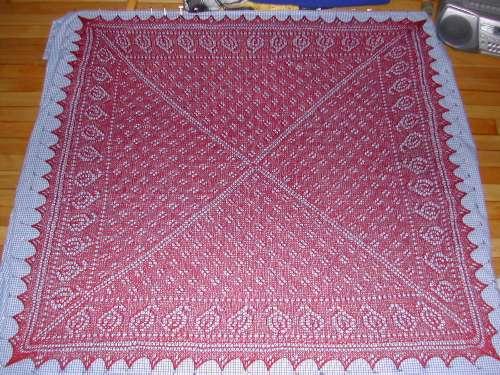
Here is my first set of swatches:
That’s a lot of swatches!
I’m using CE Renaissance.
It’s a 100% wool worsted weight yarn. It’s got quite a bit of loft due
to it’s three-ply construction, and the maker’s gauge is expressed in a
range – from 5spi on US#7 (4.5mm) to 4.5spi on US #8 (5mm). My
direction is to make a very firm fulled fabric, so I’ve made three
garter stitch swatches from double strand and two garter stitch
swatches from single strand. Here are the pre-wash specs:
Swatch 1: Double strand, knit on US #10.5, 3.75 spi, 8 rpi. 15 stitches cast on. Total dimension: 12mm wide x 10mm long.
Swatch 2: Double strand, knit on US #11, 3 spi, 6 rpi. 15 stitches cast on. Total dimension: 13.5mm wide x 11mm long.
Swatch 3: Double strand, knit on US #13, 2.75 spi, 5 rpi. 15 stitches cast on. Total dimension: 14.5mm x 12mm long
Swatch 4: Single strand, knit on US #10, 4 spi, 9 rpi. 18 stitches cast on. Total dimension: 12.5mm wide x 10mm long.
Swatch 5: Single strand, knit on US #9, 4.2 spi, 10 rip. 18 stitches cast on. Total dimension: 13mm wide x 9mm long
Although
I used up a whole skein plus part of another in swatching, it’s worth
it. Note that I’ve got not quite a straight progression, but enough of
a gauge and texture difference to make the experiment worthwhile. The
plan is now to full these as much as possible, then compare the final
dimension with the pre-wash measurements. That will allow me to figure
out what my knitted dimensions need to be to achieve a post-full target
measurement. I’ll also get to see how both row and stitch measurements
change (important as knitting does not shrink uniformly in both
dimensions. I’ll also find out which of my gauges produces the best
fulled fabric for my purpose. Washing will happen later this week. Stay
tuned!
How do I know which swatch is which? See those knots in
the cast-on tails? That’s how they’re numbered. With luck those knots
will still be discernible after fulling.
LUCKY SEVEN
Still plugging along on the counterpane, at the approximate rate of one
meta-motif per week. Week seven ends with this accumulation,
shown on the top of the bed that it will (eventually) grace:

As you can see in spite of having completed one circuit, there’s still a long way to go:

I still stick by my estimate of approximately 26 motifs (plus half
motifs) to get good coverage for my queen-size bed. I might take
a break this week though and use my knit-time to tend the ever growing
forest of ends. That’s 36 ends per meta-motif. Plus 12 more
for the solid triangles shown above. Plus two more from finding
and cutting a knot out of my yarn. So I’ve already got about 50
ends to deal with in the fragment shown above. Which should keep
me busy for a bit…
WE ARE FIVE
As you can see, motifs continue to accumulate on North Truro:
The observant will spot more evidence of my continued existence in the
photo’s lower right. Apologies for the quality of this shot. I
recently replaced the hand-me-down 1.3 mega pixel camera I had been
using with a hand-me-down 3 mega pixel camera. In theory, the best
quality setting of the latter should be better than the best quality
setting of the former. Apparently there is room for contention in
this theory. Still, you can see how the design continues to
grow. Next week’s progress shot will feature the thing on the top
of a queen size bed so you can see how far I’ve got to go.
I’m afraid that while this piece remains interesting to knit, I’m
rapidly running out of things to say about it. I don’t anticipate
any earth shaking discoveries until I get up to the bit where I have to
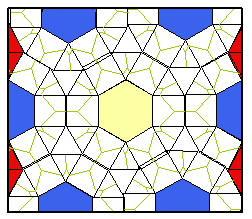
improvise half motifs to go around the edges:
Since I prefer the look of a nice straight edge and matching edging to
the rippled look of a "bare motif" spread, I’ll also have to invent
something to eke out the east/west sides. Plus the actual edging
of course. You can see the full motif smack in the center of this
layout (full yellow hex in the center). The half hexes are in
blue. They’ll pose a bit of a challenge because they’ll have to
be knit flat as opposed to in the round, but since I chart my patterns
by repeat, I don’t need to do any redrafting – just remembering the
circ/flat inversion and only working three rather than six
"petals."? The squares on the edge next to the half hexes also
need to be modified. There will be left and right halfies to
preserve the pattern’s lines. The hardest part will be the half
triangles needed to eke the thing out east and west. Fiddly but
easy to do. I never quite like the way they turn out.
Thought for the day:? Life is only as complicated as you make it.
BLOCKING AGAIN
Several people have asked about the blocking board Laura used for her
Paisley. I’ve sent the question to her, and will post any reply.
In
the mean time, here’s another suggestion. When I’m not being lazy
slinging things down willy-nilly on towels, I do follow a bit more of a
method. First, I clear out furniture in the room with our largest area
rug (I’ve got no wall to wall carpeting). Then I lay down a heavy
cotton quilt type blanket to protect the carpet from any moisture, and
to give me more depth into which I can pin. Finally I cover the blanket
with a rally check patterned sheet, one of two I stumbled across in a
discount store. Once all is smooth and ready, I pin out my item, using
long rust-free pins:

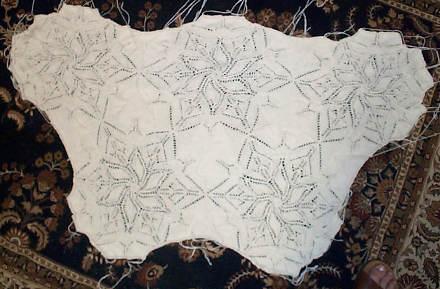
The
item above is my Spider Queen shawl. It stretched out to be about 7 feet
across. I began with a rough estimate of how large my finished item
should end up being, then I started at the center points of each edge.
I pinned them first, working from side to opposite side and tensioning
the piece across between counterpoised pins. Then I stretched out the
corners and did them, too. After that I just zipped back and forth
across the piece ping-pong style, pinning in the middle of each
remaining unpinned length until I had placed a pin in each of the
edging’s points:
About
the only caution I offer (beyond being prepared for the labor
intensiveness of this effort) is that the cheap Dritz pins I used were
long enough and rust-free enough, but they were too thin and too
fragile. They bent going in and the little bead heads pulled off when I
pulled the pins out. Not fun.
I know that rally check print
sheets are not an every day item, but any even check or Tattersall or
windowpane style plaid will work equally well. So would yard goods in
gingham or similar "graph paper" type patterns.
My friend Kathryn gently chides me about blocking my Kinzel Rose of England, languishing in my Chest of Knitting Horrors?
since 1991. While the method above would work for that piece it’s not
on my current schedule. ROE was the first bit of lace knitting I ever
attempted. It’s a testament to the precision and logic of that pattern
that I was able to do it with no prior lace experience.
At the time though, I wasn’t very appreciative though of my materials.
I used a mish-mash of size 30 white crochet cottons from various
makers, bought at different times. You can see where each purchased lot
begins and ends, some by slight color difference, some by texture. I
got about four courses of leaves into the final outside area and
stopped at the point where I ran out of thread (again) and when I was
no longer able to delude myself that the thread lot problem wasn’t
noticeable. I’d need to figure out where I was, buy more mis-matched
cotton, finish out another course of leaves, and do the final
crochet-off finish before I could even think of blocking. Either that
or ravel out a course or two of leaves and finish the thing from that
point. So you can get an idea of what the (eventual) goal is, here’s Judy Gibson’s ROE.
I know some people are asking about when I will be blocking my Alcazar shawl. I’m afraid the Larger Daughter took a fancy to my loud rally check sheets and took them off to sleep away camp. No large item blocking will happen here until she and my sheets return.
GALLERY – MORE PAISLEY!
I get a big kick out of seeing what others have made from my patterns
or pattern pieces. It’s a bit like meeting up with old friends
years down the road and finding out what they’ve been up to. I’m
delighted to be able to show off any photos of their work here in the Gallery section.
My latest vicarious bit of happy warmth was provided by my knitpal
Laura Need. She decided to do the Interweave Knits Paisley Shawl
from the Spring ’05 edition, but to finish it off with the simple edging I noodled up. She sent me the picture below and gave me permission to post it:
Laura used Zephyr, and her Paisley pinned out to about 46 inches
square. She did a much more even job of the knitting and blocking
than I did. Plus she had the wisdom to use a solid color.
You can see the difference:
Laura’s paisleys and eyelets really pop out. You can see the edging especially well. The piece’s texture patterning isn’t fighting for your attention with ground color variations. That’s a big improvement. I
took the lazy way out of blocking, using my wires rather
haphazardly and patting them in place rather than pinning them down to tension the work. She did it the more labor intensive way that
produces better results – pinning out the individual points evenly on a
dimensioned blocking surface. (Hers also pinned out to be six
inches larger than mine.)
All in all I’m extremely impressed and quite pleased that Laura found
fun in my minor contribution to this pattern. A great job!
FOUR TODAY FOR TODAY
Four motifs done. My guesstimate is that four represents about 15% of
the total finished area. That means I’m looking at something like 26 or
so in total, with some of them being halfies.
It
looks like the trillium background shapes will form rings around the
star motifs. I’m really looking forward to seeing that develop. My next
step though may be to work out the half-width motif set. That would
include a half-hex, three normal triangles, one normal square and two
half-width squares.
UPDATE – Looking for past posts here
I do try to post stuff here that I hope is useful. I also realize
that much of it might not strike a reader as being useful today, but
might stick in memory somewhere and pop up when the specific need is
encountered. I’ve gotten a couple of questions (including a
comment early today) about how to find past posts. I’ve tried to
provide tools to do that.
First, for the knitting projects and some broad subject areas, I’ve set
up category tags. You can see them in the right hand sidebar (you
might have to scroll right a bit because of an over-large graphic I
posted last week). Projects all are named something like "Project
– Lacy Scarf" and index all the posts that mention each project.
The broad subject categories also work that way. Clicking on the
"Reference Shelf" tag will bring up all the posts that I thought people
might find especially helpful, likewise "Embroidery" should find all
the posts that discuss that subject.
Some particularly popular posts have merited direct access under the
major category "References," also in the right hand sidebar. Yarn
Labels 101 and 102 for example are two posts that get lots of traffic
from people just becoming familiar with yarn labels and how to read
them.
Finally for all those search needs that keyword indexing didn’t
anticipate, there’s a search box in that same sidebar. You can
type a word in there and bring up all posts that mention it, or you can
click on the "advanced search" tag right below that box to do more
complex multi-word or time-limited searches. Typing "booties" in
the search box should find the posts I did on A. Krekel’s pattern for
booties that really do stay on.
COUNTERPANE QUESTIONS
I know I said I wasn’t going to bore anyone with further progress on my
North Truro Counterpane, but I did get to an interesting point
yesterday, and my inbox has been graced with several questions.
First, the show and tell:

As
you can see, I finished a couple more side squares of Motif #3, and
seamed in most of the other little triangles that I knit over the
weekend. That let me join #3 onto the two units I had already
completed. I like the accidental trillium flower of negative space that
forms where three motifs join. I’d love to say that was intentional,
but it wasn’t. There’s lots that science doesn’t know about this
designing stuff, yet.
Now for the mailbag:
Aren’t you going to have a bushel of ends to deal with?
Two
bushels. Even though I’m knitting the squares out from the hex center,
there’s two for the center hex, plus two for each for six squares, plus
two each for six triangles, minus one for the hex end I use to do the
first square, and one for the end that doesn’t get started at the
outset of that first square. 24 in all for each motif. As you can see
in the pix, I like to leave them long so they’re available for sewing
the motifs together. As I get further into the thing, I’ll know WHICH I
need to leave particularly long, and which I can plan to be shorter.
Still, I plan on darning in ends incrementally as I go along rather
than waiting for the end of the entire project.
Why aren’t you blocking the motifs before sewing them together?
Good
question. Sometimes I do block the motifs before I assemble them. This
time I didn’t. This particular no-name yarn and needle combo seem to
produce motifs that lie relatively flat, showing the openwork well
without the block. I suspect my squish problem WOULD be partially fixed
by blocking, but leaving the hex motif live on the circular as I finish
out the squares isn’t exactly conducive to the knit-block-assemble
production method. Plus pinning out each night’s production means
leaving the ironing board up to do the blocking, and I don’t want to
trip over it for the next umpteen months.
Are you going to leave the edges wavy?
I
could. You can see that the lower edge makes a nice gentle wave. I
could leave the thing raw, edge it with I-cord, or sew on a (yet to be
designed) complementing edge strip just as it is. But I probably won’t.
Just on the principle that the biggest fun comes from the most abstruse
and useless effort, I’ll probably do up half hexes and half squares to
produce a nice straight edge, then affix that as yet mythical edging to
it.
Lovely crib blanket! You’re nuts for spending so much effort on a baby blanket.
Huh?
This is destined to be an oversized Queen-size spread for my own bed.
(I’ve knit a blankie for each of the kids, why can’t I have one, too?)
If you think I’m addled for attempting this as a mini-throw, I’m sure
you think I’m a gibbering raving loon for doing one that big.
PLUGGING ALONG
I was busy this weekend past.
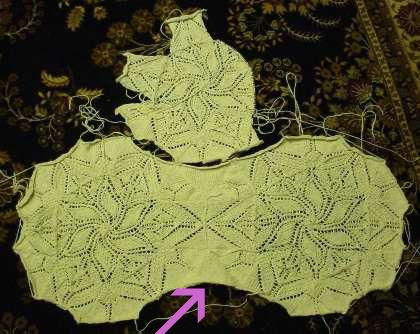
I worked out the plain triangle and made two. Both are sewn into the
growing group. One is indicated by the arrow. I do have a bit of a
scrunch problem, but probably not so much that it can’t be ignored.
The sides of my triangle are less tall than its base is wide.
Therefore, when I’m sewing the bases of the patterned triangles onto
the sides of the plain one, I have to squish them up a bit. You can see the slight rumples that result.
I do however like the way the points of the stars align. While
the orientation I tried last time had more movement in it, because the
stars were offset, this one will have less background area.

For those who have asked how I add arrows or other annotations to my
photos – I use Macromedia Fireworks to slim, retouch, or otherwise
manage my images. I cheat – the arrows are Wingding font
"letters" added with the text tool.
Shoe size chart
Some people have pointed out that their European shoe sizes are off a
bit from the chart shown yesterday. Mostly at the upper
end. The chart’s represented equivalent for US shoe sizes Women’s
9 and above seems to work out one unit larger than people are
reporting. So a 10.5 would be closer to a 42 than a
43. Grains of salt are advised.
