INCHING ALONG
More bits and pieces are accumulating. You can see I’m more than
half way done with the second meta-motif. I’ve got two triangles
to sew on (I don’t actually do the stitching until the squares on both
sides of a triangle are complete.

In this photo you can better see what the motifs look like
individually. The center hex is pretty straightforward. The
triangle
is knit base to tip. The tip’s center is a textured stitch.
The
square (shown attached to the center hex at the bottom right) also
features the same textured area in the parallelograms that flank its
center spine. When the motifs are placed together, these textured
areas join up to make the star-shaped framing device that surrounds the
center hex’s flower.
Unfortunately this sort of project isn’t very good for blog progress
reporting. From here on in it’s going to be more photos of
exactly the same thing, done again and again and again and again.
You get the idea. I’ll probably mark the completion of each
meta-unit, and show a couple more photos of significant milestones –
like joining the motifs using the plain triangles I wrote about last
week, but I’ll try to avoid boring everyone with needless
repetition. Which means I’ll have to think up something else to
write about.
N. TRURO – SECOND MOTIF
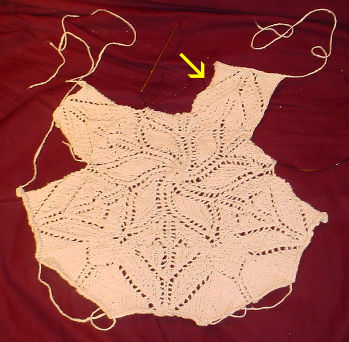
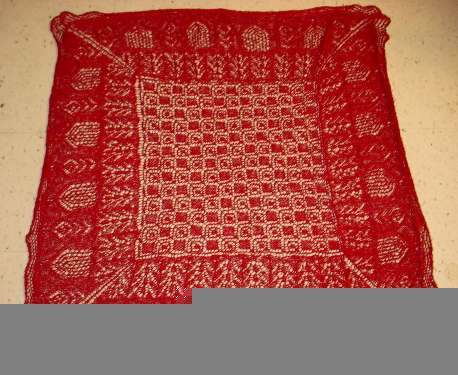
As you can see, I’m making slow progress on my counterpane.

Athough you can’t read the tape measure, one meta-unit unblocked measures around 15.5 inches across.
I’ve started the second motif, and done the hex,? half of its
squares, and one triangle. Here I’ve lined up the two as I intend
to sew them together. I will need a fourth motif when I finally
get enough done. It will probably be a solid stockinette
triangle, to go in this spot:
Either that or I need to engineer something with lines of YOs that match up with those on the bordering squares.
I did spend quite a bit of time trying to make a triangle knit from the
tip down that is as close as possible to the one I’ve got that’s knit
from the base up. So far no dice. I just can’t get a
congruent pattern on the rows that use YOs and double decreases in the
original. My triangles end up being rather rotund, and I lose the
lacy openness of my original. Plus the nifty lines formed by the
YOs are shifted somewhat, and no longer align with the squares when all
is to be sewn together. My counterpane will have to remain
assembled from lots of smaller pieces. Perhaps the next one I
play with will be an honest dodecagon rather than this assembled one.
And for those who have written to say that I’m a crazed loon for trying to knit this higher complexity tesselation instead of sticking to plain old squares or hexes, you’re not telling me anything new. Go play with geometry.
NORMALCY? WHAT’S THAT?
I have now survived my week from hell, managed to recuperate (somewhat); and we have returned the house to something resembling order. It’s not a very close resemblance, as this family’s housekeeping skill set is rather deficient, but horizontal surfaces can now be seen, laundry is no longer threatening to avalanche, and a machete is no longer needed to find the front door.
Add to that some progress on my counterpane:
As you can see, I’ve finished the first meta-motif, including seaming in the corner triangles. It’s a bit smaller than my original estimate, but not by much. Plus it will be stretched a bit not only in the blocking, but also by the natural tension of the surrounding motifs once it is in place. One thing I’m pleased with is the lack of cupping in the center hex. Too tight blocking plus that extra seam between the bottom of the squares and the sides of the hex constrained the stretch of the thing the last time around. Working the squares directly onto live stitches around the hex appears to have eliminated that problem.
Now there’s a new thing to consider. I’ve got a dodecagon (a twelve sided figure) here. Right now the triangle units are knit base to tip. But if I figure out a way to flip the design over, it’s conceivable that I could translate the thing into a tip-out piece. AND if I can do that, it’s possible for me to add those units to the squares, already worked center out, and instead of a bunch of smaller seamed pieces, produce the twelve sided meta-unit as a single piece.
Food for thought here…
QUESTIONS – NORTH TRURO COUNTERPANE
How do you start the hexes?
There
are quite a few ways to start off a flat knit piece done both in the
round and center out. I keep gravitating back to the I-cord method.
This piece is a hex, so I start by casting on a three-stitch I-cord,
and working one round (I’d start off an octagon with four stitches). On
the second round of the I-cord, I take my first needle and knit one,
then make an increase in the space between the just worked and next
stitch. If I want a more open center I’ll do a YO. If I want a more
solidly filled center, I’ll do a make 1 lifted bar increase (a devil to
do on the second round of an I-cord). Then I’ll take another needle and
repeat the K1, increase 1 unit. And again on a third needle. Now I have
three needles in the work, each bearing two stitches, plus one in the
hand to work with. At this point I flip over and begin following my
pattern. For an octagon, I’d do much the same, but with a set of five
instead of four needles.
Why bother with the multiple units when you can just assemble the hexes into a perfectly good counterpane?
For pretty much the same reason I make cassoulet instead of being happy with franks and beans.
How big are your motifs?? How many are you planning on making?
It’s
difficult to get a gauge on this stuff, but if forced, I’d say I’m
getting approximately 6 stitches and 8 rows per inch over the
stockinette areas. Unblocked, my center most hexes are about 10 inches
across at the widest point. The squares are about 5.5 inches on a
side. The bases of the triangles are also about 5.5 inches across. One
entire meta-unit of hex surrounded by squares and triangles (unblocked)
is about 21 inches across. I haven’t measured my bed yet, but it’s only
a queen size. Given the vague bed linen sizes posted here
and there, my counterpane should be a square or a rectangle something
between 85 and 100 inches on a side. I’ll need at least 4 units across
and 5 units head to foot. Given my chosen layout, that’s about
four rows of four units, plus three rows of three units, or 28 units.
That adds up to 28 hexes plus 168 squares and 168 triangles. Plus
half hexes, and the smaller units needed to square out the edges
somewhat (they’re never going to be exactly linear), and an edging of
some unknown depth. I’m not quite sure how many of the other shapes
I’ll need yet.
Doing the same size counterpane using only the hex units would mean
making about 10 rows of 8 units, and 9 rows of 7 units – that’s 142
hexes, plus edge half hexes and a border.
This project should keep me busy for a while.
QUESTION GRAB-BAG
A few knitting and non-knitting related questions from the inbox:
How did Killer Bunnies go?
Tons of fun. We played as a mixed-age group, with the youngest
being 7. We had hoped to get the Red Expansion Pack at Puzzle Me This
in Provincetown, but they were out. We settled for Violet, the
next one in sequence. The game plays more smoothly if you add
them in order because each pack builds on the last, but we were able to
use most of the Violet cards anyway.
What size needles did you use for the two versions of your counterpane?
The old version in the heavier cotton was knit on one of my odd size
needles, it’s a set of old long steel DPNs, they’re probably antique 9s
– and just a bit larger than standard US #4s (3.5mm), but closer to #4s
than #5s (3.75mm). The new piece is knit on 3mm needles, which in
some makers’ lines is a US #2, and in some is somewhere between a US#2
and a US #3.
Did you finish that embroidery doodle while you were away?

Are you planning on assembling the counterpane in the same way as the last try?
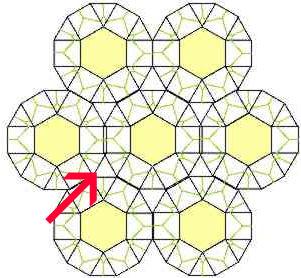
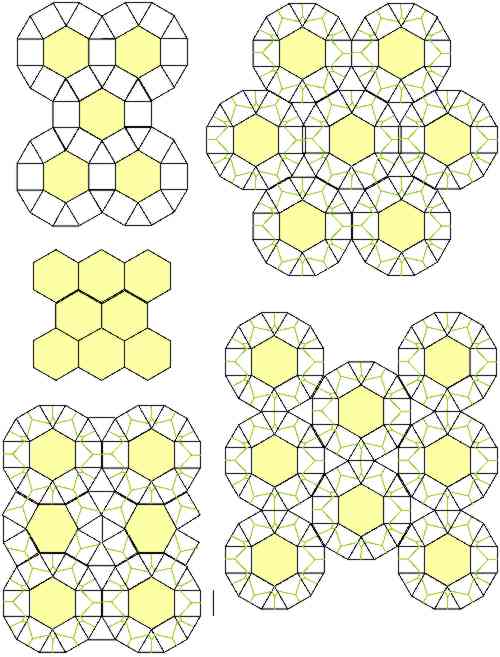
No. These units can be joined in many ways. Last time I
butted the triangles together. This time I plan to join
squares. My goal is to do the layout shown at the upper
right. Last time I used the one at the lower right. Both
use some plain solid triangles in addition to the pattern bearing units.
Where did you buy the counterpane pattern?
I didn’t. I made it up, starting with a standard spiraled
star. I added the outline-like bars to emphasize the motif, and
played with several treatments for the ground behind the star.
This one like my Mountain Laurel counterpane plays with a textured
ground and smooth star, but unlike that piece, plays a bit more with
the ground. I also wanted to do a counterpane that was an
tessellation of more interest than a flat tiled hex or a plain octagon
and hex. That’s why there are four units – the center hex, a
patterned square, a patterned triangle, and a plain triangle. The
layout above is actually an early draft showing how I played with the
concept, looking at ways in which I could use the patterned units to
extend the lines of the center hexes.
Can you send me the pattern?
Be patient. I plan on posting it to wiseNeedle this year –
probably after I’ve gotten considerably more done on the thing and have
a decent representation of the piece’s final look. I’d also like
to noodle up a complementing half hex and border.
RETURN TO REALITY
The only problem with starting out the summer with one’s vacation is that while there’s lots for the kids to look forward to in July and August, to me it feels like summer is already over.
While we had great fun on our week away, the weather wasn’t ideal. I didn’t mind the wet and cold because I was at my favorite place on earth – the beach in North Truro on Cape Cod. This is sunset over Provincetown, as seen from the deck of our room on one of the nicer days.

We had a couple of good beach days at the start of the week, then the weather turned cold and nasty. Luckily we were there with friends, and between good companionship and copiously applied wine, were able to keep both warm and entertained.
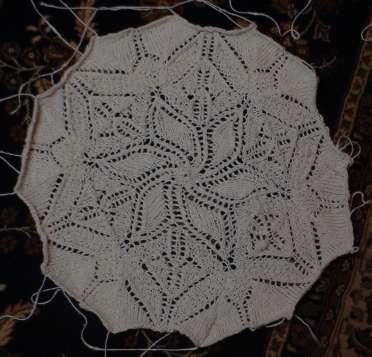
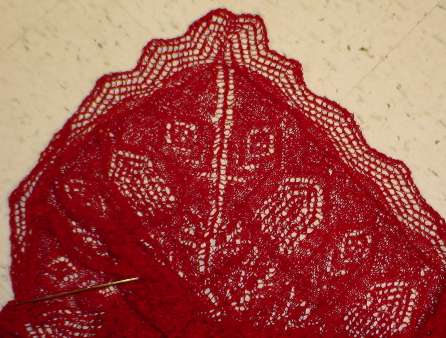
I did get in some knitting, but progress was slow. I was re-creating my North Truro counterpane pattern – invented in the very same spot – from my sketchy notes. I got off to a couple of false starts, regraphed some probelm areas, made some of the lines of the piece crisper, and played with various methods of joniing that avoid some need for seaming. Here’s the result:
As you can see, I’m mid-motif. The initial unit is the hex in the center. I knit that starting on some 3mm DPNs, moving to a circ as it got larger. Instead of binding off, I purled my final row, and left the thing on the circ. Then I attached my yarn at what looked to be a good corner point, and holding the thing with the reverse side front, knit one side’s worth of stitches. That produced the appearance of two rounds of purl on the front at the base of my soon-to-be-knit side square. I then worked the side square out using two DPNs. I worked my side squares attached like this, one at a time. After I got a couple done, I knit a side triangle separately (it’s worked base to tip) and sewed it into place.
I also experimented with skewing the attachment of the square unit. Since it really doesn’t matter where on the center hex the sides begin and end, I knit one square on katywumpus – aligning its center to the point of the star instead of to the center of the leaf motif in between the star arms. You can see it above. It’s the lone square that I’ve pointed out with the arrow. I’ve decided I like the original orientation better and left it intact just long enough to photograph.
Well and good. Things look like they’re working out. I’ve avoided working all those squares separately and the seams joining them to the hex in the center. My bargain basement Webs-find yarn is working out well, with a very soft slubby cotton hand. I like it a lot. Compare it to my first iteration of this idea:

I don’t know if you can see it, but the older yarn is MUCH heavier. It’s a very dense cotton worsted – almost a twine. The newer yarn is a 90% cotton, 10% acrylic blend, and is somewhere between DK and sport in thickness, plus it’s much less densely structured than the older stuff. The lighter yarn drapes better, plus it shows off the motifs better. All in all, things look quite promising!
ALCAZAR – FINISHED. LESSONS LEARNED
That’s it! I grafted the final row of the edging to the first row to
make an invisible seam. I’m done except for blocking. That will have to
wait a bit as I am swamped right now, with no prospect for a large
block of free time with a floor to hand in order to play with the thing
before the latter part of July. Still, I’m done. Here’s a shot of my
Alcazar in all its rumpled, squished edge, pre-block glory that we can
use for comparison to the (eventual) post-block photo I promise to
plaster up here as soon as it is available.
Unblocked
it measures about 40 inches across. If worked in the suggested needle
size with the suggested yarn, this shawl is supposed to block out to be
56 or so inches across. I’ll probably make it to 48 or so, tops because
both my yarn and needle were smaller than those recommended.
Lessons learned:
- Read the pattern and make sure you understand it before embarking on a project.
- Faux
silk (rayon) is a very unforgiving and unstretchy material from which
to knit lace. Care must be taken with gauge because it’s very easy to
knit too tightly. - Did I mention the "read your pattern" thing?
- There
are some minor quibbles in the pivot charts. Occasional one or two
stitch fudging is necessary to make the edging and corners come out
right. While I’d rate the majority of this pattern as "quite
straightforward and quick to knit if you’re comfortable with charts"
and "a challenge mostly because of size, not because of complexity"
those little problems might be enough to set a beginner off his or her
feed. But even a lace knitting beginner, armed with the knowledge of
where those little nuisances might be and the courage to work through
them, could complete this project.
Now what?
I have
the opportunity for some serious knitting time over the next week. I
had hoped that I’d still be working on this shawl, but wonder of
wonders – I finished early. I might pick up the Rogue again, but it’s
not particularly convenient for my target window (why will become
evident in ten days).
To be truthful, I haven’t quite licked
the lace/non-wool knitting bug yet. There are lots of options. I’ve got
some lace-weight linen in the stash. I’ve got a Rachel Schelling
pattern collection here somewhere. I could play with them together. Or
now that I’ve got the cotton to knit my North Truro Counterpane, I could restart that project. Other possibilities are the doilies on Yarn Over.
I have as little use for doilies as I have for shawls. They look fun to
knit, but I haven’t the inclination to use them. I could use a table
runner though. Hmmm.
Round-up – Needle sizes and Kitchener Stitch
Finally,
for those that are asking – I will return to the needle summary as soon
as I have time. Those data notes take a bit of research to write up, and
time hasn’t exactly been plentiful.
And on the Kitchener
Stitch documentation project, I’ve been in touch with a couple of
people active in historical British military kit research. They’re
branching out to their own networks, and have recommended some sources
that might confirm (or debunk) the notion that Kitchener’s revised
clothing specifications included seamless toe socks. No one has offered
up any other citations. So I’m still looking…
ALCAZAR – CORNER
I’m in the home stretch on my Alcazar. I’m about three quarters of the
way through edging the second side. That means I’ve worked one corner
and am about to work the second. I have to say that how to work the
corners wasn’t intuitively obvious in my first read through of the
pattern, and the original photo was of little help. It’s almost
impossible to see exactly
what’s going on with the edging in the photo because in the sample it
was knit in a
darker color which cannot be seen against the high contrast black
background used to display the rest of the shawl.
The pattern itself wasn’t too tough. It’s a plain variant of a
classic wave edging. It took me a couple of times through before
I realized that Carter was describing wrapped short rows for her corner
treatments. Now conceptual interference might have been in play thanks
to the glass of wine I had just before embarking on the corner, but
confusion remained even upon revisiting the instructions in the sober
light of morning. I admit I got the gist of the thing from the chart
and written accompaniment, and then (mostly) winged it. I’m not 100% pleased with Corner #1, but not so unpleased that I feel like tinking back and doing it again.
The
first step is to pause roughly one repeat away from the corner. Count
the number of live stitches remaining between your stopping point and
the absolute corner. There should be 25. Work that final repeat. If
there are too few or too many, adjust your rate of attachment by either
working one or more attachment points as sl 1, K1, psso instead of sl
1, K2tog, psso; or as sl 1, K3 tog, psso. The former should be done if
you’ve got fewer than 25 stitches remaining; the latter if you have
more than 25.
With luck and planning you’ll reach the absolute
corner stitch on the last row of the pattern repeat – the last row in
the first segment of Chart 4. You then work the plain return row, and
embark upon the next segment of the edging chart. Work across all the
stitches as directed. You’ll end up with one more stitch than is
accounted for in the chart. Wrap it short row style. Flip the work over
and slip this just-wrapped stitch, then finish off the plain return
row. On the next row work the stitches as directed. There will be two
left over. Wrap the first one, ignore the one further away from the
point of your left hand needle, flip the work, slip the just-wrapped
stitch and complete out your plain row. Do the same thing on the
remaining rows of the chart, only on each row the number of "sleeping"
stitches dormant at the end of the needle will be incremented by one.
Finish out this second segment of the chart. That last row will have
only two live stitches on it, plus a whole load of sleeping stitches
waiting for the next step.
And that next step is to begin the
next chart segment. Again work the stitches as directed. This first row
is two knits. The next stitch will be one that you had wrapped and set
dormant before. Knit it along with the loop around its base, then flip
the work over, slip this just-woken-up stitch and finish off the plain
side row. Keep doing this – following the chart, waking up the stitch
after the current row is completed, flipping the work over, slipping
that first newly woken stitch and finishing out the plain side row.
With
more luck, by the time you get to the last row of this chart segment
you will have woken up all of the formerly dormant stitches, and you’ll
be ready to march along Side #2 working the main edging repeat.
I
have to confess to one major error. Those plain side return rows? I
worked them as purls, yielding a stockinette-based edging. It wasn’t
until I was all the way around the corner and well into Side #2 that I
noticed that the directions said to knit them. A garter-based edging
would be a tad less curl-prone. I sat there and thought about ripping
back, but I decided to keep going as-is.
The flogging will commence in the morning…
ALCAZAR – EDGING BEGUN
In spite of the massive amounts of prose here over the last week or so,
I have been knitting away at Alcazar. Here you see progress to
date:

In spite of my blurry photo, you can see the fountain area at the
bottom of the outer band, surmounted by the alternating pierced and
flower-bearing arcade layer. The final edging is knit
horizontally across the top. The edging itself is very simple – a
wave edging that appears in many variants, both stockinette and garter
based (it’s stockinette here).
One caveat. If you have never started an edging that’s attached
across a needle full of live stitches, the instructions in Alcazar
might leave you a bit baffled. Here’s what happens.
First, you finish out the final row of the outer band but do not break
off the yarn. Set it aside. Then taking a DPN of the same
diameter as your circ, you cast on the requisite number of stitches
using waste string and some sort of provisional cast on (the choice is
up to you, but I crocheted mine directly onto my DPN).
Now you’ve got a DPN with a bunch of waste yarn stitches on it.
Break off the waste yarn leaving a small tail so the rest of it stays
out of your way.
Take the main piece, with the right side facing you (vast areas of this
one are in stockinette, so identifying the right side is easy).
Put some sort of needle tip cap, rubber band or other plug at the end
of what would have been the right hand needle of your original
circ. Trust me on this as leaving this end free is a recipe for
disaster.
Holding the DPN VERY close to the shawl and using what would have been
the left hand needle end of your circ, purl across the provisional
cast-on stitches using the main yarn. Now work the first row of
the edging chart using the DPN. At the end of it you’ll be back
at the side where the edging is being attached to the main body.
The last stitch of the edging is worked together with the next two live
stitches of the shawl body by slipping it, then knitting the two body
stitches together and passing the slipped edging stitch over the
just-completed K2tog.
You’ll find that most patterns that work an edging on like this direct
that every so often the rate of attachment be increased, to make up for
the fact that knit rows and knit stitches are rarely the same
height. In this particular pattern, the final row of the repeat
is attached by slipping the last two edging stitches, knitting two body
stitches together, then passing BOTH edging stitches over the just-made
K2tog.
Keep working the edging back and forth following the chart.
You’ll find that once you’ve finished the first repeat you can ditch
the DPN and use the two ends of your original circ if you prefer.
In my case, my only 3.0mm DPN was a non-slippy aluminum one that was
driving me crazy. As soon as I could I went back to using both
ends of my nice, shiny, ultra-slick Inox circ.
Although this method is most commonly seen in attaching lace edgings to
live edges, you can use it to knit any horizontally-worked strip to the
live stitches of vertically knit edge. You’ll need to play a bit
with the rate of attachment to make sure your edging lies as you like –
either ruffled (increase the number of edging rows per body stitches),
flat, or a bit cupped (decreasing the number of edging rows to body
stitches) – but not having a seam to work is always very much
appreciated.
ALCAZAR – STILL PLUGGING
I took the time this morning to slip some stitches onto an extra needle so you can see more progress than the usual red lump photo would show.
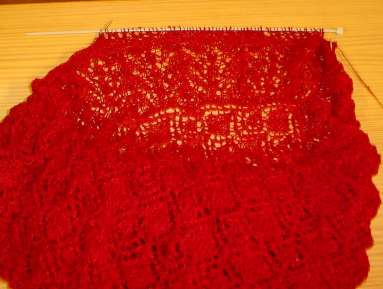
The clear patch of diamonds is part of the center panel. Above it is a row of "fountains" – a texture pattern also appearing in Barbara Walker’s Second Treasury of Knitting Patterns (p. 272). After that comes some garter stitch, and then six or so rows of the arches I spoke about yesterday. It’s hard to see them because the rows are bunched up against the needle.
But in taking this picture, there was a bit of heartbreak experienced:

See those blurry stitches still on the temporary needle?? They’ve laddered back between one and four rows – in the middle of one of the more complex sections of the pattern (the knitting equivalent of the bread always hitting the floor jam-side down.)? Obviously some reconstruction here is needed, as I have no intention of ripping back six 700-stitch rows on behalf of a measly five stitches. That possibility still exists if I can’t rescue them, but I always try before I punt and rip.
Needless to say, this is the last time I try photographic grandstanding with a lace project in process.
