DIGRESSION – ANN KRECKEL’S BABY BOOTIES
A quick side trip. Faced with a need for a last-minute small baby gift, and having at my disposal some orphaned leaf green Dale Baby Wool provided by my pal Kathryn (Thanks, Kathryn!), I do up a quick pair of booties from a time-honored pattern.
Ann Kreckel posted this pattern for Janes Baby Booties to the KnitList in 1995. Her pattern was collected and preserved at Woolworks, itself (in Internet terms) a venerable Ur-source of knitting info – one of the first generation of knitting sites on the Web. Woolworks is now defunct as I update this post in 2021, but bits can still be found on the Internet Archive (aka The Wayback Machine).
Ann’s booties are a version of the classic Stay On Baby Bootie. Her pattern, though all text is clear and easy to follow. I can vouch for the fact that these booties do stay on. In fact of all the booties I knit for my spawn in their larval stages, these were the only ones that ended up being at all practical. (Thank you Ann, wherever you are today.) Other versions of this same basic idea exist, including ones published in the Taunton Press Knitting Tips & Trade Secrets book (1996, reprinting a letter to Threads circa 1991), and the XRX Socks, Socks Socks book (1999). Based on these sources and other hints of similar items, I suspect (but can’t document) that the fundamental design of these booties goes back through “knitting for charity and bazaars” leaflets and oral traditions that probably reach back to at least sometime between 1900 and 1920.
There used to be several websites around that showed pictures of the finished items. The only other one I can find is here, but it doesn’t show the eyelets and ties. I remedy the lack and post some interim progress shots as well.
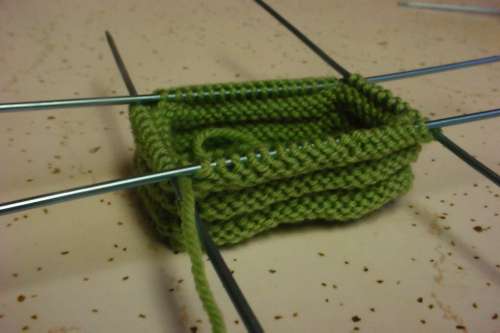
Knitting the first part – the strip of garter stitch that will become the sole. I used US #0 (2mm) needles to achieve a newborn size. I slipped the first stitch of each row purlwise. This made both counting my progress and picking up easier. When I had 18 edge stitches on both sides, it was time to begin the next step, with no need to sit down and count out 36 actual rows:

Here’s picking up around the outside edge. As you can see, I used a set of five DPNs. That allowed me to assign one needle to each side of the rectangle. Much easier than fiddling with dividing the stitches among fewer needles:

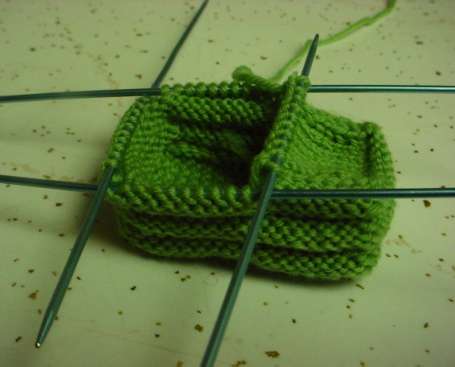
Here’s a photo after the completion of the knit and purl welts that form the sides of the foot box. These can be made a bit wider or narrower. (Hint: If I’m doing the purl welts in a contrasting color yarn, I switch on the LAST KNIT ROW before the new color welt begins):
Yes, at this stage the bootie looks rather like a cozy for a tiny box of facial tissues. Don’t worry. Baby feet are small things with roughly the same proportion as bricks. These WILL fit, in spite of their boxy appearance.
Here’s working the top of the foot. Here I chose to do this part in stockinette. I find it easier to knit or purl the last stitch of the top of the foot along with the first stitch on the side needle by transferring the last stitch over to the appropriate side needle, then working the K2 (or P2) from the side needle.
The next step is the transition to working the ankle. This is the only tricky bit in the booties, and Ann provided a very useful tip to get past it. There is a slight tendency for a hole to form at the indicated spot. I fudge this using Ann’s method. Just before working the last stitch of the first ankle round, I look at the spot I’m approaching – the first stitch of the round I am completing. I slip the loop of the stitch just below that first stitch onto my needle end, and when I work the last stitch of the round, I do it together with that “rescued” loop. Done this way there’s no chance for a little hole to form at the juncture point.
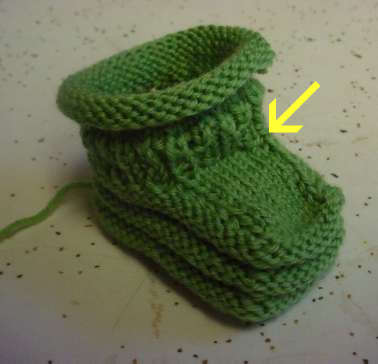
I often part company with Ann’s instructions after the eyelet rib section is completed. Here’s the spot to get playful. In this case I’ve opted for expedience instead of playfulness, and finished my bootie with ten plain rows of stockinette to make a simple roll-top. Sometimes I work a very small knit or crocheted edging onto this live stitch edge, working perpendicular to the established rows and attaching the edging as I go along.
Once the booties are done I work my ties on my Strickmuhle I-cord machine. I used to do the I-cord by hand, but the ties often took as long to knit as did the pair of booties, so I switched. I’ve done braided, crocheted, ribbon-insert, and lucet style cords as ties, too but I like the clunky look of the I-cord the best. In this case I’ve used a bit of yellow Baby Ull left over from a previous project (There are no such things as leftovers, just bits of future projects waiting to be hatched.)
And the finished product, just in time for a spring baby:
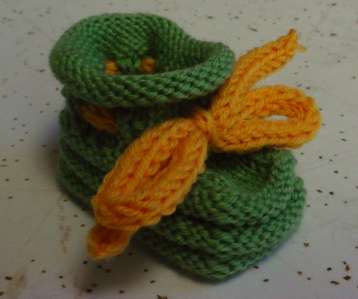
The yellow is actually paler and less mustardy than my lousy photography skills can show.
ROGUE – QUESTIONS
I’m about an inch up the pocket. Everything’s going well. Not enough progress to photograph, so I thought I’d answer some questions.
Ever establish a second layer by knitting into the front and back of each stitch?
Judy asks if I’ve ever done this. The idea is that on the foundation row, one knits into the front and back of each stitch, then goes back and separates the stitches onto two needles.
I haven’t. I stumbled across the two-strand method early on, and haven’t tried other methods. I’m a bit skeptical of this one though. I suspect that you’d get a line of stressed, slightly open stitches, almost eyelet-like at the base of the two layer part. I don’t have that problem when I knit two strands.
Is the discontinuity in the Little Dragon Skin pattern noticeable?
Yes, I’d have to say it is, but I’m looking for it. I considered ripping back and starting again with the original (and more elegant) Walker version, but I decided that to do so would be being too picky. Target Daughter is pleased, so I’ll keep going.
How do you know the pocket placement is correct because you’re doing it differently than the pattern says?
First off, my placement is within 10% of the original. I doubt the difference will make a major change in the look. Some minor change, yes, but not enough to kill the piece. That I’m able to plow ahead making changes like this is testament to the thoroughness of the explanations and clear logic of the pattern. I can read it and understand the principles underlying why something is being done. If I know why, I also can get a grip on roughly how far I can bend that why, before something breaks.
In this case the pocket is a self contained module. The original presents a stitch count at the pocket’s base, a pattern of decreases that yield a gracefully curved pocket edge, and a final stitch count after the pocket flap is completed. My pocket may have been started on a different number of stitches, but I will retain the slope and pattern of the original decreases, and end up eliminating the same number of stitches as the original. When the time comes to fuse in my left and right pocket, I’ll count in the number of stitches from the center front cardigan opening, mark the body stitch that corresponds to the endmost pocket flap stitch, and fuse accordingly.
Your texture pattern has decreases and increases on it. How are you working that in with the pocket shaping?
This pattern maintains its stitch count on each row. If I eliminate the opportunity for one of those increases to be made, I either have to eliminate its partner decrease, or fudge a substitute increase where it will be inconspicuous. Fudging the increase would mean changing the slope of the pocket shaping, so for the most part, I’m killing decreases in concert with the eliminated increases.
This pattern is pretty easy to eyeball. There are 10 stitches in a half-repeat. Each half of that includes one increase and one decrease. I started the pocket at one of the verticals. I "ate" five stitches by designating one as an edge stitch, and then working k1b, p1, k1b, p1 for my pocket edge ribbing. The insidemost purl is the column on which I am working all the pocket decreases. Since the pocket edge has consumed five stitches, the next five constitute a full increase/decrease segment of my pattern. I worked them until the pocket edge’s march to the garment’s center intruded on the decrease. After that I worked the remainder of that five-stitch quarter-repeat unit in plain stockinette.
Do you always screw around with a pattern instead of knitting it as written?
It depends on what you mean by "screw around." While it’s true I don’t often work from "boughten" patterns, I don’t avoid them on principle. If I see one I really like, I’ll do it. Some I do verbatim. My last several lace projects were like this. I’m still getting the feel of lace, and aside from several counterpane motifs and a couple of simple scarves, I haven’t plunged into designing my own yet.
I do tend to play with garment patterns more. Sometimes I do them as written. More often I play with yarn substitutions, which may or may not bring gauge adjustments, too. I’m also a bit on the tall side of large, so many patterns need some alteration before I’m satisfied with the fit. Other times I’ll like most but not all of a given design, and adjust some of the parts, even swapping in different textures, collar lines, or details.
I admit the multiple injustices I’m doing to Rogue are rather extreme, even for me. The design though is robust enough to survive my abuse.
Will you send me the pattern?
No.
There are few ways more calculated to set me off on an anti-copyright infringement tirade than receiving this question. The pattern is a good one. The price is very reasonable, especially considering the vast amount of hand-holding it contains. It’s easy to find and buy. Heaven knows I’ve provided enough links to it, and it’s so widely talked about that even the most rudimentary searches turn it up.
The author deserves recompense for her time and effort. Copying patterns in this manner is piracy. Beyond just being immoral, it’s flat out illegal.
 |
Be warned. I am considering posting the names and addresses of everyone who makes this request from now on, so that their lack of moral integrity and basic ethics will be made known to the on-line community at large. |
End tirade.
ROGUE – STARTING THE POCKET
As you can see in today’s progress photo, I’ve finished fusing the hem. I’m quite pleased with the result. You can also see that my bottom edge is in fact scalloped, and that the scallops stand up nicely without cupping or curling, and that the hem facing accommodated their shape without any special adjustments.

I’m now up to Row #4 – the row on which one is supposed to begin the kangaroo style pocket. I have to admit that I’m going to depart from the pattern and cheat a little here. I know the pattern calls for working just the pocket front, then going back and picking up stitches at its base to provide the foundation for the back side of the pocket. After both are worked to the same depth, the pocket front and back are fused, and the knitter continues on to work the rest of the body.
A while back I did several Wonderful Wallaby sweaters for assorted nieces and nephews. It’s a raglan pullover that also has a kangaroo pocket in front. Those directions called for something similar – knitting a bunch, then picking up stitches and knitting a second layer (in that case for the pocket front) then fusing the two layers together. I found the picking up to be tedious at best, so I came up with an alternative lazy person’s method.
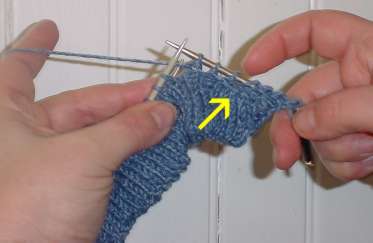
On the row where the second layer is introduced, I knit with two strands of yarn. Then I take two needles and stitch by stitch carefully slip one loop of each stitch to the needle I will use for my pocket front, and the other loop onto one from which I will end up transferring the stitches back to my original body needle (on small things, I just use the other end of the body circ for this, then shunt the stitches back to the correct "ready to knit" orientation). The yellow arrow indicates the circ that’s carrying just the pocket front stitches. The pink arrow shows the circ that’s carrying the full body.

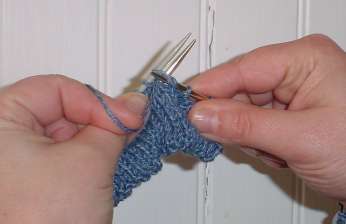
In this case, because of the split cardigan front, I’ve had to start two more yarn balls – one for each half of the pocket. Again, in order to accommodate the zipper tape, I didn’t work the two stitch thing all the way to the cardigan opening edge. Instead I cast on four "free" stitches left and right for the inside the pocket piece, leaving the outside presentation side smooth and uninterrupted. I am now ready to do the sloped side pocket itself, on this confusingly presented second circ, now hanging off the front of my work.
As for where I introduced the pocket – I fudged. My chosen stitch pattern has strong verticals. I’ve moved the pocket opening over a few stitches so that it lines up with one of those verticals. Since it looks like ten stitches are decreased away during production of the pocket, and my verticals are present every ten stitches, I think I’ll be able to be similarly congruent when I finally work up to the fusing row.
One last note – like the Wallaby, the pocket edge appears to be in garter stitch. Frankly I am not a big fan of garter, and I don’t think it will complement the already busy surface patterning of my mutant Rogue. I’m thinking of doing four stitches left and right in twisted stitch ribbing instead. I’ll play with that idea a bit and see if it works. If not – it’s rip-back time again, and I’ll revert to the original garter pocket edging.
ROGUE – FUSING THE HEM
Here I am again, on Row #10. For me with my non-pattern-compliant stitch and row gauge, that’s the row on which the depth of the hem facing is the same as the depth of the public side. It’s time to unite the hem facing and the body into one unit, eliminating the need to do this bit of finishing seamwork later.
I’ve unzipped the chain of the provisional cast-on and put the newly freed stitches onto the smaller diameter circ I used to work the facing (the gray needle). The work is folded along the turning ridge, and I’m holding it with the hem facing showing. You can see the bit of ended off facing I mentioned yesterday. If you squint at the spot indicated by the arrow you can just make out the little "plateau" of the four terminated stitches. Instead of doing an orthodox bind off, I used a crochet hook to loop the stitches together, looping the last one around the base of the fifth stitch in from the end. While this is a legitimate bind off technique it is rarely used, as it makes an extremely tight, unstretchy edge. (Some buttonholes use this trick for extra firmness). Besides tightness the other reason for doing the bind-off this way was to eliminate the need for extra ends. I’ve got only one working strand here. If I were to do a normal bind-off on the four end stitches, I’d need to introduce a strand with which to do it.
In the photo above, my right hand needle holds four purled stitches of the body, and three stitches in which I’ve purled together a body and a hem facing stitch. (I’ve stretched the thing as much as possible for clarity).
Here I am making one of those purl togethers. The facing is closest to the camera again. If it looks awkward it’s because I’m holding the thing at arm’s length, and The Target Child (official house hand photographer) is standing on a box with the camera perched on my shoulder, giggling. This shot answers another inbox question – as you can see I did NOT work the facing using twisted stitches. I knew I wanted to do this fusing step, and I wanted to eliminate any possible source of biasing.
ROGUE – ONE STEP FORWARD, TWO STEPS BACK
This weekend saw some Rogue advances and retreats.
Advances
First, I knit up to the point where I had the same width of finished motif-bearing front as I had stockinette hem facing. Because of the needle size change, this happened on row 10 of the side panel motif chart – a few rows before I was to begin the front pocket, very conveniently – a row without cable crossings on the side panel motif chart. I decided that I wanted to fuse the hem to the body, rather than wait and sew it down later.
This isn’t part of the original pattern. Jenna suggests sewing down the facing in as part of finishing. It would be difficult to write up doing fusing. The "how" is easy (see below). The "when" is harder. When to do it depends on row gauge, which can vary enough to make the answer too subjective for hard and fast directions, especially considering that not everyone would be doing it on the same row, and that exact directions would vary depending on the row used. I can see why she didn’t include it.
Here’s why. For me, fusing the facing posed two potential challenges. The first is common to everyone making either the cardigan mod or the original pullover. The side motif chart includes increases. There are more stitches on Row #10 than there were on Row #1. 21 as opposed to the original 15. If I were to knit one facing stitch with one body stitch, I’d run out of facing stitches, and the hem would be bias skewed.
The second challenge is unique to cardigan mod makers. I’m doing a zip front. If I just work the facing in straight across I won’t be able to encapsulate the lower part of the zipper tape inside the doubled-over hem facing. Not a vital concern to be sure, but one of those finishing/neatness details that are nifty to do (if you remember in time).
So I went about my fusing step. I popped open my provisional cast-on’s crochet chain, and slipped the stitches it released onto my smaller circ, one by one. I folded the piece along my turning row with the purl side on the inside, and began working my body and facing together. Doing this is a lot like working a three-needle bind-off, but without the final bind-off step. Working in my established pattern, I either knit or purled one stitch of the body together with one stitch of the facing, uniting them into one unit. When I got to the side panels I fudged a bit. Because I had more side panel stitches than facing stitches, starting two stitches before each panel, and ending about two after – and trying to be more or less even in my spacing between – I worked one stitch of the panel without a companion stitch from the facing. I did this as many times as I had "leftovers."I am pleased to report that my facing was nicely fused into the main piece, and even in my non-stretchy cotton the facing relaxed nicely, avoiding any puckering or undue flaring out.
Now about leaving room for the zipper tape. I didn’t just begin fusing at the stitch. I left the first and last three stitches of the facing on safety pins, working the corresponding stitches of the body by themselves. I’ll go back later and either end them off with a crochet hook (possibly tacking them down with a couple of sewing stitches), or I’ll sew them down to the zipper tape when I do my final finishing. In either case, I’ve left a slot along the zipper edge to accommodate tape placement.
In other issues, as predicted the Little Dragon Skin pattern did scallop at the bottom edge. The facing accommodated the scallops with no problems, and in fact – I think the non-straight edge looks quite interesting. I like the effect and the treatment because the facing is keeping the scallops from cupping and turning in on themselves. I think I’ll have to play with this hem facing technique on other projects using deeply embossed or deformed edge patterns.
All in all, the fusing step was a rousing success.
Retreat
O.K. Having done all of this, I ripped back the entire thing and started again. I am now up to exactly the same point as I showed in Thursday’s post. I did this because of a size issue.
My gauge was spot on. The measurements were good. However, I forgot to include one vital thing in my ease calculations. Target Daughter is in the cocoon phase of early adolescence – the phase in which one wants to hide in overly large, baggy, anonymous garments. I seem to remember similar sentiments, and that the whole hiding thing ended up being a prelude to a later butterfly phase.
She "tried on" the piece on the pre-pocket row and was shocked that it wasn’t going to be as generously full a fit as her original concept. So being a good maternal-unit, I decided to subscribe to her comfort level, and start again.
This time it’s going to be harder, as the measurements of the garment she’s chosen as a size model combined with my smaller native gauge preclude use of the stitch counts of the largest size of the original Rogue pattern. I’m going to increase the width of the body panels a bit, but not tinker with altering the angles or numbers of the waistline decreases, nor mess with the armhole. The largest armhole should be adequate. If not, there’s always ripping back and trying again.
If anyone HAS done an up-sizing mod on Rogue and has met special concerns with which I am blissfully unaware, I’d greatly greatly appreciate a warning. Finally, this ripping back thing is good for followers of String. On this second go-around I hope to be able to provide photos of the fusing process.
ROGUE AND CENTRAL DOUBLE INCREASE
I admit it. I’m wrong. Not that it happens all that infrequently. Yesterday I answered a question on the KnitList about the central double increase used in the side panel cables of Rogue. I didn’t have my knitting with me, nor was I at my base station, surrounded by my reference library. So of course, I messed up.
Because confusion persists, and I still think there might be a typo in the directions for this stitch as written, I present a walk-through.
The bottoms of the closed loops in the side panel cables are formed by central double increases. The Rogue pattern directions say:
I think the "knit into front and back" should be reversed. The all-knowing Barbara Walker in both her Charted Knitting Designs (aka Walker III) and Fourth Treasury of Knitting Stitches (aka Walker IV), says this (paraphrased from page xxiv of Walker III):
Like a dingbat I also reversed the front/back first step. Here’s how it should go:
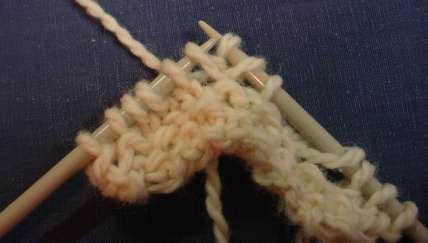
First, knit into the back of the stitch (needle shown inserted into back of next stitch, ready to knit):

Then knit into the front of THE SAME stitch (needle shown inserted in the right place, ready to knit):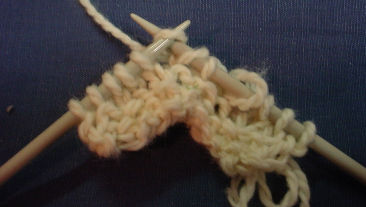
Here’s the result after doing the two knits described above: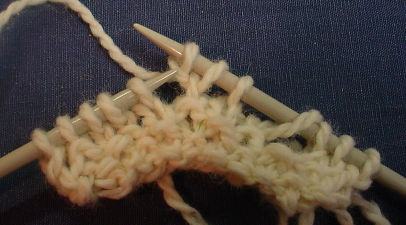
If you look carefully, you can see the vertical bar both sets of directions describe. I’ve called it out with an arrow:
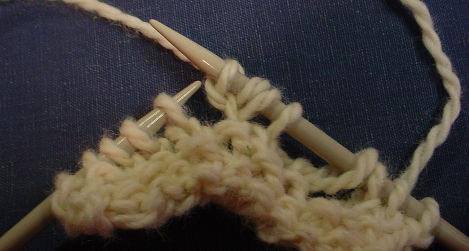
I take my left hand needle tip and grab that bar, then knit into the back of it as well. Bar shown on the left hand needle tip, ready to be knit as a twisted stitch:
The end result: three stitches where there was one before:
The beatings may commence at sundown. Thanks to Rosemary who took me to task on this one.
Edge Scallops
I also received an interesting observation from Melanie, who said she’d tinkered with Dragon Skin and noticed that it made a very pronounced scalloped edge. She wants to know if Little Dragon Skin does this too, and whether or not it will be a problem.
Little Dragon Skin also scallops. (It would make a very nice scarf stitch for this reason). I am hoping that the two-inch hem facing, knit on smaller needles will help tame the scallops. I can’t say for sure that it will. This may end up being one of those bugs that lives on as a design feature.
I’m almost up to the point where I will be unzipping the provisional cast on, putting those stitches on another needle and working them along with my main body stitches. In effect I’ll be fusing my hem facing to eliminate the need for sewing it down later. I should be able to tell at that point if I like the effect.
Should I have taken the time to work all this out in the swatch before casting on for the main piece? Sure. Absolutely. Most sane people would have thought to do so. But I find knitting to be more exciting when you live dangerously, and I don’t mind ripping back.
ROGUE AWAY!
Just spent the morning answering questions over on wiseNeedle, so forgive me for cutting today’s post short. Feel free to ask (or answer) questions on knitting technique over there.
Dragon Skin Rogue
I’m surprised no one noticed the discontinuity in the Little Dragon Skin graph I posted yesterday. It’s not as elegant a pattern as its big brother because there’s a break in the lines formed by the decreases and increases when the chart replicates after Row #11. I haven’t decided if I like it yet. The swatch looked o.k., but I need to see it larger. I may end up ripping back the body if I’m less than pleased.
Here’s the obligatory Wiggly Worm Photo of a piece just aborning. Proof positive that I’ve actually cast on and am working on the thing:
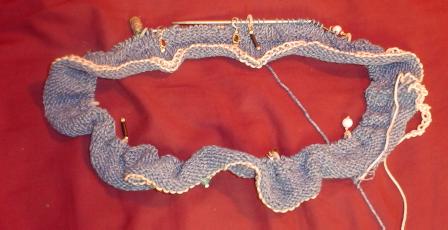
You can see the white string of the provisional cast-on, the ten tons of markers keeping me on track (my new silver ones mark the center back, plus the beginning and end of the two cable detail side panels; the older beaded ones mark the dragon skin repeats). I am about to start one of the side panels, and my cardigan split is on the right, where the extra crocheted chain trails off.
I’m using Almedahls Texas. It’s a 100% cotton in faded denim type colors (50g, 105m, color #30). I’m already fearing running out of the stuff as The little bit you see – about two inches of hem facing plus four rows of the main body) is more than half of the first ball. That’s in spite of having 18 balls – about 2060 yards, which should be a ton. In theory…
I can say that this is NOT my favorite cotton yarn. It’s multi-ply, with the multiple plies only loosely wound together. It splits like crazy, and is about as inelastic as cotton comes. It’s nice and light for a cotton though, and shouldn’t have the leaden drape of many worsted weight cottons. Very soft, too. Between the softness and blue color, I can see why Target Daughter picked it from my stash.
ROGUES WITH DRAGON SKIN
Having finally gotten my act together what with swatching, recalculating, and general pointless noodling, I’m embarking on the highly modified Rogue. As ten thousand others have noted, it’s a very completely written out pattern for a pocket front hoodie, by Girl from Auntie’s Jenna. I really like the organic way she has used closed form cables to highlight the piece, and how those shaped cables narrow and widen. Killer!
In spite of the beauty of the native version, I am trying to satisfy specifications issued by a child in The Picky Years, so modifications are necessary:
- Gauge. Target child has picked out a yarn that knits at 5 spi instead of the pattern’s 4.5. Math will be needed.
- Fiber. Nice springy wool works best and is easiest to use for cables, but the chosen yarn is 100% cotton. I’ve done complex cabling in cotton before. I’ll cope.
- Zip front. I won’t be the first to modify this and make a cardigan. The pattern’s own home page provides hints on cardigan-ization. I’ll be leaning on them.
- Texture for body. Kiddo is in love with the Dragon Skin all-over pattern (Walker II, p. 136). While I prefer the contrast between the smooth body and dense cables of the original, she’s set on my using the design. Unfortunately, the design as presented by Walker needs 26 stitches to manifest nicely. A bit wider than is convenient for this pattern.
So to start. How to start?
First I bought the pattern. (Always a good thing, as “sharing copies” is a pernicious, evil, illegal but all too often seen antisocial behavior).
Knowing that the Dragon Skin pattern in the original was too wide. I began to play with it, and eventually trimmed it down somewhat. Here’s the result:
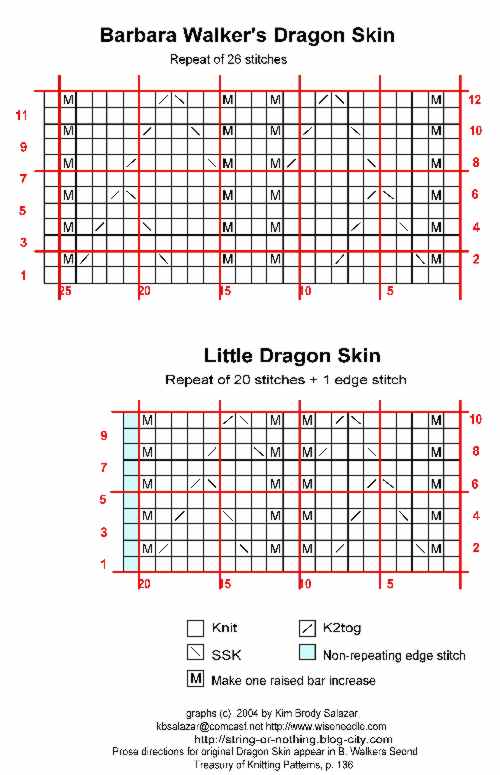
The original is definitely nicer, with wider vertical elements, but the slimmed down version is quite usable and recognizable as the other’s little brother. I’m still dithering whether or not to do the single stitch knit column between the make-ones as a normal or twisted knit stitch.
I swatched my yarn and established an unambiguous gauge for the stuff in my dragon skin patterns. I got a firm 5 stitches per inch total. Not the 4.5 spi the pattern specifies.
What to do?
First I looked at the size appropriate for Target Daughter in the original. Then I looked at the stitch counts of the next two larger sizes. I did the math to see if at 5 stitches per inch, they came anywhere near the circumference of the optimal original size. Serendipity! One did. I am using that size as the basis for all my stitch count estimations. I’ll use that size’s stitch count directions for anything relating to width, but will use the original size’s directions for length. Yes, I’m sure there will be fudging along the way, especially to eke out vertical repeats so that the cables up the side finish nicely, but I don’t think that those tweaks will be too difficult.
Can you take any pattern and do this? Yes and no. It’s relatively easy to translate between Worsted and DK (5 and 5.5spi) and Aran and Worsted (4.5 and 5spi), but harder to make this translation for larger gauge differences. Plus patterns that rely on row gauge like colorwork, or raglan shaping present additional challenges. It’s also easier to do this if you are not at either end of the range of sizes presented. If you already take the largest size in a pattern written for Aran weight yarn, and you wish to use Worsted, there aren’t any sizes left with higher stitch counts for you to play with. (If you were going the other way – you were faced with a Worsted weight 5 spi pattern that was just a tad too small – you might be able to eke out an additional size or two by using Aran weight yarn at 4.5 spi instead.)
I’ve got my basic stitch count now, adjusted for my finer gauge. The next mod is the cardigan one. The advice worked out by others suggests adding an extra stitch to the front and back so that the total stitch count can be divided by two, creating the center front break. I’m going to add three to the front, but two to the back. My width is just a bit skimpy, and I have a feeling that I’d like an extra selvedge stitch in the center front when zipper sewing and I-cord trim time comes. I’m adding one fewer stitches to the back because my new texture design has a center stitch, and I want it run down the center of the back.
The next step is to cast on. I’ll be working my Rogue back and forth rather than in the round (a loss there, I’d much prefer to work it in the round, but steeking would kill the elegance of the cables at the neckline). I note that the thing is written with a hem instead of ribbing. I like that for this cotton. Working it on smaller needles as directed should tame edge flare. Since I prefer a smooth finish inside when using a hem facing, I am using a provisional cast on – the same crocheted onto the needle one I used for Crazy Raglan. Using needles three sizes smaller than my body needles, I cast on the specified number of stitches for my chosen (larger) size, plus five more (three front, two back), and began knitting the facing.
On my first row of the facing, I decided to spot the left and right side areas in which the cable detail will happen. I did the count, figuring out which stitch will be the center sidemost stitch left and right, then counted out the required number for the first row of the cable detail chart, centered on those two stitches. I put markers in my work and left them there. While I’m not up to the post-facing bit yet, I can use the facing rows to re-count and confirm my marker placement. By the time I’m up to the first row of the main body, I should be 100% confident that those markers are in the correct places.
Next headache? Centering the Dragon Skin texture pattern repeat. On the back, I’ll identify the centermost stitch. That will be stitch #11 on my chart above. I’ll count back from that point, and begin my pattern panel on the appropriate stitch. On the fronts, I’ll also plan out from the center, working one plain stitch, then walking backwards from Stitch #21 to figure out where I have to begin my left front; and doing one plain knit then walking forward from Stitch #1 to place the pattern on the right front. One thing to take into consideration – to maintain a stable stitch count there must be an equal number of increases and decreases per row. Because the width of the back and front panels will require that I truncate the repeats, I’ll have to make sure to maintain that stitch count by fudging if that truncation cuts into an increase/decrease pair. I’m hoping that by happy coincidence, I’ll be able to work the pocket openings into the verticals naturally created in the Dragon Skin texture pattern. THAT would be nifty!
Now all that remains is to plug away at the knitting part. Like with all pattern manipulations, there’s no guarantee that my doing this will work out. I’m willing to wing it. By the time I get half-way up the body I’ll have a good idea whether or not finishing IS a good idea. If not – I’ll rip back and design something from scratch. (If you’ve read this far and noticed that I’ve screwed up my logic, please feel free to leave a comment and let me know.)
One final note – for those of you who are wondering how I can slap a copyright notice on a texture design from Walker – I am not copyrighting the pattern. She owns her prose write-up of the thing. I am asserting ownership of only my graphed representation. Have fun. Use it and other patterns shared here for your own knitting; but please do not repost or republish them without my permission.
MANY HAPPY RETURNS – NIGHT AND DAY SOCKS
Back from a business trip to Tucson, Arizona. No, I wasn’t there for the incredibly huge Gem and Mineral Show, but wandered by one of the show’s many pavilion complexes in the little bit of free time I had on Saturday.
In the knitting realm here’s what I got:
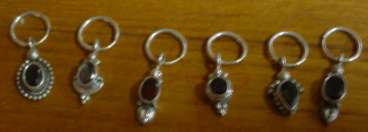
These are little silver mini-earrings – the kind some people line up by the half dozen along the edge of their ears. The dinglebobs (a technical term) hanging down are small faceted semiprecious stones – mostly garnets and pale amethysts, in small silver settings. They were incredibly inexpensive. (I’m sure somewhere in India there’s a whole village making these by the barrel full for next to nothing.)
While I was in Tucson, I happened to meet Dr. David Crawford, the Executive Director of the International Dark Sky Association. His group advocates for increased awareness of the problems caused by light pollution, and changes to local zoning/building regulations in favor of more efficient use of outdoor lighting. There are compelling reasons to improve outdoor lighting, including increased energy efficiency, reduced cost, and improved visibility where it is truly needed. There is also a growing body of research documenting how light affects people’s health and well-being, and the negative impacts that indiscriminant lighting can have on organisms of all types. When all of the other benefits are taken into consideration, the aesthetic and scientific benefits from preserving the dark night sky almost become secondary concerns.
In any case, Dr. Crawford’s impassioned (and sensible) ideas stuck with me on the over-long flight home. I turned out that the sock yarn I brought with me sort of fit the darkness and light theme, so I present Night and Day socks (still in process):

This particular yarn is Regia 4-Ply Ringel, Multi Effekt Color #5383. I’ve done a standard toe-up on US #00s, with 17 stitches on each needle (68 around). After the heel, I increased two stitches to a total count of 70. I did the increases where the corners of the short-rowed heel ends. Those two stitches help fill in the small hole that can form at that point. Normally I add a stitch on each side at that point anyway, then decrease it away on the next row. This time I just left them in.
The ankle pattern is a 10-stitch repeat I doodled up on the plane. I’m sure similar things exist in stitch dictionaries:

I hope that the the organization doesn’t mind having something as silly as a pair of socks dedicated to it. I’ll be writing up the pattern at greater length as I do Sock #2. If you decide to knit them, consider investigating (and making a donation to) Dark Skies.
Oh. The red jelly-bean looking things in the sock photo are lampwork glass ladybug beads, about to become a necklace for The Smallest Daughter. The other received earrings made from slices of a very small fossil ammonite, set in silver. My gift for myself was an unusual silver wire necklace thingy, meant to display large dinglebobs (see above). The ones I chose were rectangles of cobalt blue dichroic glass set in silver. (Dichroic glass is that iridescent stuff that looks like someone vitrified a peacock.) The Resident Male got an entire backpack full of various types of dried chili peppers – things that are hard to lay hands on here in this small corner of Massachusetts. He’s much happier with something edible.
LILLEHAMMER MYTHOLOGY
Posted in absentia. I’m off on a business trip, but left this behind.
A couple of people did write to say they would be interested in reading more about the symbols on the Lillehammer. Please bear in mind that this is just one person’s interpretation. I may be reading more into the little bits than the designers intended. And I am not someone schooled in this stuff. This is just one Avid Reader’s observations. Apologies if I’ve forgotten my Eddas and sagas, or have messed up the spellings.
Here’s my Lillehammer:
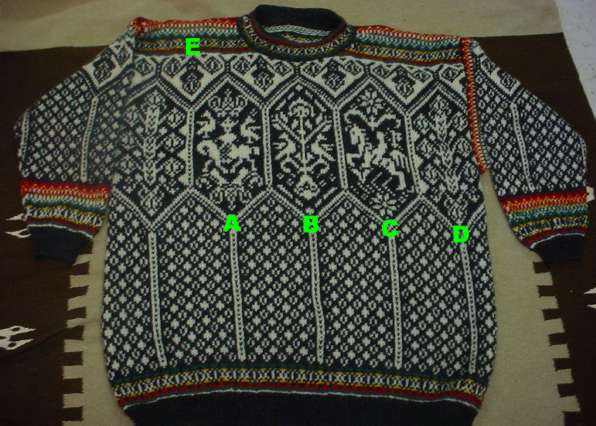
Starting with Lozenge C, just because I like to skip around, we see Odin chief and father of the gods, and god of battle and honorable death. He is riding on his ultra-speedy, eight-legged horse Slepnir (the extra legs are implied by the zig-zags). He carries his customary spear Gungnir (hard to see, but I think it’s here because he’s holding something long and thin in his hand) and has a raven following him. (More on Odin’s ravens below). I think he’s shown in profile because Odin has one eye (more on that below, too). The flower shapes might be an obscure reference to poetry (flowering words), as he was the source of bardic poetry and runic writing; and was the special protector of bards and poets.
Slepnir has a nifty parentage of his own, involving Loki masquerading as a mare to distract the dray stallion of a giant (the adversaries of the gods), to get him to default on a building deadline. The trick worked, the giant was unable to complete his project and received the penalty specified in the bargain, but Loki (a male god) was too tempting to the stallion, and ended up with foal.
Lozenge B carries Yggrdasil or Hoddmimir, the world tree. It’s a giant ash tree, most often described as white and covered with flowers. It grows from three roots in springs of knowledge, while its top shades all nine worlds, including Asgard (home of the gods), Midgard (where people live), Jotunheim (where the giants live) and Niflheim (the underworld). One of the roots was in the spring of Mimir. Mimir was an all-knowing god, whose head (some say skull) was thrown in the spring after he was beheaded. His knowledge though wasn’t lost, and some of it could be obtained by drinking from his spring. I see Mimir’s head in the ovoid object at the tree’s base.
On Yggdrasil are flowers that drip a honey-dew of inspiration, and are the ultimate source of all bees’ honey (and the exaltation that comes from drinking mead – a fermented honey-wine). Odin’s two ravens, Huginn and Munin perch on its branches. These two birds overfly the earth every day, observing everything and whispering that information back to Odin every night.
Odin is also closely associated with Yggdrasil because he sacrificed part of himself to obtain knowledge from the springs that feed the tree. In some tales he allows a raven sitting on the Yggdrasil to peck out one eye in exchange for a sip from Mimir’s spring. In others he hangs for nine days on the tree, transfixed to it by his own spear. During this ordeal he learns nine songs of power and the basic runes.
Lozenge A holds Freya, wife of Odin, and foremost female deity of the pantheon. Freya is a fertility goddess and wards agriculture and birth. I’m kind of stumped by the creature she’s riding because Freya’s mount was Hildesvini – a former lover disguised as a fierce boar. Either that or she got pulled around in a cart drawn by cats. The thing she’s riding on is way too long-legged to be a big pig. But the pattern calls out this motif set as being her, so I’ll try to find more in it. Freya did have the ability to transform herself into a bird by use of a magic cloak of bird feathers. She does have a large flat thing in her lap (perhaps the cloak); and there are birds around her. Perhaps the strange shapes at her mount’s feet are supposed to be cats as well. Her palace of Folkvang is supposed to be flower-strewn, so perhaps that’s a big flower below the cats. The royal crown above her is not uncommon on Norwegian embroideries, and so might signify her queenship over the gods.
Lozenge D and the partials up along the neck/shoulder line and sleeve tops all carry the same sort of organic growing thing. To me they look like fruit. The most famous fruit in this cycle of tales would be the apples of Idun. Idun was the goddess of youth, married to the Bragi, whose special charge was poetry. She kept a tree and stock of golden apples, which the gods ate to stay eternally youthful. Idun was once captured by a giant, and without her apples the gods aged quite quickly. There’s a whole cycle of stories about the quest mounted to get Idun and her apples back.
That’s about all the figural elements I can pick out from the design. The rest is just generally decorative. I do however particularly like the use of the close color banding at the top and edges. It looks reminiscent of tablet weaving, in a geometric that wouldn’t be inappropriate for before 1000AD. Likewise with the lozenge framing mechanism and brocade-like voided and filled dots. That’s not to say that knitting of this type was done back then (it wasn’t); but the style of the ornament on this sweater echoes weavings and textile decorative composition of a time when worship of these deities was widespread.
If you want to read more about Norse mythology, there’s always the public library – that wonderful resource in your own back yard. On line there’s also the Prose and Poetic Eddas, translations of which are both available on-line.
