EXPLORING A BLACKWORK SHORTCUT
Back from my first in-person SCA event in a long time. I went to “Aisles of March” – what can be best described as a historical-recreation-item “craft fair” for those unfamiliar with the organization. It was a group-specific gathering at which dozens of merchants displayed wares, selling everything from whole garments of historical design and cut; to accessories, jewelry, jewelry findings/stones; the components to make clothing (including hand-dyed yarns and yardage); armor; wooden and metal table implements and specialty crafting tools (embroidery frames, weaving looms and the like); camping implements (open hearth cooking tripods and accessories); research and how-to books; and even spices and fragrances. There was also a certain amount of ceremony including SCA royal presence, and awards given out for mastery of specific arts, or for service to the organization and its constituent groups.
But I wasn’t there to attend court, or to shop. I was there to help The Apprentice and household sell their products – brilliantly hued hand-dyed silk and wool threads and yardage prepared with researched, historical recipes; bead jewelry reproductions of various eras (Viking age, late Roman Empire, Venetian), and sturdy linen by the yard. Some of this is also available on Etsy. Obvious affiliation disclosure – The apprentice is the proprietor of that Etsy shop.
While I was helping out I also had an opportunity to sell a few copies of The Second Carolingian Modelbook in person. And that gave me a chance to chat with folk interested in counted embroidery, and blackwork in specific. One thing several people mentioned was the difficulty of drafting out the freehand patterns for inhabited blackwork – the Elizabethan style characterized by heavy outlines filled in with counted or freehand stitched fills, usually in black but occasionally embellished with metal threads.
I understand that challenge. My ancient underskirt was an exercise in freehand pencil drawing, modeling flowers and foliage after group of historical artifacts including a cushion cover repurposed from a dress in the collection of the Art Institute of Chicago, Accession 1955.1221; and a panel from an embroidered sleeve held by the National Museum of Scotland, Accession A.1929.152 (other fragments of the same work exist in the Metropolitan Museum of Art and other institutions). Not everyone has the patience or confidence to do that kind of freehand drawing.

So, I set to thinking about what pre-drawn resources might be available.
Spoonflower and other print-to-order textile/wallpaper houses offer designers the chance to get their patterns printed on a variety of media, and sold by the yard. I had ordered wallpaper from them a while back.
There are thousands of prints in Spoonflower’s active catalog – among them several adapted from Elizabethan embroidery. Note that these are NOT my offerings, I have nothing posted there. I just went browsing among their current listings and picked two that were likely candidates – the ones with the most historically representative designs at offered at the largest scale. Then I went to the fabric choice area and picked two different fabrics, both possible choices for counted or surface work, and ordered two eight-inch swatches. This is what I received:

The design on the left is shown in several reference books, and is one I included a thumbnail of in my very first hand-drawn booklet on blackwork, issued in 1978. It’s vaguely similar to one in Trevelyon’s Miscelleny, but as soon as I find my now-packed-away booklet, I’ll insert the specific source. The one on the right is a simplified and very recognizable version of a standard Elizabethan scrolling floral design, of the type rendered in blackwork or polychrome stitching, often with metal thread embellishments.
I requested my sample of the one on the left (the darker one) be printed on what Spoonflower sells under the name Cypress Cotton Canvas. The one on the right was printed on their Belgian Linen. Here are zooms, with a penny for ease of thread count calculation:


Note that the cotton canvas (left) isn’t really countable, but it has a dense weave structure that might be amenable to surface work. However I am not a textile history expert, and I don’t know if fabric of that structure, even if it were not cotton would be appropriate to the period of the design. The linen however is plain tabby weave. By counting threads occluded by the penny I get 17 horizontal threads x 21 vertical threads. Factoring in the penny’s standard width of 0.75 inch, we can compute a thread count of approximately 21 x 26 threads, but I can’t tell which is warp and which is weft due to the lack of selvedges. Skew but easily counted and stitched.
BUT
My first reaction to both of these samples is that the motifs on them are quite small in scale for easy stitching. Even on the uncountable canvas, I would have preferred that design be imaged about a quarter to third again bigger to make it easier to work. This is also very true for the scrolling flower design printed on linen. It might do for non-counted polychrome treatment with a very simple stitch used for the stem; or for speckled freehand blackwork, again simple outlines and a scattered stitch, shaded infilling. But for fancy counted, geometric, diapered fills, there just isn’t enough real estate inside most of the flower and leaf motif segments to make such stitching worthwhile.
The next step of course is hands-on. It won’t be any time soon (I have a massive to-do queue), but I do intend to secure the edges, launder, iron and give both a try anyway, to see how the fabrics and printing perform. If the stitching goes well I might finish them out into small sweet bags. Or not. This is just an idle experiment.
Again, I am not endorsing or promoting the source, the products, or the designers who offer their patterns at the source. I paid full price for my swatches. But I am trying to help out those who are looking for some sort of assistance in starting their own blackwork projects. While these items are not exactly optimal, they or similar pieces might be learning tools that could jumpstart creativity, and help someone reach towards a previously unattainable goal of making something visually period-appropriate. And that in turn might help them advance towards less “factory-modern” ways of getting there.
Stay tuned. Eventually I will cycle back to this experiment, do the wash test, and play with these some more.
EPIC FANDOM STITCHALONG – BAND 11
On to one of our heavily themed strips – WHERE NO STITCHER HAS GONE BEFORE.
I know you’ve been waiting for this one. Our voyage continues. To seek out new worlds, new civ… Well, to possibly to try new techniques and have fun along the way.
This is another chance to attempt voiding – filing in the background for dramatic effect (in this case, The Final Frontier). I suggest long-armed cross stitch, plain old cross stitch, but you can see in the examples that one of the more open fills also works nicely. The stars really pop against any of the backgrounds. But even without voiding the piece presents well, so if you prefer not to do it, don’t feel pressured.
Time Factor 4 for height and complexity. Time Factor 5 if you choose to work the background, too. Use one color, multiple colors, or variegated threads, as you prefer. As with the rest of Epic, there are no rules or must-do approaches. Use one color, multiple colors, or variegated threads, as you prefer. As with the rest of Epic, there are no rules or must-do approaches
134 stitches wide x 26 stitches tall. 2 blank rows left between this and the following strip. If worked as a continuous band, one full repeat in 93 units.

As usual this band plus working notes and hints has been appended to the bottom of the write-up on the SAL page, accessible via this link or via the tab at the top of every page here on String-or-Nothing.
If you are working our Epic Fandom SAL either as a whole or as a strip excerpt, please let me know. It gives me great joy to see how my “pattern children” fare out in the wide, wide world, especially when they meet up with creative, playful people. And if you give permission, I’d be happy to share your pix of this developing sampler, it in its finished state, or derivative projects including one or more of the Epic bands here on String, in a gallery post, with full credit to you as interpretive artist.
Band 12 will debut on the Facebook Enablers group on 29 March, and be echoed here on 4 April 2022.
#epicfandomSAL
EPIC FANDOM STITCHALONG – BAND 10
Time for one of the “in-betweeners” – the simpler bands that alternate with the more complex, themed ones. This one is entitled PORTAL TO NOWHERE
Yes, I know this was supposed to be a plain and boring strip. It started out as a simple geometric with some interlaced bits to make it interesting. After I finished drawing, I noted the vague echo of a Portal Cube in its center motif. Subconscious channeling from other dimensions? Probably just coincidence. Yes, that’s right. Coincidence.
Time Factor 2 for height and the overlapping flanges on the motifs (Without those layered bits I’d consider this a Time Factor 1.) Use one color, multiple colors, or variegated threads, as you prefer. As with the rest of Epic, there are no rules or must-do approaches
134 stitches wide x 18 stitches tall. 2 blank rows left between this and the following strip. If worked as a continuous band, one full repeat in 12 units.
| Samples | Fabric Used | Stitch | Thread Consumption/ Notes |
 | 28 count evenweave | Back stitch, 1 ply | About 1 yard each of black and red |
 | 18 count Aida | Back stitch, 1 ply | Variegated floss |
 | 28 count evenweave | Back stitch, 1 ply | |
 | 28 count evenweave | Double running, 2 plies | About 1.75 yards of light red, remnants of light green |
As usual this band plus working notes and hints has been appended to the bottom of the write-up on the SAL page, accessible via this link or via the tab at the top of every page here on String-or-Nothing.
If you are working our Epic Fandom SAL either as a whole or as a strip excerpt, please let me know. It gives me great joy to see how my “pattern children” fare out in the wide, wide world, especially when they meet up with creative, playful people. And if you give permission, I’d be happy to share your pix of this developing sampler, it in its finished state, or derivative projects including one or more of the Epic bands here on String, in a gallery post, with full credit to you as interpretive artist.
Band 11 debuted on the Facebook Enablers group today and will be echoed here on 15 March 2022.
EPIC FANDOM STITCHALONG – BAND 8
To continue our slither through North American winter I present Band 8 – Snakes! And They’re Plain!
OK. So, this one is a bit more creepy-crawly than it is classic-blackwork-floral-ordinary. My excuse is that I drew it in the run-up to the 2019 Halloween season, adapting it from a design in Ensamplario Atlantio II, one of my free books of blackwork fills and borders. Plus, we should only ignore those who adore campy horror movies at our own peril.
Time Factor 1 for height and the ultra-simple straight repeat. Our scaly friends are all identical, with the second row flipped and travelling the opposite direction. Feel free to work all the right-bound crawlies in one pass, and then all the left bound ones, or hop back and forth as you please. Use one color, multiple colors, or variegated threads, as you prefer. There are no rules or must-do approaches here. One of the beta testers used beads for the eyes – a charming enhancement.
134 stitches wide x 16 stitches tall. 2 blank rows left between this and the following strip. If worked as a continuous band, one full repeat in 23 units.
| Samples | Fabric Used | Stitch | Thread Consumption/ Notes |
 | 28 count evenweave | Back stitch, 1 ply | |
 | 18 count Aida | Back stitch, 1 ply | |
 | 28 count evenweave | Back stitch, 1 ply | About 2 yards Plus 20 beads (See below) |
 | 28 count evenweave | Double running, 2 plies | About 1.5 yards each of light red and light green, about 0.75 yards of light blue and yellow each |
As usual this band plus working notes and hints has been appended to the bottom of the write-up on the SAL page, accessible via this link or via the tab at the top of every page here on String-or-Nothing.
If you are working our Epic Fandom SAL either as a whole or as a strip excerpt, please let me know. It gives me great joy to see how my “pattern children” fare out in the wide, wide world, especially when they meet up with creative, playful people. And if you give permission, I’d be happy to share your pix of this developing sampler, it in its finished state, or derivative projects including one or more of the Epic bands here on String, in a gallery post, with full credit to you as interpretive artist.
Band 9 debuted on the Facebook Enablers group today, and will invade here on or about 1 February 2022. I’m betting you’ll be long finished with Snakes before then.
EPIC STITCHALONG – BAND 5
The world is starting to open up again, but among us there are folk who felt the lockdown most keenly during convention season.
They missed meeting friends, swimming in a sea of fellow fans – regardless of fandom; reveling in the costumes either as a cosplayer or just an appreciative passer-by; viewing films, trailers, and shorts; listening to authors, famous actors or other community celebrities as they reminisce, lecture, or engage in open panel banter; shopping for that special Something that sings to the inner nerd; and more. Like the Game Room. There’s almost always at least one, where folk compete for the sheer fun of it, or sometimes for prizes.
I know many people who live for game rooms, then bring home their favorite games and introduce them to their circle of local friends. This strip is for them, the gamers, be they lovers of electronic formats, the classic card and board games, multiplayer role playing games like Dungeons and Dragons, or the new set of tabletop/parlor games, like Settlers of Catan.
This strip is 134 stitches wide x 28 stitches tall, including the narrow companion border at top and bottom. 2 blank rows are left between this and the following strip.
| Samples | Fabric Used | Stitch | Thread Consumption/ Notes |
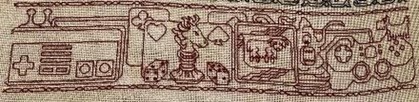 | 28 count evenweave | Back stitch, 1 ply | Pips are French knots |
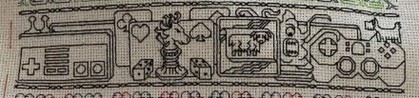 | 18 count Aida | Back stitch, 1 ply | About 3 yards. Pips are French knots |
 | 28 count evenweave | Back stitch, 1 ply | Pips are French knots |
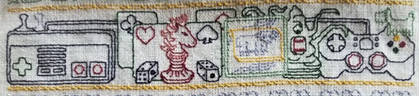 | 28 count evenweave | Double running, 2 plies | About 1 yard of blue, 1/2 yard of yellow, 1/4 yard of red, 1/4 yard of light blue. The snake eyes pips are each 2mm paillettes. Other pips are tiny 1×1 cross stitches |
As usual this band plus working notes and hints has been appended to the write-up on the SAL page, accessible via this link or via the tab at the top of every page here on String-or-Nothing.
If you are working our Epic Fandom SAL either as a whole or as a strip excerpt, please let me know. It gives me great joy to see how my “pattern children” fare out in the wide, wide world, especially when they meet up with creative, playful people.
Band 6 be released on 23 November in the Enablers Facebook group feed, then echoed here on or about 7 December.
EPIC STITCHALONG – BAND ONE
It’s here! Today is the release of the first band of the Epic Fandom Stitch-Along.
I’ve mentioned this before – it’s my original free band sampler celebrating multiple fandoms, offered up as a way for the nerdy at heart (and those who stitch for them) to come together. This isn’t a mystery stitch-along. You will be able to see what you’re getting into. I encourage experimentation with color and technique. and I will share as many examples of different approaches to the individual bands as I have on hand at time of release (with special thanks to our group of intrepid Beta Stitchers!).
We start off with a giant robot and Kaiju, which should delight fans of multiple Anime and Anime-derived Mecha animations/ live action movies/videos – pretty much everything from Transformers, Giant Robo and Voltron to Pacific Rim, and blissfully inclusive all the way through the spectrum from Gundam to Power Rangers.
Here are four finishes:
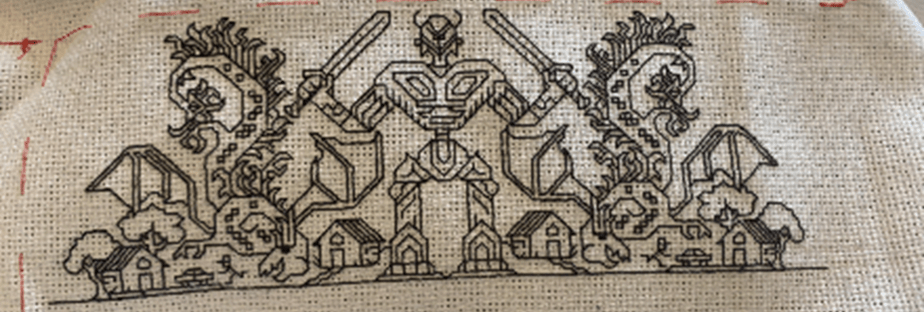


(Above bits, top to bottom, stitched by Danielle, Heather, Callie and me)
Full info for the Stitch Along is at the SAL tab at the top of this page, or click here to hop direct. Scroll down to the big yellow BAND ONE subhead to find a downloadable PDF containing Giant Robot and Kaiju, plus background info for the project as a whole.
Feel free to post questions – I’d suggest doing it on the SAL page rather than here, so any info that can help other stitchers will be in one central spot. And feel free to send progress pix or tag them with #EpicFandomSAL on social media. With your permission (and proper credit), I’d like to post them in a gallery, so we can all celebrate together.
BAGGED UP AND READY TO GO!
A finish! The mini-bag kit I savaged and repurposed to feature my own choice of stitching is now complete, and can be sent to the recipient.


To recap, in order to have better access for my hoop I unpicked the side seams of the evenweave decorative layer, and of the heavy cotton twill lining. The evenweave had no seam at the bottom. The twill lining was left with the bottom unseamed. Earlier in the process the bag could be splayed out flat, with only the bit of seaming at the top surviving – where the lining and evenweave were sewn together with the red handles. Here you see it draped out and in the hoop.
When I finished both sides, I sewed it back together by hand – my sewing room and machine being off limits due to the big basement rehab project. First I sewed the lining using back stitch. Then I attempted a fancy decorative openwork seam in black to reunite the two sides of the evenweave.
It didn’t work.
It looked rather Frankenstein-like. Of the stuff of nightmares. So I covered up the buttonhole stitch based seam with three rows of reverse chain, done with a whole 6-ply strand of my linen floss. The first row of reverse chain went down the openwork bit at the center of my former decorative seam, and the other two courses went left and right of that, hiding the bits that encroached into the body of the bag. Which is why there’s now a thick black stripe along both sides of the thing. Not an optimal solution but the best I could do right now.
And on to the next project.
This one I have to admit I am posting as a tease. I used time over the past pandemic year to design a free stitch-along. It’s a rather large and complex stitch-along, with a distinctly nerd-world/fandom theme. It will be released on The Enablers Facebook group, and also here on String, on a two-week delay, starting sometime in August. I will be creating a new page here on String to host it. Beta-test stitchers from that group have been working on their pieces to proof the design and confirm the directions, and their efforts have been much appreciated. The thing will NOT be a mystery stitch-along (folk should know what they’re in for before they commit), but it will be released one panel at a time, with periods between releases pegged to the complexity of the individual panels.
However, until now I haven’t started my own rendition. I won’t spoil the surprise, but as I warned – I will tease here.

Obviously not a historical redaction (for a change), and that’s going to be part of the fun.
PENDING
Some movement here at String Central, but not as much as I would have liked.
First, on the Great Basement Rehab, we are in hiatus. This being an old house, of course they found asbestos. Which we expected. Not friable, immediately dangerous asbestos, but materials that would be of hazard to the crew doing demolition. Most notably, in the adhesive that sticks down the floor tiles in the old sewing/craft room, and in some intact cladding around various pipes. Some of those pipes may be moved, and others will be less bulky to encapsulate if the cladding were absent. So it all goes. Unfortunately due to demand, the earliest the asbestos remediation team can deal with us will be the last week of May, so for the past week or so until then, nothing will be accomplished.
Except cleaning. The demo team was able to do quite a bit of wall removal down there. Some of the walls were old lath and plaster, which make a TON of dust. In spite of taping over the door to the basement with a plastic airlock, a ton got upstairs, all the way in fact to the second floor. It infiltrated through various holes in the floor around the pipe penetrations of the hot water radiator heating system, in between floorboard expansion voids, through the seams between mop boards (baseboards) and floors, and through the required vent to bring extra air to the kitchen (a code mandate for the gas stove/high capacity exhaust vent in the kitchen).
It took four moppings to remove that stuff from the bare wood and tile floors, and many vacuumings to see the original color of the rugs again. I’m still cleaning/washing every other surface and soft item – behind furniture, inside the kitchen drawers and cabinets, linens in the linen closet, behind books. Even the formerly clean socks in my sock drawer will benefit from a no-heat air tumble in the dryer. Right now I am concentrating on high traffic/high touch and food-prep areas. When construction resumes there will be more dust, so there is no point in going nuclear on what’s there now only to do it again in June/July.
To illustrate the dust that accumulated in just two hours, I moved this cork trivet from the place I had put it earlier that morning.

Yes, that’s a collection of little plastic bulls from Sangre de Toro Rioja wine bottles. An everyday plonk enjoyed here as a sentimental favorite, often enough over the years to have accumulated a herd.
On the stitching front, I’m well into the second side of the small tote bag project.

Here it is mounted on my sit-upon hoop. You can see that the bottom of the bag is just a fabric fold – no square box bottom. When I picked out the side seams of the evenweave there was no join at the bottom. However the lining will need a bottom seam. Prior to my surgery, the side seams of the lining only extended halfway down, and its bottom was unsewn – in a futile attempt to make stitching on the evenweave outside easier.
The design is yet another one from T2CM, but this one is original, loosely based on historical aesthetic, but with no point source or specific inspiration that’s been adapted. It’s a slightly eccentric framing interlace (the bits framing the tumbling lilies are just a bit taller than they are wide), I’ve worked it before, also with stairstep voiding, but done monochrome, with a different directional treatment, and without the concentric rings in the inner circles:
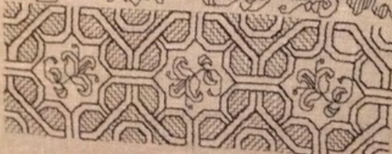
Note that last time I also used single ply for the fill and two plies for the interlace, but in the older bit the flowers were also done in one ply.
I’m about a third finished with this side. The rest is just “wash/rinse/repeat.” The next challenge on this piece will be the re-seaming. I will finish the lining on the sewing machine, but I intend on working some kind of decorative seam treatment on the evenweave outside layer. What it will be is as yet undecided.
EXPERIMENTS AND ADAPTATIONS
As an in-between, quick project, I’m working on the small tote bag – the piece on the bag body I salvaged from an old DMC cross stitch kit. I’m using yet another design from T2CM, but I’m playing with it a bit.

First, there is thread choice. Note how the black is thicker than the red, more matte, and a bit rustic-slubby. It doesn’t make factory-precise lines. It’s not cotton floss. It’s two strands of linen from a line of DMC six strand linen embroidery floss, discontinued about 7 or 8 years ago. My local independent crafts store had a small quantity left, and I bought it all out in 2016 or so. I don’t have very much of it, not enough for a large piece, for sure, and being discontinued, there is no more to be had.
Experimenting with it I have found that it needs to be used in much shorter lengths than cotton, needs a relatively thick needle compared to the ones I would use with cotton or silk on the same count ground, and performs best when very heavily waxed. That’s because the linen is surprisingly friable, and abrades heavily from the action of stitching. This is not stuff to be “sewed” – it has to be stabbed up and down. It is also stiffer than cotton or silk with a notable bend radius, and special care in tensioning stitches is needed to keep angles from distorting the weave.
The single-ply red by contrast is thinner, silkier, and easier to stitch. It’s plain old DMC six strand cotton floss, color 815 – the closest match I had to the color of the bag’s “built-in” cotton twill handles. Note though that there is minor thickness variation in the single red strand, but I bet you would not have seen it had I not pointed it out.
On to the design.
This particular zig-zag flower stripe is in my ever-forthcoming The Second Carolingian Modelbook. It’s adapted from the Museum of Fine Arts Boston holding, accession 99.178. It’s one of my favorites because the original artifact has a VERY evident mistake on it. Well, evident to me at least. Can you spot it?
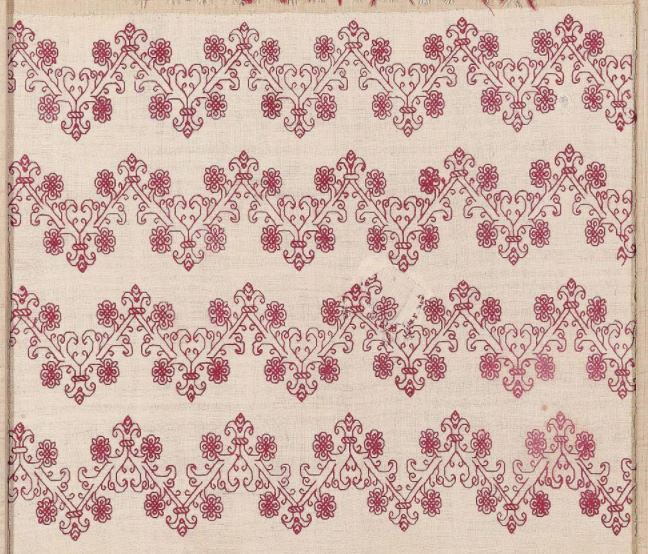
Good eyes if you have! The repeat is not quite symmetrical up and down. Look at the valleys – the V bits below the paired flowers. There are two different treatments for the foliate curls there. A “fat end ” one that curls back towards the zig-zag stem, and a “skinny end” one that curls back towards the center. The first three strips all are in the same orientation, with the “skinny end” curl on top. But that bottom one is upside down in comparison to the other three – in it the “fat end” curl is on top. It drove me nuts when I was trying to work out the pattern. Someday I want to use this ones on the sleeves and bodice of an 16th century Italian camica. I think It would be perfect for that….
Now on to my adaptation of the design for use on this specific piece.
I have moved the zig-zag stripes much closer together than the original because of the size of this very small carry bag. I’ve changed the direction of the striped “collar” around the terminal buds on the lower strip, just for fun. And I’ve introduced the step-fill between my strips. The heaviness of the double strand, rather rustic and slubby linen mates up well with the feel of the original; and the contrast between the step fill (mirrored along the center line for each up-down repeat) done in the smoother, more delicate thread adds interest.
Now. Is this a historically accurate use of the design? If I was to be totally textbook, have to say no, even after discounting its use on a contemporary tote-bag, worked in modern materials.
Yes, the flower zig-zag has a clear source. Yes, designs with voided grounds were worked at the time. Yes, designs with outlines in one color and the ground covered in another are not unknown. And Jack Robinson (the UK’s late and lamented blackwork master artisan) in his book noted the use of varying thread thicknesses on a single project.
However, I have not yet seen an artifact with a stepwise fill as a voided ground (square mesh yes; diagonal mesh, yes; diagonal zig-zags, yes). I have not yet seen a voided artifact with a ground that’s mirrored. And I have not yet seen an artifact with an all-over repeat of this type, worked with a voided background.
Do I care? Not particularly. I have no intention of entering this before any juried panel. It’s a doodle, for the sheer fun of playing around with the design. And it will eventually be a gift for someone special.
VOIDED PIECES AND OUTLINES
First, thanks to Callie of NotAnotherCostumingBlog for this question, which takes me tumbling down another chasm, dragging all of you along with me. Callie asks,
“…do you have any tips for converting patterns charted for LACS to charts for double running? I seem to have a bit of a mental block about it and the best idea I’ve got is to print them out, estimate where the lines would be instead of blocks, draw those on, and then transfer them to clean graph paper. I have a lot of patterns that I would really prefer to work linearly because it is so much faster but I’m not yet at the point where I can look at a block chart and just mentally convert it.”
I break down the answer into several parts, and try to respond to each.
Outlines in historical examples of voided stitching
Were historical voided pieces worked with or without outlines? The answer is “Yes.” There are some with stitched outlines and some without, and the presence of stitched outlines does not correlate neatly to the technique used to fill in the background. In addition, there look to have been voided pieces that used drawings as their “outlines” – working the fill right up to and sometimes over those markings, which seem to have (mostly) been stitched.
The one thing about outlines in these pieces that is different from their use in modern needle-painting style cross stitch is that in the historical works, close inspection shows the dense coverage stitching (of whatever type) encroaching on the linear stitching. This says to me that the lines were worked in one of two manners:
- laid down first, and the background filled in later (the most common approach, especially for meshy or long-arm cross stitch fills; also logically on the pieces where the fill leaves a unworked “halo” around the linear stitched foreground, as in the lowermost right example of the first group below)
- Stitched at the same time as the ground behind (more usual for square fill as in the lowermost left example of the first group below)
Modern cross stitch pieces generally direct the stitcher to finish the ground areas, then go back and work the linear bits on top of them.
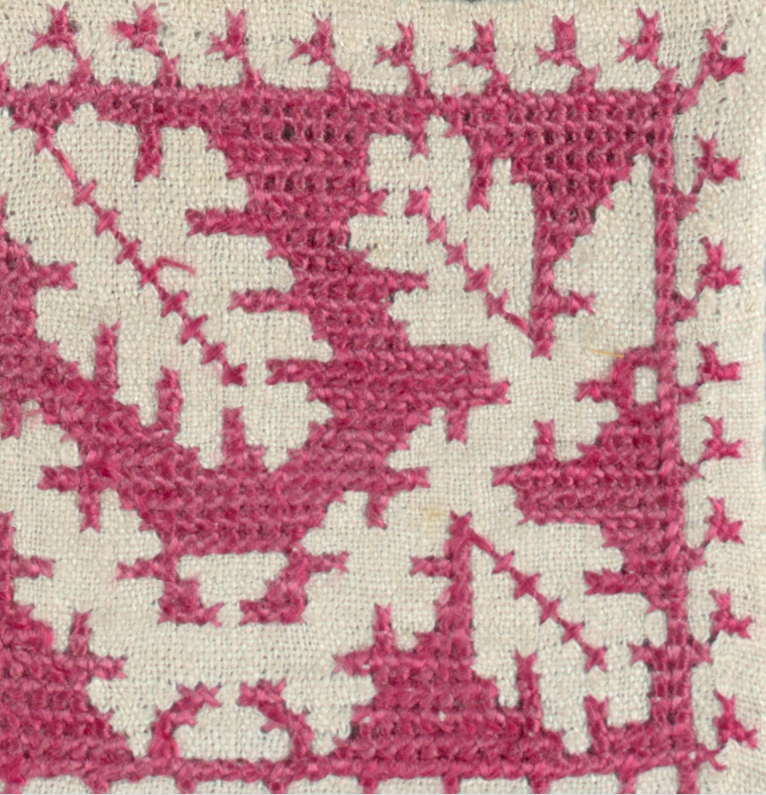
Historical examples of voided work with counted outlines:

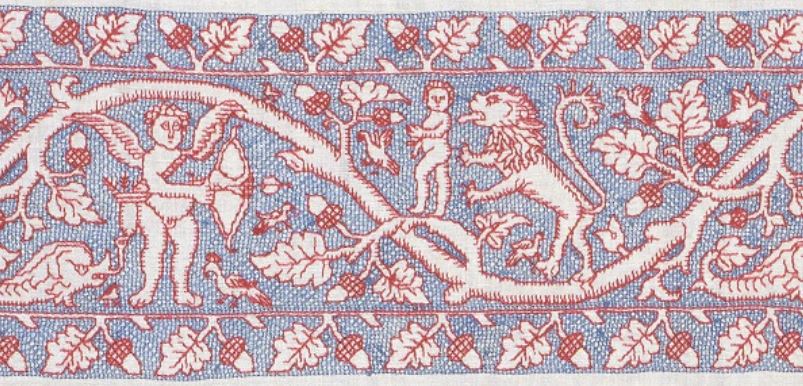


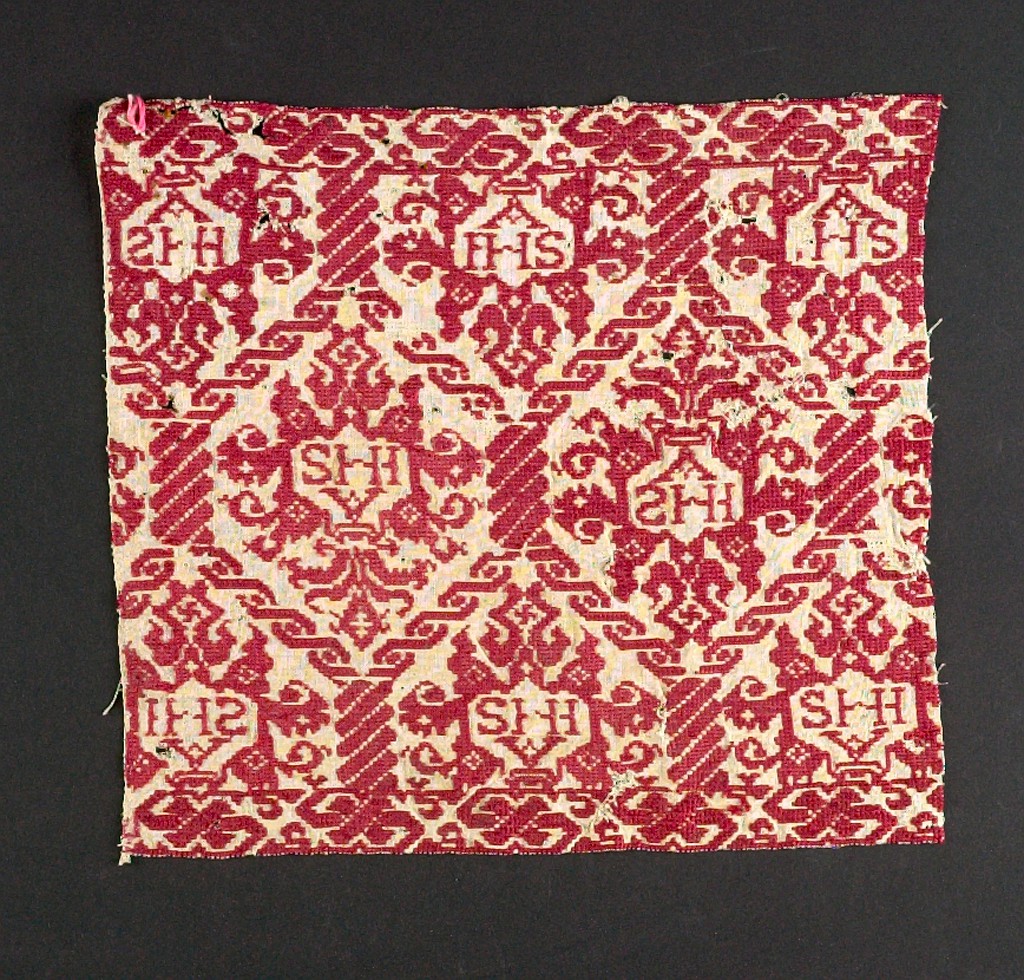
Historical examples of voided work without counted outlines:
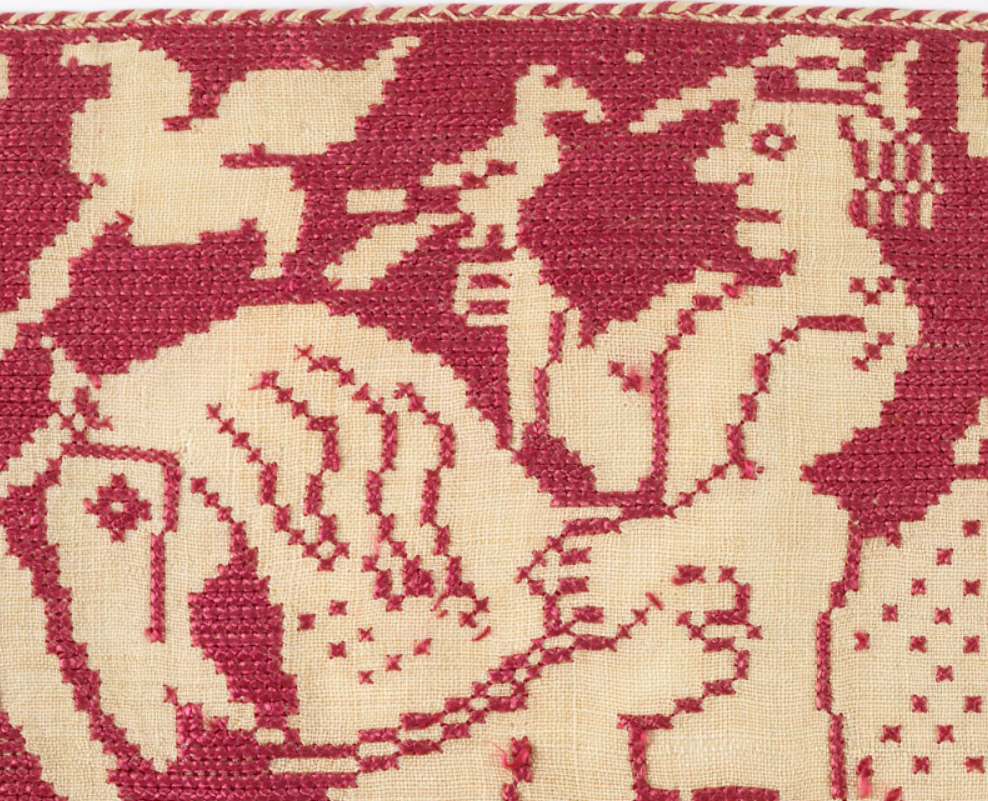
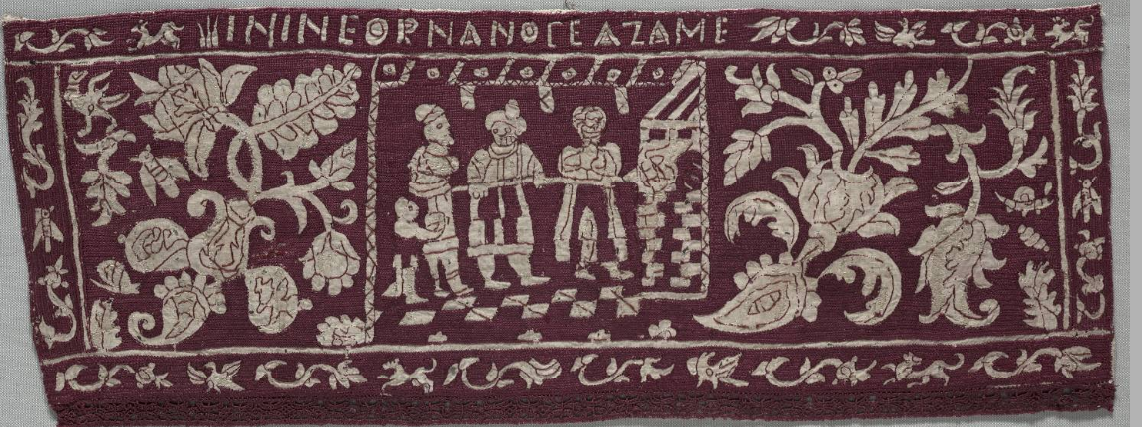
Historical examples of voided work with (probable) outlines drawn freehand, then stitched.


Another thing that can’t be determined is whether the historical embroiderers finished ALL of the outlines first, then went back and did the fills; did them section by section; or if in fact the SAME stitcher did both. I can well envision a large group project like a set of bed hangings, where someone proficient in laying down the outlines did that, copying from a chart or a previously stitched piece; with a team following on behind filling in the voiding.
Being a team of one myself, I tend to work section by section, defining my outlines, proofing them, and filling in the voiding – then leapfrogging on to the next bit.
Representing outlines in modern charting
In my own work, if I’m redacting or adapting from a piece that has evident outlines, I use a specific convention for charting. I employ the same dot-and-line method I use for plain un-voided linear work, but flood-fill a portion of the background to indicate the areas to be filled in with stitching after the outlines are completed. The sample bit I worked up for a previous discussion on charting methods (derived Kathryn Goodwyn’s redaction) illustrates this method (left). If the piece had no outlines or was charted from a graphed original or a historical piece in a medium that did not show outlines (some lacis, buratto or other darned-mesh type pieces), then I use the standard square in box technique (right) although usually without the red line 5-unit notation and count, which I tend to do mostly for use for knitting. Both my The New Carolingian Modelbook and its forthcoming sequel The Second Carolingian Modelbook include linear unit and block unit sections.


There’s one other style I use on rare occasion, mostly for linear pieces that include large, dark areas, and whose edges are defined not by prior outlines, but by half cross stitches worked at the same time as the fully covered internal areas. This spider panel from Ensamplario Atlantio II is an example – note that the ultra-dense spider is done in boxed cross stitch (aka 4-sided cross stitch), with half cross stitches to smooth out the outlines.

Conversion from voided chart to a linear chart
This is something I hadn’t considered doing before. It presupposes a finished chart in the block unit style.
First, I have to apologize. I don’t use commercial charting software, relying instead on a homegrown solution based on the freeware drafting program, GIMP. (I offer a free tutorial and templates for my method elsewhere on this blog.) You could do this with a photocopying machine and a pencil, but please bear with me.
Let’s use the bunny seen above, which I previously charted and made available for free download as a PDF.
The approach is pretty straightforward, but there are no shortcuts. Take the chart you want to convert, photocopy it, and pencil in your adaptation over the established boxes. Or regraph it as I did, then use an outlining tool manually, box by box, to smooth the edges until you get a look you like. You will want to take liberties with the diagonals, instead of outlining every 90-degree intersection (although that’s a clear alternative). You may also wish to add details, like the toes, nose, eyeball, and ear openings. That’s also a design choice and up to you.

Finally, please note that I do not use “knight’s move” stitches (two units over, one unit up, to make a 30/60-degree angle). That’s a conscious design decision on my part. They are absent from 16th and 17th century artifacts with the rare exception of when they are used to form eyelets, or in later 18th century works – solid blocks of stitching radiating from a central point. I’ve not yet found a single 16th or 17th century voided or linear work artifact that employs knight’s move angles. They are a great addition to the charter’s tool set for sure and can be used to expand the stitcher’s design vocabulary. But they are also a clear indication of modern design aesthetic, so I leave them to other modern blackwork designers, and limit myself to 90 and 45-degree angles exclusively, even in my contemporary “nerd-culture” pieces.
So there’s the long answer for Callie. She is absolutely right. The solution is as she suggested in her question. If you need to draw it out before hand rather than adapt on the fly, you will need pencil and paper (or a charting design drafting solution) and I know of no shortcuts.

