LOOKING EAST AGAIN
Back when we were doing the expat stint in Pune, India, I wrote about Kasuthi (aka Kasuti, Kashida), a blackwork cousin that deserves to be better known by Western double running stich aficionados. I recently stumbled across another sample of related stitching, this time from a bit further north.
The Hazara people, mostly in Afghanistan, but also present in Pakistan practice an interesting and related form of linear geometric stitchery. It’s hard to date beyond “traditional,” and given current geopolitics, deeper investigations are unlikely. But here is the limited info I’ve found, plus some examples, and some sources of additional information.
The Hazara are known for several forms of stitching, mostly but not exclusively counted styles using satin stitch, straight stitch, double running stitch and cross stitch, and is better known for phulkaris (large shawls often worked in geometric, counted straight stitches). These double running stitch pieces in particular are probably made by women of the Wardak Hazaras, who live mostly southwest of Kabul. This style is usually worked in cotton or silk on linen or cotton grounds. These double running stitch pieces are often finished out as small mats, bags, shawls, prayer cloths, and other covers.
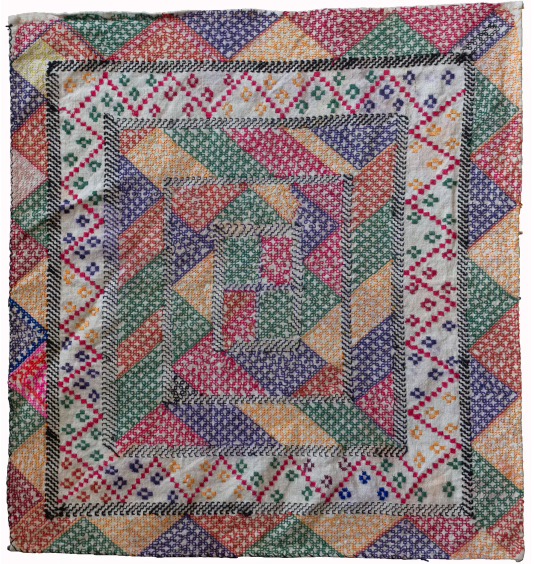
First is the artifact that piqued my interest.

This is piece in the collection of the George Washington University Museum, Accession T-1240. They note it’s provenance as being Hazara from Afghanistan, probably sometime between 1880-1920. That mushy date range is the earliest and although it’s only semi-hard, is the only date I’ve seen for this style. Note the fields of diapered patterns stitched on the count on a not-so-evenweave ground. The designs skew east-west compared to north-south due to there being more ground fabric threads per unit measurement in one direction than the other. But skew or not I love the repetition and color usage. So I went looking for more.
This artifact is probably the best represented on line for the style, and shows up in most on-line photo collections of Afghan embroidery, although not always with attribution. It is nicknamed “The Snowflake Shawl” and was collected by Jania Mishra, the author of the art blog/sales gallery Woven Souls. She places it as Hazara, but does not opine a date. Still it’s clearly antique/vintage. Her write-up includes lots of close-up photos, and notes the relationship of this style of stitching to mathematical theory. Pop by her blog to truly admire the diverse detail of this piece.

More examples. On the left is a bandanna size prayer cloth that was sold by a textile/rug auction dealer, and on the right is what’s described as a Hazara napkin in the Galerie Ariana ethnic textiles sales site. (No affiliation with/endorsement of these sellers – I find dealers’ on-line photos and attributions an occasionally useful research supplement, although not all dealers’ listing data are of the same quality.)

What can we conclude about dissemination and influences?
Very little.
Double running is one of the simplest, oldest and most ubiquitous of stitches. The scholars of Kasuthi posit a vague “Persian origin” before adoption, mention of in literature, and refinement of the style in the Deccan area Chalukya dynasty courts of the mid 500s to mid 700s, and that dynasty’s later resurgences through the end of the 1100s, culminating in the disciplined style and vocabulary of traditional motifs that are known today through surviving examples dating to the 19th century. Overland trade routes have connected Northern India and Afghanistan and beyond going back to antiquity. The the flow of both peaceful and aggressive contact is also well known, as is historical trade that connected the northeastern African coast with India. Egypt’s Fustat region is another area where visually similar double running stitch artifacts from the Mamluk era (1200s-1500s) are found.
Is this another survival of some sort of time-lost tradition that also gave rise to Kasuthi, the Mamluk works, and by extension over time and geography (and by direct quotation noted by others as well as myself), the stepwise and geometric designs found in early European modelbooks at the dawn of the popular print era (early 1500s), and on to early European blackwork and strapwork? It’s tempting to speculate so, but we have absolutely no proof.
These Afghani pieces could also have been a product of later cultural influences, as waves of association washed back and forth along time’s shores. But the clear correspondences, whether they can be affixed to defined family tree, or are just casual correlations due to the limits of geometry and the simple stitching style itself, are to me are a source of endless fascination.
Here are a couple of sites with additional information on Hazara embroidery in general:
Source material for the Mamluk styles mentioned
- Marianne Ellis. Embroideries and Samplers from Islamic Egypt, Asmolean Museum, London, UK, 2001. ISBN1-85444-135-3.
- Ashmolean Museum Yousef Jameel Center for Islamic and Asian Art, Newberry Collection of Islamic Embroideries
And there are more traditional regional counted styles to explore in this area of cultural confluence. I promise to keep digging.
THOSE OLD LINENS…
First, progress on my Dizzy Grapes sideboard scarf. I’ve doodled up a companion border that I like, and I’ve begun working it. Now you can see what I meant when I said the field design would truncate where it intersects the border, rather than floating inside it.
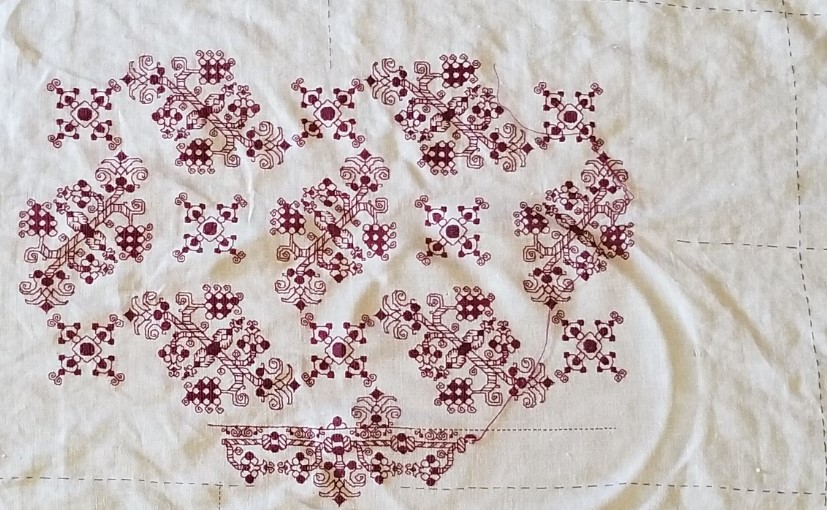
The border is Italian Renaissance in feel, but with significant stylistic departures from standard borders as seen on museum artifacts. For one, there are mirrored bounces in the repeat. That’s not uncommon for main field designs, but not something I’ve encountered before in the companion borders. Usually the motifs in those repeat, all with the same directionality, as if they were all marching in precision following an unseen leader. The heavy reuse of design elements from the main field is a second departure. It’s not uncommon for borders to repeat bits of the design from the main field, and sometimes they do quote sections verbatim, but it’s relatively uncommon for those elements to be recomposed in this manner. Still, I’m not planning on entering this in any competitions where my usage and adaptation are judged.
Old Linens
I’ve gotten a couple question about the linen piece I used – where stuff like this can be found and the like. It so happens I lucked into a couple more old needlework and linen pieces yesterday. Younger Spawn was describing the treasure-hunt fun that can be had at estate sales, so we zipped off to one nearby. We both found goodies.
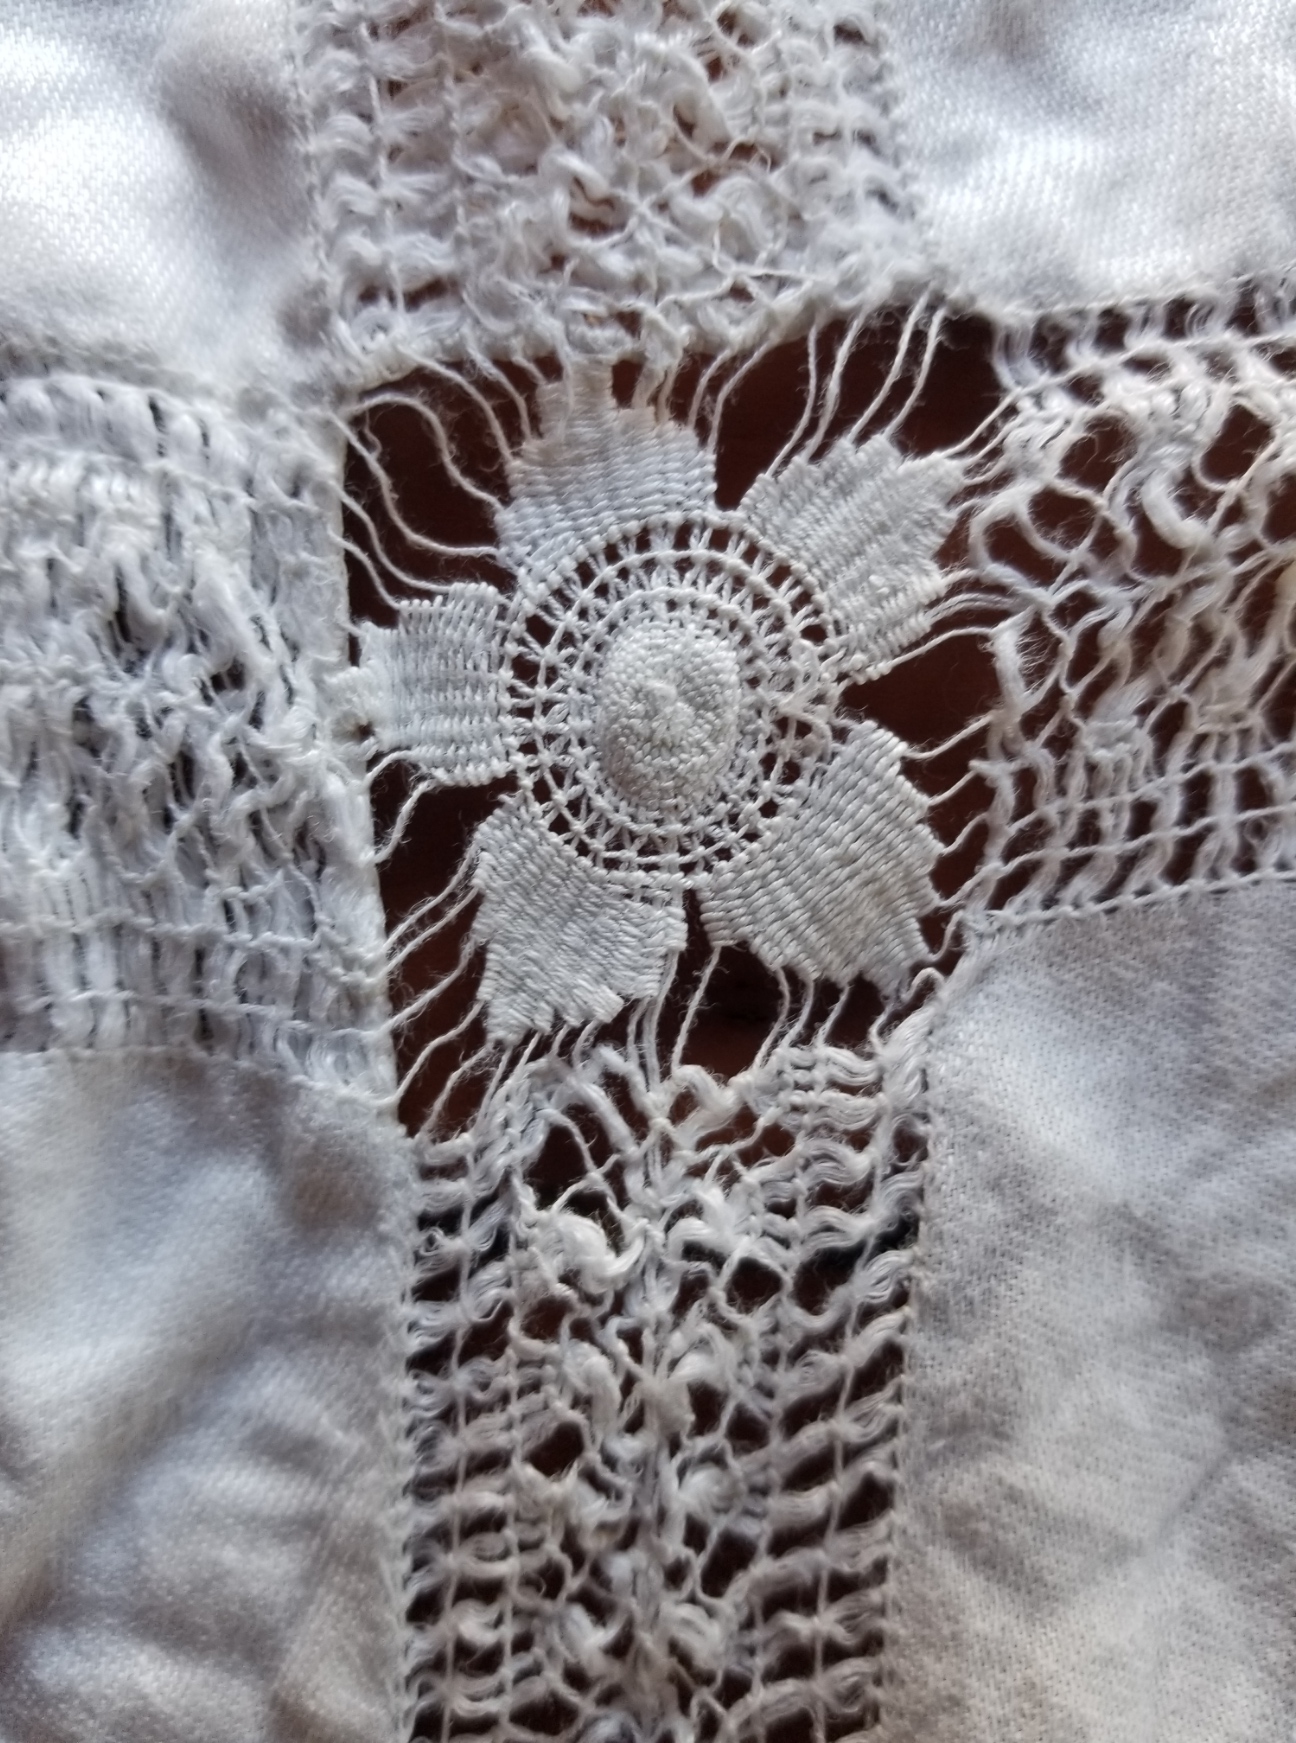
Among my discoveries were two darned net bridge cloths (small square table spreads). The substrate is hand knotted, in cotton, as is the darning and embroidered embellishments on top. I’m not good at dating/sourcing these pieces, but I suspect these are Sicilian Modano work, not earlier than 1920. Both are in very good condition with a couple of tiny brown “age spots” – probably the legacy of old spills. I don’t know enough to differentiate the earlier pieces of Modano from those of its 1980s revival. In the detail shot you can see the two weights of threads used for the darned fills, plus the long attached woven bullion style “picots” – not exactly sure what that stitch is called, plus a bit of straight stitch outlining.
Both are of exactly the same design, but one looks to have been savagely washed with bleach – it’s much whiter and about 20% smaller. One thing that does make me think they might be earlier is their size. By the 1980s bridge cloths were not exactly in style.
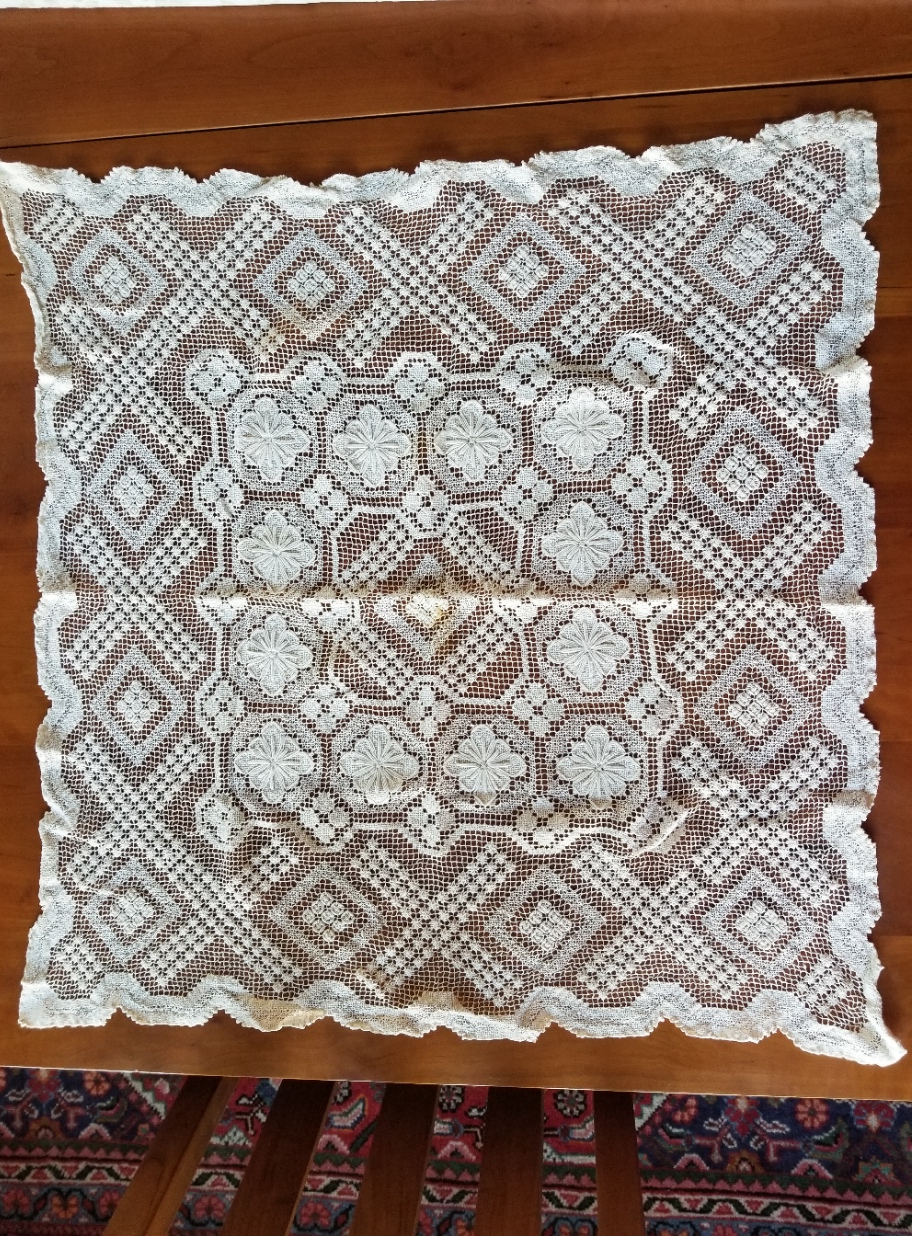

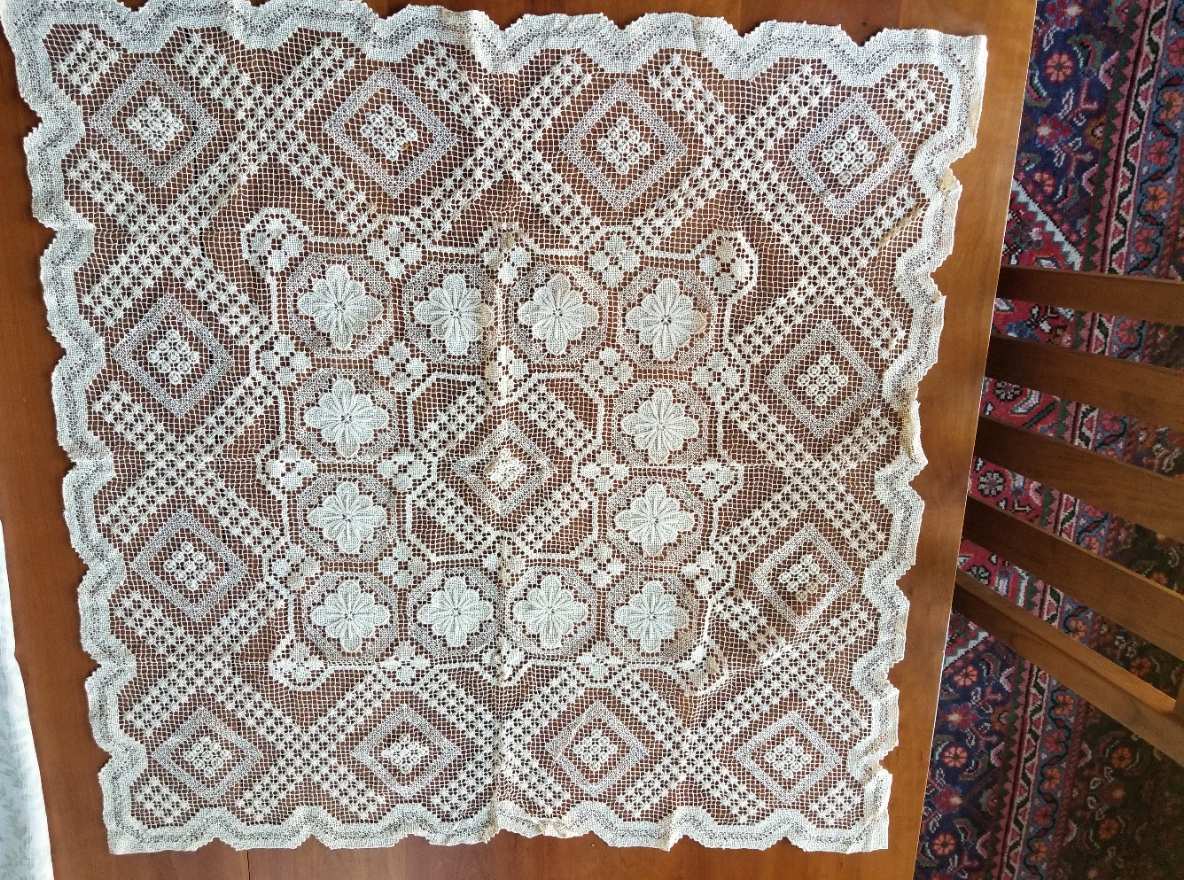
I’m not sure what I will do with these, but I couldn’t leave them there balled up, unloved and tagged at $1.00 each.
Lovely, but not actually linen. Moving on.
This is a tablecloth. The main body is twill weave linen, not suitable for counted stitching, but fantastic for surface embroidery. The hand-done withdrawn thread edgings are mostly intact, although the rondels in the corners are all slightly damaged. The main body of the cloth though is stain and damage-free. I won’t be using it at table – it’s too small for my dining room, but again the price was right, and the right person might be able to make a wonderful 16th/17th century Italian underdress/smock from it. $2.00 for about two yards of 60-inch wide linen? Not a bad price.

And at last – that upon which I will be stitching. I have some specific ideas for these twelve machine finished napkins. They are not uniform in size – some have shrunk significantly. A couple have stains that must be worked around.


The thread count on the one I’ve “penny-ed” is representative – roughly 38 x 38 threads per inch. Some variation and slubbing, and some of the napkins are a bit more worn, but 12 roughly 14″ (about 36 cm) squares of evenweave for $6.00? That’s a good deal.
So there you have it. Yard sales. Consignment stores. Estate sales. Look for the hamper of neglected household linens. Sort past the old sheets and cafe curtains, maneuver around the ladies looking for interesting souvenir tea towels, and wadded up in the bottom of the bin may be treasure to appreciate, to re-use, or to stitch upon.
DIZZY GRAPES
Fueled by a week at the beach; hot, dry, and windy weather; paella, sufficient wine, and other indulgences, my grape-adorned sideboard placemat grows.
First an observation on the ground cloth itself. I had intended to preserve the simple crocheted edging that this piece of well worn linen came with. But as you can see – “loving hands at home” were at work when this remnant was rescued from a larger prior incarnation, and the edges of the cloth are far from parallel. The thin black lines are my basted guidelines, done on the weave to mark the absolute center, and also about 1.5 inches in from the edges. Obviously they are not parallel to the edges. The short sides are especially skew:

Eventually I will have to trim off the edges and hem. Then possibly finish with a bit of simple needle lace. I haven’t done that in a while, so it should be an interesting adventure. But for now, I will stick to the inside of the designated rectangle. I’m still contemplating designing a companion edge pattern to the field of the original artifact, so I won’t get too close to those basted lines, just to make sure I have ample room for both the edging and the field.
So, that being said, I started in the center. Note that I don’t stitch over my basted guidelines – I snip them out as I come close.

You can really see the even/uneven nature of the ancient linen in the shot above. Yes, I am working it in a hand-held hoop (although I’ll probably switch to my sit-upon later tonight). I’m using plain old DMC six-strand floss, color #615. This piece will become a placemat on my sideboard, where wines are generally opened. The grape motif is fitting, but there is ample chance for spills, and washability is my prime concern. The linen itself is already far from pristine, so a few more stains won’t make much difference, but I didn’t want to use silk or faux silk (rayon), to make care less complicated.
According to the updated notes on the museum photo, the stitches used are double running and an Italian double sided cross stitch. The original has a design that’s truncated around the outer edge, and might have been cut down from a larger work. I do believe that The Ancients were just as practical as we are today. If something wasn’t going to be seen flipped over, it didn’t merit the additional work of making it perfect on both front and back. A bold leap of surmise on my part, but since I have no earlier larger work to repurpose into this sideboard mat, I’m comfortable with not extending the extra effort. Plus, I am doing this entirely for me. I have no intention on documenting it and entering it in any historical needlework exhibit or arts competition.
The variant of the two-sided cross stitch I’m using produces a boxed cross stitch on the front and a square grid on the back. If you zoom in on the original the scrum of stitches does look like a cross in a box. I could have used meshy, either pulled tight or relaxed to go double-sided, or long armed cross stitch (another historically congruent approach), or even satin stitch, but I wanted to try something new. Here’s the back. You can see the little grids where on the front the presentation is solid color.
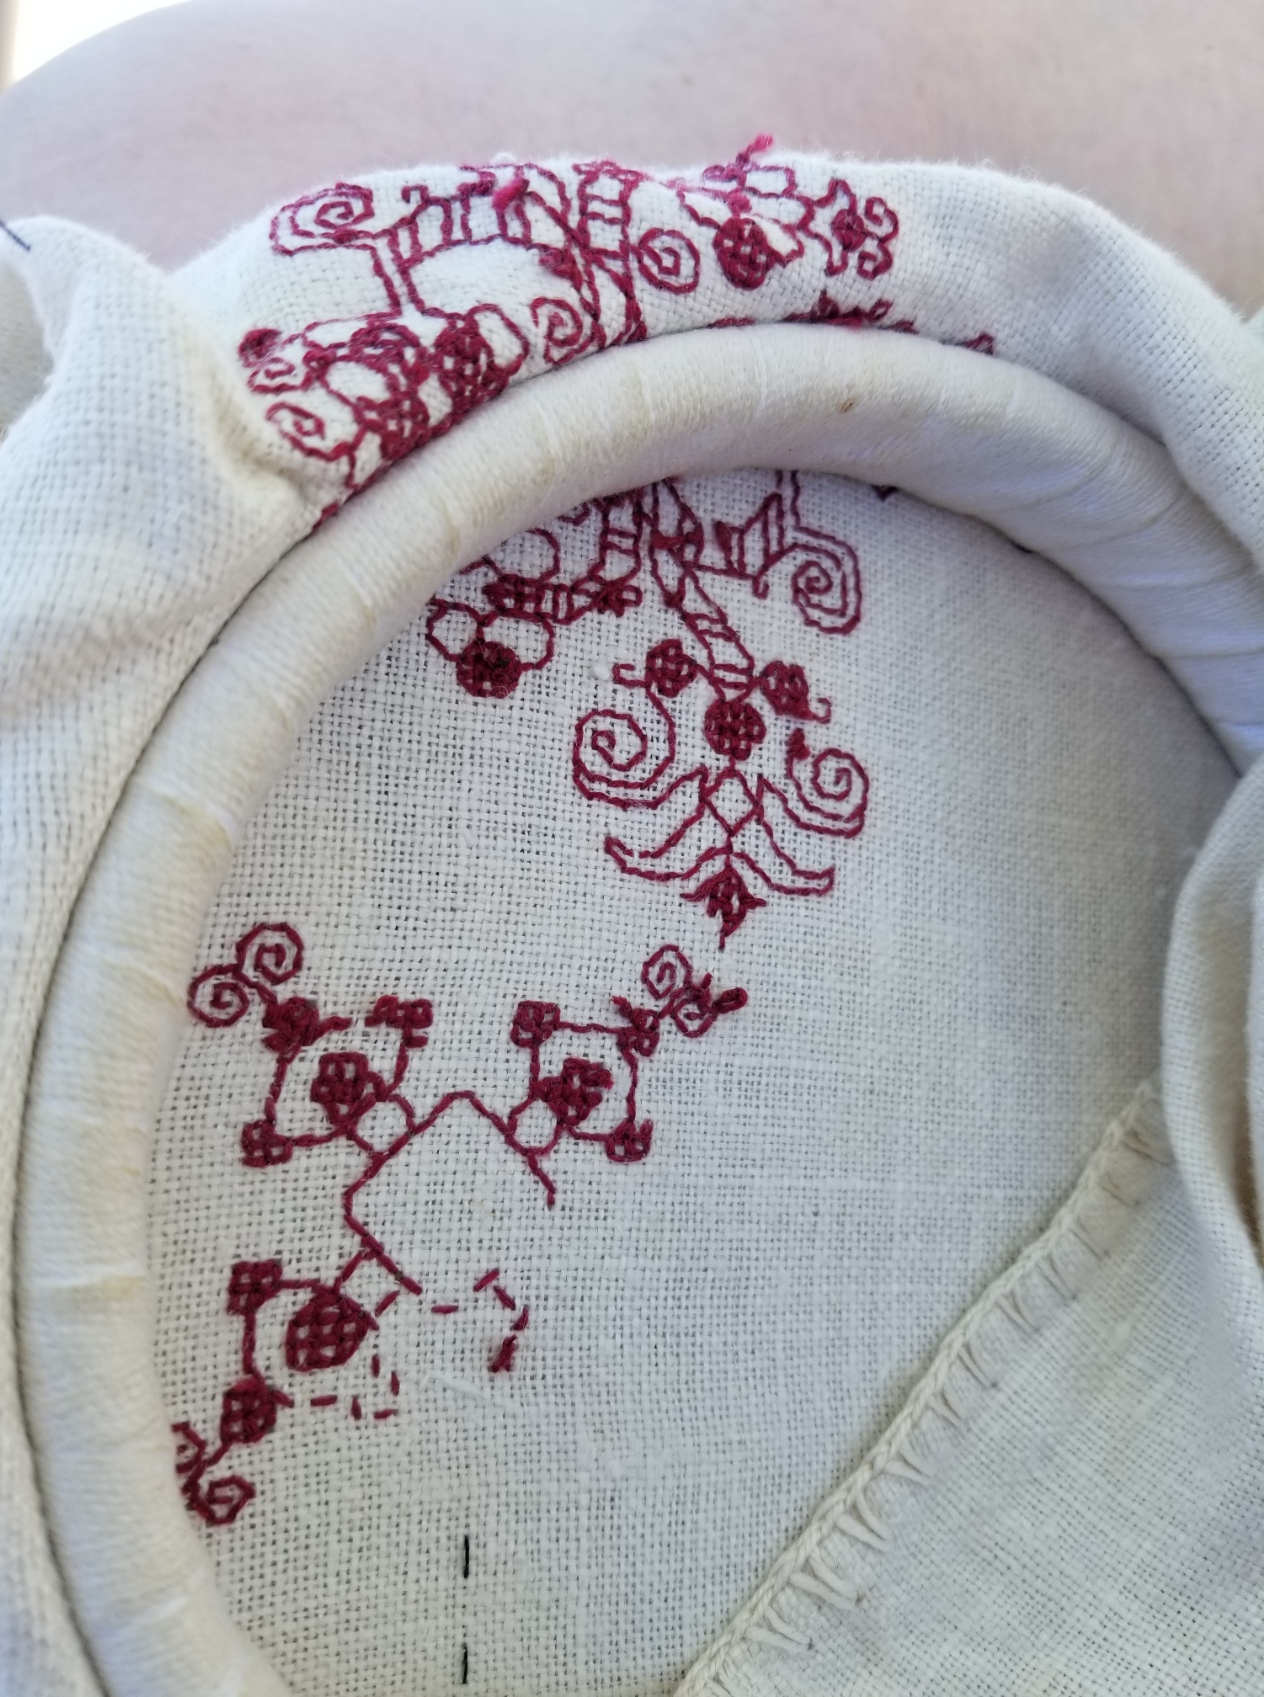
And of course, since nothing can be perfect, especially after all the wine referenced above – this particular iteration of the secondary motif was in the wrong place. I haven’t done it yet, but the whole square has to be picked out. But I made progress none the less. The offending misplaced robot-headed square is mostly unseen over my knee in the general progress shot below. The other two secondary motifs are correctly placed.
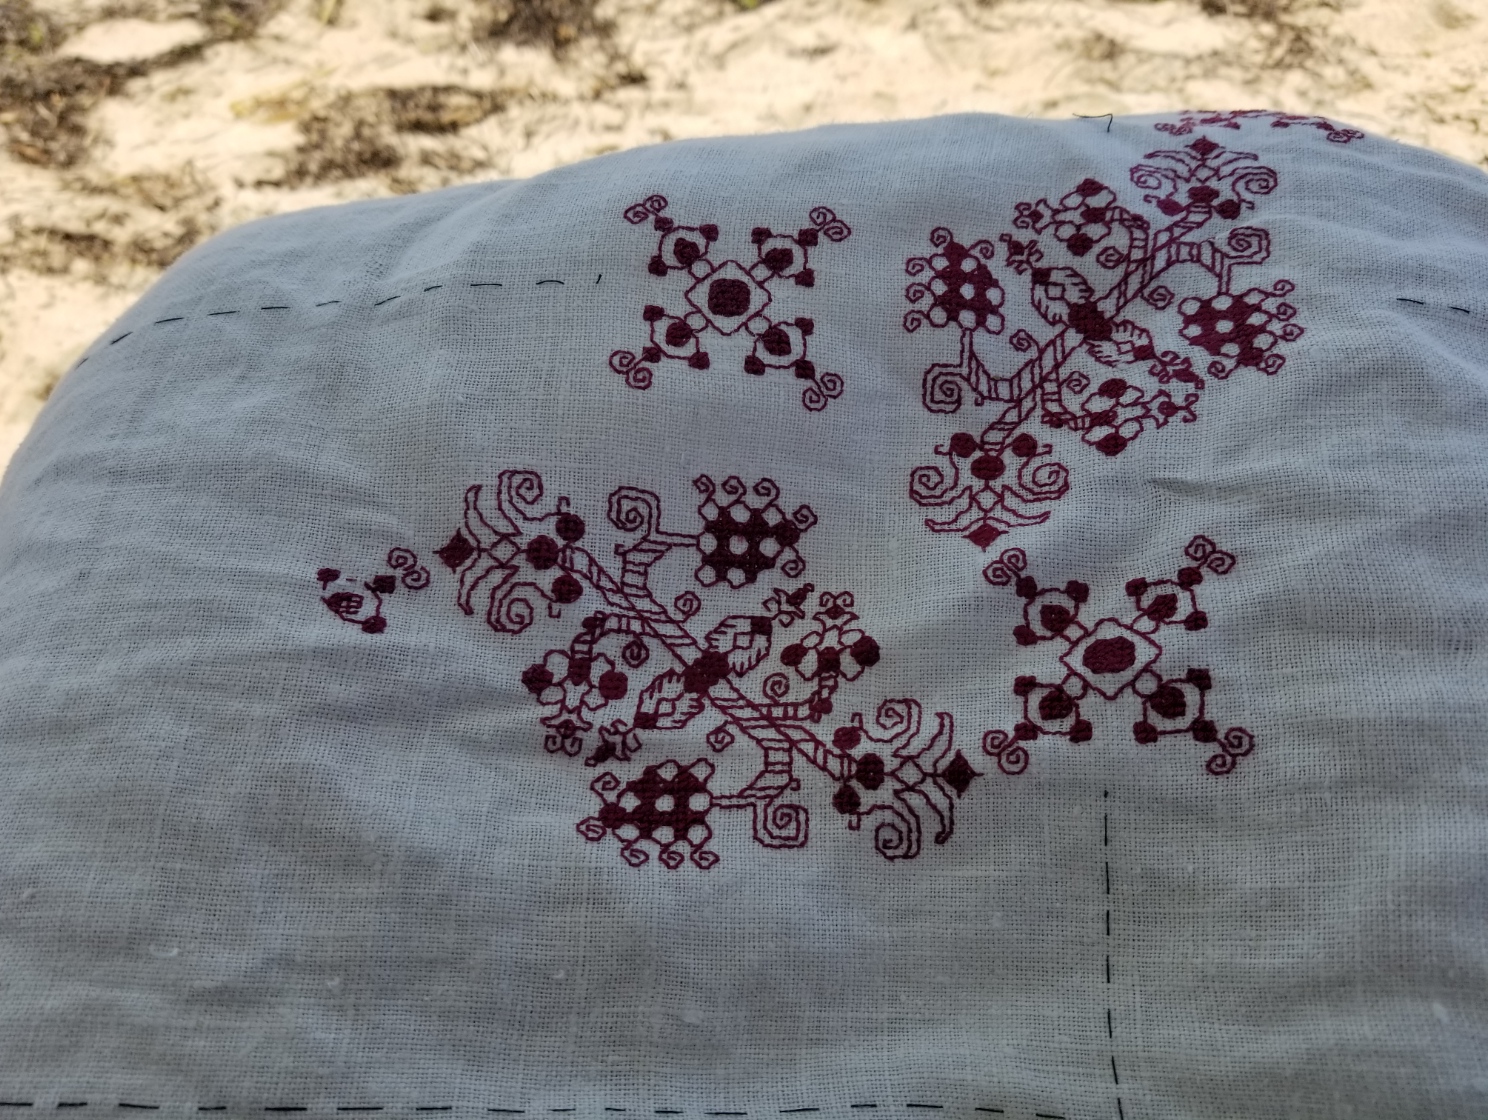
I will continue on with this cloth, filling in the additional iterations of the main and companion motifs. Still thinking of doing a companion edging, but treating it as they most often did contemporary with the design, by using butted rather than mitered corners. We’ll see what I come up with…
I’m “off paper” now, mentally rotating/flipping as needed, hence the dizzy title of this post. I like that extra challenge, too.
This design may end up being in The Third Carolingian Modelbook, a project I’ve already begun. But frankly there has been very little uptake of either of my two earlier citation rich for-sale books, and only marginally more from my free releases of mostly original material or from the free pattern broadsides or the SAL on this website. Sales and downloads, yes – but very little actual stitching from any them. It’s disappointing, and I am not sure I want to take the time if folk are just looking for shelf fodder and not actual stitching inspiration.
Have you done something from my pages? Please let me see it. If you give permission I would be happy to post your work here on String under a gallery tag, either with your name or anonymously as you prefer.
EPIC FANDOM STITCHALONG – BAND 16
MERCY
After the last band, everyone who is still sticking with this project deserves something simple. Very simple. This would also be a useful learning exercise for someone wanting to try a first strip in double running or back stitch. There are no surprises here at all.
Time Factor 1 for a nice, quiet, symmetrical repeat that returns us to alignment with the indicated project center line.
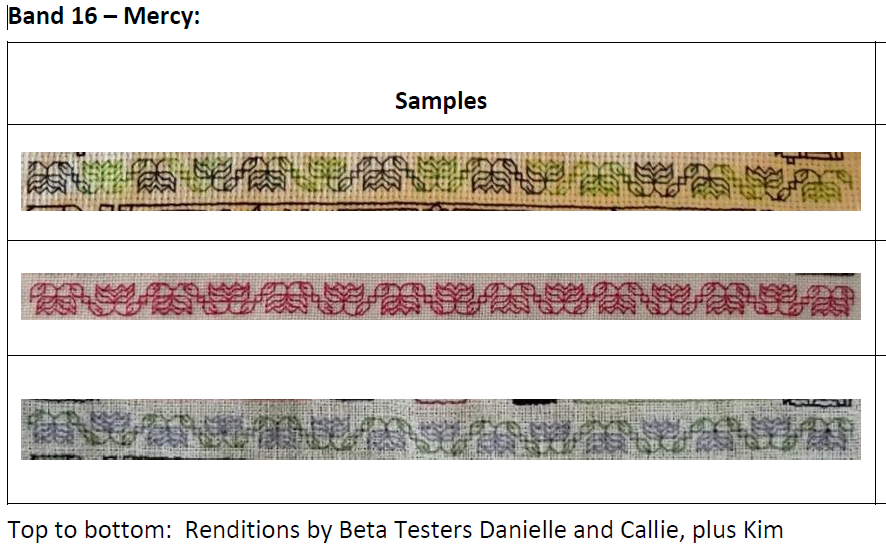
Use one color, multiple colors, or variegated threads, as you prefer. As with the rest of Epic, there are no rules or must-do approaches.
As usual this band plus working notes and hints has been appended to the bottom of the write-up on the SAL page, accessible via this link or via the tab at the top of every page here on String-or-Nothing.
If you are working our Epic Fandom SAL either as a whole or as a strip excerpt, please let me know. It gives me great joy to see how my “pattern children” fare out in the wide, wide world, especially when they meet up with creative, playful people. And if you give permission, I’d be happy to share your pix of this developing sampler, it in its finished state, or derivative projects including one or more of the Epic bands here on String, in a gallery post, with full credit to you as interpretive artist.
Band 17 debuted on he Facebook Enablers group today and will be echoed here on 19 July.
#EpicFandomSAL
EPIC FANDOM STITCHALONG – BAND 15
MAY THE FLOSS BE WITH YOU
The tribute here should be obvious. But there’s always room to insert yourself into the action, and this band is designed specifically for that. Obviously, the chart bears my initials over a ribbon, but it’s easy to modify to include yours there instead. Or instead of big initials, you can include a smaller set, bracketed by tiny AT-ST walkers. Or you could draft up a short saying, dedication, or motto to fit the spaces left and right of the center helmets. Or you could either doodle something else entirely to put in those spaces, or use the extra motifs I provide.
The whole idea of this strip is to help to make the piece uniquely yours, either through selection of the provided elements, or by taking that step into modifying a design or even drawing up your own bits for those two spaces. To that end there’s a worksheet on the last page of this band leaflet. I offer the layout, two sample alphabets (one large, one small); a panel with spaces to draw in your final design, plus a few “rehearsal” slots below with the corners of the available space drawn in, and those extra motifs.
Time Factor 5+ entirely for the accompanying layout and design task, plus the long straight stitch runs. (I can hardly wait to see what people dream up).
134 stitches wide x 17 stitches tall. 2 blank rows left between this and the following strip. If worked as a stand-alone continuous band, one full repeat in 134 units, plus one blank unit in between the full iterations.
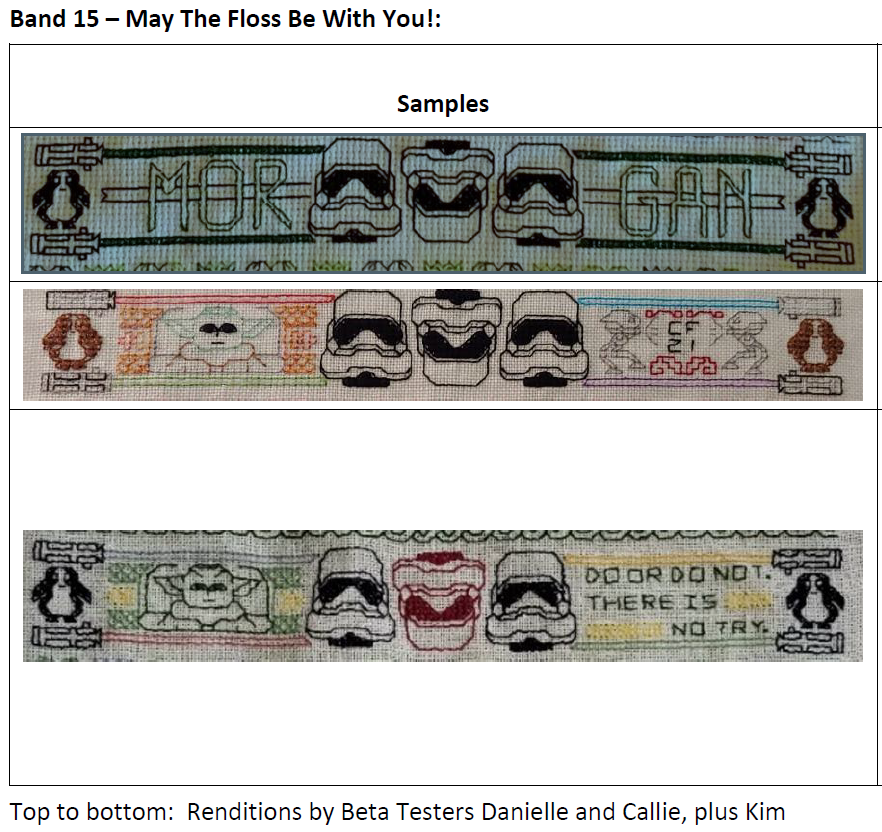
Use one color, multiple colors, or variegated threads, as you prefer. As with the rest of Epic, there are no rules or must-do approaches.
As usual this band plus working notes and hints has been appended to the bottom of the write-up on the SAL page, accessible via this link or via the tab at the top of every page here on String-or-Nothing.
If you are working our Epic Fandom SAL either as a whole or as a strip excerpt, please let me know. It gives me great joy to see how my “pattern children” fare out in the wide, wide world, especially when they meet up with creative, playful people. And if you give permission, I’d be happy to share your pix of this developing sampler, it in its finished state, or derivative projects including one or more of the Epic bands here on String, in a gallery post, with full credit to you as interpretive artist.
Band 16 will debut on the Facebook Enablers group on 21 June and will be echoed here on 5 July.
#EpicFandomSAL
EPIC FANDOM STITCHALONG – BAND 14
SNACK BREAK
Another respite from evil. We take a snack break, complete with pretzels. Or a twist that makes me hungry for them. Think of this as a seventh inning stretch. There’s a lot more game to come, and quite a bit of excitement left. When you see Band 15, you’ll appreciate coming off this bit of rest.
Time Factor 1, but stay awake! There are twists and overlaps to keep sorted out. But through it all, I promise – NO partial stitches.
134 stitches wide x 15 stitches tall. 2 blank rows left between this and the following strip. If worked as a stand-alone continuous band, one full repeat in 15 units.

Use one color, multiple colors, or variegated threads, as you prefer. As with the rest of Epic, there are no rules or must-do approaches.
As usual this band plus working notes and hints has been appended to the bottom of the write-up on the SAL page, accessible via this link or via the tab at the top of every page here on String-or-Nothing.
If you are working our Epic Fandom SAL either as a whole or as a strip excerpt, please let me know. It gives me great joy to see how my “pattern children” fare out in the wide, wide world, especially when they meet up with creative, playful people. And if you give permission, I’d be happy to share your pix of this developing sampler, it in its finished state, or derivative projects including one or more of the Epic bands here on String, in a gallery post, with full credit to you as interpretive artist.
Band 15 debuted on the Facebook Enablers group today and will be echoed here on 7 June.
EPIC FANDOM STITCHALONG – BAND 13
WHERE’S MY FLYING CAR?
Our salute to Retro-Futurism! Slap wings on that SUV and take to the skies. I am dating myself, but I can confess that we kids of the late 1950s/early 1960s were convinced we’d have flying cars by the time we had our own kids, and would be vacationing in orbit or on the moon. But the whole personal computer and Internet revolution, and the phone-in-every-pocket transformation weren’t even on our radar. Just as well. Computer/phone crashes are far less painful than having one’s flying car fall out of the sky.
Time Factor 2, mostly for height and discontinuity (the motifs are separated, and the wind/speed lines present lots of annoying little “orphan islands” to stitch).
134 stitches wide x 15 stitches tall. 2 blank rows left between this and the following strip. If worked as a stand-alone continuous band, one full repeat in 28 units. Note that this strip isn’t exactly centered. I moved the placement in order to squeeze three whole autos into our allotted area.
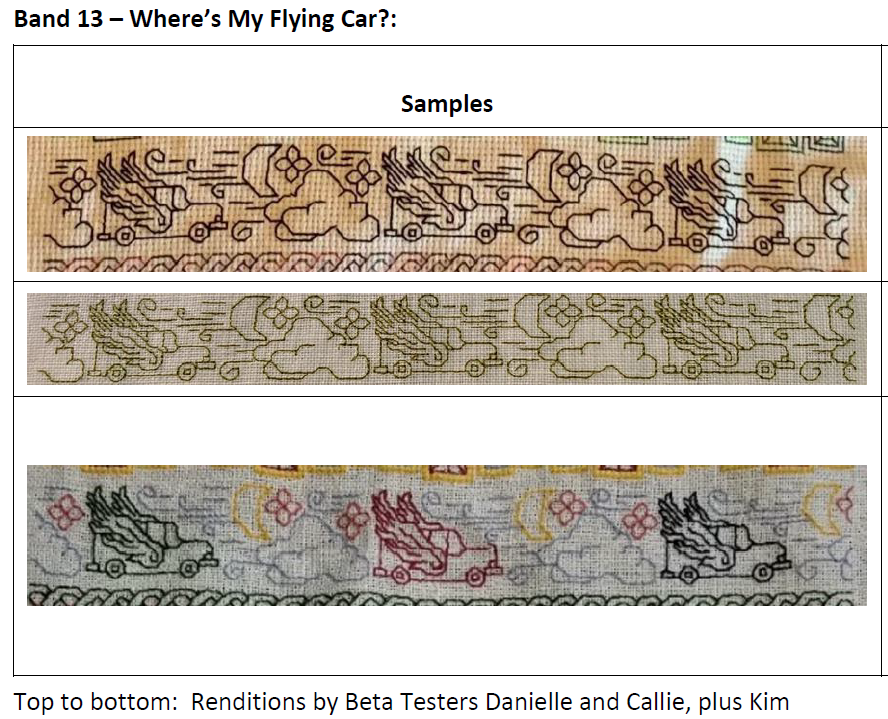
Use one color, multiple colors, or variegated threads, as you prefer. As with the rest of Epic, there are no rules or must-do approaches.
As usual this band plus working notes and hints has been appended to the bottom of the write-up on the SAL page, accessible via this link or via the tab at the top of every page here on String-or-Nothing.
If you are working our Epic Fandom SAL either as a whole or as a strip excerpt, please let me know. It gives me great joy to see how my “pattern children” fare out in the wide, wide world, especially when they meet up with creative, playful people. And if you give permission, I’d be happy to share your pix of this developing sampler, it in its finished state, or derivative projects including one or more of the Epic bands here on String, in a gallery post, with full credit to you as interpretive artist.
Band 13 debuted on the Facebook Enablers group on 12 April. Band 14 will premiere there on 10 May, and be echoed here on 24 May 2022.
#epicfandomSAL
EPIC FANDOM STITCHALONG – BAND 12
We continue, this week’s offering is rest and relaxation again after the last band. Think of the fabled treasures sought in so many books, movies, and series: the sparkling gems, items of destiny, and priceless bric-a-brac. You don’t need to be a dragon to have your own hoard. Just stitch this up.
Time Factor 1 – it’s very simple. The only big challenge here would be all those ends if you succumb to my temptation to do this in multicolor In plan monochrome it would make fabulous trim, and would be even more special if worked in several jewel tones.
134 stitches wide x 8 stitches tall. 2 blank rows left between this and the following strip. If worked as a stand-alone continuous band, one full repeat in 28 units. However, if you want to work just one unit of graduated stones, starting and ending on either side with one complete smallest gem element, the count would be 32 units.
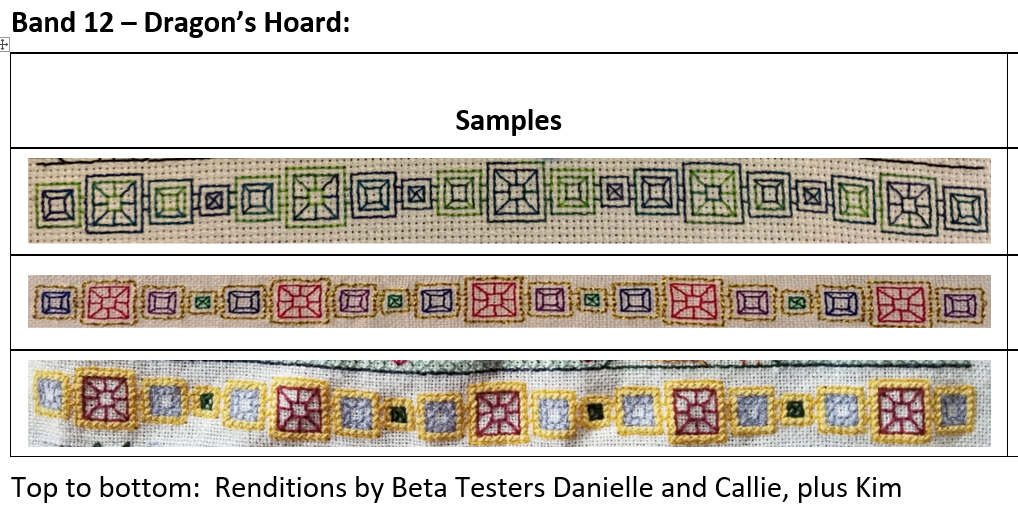
Use one color, multiple colors, or variegated threads, as you prefer. As with the rest of Epic, there are no rules or must-do approaches.
As usual this band plus working notes and hints has been appended to the bottom of the write-up on the SAL page, accessible via this link or via the tab at the top of every page here on String-or-Nothing.
If you are working our Epic Fandom SAL either as a whole or as a strip excerpt, please let me know. It gives me great joy to see how my “pattern children” fare out in the wide, wide world, especially when they meet up with creative, playful people. And if you give permission, I’d be happy to share your pix of this developing sampler, it in its finished state, or derivative projects including one or more of the Epic bands here on String, in a gallery post, with full credit to you as interpretive artist.
Band 13 debuted on the Facebook Enablers group today, and be echoed here on 26 April 2022.
#epicfandomSAL
EPIC FANDOM STITCHALONG – BAND 11
On to one of our heavily themed strips – WHERE NO STITCHER HAS GONE BEFORE.
I know you’ve been waiting for this one. Our voyage continues. To seek out new worlds, new civ… Well, to possibly to try new techniques and have fun along the way.
This is another chance to attempt voiding – filing in the background for dramatic effect (in this case, The Final Frontier). I suggest long-armed cross stitch, plain old cross stitch, but you can see in the examples that one of the more open fills also works nicely. The stars really pop against any of the backgrounds. But even without voiding the piece presents well, so if you prefer not to do it, don’t feel pressured.
Time Factor 4 for height and complexity. Time Factor 5 if you choose to work the background, too. Use one color, multiple colors, or variegated threads, as you prefer. As with the rest of Epic, there are no rules or must-do approaches. Use one color, multiple colors, or variegated threads, as you prefer. As with the rest of Epic, there are no rules or must-do approaches
134 stitches wide x 26 stitches tall. 2 blank rows left between this and the following strip. If worked as a continuous band, one full repeat in 93 units.

As usual this band plus working notes and hints has been appended to the bottom of the write-up on the SAL page, accessible via this link or via the tab at the top of every page here on String-or-Nothing.
If you are working our Epic Fandom SAL either as a whole or as a strip excerpt, please let me know. It gives me great joy to see how my “pattern children” fare out in the wide, wide world, especially when they meet up with creative, playful people. And if you give permission, I’d be happy to share your pix of this developing sampler, it in its finished state, or derivative projects including one or more of the Epic bands here on String, in a gallery post, with full credit to you as interpretive artist.
Band 12 will debut on the Facebook Enablers group on 29 March, and be echoed here on 4 April 2022.
#epicfandomSAL
EPIC FANDOM STITCHALONG – BAND 10
Time for one of the “in-betweeners” – the simpler bands that alternate with the more complex, themed ones. This one is entitled PORTAL TO NOWHERE
Yes, I know this was supposed to be a plain and boring strip. It started out as a simple geometric with some interlaced bits to make it interesting. After I finished drawing, I noted the vague echo of a Portal Cube in its center motif. Subconscious channeling from other dimensions? Probably just coincidence. Yes, that’s right. Coincidence.
Time Factor 2 for height and the overlapping flanges on the motifs (Without those layered bits I’d consider this a Time Factor 1.) Use one color, multiple colors, or variegated threads, as you prefer. As with the rest of Epic, there are no rules or must-do approaches
134 stitches wide x 18 stitches tall. 2 blank rows left between this and the following strip. If worked as a continuous band, one full repeat in 12 units.
| Samples | Fabric Used | Stitch | Thread Consumption/ Notes |
 | 28 count evenweave | Back stitch, 1 ply | About 1 yard each of black and red |
 | 18 count Aida | Back stitch, 1 ply | Variegated floss |
 | 28 count evenweave | Back stitch, 1 ply | |
 | 28 count evenweave | Double running, 2 plies | About 1.75 yards of light red, remnants of light green |
As usual this band plus working notes and hints has been appended to the bottom of the write-up on the SAL page, accessible via this link or via the tab at the top of every page here on String-or-Nothing.
If you are working our Epic Fandom SAL either as a whole or as a strip excerpt, please let me know. It gives me great joy to see how my “pattern children” fare out in the wide, wide world, especially when they meet up with creative, playful people. And if you give permission, I’d be happy to share your pix of this developing sampler, it in its finished state, or derivative projects including one or more of the Epic bands here on String, in a gallery post, with full credit to you as interpretive artist.
Band 11 debuted on the Facebook Enablers group today and will be echoed here on 15 March 2022.

