INITIAL EXPERIMENTS
I’ve started in trying out various approaches and threads for the Unstitched Coif project. Here’s last night’s progress on my sidecar companion piece. It’s the same ground and threads I will use on the main project, but done to keep mistakes off “center stage.”
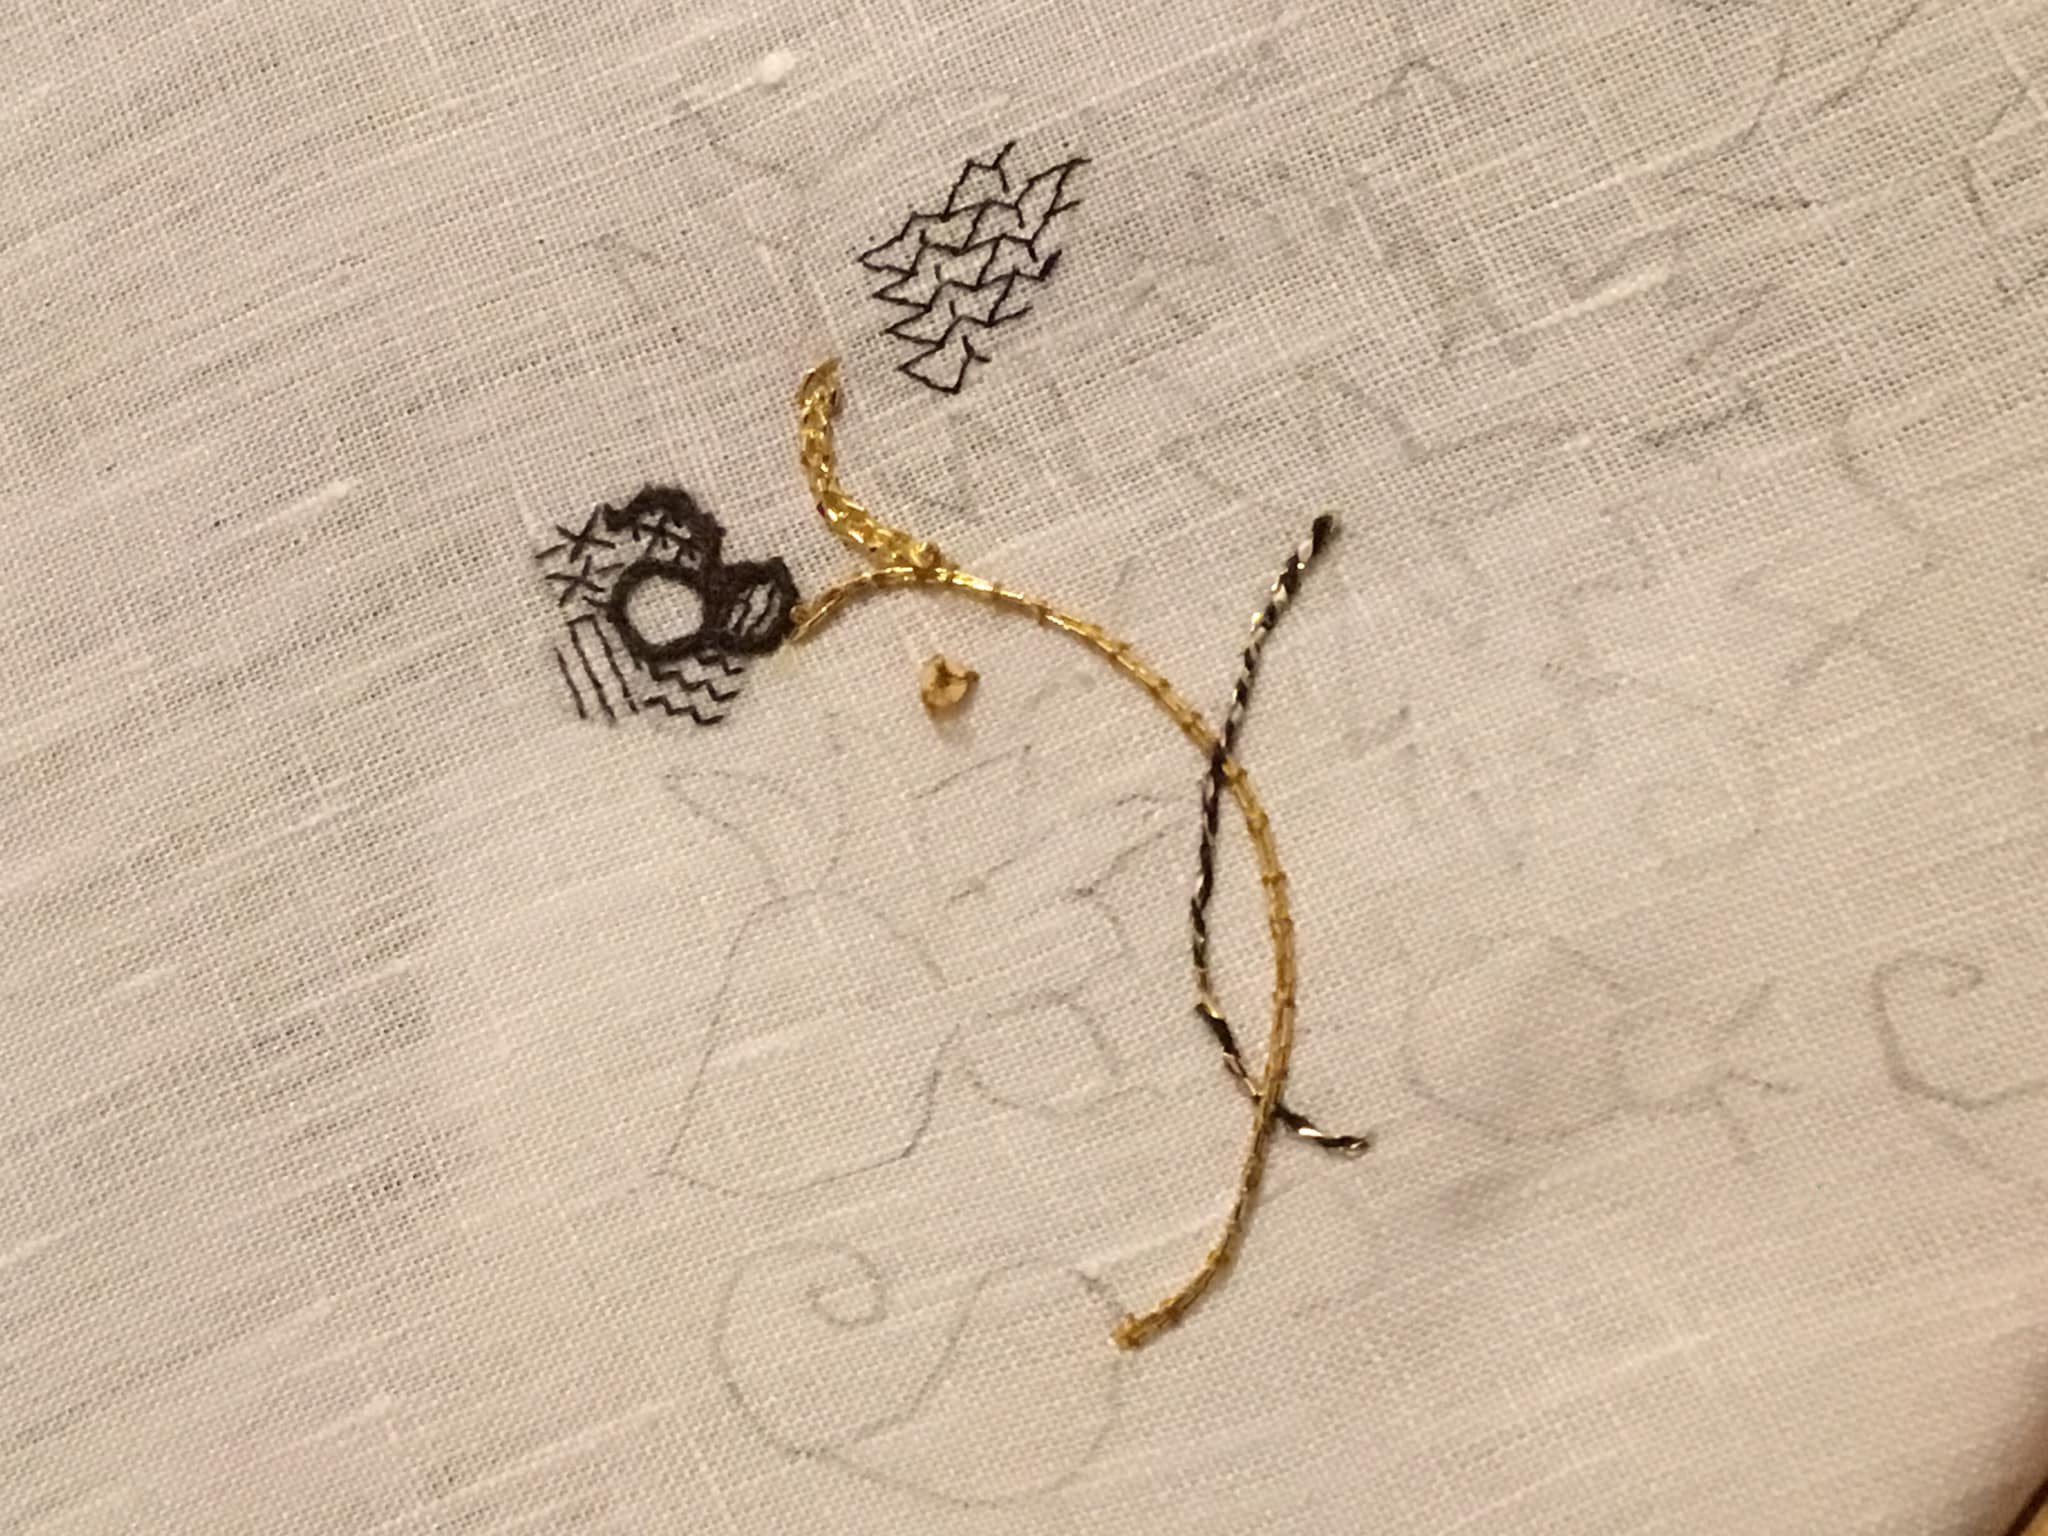
This isn’t final work, just doodles. I am not proud of it, there are lots of things that are sub-optimal. Let’s go through the bits.
First, the couched double strand of Japanese Gold #5. Still getting my mojo back with metal thread couching, I did cross my strands at the beginning of the bit up near the sad little flower, but by and large it worked. And it’s much easier on the flat frame where I can use two hands to stitch, rather than on this little round, where one hand is used to hold the frame itself. If the other hand manipulates the couching thread, I still need a third to tension and bend the metal thread around curves. Sadly, I am only equipped with two hands.
I used a gold color “art silk” for the couching threads, and was able to plunge the ends neatly using a loop of polyester sewing thread to capture them. That thread does not remain in the project. I thread a folded strand into a needle that’s slightly larger than what I would use to stitch, and with the loop trailing, pass it from top to bottom through my ground, then use that loop to nab the metal threads’ ends and pull them through to the reverse.
As far as appearance, not bad. I’ve managed tight curves using this stuff before, and I am confident that I could do it again. But the contrast between the blackwork and the many gold stems might be too great. We will see….
The 2mm paillette sewn just south of the gold stem. It works. It’s the right size for the uninhabited spaces between motifs. I will probably use them to spangle the piece once the majority of the stitching is done. And yes, I used the same faux gold tone silk to affix it, with three stitches.
The thicker gold sprig at the top. Again, that’s the Japanese Gold #5, but used as a passing thread. Only partial success with this bit. I used a reverse chain stitch, and passed the chain loop underneath the legs of the previous stitch, but did not pierce the fabric. While I like the sparkle it adds, it was not easy to do. The wrapped thread denatures, and the #28 needle was impossible to thread. I most definitely need a different needle if I want to use this stuff as a passing thread. Still even though it’s not a heavy plaited stitch and may not be exactly documented as a specific stitch used on historical coifs, the texture sings to me, as an echo of Elizabethan/Stuart era aesthetic. If I can figure out a better needle size, I may use it for some of the logically thicker stem sections. But like the plain couched bit, I am afraid of overwhelming the blackwork. Even more so with with sparkle.
The black and gold stem. Two strands of one of my thicker, stash-aged filament silks. Very fuzzy and prone to catching. I tried out both regular chain stitch and reverse chain (top and bottom of the stem respectively), then I whipped the entire stem with a single strand of the Japanese Gold. Again I had problems with the gold thread unraveling, even though the only place I pierced the ground was at the beginning and end of the stem. Different needle, for sure. And possibly doing it in the other spiral direction. Perhaps I was unknowingly adding to the metal thread’s twist by working in the established direction. But if I can make it work, I do like the look. Perhaps as shown here, I could vary stem treatments, twining full gold with black/gold. Or I could try out a line of double running, back or outline stitch done off count, and whip that, or work another threaded-behind surface treatment with the gold. More thought (and a better needle) is required.
The sad little flower. Been over this one before. My initial stab at counting on this ground. Working over 3×3 threads with one strand of Golden Schelle thread. Not pleased. Nothing wrong with the thread but it but a touch too heavy for the effect I want. That plus my own eyes, the needle size and unfamiliarity with working so fine a count make this bit suboptimal. I also tried using two strands of my slightly thicker stash silk for the outlines, in reverse chain. Too thick. Good for stems at that thickness. Have to experiment with using only one. Or perhaps using two of the Schelle strands for the outlines. More work is needed before I settle on “just right.”
The bit of fill at the very top. This is the debut try-out of one of the finer, newly purchased threads. This one is the one I got off Amazon – YLI 100 weight silk. The tiny spool holds 200 meters.

It has a very smooth finish compared to the others I have, and is quite ethereal. I waxed it with beeswax (as I do all of my threads used for countwork), and that helped give it more body. It was difficult to keep my needle threaded though, because being that fine it could have held a state banquet for fifty more threads of its diameter in the ample eye space of my #28 tapestry needle.
On the effect achieved – yes, I made a mistake in the fill design I was playing with (Ensamplario Atlantio II, #29). I chose that one because it would magnify differences in warp and weft stitch length, both straight and on the diagonal. I am getting more used to working with the magnifier three inches from my nose, and although I have some stitches wrong, they are all in the right spots. The effect though is rather leggy and spider like. This thread may be too tightly spun and smooth for best effect. I will try it out with a double strand next.
So there is my first round-up of experiments. Nothing done yet on the main project. Some food for thought. Some nope. And I am on tenterhooks waiting for the other two threads and the finer needles. But until they arrive, back to the lab for more bench tests!
ON CHARTING
Folk have asked me how I can redact designs from photos. I try to reply, with specific examples from a new-to-me design I just charted up this morning.
First credit where credit is due. This artifact is a work bag in the collection of the Boston Museum of Fine arts, accession number 12.52. Below is their photo of the thing from the page linked in the last sentence.

The museum’s attribution is Italian or English, from around 1600. It’s part of the Denman Waldo Ross Collection, which means it was probably collected before 1900. The description further says it’s done in red silk on white plain weave linen, but does not say if it was done in double running or back stitch. No photos of the stitching’s reverse are shown, although there is a note that implies that when the piece was made up into a bag, a coarser grade of linen was used for the presumably unstitched back side.
The regularity and angles immediately signal to me that is was done on the count. Also that the ground cloth’s weave is not quite even, with a few more threads in the horizontal-appearing direction, than in the vertical. I can tell that from the large center flowers, which although they are quadrilaterally symmetrical, appear to be a bit squished side to side.
First, some base assumptions.
- Modern blackwork and its expanded vocabulary aside, historical examples employ only straight lines, right angles, and 45-degree angles.
- Stitch length units are regular, and are constrained to multiples of a single whole unit, either on edge or on the diagonal. Yes, there are some artifacts with instances of half-unit stitches, but for the most part they are extremely infrequent in foreground design. They do appear sometimes in voided work, to help the stitcher cozy up to the outlines of their previously laid down foreground design.
- Gaps between stitches in a continuously linked design will be the same multiple of the base unit. There are no “floating islands” in this piece. Every bit is straight-line attached to every other bit, and therefore must be on the same base grid.
- Not every iteration of the original is assumed to be spot on accurate. Imperfections in cloth, and stitchers who let mistakes remain or improvise their way out of a mistake can make the creation of a final normed chart a matter of adjudicated compromise, comparing as many of the iterations of the pattern as appear on the piece and deducing the most likely original pattern drafter’s intent.
It’s pretty clear that this photo, while quite good, isn’t the best. Individual stitches blur together. Angles are not always crisp, and the threads have aged over the centuries. Still the base logic and standard shapes that can be formed using the assumptions above remain. I’ve charted hundreds of these, and have a pretty good grasp of what can be done with those shapes, but even if you have fresh eyes and haven’t done this before it’s not impossible. Think Logic.
So. Where to start? That’s easy. At the center.
That big rosette must start at the center with a square of four units. We know that from the little Y units that grow out of it. Heart shape units are pretty common in this work, and it’s also easy to deduce that these must be an extra unit tall so that the center vertical of each ends up one unit above those same Ys. That makes the diagonals linking the center square to the edges of the centermost heart flower two units long.


(An aside: the distortion produced by the less than even ground is evident when you compare the original and my true-square chart.)
The next thing I added was the simple hearts that grow out of the four cardinal directions. That establishes the height and width of that motif. I decided these hearts had flat rather than pointed top corners after looking at several spots on the original, and seeing that to achieve the height as seen, pointy corners would have been too tall – the divot at the center of the heart would not be in proper proportion otherwise. After that I played with the surrounding petal shapes, noting which straight lines were preserved, and noting the parallel size of the right angle juncture where the center heart petals meet with the size of the elongated diamonds that link the center rosette to the smaller flowers. Those have to be two units at each end. And so I filled in the rest of the rosette and those connecting links.
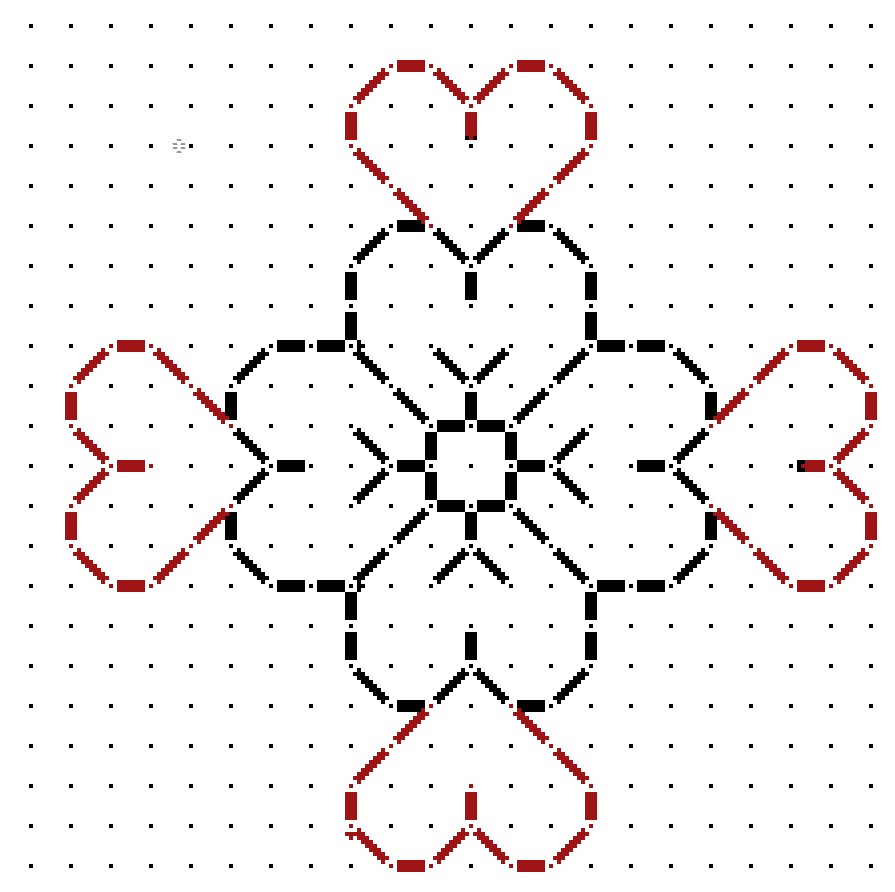

The only thing remaining to create the flower framing motif was to graph out the little blossom. Comparing the corners of those petals it was pretty clear that they WOULD have to be pointy to make the motif congruent with its own center square, which is clearly the same size as the larger rosette. Easy. So is chaining two together to make the inter-rosette connections. The only thing I had to watch for was the direction of those little leaves sprouting on the side. Those had to mirror around the center. A simple matter of copying and pasting, with flips as needed.
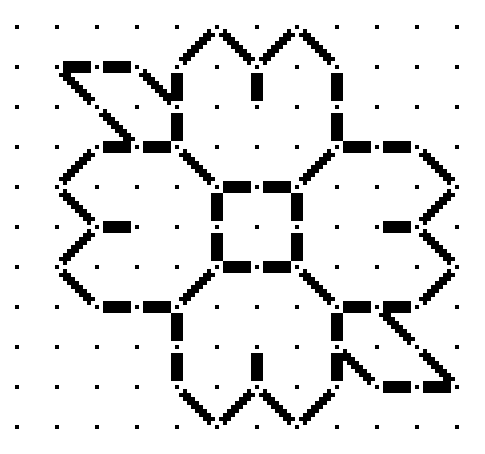

The chart at right is pretty much the entire logical repeat for the floral frame (click on it if it truncates on your device). Now for the harder part. The stemmed sprig of hops? grapes? whatever? is NOT symmetrical at the bottom. For that we have to rely on alignment with the wonderfully and conveniently regular floral frame.
Yes, this part is harder, and sometimes takes quite a few trial-and-error iterations before I hit on the logic of the original. In this case it wasn’t that difficult. Although it’s not possible to count stitches in the photo, our base assumptions and our clearly defined frame made it rather easy. I look for alignments and spacing when compared with the frame. For example, if you compare the red alignment lines on the photo of the original to my chart, you see I hit all the bases. There are lots more points of alignment and extrapolation than just my few red marks. And yes, long familiarity with the shapes and curves possible does make it a bit easier.


You can also see in the original that the curlicues do not always “lay flat.” Some have fallen victim to age and loose stitching. In most cases I had to sift through multiple instances of the repeat and come up with a best guess. And in this photo is one thing I often add – a deliberate interpretation that’s a tell-tale, so that I can spot unauthorized reproductions of my charting, even when others claim to have charted the same original on their own. (Don’t laugh, this does happen. Mapmakers still do this to spot knockoffs, too.)
Thankfully the upper part of the sprig is symmetrical. I use the same alignment and spacing methods to fill in the tightly packed flower/fruit shape and the lily-like finial on the top. The best part of that is once I’ve got a good stab at half, I can cut and paste with mirroring, rather than doodling in every line segment.

And the whole thing together – click here for an easy to download, save and print PDF. Note that a full size page version of this design is also available in the permanent free embroidery patterns collection tab, scroll down to the linear patterns section.

As with all my charts, I copyright my own graphed interpretation, with no claim on the parent object that inspired it. I make this chart freely available for your own personal use. If you intend to incorporate my charting into your own design, and especially if you intend to sell that design OR if you wish to use this to produce items for sale or fundraising purposes – you are requested to contact me before doing so.
GALLERY OF APPRECIATION
UPDATE: 6 FEBRUARY 2024 – I’ve added a permanent page for the Gallery of Appreciation. Click here, or find it in the tabs listing, above.
——-
I adore it when I see projects folk have worked up from my designs. I’ve shown off a smattering of them here on String under the tag “Gallery” on the categories list, but I have fallen behind of late. I will try to be more timely posting these fabulous finishes (and works in progress), as tribute and thanks to the creative people who have returned joy to me.
Right now I have several such submissions lurking in my email inbox. Apologies if you have sent photos to me that haven’t appeared yet. It’s a big inbox, and I am combing back, looking for the flags. Names and photos appear here with the permission of those who sent them. I also have some requests out to folk who have sent me photos, but from whom I do not yet have express consent to post. And if you’d like your work to appear here in a subsequent gallery post, please drop me a line. My Gmail address is kbsalazar (in the usual email format).
So in no particular order other than my stumbling around in the dark, I present the first of what I hope will be a renewed series of proud pieces.
The Second Carolingian Modelbook
Sent in by Alex Logsdon, a genuine original composition featuring many motifs from T2CM, selected, snipped, and arranged in true “bungee jump stitcher” mode – picked on the fly and fitted to the space available. There haven’t been many finished objects from my latest book, and this one made my heart sing.

The New Carolingian Modelbook
Elaine Cochrane is working on a big purple band sampler, and has included in it some strips from TNCM. Elaine is also choosing designs on the fly in bungee-jump mode. I love seeing her piece evolve with the addition of each new bit.

Ensamplario Atlantio, Volumes I and II
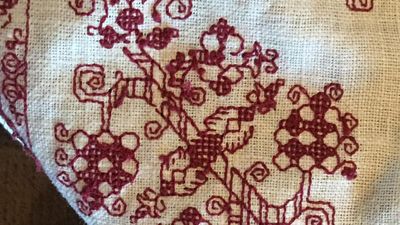
It’s hard for me to separate out the fills in the two volumes in the EnsAtl series. With only a few exceptions, even I can’t remember which ones are in which book. V Louise Behrman is working on a couple of projects using the patterned fills from the books. One is a lovely bit of inhabited blackwork – panels for a casket (a small fabric covered keepsake/display box), the other is destined to be made up into an adorable needle book (a small fabric folder to keep needles safe, dry, and at hand). Both images below are (c) V Louise Behrman, 2022, and appear here with permission.


Epic Fandom Stitchalong – Adaptations
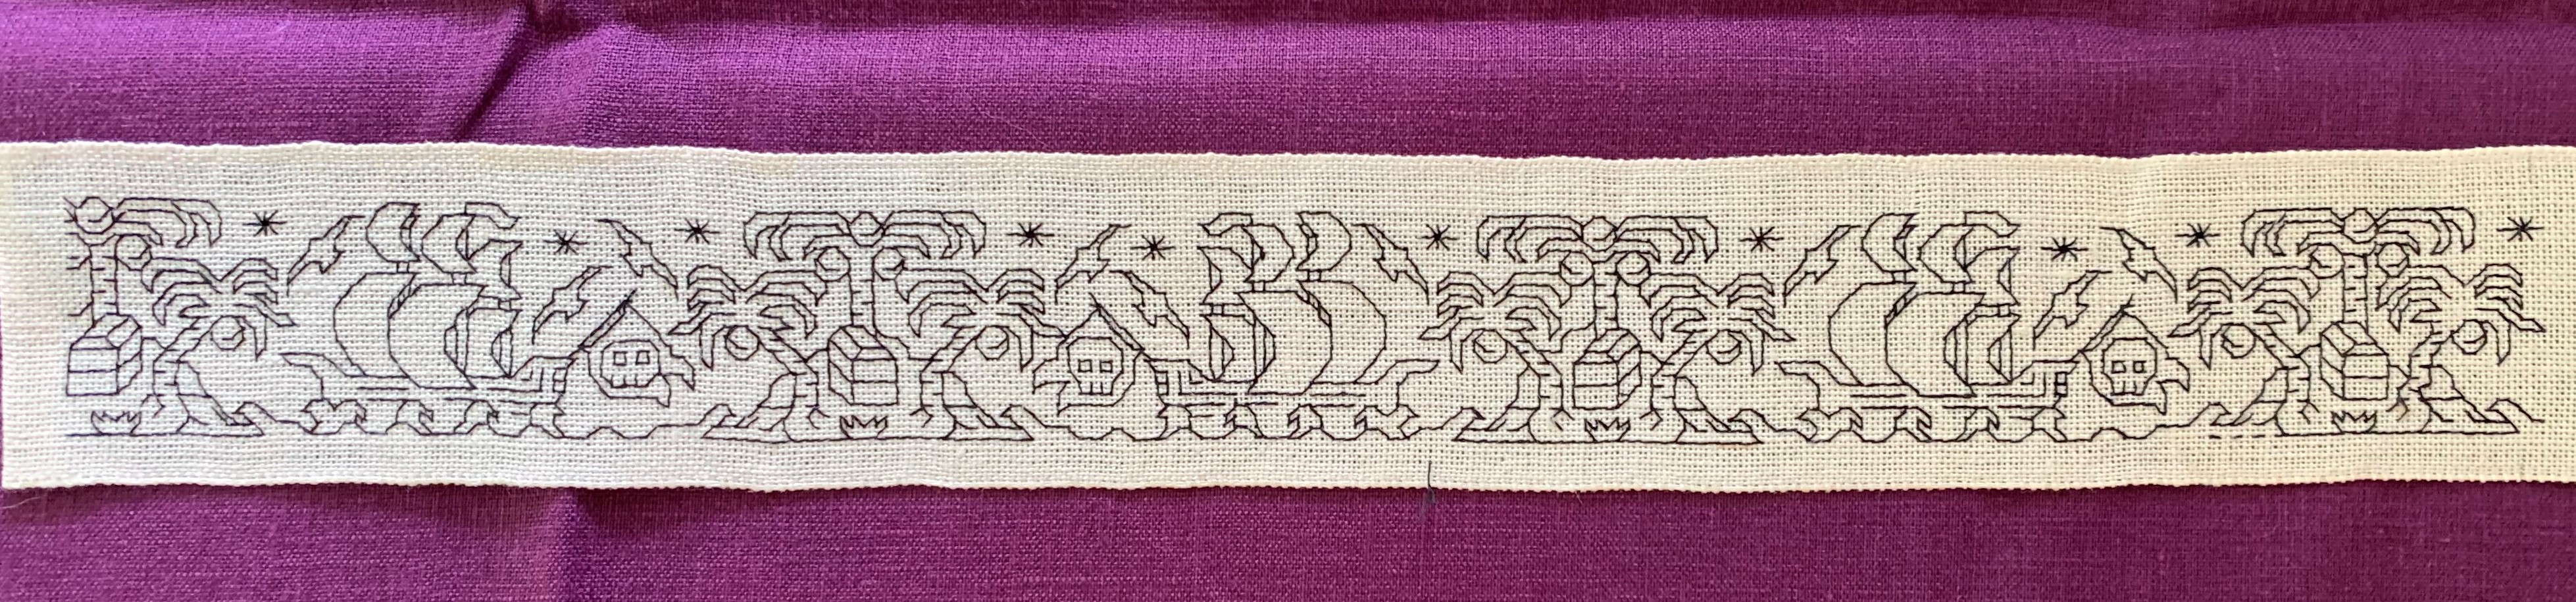
Long time friend and occasional SCA mentor Robert Himmelsbach was a stealth beta tester for some of the bands appearing as part of Epic Fandom. He used the dinosaur strips to make collar and cuff ornamentation for an otherwise historically accurate Renaissance era shirt, proudly proclaiming his ancient lineage and participation in that group’s pre-history (provided you look closely enough at his outfit). He is intending the pirate strip for a second shirt.
Links and/or info about the books mentioned are at the “My Books” tab above. The Stitchalong also has its own tab, above.
FIELD OF FLOWERS FOREHEAD CLOTH
My quick project gets off to a flying start. I’m about 20% done already. I started out with my hand-held 6 inch hoop to get close to the irregular corner of my linen scrap, but now have moved back to the larger 8 inch sit-upon.

The pattern itself is an original doodle destined for the next volume of Ensamplario Atlantio (as usual, no ETA on its release yet, but I’ve got the first 8 pages done). It requires a bit of attention, the diagonal columns connecting the saltire flowers carry twists in various directions, depending on where in the design they are, but overall the pattern itself is more repetitive than difficult. So to up the interest factor, I’ve transformed my original strip/border/edging layout into large, interlocking hashmark-shaped motifs, and am working each one in a different color. The final will have a patchwork meets jigsaw puzzle effect, kind of like a kid’s puzzle mat.
The other item of interest in this one is the thread. After reading about how others were using Sulky, a single ply hard twist thread intended for both hand and machine embroidery, I decided to give it a try. The ground is roughly 32 threads per inch linen, give or take. I am using a double strand of Sulky 30 weight.

First impressions are quite good. The 500 yard spool put-up is very convenient, as is not having to separate plies as with floss. It works up very quickly in linear stitching – the hard twist, firm nature of the thread eliminating the occasional snags and catches that can slow down softer, more friable floss and silk, when stitching with one hand above and one below. It also is amenable to being used in much longer lengths than regular embroidery floss. Longer thread length means fewer stops to end and begin new threads, so that speeds up stitching a bit. And it makes very crisp lines and corners. The hard twist paired with a blunt point needle makes the junctions where stitches cohabit easier to keep clean. There’s far less chance of a split stitch when stitching back up or down through a hole that is already used by a previous stitch, even when using (near) evenweave linen. I also like the way the dense, round thread keeps its “height,” with the stitches standing proud of the surface, rather than splaying out like floss strands do. Of course that means that floss strands provide better coverage for other types of stitches, but for linear work, clean lines and sharp corners take precedence. I try to capture the “depth” of the stitches below.

On the down side, I do note that colors do crock a bit onto the ground cloth even though the thread is not fuzzy. This is mostly evident when mistakes are picked out. Hints of the previously stitched color remain. To be fair, floss does this too, with the added annoyance of more stray fibers. My Silly Putty kludge works well enough on the color halo left when picking out Sulky, though.
So in my opinion Sulky 30 (double stranded) on 32 count linen is a good pairing. I will continue to explore its use, and report back on wash properties and durability. I would even go so far as to recommend it for folk who are interested in trying double running stitch on medium to high count evenweave. I think the properties outlined above would make it easier for those just starting out on their own blackwork journeys to achieve superior results.
Please note that I pay full retail for the materials I use. I do not accept freebies in exchange for reviews, nor does String participate in product placement schemes. Opinions here are entirely my own.
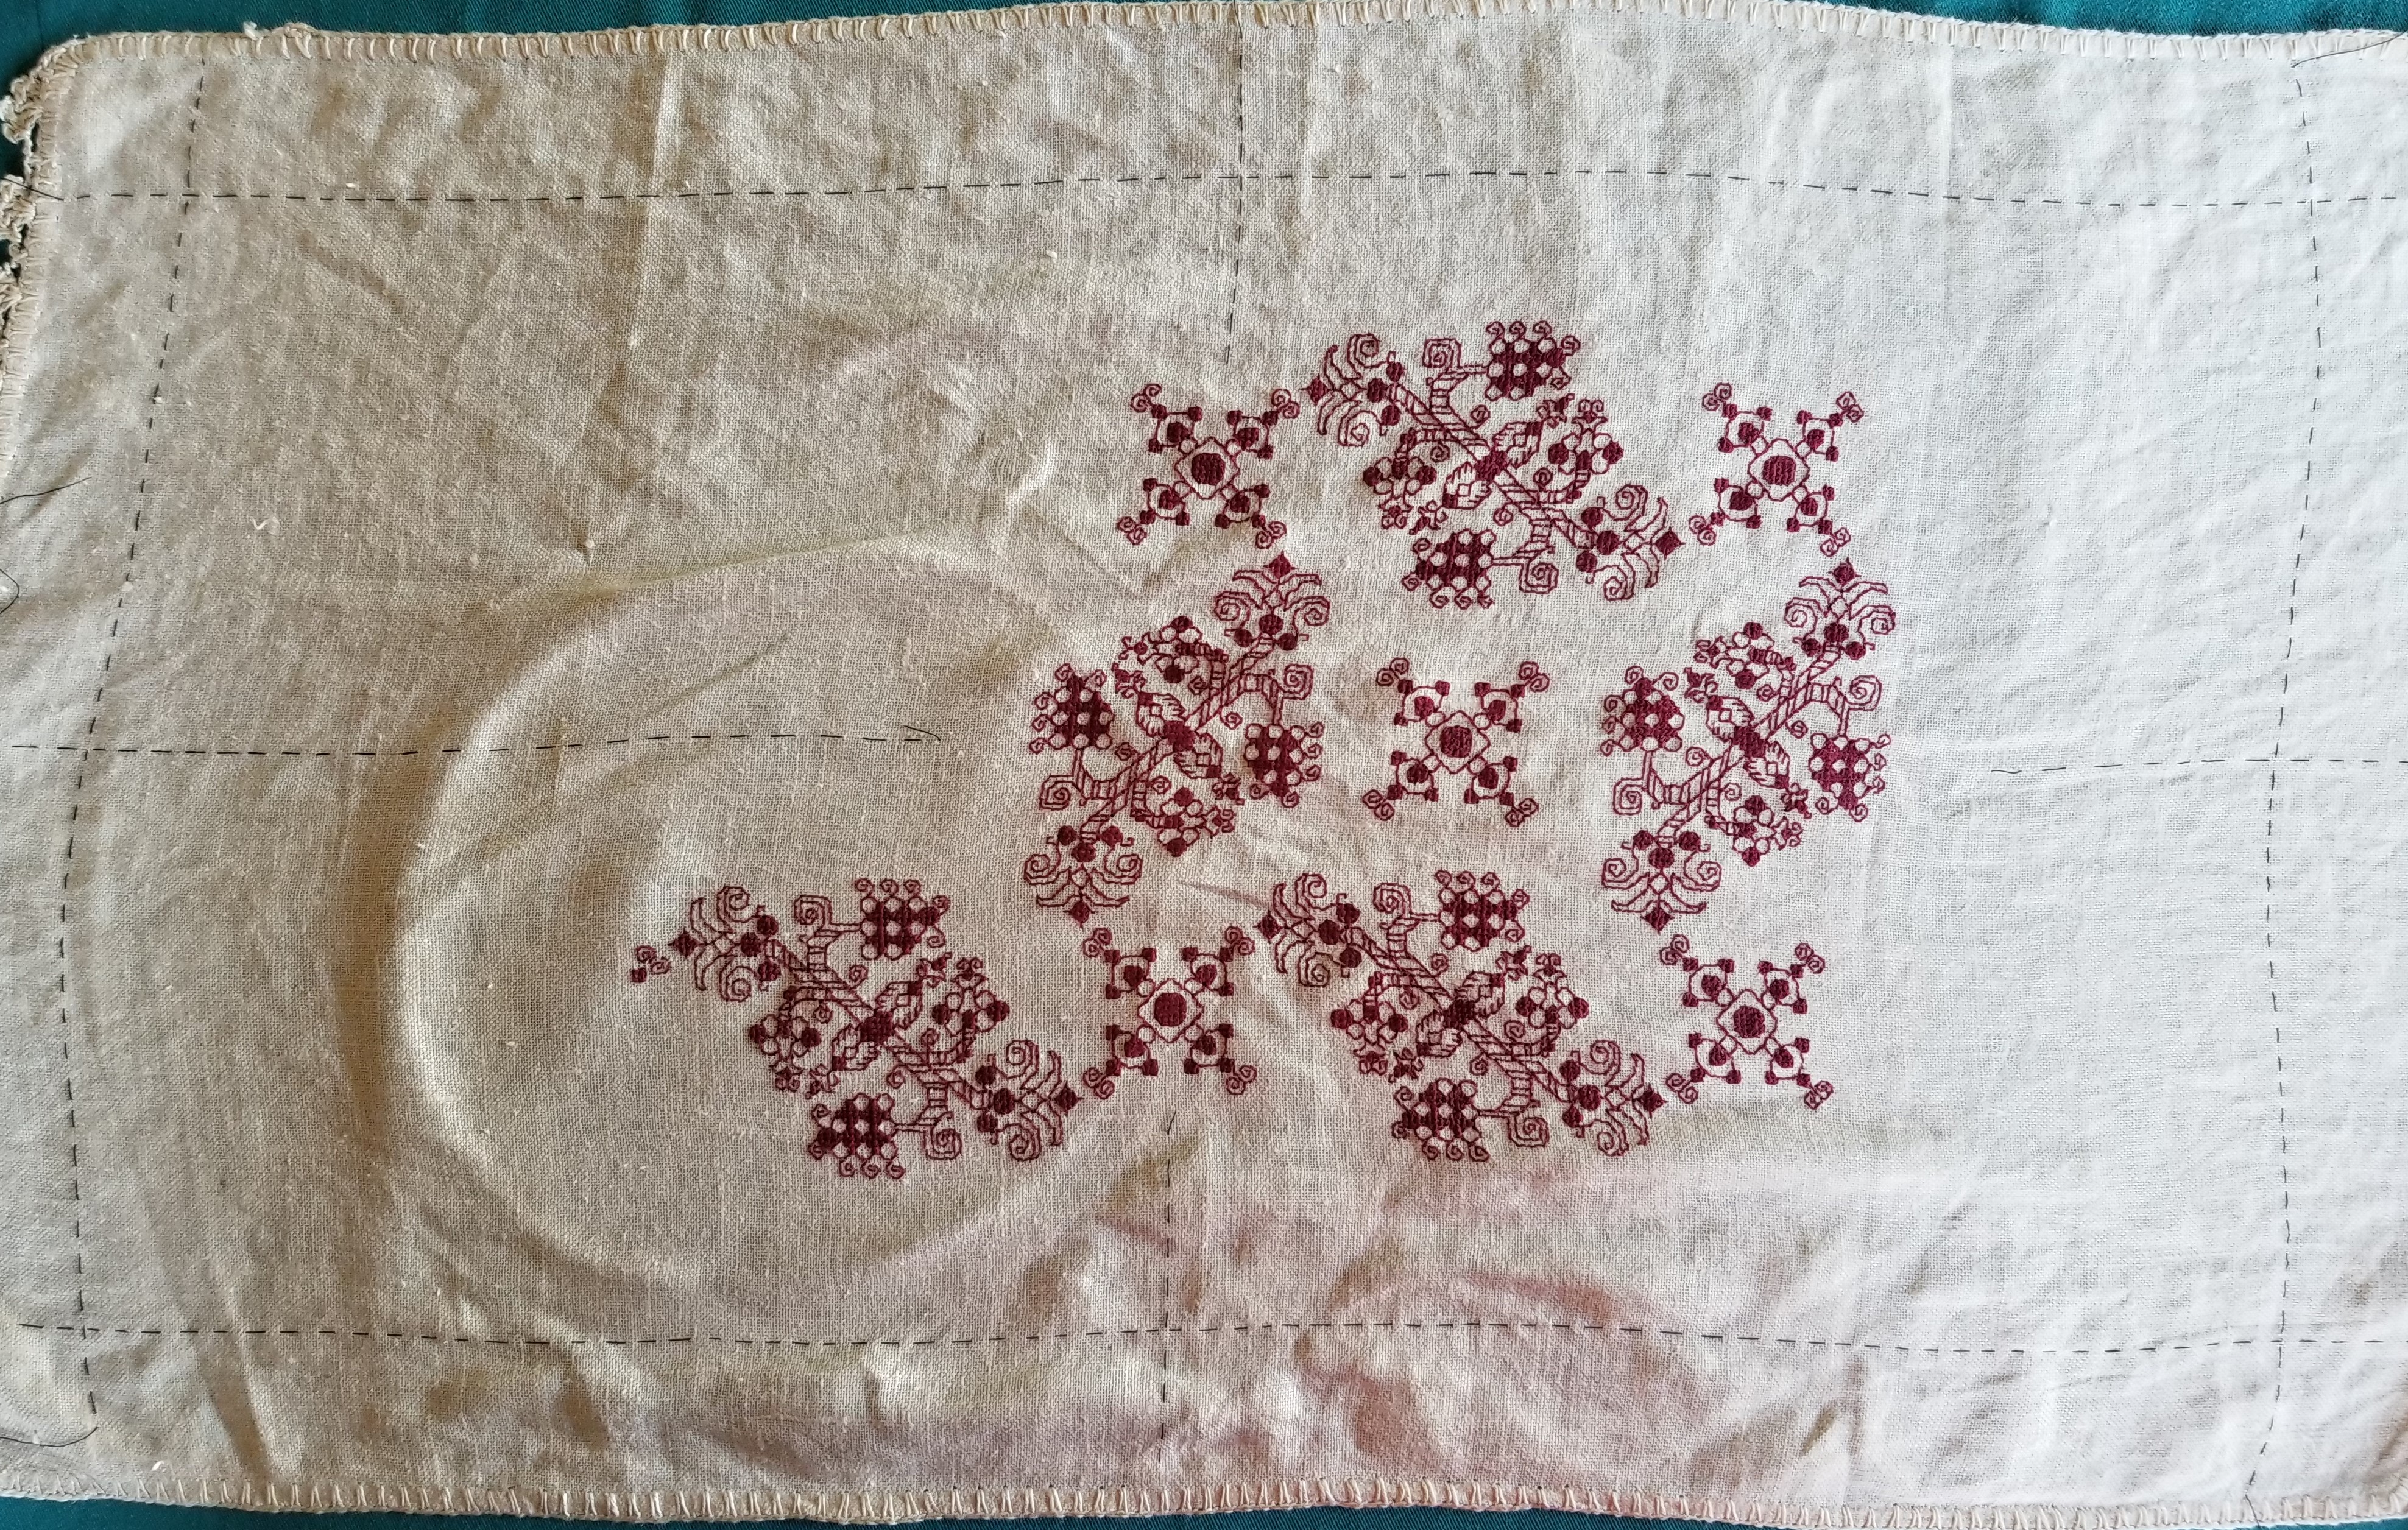
DIZZY GRAPES DONE!
A finish. I began at our Cape place around 14 July, and finished last night at the Cape place on 25 September, about 73 days of stitching, working an average of about 2 hours per day.

To recap, this was a vintage dresser scarf, clearly cut down and re-edged from some older piece of linen. It was very well washed, and although it had no broken warp or weft threads, there was a lot of blooming, where the linen breaks down a bit, with threads fused together and some slubs. The count wasn’t consistent, with some threads being much thicker than others, but spot measurements ranged from 28 to 34 threads per inch, mostly averaging out to between 30 and 32. It was ever so slightly skewed, but no where near as badly as other non-evenweave grounds I’ve worked lately.
The pattern has two parts – the main field which I redacted from a 17th century Italian cushion cover held in the Hermitage Museum, shown below (Accession T-2736 in case the link breaks). The companion border I doodled up myself.

Amusingly the skew count of the ground used in the original is greater than the skew of my vintage linen. You can see that clearly in the smaller motifs which chart out as squares, but appear taller than they are wide. Also my redaction norms the spacing of the motifs, which in the original does vary by quite a bit. But I preserve the “creep”. Look at the partials around the edge of my piece. They rise from/sink into the static edge line, each iteration of the swirl being offset from the previous one by a stitch or two in each direction. You can see the same thing on the original.
I stitched the design in garnet cotton (DMC #815). It took almost all of seven skeins. I worked the linear bits in double running, and the solid bits in a variant of Italian four sided cross stitch (basically cross stitch, but in a box). The version I chose is NOT double sided, instead it produces a grid on the reverse. The only reason why I chose that version is that I hadn’t attempted it before. I have no historical reason to pick it over the more usually done fully two-sided version. The full double sided version is more or less the same stitch that forms meshy totally overstitched grounds, but done “gently” as surface stitching, and not pulled to the max to both totally encase the ground threads and produce the characteristic mesh ground found in so many museum artifacts. Here’s my back showing the grid structure of my single-sided interpretation.
On the whole I am quite pleased. My goal of making a splendid runner for our sideboard has been achieved, and I can retire the old, ratty placemat that’s there now. It’s The Resident Male’s favorite spot for opening bottles of wine, and now he can do so in a style appropriate for a Renaissance princeling.
Things I would do differently. Hmmm…. I now wish I HAD done the solids in the reversible variant. Not because I want to have a true double-sided piece, but because I want to play with the challenge of that stitch some more. (Additional future experiments are warranted.) I’m also not entirely pleased with leaving the original dresser scarf edging on this. For one, the non-rectangular nature of the cloth is more evident with my on-grain, symmetrically sized stitched area. It bothers me. But consensus seems to be to leave it alone. So I will. For now at least.
And so I move on to an interim project. I have a wild departure queued up for my next big thing, but the materials to do it aren’t here yet, so I digress.
I want to make another forehead cloth. I really enjoy wearing the two I did a few years back. They are more fun than bandannas or scarves, and do a good job of keeping the hair out of my eyes. I have a piece of linen scrap I am considering. It’s very densely woven though at about 32 threads per inch, and I am not sure that it will show off my chosen design to good effect. (I do have an airier alternative, but I prefer the look of the scrap.) I don’t remember whose leftover this is, but send thanks again to The Anonymous Donor. As you can see I’ve plotted out the corner of my triangle.
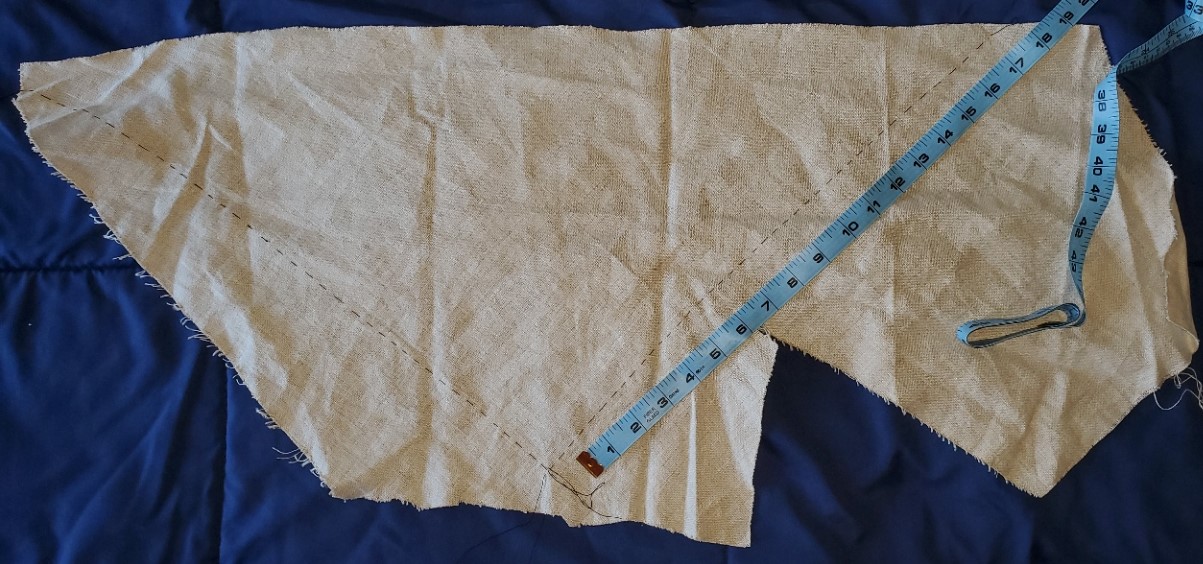
There is plenty of real estate on this piece of spill, left over from Anonymous Donor’s sewing project. I’m aiming to make something midway in size between the two forehead cloths I already have. Something in the range of 14 inches for the non-hypotenuse sides.

Shameless plug department: These two pieces have been worn heavily and washed without mercy for the past three years, as can be seen by the frayed ties. But look at the stitching, it’s as good as the day I finished. I did it in the stranded silk thread hand dyed by my apprentice using a historical recipe. NO fading, no breakage in spite of the ground’s distortion from being stretched in wear. No harm to the ground beneath the stitches from the dye used. It’s a small batch item, and not always available, but when it is, it’s worth it. Highly recommended.
Back to the project at hand. I will be stitching a rather dense design I recently doodled up. I’m working on Ensamplario Atlantio III, and that pattern will be part of it. And I will be trying out Sulky thread, a spooled mercerized single strand cotton sold for hand and machine stitching. Possibly in polychrome. I have black, red, blue, and green, so I have scope to play.
More on this one as it develops, of course…
BADGE TETHERS AND MORE METHOD DESCRIPTION
In the last post I started a method description on working a large project without having to do a full chart of the entire design. I’ve now finished the first end and am starting on the second, so I continue the discussion.

I worked both the top and bottom borders to the same logical stopping point. Since I had begun both of them aligned to the exact center of my piece and was careful to follow the design exactly, the ends of both lined up. More or less. There’s actually one FEWER unit one one end of the top of the end strip than there is at the bottom. But I also bet that without knowing it was there, zooming in and looking for it, you would never have noticed. Again, a variance but not a fatal error, and far less egregious than the errors I’ve spotted on historical pieces.
There’s a lot of “white space” to the right of the stitching, but bear in mind that the opposite side is the one with the wonky end has less free space to play around in (it’s not just photo foreshortening, it’s really not parallel to the edge line I based on the true grain of the fabric). So in order to leave enough room even at the narrowest point, I have allowed for more “waste ground” on the more generous edges. I also am not sure exactly what I will be doing for the border yet. I was thinking a simple hem and some needle lace (picking up something I haven’t done in decades), but there’s also the temptation of a withdrawn element Italian style hemmed edge. And I may just leave all such elaborations off for a bit, to mull it over some more and possibly rehearse those very rusty techniques.
Anyway, back to the stitching at hand. Note also that in the shot above, I was working the bottom border out to the left, to the exact same stopping point as the edge on the right. I continued and finished both long side borders. So it was on to the second short side.
In the photo below the piece has been flipped so that the bottom in the shot below is now at the top. But where to place that second border?

Since the left and right ends of both long side strips end in exactly the same place, it’s easy. I went over to the finished work, determined that the “collision line” where the border meets the field pattern aligns with the curly end of one of the little sprigs that grows up from it. So I found the corresponding point on the second side and began the first pass of double running down it. I didn’t do the whole side, because I know I’ll be working those curls and sprigs eventually, and rather than risk a massive miscount due to the long run between those sets, I would prefer to work the larger floral border, then fill in the little secondary one once that’s been finished. But I DO need to know where the collision line is so I can fill out the truncated edges of my main field design.
I will probably begin the large border again from the center, although since the end points of my other short side border are known, I could just mirror those. We will see where whim and fancy take me. At this point, all of the known issues have been worked out, mitigated, or blissfully ignored. It’s just dogged completion of the motifs and borders from now on.
GADGETS – THE BADGE TETHER
Last year I mentioned using a retractable badge holder to help corral my scissors at the beach.

I clipped it onto the straps of the drink holder of my beach chair. That worked so well, I’ve been looking for ways to do something similar at home. I tried clipping the things to me or wearing my old work lanyards. Too fussy. My favorite stitching chair is wood and leather, with no good clipping spots on it. But I’ve been working this current project on my Hardwicke Manor sit-upon hoop/stand combo. It has a nice, long screw clamp. The clip jaws of one of my badge holders fits exactly on the exposed screw.

While I’m showing the thing holding my favorite scissors and laying tool, with both lapped in front of the work, in actual play the angle of the badge head suspends them behind and away from the fabric, so catching isn’t a hazard. I love the convenience of not fishing around for often-used tools, and the fun of repurposing these tiny work albatrosses for greater ease.
Oh, and on my big flat scrolling frame, remember those penny size strong magnets I glued to the uprights? They hold the badge leashes quite securely, too. So I have the advantage of tools-to-hand on my flat frames, too.

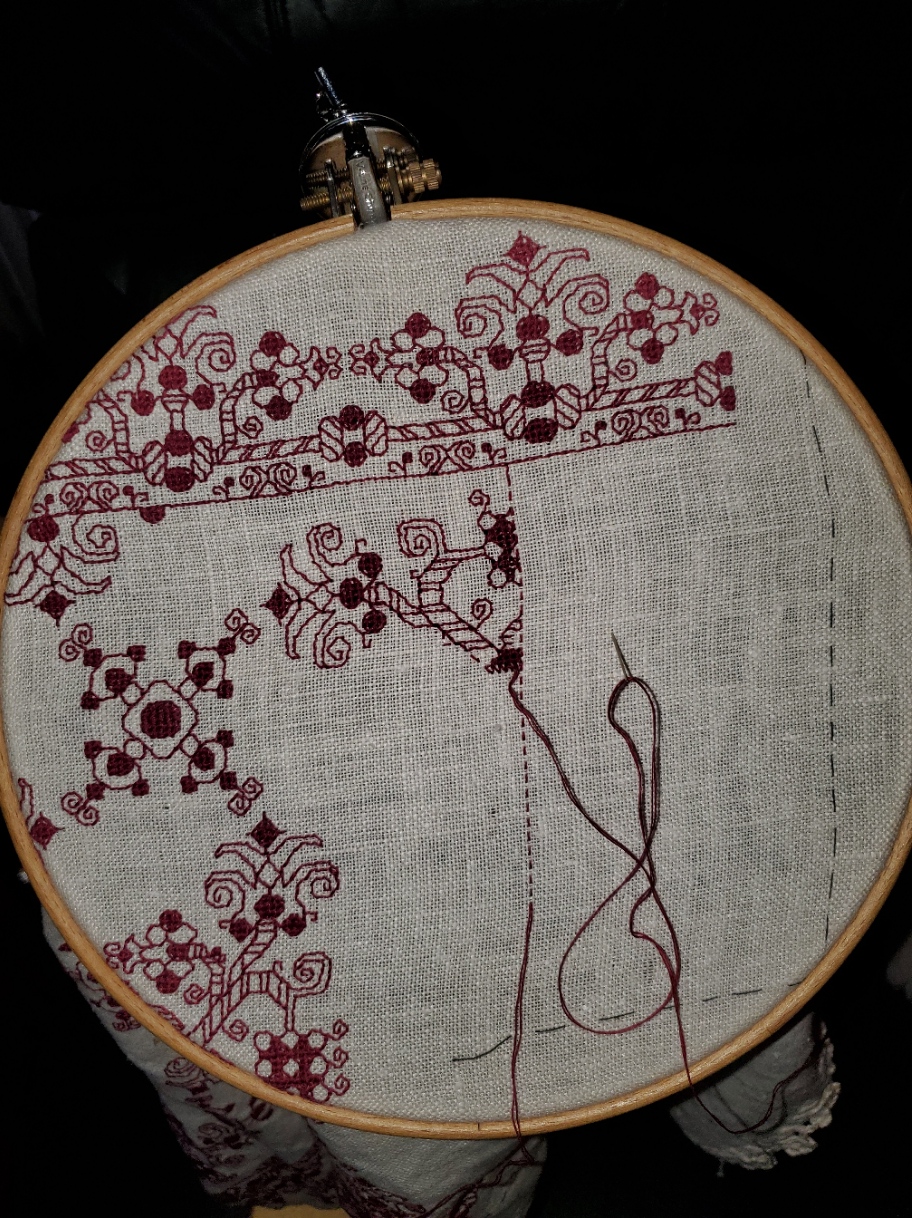
INTO UNKNOWN SEAS – METHOD DESCRIPTION
A couple of people have sent me private notes asking about how I go about designing a larger project without graphing the entire thing. I attempt to answer, using the current Dizzy Grapes sideboard scarf/placemat as a possible approach.
It’s true I didn’t know how I was going to proceed when I began this project. I had a graph for the main field repeat, but only one iteration of the design, but not a chart for the entire area that design would inhabit. I didn’t have a border (yet). I had a piece of cloth of dubious cut and unknown count, and I had picked a thread well represented in my stash, with known easy-care laundry properties. I knew I wanted to make a large placemat type sideboard scarf, as big as attainable given the materials on hand.
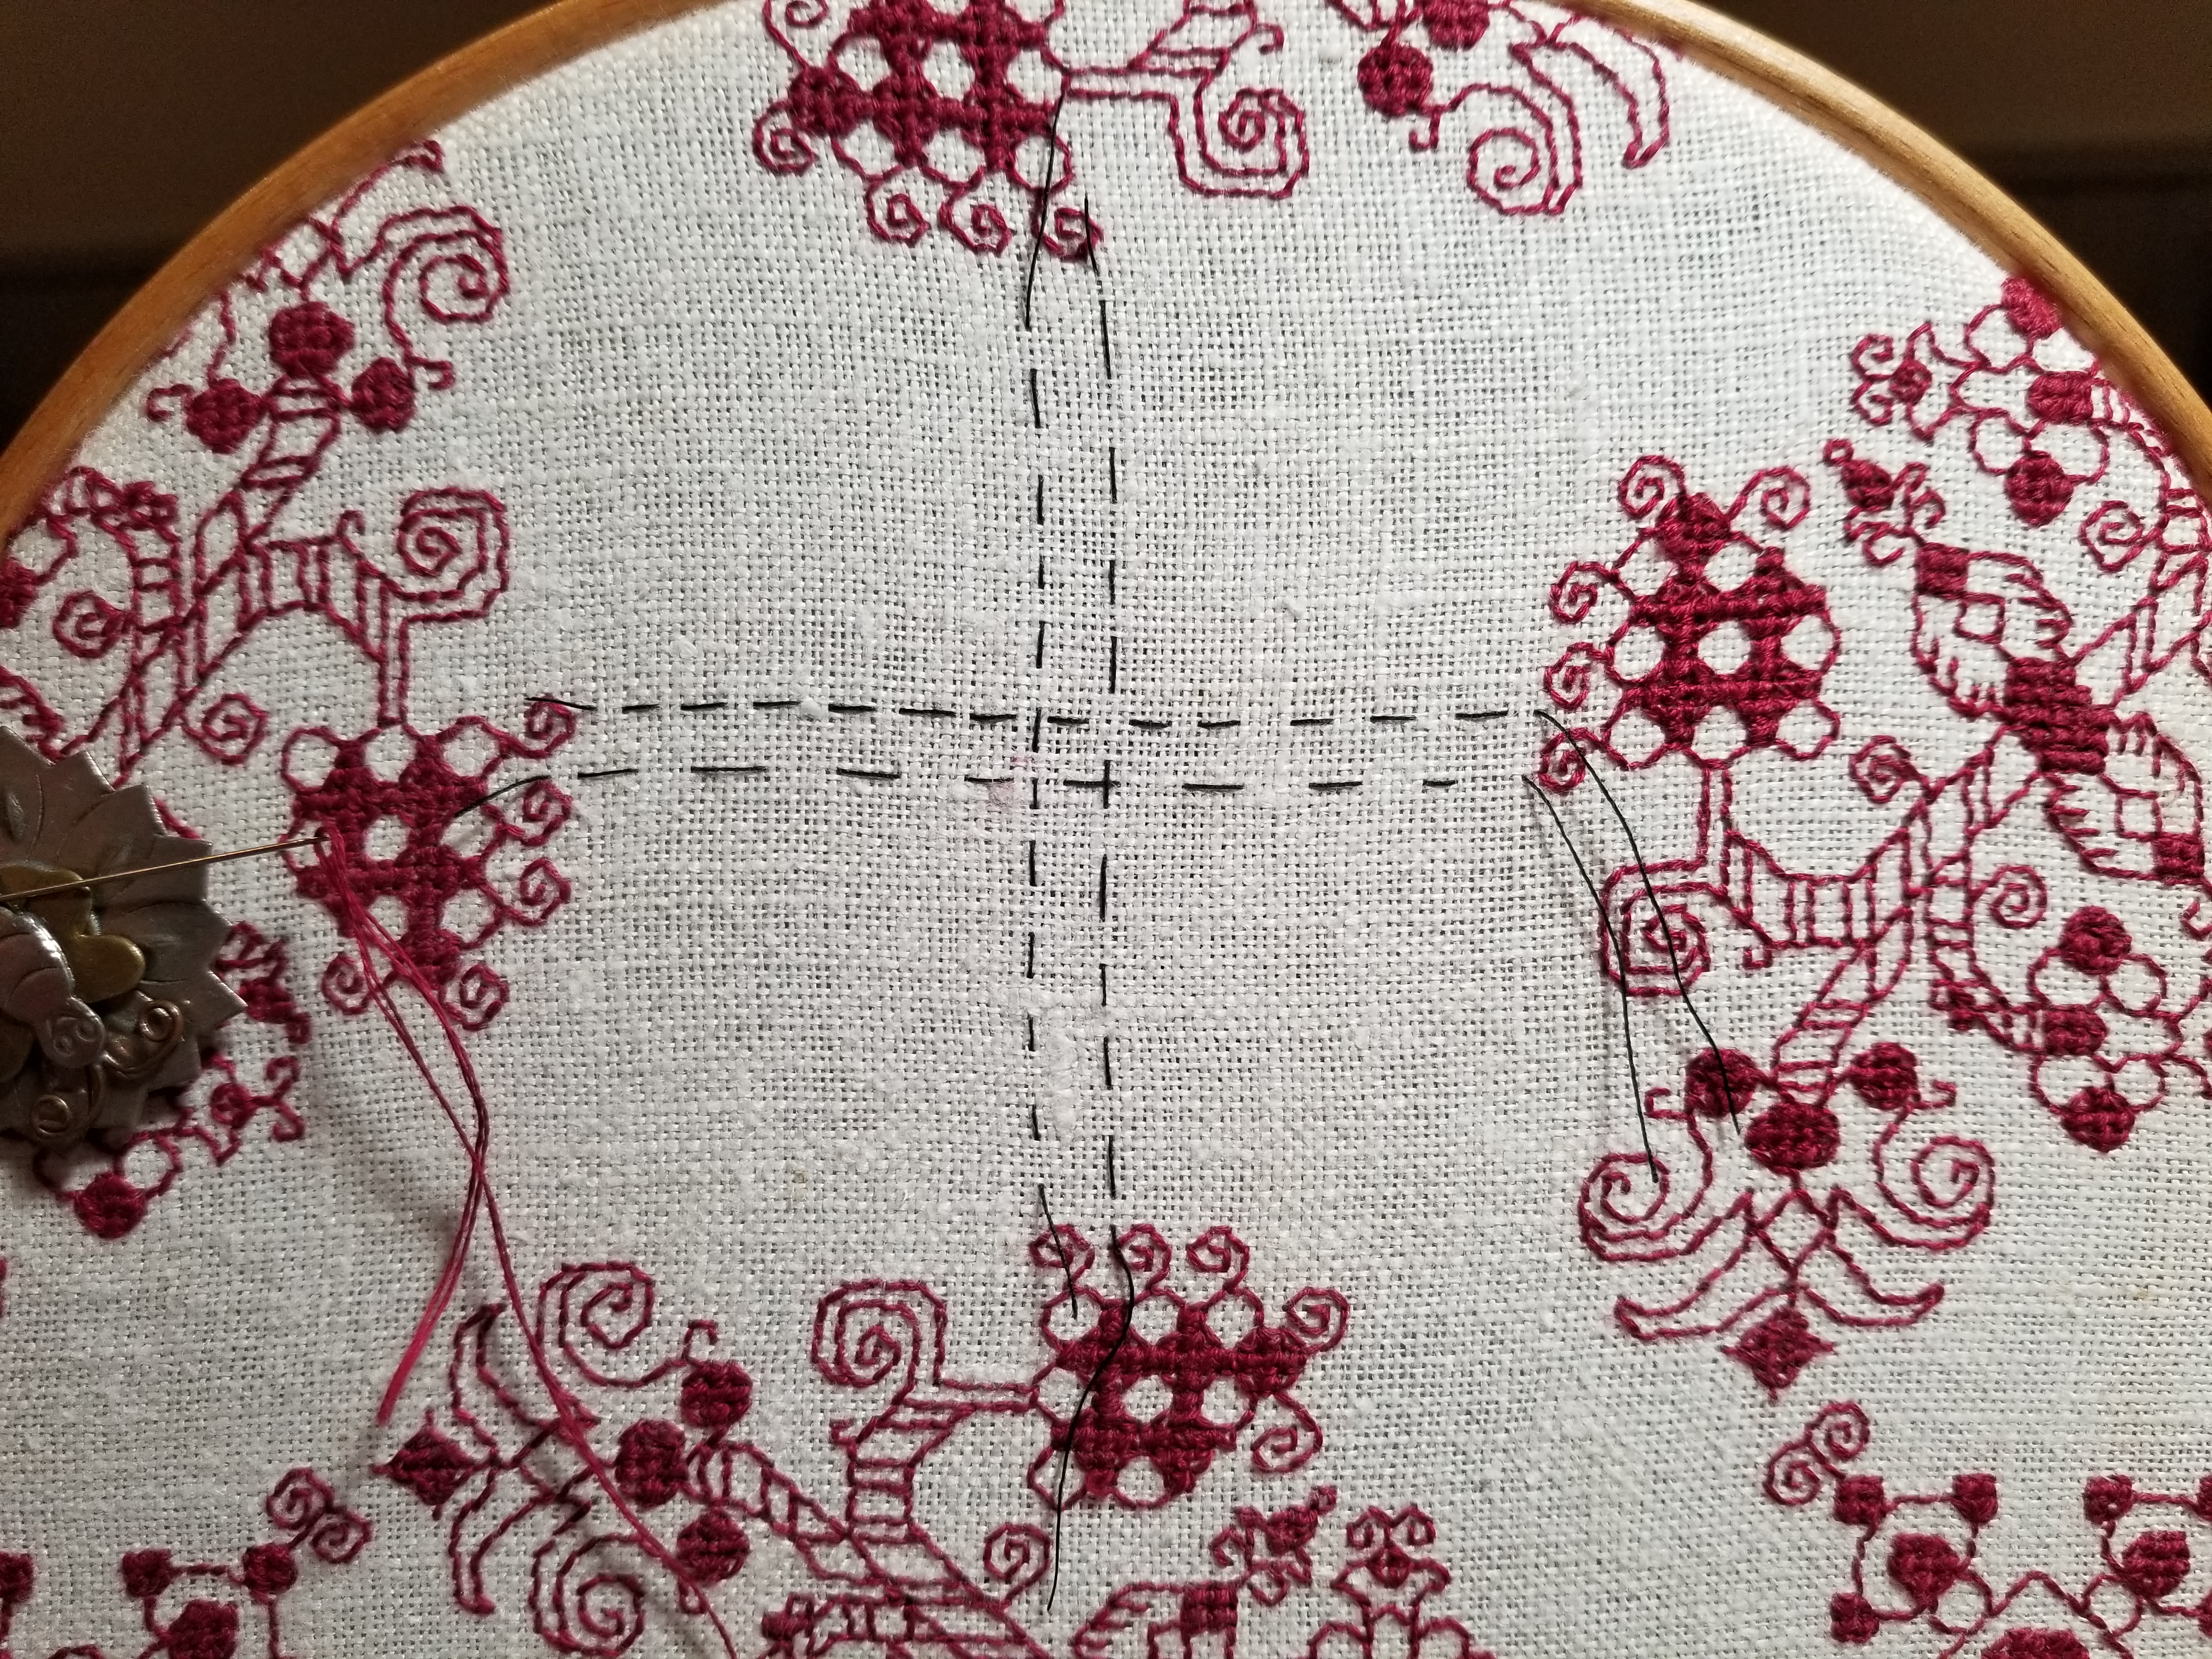
The first thing to do was to figure out the largest possible area I could stitch on my unevenly hemmed ground. Leaving a bit of a margin around for easy hooping, I took plain old sewing thread and basted in a to-stitch area, with a bit of a margin. In doing this I discovered that the person who had reclaimed this bit of antique linen and done the crocheted edge treatments had a rather liberal interpretation of rectangles in general. Once my edges were basted in, I used simple measure/fold to determine the center lines, both north/south and east/west. Those were basted, too. Here’s that first step:

I also determined the thread count of this well washed, buttery soft vintage linen. It averages about 32 threads per inch, but is quite uneven, ranging from 28 to 34 in places, but didn’t dwell on that beyond satisfying myself that there was enough “real estate” inside my designated area to accommodate at least two full repeats of my chosen design across the narrow dimension.
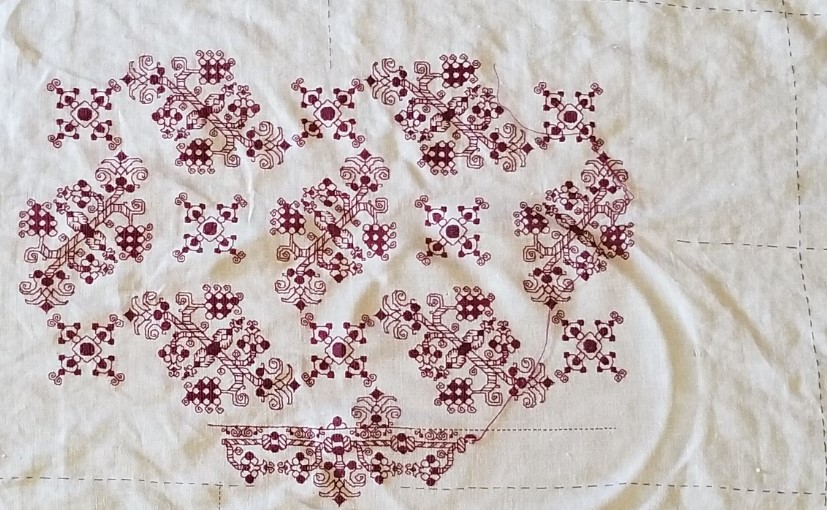
Having the dead center of the piece determined, I chose a center point on the field design. I could have used the center of the smaller motif. That would probably have been easier, but I wanted the large rotating floral shapes to dominate instead of the largely unworked area surrounding the smaller motif. That was a bit tricky because the motif has a square unit in the dead-center, but I worked that straddling my basted center mark. Then I began working, snipping back my basted center guides as I went. (From here on the piece is shown rotated, with the narrow dimension north/south and the wide one east/west).

The shot above shows that first center motif in process, with the center guides being snipped back as the work encroached.
From there it was a simple matter of adding more floral motifs and the smaller X motifs they spiral around. Then after a group of four florals were complete, defining the space between them, centering the free-floating X in that area. Here are shots of those two processes. Note that as a Lazy Person, instead of tedious counting in from the established stitching, I used temporary basting to determine the centerpoint for the free-floating X motifs.
How did I know where to stop? No clue initially. I figured I’d get as close to the edge of my defined real estate as I could with full motifs, then pause to assess. It’s clear in the left photo that another full cycle of the repeat would not fit neatly between the established work and the basted guideline. But that area is also a bit wide to be entirely border. The proportions would be off. Plus that small X motif in the center bottom looks odd without at least a partial snippet of the floral motif spinning off its bottom leg.
So I did a rough count of the width left and decided I wanted a border that was about two inches wide at its widest (about 5 cm). Back to the drawing board to draft out something that complemented the design, and was somewhere around 30 units tall. I doodled up a couple of possibilities before settling on one. One strong consideration was the use of an inner line to contain the field pattern, so it had something even against which to truncate.
Once I had my border in hand, I decided that a bit of the center flower in its repeat could scallop below the basted edge line, so allowing for those 6 units, I counted up from my basted edge guide, and beginning at the center point I started the border of the first side. Then I worked right and left until I got to the edge of the “uncertainty zone” – the area as yet unworked at the left and right of the piece. Here’s the first side’s border in process.
As I established the border’s top edge (that field containment line), I went back to the main field, and worked the truncated snippet of the floral motif to fit. You can see that first snippet in the photo above.
Now on to that second side. But I had a cheat! Instead of starting it by counting down, I looked at that center floral snippet on the first side. Then I worked the floral snippet on the opposite side to the same point. That established the containment line on the second side, and I began the border at the center of the second side, working out to the left and right.

Now on to the ends. You can see now that I’m making these decisions on the fly. When I started I had no clear idea of what I was going to do beyond “Field. Border. Big.” I’m handling the problems and decisions as they are encountered, with minimal fretting about perfection along the way.
I chose to do butted borders on this piece. Neatly mitered, squared, or fudged border corners do exist on historical pieces, but they are in the minority. Even though my self-designed border isn’t particularly period representative (those repeating centered units with their own bounce repeat, as opposed to simple twigs all marching it the same direction), I wanted to use a non-mitered corner. I could have ended each off, designed a separate corner square, but I didn’t want to introduce another design variant – the border was already too busy.
Where to start that side border? What happens to the longer top and bottom borders? Do they just end or should I try to end at a visually logical place? Well, I chose the latter. I kept going on the bottom border to the right until I ended at the center of the bounce repeat. It’s just a few units shy of my designated basted edge. Not a lot of waste there. And knowing the height of the border, I established my north-south containment line.

You can see that I’m working on the first of the two spin-off floral sprigs along this side. When that’s done I will go to the centerpoint of the right hand edge and begin working the border from there, headed back to the corner shown. The side borders will end where they end. They will truncate oddly for sure, but having made the bottom and top congruent, what is on the sides, will be what it is. The side as a whole however should truncate in the same spot where it meets up to the border on the top. But no one is perfect. If it’s off by a unit or two, I will have accomplished the same degree of precision as most of the Ancients. They weren’t perfect either.
Stay tuned! The Grand Excitement of seeing the final product remains; and with it how things meet up, how close to symmetry I achieve, and how any as yet unknown problems are solved. And that’s before I decide how I’m going to edge and trim the piece out. Needle lace and/or a withdrawn/pulled element hem are both possibilities I haven’t yet ruled out.
So there you have it. Another adventure in bungee-jump stitching – starting a project with little or no detailed planning, no full project chart (just a partial chart showing the minimum needed), and no clear idea at outset on handling challenges encountered en route. I hope sharing this process inspires folk to take up their own self-composed projects.
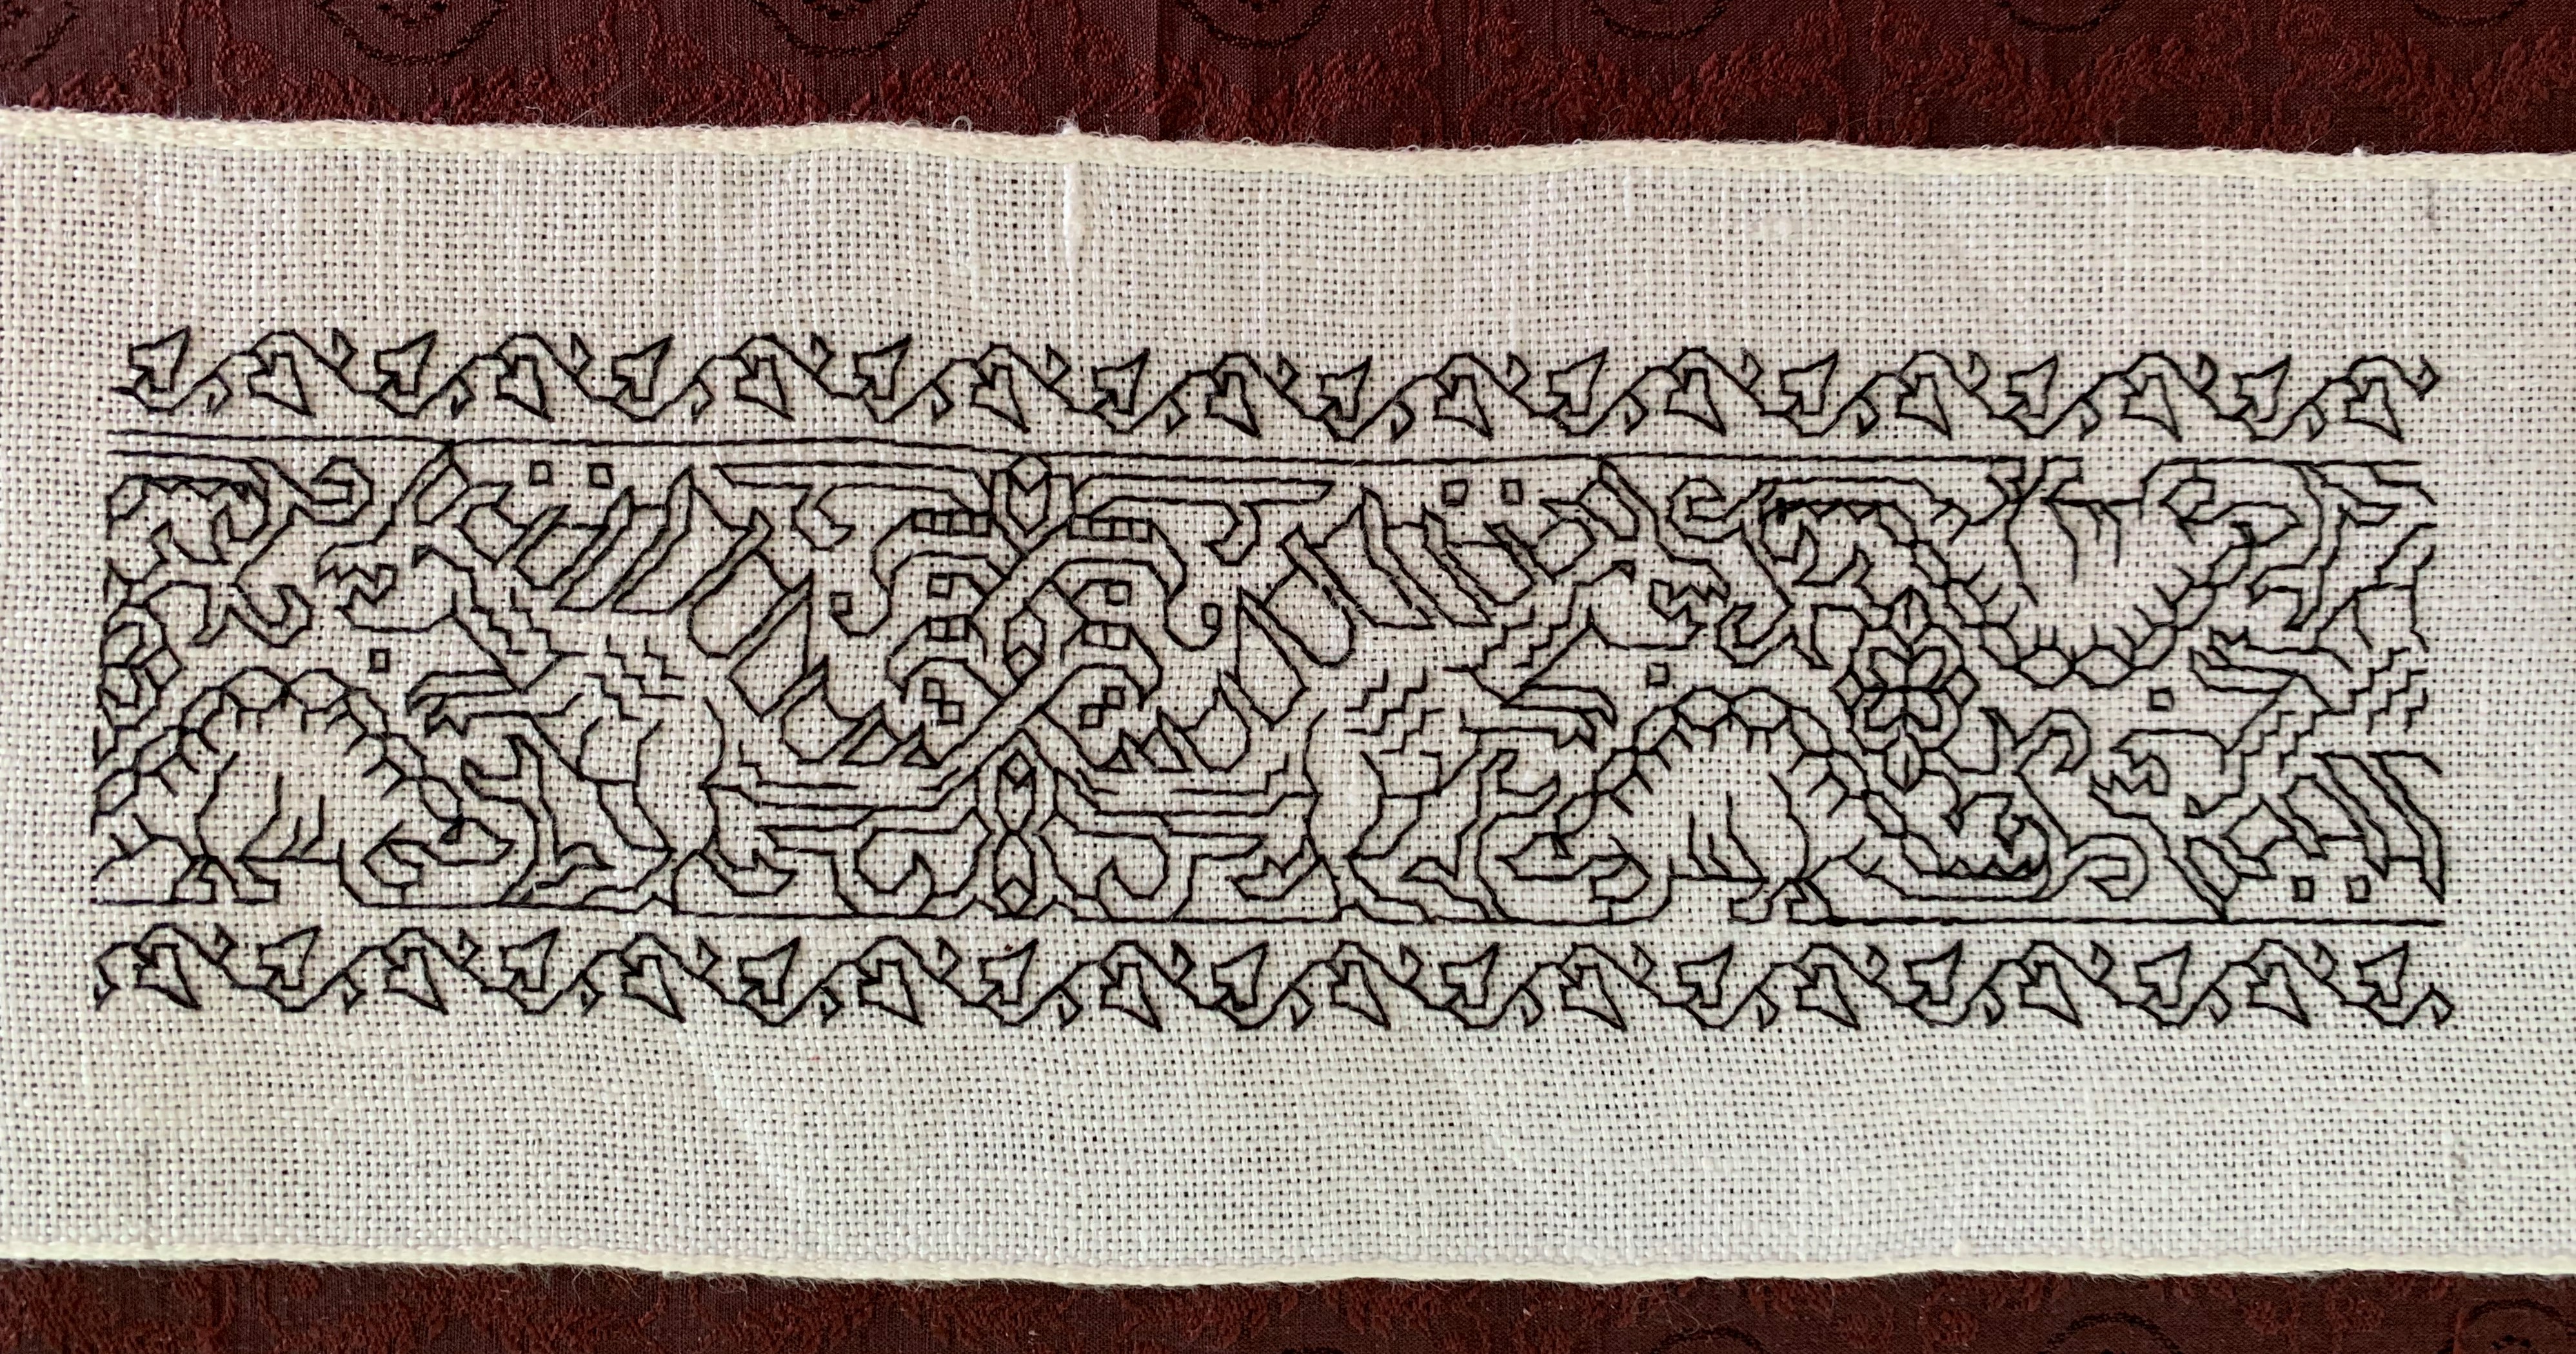
EPIC FANDOM STITCHALONG – BAND 19
WHOVIAN NIGHTMARE
Too late. You peeked.
After more than a year since Band 1 was debuted, we go out in style. And I know that a lot of you were waiting for this one in particular. In this design you never know what’s lurking in the interlaces, waiting to trip you up.
Like the other panels that feature shading, this one can be worked voided if you so desire and the grey area on the chart indicates the logical areas for that background’s inclusion. However the design is a bit full, so if you do opt for voided, I suggest something that’s quite open, or is done with thinner threads than the main outlines, so that the foreground motifs, sprigs, and twigs are not obscured.
Time Factor 5, mostly for size. Time factor 5++ if you choose to work this voided with a background fill, but by now you are old pros at this and nothing I say will daunt you.

Use one color, multiple colors, or variegated threads, as you prefer. As with the rest of Epic, there are no rules or must-do approaches.
As usual this band plus working notes and hints has been appended to the bottom of the write-up on the SAL page, accessible via this link or via the tab at the top of every page here on String-or-Nothing.
If you are working our Epic Fandom SAL either as a whole or as a strip excerpt, please let me know. It gives me great joy to see how my “pattern children” fare out in the wide, wide world, especially when they meet up with creative, playful people. And if you give permission, I’d be happy to share your pix of this developing sampler, it in its finished state, or derivative projects including one or more of the Epic bands here on String, in a gallery post, with full credit to you as interpretive artist.
This is the last band of the project. I sincerely hope you have enjoyed it. For those who haven’t started yet, these files will remain here as long as String-or-Nothing persists.
GALLERY
That photo display opportunity mentioned above is a real offer. I will be starting a stand-alone gallery page here on String to celebrate progress and finishes of works inspired in the whole or in part by patterns from this SAL and from my books and single sheet releases. The new Gallery will replace the gallery tag in the general subject index. I would be happy to post any pix of anything derived from my designs, including projects knit from my patterns.
If you do send me photos, please indicate that you are giving permission to post your material, and let me know whether you want your name (or any nickname you choose) and/or a live link to your own page or website to appear alongside. I am happy to withhold names on request (not everyone wants fleeting Internet fame). And thanks for helping me spread the fun!
#EpicFandomSAL
LOOKING EAST AGAIN
Back when we were doing the expat stint in Pune, India, I wrote about Kasuthi (aka Kasuti, Kashida), a blackwork cousin that deserves to be better known by Western double running stich aficionados. I recently stumbled across another sample of related stitching, this time from a bit further north.
The Hazara people, mostly in Afghanistan, but also present in Pakistan practice an interesting and related form of linear geometric stitchery. It’s hard to date beyond “traditional,” and given current geopolitics, deeper investigations are unlikely. But here is the limited info I’ve found, plus some examples, and some sources of additional information.
The Hazara are known for several forms of stitching, mostly but not exclusively counted styles using satin stitch, straight stitch, double running stitch and cross stitch, and is better known for phulkaris (large shawls often worked in geometric, counted straight stitches). These double running stitch pieces in particular are probably made by women of the Wardak Hazaras, who live mostly southwest of Kabul. This style is usually worked in cotton or silk on linen or cotton grounds. These double running stitch pieces are often finished out as small mats, bags, shawls, prayer cloths, and other covers.
First is the artifact that piqued my interest.

This is piece in the collection of the George Washington University Museum, Accession T-1240. They note it’s provenance as being Hazara from Afghanistan, probably sometime between 1880-1920. That mushy date range is the earliest and although it’s only semi-hard, is the only date I’ve seen for this style. Note the fields of diapered patterns stitched on the count on a not-so-evenweave ground. The designs skew east-west compared to north-south due to there being more ground fabric threads per unit measurement in one direction than the other. But skew or not I love the repetition and color usage. So I went looking for more.
This artifact is probably the best represented on line for the style, and shows up in most on-line photo collections of Afghan embroidery, although not always with attribution. It is nicknamed “The Snowflake Shawl” and was collected by Jania Mishra, the author of the art blog/sales gallery Woven Souls. She places it as Hazara, but does not opine a date. Still it’s clearly antique/vintage. Her write-up includes lots of close-up photos, and notes the relationship of this style of stitching to mathematical theory. Pop by her blog to truly admire the diverse detail of this piece.

More examples. On the left is a bandanna size prayer cloth that was sold by a textile/rug auction dealer, and on the right is what’s described as a Hazara napkin in the Galerie Ariana ethnic textiles sales site. (No affiliation with/endorsement of these sellers – I find dealers’ on-line photos and attributions an occasionally useful research supplement, although not all dealers’ listing data are of the same quality.)


What can we conclude about dissemination and influences?
Very little.
Double running is one of the simplest, oldest and most ubiquitous of stitches. The scholars of Kasuthi posit a vague “Persian origin” before adoption, mention of in literature, and refinement of the style in the Deccan area Chalukya dynasty courts of the mid 500s to mid 700s, and that dynasty’s later resurgences through the end of the 1100s, culminating in the disciplined style and vocabulary of traditional motifs that are known today through surviving examples dating to the 19th century. Overland trade routes have connected Northern India and Afghanistan and beyond going back to antiquity. The the flow of both peaceful and aggressive contact is also well known, as is historical trade that connected the northeastern African coast with India. Egypt’s Fustat region is another area where visually similar double running stitch artifacts from the Mamluk era (1200s-1500s) are found.
Is this another survival of some sort of time-lost tradition that also gave rise to Kasuthi, the Mamluk works, and by extension over time and geography (and by direct quotation noted by others as well as myself), the stepwise and geometric designs found in early European modelbooks at the dawn of the popular print era (early 1500s), and on to early European blackwork and strapwork? It’s tempting to speculate so, but we have absolutely no proof.
These Afghani pieces could also have been a product of later cultural influences, as waves of association washed back and forth along time’s shores. But the clear correspondences, whether they can be affixed to defined family tree, or are just casual correlations due to the limits of geometry and the simple stitching style itself, are to me are a source of endless fascination.
Here are a couple of sites with additional information on Hazara embroidery in general:
Source material for the Mamluk styles mentioned
- Marianne Ellis. Embroideries and Samplers from Islamic Egypt, Asmolean Museum, London, UK, 2001. ISBN1-85444-135-3.
- Ashmolean Museum Yousef Jameel Center for Islamic and Asian Art, Newberry Collection of Islamic Embroideries
And there are more traditional regional counted styles to explore in this area of cultural confluence. I promise to keep digging.
THOSE OLD LINENS…
First, progress on my Dizzy Grapes sideboard scarf. I’ve doodled up a companion border that I like, and I’ve begun working it. Now you can see what I meant when I said the field design would truncate where it intersects the border, rather than floating inside it.
The border is Italian Renaissance in feel, but with significant stylistic departures from standard borders as seen on museum artifacts. For one, there are mirrored bounces in the repeat. That’s not uncommon for main field designs, but not something I’ve encountered before in the companion borders. Usually the motifs in those repeat, all with the same directionality, as if they were all marching in precision following an unseen leader. The heavy reuse of design elements from the main field is a second departure. It’s not uncommon for borders to repeat bits of the design from the main field, and sometimes they do quote sections verbatim, but it’s relatively uncommon for those elements to be recomposed in this manner. Still, I’m not planning on entering this in any competitions where my usage and adaptation are judged.
Old Linens
I’ve gotten a couple question about the linen piece I used – where stuff like this can be found and the like. It so happens I lucked into a couple more old needlework and linen pieces yesterday. Younger Spawn was describing the treasure-hunt fun that can be had at estate sales, so we zipped off to one nearby. We both found goodies.
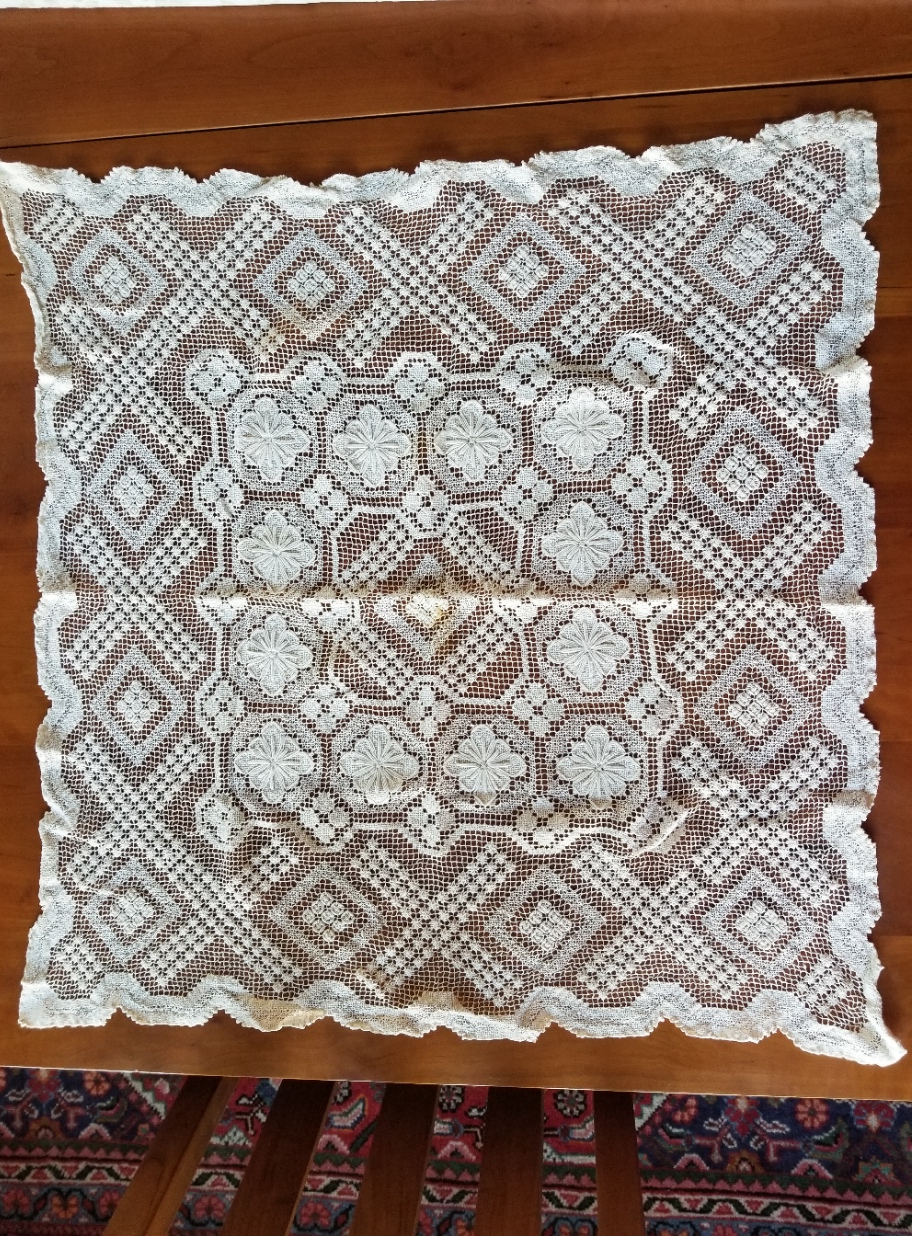
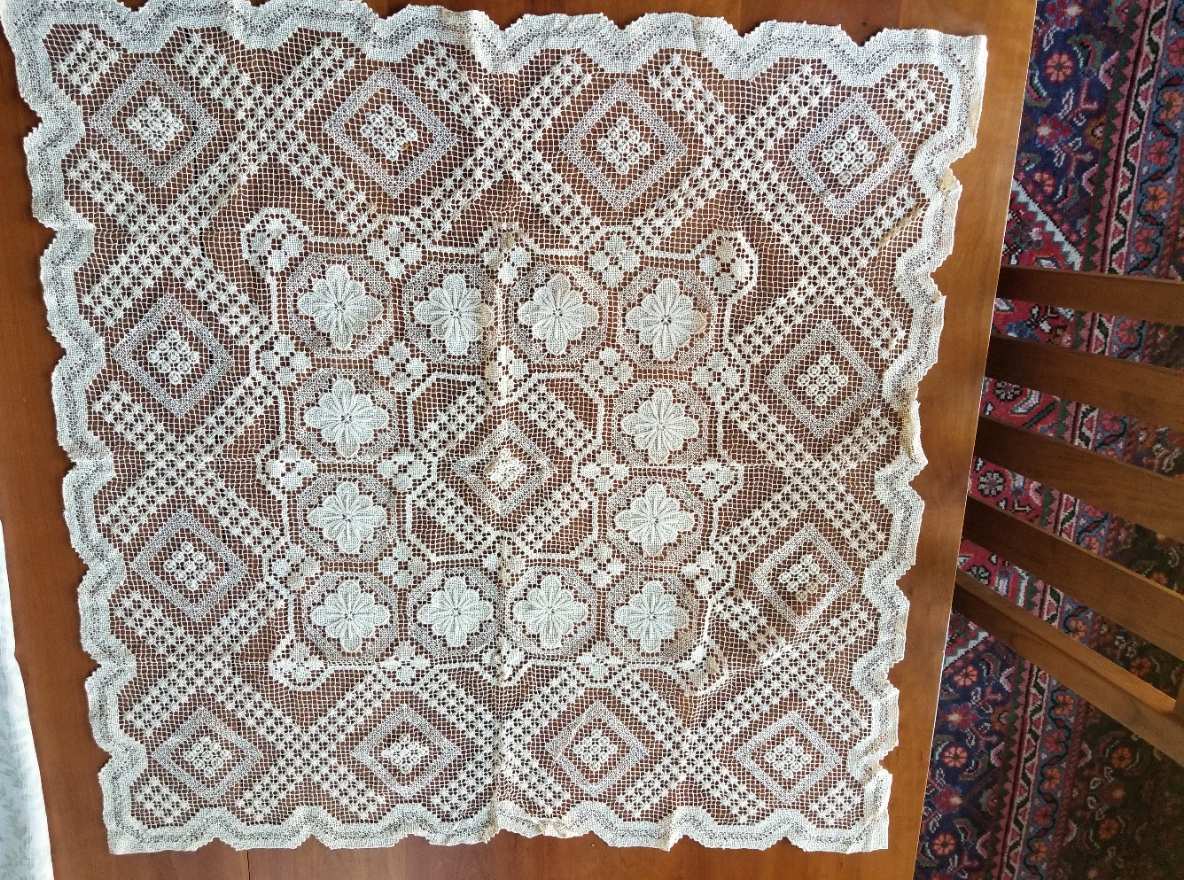
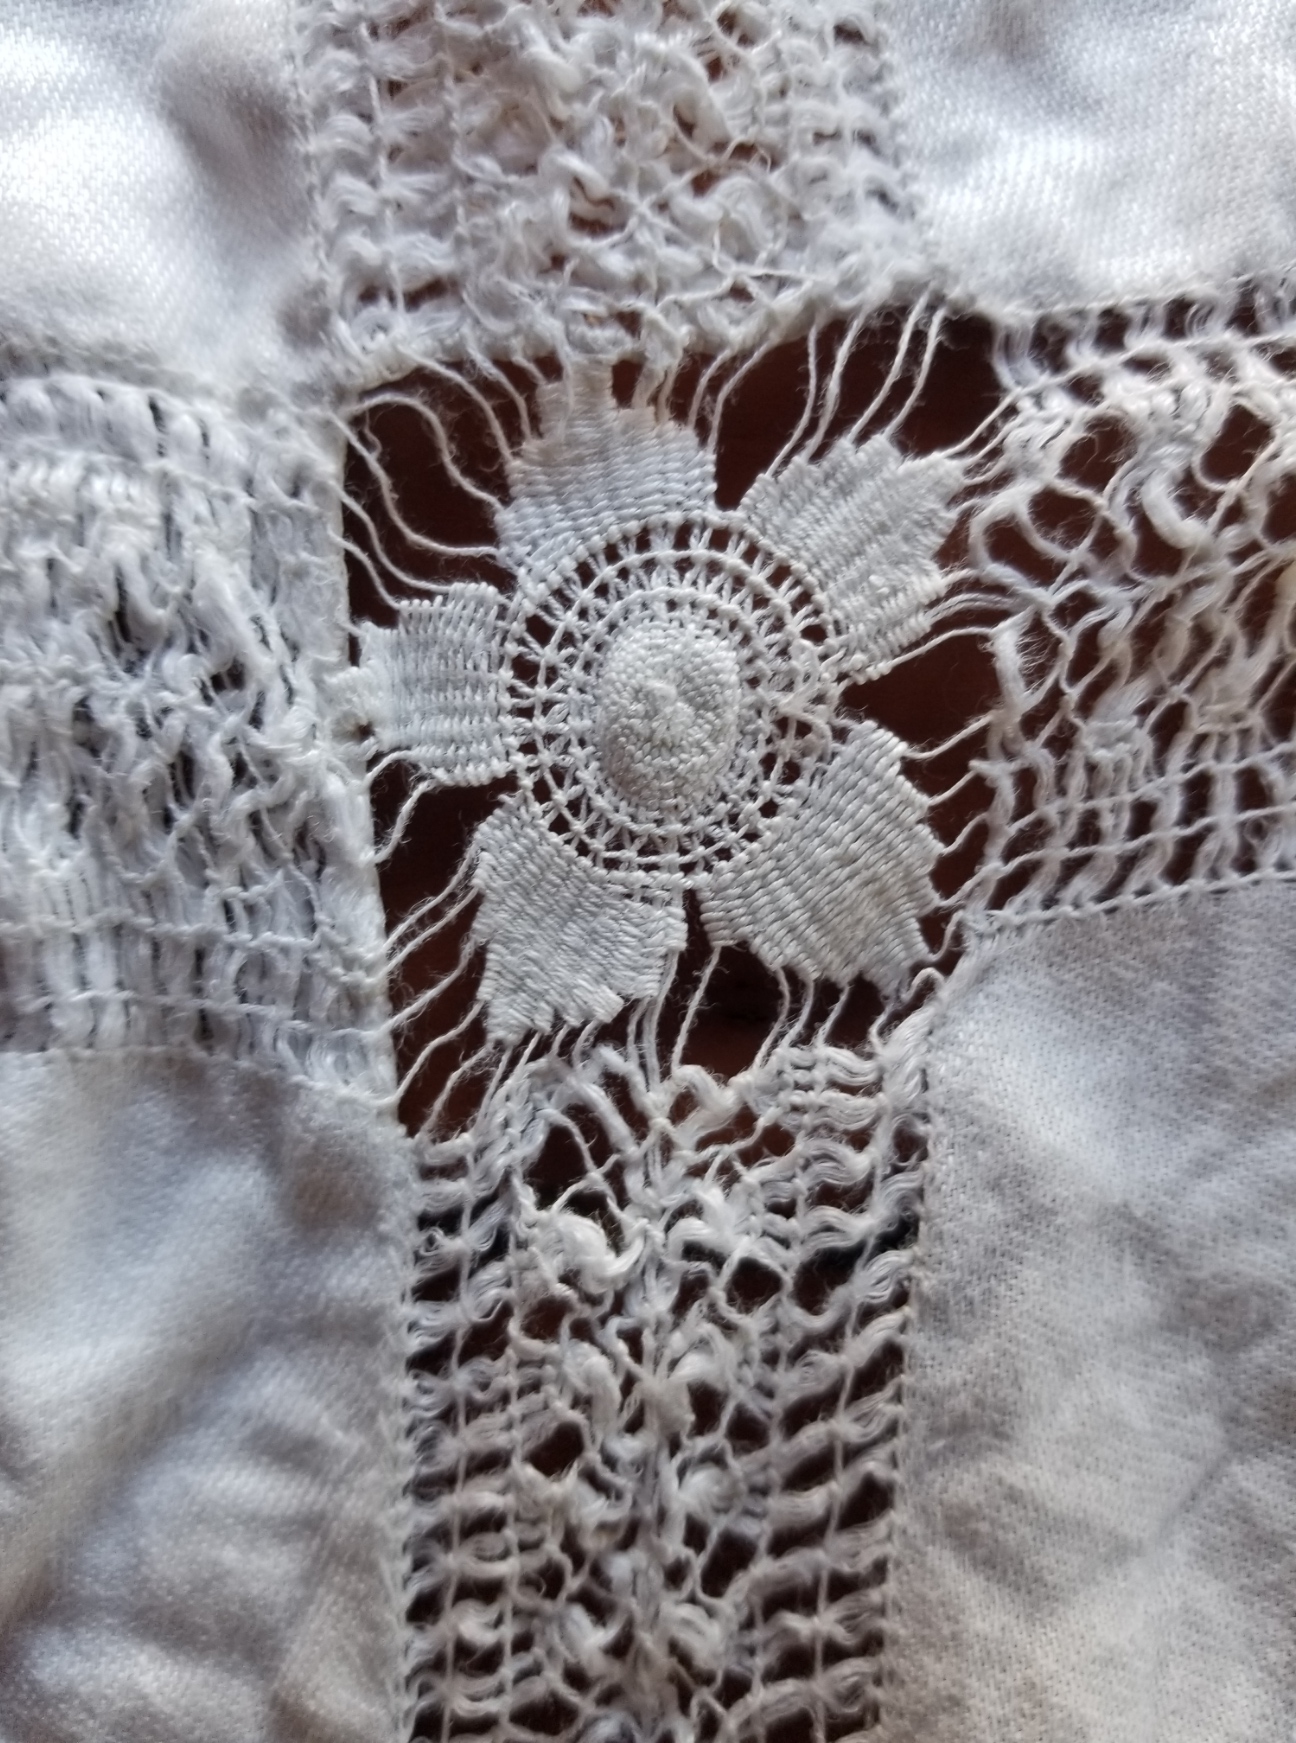
Among my discoveries were two darned net bridge cloths (small square table spreads). The substrate is hand knotted, in cotton, as is the darning and embroidered embellishments on top. I’m not good at dating/sourcing these pieces, but I suspect these are Sicilian Modano work, not earlier than 1920. Both are in very good condition with a couple of tiny brown “age spots” – probably the legacy of old spills. I don’t know enough to differentiate the earlier pieces of Modano from those of its 1980s revival. In the detail shot you can see the two weights of threads used for the darned fills, plus the long attached woven bullion style “picots” – not exactly sure what that stitch is called, plus a bit of straight stitch outlining.
Both are of exactly the same design, but one looks to have been savagely washed with bleach – it’s much whiter and about 20% smaller. One thing that does make me think they might be earlier is their size. By the 1980s bridge cloths were not exactly in style.

I’m not sure what I will do with these, but I couldn’t leave them there balled up, unloved and tagged at $1.00 each.
Lovely, but not actually linen. Moving on.
This is a tablecloth. The main body is twill weave linen, not suitable for counted stitching, but fantastic for surface embroidery. The hand-done withdrawn thread edgings are mostly intact, although the rondels in the corners are all slightly damaged. The main body of the cloth though is stain and damage-free. I won’t be using it at table – it’s too small for my dining room, but again the price was right, and the right person might be able to make a wonderful 16th/17th century Italian underdress/smock from it. $2.00 for about two yards of 60-inch wide linen? Not a bad price.

And at last – that upon which I will be stitching. I have some specific ideas for these twelve machine finished napkins. They are not uniform in size – some have shrunk significantly. A couple have stains that must be worked around.


The thread count on the one I’ve “penny-ed” is representative – roughly 38 x 38 threads per inch. Some variation and slubbing, and some of the napkins are a bit more worn, but 12 roughly 14″ (about 36 cm) squares of evenweave for $6.00? That’s a good deal.
So there you have it. Yard sales. Consignment stores. Estate sales. Look for the hamper of neglected household linens. Sort past the old sheets and cafe curtains, maneuver around the ladies looking for interesting souvenir tea towels, and wadded up in the bottom of the bin may be treasure to appreciate, to re-use, or to stitch upon.
