GEAR-HEADED
Trifles is moving right along. Waxing the thread has greatly speeded up production. You can see my working method: filling first, then outline to cover up any edge fill irregularities.
Here’s the gear set now:


I’m having fun picking out the fillings on the fly, trying to vary density, color, and form, so that abutters contrast nicely. For those who have asked – yes, every filling used so far appears in Ensamplario Atlantio. I have it downloaded to my iPad. My favorite sewing/knitting chair is a Mission-style recliner with very wide, flat wooden arms. I am able to stand the iPad up on one and zoom in on the chosen designs as needed. Very convenient.
Progress will get a bit less exciting from here on in. I plan to totally fill the ground around the motto with gears, each worked in a different filling design. No other colors will be used. I’m sticking to the deep russet red, chocolate, gold, and silver. I may or may not add some real brass gears as embellishment. I may add some small large-eyed tiny critters stuck in the gearwork, sort of like the soot sprites from the movie, Spirted Away. That’s another of the target recipient’s favorite fandoms.

TRIFIAL PURSUIT
Back from our annual escape to North Truro, and reporting progress on the recently dormant Trifles sampler, being stitched for Younger Daughter to take with her off to college next fall. I decided that for my no-longer-little Steampunk (and Dr. Who) fan, instead of working lots of bands, the design for this one would feature gears. But I had a lot of problems hand-drafting up a nice set of them. It took a while, but eventually I hit on the idea of using a commercial stencil intended for airbrush work, then filling in the traced gear shapes with blackwork counted fills.
Here’s where I am now:

I’ve finished the main motto and the frame around the to-be-worked area. Minor brag: Note that having marched all the way around the piece without drafting first and using only counts of the border repeat to stay on target, I ended up even, perfectly aligned.
All of the fillings I will use on this will be from my free eBook, Ensamplario Atlantio. The ground patterns are stitched using two plies, mostly in double running, with lots of departures to accommodate the non-continuous nature of many of the fills. The outlines are plain old chain stitch, done in three plies of the same color as the gear filling. I am not taking any special pains to make the cam teeth totally square, or to make them mesh. I am liking the rounding and imprecision. Right now I’m thinking of covering the entire piece with gears in burgundy, brown, gold, and silver, relying on classic Four Color Theory to avoid making any two contiguous gears the same hue. Choosing fills for color in addition to density and form is adding a new dimension to this decidedly un-traditional yet somewhat traditional blackwork piece. And I may insert a surprise Trifle or two, just to emphasize the point.
On execution, I can report that I’ve managed to tame the extremely unruly Indian “silk” (in reality, man-made rayon) thread.
Beeswax.
I occasionally wax the last inch or so of my silk threads to make threading easier and to help ward off “ply creep” – when one ply of a multi-ply threading is consumed faster than the others. But I usually don’t wax the entire length unless I’m working with linen thread. However this stuff is hellaciously difficult, shredding and sliding, breaking and fraying, and catching. Using shorter lengths wasn’t the answer – no usable length was short enough to use comfortably. So I moved up to waxing the entire strand, and when I did so, most of my problems disappeared.
I am very pleased with the results using the fully waxed threads. They don’t break. They don’t escape from the needle’s eye. They don’t shred. Both plies are consumed at the same rate. Double running is nice and crisp. A major improvement that’s increased the enjoyment factor of a project that might have been truly tedious.

And I’ve wanted an excuse to stitch up those griffon-drakes since I drafted them up for the book.
BACK TO TRIFLES
As usual, I have several projects going at once. Right now these include the giant green sampler, the pullover I am knitting with a friend (now awaiting total rip-back and restart after An Inadvertently Destructive Incident), and the Trifles sampler I am working up for Younger Daughter. Although I do not intend to leave my co-knitting pal in the lurch, the last one is the only one with a hard deadline.
I’ve been road-blocked on Trifles for a while. I wasn’t sure how I would edge it, and what would define the interior space. I knew I wanted to do inhabited blackwork cogs for the filling, but the one I hand-drew wasn’t working out very nicely; plus getting many different sizes of gears to mesh properly was proving problematic. So I set the thing aside to ponder.
I’m now done pondering. My solutions are:
- Work a narrow edging around the entire piece, in slightly heavier stitching than the infillings, in order to define the field.
- Cheat. Use a commercial stencil to achieve the gear shapes. Not only does the stencil present a nice, large field of meshing cogs, it is also calculated to tile properly.


I found the stencil on line. It’s plastic, and much more durable than any downloaded/paper printed solution. I liked the clear differentiation among the shapes on this one, with very little overlap that would require hand-drawing the missing teeth. Although it wasn’t inexpensive, it will save me an infinite amount of grief. I will modify the individual gear shapes on the fly – stitching some with full interior detail as presented on the shapes, and some without, making more solid gears. I also have a little packet of brass Steampunk watch gear shapes, if I decide to add them as an added embellishment.
The narrow edging is yet another design from my forthcoming book, but worked in two colors. And I will be picking out the beginning of the filled gear underneath the letter “T.” Once I have the outer edging finished, I will trace the field using the stencil. Then I will stitch up the gears using fillings from Ensamplario Atlantio, with their edges defined crisply using either back stitch or chain stitch (experimentation will ensue).
On working a symmetrical counted edging without drafting up the entire thing ahead of time – it’s easy on a simple geometrical one like this. Begin at a corner. I improvised a corner treatment, where north/south and east/west meet. Then at the center of the piece (conveniently marked ahead of time by a line of basting), I improvised a symmetrical join, then mirrored the completed stitching previously done. Eighteen pattern repeats later, I mirrored the improvised corner. I will continue my march north until I get to the basted center line. There I will make another decision on how to treat the center and soldier on to complete that edge. I work that same kludge on the left hand edge. Since the centers will match top/bottom and side to side (even if they are different) – no one will notice them, and every corner will be crisp.
As to the thread – I am using the art silk stranded floss I found in India. I am not loving it. It’s rayon, and very slippery. Surprisingly, its tensile strength is less than that of cotton, no where near the mighty nature of real silk. It shreds, and must be used in short lengths. In addition, the plies separate and “walk” against each other. I have to use a laying tool to get even these short stitches to look nice. I would not recommend the stuff, and am glad that I will be using up pretty much my entire stock on this project.
GANESH PROJECT – INSTRUCTIONS
Over the past few months I’ve gotten a few inquiries from folks who want to stitch up my Lord Ganesh piece. I don’t issue it as a kit or fully laid out project chart. For one, the outline isn’t mine. It’s a coloring page I found on line. But here’s a run-down of the piece, plus identification of the various sources and fills I used. All the fills are in Ensamplario Atlantio – my free collection of blackwork geometrics available elsewhere on this site.
Fabric: I used a 32-count not-so even weave linen-cotton blend. My piece was a rectangle about 12 inches wide, and about 16 inches long, but the motif itself as-stitched was only 8 inches across from lotus-leaf tip to lotus-leaf tip at its widest diameter.
Thread: I used DMC six-strand cotton floss, Color #498. I used two strands to stitch the counted fillings, and three strands for the simple chain stitch outlines. I am not sure how much I used, but three skeins should be plenty for the entire project.
Needle: I used a ball-point needle intended for sewing knits to work the fillings. If I am using only one or two plies of standard embroidery floss, the small eye makes for less “thread drop,” and the rounded tip slides between rather than pierces the ground cloth’s weave. I think I used a #26 or #28 embroidery sharp for the chain stitch.
Stitch count: I worked the counted fillings over 2×2 threads of the ground, yielding a worked stitch count of about 16 stitches per inch. However my ground cloth was not exactly even weave, so you can see a bit of north-south distortion, and fillings that were supposed to be square ended up a bit stretched in that dimension.
Pattern sources: The outline pattern – a coloring book page found here. Coloring books are a great source for simple line drawings suitable for use in embroidery of all types. For the fillings – all are in Ensamplario Atlantio, my free on-line pattern collection.
Working Method:
1. I retrieved the coloring page and enlarged the image so that it was about 8 inches wide. I used a graphics program to do the enlargement, although if you do not have access to one, a simple print followed by enlargement on a photocopier would work quite nicely.
2. I taped the pattern print-out to a sunny window, then taped the fabric on top of it. I traced the pattern onto my cloth. I used a plain old pencil – all I had at hand at the time. I did not bother to edge the cloth prior to tracing or stitching.

I did not use tape or overcasting to prevent fraying. The reason I didn’t is that I knew this would be a very quick little project for me, and took less than a week, start to finish. I didn’t see the need. If you think it will take you longer to do, you may wish to do something to preserve the ground cloth and limit fraying. Hemming, basting, overcasting, tape, serging – all methods have their proponents and one may be right for you.
3. Using an embroidery hoop, and starting in the center of the piece, I began to work counted fillings in the design’s fields. I chose them as I went along, and did a very rough centering of each design in the space provided by eyeballing the shape and sticking a straight pin into the visual focus of it, then using that indicated point for the center of the chosen geometric filling.
In some cases where the tight curves of the shapes didn’t align exactly with the grid of my design, I used half-stitches to eke out the edges, so that the geometrics would totally fill the shape areas. I started and ended each shape individually, and did not strand my working thread from one to the next, in order to prevent “show through.” I also tried to stitch using double sided-double running stitch logic as much as possible, but I did not cling to it. My piece has knots and ends, and is NOT reversible.
4. After each shape was filled, I used plain old chain stitch to go around its perimeter. This hid all “rough edges” that result when geometric fillings are used in curved shapes. The chain stitch was NOT worked on the count.

5. When the entire piece was finished – all fillings complete and all outlines complete – I went back and did Italian hem stitching to neaten up the edges of my cloth. This actually took longer to do than the rest of the project.
Here is a clean picture of Lord Ganesh for reference; plus one with the fillings numbered, followed by a list of the Ensamplario Atlantio design numbers for each filling used.

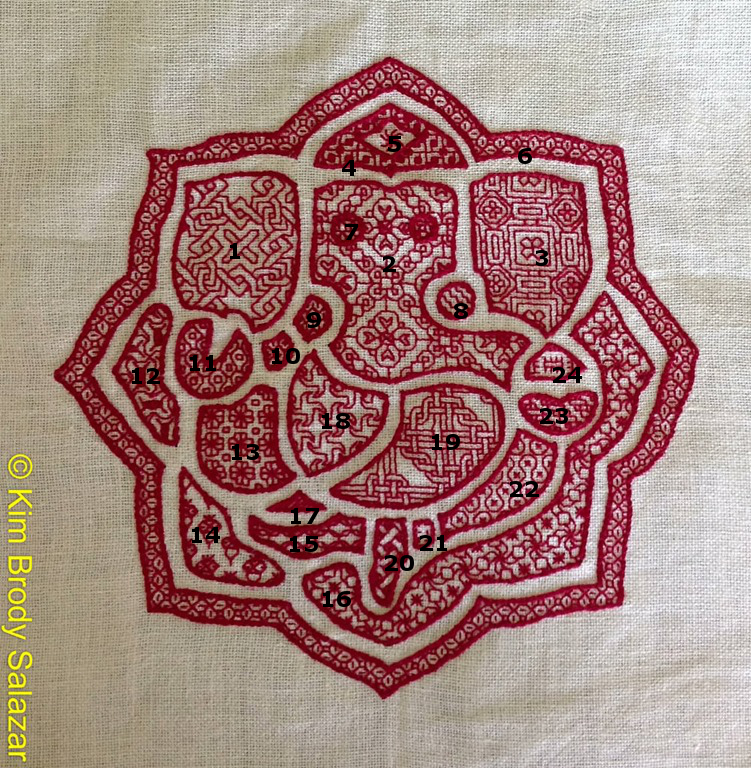
Ensamplario Atlantio Pattern Key
- EnsAtl Part 4, Plate 34:199
- EnsAtl Part 2, Plate 12:68
- EnsAtl Part 4, Plate 33:196
- EnsAtl Part 2, Plate 10:59
- EnsAtl Part 2, Plate 6:34 – one swirly star from the center of the repeat only.
- EnsAtl Part 2, Plate 11:64
- EnsAtl Part 2, Plate 7:39 – same used for both eyes.
- EnsAtl Part 3, Plate 16:94, lower leftmost
- EnsAtl Part 2, Plate 7:40
- EnsAtl Part 1, Plate 3:17 – made this one up on the fly and have no record of it. Use this one instead.
- EnsAtl Part 3, Plate 19:109
- EnsAtl Part 4, Plate 27:161
- EnsAtl Part 2, Plate 7:42
- EnsAtl Part 1, Plate 1:4
- EnsAtl Part 1, Plate 4:23 – worked sideways
- EnsAtl Part 3, Plate 16:93
- EnsAtl Part 2, Plate 13:74
- EnsAtl Part 4, Plate 31:182
- EnsAtl Part 4, Plate 25:147
- EnsAtl Part 2, Plate 8:43
- EnsAtl Part 2, Plate 14:84 – but done single stitch instead of double (off count)
- EnsAtl Part 3, Plate 17:98 – but just x in the centers, not boxed-x
- EnsAtl Part 2, Plate 12:70
- EnsAtl Part 3, Plate 22:129
I hope this helps those who want to make their own stitching of Lord Ganesh.
Enjoy!
SECOND HELPING OF TRIFLES
Two progress status reports today!
First is the Trifles sampler, in progress as a dorm gift to Younger Daughter, who will need such a thing in a year or so. (I have given myself lots of time for completion). As you can see, the motto is finished, using four different alphabets from Ramzi’s Sajou collection. I’ve played with them somewhat, working in the gold color accents, which are not marked as a secondary color on the charts.

I have also stitched in two small Daleks, to comply with her request, stitched in gold and off white silks. I am up to the surround now. I had originally planned to stitch lots of linear strips, patterns from my upcoming book, but as I alluded to before – I have been seized by Another Idea. The small stitched area just getting underway next to the T of TRIFLES is the beginning. I am going to make an interlocking and overlying mesh of gears of various sizes and configurations, each outlined in a heavier non-counted stitch, but filled in using the geometrics found in my Ensamplario Atlantio. I’ll be using coordinating fall colors for these – a bit of the brown and gold from the alphabet, but also cranberry, silver, and possibly a deep green. The total effect should be rather Steampunk, and a lot of fun.
However as much fun as this piece is, necessity intrudes. A friend of mine is welcoming a baby come the turn of the year. She’s expressed a fondness for traditional baby colors, so I am knitting up a small baby blanket for her. It will be car-seat and basket sized, not crib or reception size, so it is going quite quickly.

I’m using Encore Colorspun worsted, an acrylic/wool mix for maximum washability, this being a baby blanket and all. I’m knitting it on US 10.5 (6.5mm), which is relatively large for worsted in order to bring out the lacy stitch pattern. The stitch pattern itself is adapted from an 18-stitch-wide strip pattern appearing in Knitted Lace Patterns of Christine Duchrow, Volume I. I’ve chosen the narrow strip so that the gradual color changes pool, rather than speckling across the rows. I’ve also chosen to work the stripes horizontally because I only have four balls of this yarn. If I had run the piece the long way I might have risked running out before I reached a useful width. By fixing my width, I can keep going until I have just enough to do an edging, or I can find a coordinating pink or off-white Encore for the edging, if there isn’t enough of the graded color yarn. And finally, being a lazy person and not wanting to sew the strips together, I am using the long-loop join method I learned while working Fania Letouchnaya’s Forest Path Stole to knit the strips together as I march along.
Oh, and yes – those are massively long DPNs – about 12 inches long. I really like extra long DPNs for hats and sleeves, and generally don’t use circulars for anything less than 20 or so inches around. As a result I’ve got a collection of these admittedly unusual needles.
TRIFLES, ANYONE?
When I last wrote, I was just getting underway with my Trifles sampler, a special request from Younger Daughter. Some of you expressed surprise that I don’t plan out these larger stitched projects all at once, graphing them up in their entirety before I start. But I don’t, although this one is shaping up to be a bit less chaotic than my usual process.
To start – here’s what I’ve done so far:

First off, I hemmed all the way around the edge of the cloth. This is something I rarely take time to do, and always regret skipping. It was furiously frustrating – to have the ground in hand but put off stitching, but I steeled myself to it and completed.
Second, I basted lines indicating the centers, north-south and east-west. Long time pal Melisande will smile at this because the thread I always use for this purpose is plain old sewing cotton left over from the bridesmaid’s dress I sewed to wear at her wedding. It’s a pale baby blue – dark enough to be seen on white ground, and light enough to show on dark; non-fuzzing, quick to pull out, and non-crocking.
Yes, when originally stitched the two center lines intersected, but it’s my habit to pick out the guidelines as I no longer need them, so that they don’t get caught up by the embroidery stitches. I determined my center and began from there, removing and clipping my basted guidelines prior to working the cross stitching.
Cross stitching? Yup. Plain old cross stitch for the alphabets on this one. Also for the Daleks, one of which can be seen adjacent to the big “P.”
In this case I have actually graphed up the entire center section that bears the inscription and the offspring-mandated Daleks. Younger daughter prefers symmetry to chaos, and she specifically requested that I do everything I could to align the words neatly.
Now, what to do for the rest of the piece, once the motto is complete…. Originally I thought I’d do more strips from my upcoming book, just for the fun of trying them out. But the late 19th century alphabets in brown and gold silks is giving the piece a particularly steampunk look. Again welcome, since Younger Daughter is a big steampunk fan. I suppose those bands could work, but now I have been seized upon by a Concept, one that has affixed itself to me like a tiny homesick kraken.
Instead of strips, I will probably do this as a montage in inhabited blackwork – the style that features solid outlines, with various shapes filled in using geometric fillings.
Off I fly to draft and cut some standard stencils for my shapes, and to play with their placement. Stay tuned!
ENDINGS AND BEGINNINGS
Some of each to report.
First, goodbye, this year’s crop of giant grass:

I cut it down with our hand-sickle. Younger Daughter is stripping leaves from the longest stalks. Elder Daughter and she bagged the remains for yard waste recycling, setting aside the best canes for use in next year’s bean trellis. Resident Male took a heavy maul and split the clumps, which after two years unsupervised, were threatening a massive campaign of lawn-conquest. So goodbye grass! Hello, next year’s beans!
Second, Swirly is finished!


I like the way the mitering worked, even on the very narrow green strips. I also used a sawtooth with a ten-row repeat, so I was able to easily fit it around corners, letting the natural splits between the teeth accommodate the direction change. Swirly now goes to Elder Daughter, to replace the last blanket I knit for her, back when she was born.
Third, I can’t just sit. Especially when I am thinking or listening. I have to have something going. So, as a think piece, to keep my fingers occupied, and because I haven’t knit a pair of socks for me in so long my own sock drawer is looking more like a darn-me convention, I finished a quick pair for me.

This was done in Plymouth Happy Choices – a yarn that comes pre-knitted into a long scarf strip, then dyed. The idea is to unravel the thing and re-knit it. Depending on what you make the resulting pattern will be different, and always a surprise. These are standard 72-stitch toe-ups on US #00 needles, with figure-8 toes and short-rowed heels. I started at the same place in the color cycle repeat for both, but you can see that slight variations in dyeing produce fraternal instead of identical twins. I happen to love it, but others may be more fastidious. And yes – there’s a simple double YO diamond detail on the ankles, just for fun.
And another beginning – this time a stitching project.
I begin my Trifles sampler. This is a promised/bespoken piece. I made a sampler for Elder Daughter for her to take with her to her university dorm room. It bore a motto, as a subtle bit of parental nagging, embedded in a loving-hands-from-home wrapper:

Younger daughter is now in 11th grade, and wants one, too.
Hers will have a different motto, chosen just for her: “Pay attention even to trifles,” – one of Musashi’s nine precepts. She’s also asked that it bear at least one Dalek.
Here is the materials set – the remainder of the 30-count linen I used for her sister’s, plus a pile of autumn colors chosen from the stash of silk floss I bought in India:

In addition to Amy Schilling’s Dalek (chart at link above), I am using several alphabets from Ramzi’s collection of vintage Sajou and Alexandre leaflets, available at his Free Easy Cross and Pattern Maker website – a fantastic resource that should be better known. You’ll note that for once I’ve actually laid out the motto ahead of time, rather than trust to luck and eyeballing. This is because Younger Daughter is a creature of logic and symmetry. I accommodate her preferences with a bit more precision than I usually use.
More on this project as it develops. This time I’ll try to document what goes into my rather ad-hoc pattern selection decisions, and any tech tips I can.
Fall is after all, a time of endings and beginnings, and my favorite time of year.
FOR SOMEONE DOING NOTHING, I SURE AM BUSY
It’s a fair question – “Where have you been?”
The answer is “Busy.”
I’ve been out fabric shopping with friends; trying to establish a regularly meeting needlework circle at a local mall on Fridays; battling the Sacred Dust of India as it tries to repossess the flat; writing a presentation and workshop on the style intersection between Kasuthi embroidery and Renaissance counted work; dealing with assorted technology annoyances; working on TNCM2; trying to parse out more interesting blog entries from my London pix; and playing with various stitching and knitting projects.
First off, I’ve taken up Big Green again. It’s tough to do here. I need very strong light, and even with a small task spot in the living room, the only place bright enough is next to a window in the middle of the day. I long for my comfy chair and spotlight at home.

It’s hard to spot the progress on this strip because it advances at such a slow rate, but it’s there.
Then there’s a new stitching project, as leggy and coarse as Big Green is fine. I bought a pack of ultra-cheap dishtowels at the supermarket, because I always seem to have run out of non-terry ones when I am looking for something to toss over rising bread. One quick wash later, and as expected for bargain basement Indian cotton – they’d faded and shrunk. But wait! That dark indigo one is now a pleasant, mottled chambray. And it’s almost even weave:

So into the stash for some ecru DMC linen floss (which I’ve now learned has been discontinued. It figures…) Because I’m stitching over 3×3 threads to even out inconsistencies in the weave, and because the linen thread is fuzzy with its own rustic character, I decided to play on that folksy appearance rather than going for crisp, tiny detail. The pattern is yet another one that will be featured in in TNCM2. This, when finished out, will be a strip decorating a pocket edge of a zippered stitching caddy. The entire outside of the case will also be worked in one of the larger all-over patterns in TNCM2. Without cutting up the dishtowel, I intend to origami it into a series of graduated pleats, then stitch perpendicular to the folds to make pockets opening “up” and “down”.
The final step will be to fold the entire thing in half, then take an over-long large-tooth jacket zipper (toddler size), and run it around three sides. This should make an organizer pouch that when zippered, lies totally flat. I may sew one of the smaller interior pockets shut, stuffing it with some sort of padding to make pin cushion (perhaps with a finer gauge fabric as liner, so I can put emery into it). And I may also stitch in a couple of pieces of sturdy felt, so it has an integrated needle-book on the inside. The details of this finishing are still idle speculation at this point. Right now, it’s just a quick doodle.
I’ve been busy with knitting, too.


I’ve finished the body of the beaded red lace scarf. I’m drafting up the companion edging, with more beads and mitered corners. I also have to “kill” the acrylic yarn so that it lies flatter. Not quite sure how I’ll achieve this, since the beads make ironing problematic. But I’ll figure it out, even if I have to do up a couple of sacrificial beaded test swatches.
Also in the photo above is the latest pair of socks. That’s pair #5 in the past two months. I work on them while we wait for the school bus in the morning, or any other time I’m waiting on a line, for a car, or find myself idle outside the apartment. After this pair I’ll have to get creative in combining the leftovers on hand. I’ve gone through most of the sock yarn I brought with me. I have a couple of balls of Noro sock yarn left, but I’d prefer to use that for some other accessory. The yarn is beautiful but I prefer wearing (and washing) other sock yarns, for comfort and durability reasons.
KEEPING BUSY
In all of this observational and research posting what’s been missing has been reporting on my own projects.
I’ve been busy since finishing the Ganeshji piece. I’ve finished Younger Daughter’s red pullover:

Purists will note that we ended up eliminating the belled lower sleeves. They ended up being a bit too much for India’s climate. The thing fits quite nicely. My only caution is that in the chosen cotton DK it’s quite warm.
I also knit up a small teddy bear as an as-yet ungiven gift. I used the free Berroco Foliage Bear pattern, and Bernat Mosaic on US #9 (5.5mm) needles. There’s enough in one skein of multicolor Mosaic to knit at least one more bear of this size. Stuffing was cannibalized from an inexpensive throw pillow bought at the local supermarket; crafts stores and virgin stuffing materials not being exactly common in Pune.

Special thanks to long time needlework pal and multi-century enabler Kathryn, who gave me this wildly bright acrylic skein to share with my kids. I sheepishly admit that it crept into my backpack, and I diverted it to my own use.
I also finished yet another pair of socks. I’ve taken to knitting at the bus stop while waiting with Younger Daughter in the morning. This pair is done, and there is another behind it, well along on the needles:

It’s my standard figure-8 cast-on, toe-up sock, but done on log-huge US #1s – 64 stitches around. The lacy meander on the side is from the first Duchrow collection (page 35). I’ve used it before on a baby blanket. These stripy blue socks are also meant as a gift, along with the men’s pair I’m working on now.
And I’ve started doodling with Kasuthi embroidery. I’ve got a large piece of somewhat even-weave fabric. Big enough to make a half dozen napkins. So I am doing a different motif, totally double sided, on each one. I will stitch all six motifs, then cut apart the cloth and hem the napkins. Motif Number One is complete:

You can see the stepwise logic of the filling pattern in the star flower’s petals. The resemblance to stepwise Western band patterns (like Jane Seymour’s famous cuffs and Anna Meyer’s sleeves) is even more pronounced in Kasuthi border/edging designs. A couple of those are on deck for future napkins. But first, I’ve GOT to do one of the traditional elephants…
HEMMING AND HAWING
Well, not “hawing.” Just hemming.
In answer to the question, “What do you mean by ‘Italian hemming’ since there are so many things that go by that name?” I trot out this picture of my Lord Ganesh cloth’s corner:


The person who asked the question is spot on. There are many types of hemming with confusing, occasionally overlapping names. Some are single pass rolled or folded hems like mine, others are double rows of stitching. I don’t remember where I learned this, but “Italian hemming” was the name attached.
Basically, the stitch I learned is similar to a hemming technique employed in withdrawn thread work, but in this case is done without removing any threads, as a pulled thread stitch. This style of hemming is worked on the reverse, and folds up/fixes the hem/makes the decorative pulled thread “dots” all in one pass. The stitches that make the vertical legs (as opposed to the stitches that do the horizontal bundling), are worked solely through the hem fold, and do not pierce the front or display side of the piece. All of the folding up is done with finger-pressing, neatly crimping the edges tight between thumb and forefinger, just ahead of the actual stitching. The same for the mitered corners – no ironing here, just careful folding along the threads of the weave, going slowly and working under a strong light.
I’m not the neatest at it, being long out of practice, but I’m finished, and not entirely displeased with the final product.
