THE UNSTITCHED COIF EXHIBIT
As promised, here’s a recap of the exhibit. It was an immersive whirlwind of talent, exuberance, and fun. I am very happy we were able to go. I just wish we had longer to chat with all the delightful, creative folk in attendance. But first, here’s a run-down of the displays. Note that while the Unstitched Coif was well represented, it isn’t the only project Toni Buckby is doing. More on those other efforts after the coifs…
The Unstitched Coif
I tried to take photos that showed the individual displayed pieces in situ, among their neighbors. The official website http://blackworkembroidery.org is hosting stitcher-provided blurbs and supplemental photos – the same info that is in the official exhibit book. This linked page indexes all of the stitchers alphabetically by first name. I provide the names of the stitchers for each photo below to save squinting. Pop over to that official site page for high-res closeups of any coifs that catch your eye.
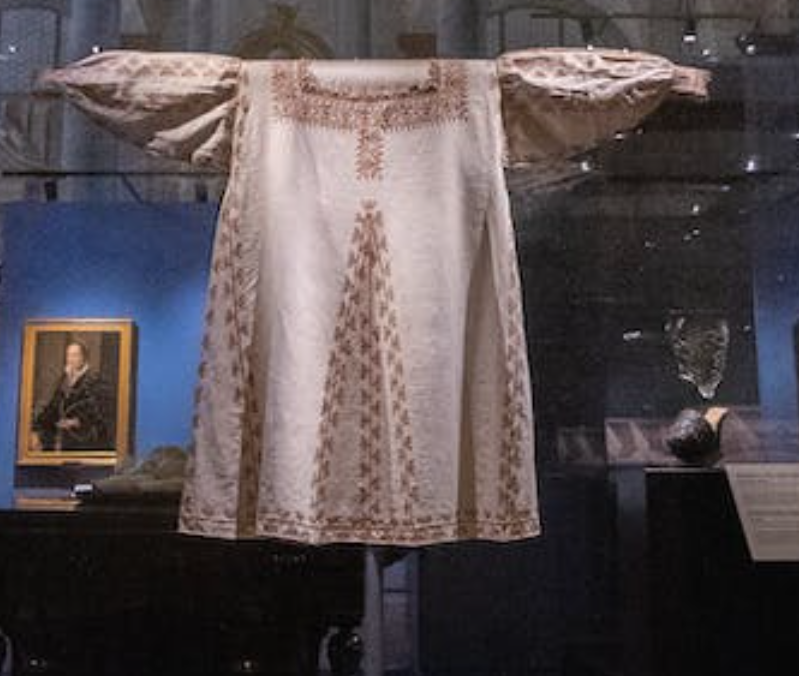
First, the introductory material – a brief on the project, plus a sample of the pattern transcribed onto cloth (but not stitched) and made up into wearable configuration. If you open the poster photo in another window you may be able to zoom in enough to read the text.


And on to the coifs, in groups of three as displayed. There is an amazing variety of techniques, approaches, color interpretations, embellishments, and general artistic vision. The little QR codes on the name tags led to the stitcher’s personal submissions referenced above. Again, if you see something that you want to examine in lovely detail, go to this page and click on the stitcher’s name to read that material.
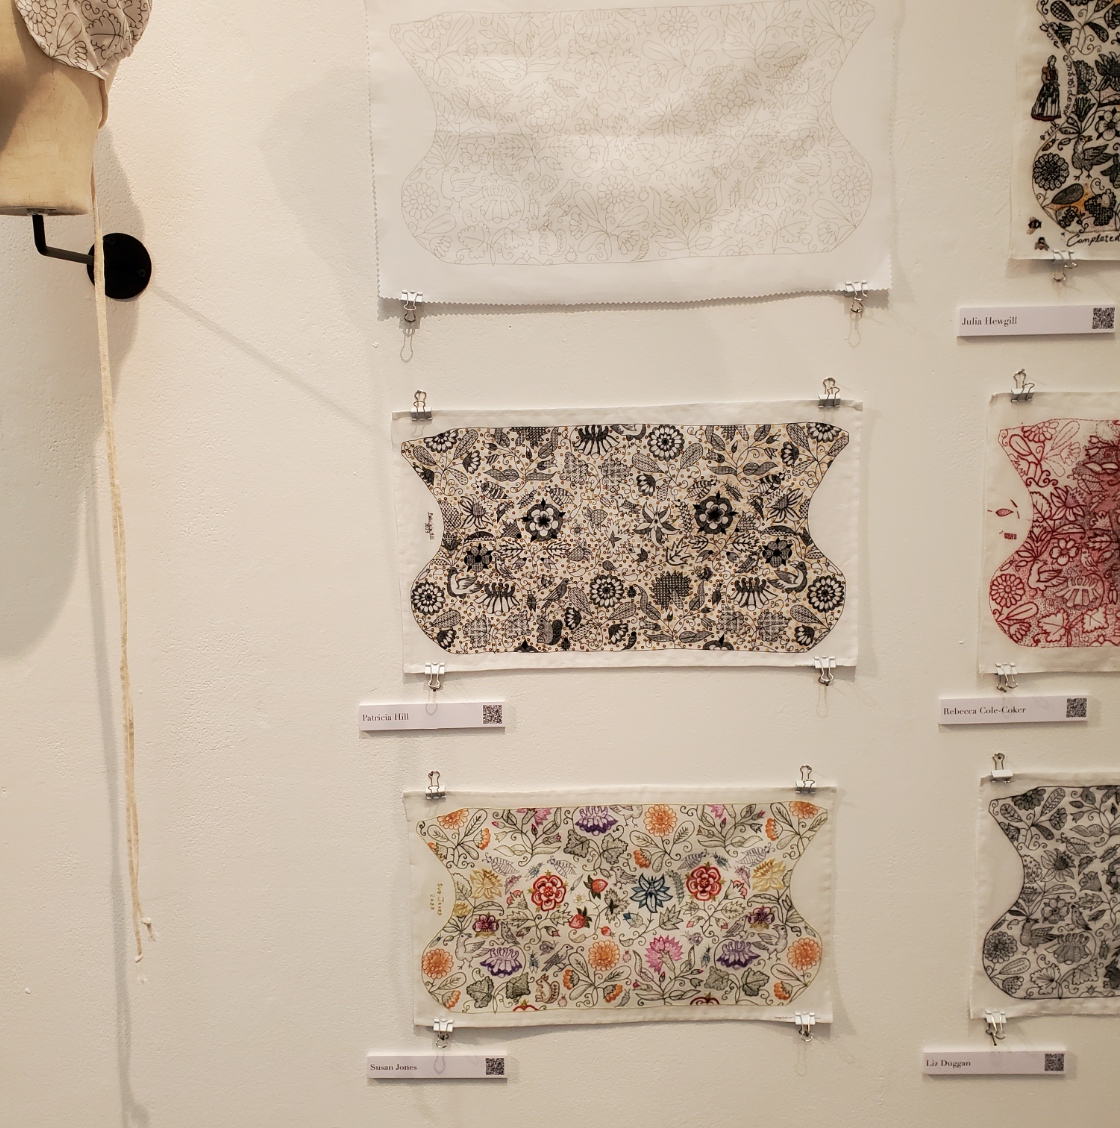
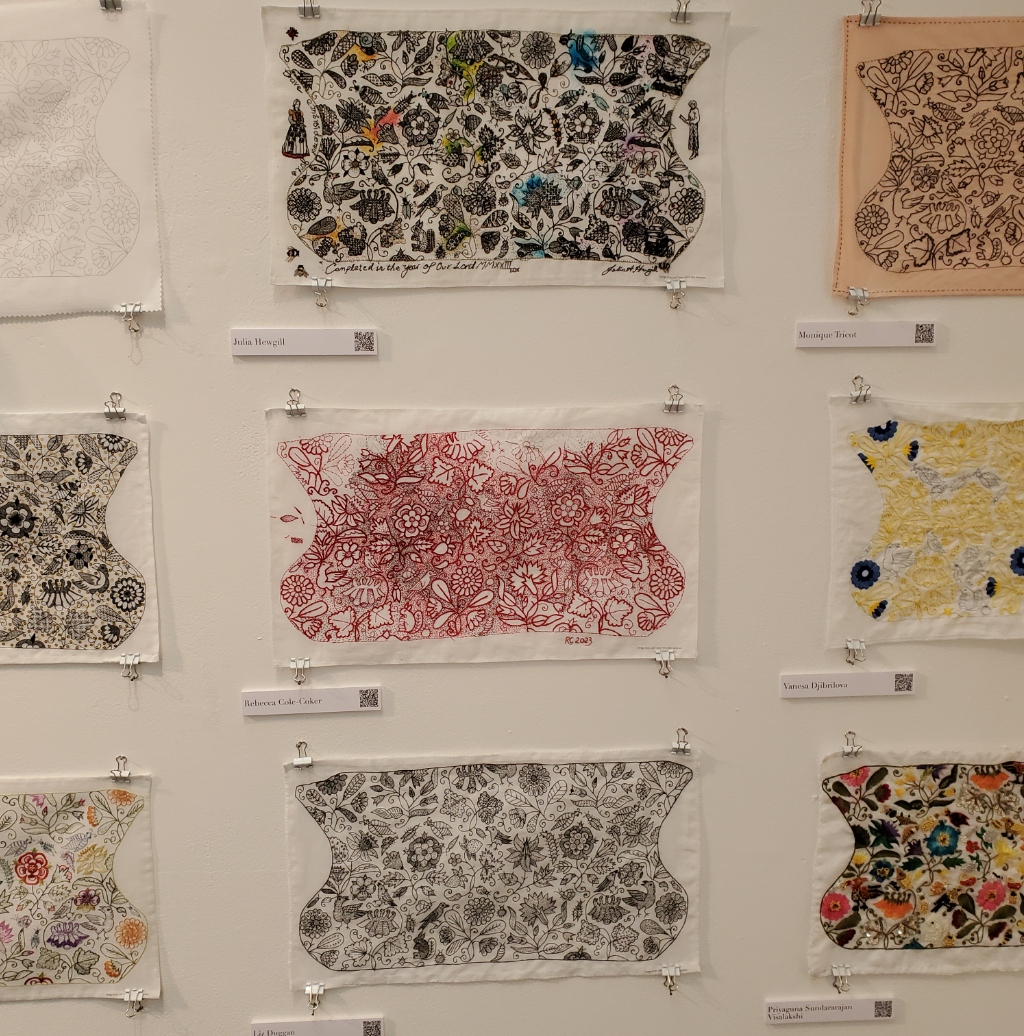

| Unstitched cloth Patricia Hill Susan Jones | Julia Hewgill Rebecca Cole-Coker Liz Duggan | Monique Tricot Vanesa Djibrilova Priyaguna Sundararajan Visalakshi |
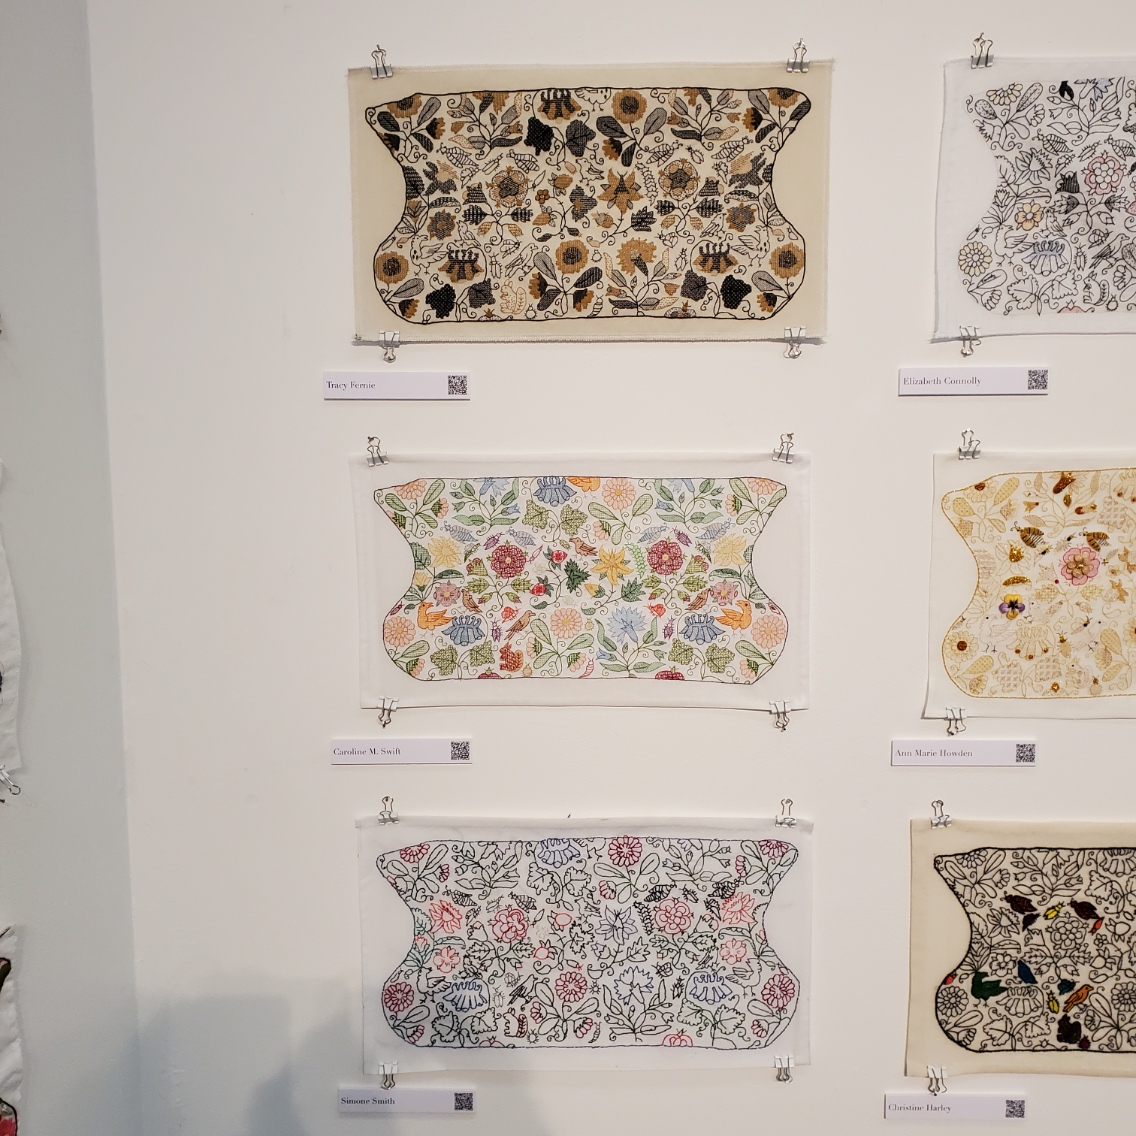

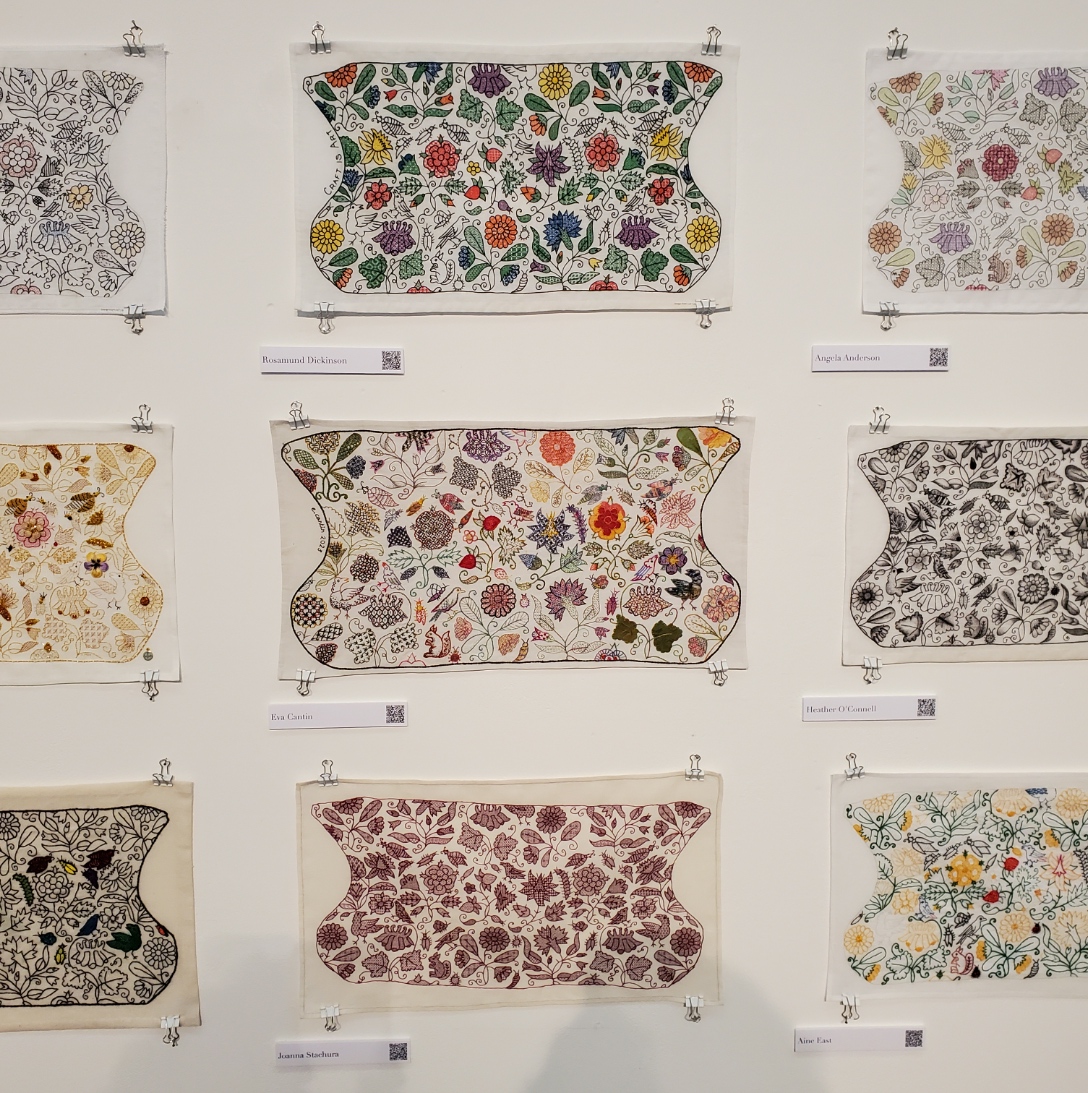
| Tracy Fernie Caroline M. Swift Simone Smith | Elizabeth Connolly Ann Marie Howden Christine Harley | Rosamund Dickinson Eva Cantin Joanna Stachura |
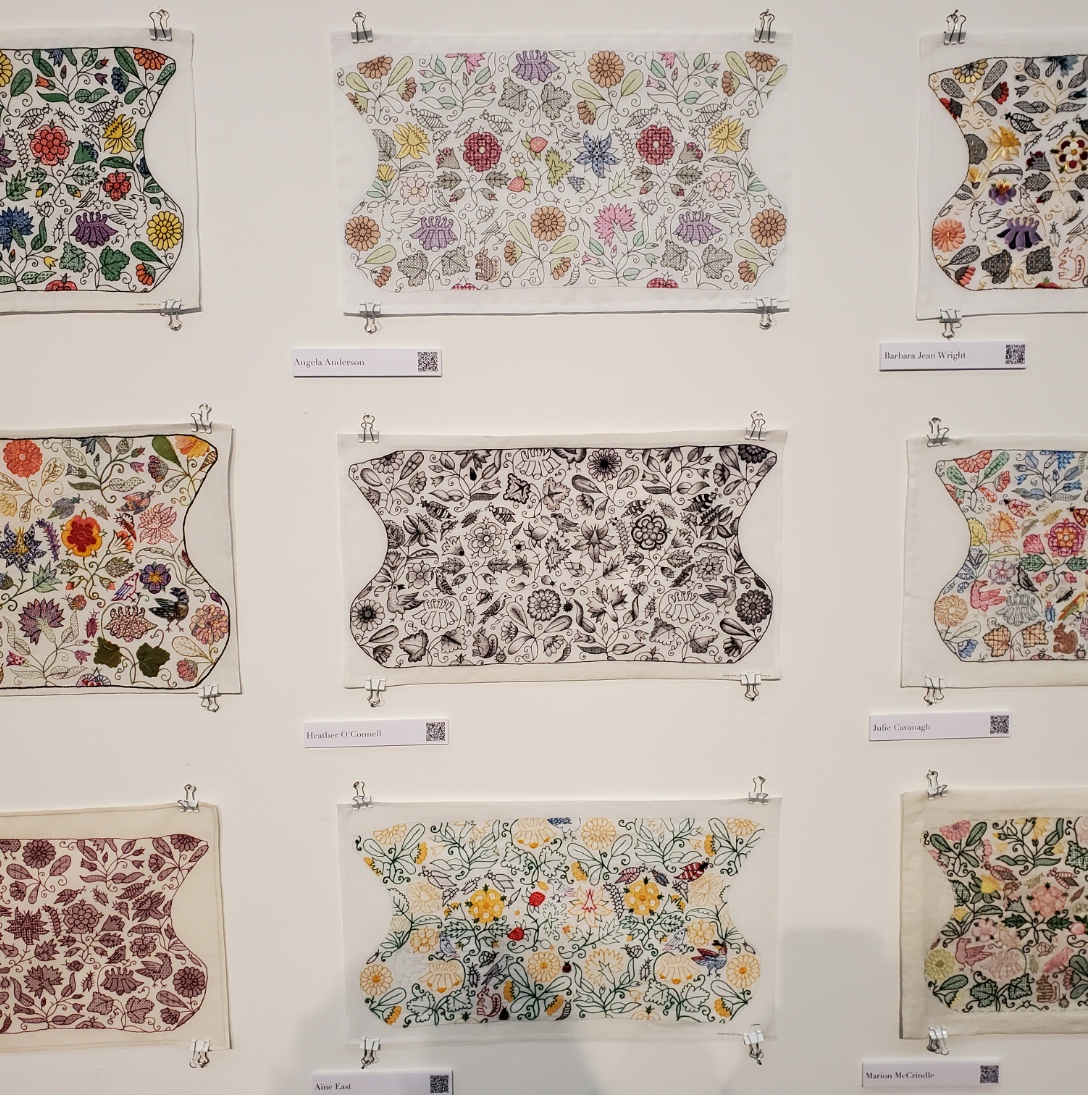


| Angela Anderson Heather O’Connell Aine East | Barbara Jean Wright Julie Cavanagh Marion McCrindle | Elizabeth Dymond Holly Searle Margery Dickson |


| Jane Burnham Vicki Parsons Jen Cable | Anna Tagg Sue Critchley Becky Stewart | Louise Goult Jill Kipnis Sarah Capel |


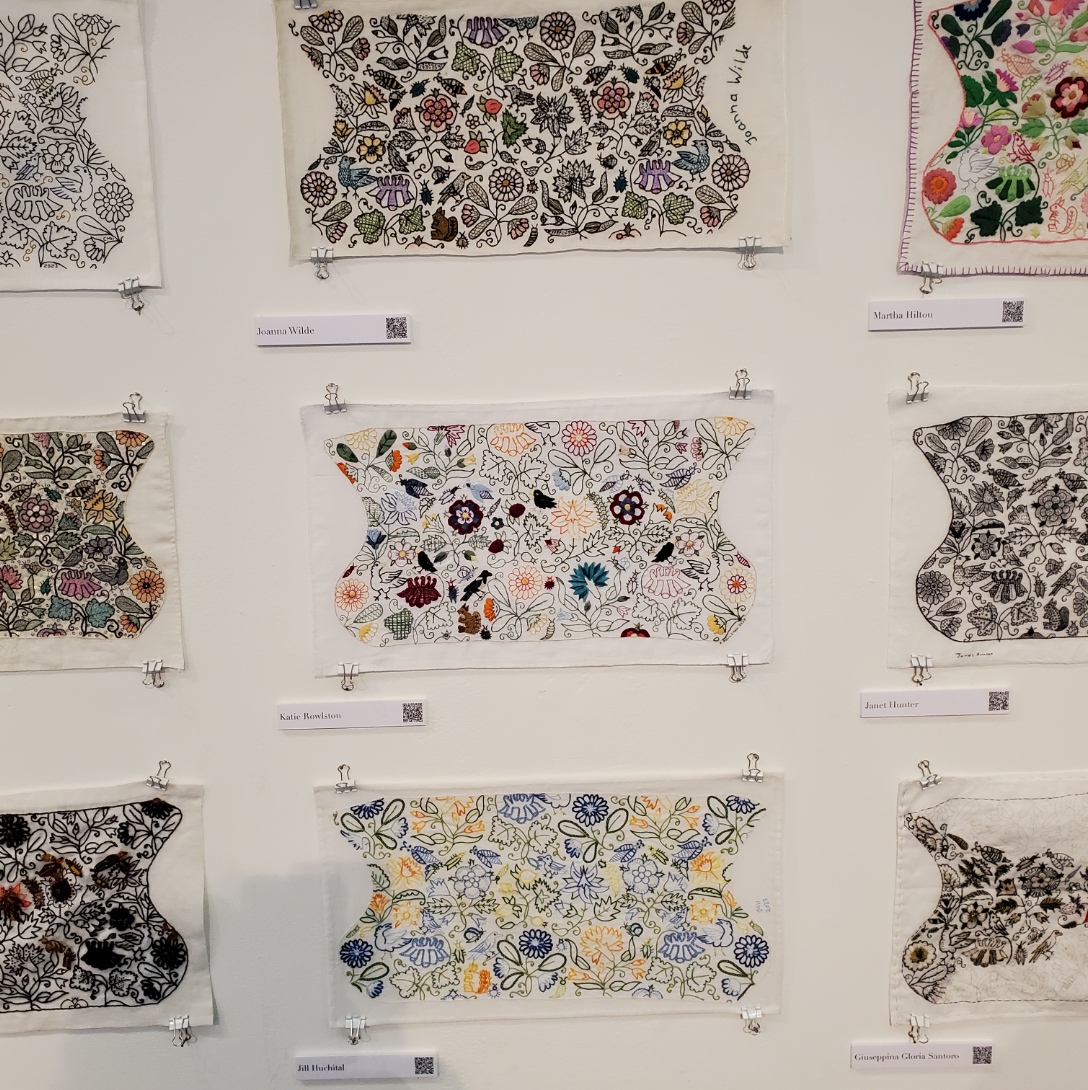
| Catherine Hill Kim Brody Salazar Jen Best | Christine Hillman Jo Tyrrell Victoria Keech | Joanna Wilde Katie Rowlston Jill Huchital |
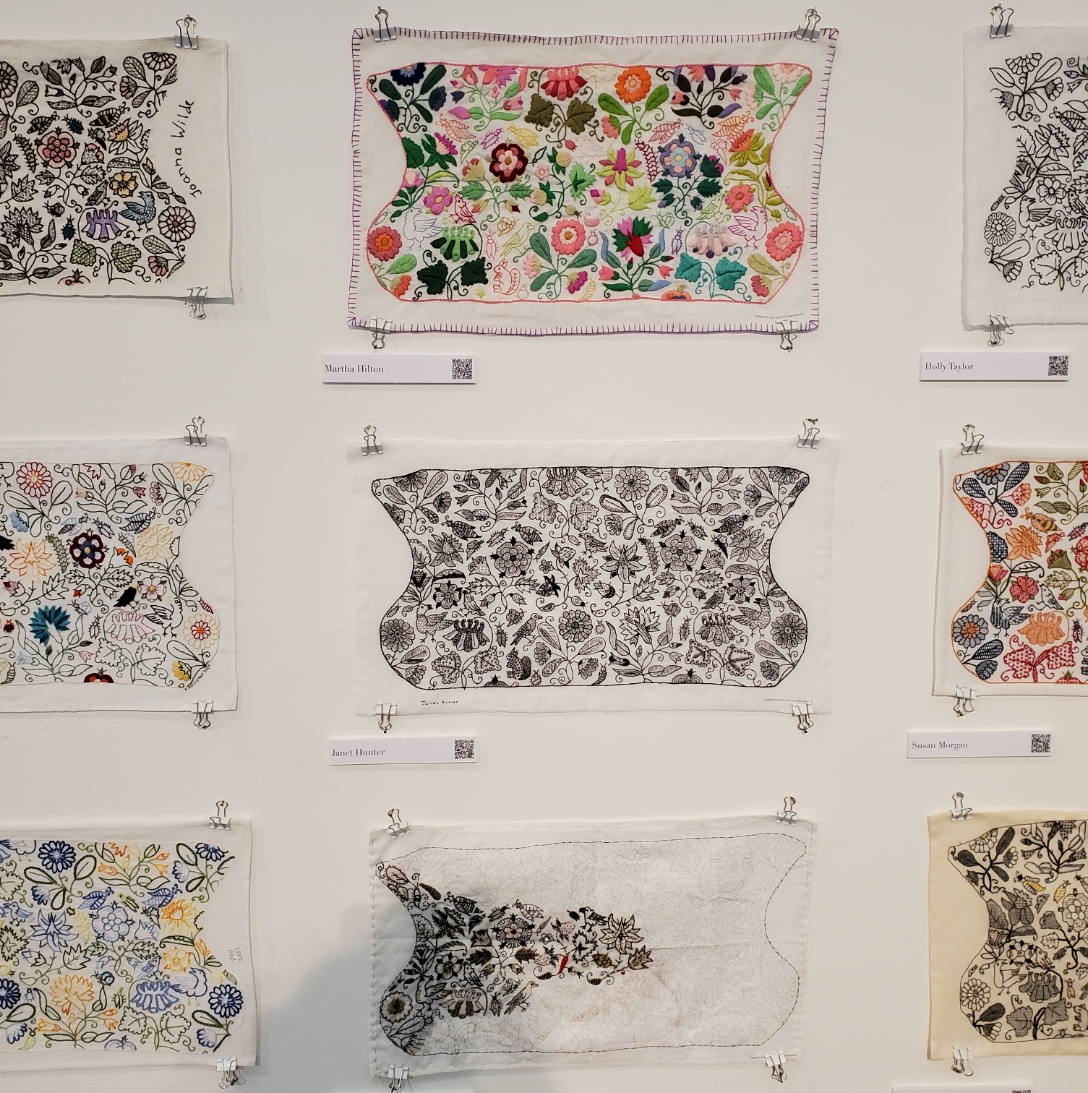

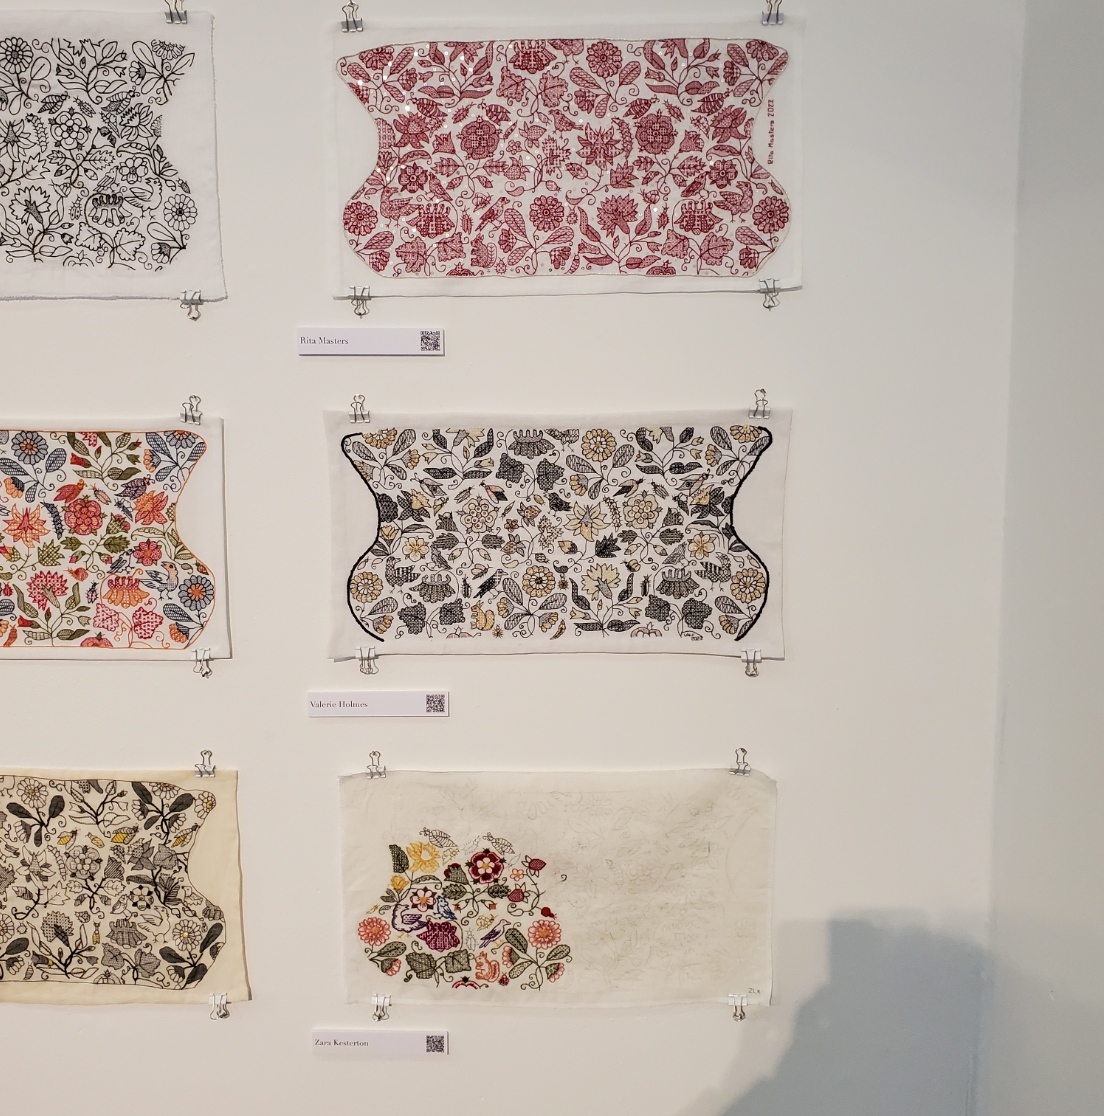
| Martha Hilton Janet Hunter Giuseppina Gloria Santoro | Holly Taylor Susan Morgan Leila Scott | Rita Masters Valerie Holmes Zara Kesterton |
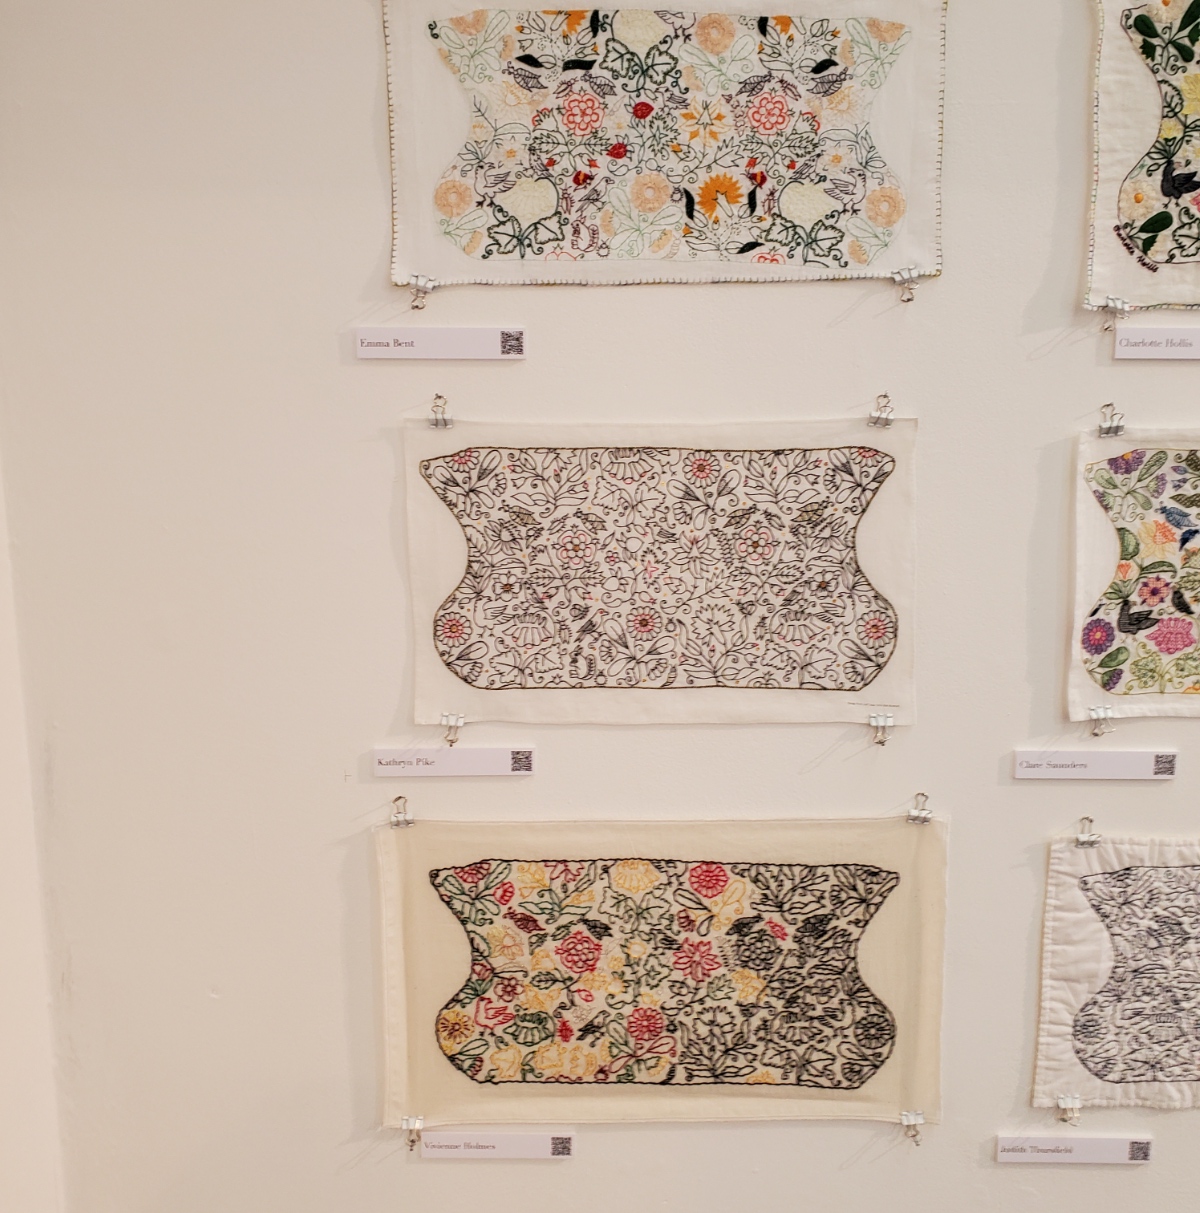
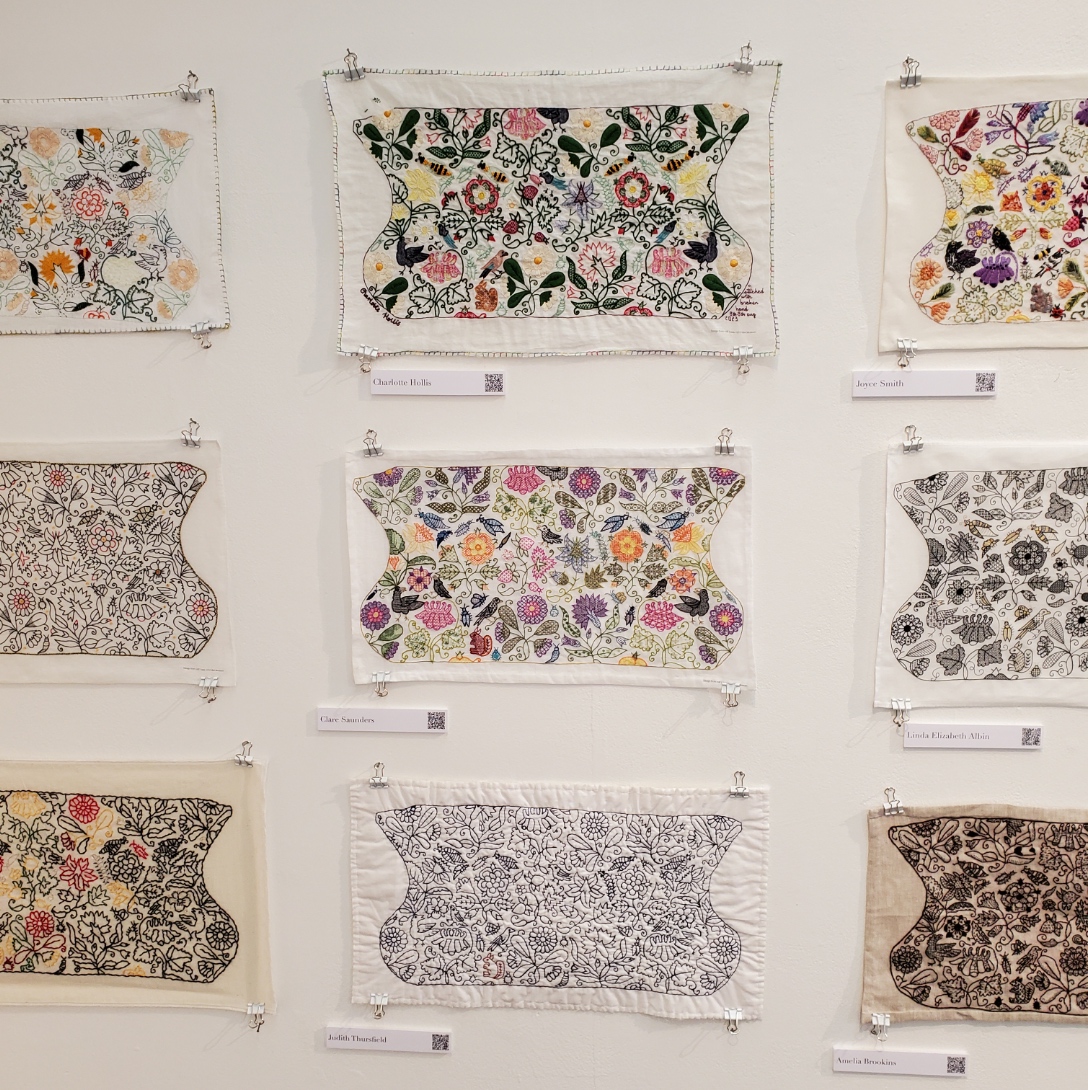
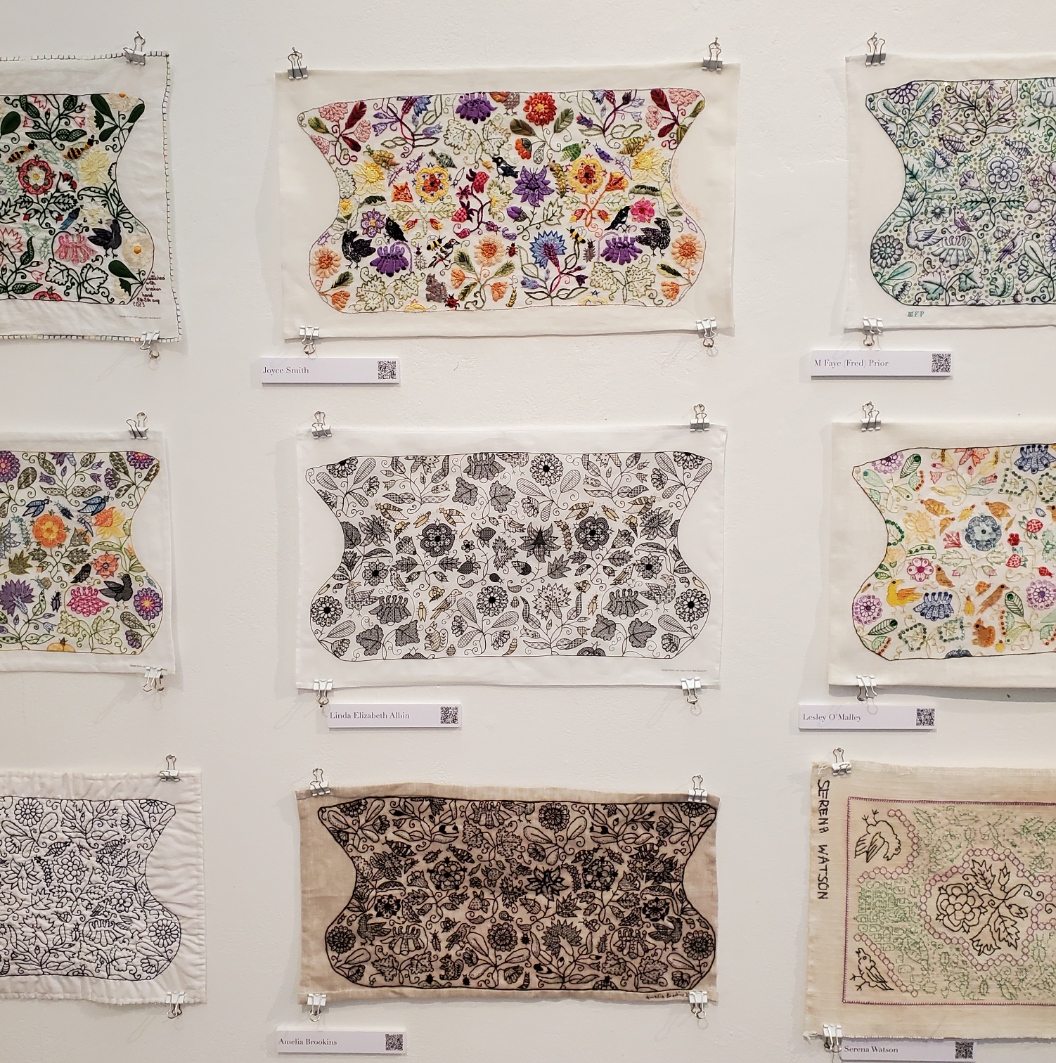
| Emma Bent Kathryn Pike Vivienne Holmes | Charlotte Hollis Clare Saunders Judith Thursfield | Joyce Smith Linda Elizabeth Albin Amelia Brookins |


| M. Faye (Fred) Prior Lesley O’Malley Serena Watson | Isabelle Verny Mathieu Anna Vereker Fiona Johnston | Bridget Marrow Ann Fitzgerald Debbie Gonet |

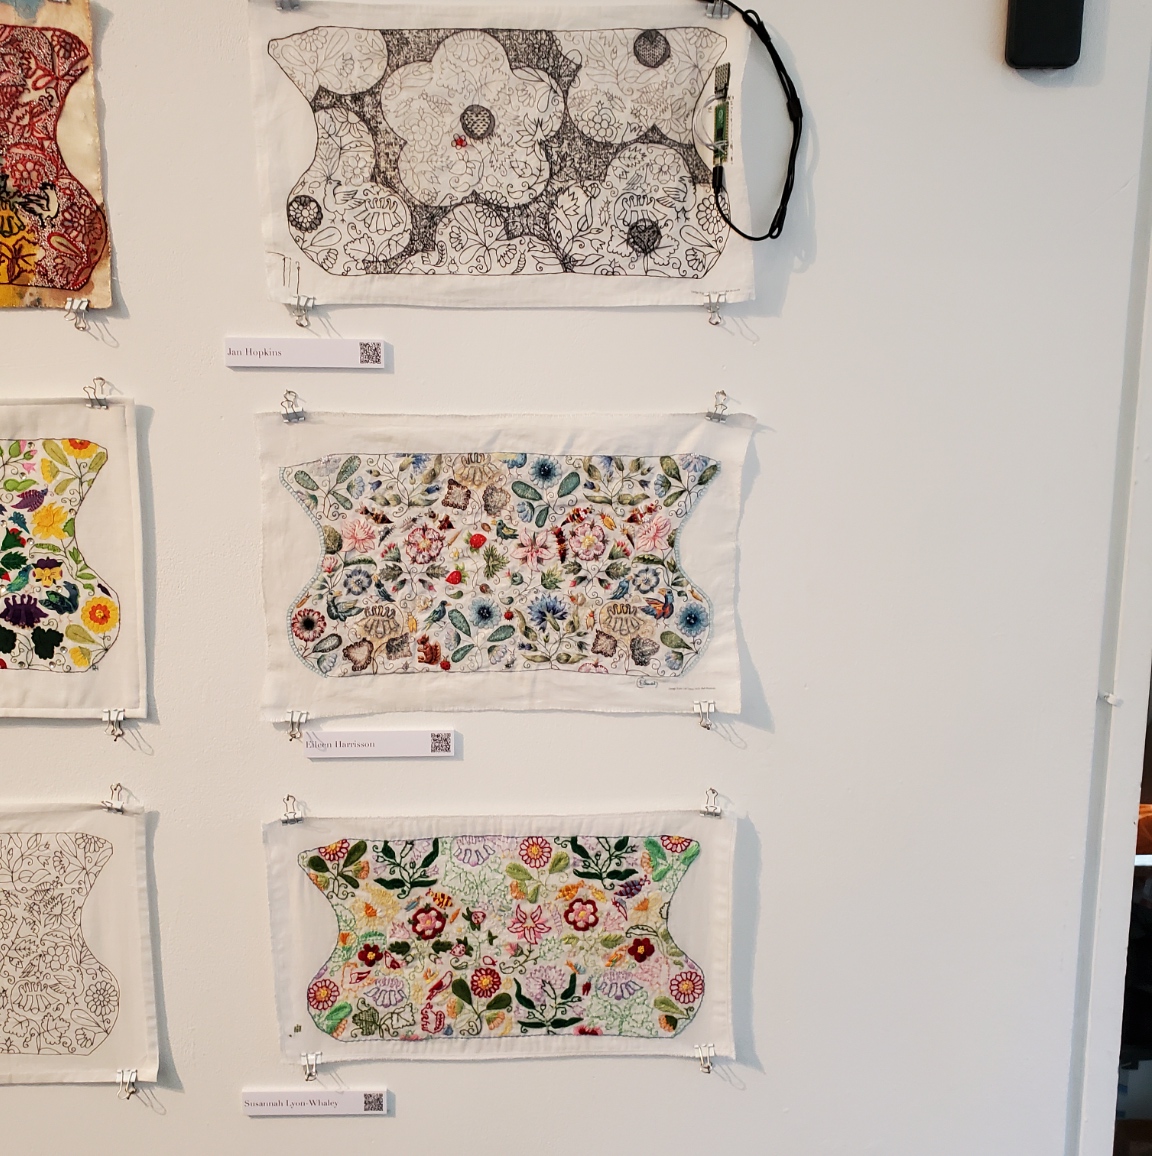

| Duwenavue Sante Johnson Rebecca Harrison-Page Linda Hadden | Jan Hopkins Eileen Harrisson Susannah Lyon-Whaley | Long wall photo to round out the set. |
Coif Replication
As she describes it, Toni Buckby hit upon the idea for the Unstitched Coif project while working on a replication assignment for the Victoria and Albert Museum. They have many pieces of blackwork that are literally eating themselves to death – the tannic black dye used on the silk threads turns them brittle over time. Now, some 400-500 years after they were stitched they are crumbling, leaving only the holes in the ground behind. But these pieces are still sought after for research by visiting enthusiasts/scholars. Toni was commissioned to do a full stitch by stitch reproduction of V&A accession T.12-1948, a well known and popular (although rapidly disintegrating) piece. Her reconstruction is intended for use in educational and outreach efforts because the original is now to fragile to be handled for view.
Toni sourced modern materials as close as possible to those of the original (the 72/74 threads per inch ground is the same one recommended for use on the Unstitched Coif project). She used forensic investigation of the “fossil” piercings and older photos to work out the now crumbled fills and outlines that can no longer be seen on the artifact itself. Her repro is at right.


Other Forensic Analyses and Reproductions
Toni is mapping out another very famous bit of blackwork in the V&A’s collection – the Falkland Pillow Cover, Accession T.81.1924. (In coincidence, this is the piece whose tiny thumbnail photo in Mary Thomas’ Embroidery Book set me off on my own blackwork journey back in the early ’70s). She is using layered drafting methodology to posit the placement and patterning of sections that have now largely disappeared.


Toni is also in mid-project of an ambitious effort to map the patterns on the three dimensional Falkland Waistcoat , V&A Accession T.80-1924, also a victim of thread degradation, plus other distortions and alterations. The goal of this effort is to chart the 3D design and translate it into flat patterning on garment sections that can be replicated and reassembled into a full reproduction. As you can see, exploring the garment shape by modeling is already underway. (Again, click on the photos to open in a new window, so you can enlarge them to read the text).


There was much more to the exhibit – a series of photos and explanations on materials suitability and choice methodology, and samples of the stitches used. But I’ve gone on long enough.
Suffice it to say that it was total immersion in the subject matter that sings to me, surrounded by people who understand and appreciate the artistry, time, and technique it requires. I met so many people, so talented and so gracious, who took time to chat with me, share their insights, and to mutually giggle in joy of finding others of the like mind. I’ve learned a lot from this project both in my own stitching, and from each and every version displayed here. I am deeply indebted to Toni for pulling the community together, orchestrating the effort, inspiring us along the way, and pointing the way forward, beyond. I do hope that this stitched together fellowship persists, and joins forces on future efforts. I know my needle is sharp and ever ready.
EVEN MORE ON AZEMMOUR
Yet another post only a stitching nerd will love.
Remember a while back, I pulled together some observations on the Azemmour Cluster? That’s a group of embroideries, usually known as fragments rather than whole cushions or other items. Those fragments were among the bits largely collected during the era of the Grand Tour (roughly 1870s up through World War I and on to the 1920s) when monied folk would do a season in Europe, collecting artworks and other items of interest. Needlework and lace collection were among those passions, along with other more traditional forms of art. Those gleaningss eventually landed in museums.
Since needlework fragments are not among the items most highly prized in museum collections, many remained in storage cabinets, with the donor’s provenance notes unchallenged. Or they did until museums began photographing these holdings both for their own use, and to post on line. At that time many of the attributions came under scrutiny, and did not hold up. In the past thirty-plus years I’ve been nosing these up, comparing them and making notes I’ve seen dozens of museum tags specifying stitches, dates, and places of origin change.
Among these collected and sometimes reclassified pieces were items in what some call the Azemmour Cluster. They were scraps sold to unwitting tourist-collectors as genuine late Medieval through Renaissance artifacts. But in actuality it does look like a lot of them, and a lot of the most represented designs in those museum back room cabinets, were produced in Morocco, with many dating to the late 1700s at the earliest, but most were likely made in the 1800s.
To be fair, the designs DO look like they express Renaissance roots. In the post above I even point out a piece that looks like it may be a predecessor. The Moroccan connection was known for some of these. Frieda Lipperheide in Old Italian Patterns for Linen Embroidery does point out that origin for some strips, noting their similarity to Italian designs.
Well, thanks to discussions in the Zoom meetings that are part of the Unstitched Coif project, a significant arguments strengthening the joint Moroccan sojurn of these designs has come to my attention.
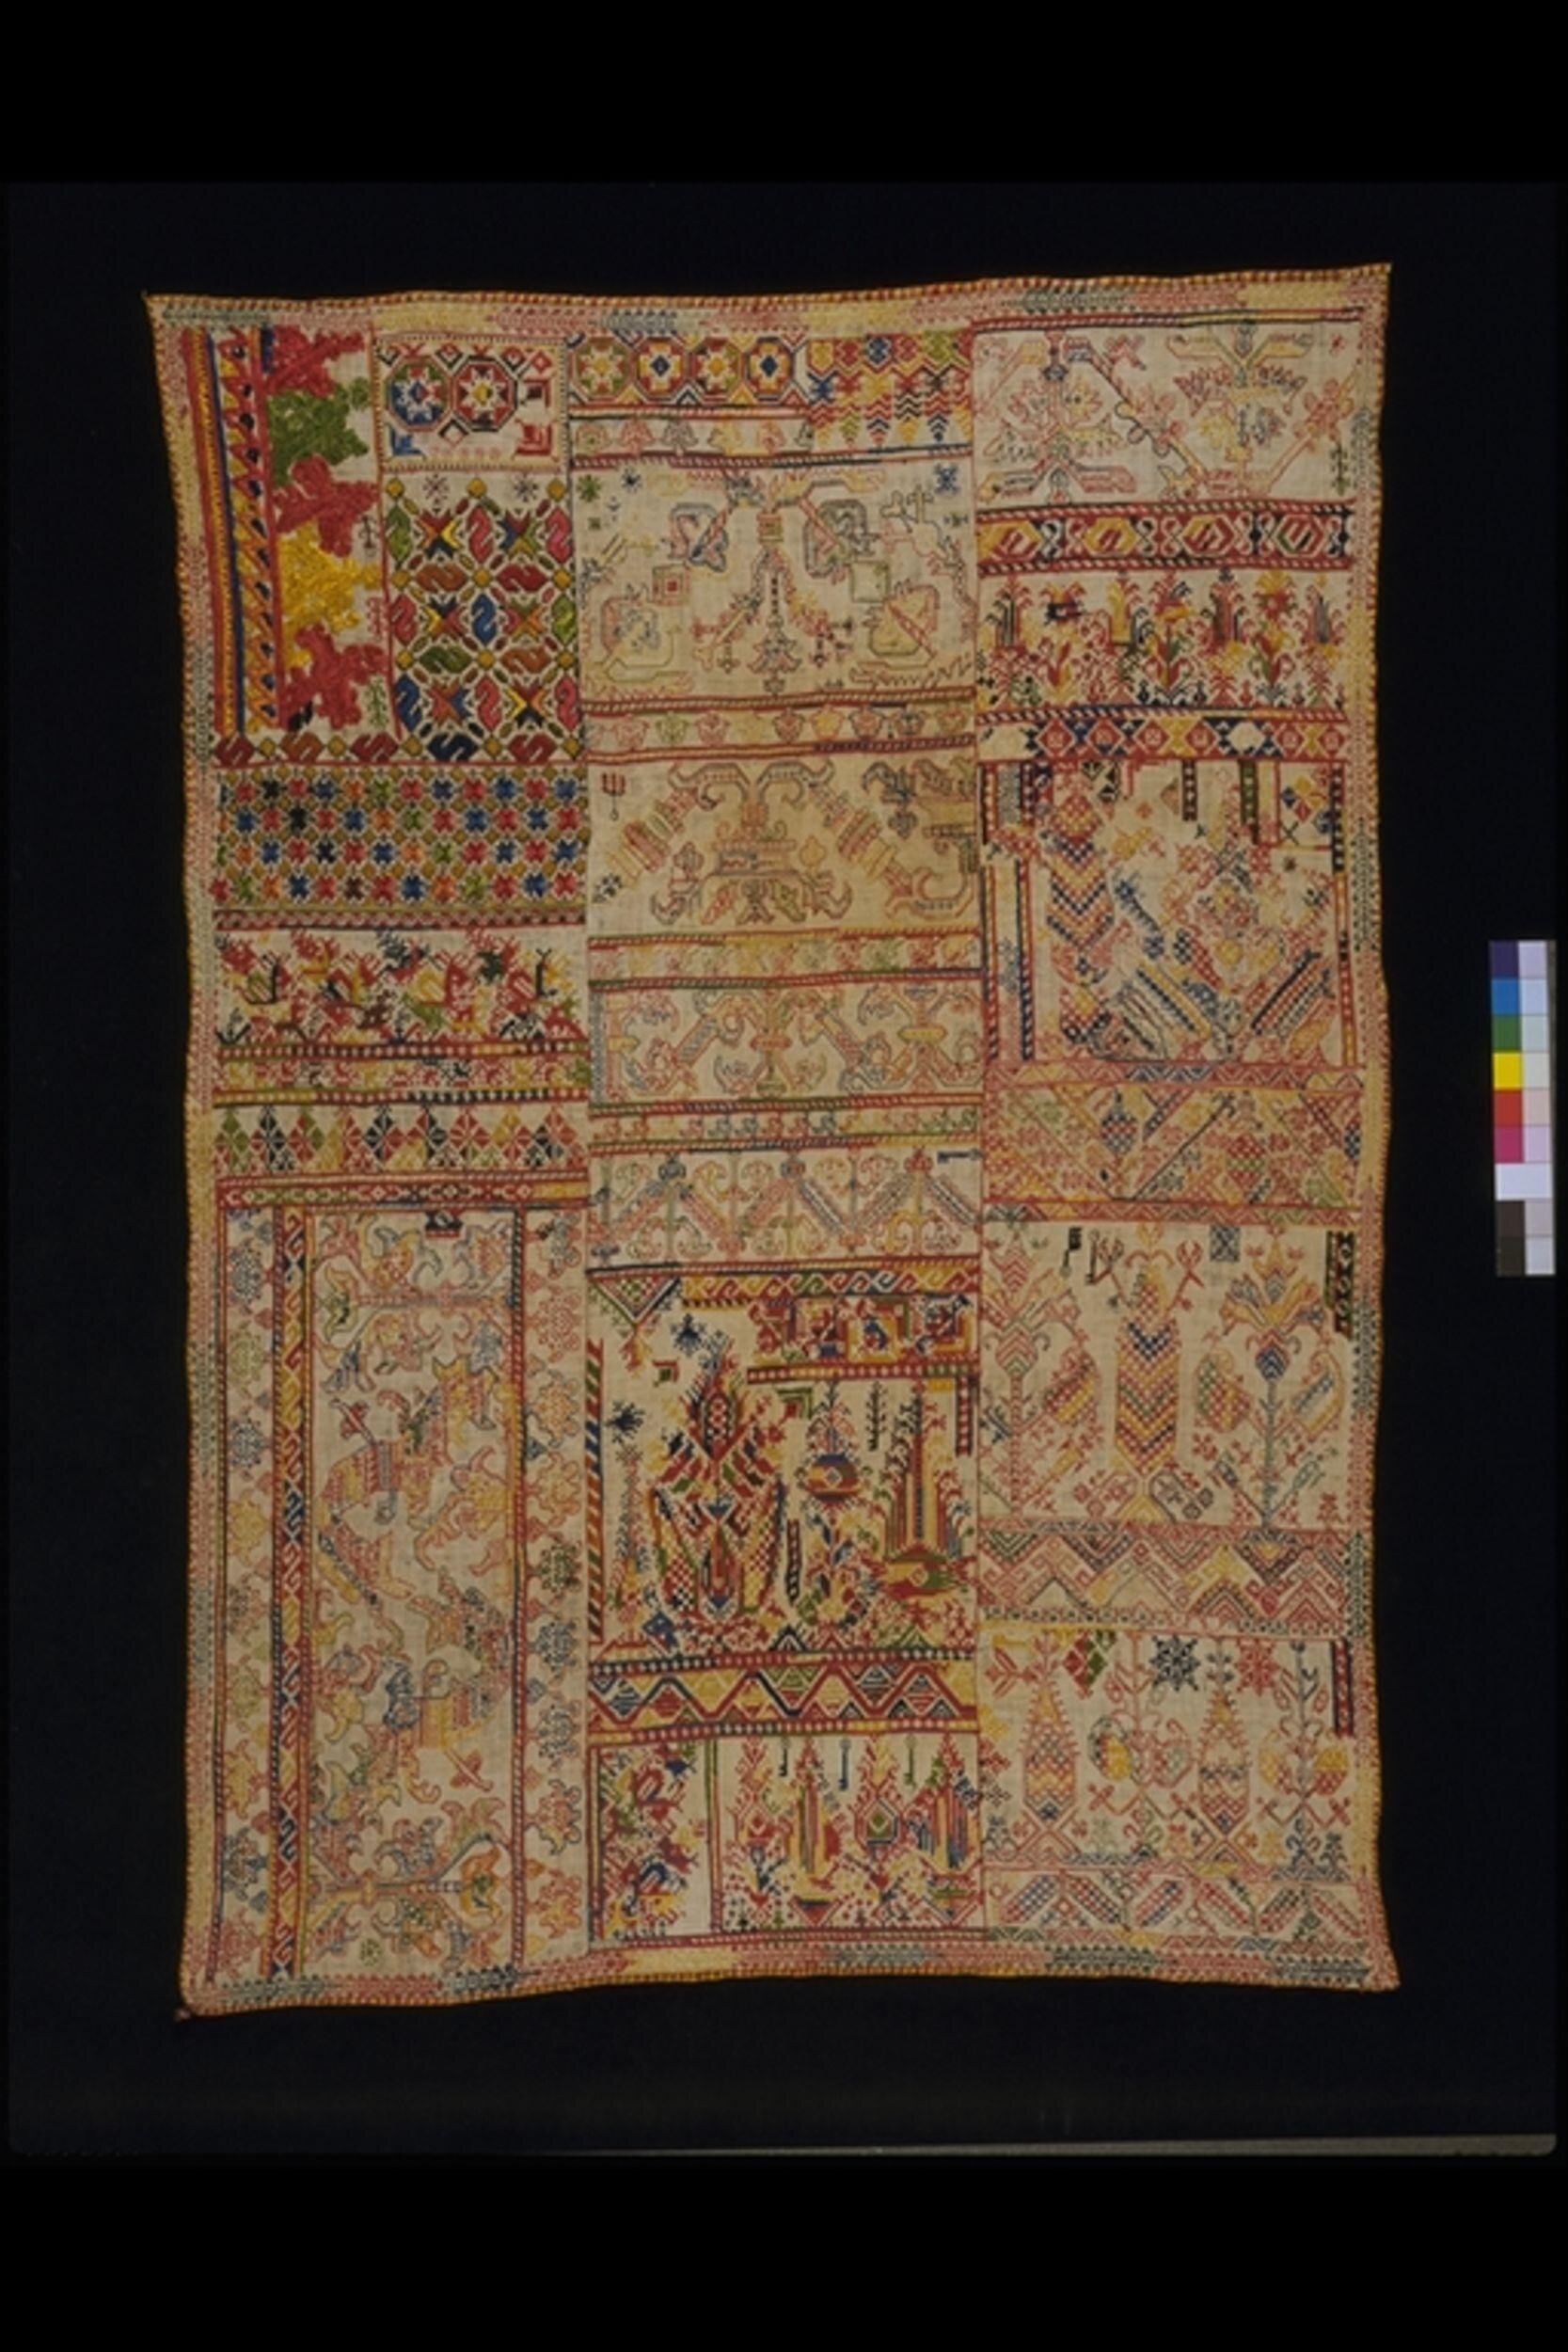
Here are two samplers from the Victoria and Albert Museum’s collection. The images are theirs used here under fair use/academic auspices. The multicolor one is Accession T.35-1933, a 19th century piece from Morocco, stitched in silk on linen. Yes, most of the individual fragments of these designs are in monotone, usually red, but occasionally deep indigo, these two samplers with their collections of many designs are happy riots of color.
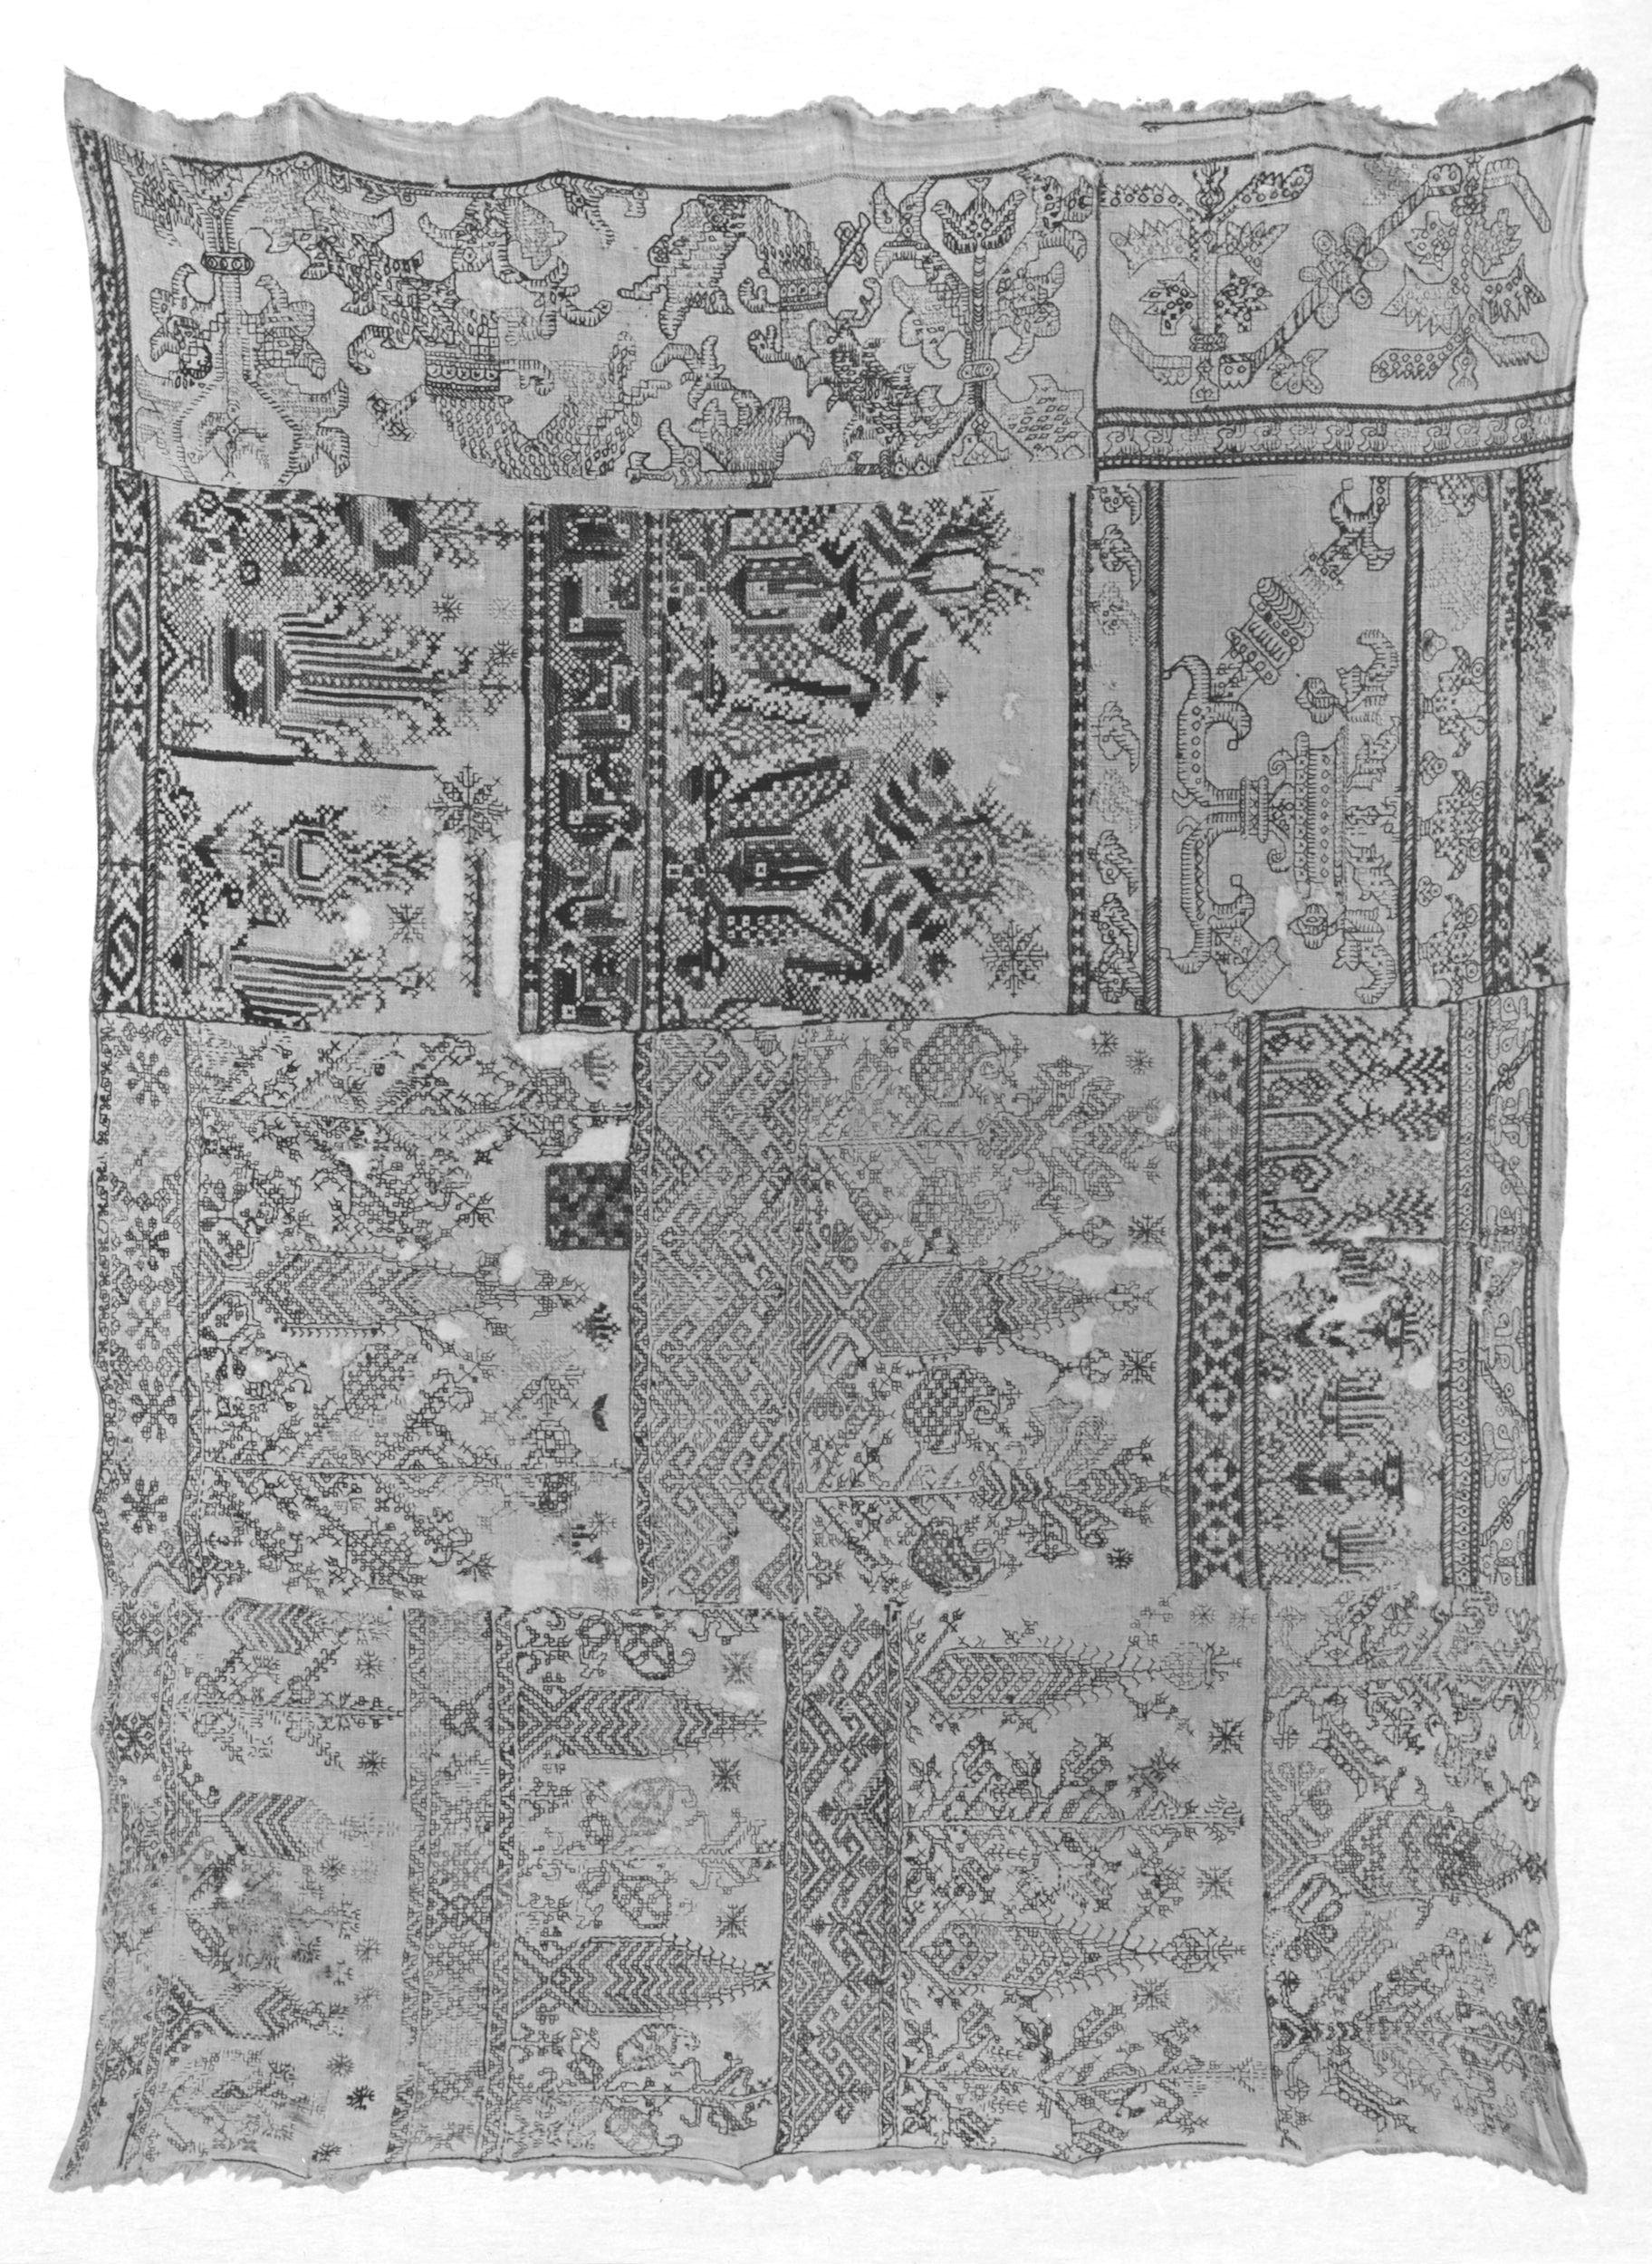
This black and white photo is also of a multicolor piece (Accession 372-1905), dated from the 1800s, and is also listed as of Moroccan origin.
Both of these pieces contain two of the most common motifs in the cluster. This one is what I call the Spider Flower, for its spindly center blossom.
Here’s the second. I call it Wide Meander. This is found both with the wide strip looking rather sea-monster like with a gaping mouth, and in a tamer form, where the monsters have fused to become a super-wide belt like meander join. Discussions of both Wide Meander and Spider Flower are in my previous Azemmour post. Earlier musings on the Spider flower are here.

But these are not the only ones. The multicolor photo also has these two designs on it that I’ve discussed before.

The one on top is a variant of a pattern that is of Italian provenance. I mention it in this piece, and again in my discussion of voided grounds (under the boxed fill).
The one underneath I call the Pomegranate Meander. It’s clearly related to the Spider Flower, although in this case the ornaments on the joining diagonals are emphasized, rather than the center flower shape. It’s also mentioned in the Azemmour discussion cited earlier.
Plus it’s also worth noting that both of these V&A samplers show lots of variants of the customary accompanying borders so often seen with these main strip designs.
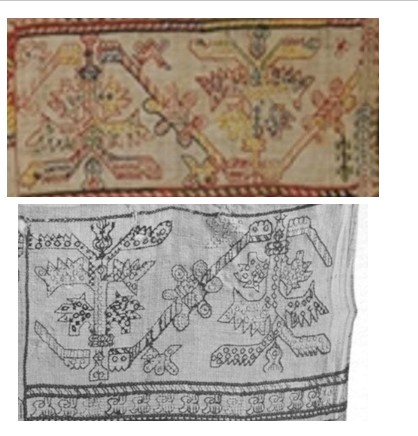
But for me the eye opener was the addition of another design to the group. Both samplers show the wide urn design.

This one I should have tweaked to based on the style of detail in the foreground. But I did graph it up for The Second Carolingian Modelbook based on this example from the Hermitage Museum, and accepted their identification as Italian, 16th to 17th century. Accession T-2714, entitled “Border Embroidered with Bowl and Stylized Plant Motifs” if the link breaks).

Here is my own rendition of this design, as I stitched it on my long green sampler.

Now we have a conundrum. We have many items whose dates and places have been corrected in museum collections. We have a continuing tradition of design replication and pattern re-use in a specific place. We have some predecessor designs and traditions that might have fed the Moroccan styles. And we even have some evidence of the post-Inquisition diaspora spreading these stitching styles TO settlements in Morocco. The Jewish link is cited by The Textile Museum of Canada. The Jewish Virtual Library notes the migration and community. The Jewish link is also mentioned here. The Textile Research Centre writes that production of Azemmour pieces died out in the mid 1900s, although recent revivals have been undertaken.
So where do we draw the line? Are these related items ALL to be reassigned to the Azemmour Cluster, with production dates in the 1700s through 1800s, sold to the unsuspecting as older artifacts? Are some possibly earlier, transitional pieces? Can we rely on just the wealth of ornament in the foreground of these strips to differentiate them from earlier forbearer pieces? Without detailed textile forensics, we may never know. But wherever and whenever their points of origin, it’s nice to see the family reunited again.
YET ANOTHER BLACKWORK PATTERN INTERPRETATION
A big thank you to the Facebook/Blogspot guru who posts at Attire’s Mind. Today he posted a painting from the collection of the National Gallery of Art, (Accession 1931.1.114 in case the links break). It’s a devotional image by Giovanni Battista Morini, and is entitled “A Gentleman in Adoration before the Madonna.” It’s dated to 1560.

The Attire’s Mind post called out the blackwork on cuffs and collar.
Of course I was smitten with the pattern and had to graph as close an approximation of it as I could. It’s got a bit of interpretation, but given that the original I am working from is paint and not countable linen, I think that relying on best-effort/logical construction that achieves the motifs using the least real estate is good enough.
This one is especially interesting because it looks like the artist went out of his way to depict two line thicknesses. These could have been achieved by using different stitches, or by varying thread thickness. I’ve tried to convey that look by using two line thicknesses in my chart. Experimentation with how to render this in real stitching would be lots of fun.
Now, I could save this along for eventual publication in The THIRD Carolingian Modelbook, which I’ve already begun compiling, but given my dismal track record of decade-plus production for each of that series’ two prior volumes, why wait?

You can click here to download this as an easy single page PDF file
It’s also available on my Embroidery Patterns page. Enjoy!
MARCHING ORDER
I apologize for frequent posts on the Unstitched Coif, but if there’s something to say it’s usually very hard to keep me from saying it.
I want to thank everyone on the outpouring of support and appreciation, hints, and suggestions. I’m delighted that you are enjoying these notes, and that magnifies my own enjoyment of the process. Many of your recommendations and hints have been quite valuable. I have gotten some suggestions though pointing out that in the writers’ opinions, I am going about this all wrong. My sequence of attack on the piece – the order and manner in which I am working the components doesn’t synch with those folks’ opinions.
I attempt to explain myself.
First, I am a self-taught stitcher. I’ve never taken a class or workshop in this or any embroidery style. I fumble along aided by books and personal observation of artifact photos (and actual artifacts on rare occasion when I’ve been lucky enough to see them). It’s very possible I’ve missed lots of clues on working methods. I don’t claim how I go about my stitching is the one canonical and correct way to do it, it’s just the way that works best for me.
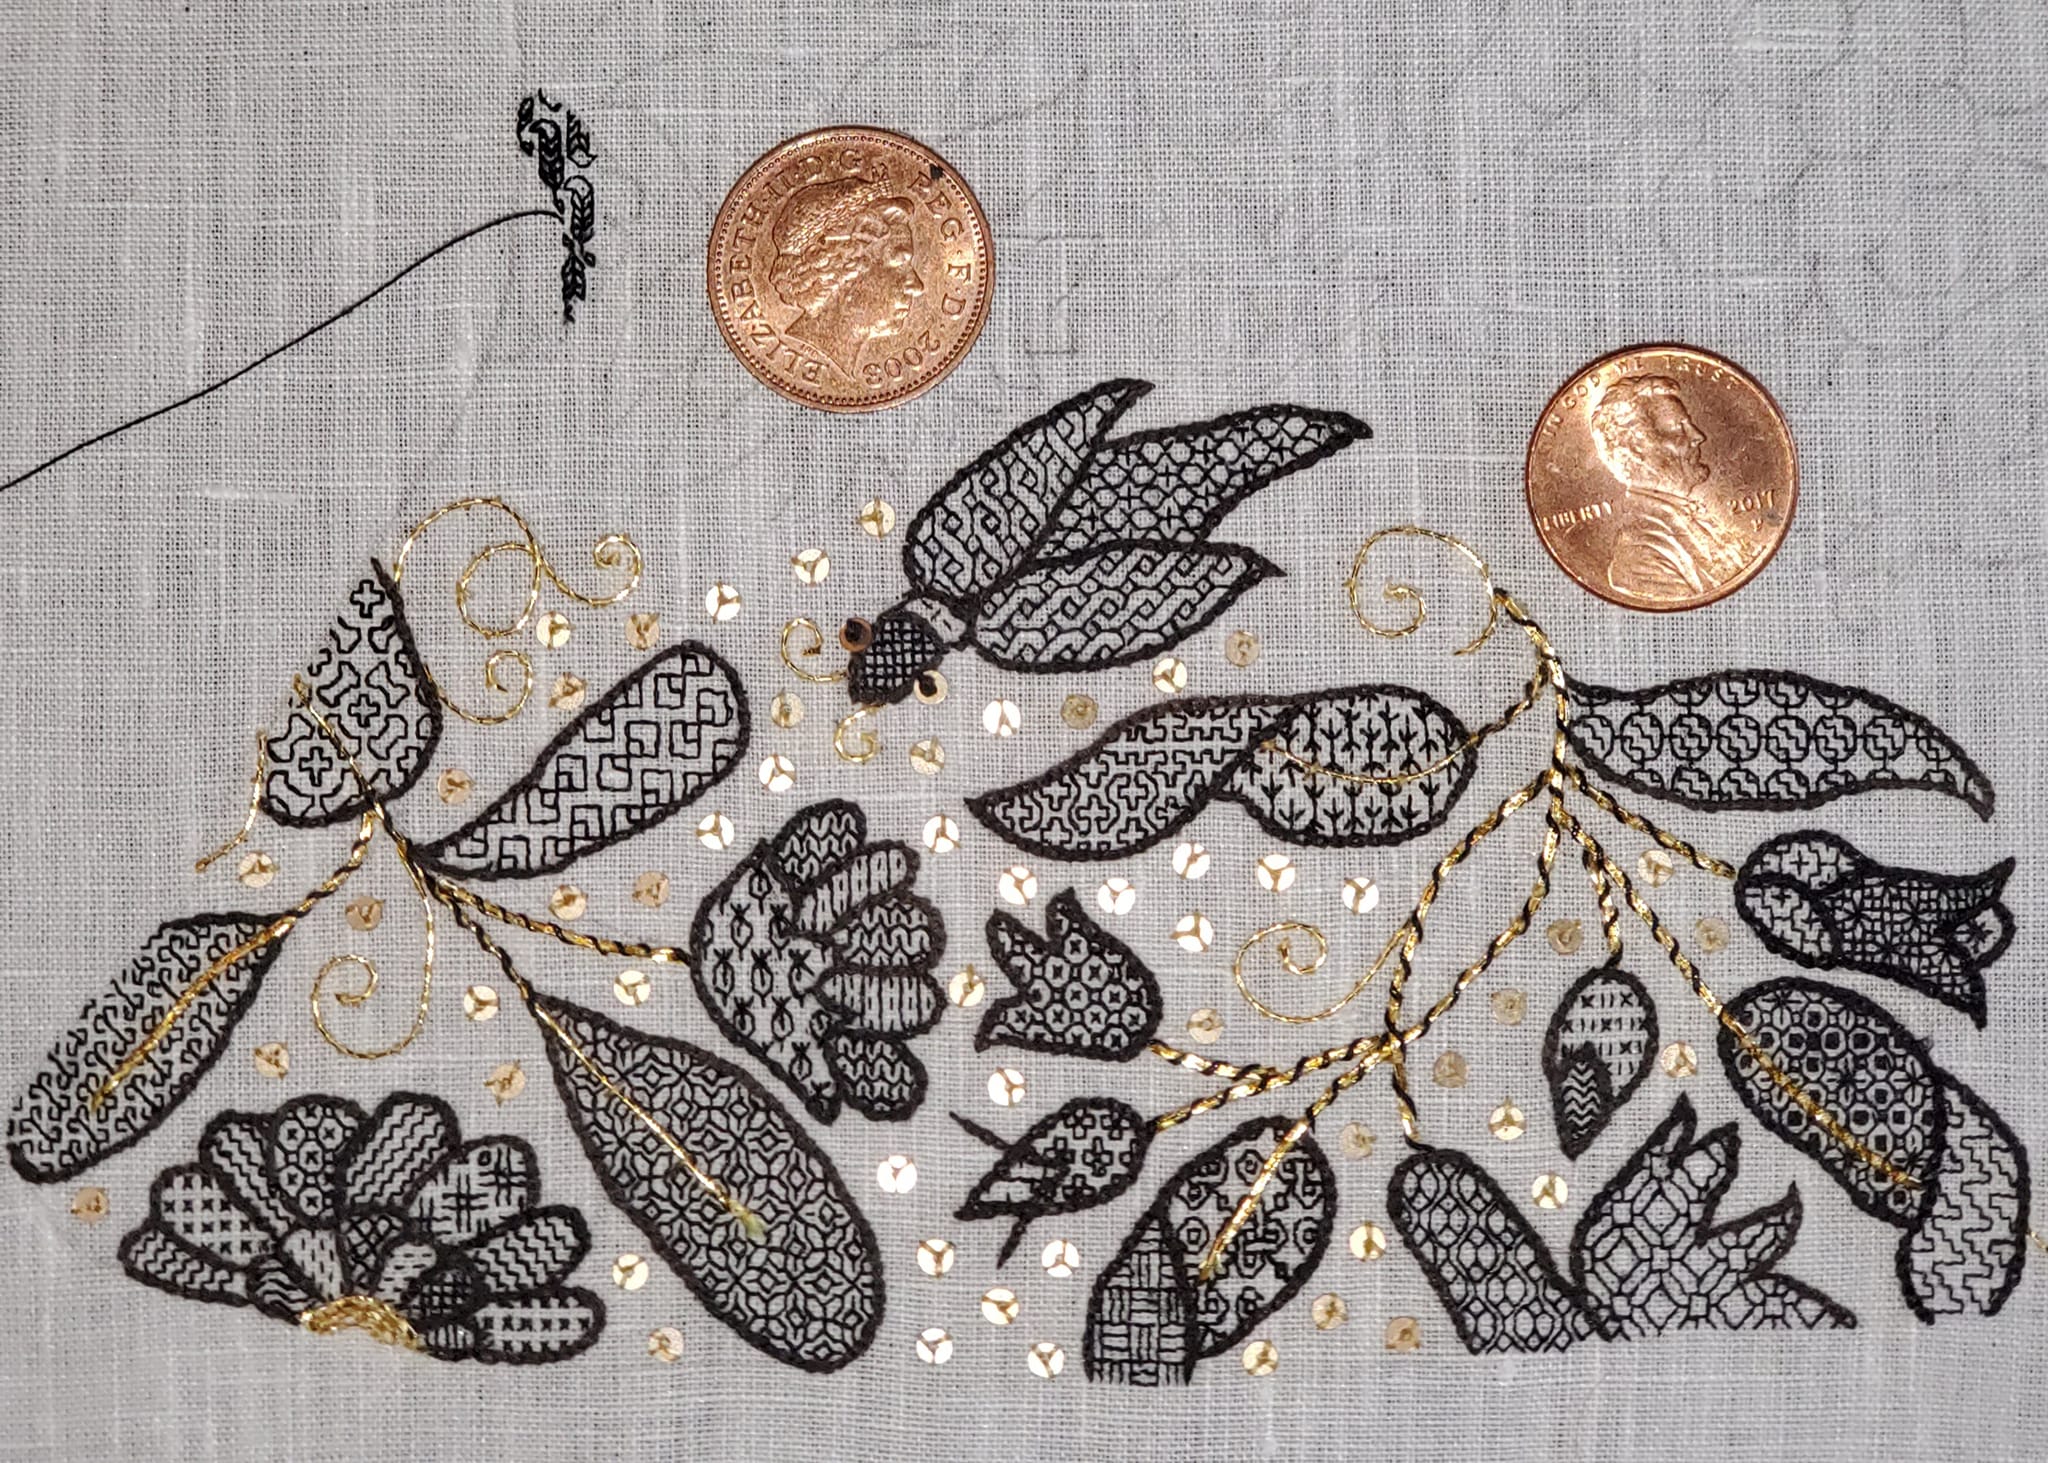
On lack of advance planning and charting – In general on an inhabited blackwork project (the type with outlined shapes and fills), I do very little planning ahead. Each flower or other motif is considered when I get to it, I pause, look at the new bit, decide if I want a dense/dark fill or something lighter; consider contrasts for any sub-components; and try to balance the types of fills used. Do I want the turned underside of a leaf to contrast with the rest of it? Should I put two fills that are angular and spiky next to each other, or should I try to maximize texture contrast in addition to density? Is the current space big enough to give play to one of the larger, more complex fills, or is it so small that a simple one would work better there; or should I abstract the “main motif” of a more complex fill to complete that space? Is a particular fill so stand-out that it will influence the choice of those around it? On that last one, the bead-like fill in the leaf just under the US penny is so striking that I would not want to use another rondel-based design nearby.
As you can see I’m still recalibrating for the tiny gauge. I have underestimated the display potential of these small spaces, and with judicious choice can begin using the larger, more dramatic fills both from my collection and from the ones provided by Ms. Buckby on the official project website.
Then there’s working order. One person who wrote a private note to me swears that the only way to work this type of piece is to complete all of the outlines first, then fill them in. Someone else says that I should be doing all of the fills for the entire piece first, and adding the outlines only after they are finished. Another person writes that I am a know-nothing for working the gold couching (and even worse the spangles) before finishing all of the black silk bits. And someone else chastises me for starting in a corner rather than the center of the work.
I reply that there are no Embroidery Police. I do what I do because it works for me, and because I have reasons for it – both as production procedure and as a bow to my personal temperament.
Here are yesterday’s additions – the finish of the little ruffled flower on the coif border, plus most but not all of the blackworked bits for the daffodil/narcissus like flower immediately to its right. I’ve used some medium-size fills from my notebooks for these bits, plus one of the fills cited on the website.

In general, I like to do the fills first, then go back and add the outlines. Note that along the edges of the fill areas there are half-stitches, eking the fill out up to the projected placement point of those outlines. Although they are a pain to do, they help avoid small gaps, and are much easier to stitch if you aren’t trying to bump up against heavier stitching. And when the outline stitching is finally done it neatly camouflages the ragged edges of the filled areas. Those little halfies barely peek out but do add to design completion (as seen in the “bone and cross” leaf in the lower left of the photo).
BUT there is a caveat. My traced pencil lines, especially in this area, are quite light and hard to see. I do my best to follow them, aided by an ever-present printout of the design for ready reference. I want to do the frill that marks the interior of the flower’s trumpet in a darker, denser stitch, but the edge of the frill separating the interior and the exterior of the trumpet is very hard to see. So before it was lost, I chose to do just that bit of outline, while I could still see it. I’ll go back and complete the rest of the outline on the flower as a whole once the interior dark part is worked.
Once the black silk is all laid down not only for this flower but for any other components touching its stems and sprigs, I will add the double line of gold couching for all of the leaf veins and stems in the group, and whip just the stem parts with black silk. Then I will work the single line couched gold curls, tendrils, and antennae (if any). And when most of the work surrounding a bit of “white space” is complete, I will add the spangles. Mr. Big Bug is missing the gold stripe embellishments on his body. I am still deciding on whether to do them in double or single thickness gold. Double stands out better, but there are so many that done heavily they might take over his look. I’ll get there, but not yet.
I am working each section to completion rather than doing all of the black silk work for the entire piece first, then adding the gold and adornments (or for that matter, working all of the fills or outlines first, then completing) because I need the variety to keep fresh. Each different component requires a different type of concentration and moves at a different pace. Mixing them up both gives me a better guide for the look I am trying to achieve, and keeps me mentally nimble as I go. This project would be stultifying for me if I were to break it down by type of stitching and work them singly to completion in sequence.
There are downsides to my mix-it-up approach. Those spangles and bits of bling catch threads, and can be abraded or otherwise damaged by clumsy fingers or needle tips as I go along. I will probably deploy pieces of well washed muslin or old, freshly washed handkerchiefs to cover previously stitched areas as the piece grows, taking them off only for progress photos.
And as for why I started in a corner – I point to visual focus and prominence. The center of a piece is the most scrutinized. By easing into the thing at one of the corners I commit my experiments in scale, pattern complexity, and density to the less ogled outer edge. Ripping out bits I don’t find totally successful is not an option at this gauge. Once I commit, that’s it. By the time I get to the center I should be better in command of the fill vocabulary on 70+ count, and the best of my work should mate up with the eventual viewers’ most exacting gaze. Note that if I had been stitching this coif with an eye to making it up into a hat and wearing it, I would have started at the center bit at the nape of the neck where the cap would have tucked under the wearer’s bun-bundled hair, that being the least viewed part.
The one thing I haven’t been doing reliably though is whipping down all of those plunged ends of the gold thread on the reverse, which already looks like a nightmare. I detest doing that and should be, but haven’t. For this sin I will go sit in a corner and contemplate my life choices, preferably while tending to those little monsters…
So that’s my working cadence, and my reasons for it. Should yours differ, that’s fine. What works best in the long run is what works best for each of us as individuals who understand the strengths and weaknesses of our materials and our own proclivities, instead of dogmatic compliance to an arbitrary set of rules.
STITCHING ON THE MUSEO DEL TESSUTO’S 16TH CENTURY CAMICA
Of late there’s been considerable chatter in historical clothing and embroidery circles about the late 16th century Italian camica (underdress/smock) displayed by the Museo del Tessuto as part of their current exhibit on the life and times of Eleanor of Toledo. The piece is magnificently stitched and in extraordinarily good condition.
The piece’s citation (autotranslated) is listed on their Facebook feed page as Women’s Shirt, Italy, Sec. XVI second half, Prato, Textile Museum, inv. n. 76.01.15.
There has been extensive discussion of how it was made, with Dani Zembi of The Vorpal Rabbit blog contributing an insightful deep dive into construction, and others elaborating on her observations. Seeing so much enthusiasm for this artifact, I decided to contribute to the store of general knowledge as best I could. So I redacted the stitched patterns for the main yoke motif and the seam/hem bands.
CLICK HERE OR ON THE IMAGE BELOW TO TO DOWNLOAD A LEGIBLE PDF

The thing is also available via the Embroidery Patterns tab at the top of every page here on String.
Notes on the redaction:
- There were lots of variations in the pattern repeats on the artifact. I’ve normed my version by relying on the most represented version of each of the motifs. So this is an ideal rather than an as-stitched, include-every-original-mistake replication.
- I have tried to show use of long armed cross stitch on this piece. I do not know what variant of LACS is employed, but I have used solid blocks to show its presence. As anyone who has worked that stitch family knows, working it over only one unit is problematic. The historical stitcher solved this by using plain old cross stitches for one-unit blocks. My chart shows those, and along with the solid areas gives a good indication of the directionality of the LACS variant where it was employed.
- I did not include the pendant tab center of the yoke. That’s a two-repeat crib of the main motif, with fudged ends. Since folk using this design will do so at different ground cloth thread counts, they will have to do something similar themselves, centering a slab of the main design on their yoke and improvising the join. After all, there’s historical precedent.
- I only charted one corner because the photos I was working from didn’t show the others well enough for charting, although they may in fact be more or less symmetrical. And that corner is best guess – especially for the curlicues, which were difficult to parse due to encroachment and possibly some small damages.
- Note the difference in the companion border above and below the yoke motif.
- The spacing of the seam ornament varies a bit in use on the sleeves, gores, and hem. Again I’ve normed it, and although in the original it does NOT align with its “beaded” spine, I’ve done so here to make it easier to stitch.
- From examination of the angled parts (sleeve and gore edges) where the seam treatment was not worked along a straight grain edge, it looks like the sprigs were spaced by eye, and stitched first, normal to the weave’s direction. Then the spine was stitched freehand in close approximation of the size of how it looks when worked on grain.
As to materials, there’s a healthy discussion about the museum’s description. The ground is linen, but some translations claim the stitching is cotton. That’s not impossible. Although a rare luxury material cotton was used and was sumptuary law legal in Italy at that time, but I’d say that claim is met with skepticism by many in the historical stitching community. In any case, even if it were, it’s not the smooth, shiny, hard mercerized and gassed cotton we find in today’s off the shelf embroidery threads. It’s something softer and less tightly twisted. Possibly finger spun (although I’m no fiber expert). I’d love to see it zoom magnified so we could learn about twist and ply.
EPIC FANDOM STITCHALONG – BAND 18
PILLARS OF MUTUAL SUPPORT
You’ve stuck with this for a good long while now, and we’re almost done. Just one more strip after this. So please excuse me for inserting a bit of serious into all this silly.
Greater Fandom as a whole depends on the output of creative professionals. These range from big-money movie studios, highly paid actors and other high-impact performers/public personalities and well known/successful writers; to small one-person artisan shops selling on Etsy and other venues, authors struggling to get a toehold in the market, and independent musicians, artists, designers, costumers, actors, craftspeople, and artisans. Times have been tough for us all, and things have been especially hard for the creative community who depend on in-person consumption of their content, either in theaters or arenas, on screen, or interaction with their books or other publications. Many creative folk have just barely eked by for the past two years, and are hoping against hope that this year is an improvement.
If you have the means, please consider paying forward the time and attention invested in this free group project by purchasing something – it could be something as small as a 99-cent short story on Kindle – or otherwise offering support and acknowledgement. If you are hurting, too, consider leaving an honest review for a maker/writer/performer whose wares you might have bought and enjoyed in better times. The arts, especially those that feed the imagination, are what keep us human when all else conspires to strip back mutual respect, compassion, and empathy. Let’s work together to preserve them.
Time Factor 3, mostly for size. The over/under crosses can be a bit tricky, however, the repeat isn’t very long, and being quite symmetrical is quick to memorize, and is an easy field in which to spot errors.
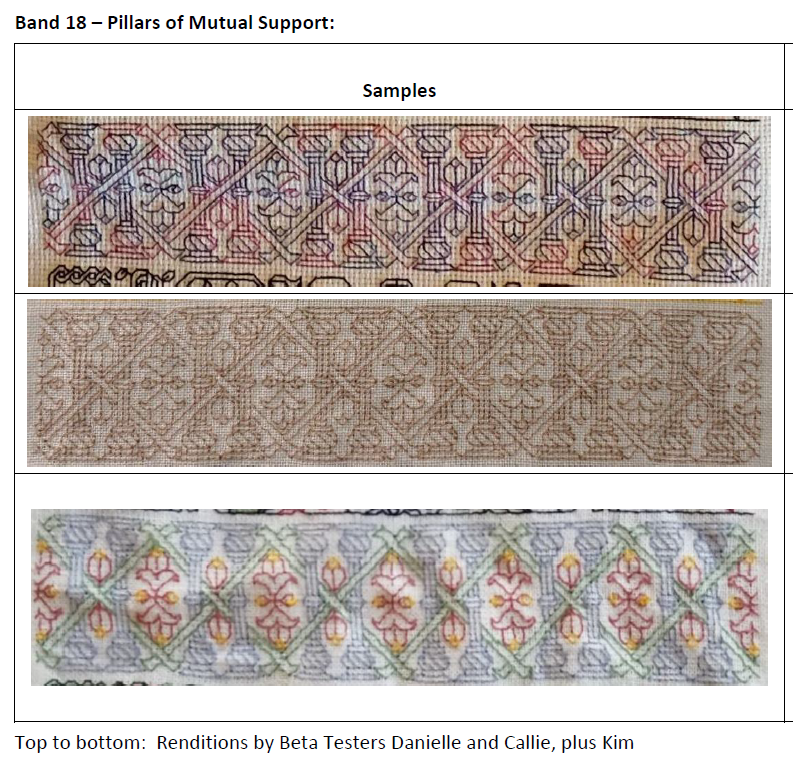
Use one color, multiple colors, or variegated threads, as you prefer. As with the rest of Epic, there are no rules or must-do approaches.
As usual this band plus working notes and hints has been appended to the bottom of the write-up on the SAL page, accessible via this link or via the tab at the top of every page here on String-or-Nothing.
If you are working our Epic Fandom SAL either as a whole or as a strip excerpt, please let me know. It gives me great joy to see how my “pattern children” fare out in the wide, wide world, especially when they meet up with creative, playful people. And if you give permission, I’d be happy to share your pix of this developing sampler, it in its finished state, or derivative projects including one or more of the Epic bands here on String, in a gallery post, with full credit to you as interpretive artist.
Band 18 debuted on he Facebook Enablers group on 2 August. Band 19 was posted there today, and will be echoed here on 30 August.
#EpicFandomSAL
RISING SUN DESIGN CHALLENGE
I’m working along happily on my grapes wine-opening placemat, using the motif I redacted from the 17th century Hermitage artifact.
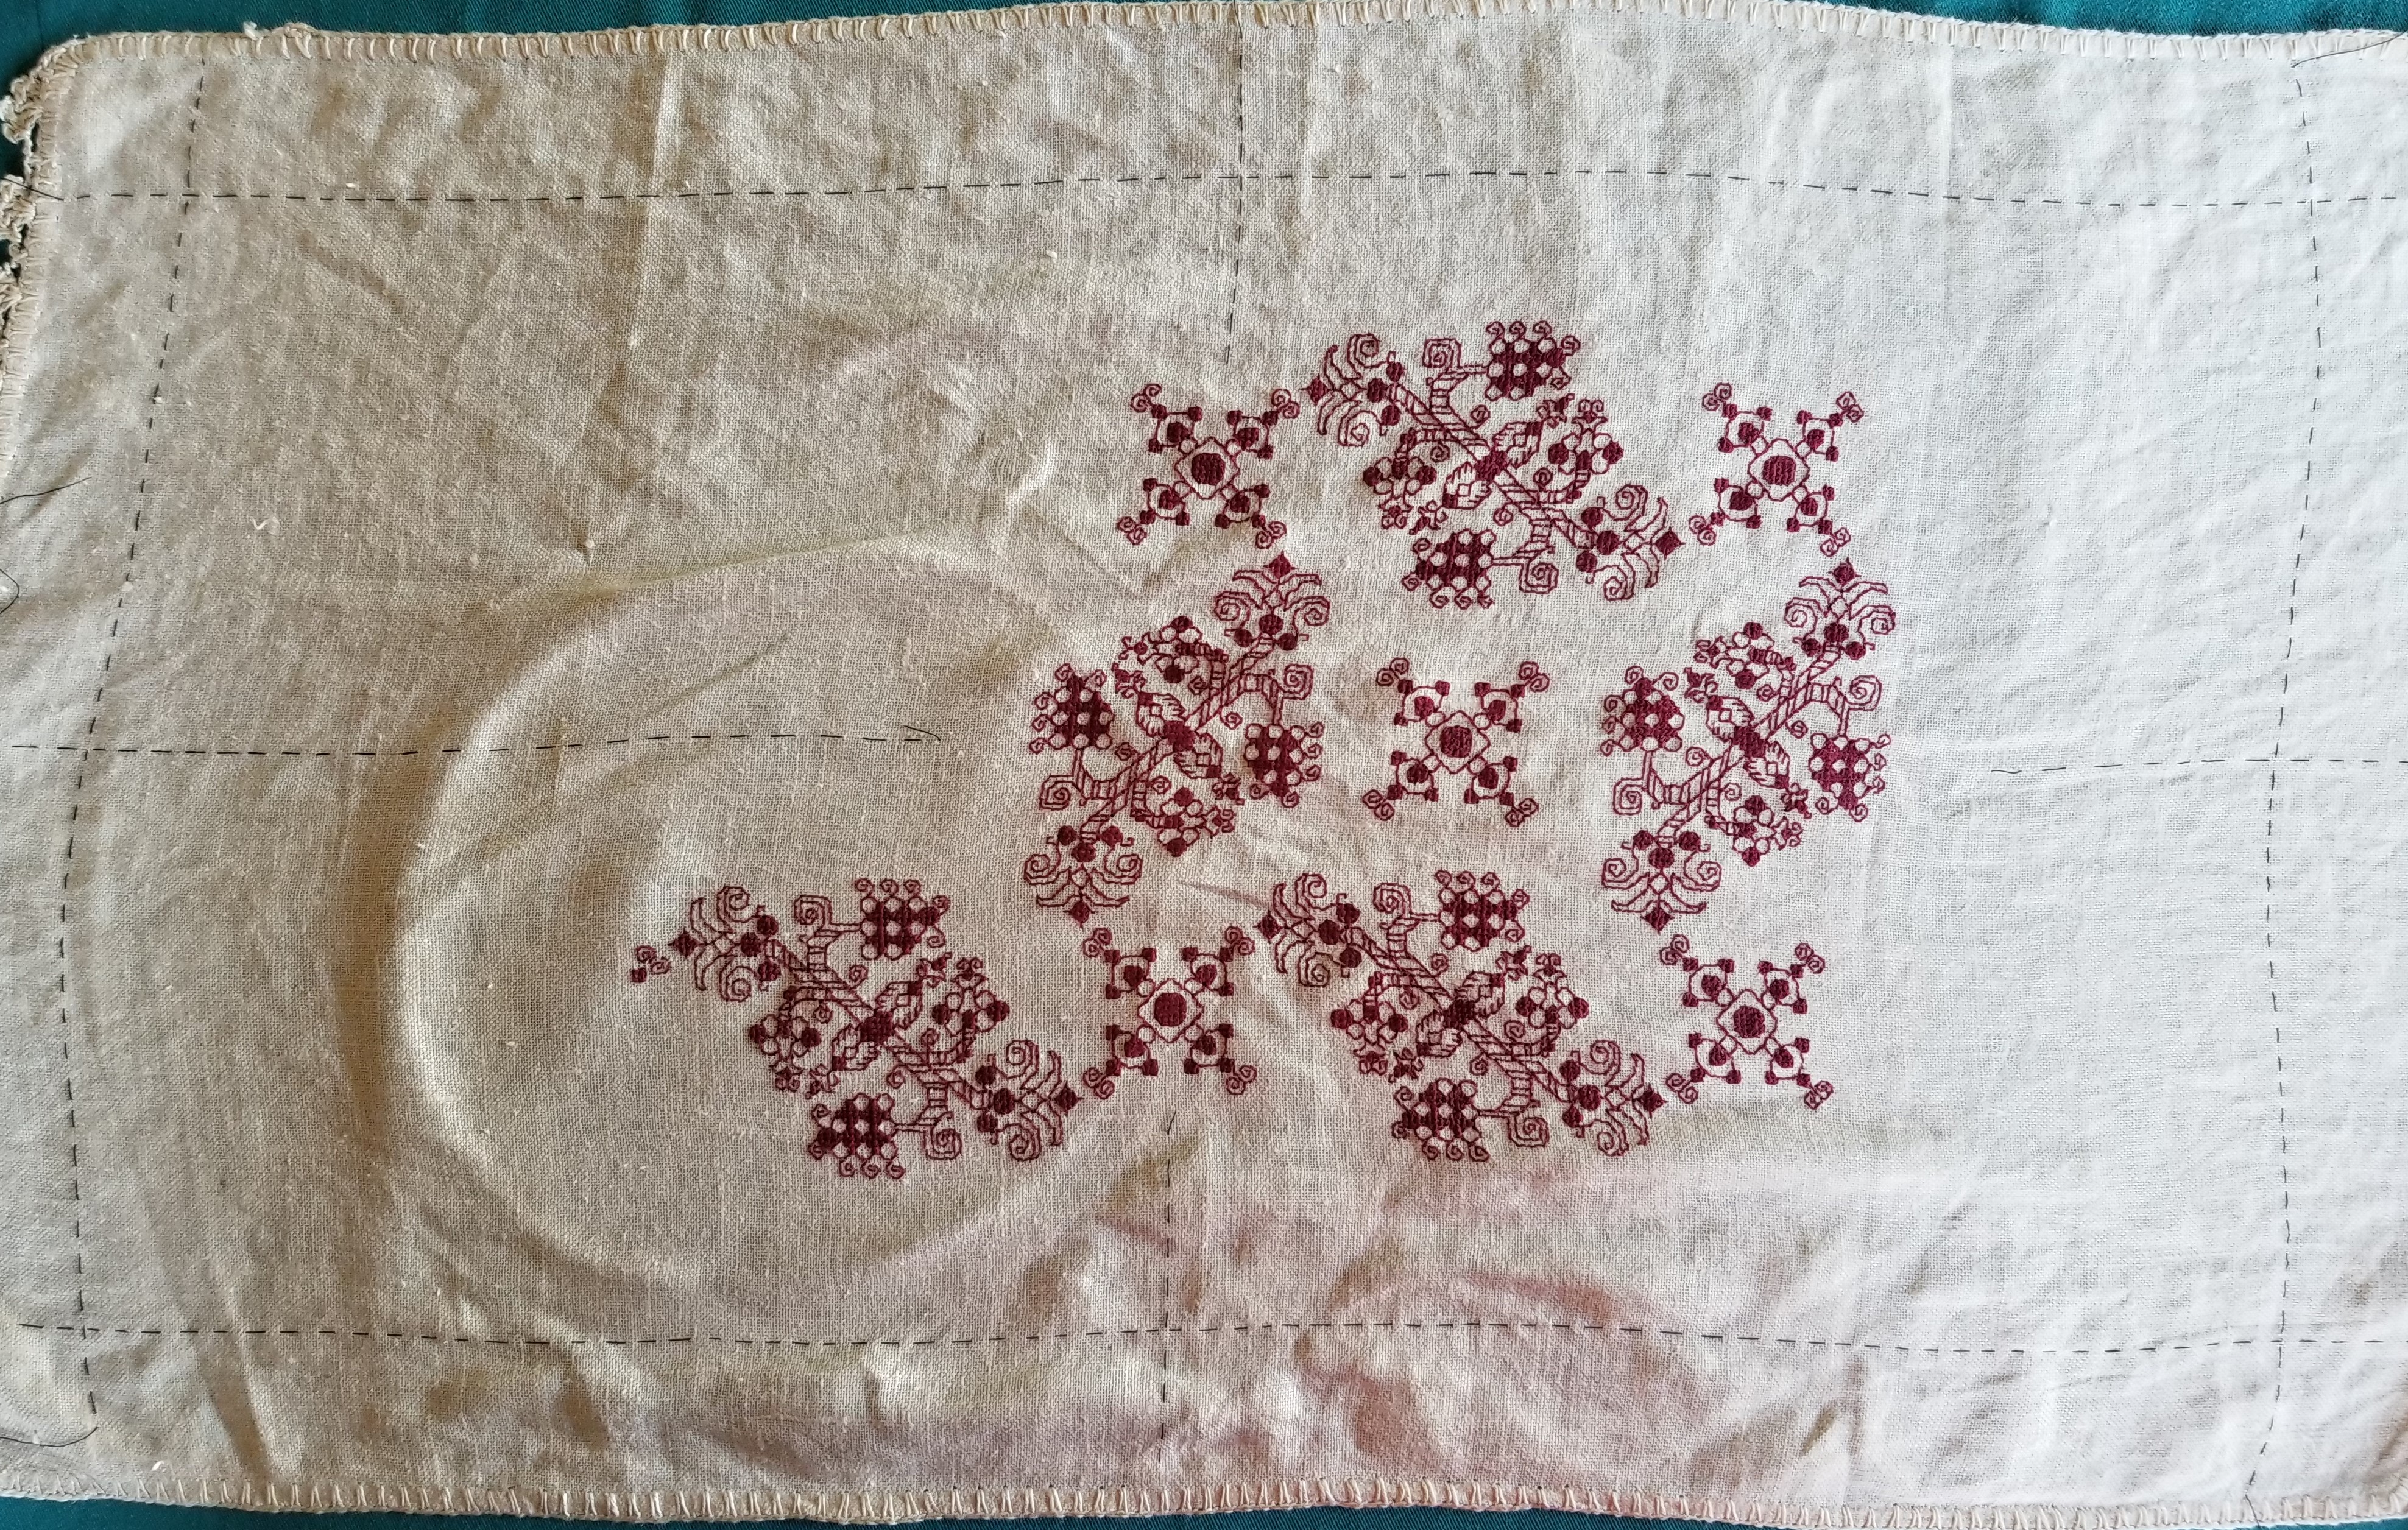
One big problem with my graphing of the design is that the original doesn’t stick to count on the placement of the individual large and small motifs. While each motif is worked true to count, their scattering across the piece is a series of eyeballed guesses, with no two offset by the same spacing. Here are a couple of enlarged snippets from the museum original that showcase the variance:
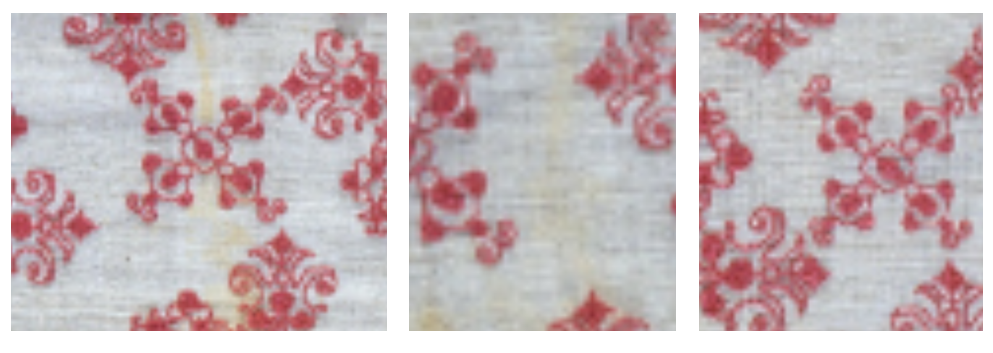
However, when I graph up a design I try to “regularize” it – often averaging the deviations among many repeats to create an easy to replicate canonical version of the design. In T2CM I note the degree to which I normed the repeat in each redacted design, so those who are interested in total veracity know that I’ve done a bit of tinkering, and can refer back to the original and determine if that level of deviation complies with their intent.
I played with the two main elements of this all-over repeat until I hit upon something that was regular and that accommodated the use of the smaller motif both as the “pinwheel” spinning off the larger grape/floral motif, and to occupy the center of the circle formed by the grape/florals. And I began stitching.
Now the placement I ended up using does have a flaw. The march of the grape/florals is offset one unit each iteration by the pinwheeling. That means that in the sample above, the right-most grape/floral presents one unit ABOVE the line established by the one immediately to its left. This is the problem that the original stitcher tried (with limited success) to combat by eyeballing placement rather than sticking to the count. Even with their best effort, the original artifact’s overall design does migrate a bit in the same way, like a time lapse photo of a rising sun, each pattern repeat appears ever so slightly above the one to its left.
This isn’t much of a problem for a large field design with no edges that matter, but for a smaller work the migration does become evident. Especially if an edging or hard border is used.
And I want to use a hard border. I’ve designed a companion border for this field, to be worked in the same color as the rest of the piece. Or I should say I’m still in the process of designing one because I haven’t settled on exactly the **right thing** yet. But this is getting close. I’m using the cinched rope visual trope contemporary with the field design, and incorporating elements of the grape/floral with it.

Yes, it’s blurry. It’s not ready for prime time yet, but you can squint and make out the basics – the rope, the pendant flowers borrowed from the field, and the line above running parallel to the rope. That line will save me, and whatever variant of this edging I end up using will include it. I will work the edging in strips, butting the corners instead of mitering them (a very historically accurate way of dealing with pesky corners), doing it in the neighborhood of the basted black guideline threads. Then I will work the field pattern up to and touching the edge line.
The rising sun anomaly will still be there, but the piece as a whole should be both bound and defined by the border. Or so I hope. Stay tuned! It’s going to be a while before I get to actually stitching that part. All the more time to refine my edging graph. 🙂
EPIC FANDOM STITCHALONG – BAND 9
Bug eyed monsters waving ray guns in their tentacles! Mid-century era finned spaceships! Coming and going! Run! Hide! It’s an invasion, for sure and cheesy peril abounds. Or capture them for all time, frozen in your stitching. I recommend the latter. It’s far more relaxing to sit and embroider than it is to bolt away in terror.
Time Factor 2 – not particularly complex nor wide as the featured odd number strips go, but there is one small tricky bit. Note that the rockets flip and are symmetrical. BUT the little monsters mirror, alternating orientations where they are firing ray guns to the left or right.
134 stitches wide x 16 stitches tall. 2 blank rows left between this and the following strip. If worked as a continuous band, one full repeat in 23 units.
| Samples | Fabric Used | Stitch | Thread Consumption/ Notes |
 | 28 count evenweave | Back stitch, 1 ply | |
 | 18 count Aida | Back stitch, 1 ply | |
 | 28 count evenweave | Back stitch, 1 ply | About 2 yards |
 | 28 count evenweave | Double running, 2 plies | About 1 yard of red, 1 yard of green, .75 yard of blue, remnants of yellow |
As usual this band plus working notes and hints has been appended to the bottom of the write-up on the SAL page, accessible via this link or via the tab at the top of every page here on String-or-Nothing.
If you are working our Epic Fandom SAL either as a whole or as a strip excerpt, please let me know. It gives me great joy to see how my “pattern children” fare out in the wide, wide world, especially when they meet up with creative, playful people. And if you give permission, I’d be happy to share your pix of this developing sampler, it in its finished state, or derivative projects including one or more of the Epic bands here on String, in a gallery post, with full credit to you as interpretive artist.
Band 10 debuts on the Facebook Enablers group on Tuesday, 15 February and will be echoed here on 1 March 2022. Happy zapping until then!
EPIC STITCHALONG – BAND FOUR
The latest band! A narrow one to provide a bit rest and relaxation following on the heels of the ravaging pirates. This is a quickie and should take most folk less than the two weeks allotted for its completion.
Palm Cluster is based on a visual family of historical designs, but is my own, and does not directly replicate any single one of them. Feel free to work it in monochrome, using variegated floss, or in multicolor.
 |
 |
 |
 |
I’ve had some questions from folk who find themselves unable to make the commitment to work the entire Epic Fandom sampler, but are in love with specific strips and have asked about working them up separately.
I answer if it’s for your own personal pleasure, please go ahead. Put these on cuffs, collars, napkins, tote bags, small pouches, or add them to your own samplers. I just ask that you contact me if you are considering the distribution of any pattern that includes my strips (or any of my other charts or designs) either for free or for sale. And as always, a link back to String-or-Nothing if you post about your piece would be deeply appreciated. I derive great joy from seeing what mischief the pattern-children are up to in the company of the creative.
Full info on stitch count and thread consumption plus downloadable PDFs for the charts released to date are provided on the StitchAlong page here (also reachable via the tab at the top of every page on String). I’m stacking all of the SAL info on that page, so scroll down to the newest info at the bottom.
Band 5 was released on The Enablers group on Facebook today, and will be echoed here for posterity on 9 November. Happy stitching!
EPIC STITCHALONG – BAND THREE
I present the third band of our Epic Fandom StitchAlong. It doesn’t matter if the pirates are from Never-Never Land, Penzance or the Caribbean – it’s always good to be a Pirate King. Or Queen. Or Monarch.
Here are our finished samples, courtesy of the flashing needles of our Beta Testers, Heather, Danielle and Callie, plus my own finish. Note that the band looks equally good stitched up just in outline or voided. Working that background is totally optional.
 |
 |
 |
 |
Full info on stitch count and thread consumption, plus descriptions of some voiding methods are provided on the StitchAlong page here (also reachable via the tab at the top of every page on String). I’m stacking all of the SAL info on that page, so scroll down to the newest info at the bottom.
Band 4 will be released on The Enablers group on Facebook on 12 October, and echoed here for posterity on 26 October. Happy stitching!
