UNUSUAL FIND AND POSSIBLE USE
Sometimes it feels like everything I see is fraught with stitching purpose.
Yesterday Younger Spawn and I went to the local Burlington, MA H-Mart, for a general restock of kimchi, various sauces, and condiments since the options in Troy, NY for such things are less abundant and can pose a logistic challenge in an area with so little public transportation.
While we were shopping we wandered the housewares aisle. I’ve found all sorts of useful stuff in there, including the hand sickle we use to keep our giant grass in check. This time was no different.
I stumbled across a display of small mesh cloths of various sizes. If it is to be believed, Google Translate tells me this stuff is called Isambe Bozagi or Bojagi (various transliteration/translation platforms render it differently), and then translate it variously to hemp cloth (middle), and burlap (Chinese). But it’s clearly marked as cotton, and of domestic Korean manufacture.


Product information says that it’s about 33 x 34 cm and hemmed. That it’s food-safe, essential for steaming (especially dumplings, and sweet potatoes), can be used to cover food in the summer, and is used to strain soy products (possibly making tofu), and soups. It also says to wash separately and dry thoroughly before use.
All well and good. I do steam things on occasion and it might come in handy. But what caught my eye was the weave. I think it’s sideways in my penny photo, but note the doubled thread in one direction (probably the weft). That’s not unlike the woven ground used for Buratto embroidery – a stitched and darned form popular in the 16th and 17th centuries, stretching on to the 18th century. It’s a cousin to other better known darned mesh works done on knotted netting grounds or on withdrawn thread scaffoldings, but in Buratto’s case the ground was purpose woven as a mesh.
Here’s a bit in the Metropolitan Museum’s collection (Accession 076261 in case the link breaks) – 16th century, Italian. The ground is linen, not cotton, and the stitching is silk. The piece is about 13×4 inches (33×10 cm).

My Korean kitchen cloth’s mesh count is roughly 16.5 x 15 meshes per inch. Just a little bit finer than this, which is about 14 meshes per inch (counting height of the snippet and dividing by 4). And although it’s hard to make out, the structure can be seen in this ultra close-up.

There are places you can find buratto style grounds to stitch. Those resources are usually quite a bit more expensive. If you happen to have an H-Mart in your area (and they are a national chain here in the US, with more popping up every year), you may be able to luck into this wildly inexpensive cloth. It’s not perfect, but at the price it’s a wonderful tool for experimentation. I’m penciling playing with this stuff into my dance card, probably for some time next year, and may go back and get more.
Bonus Eye Candy and Background
Just for fun, here are some more examples so you can see the breadth of expression of this stitching family. There is a lot of variety in works done on buratto. Monochrome was common. Polychrome was common. Dyed grounds were common. Geometrics and florals were both common. Also the style went through several revivals, and was particularly prized during the “Indiana Jones” era of textile collecting. Many museums collections are based around those gleanings, and haven’t been revisited since their donation before WWI. As a result, many attributions are a bit “mushy” – there are certainly revival pieces marked as pre-1700s originals, and even the real experts (of which I am not one) have problems determining age without extensive forensic testing.

The one above is also Italian, 16th-17th century, and is in the collection of the Cooper-Hewitt Museum, accession 1971-50.198. No information on the museum’s page though as to size or scale.

The one above looks to have an indigo-dyed ground, stitched in white. Italian, 16th century, from the Met’s collection, accession 08.180.448. This one is about 3.75 inches tall, which makes its scale very close to the 14 meshes per inch of the Korean steaming cloth.

And a wild multicolor one 17th century Italian, also from the Met, accession 12.9.3. Many of these pieces just said “embroidered on net” or were lumped in with lacis, but lately there has been a move to divide those done on true knotted net (lacis) from those done on woven buratto fabric. The on-line descriptions are slowly being updated accordingly.
Although I can’t declare for certain, looking at the dates of the more elaborate, especially the ones with patterned infills, the style appears to have evolved in that direction over time. Here is a piece typical of that group. This 18th century piece is another gem of the Met, accession 12.8.3 in case the link breaks. But do note that multicolor is documented back to the 1500s.

And here are some links on the history of the style; some discussing its link to early modelbooks. Buratto was one of the stitching styles specifically named in modelbook prefaces as a suitable art for the designs they presented.
So there we are. A chance encounter in the housewares aisle turned into a rabbit hole of exploding possibilities. Good thing I’m retired. I might actually find the time to dance with all of these charming partners lined up on my card. 🙂
THOSE OLD LINENS…
First, progress on my Dizzy Grapes sideboard scarf. I’ve doodled up a companion border that I like, and I’ve begun working it. Now you can see what I meant when I said the field design would truncate where it intersects the border, rather than floating inside it.
The border is Italian Renaissance in feel, but with significant stylistic departures from standard borders as seen on museum artifacts. For one, there are mirrored bounces in the repeat. That’s not uncommon for main field designs, but not something I’ve encountered before in the companion borders. Usually the motifs in those repeat, all with the same directionality, as if they were all marching in precision following an unseen leader. The heavy reuse of design elements from the main field is a second departure. It’s not uncommon for borders to repeat bits of the design from the main field, and sometimes they do quote sections verbatim, but it’s relatively uncommon for those elements to be recomposed in this manner. Still, I’m not planning on entering this in any competitions where my usage and adaptation are judged.
Old Linens
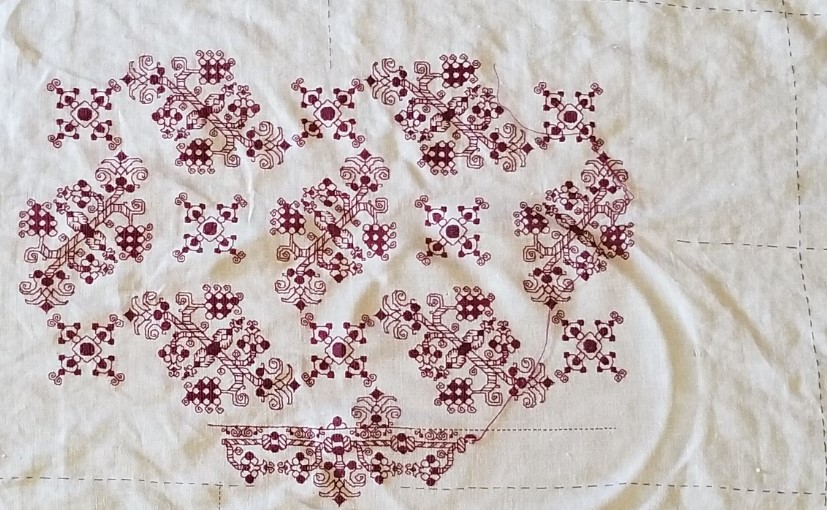
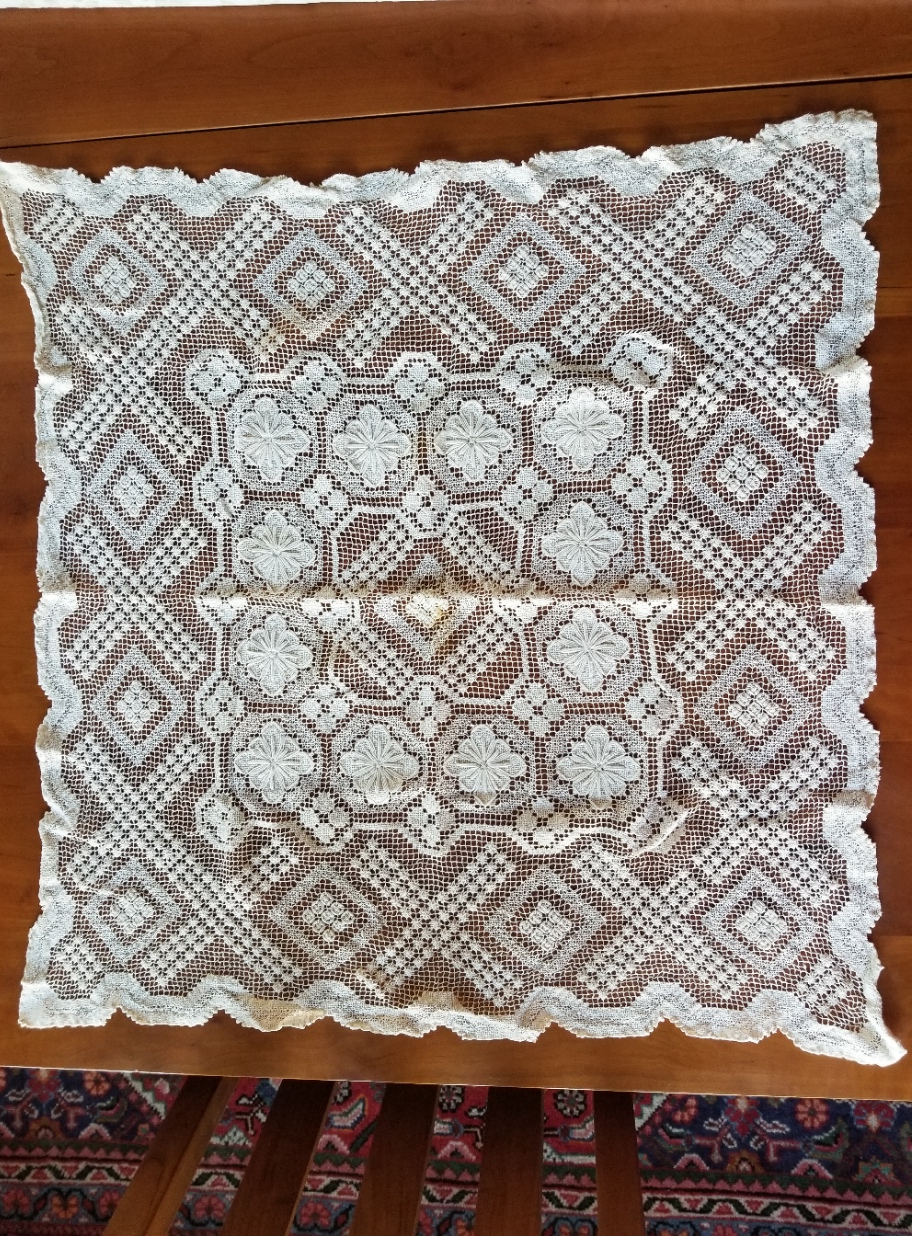
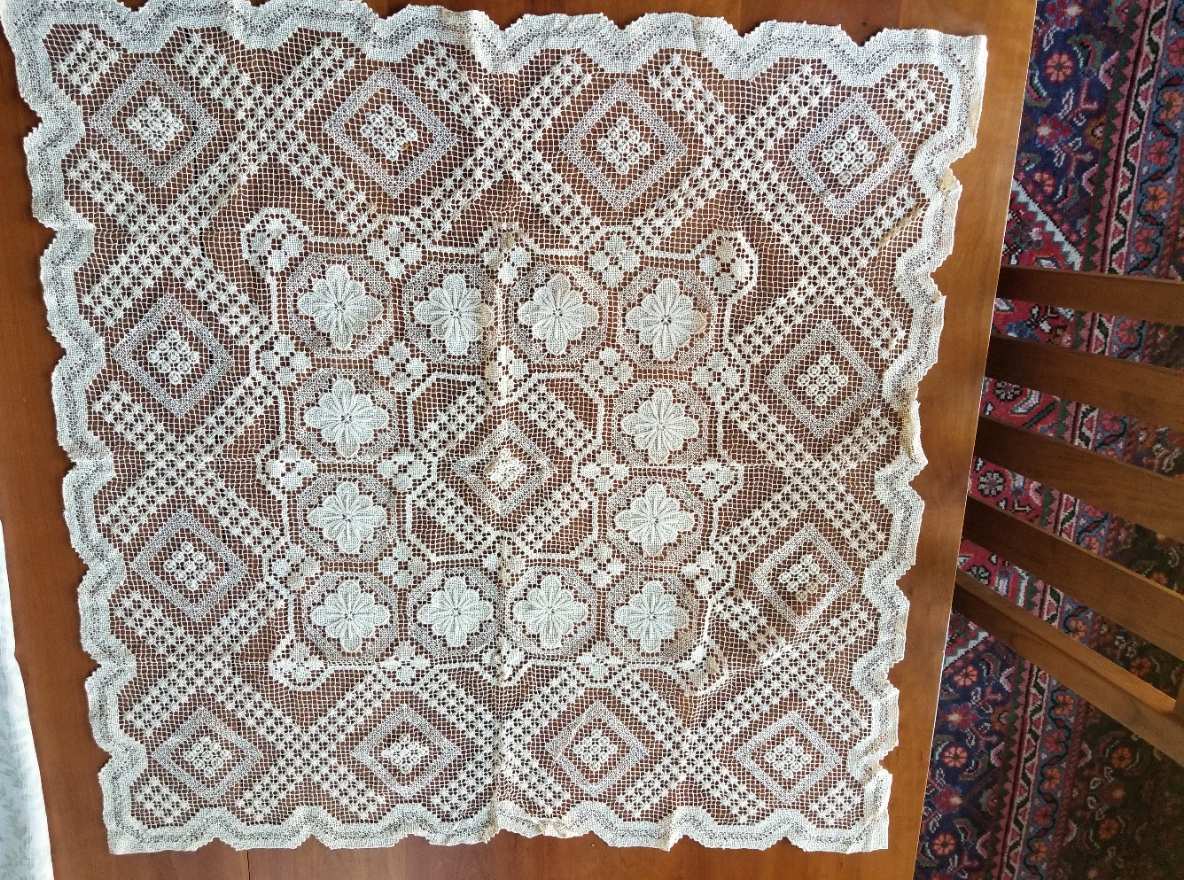
I’ve gotten a couple question about the linen piece I used – where stuff like this can be found and the like. It so happens I lucked into a couple more old needlework and linen pieces yesterday. Younger Spawn was describing the treasure-hunt fun that can be had at estate sales, so we zipped off to one nearby. We both found goodies.
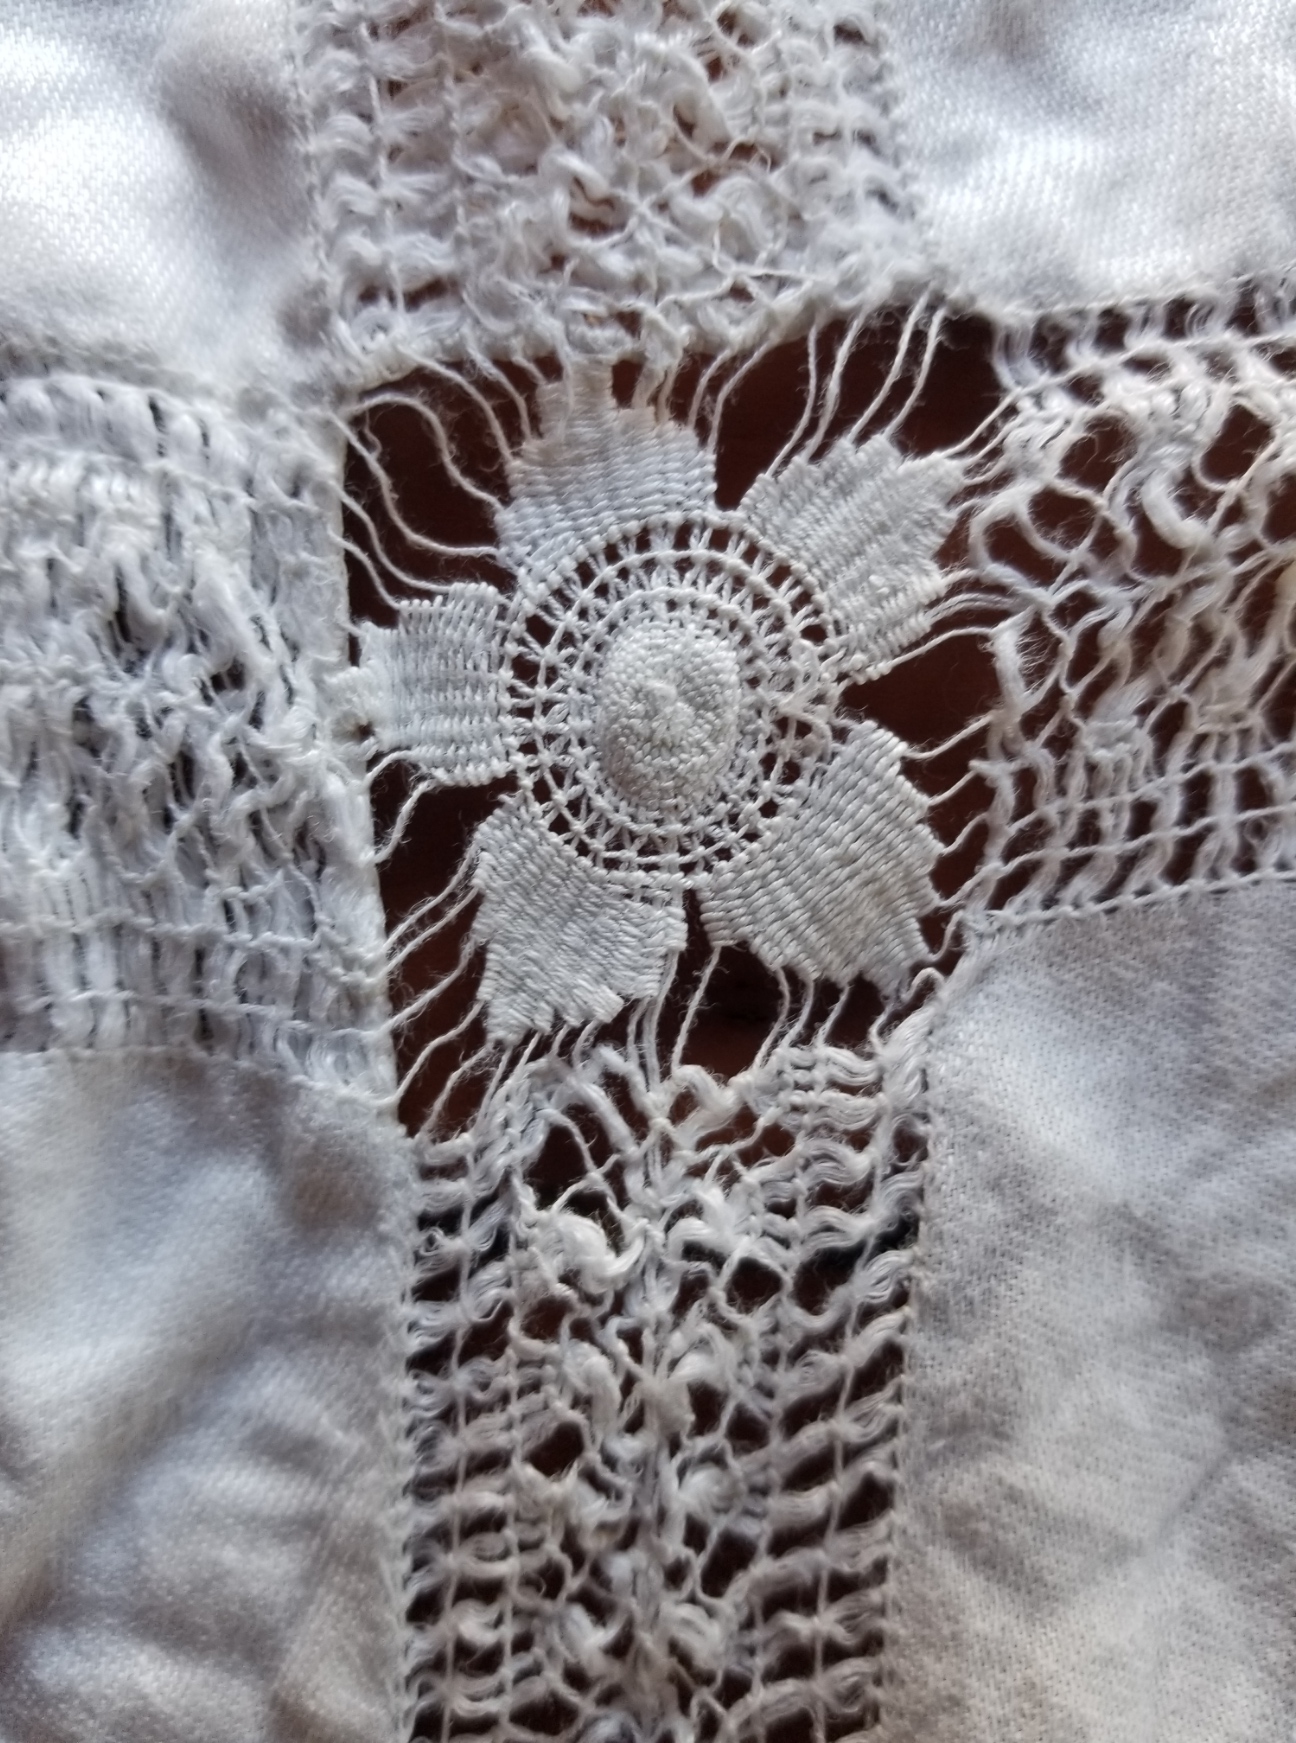
Among my discoveries were two darned net bridge cloths (small square table spreads). The substrate is hand knotted, in cotton, as is the darning and embroidered embellishments on top. I’m not good at dating/sourcing these pieces, but I suspect these are Sicilian Modano work, not earlier than 1920. Both are in very good condition with a couple of tiny brown “age spots” – probably the legacy of old spills. I don’t know enough to differentiate the earlier pieces of Modano from those of its 1980s revival. In the detail shot you can see the two weights of threads used for the darned fills, plus the long attached woven bullion style “picots” – not exactly sure what that stitch is called, plus a bit of straight stitch outlining.
Both are of exactly the same design, but one looks to have been savagely washed with bleach – it’s much whiter and about 20% smaller. One thing that does make me think they might be earlier is their size. By the 1980s bridge cloths were not exactly in style.

I’m not sure what I will do with these, but I couldn’t leave them there balled up, unloved and tagged at $1.00 each.
Lovely, but not actually linen. Moving on.
This is a tablecloth. The main body is twill weave linen, not suitable for counted stitching, but fantastic for surface embroidery. The hand-done withdrawn thread edgings are mostly intact, although the rondels in the corners are all slightly damaged. The main body of the cloth though is stain and damage-free. I won’t be using it at table – it’s too small for my dining room, but again the price was right, and the right person might be able to make a wonderful 16th/17th century Italian underdress/smock from it. $2.00 for about two yards of 60-inch wide linen? Not a bad price.

And at last – that upon which I will be stitching. I have some specific ideas for these twelve machine finished napkins. They are not uniform in size – some have shrunk significantly. A couple have stains that must be worked around.


The thread count on the one I’ve “penny-ed” is representative – roughly 38 x 38 threads per inch. Some variation and slubbing, and some of the napkins are a bit more worn, but 12 roughly 14″ (about 36 cm) squares of evenweave for $6.00? That’s a good deal.
So there you have it. Yard sales. Consignment stores. Estate sales. Look for the hamper of neglected household linens. Sort past the old sheets and cafe curtains, maneuver around the ladies looking for interesting souvenir tea towels, and wadded up in the bottom of the bin may be treasure to appreciate, to re-use, or to stitch upon.
LAZY CENTERING
I continue along with what has been nicknamed The Dizzy Grapes sideboard scarf. I successfully rounded the second group of main motifs, and am up to working the small one in the center of the field.
As you can see, there’s plenty more to stitch, including the border. And you can also see the slow rise problem I described earlier. The cloth is flipped from the last set of photos, but the repeat on the right is one unit skew to the one on the left – an inevitable complication of this design.
So. That center unit. Given that it doesn’t align perfectly with the previous one, how to go about placing it. The most obvious way is to pick an easy to spot point on the established stitching, and now that I’ve done one, just count over the same number of stitches to a similarly distinctive spot on the motif to be stitched, then just start in.
But I’m lazy, know that long stretches of counting blank linen are one of my weaknesses, and given the long span, extreme variation in the thickness of this linen’s threads, and frustration after several false starts, I decided to try something different.
Its easy to determine the center point of the large floral motifs. It’s the centermost stitch in the dark center “knot” around which the branches are symmetrically inverted. That aligns with the dark stripe in the grape motif that’s closest to its stem. But those centers are all offset from each other, so just using a simple ruler or single straight edge is problematic. Instead I picked the same spot on each of the four motifs that bordered the field in which I wanted the smaller X pattern to appear, and quick basted a line across that field. One basted line for each big floral produced a 3×3 area. The center unit of that 3×3 area became the center of the large dark spot in the middle of the X pattern. (Yes, if you zoom all the way in you’ll see that one of my basted lines was off by one thread, but I compensated).

You don’t see the basted lines on the full piece, above because once I did that centermost stitch, I removed them. I never stitch over my guidelines, I always snip them away from the work as I approach.
I did this for the other placement of that center X, too, but I didn’t think to document the process. I did try the count in and start method for the second one. You may be able to see the remains where I picked out my three false starts, but the basted line method turns out to be vastly quicker, less fraught, and more accurate.
I am still aiming for full coverage – not just these two repeats centered on the otherwise bare cloth. Now its time to go into hypergear and finish designing the companion border. Once I’ve got that and have my distance from repeat worked for the long sides, I can establish that line and then work my field up to it with confidence.
EXPLORING A BLACKWORK SHORTCUT
Back from my first in-person SCA event in a long time. I went to “Aisles of March” – what can be best described as a historical-recreation-item “craft fair” for those unfamiliar with the organization. It was a group-specific gathering at which dozens of merchants displayed wares, selling everything from whole garments of historical design and cut; to accessories, jewelry, jewelry findings/stones; the components to make clothing (including hand-dyed yarns and yardage); armor; wooden and metal table implements and specialty crafting tools (embroidery frames, weaving looms and the like); camping implements (open hearth cooking tripods and accessories); research and how-to books; and even spices and fragrances. There was also a certain amount of ceremony including SCA royal presence, and awards given out for mastery of specific arts, or for service to the organization and its constituent groups.
But I wasn’t there to attend court, or to shop. I was there to help The Apprentice and household sell their products – brilliantly hued hand-dyed silk and wool threads and yardage prepared with researched, historical recipes; bead jewelry reproductions of various eras (Viking age, late Roman Empire, Venetian), and sturdy linen by the yard. Some of this is also available on Etsy. Obvious affiliation disclosure – The apprentice is the proprietor of that Etsy shop.
While I was helping out I also had an opportunity to sell a few copies of The Second Carolingian Modelbook in person. And that gave me a chance to chat with folk interested in counted embroidery, and blackwork in specific. One thing several people mentioned was the difficulty of drafting out the freehand patterns for inhabited blackwork – the Elizabethan style characterized by heavy outlines filled in with counted or freehand stitched fills, usually in black but occasionally embellished with metal threads.
I understand that challenge. My ancient underskirt was an exercise in freehand pencil drawing, modeling flowers and foliage after group of historical artifacts including a cushion cover repurposed from a dress in the collection of the Art Institute of Chicago, Accession 1955.1221; and a panel from an embroidered sleeve held by the National Museum of Scotland, Accession A.1929.152 (other fragments of the same work exist in the Metropolitan Museum of Art and other institutions). Not everyone has the patience or confidence to do that kind of freehand drawing.

So, I set to thinking about what pre-drawn resources might be available.
Spoonflower and other print-to-order textile/wallpaper houses offer designers the chance to get their patterns printed on a variety of media, and sold by the yard. I had ordered wallpaper from them a while back.
There are thousands of prints in Spoonflower’s active catalog – among them several adapted from Elizabethan embroidery. Note that these are NOT my offerings, I have nothing posted there. I just went browsing among their current listings and picked two that were likely candidates – the ones with the most historically representative designs at offered at the largest scale. Then I went to the fabric choice area and picked two different fabrics, both possible choices for counted or surface work, and ordered two eight-inch swatches. This is what I received:

The design on the left is shown in several reference books, and is one I included a thumbnail of in my very first hand-drawn booklet on blackwork, issued in 1978. It’s vaguely similar to one in Trevelyon’s Miscelleny, but as soon as I find my now-packed-away booklet, I’ll insert the specific source. The one on the right is a simplified and very recognizable version of a standard Elizabethan scrolling floral design, of the type rendered in blackwork or polychrome stitching, often with metal thread embellishments.
I requested my sample of the one on the left (the darker one) be printed on what Spoonflower sells under the name Cypress Cotton Canvas. The one on the right was printed on their Belgian Linen. Here are zooms, with a penny for ease of thread count calculation:


Note that the cotton canvas (left) isn’t really countable, but it has a dense weave structure that might be amenable to surface work. However I am not a textile history expert, and I don’t know if fabric of that structure, even if it were not cotton would be appropriate to the period of the design. The linen however is plain tabby weave. By counting threads occluded by the penny I get 17 horizontal threads x 21 vertical threads. Factoring in the penny’s standard width of 0.75 inch, we can compute a thread count of approximately 21 x 26 threads, but I can’t tell which is warp and which is weft due to the lack of selvedges. Skew but easily counted and stitched.
BUT
My first reaction to both of these samples is that the motifs on them are quite small in scale for easy stitching. Even on the uncountable canvas, I would have preferred that design be imaged about a quarter to third again bigger to make it easier to work. This is also very true for the scrolling flower design printed on linen. It might do for non-counted polychrome treatment with a very simple stitch used for the stem; or for speckled freehand blackwork, again simple outlines and a scattered stitch, shaded infilling. But for fancy counted, geometric, diapered fills, there just isn’t enough real estate inside most of the flower and leaf motif segments to make such stitching worthwhile.
The next step of course is hands-on. It won’t be any time soon (I have a massive to-do queue), but I do intend to secure the edges, launder, iron and give both a try anyway, to see how the fabrics and printing perform. If the stitching goes well I might finish them out into small sweet bags. Or not. This is just an idle experiment.
Again, I am not endorsing or promoting the source, the products, or the designers who offer their patterns at the source. I paid full price for my swatches. But I am trying to help out those who are looking for some sort of assistance in starting their own blackwork projects. While these items are not exactly optimal, they or similar pieces might be learning tools that could jumpstart creativity, and help someone reach towards a previously unattainable goal of making something visually period-appropriate. And that in turn might help them advance towards less “factory-modern” ways of getting there.
Stay tuned. Eventually I will cycle back to this experiment, do the wash test, and play with these some more.
VOIDED PIECES AND OUTLINES
First, thanks to Callie of NotAnotherCostumingBlog for this question, which takes me tumbling down another chasm, dragging all of you along with me. Callie asks,
“…do you have any tips for converting patterns charted for LACS to charts for double running? I seem to have a bit of a mental block about it and the best idea I’ve got is to print them out, estimate where the lines would be instead of blocks, draw those on, and then transfer them to clean graph paper. I have a lot of patterns that I would really prefer to work linearly because it is so much faster but I’m not yet at the point where I can look at a block chart and just mentally convert it.”
I break down the answer into several parts, and try to respond to each.
Outlines in historical examples of voided stitching
Were historical voided pieces worked with or without outlines? The answer is “Yes.” There are some with stitched outlines and some without, and the presence of stitched outlines does not correlate neatly to the technique used to fill in the background. In addition, there look to have been voided pieces that used drawings as their “outlines” – working the fill right up to and sometimes over those markings, which seem to have (mostly) been stitched.
The one thing about outlines in these pieces that is different from their use in modern needle-painting style cross stitch is that in the historical works, close inspection shows the dense coverage stitching (of whatever type) encroaching on the linear stitching. This says to me that the lines were worked in one of two manners:
- laid down first, and the background filled in later (the most common approach, especially for meshy or long-arm cross stitch fills; also logically on the pieces where the fill leaves a unworked “halo” around the linear stitched foreground, as in the lowermost right example of the first group below)
- Stitched at the same time as the ground behind (more usual for square fill as in the lowermost left example of the first group below)
Modern cross stitch pieces generally direct the stitcher to finish the ground areas, then go back and work the linear bits on top of them.
Historical examples of voided work with counted outlines:


Historical examples of voided work without counted outlines:
Historical examples of voided work with (probable) outlines drawn freehand, then stitched.


Another thing that can’t be determined is whether the historical embroiderers finished ALL of the outlines first, then went back and did the fills; did them section by section; or if in fact the SAME stitcher did both. I can well envision a large group project like a set of bed hangings, where someone proficient in laying down the outlines did that, copying from a chart or a previously stitched piece; with a team following on behind filling in the voiding.
Being a team of one myself, I tend to work section by section, defining my outlines, proofing them, and filling in the voiding – then leapfrogging on to the next bit.
Representing outlines in modern charting
In my own work, if I’m redacting or adapting from a piece that has evident outlines, I use a specific convention for charting. I employ the same dot-and-line method I use for plain un-voided linear work, but flood-fill a portion of the background to indicate the areas to be filled in with stitching after the outlines are completed. The sample bit I worked up for a previous discussion on charting methods (derived Kathryn Goodwyn’s redaction) illustrates this method (left). If the piece had no outlines or was charted from a graphed original or a historical piece in a medium that did not show outlines (some lacis, buratto or other darned-mesh type pieces), then I use the standard square in box technique (right) although usually without the red line 5-unit notation and count, which I tend to do mostly for use for knitting. Both my The New Carolingian Modelbook and its forthcoming sequel The Second Carolingian Modelbook include linear unit and block unit sections.


There’s one other style I use on rare occasion, mostly for linear pieces that include large, dark areas, and whose edges are defined not by prior outlines, but by half cross stitches worked at the same time as the fully covered internal areas. This spider panel from Ensamplario Atlantio II is an example – note that the ultra-dense spider is done in boxed cross stitch (aka 4-sided cross stitch), with half cross stitches to smooth out the outlines.

Conversion from voided chart to a linear chart
This is something I hadn’t considered doing before. It presupposes a finished chart in the block unit style.
First, I have to apologize. I don’t use commercial charting software, relying instead on a homegrown solution based on the freeware drafting program, GIMP. (I offer a free tutorial and templates for my method elsewhere on this blog.) You could do this with a photocopying machine and a pencil, but please bear with me.
Let’s use the bunny seen above, which I previously charted and made available for free download as a PDF.
The approach is pretty straightforward, but there are no shortcuts. Take the chart you want to convert, photocopy it, and pencil in your adaptation over the established boxes. Or regraph it as I did, then use an outlining tool manually, box by box, to smooth the edges until you get a look you like. You will want to take liberties with the diagonals, instead of outlining every 90-degree intersection (although that’s a clear alternative). You may also wish to add details, like the toes, nose, eyeball, and ear openings. That’s also a design choice and up to you.

Finally, please note that I do not use “knight’s move” stitches (two units over, one unit up, to make a 30/60-degree angle). That’s a conscious design decision on my part. They are absent from 16th and 17th century artifacts with the rare exception of when they are used to form eyelets, or in later 18th century works – solid blocks of stitching radiating from a central point. I’ve not yet found a single 16th or 17th century voided or linear work artifact that employs knight’s move angles. They are a great addition to the charter’s tool set for sure and can be used to expand the stitcher’s design vocabulary. But they are also a clear indication of modern design aesthetic, so I leave them to other modern blackwork designers, and limit myself to 90 and 45-degree angles exclusively, even in my contemporary “nerd-culture” pieces.
So there’s the long answer for Callie. She is absolutely right. The solution is as she suggested in her question. If you need to draw it out before hand rather than adapt on the fly, you will need pencil and paper (or a charting design drafting solution) and I know of no shortcuts.
MESHY DONE, PLUS KITTING OUT THE FRAME
Yaay! A bit of self discipline imposed, and the forever voiding on the meshy lettuce pattern panel is complete. I have to admit that while I adore the look, I am not wildly fond of the hard-pulling needed to achieve it. I might try it again if I ever find a linen that’s the right combo of threads-per-inch plus nice soft and lofty constituent threads, instead of skinny hard-spun ones.

How does this strip fit into the growing project? After all – it has been about 8 years since we’ve seen the whole thing laid out. For the record, I’ve filled about 45% of the available real estate – there’s a lot more to go.

Now for the next. I don’t think I’ve play-tested these dolphins before (another design in the ever-forthcoming T2CM). The original showed them with a squared fill background in voided style, but I wanted something lighter to follow the dark band I just finished. I left off the voiding, but then decided that the bit looked rather spare. My dolphins needed something to play with, so I added the round elements, and am now pleased. A quickie, this bit took just Saturday and Sunday evenings:
I will add the roundels to the dolphin at right of center, but I left it off so you can see the rather unfinished look it had without something there.
After this one? Probably another narrow strip, possibly a bit wider than this one, and possibly darker for contrast. Then after that I have a double running stunner queued, but it’s rather wide and needs a bit more spacer ground between it and the giant meshy lettuce panel.
In the mean time, as I get up close and personal with the frame I am making little improvements to my set-up. For example, the jaw of the Lowery is steel, and well loved by magnets. But it’s not exactly accessible with the large frame extender unit. BUT when I flip the thing over to terminate a thread, it is. Add a strong classic U-shaped magnet, and I’ve got a handy place to park my snips (the red magnet is just behind the red snipper).

My needle minder works quite well, and sometimes I use it to park my threader. It often does double-duty as a holder for my pattern page. But that can get in the way of the stitching area. So I glued a magnet to the flat side of one of my Millennium frame scroll bars – on the flat side (yes, I tested it to make sure the correct side was up – that’s the one that attracts rather than repels the other magnetic goodies I wanted to use):

I can use this as a rather plain needle minder all by itself, or I can park my fancy one there instead of in the hidden spot where you see it now. Or I can use another magnet with it to hold my pattern page. But best of all, I can use it in conjunction with this page holder I picked up years ago (it used to stick on my fridge door, to hold tickets, recipes, coupons, or whatever).


By just gluing on a magnet, I’ve left the door open for all sorts of other magnet-enabled organizers. There are other styles of clips. Hooks and loops with magnetic bases could accommodate scissors, for example. Finally, I’m still looking for it to test out, but because the rare-earth magnet I used is so strong, I’m betting it can hold my smaller flat metal magnet board. That would allow me to use placeholder magnets on my pattern page while the page is displayed right on my work area.
And where to find inexpensive strong-hold magnets? I recommend the geeky source, American Science & Surplus. They are a clearing house for engineering tidbits, science gear, weird surplus items, kids’ educational toys, and other miscellanea. They are especially good for containers, magnifiers, bags, precision scales and measurers, cutting implements, office supplies, and magnets. Like any surplus store, their inventory turns over quickly, so if you don’t see what you want there today, visit again next week.
STUMPWORK PEN DRAWING
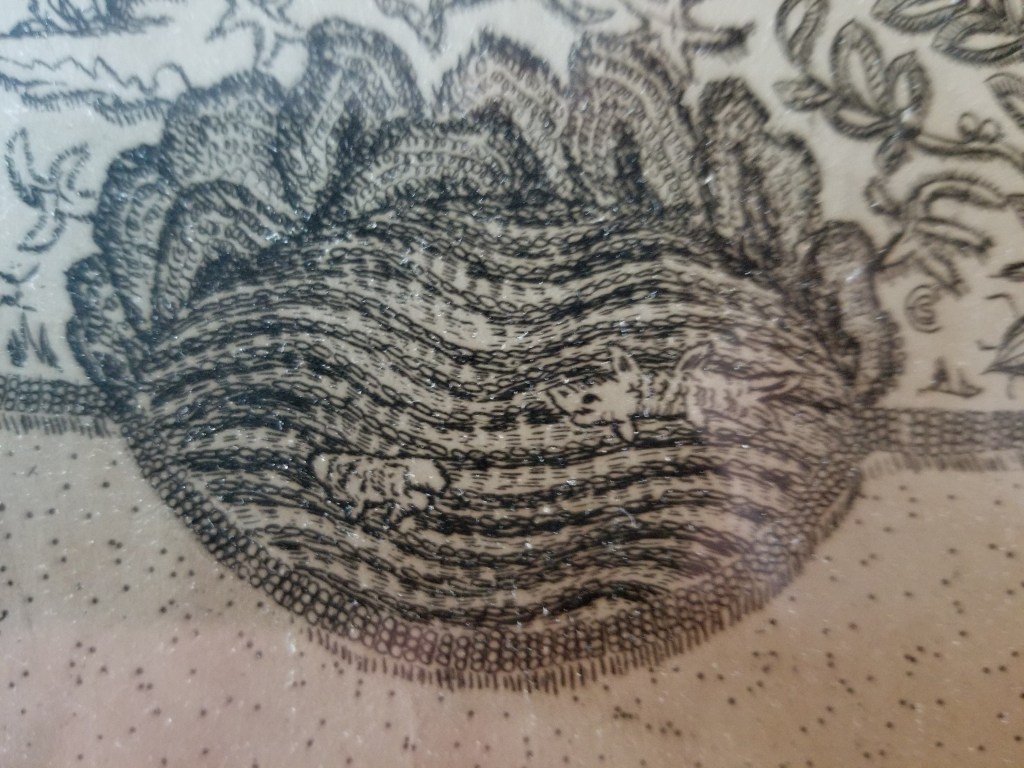
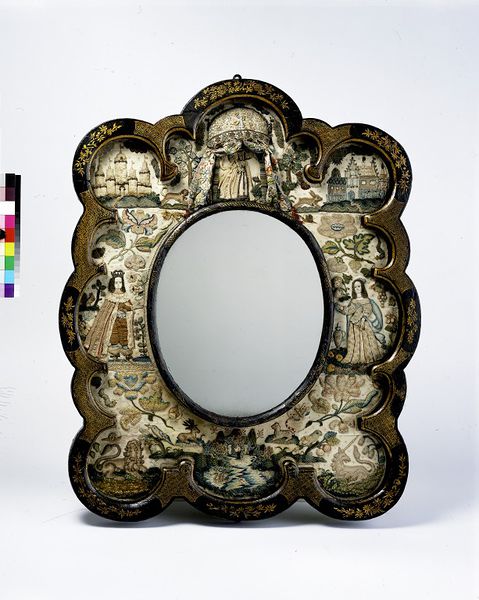
A while back I posted about a drawing that came to me from my grandparents. It hung in their dining room/library. As a kid I adored it and since it was hanging so far up on the wall, was especially delighted after I finally got glasses, and discovered all the details – the flowers, bugs, and little goodies hidden in the piece.
I am convinced that my drawing is a rendering of an actual artifact. The sketch probably dates to the 1920s or 1930s at the latest. The artifact itself is clearly a stumpwork piece of some type – a style dating to the 17th century. Possibly a mirror, possibly a bookbinding. Possibly a combo of motifs from more than one piece. But I don’t think it was just dreamed up by the artist.
I’ve gone looking for the thing several times. I’ve hunted in on-line photo collections and books cataloging famous embroidery collections. I’ve paid special attention to items in New York City area museums because I have a hunch that “art student selling on the street” was more in my Brooklyn dwelling grandparents’ budget than was purchasing from a gallery. And an art student might well have sketched something seen on display in a local museum.
I even read about a collection of stumpwork pieces being acquired by the Brooklyn Museum in the 1920s, so I wrote to the curators and asked if it was still in accession, and if anyone dealing with it might recognize my piece. Sadly, not. But they were very gracious and wished me luck in my hunt.
Recently I was part of an on-line discussion among historical needlework enthusiasts, and posted my (not very good) photo. Several folks there requested higher resolution pix. So in the hope that I can enlist others in my hunt, or provide inspiration to someone wanting to stitch their own stumpwork frame, I post some here.

Bottom center – note the shark-like fish, and detail that looks very much like the artist was trying to depict actual stitching. Hills with an ocean or lake in front are very common center bottom treatments on mirror frames.
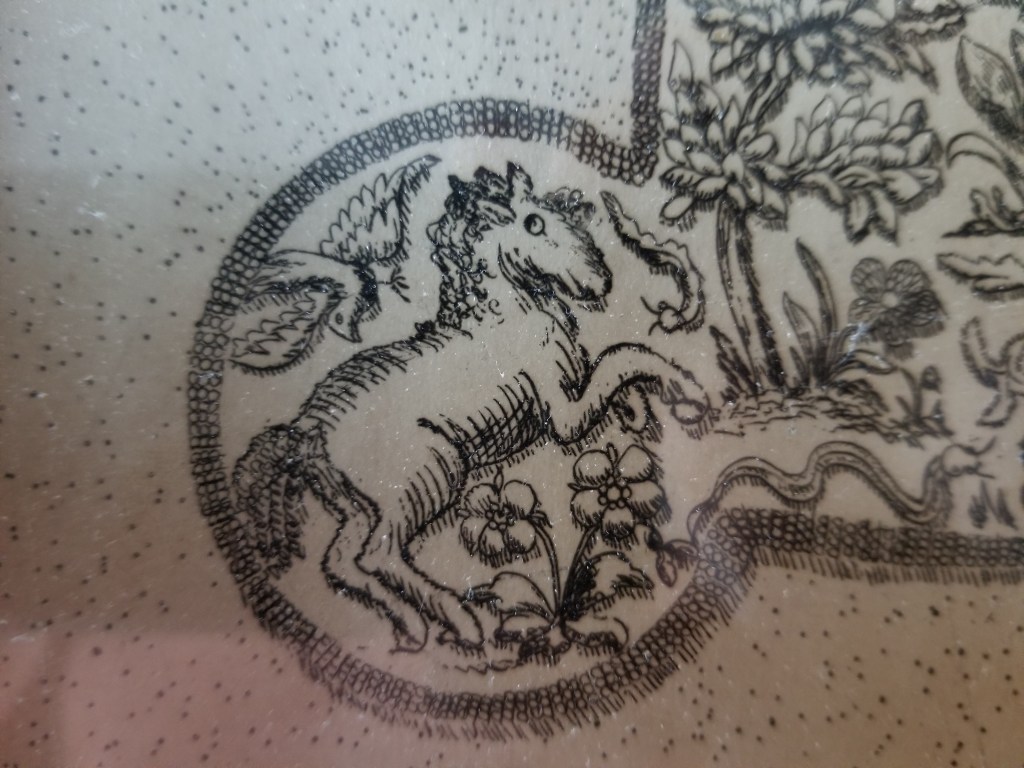
Lower left corner – the pony, plus a dove(?), a snake, and a centipede. And flowers. There are always flowers.
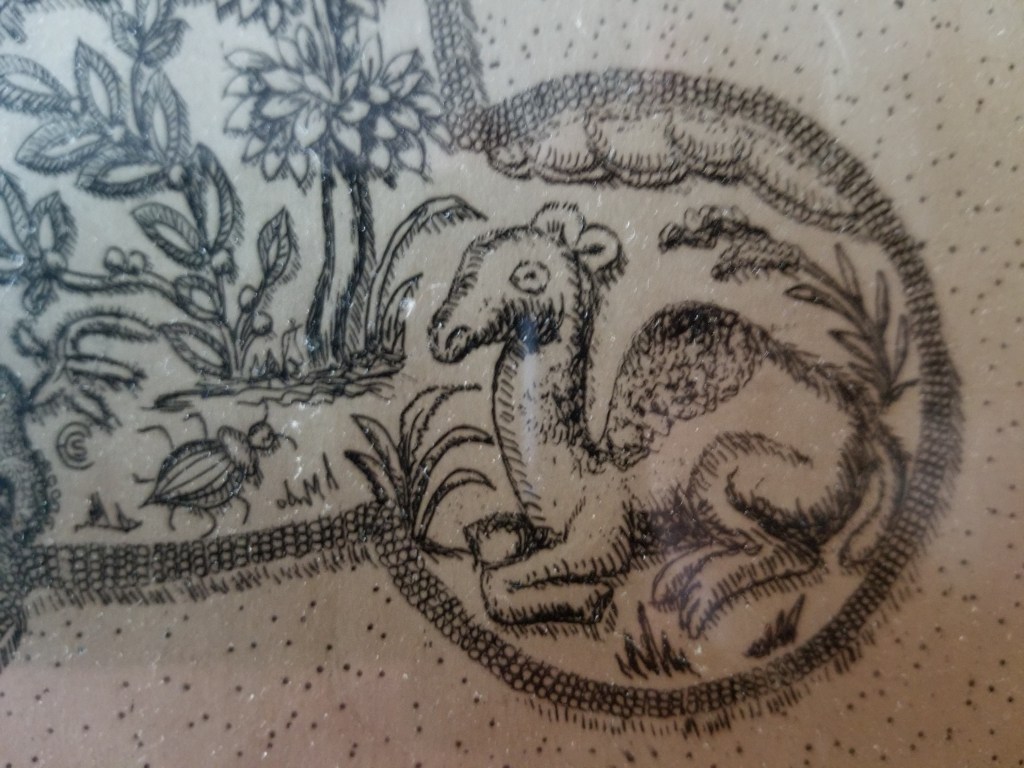
Lower right corner – the camel, and a beetle. That hump looks like turkey work to me. Also what might be a partial signature at the left of this detail shot – a little roundel that might be CCS or HS, or HCS.
Upper left corner – the leopard, with a caterpillar a bird, and a worm. Leopards (and lions) are common corner residents.

Upper right corner – the moose-nosed stag, with the worm and a two small snails. (Hmm… Maybe this is why I often include snails in my own work.) Stags show up often on similar pieces, too.

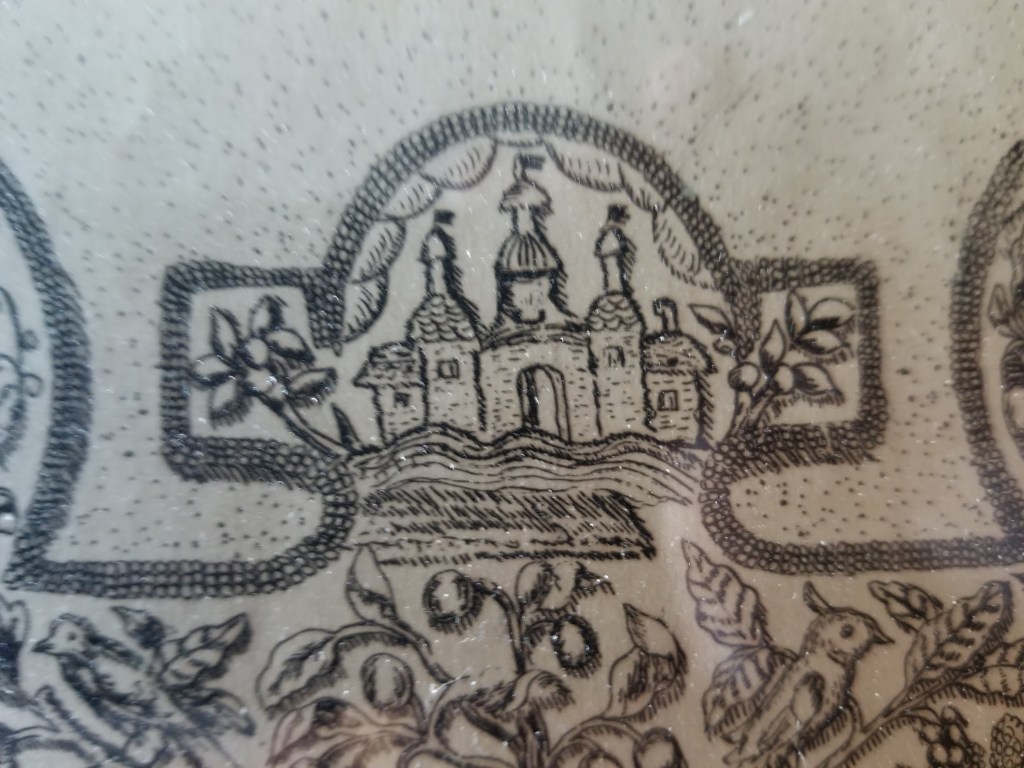
Center top – buildings, plus fruits and birds, below. Buildings, perhaps visions of Jerusalem or the city of heaven are also a standard feature of stumpwork mirror frames.
Left edge – Now this is where it gets complicated. On mirror frames there is often a couple – a king on one side and a queen on the other. Family folklore (with or without any reason) claims that in this drawing the center figure, a queen, is in fact Queen Esther, and this guy on the edge with the wide collar is King Ahasuerus. Whoever he is, he has bugs, a bird and a bunny to keep him company.
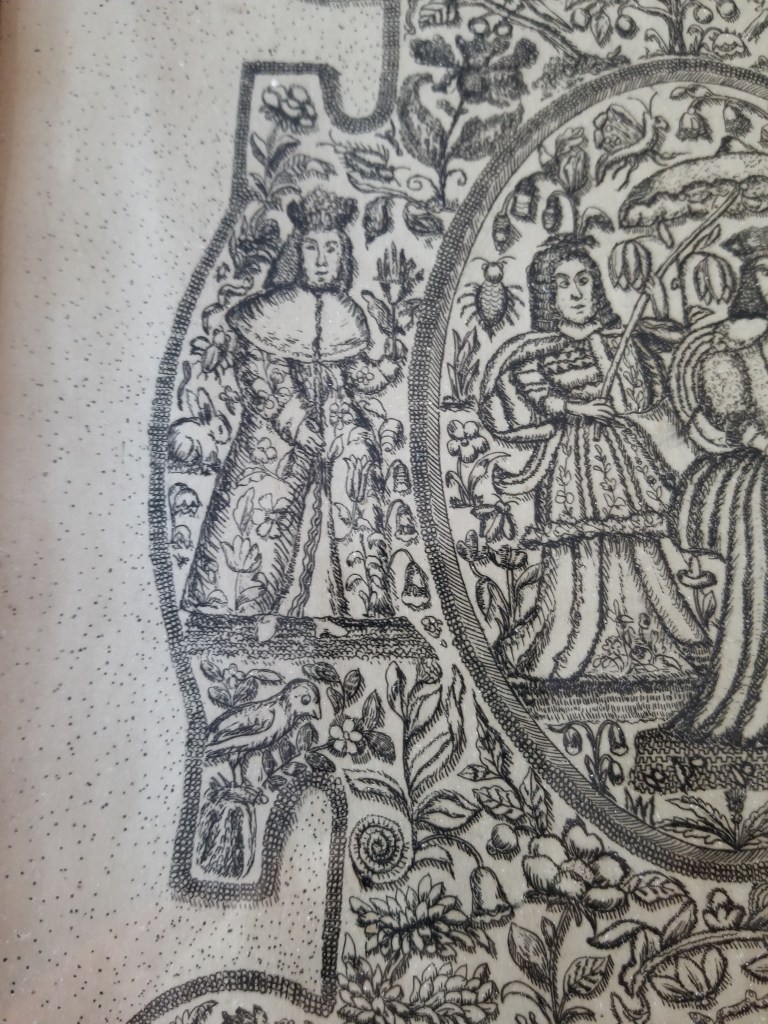
Right edge – If the Esther interpretation is correct, this would have to be Mordecai. Not quite as sumptuously robed as the King, but escorted by a bird, grapes, and another caterpillar. (Haman, being the bad guy gets no depiction.)

Center – Finally we get to Queen Esther and her attendant. And her own bunny, worm, and bugs, plus even more lovely flowers. From what I’ve seen it’s unusual for just a queen to be shown alone in these English stumpwork pieces – more often a couple was shown, usually in homage to the sitting monarchs.

So there we have it. If you look closely at these pix you can begin to see stitch detail – a raised braided stitch of some type as the heavy outline, the mentioned turkey work on the hump of the camel, a three-D thrust on the parasol, satin stitch and shading on some of the flowers and fruits (either to indicate depth or stitches – I can’t tell).
So now the APB is truly issued. Seen these characters, or pieces like this one? Let me know. If the link is accessible, I’ll post it here.
Adapting one of these pix for your own raised work piece? Let me know! I’d be happy to post that, too. (I think the corner animals in particular would make lovely tops for small, round boxes).
Museum Examples
Metropolitan Museum, Mirror Frame, Third quarter 17th century, British. Accession 64.101.1332: Leopard at lower right, pond or sea with fish at bottom, couple left and right.
Victoria & Albert Museum, Mirror Frame, 1660-1680, British. Accession 351-1866. Lion and unicorn in lower corners, couple at left and right, pond with mountains and fish at bottom.
Drawing presented on Lizapalooza/Elizabethancostume.net’s blog (photo borrowed from that site, I hope they forgive me).

SOMETHING COMPLETELY DIFFERENT
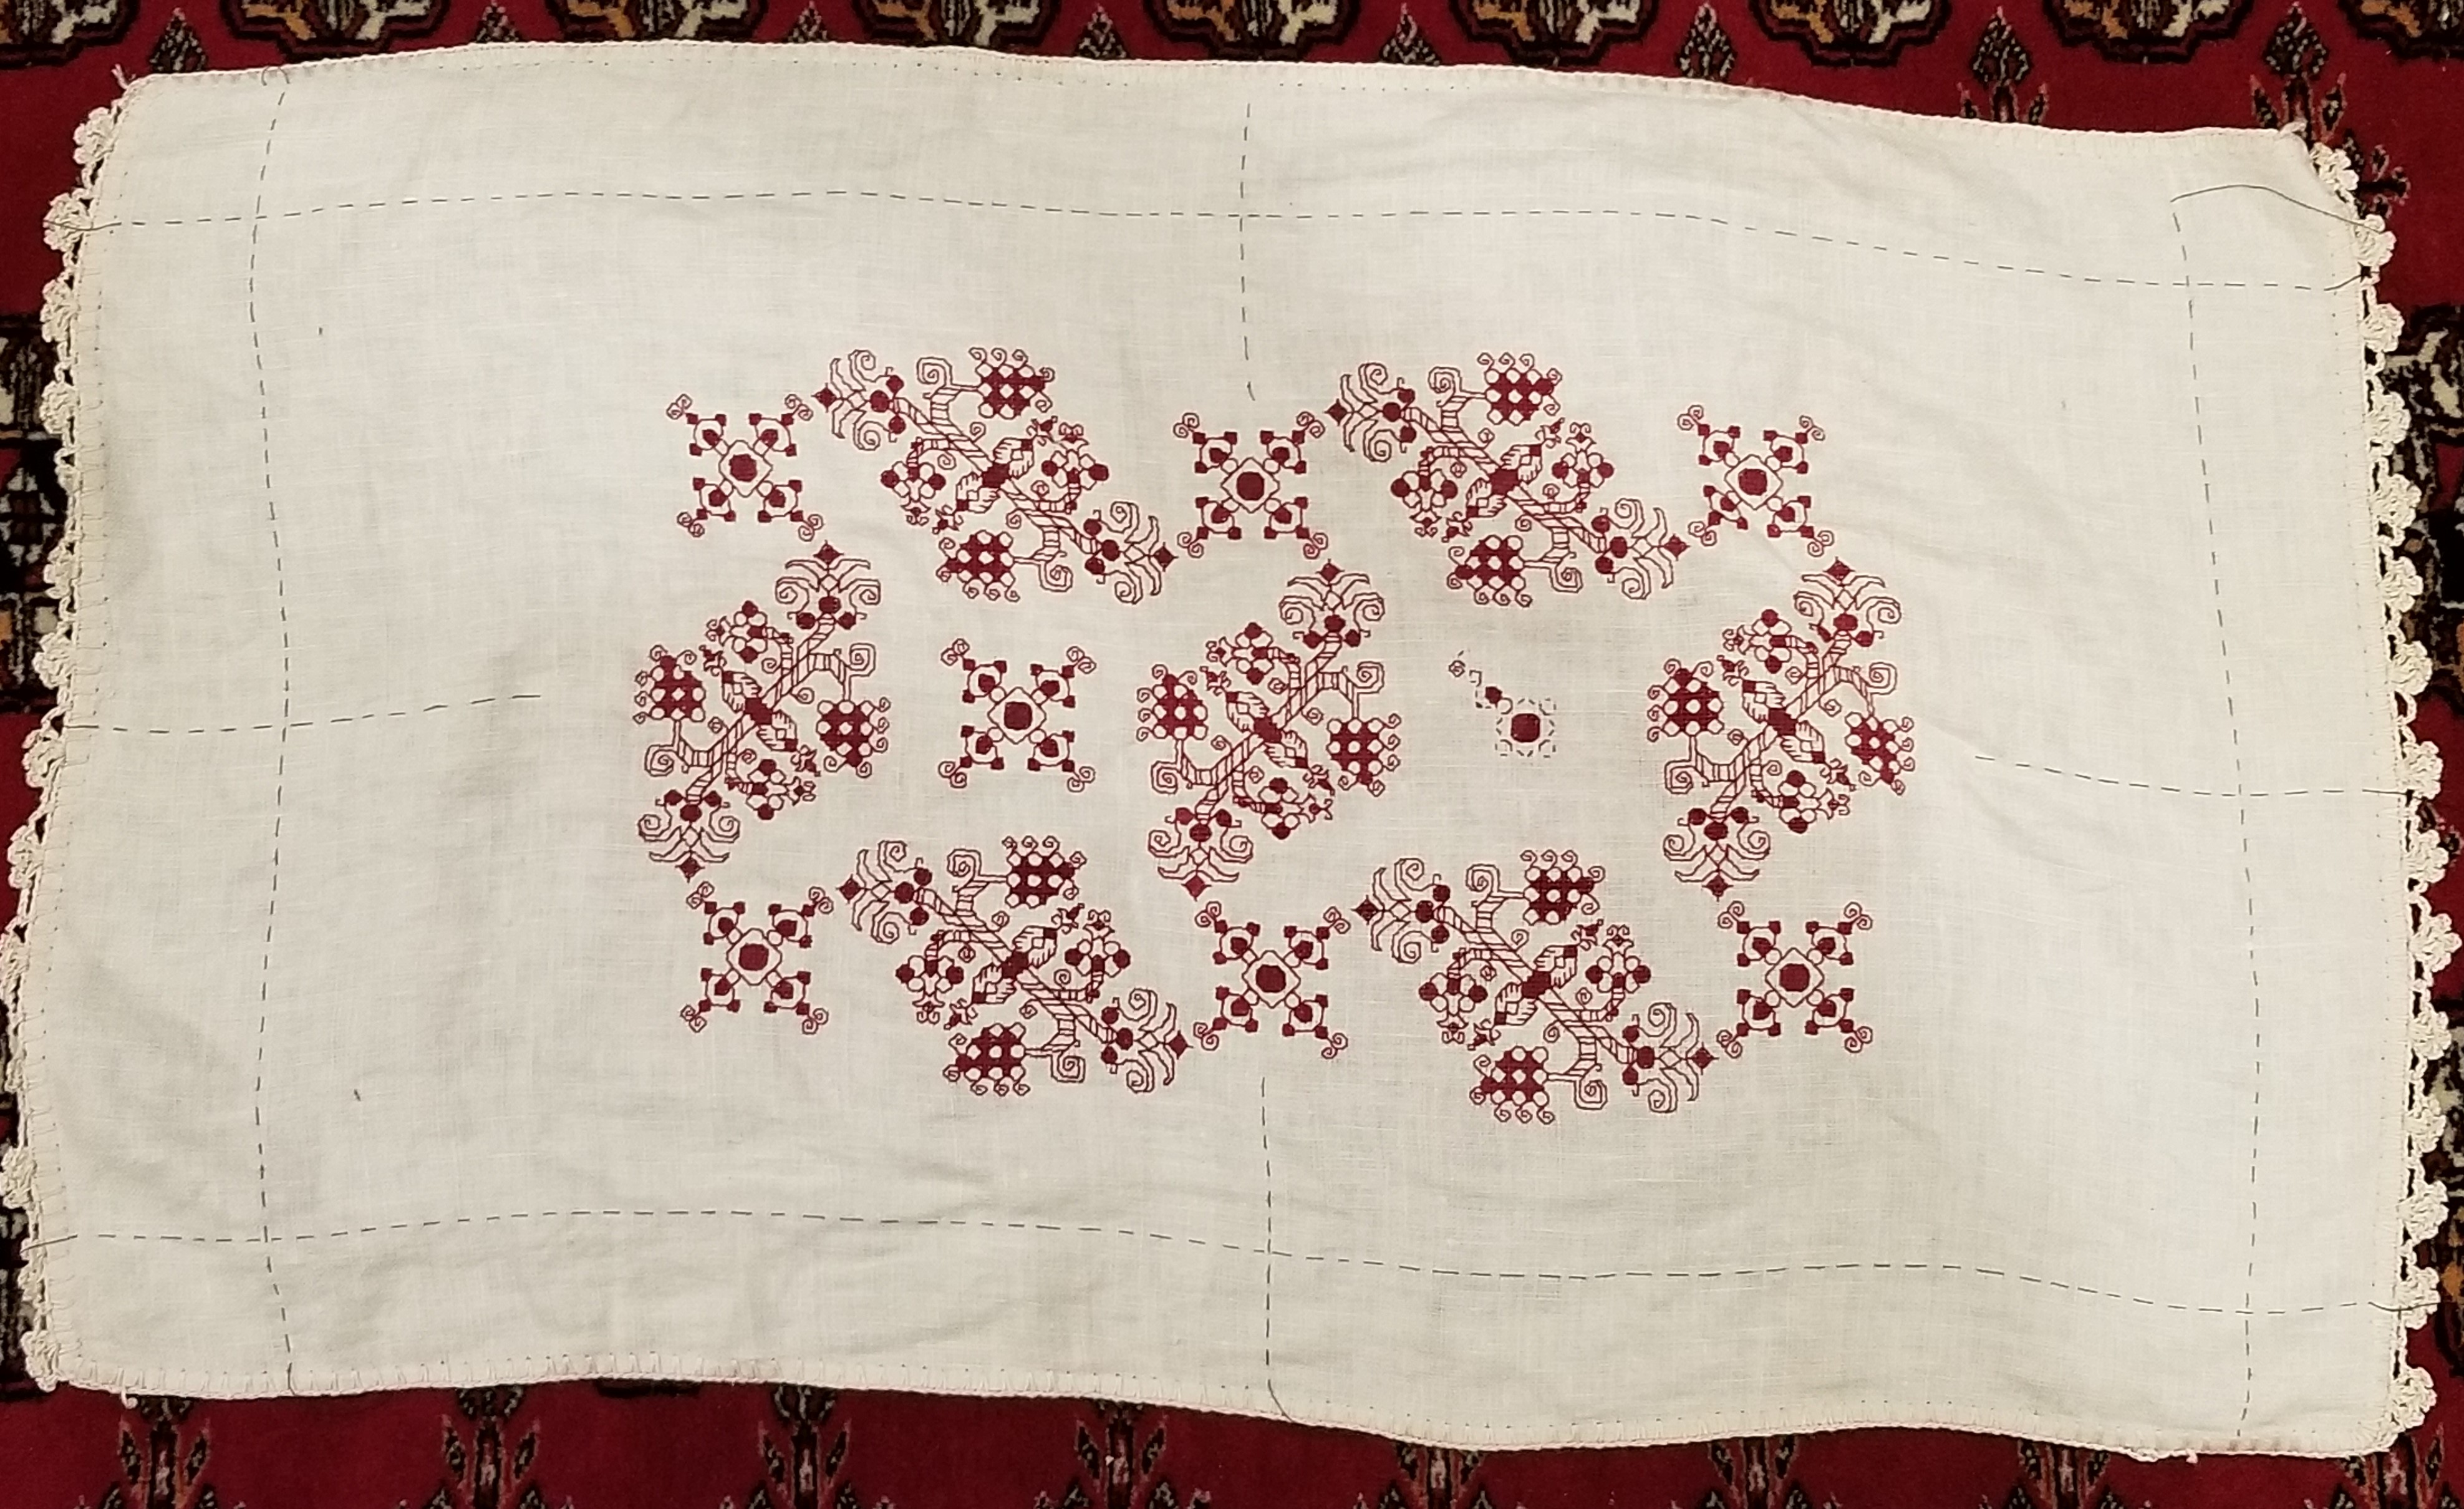
I don’t think I ever wrote anything about this piece. It’s one of our India-acquisitions – a beaded toran (small window curtain or alcove decoration). Glasses for scale.
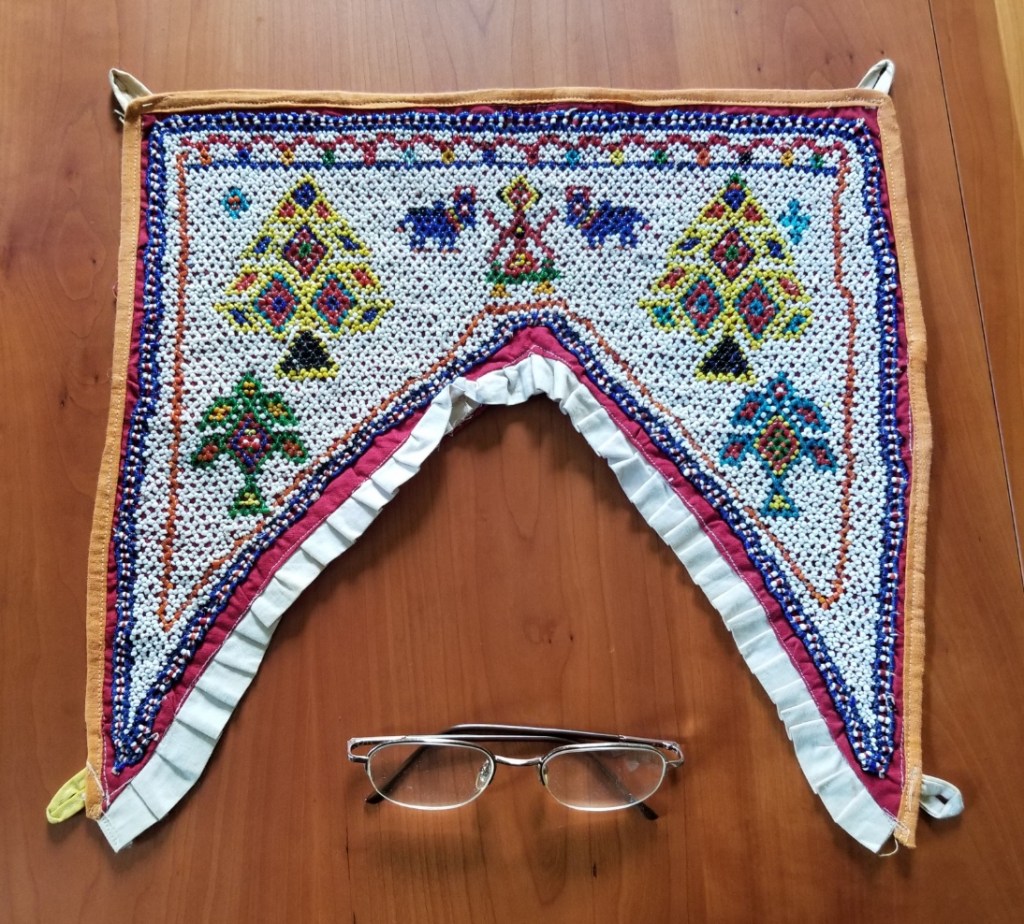
We bought it in the Koregaon Park neighborhood of Pune, in a curiosities/furniture/antiques shop called Sanskriti Lifestyle. The clerk there was only able to tell me that it was old – he had no other information to share. So I began to research.
The beadwork style is called “Moti Bharat“, and is practiced in both Gujarat and neighboring Rajasthan, but is a relatively recent practice, only dating back to the mid to late 1800s. I don’t know enough about how the execution of this style differs between those two provinces to identify the exact source. All I can say is that compared to many on-line examples from both areas, it’s a rather modest and understated little piece.
On “old” – it’s definitely not a recently made piece, but neither is it very aged. I suspect it was probably made before the 1970s, but probably not earlier than the 1940s, based on the colors and types of beads used (all glass rather than plastic, with a wider color set than pre-1940s pieces).
Observations:
I believe this piece was beaded off-fabric, using a mesh technique. That’s the traditional method.
It may or may not have been displayed in this original un-backed format – the condition is quite good with no breaks or evidence of stress, which leads me to believe that it probably wasn’t. But I don’t think this piece is totally untouched.
I think that what I have might be a fragment of a larger toran.
Look at the red/orange beaded line that surrounds the center motifs. On the left, it’s a straight line, and the width of the white beading to its left is more or less constant. But on the right it’s wavy, it corners earlier and the white beaded area varies in width, and is oddly bunched in places by the blue/white/red border. If my hunch is correct, the border (which has a different periodicity than the field) might have been applied later, after the bulk of the piece was salvaged from an earlier work, and after its right side was more or less restored.

After the beading (including any theoretical restoration) was finished, this piece was affixed to the current red cotton cloth backing, by hand. I’ve looked closely at these myriad little attachment stitches, and they do NOT go through the beads themselves. Instead they loop around junctions in the beaded mesh, to attach the entire structure to the backing.

Again – there may have been an earlier presentation that involved the beads and the red backing, possibly with some sort of other edging because the seam allowance of the red bit shows evidence of earlier hand stitching.
And at a still later date (based on wear of the backing cloth), the edges of the beadwork were stitched down again, with long reinforcing stitches in heavier string, and the piece was edged around with the yellow bias binding. At this time the white ruffle on the bottom was added. The bias binding, hanging loops, and ruffle were all put on with machine stitching. There is evidence that the piece was hung for display in this configuration – rust stains on the inside of the top loops, plus one of the bottom loop that has been pulled from its attaching stitches.
As to what the motifs symbolize – all I can say is that trees and the little bulls are traditional. The top center motif might be a representation of a divine figure, I can’t say. All I can observe is that the composition although balanced and pleasing is very simple for pieces of this type. It was a decoration that brought joy to a modest household, albeit it one of the means to afford such things. It now hangs in my house, and continues to bring joy.
I invite my India friends to chime in with more details!
MODELBOOK BLOCKS: ACORNS AND CHICKENS
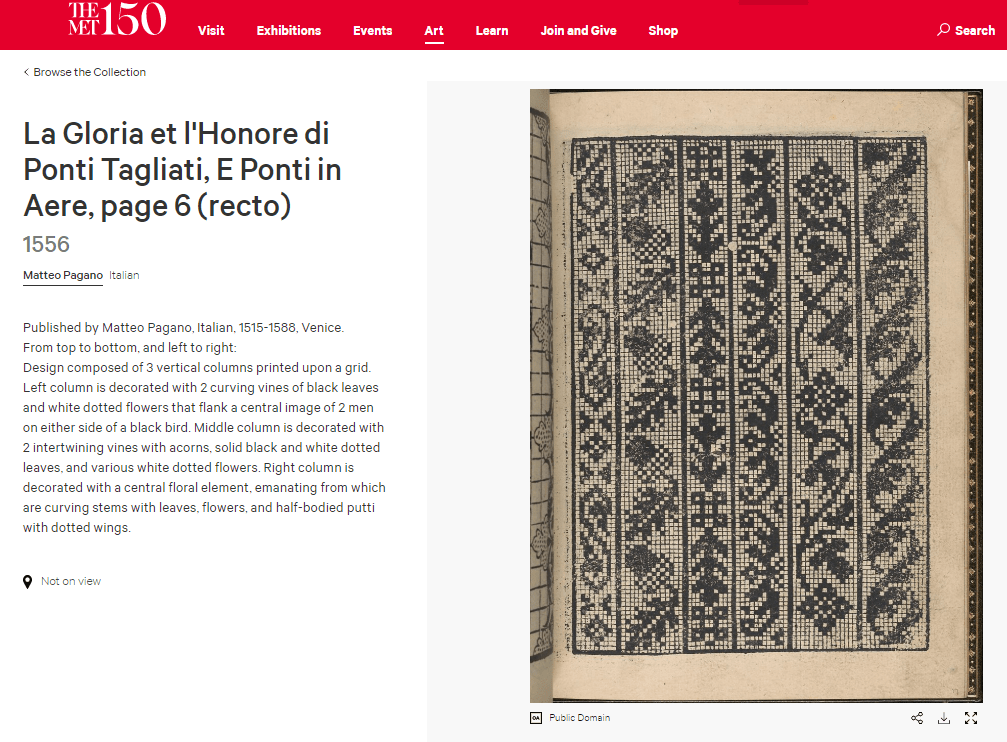
Long time SCA friend/needlework penpal and costuming/stitch research role model Kathryn Goodwyn recently began posting her transcriptions of charted modelbook pages she’s collected over the years. She’s in the middle of a series from Matteo Pagan’s L’Honesto Essampio del Uertuoso Desiderio che hano le done di nobil ingegno, circa lo imparare i punti tagliati a fogliami, published in 1550, in Venice.
This is her chart of one of the pages, presented here with her express permission:
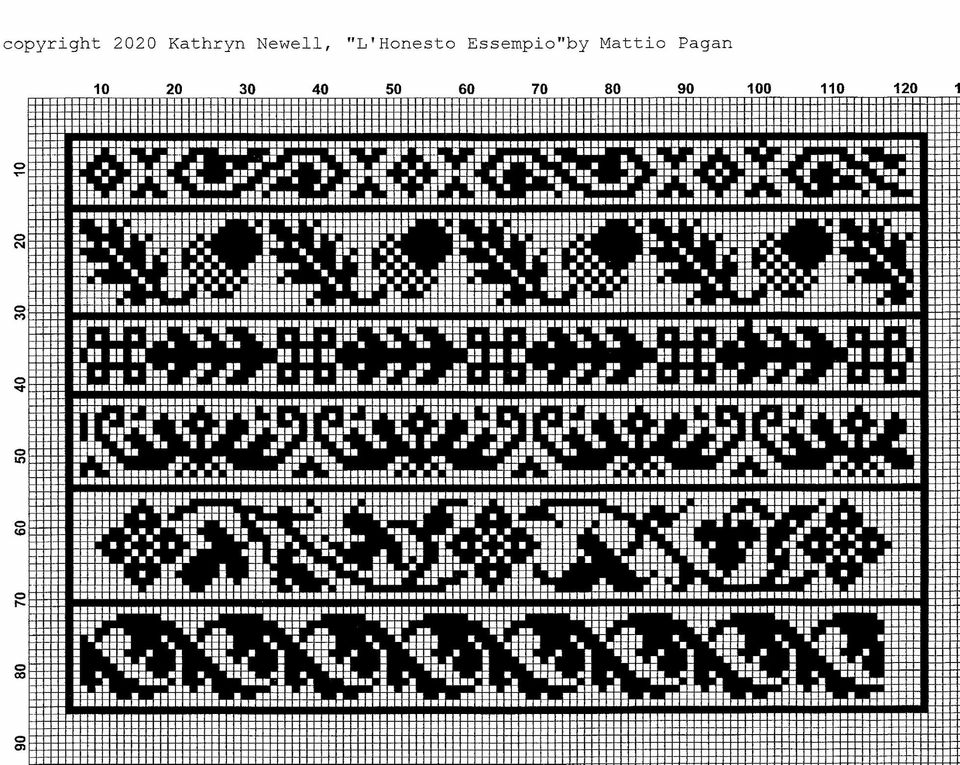
In her post to the Historic Hand Embroidery group on Facebook, Kathryn noted that in the original, there was something odd with the acorn panel – that the count inside the frame didn’t match that of the other strips that accompanied it. Lively discussion ensued. Some people opined that the strips were all cut on individual blocks, assembled into a page at the time of printing, and pointed to the large number of designs that appear in multiple books over time, put out by different publishers.
I agree that there was lively trade and outright reproduction (authorized or not) in early pattern books. There are many instances of designs appearing either verbatim (probably printed from the same blocks), and being re-carved with introduced errors and minute differences. And it makes perfect sense that in the high precision work of block production, carving separate strips would be more forgiving of errors. If a chisel slips, only one design would be spoiled – not the entire page.
However in this particular instance, I think that this piece was carved as a single, integral block. And the skew count for Acorns was a kludge, done when the carver realized that the design would merge into the border of the block and took pains to nibble one last partial-width narrow blank row from the wide border, to separate the leaf from it.
I have found two (possibly three) renditions of this page, all from various extant Pagano volumes.
From the L’Honesto volume (1550) held by the Sterling and France Clark Art Institute Library, available on Archive.Org:
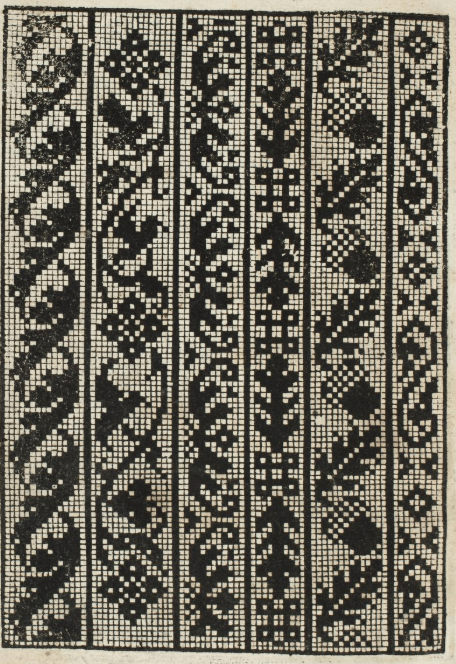
Sadly the edition of L’Honesto in the Gallica collection in France (dated 1553) does not contain this page, but modelbooks were probably issued as folios rather than bound volumes (buyers later paid to have them bound, and decades could have elapsed before that happened), experienced hard wear, and it’s not unlikely that this one is only partial.
The plate however shows up again in a composed edition of Pagano’s later work, La Gloria et L’Honore di Point Tagliati, E Ponti In Aere (1556) now in the collection of the Metropolitan Museum in New York (Accession 21.59.1). There is some confusion in the museum’s presentation – it’s not clear if this page is included once or twice. There are two images of it each tagged with a different page number, plus one image with no page number tag. On all three the facing pages are identical, as are tiny print imperfections on the pictured plate; which leads me to suspect that (gasp) there is a mistake somewhere in the museum’s on-line listings:
- The link for the first image below.
- Link for the second image below.
- Link for the third image below.


I have found this plate and its constituent strips ONLY in these images. I have not found the plate as a whole in another work, nor have I found these exact strips (identifying mistakes and all) replicated in combo with other strips in other Pagano works, or in issues by Vavassore (a close associate).
However other designs do appear to wander. Or do they…..
I’ve noted a couple of these before – but those tended to be full page designs. How about clear instances where a page of designs was created from constituent individual blocks, and those specific blocks can be spotted in different compositions/pages?
It’s surprisingly difficult to find evidence of independent re-use of identifiable single-strip or single motif blocks. Even for a very recognizable and common design that at first glance looks like a single block that wandered among several pages.
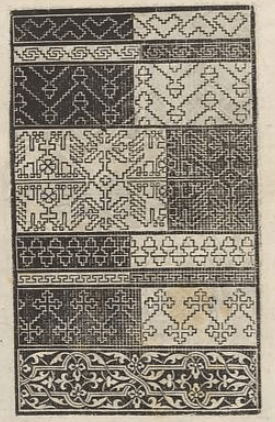
Here’s a well represented one. The Chicken Page. (My own shorthand name for it, nothing actually official.) This design shows up again and again, and persists over the ages in folk embroidery styles of Sicily, the Greek Islands, and up through Eastern Europe and into Russia. It’s meant to be rendered in double running (or back stitch) and in modelbooks often appears with other designs of similar technique on the same page. For a very long time I thought there was only one chicken. But not so.
The copy on the left below is the chicken page from Quentell’s Ein New kunstlich Modelbuch, Cologne, 1541. (I normed these pages to the same orientation for easier comparison.) The middle copy is from Ein new kunslich Modelbuch dair yn meir dan Sechunderet figurenn monster… published in 1536 in Koln, by Anton Woensam. It’s also in Ein new kuntslich Modelbuoch…,attributed to Hermann Guifferich, with a hard date of 1545 (the same page is also in his Modelbuch new aller art nehens und stickens, from 1553). On the right is an example from the composed volume La fleur des patrons de lingerie – an omnibus volume that contains four different modelbook editions bound together. While the archive lists 1515 as the publication for La fleur, that’s not correct.


Some more. At left is the Chicken Page from Zoppino’s Ensamplario di Lavori of 1530, in the version cleaned up and presented as Volume I of Kathryn’s Flowers of the the Needle collection. On the right is another imprint of the same exact block or set of blocks, from Pagano’s Trionfo di Virtu, of 1563.

Obviously the second set of chicken images was printed from exactly the same full page block, in spite of being both the earliest and the latest example in our total set. There are no deviations, and all copyist’s errors are the same, left and right for every strip. However they are also clearly not printed from the same blocks others. Most obviously, the chicken repeat in the set of two doesn’t begin or end at the same point as it does in the first set of three.
But I don’t think all three chicken panels in the first set came from the same nest either. There are too many differences between the first shown panel and the other two next to it. Not just partial lines where ink may not have reached during the print, but actual deviations in the carving:
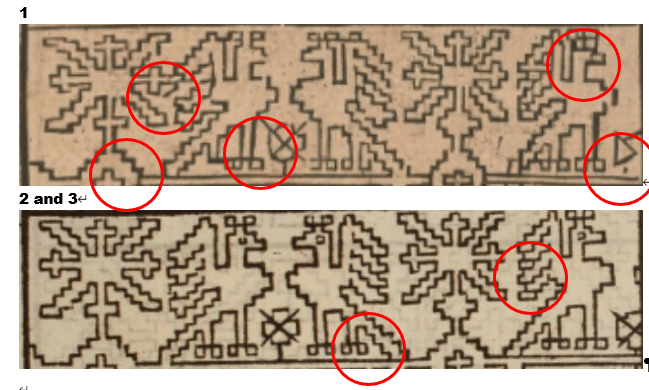
The other strips on the leftmost example of the three also deviate from the other two examples in its set, elongated stitches represented, different numbers of counts in comparable stepwise sections and the like.
My conclusion from this flock of chickens is our bird motif was carved three times. One imprint appears in Quentell [Chix1]. A second is in Woensam/Guifferich/[La fleur] [Chix2]. And a third appears in Zoppino/Pagano [Chix3].
Our timeline is now something like:
- 1530 – Zoppino – Chix3
- 1536 – Woensam – Chix2
- 1541 – Quentel – Chix1
- 1545 – Guifferich – Chix2
- 1553 – Guifferich – Chix2
- 1567 – Pagano – Chix3
What we are NOT seeing in this ONE particular case is that the chicken motif although quite prevalent and highly mobile was NOT being re-used as a single block, in combination with assorted blocks to make unique pages. Instead it appears with its established companion set – verbatim. And in the instances where it looks like it might be nesting with new friends, it is in fact an entirely different carving – a totally different chicken.
Finally, I am not sure why the positive/negative presentation is so prevalent for this particular style of block. My guess is because the dark lines/light ground carving was fragile and more time-consuming to produce than the dark ground white lines areas. Perhaps the dark areas were an economy measure, or their presence strengthened the block as a whole so that it lasted longer or warped less (dark/light areas on these blocks tend to alternate left/right).
Apologies for the length of this post. If folk remain interested I’ll look at the peregrinations of other specific designs.
DANCING AROUND THE CORNER
Having gone on and on about straight repeats as my bony bois march across the top of my piece, we have now come to the first corner.
Thankfully, my count is spot-on and everything is in place.
But why did I start with the strip of skeletons doomed to dance upside down? Because I knew that I would probably make some tiny adjustments to the design as I went along. The viewer’s eye is drawn to the closest point of the work, and the most logical part – that’s always the strip across the bottom, where the motifs are all right-side-up.
It’s unlikely that any small tweaks would be noticeable in the upside-down part at the top. So being too lazy (and waaay too short of thread I can’t replenish) I started there, knowing that I would not be ripping back vast regions to norm those tweaks.
Closer up, in a more normal orientation:

My last post discussed the non-historical use of the same framing element on either side of a mirrored repeat with horizontal directionality. Here’s another feature of this strip that’s not often seen in museum artifacts – the mitered corner.
The majority of corner treatments in surviving historical fragments have butted-up or improvised corners. Carefully plotted mirror images across a diagonal (mitering) are quite hard to find. But I decided to do one anyway. You can spot the diagonal running through the center line of the rightmost internal knot, down through some leafy bits, and into a flower-like shape. I’ve also established the beginning of the 90-degree flipped border, with the upper part of that skeleton plus the first pomegranate underway.
I’ve also rounded the outside corner. In a serendipitous happenstance (I can’t claim I planned it ahead of time), the width and height counts of my marching plumes are equal, so I was able to fudge the corner with one last plume on a long stem.
Side note: At this point I really don’t need to refer to my printed pattern any more, I am mostly working off prior stitching, with occasional glances back at my chart to make sure all is aligned and true.
But that inside edging – it’s different. I’ve introduced another element, playing with the eternity knots and tying them into the plume strip. I did this because the thread count of the warp (the threads that stretch up-down in the detail photo) is denser than the thread count of the weft (those that go across in the detail photo). The closer together the threads are, the more compressed the design will be in that direction. My skeletons marching up/down the sides of my piece will end up looking ever so slightly shorter and chunkier compared to their more lanky brothers that tumble across the top and bottom. BUT I can draw the eye away from that difference by adding the additional knotwork strip.
So it turns out that my design is all about insouciance, breaking historical composition precepts, and visual deception. Still for all of that I think that its look is more closely aligned to the aesthetic of historical blackwork rather than more modern pieces. Just my opinion, feel free to differ.
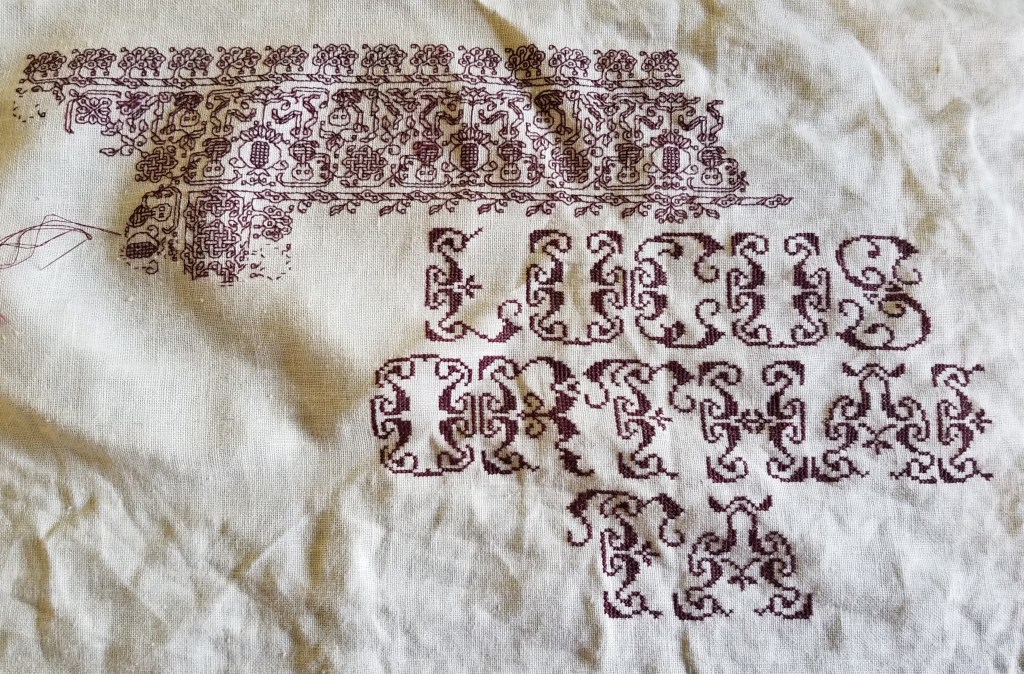
Class Handout Page
And for having the patience to read down this far, here’s another present. I was going through some older files and came across this class handout page. I’ve taught several workshops using it. The last one I came equipped to do was for a public SCA demo in Rhode Island, although the circumstances and attendees made just sitting and chatting about the stitching a better option. Still, I did update the handout, and it may as well be of use to someone.
The patterns are (more or less) ordered in level of complexity, and are intended to be a self-tutorial in double running stitch. When I teach I provide the page below, a strip of Monk’s cloth and length of standard embroidery floss and needle, plus an inexpensive hand hoop (if I have some to spare). Depending on prior experience, stitching proficiency, confidence level I encourage the participant to select one of the designs from the leftmost two columns, to try out face-to-face in the workshop. Then I encourage everyone to use the rest for self-study at home.
For self study, what I suggest is to just grab a piece of cloth and begin – no need to plan an intense, composed sampler. Pick a point anywhere on your chosen ground, then starting at the spot in the upper left column where you feel comfortable, continue down that column to the simple acorns. Then keep going. The next design in the complexity sequence is the flower spring at the top of the next column. Go down that column to the folded ribbons.
After that, I’d suggest attempting the birds at the bottom left. From there the vertical star flowers, then the knots, four-petal flower meander, and the design immediately above the title. Once you’ve done all that the remaining four intermediate patterns on the page should be well within your grasp (the heart flower all-over, fancy acorns, geometric strip, and oddly sprouting peppermint-stick squash blossoms).
Of course you can be totally random and just use these designs as you will. No need to march in lock step with the protocol, above.

Download this handout in PDF format from my Embroidery Patterns page. It’s the last one listed (click on the thumbnail there to get it, then save it locally).
As ever, if you stitch up something from any of my designs, please feel free to send pix. I always get a big smile out of seeing you having fun with the pattern children. And if you specifically say so and give permission to re-use your photo, I will be happy to post it here and index it under “Gallery”.
