UNSTITCHED COIF – FINISH. THE FILLS
As promised here’s the breakdown of the design, motif by motif – a guided tour of what I was thinking or not thinking about. This is turning out to be way longer than I expected. Feel free to scroll down to the eye candy and ignore the prose.
First, on the general aesthetics, I already confessed yesterday that this piece is a departure from the strictly historical, using stitches, materials, and fills that have no specific point source in a particular artifact contemporary (or near contemporary) with the original Victoria and Albert Museum piece of ink-drawn linen. But in spite of that I’ve tried to stick to general aesthetic. It was a time of “more is more.” Pieces like this coif were status items that proclaimed the wearer’s wealth. I heard Thistle Thread’s Tricia Wilson Nguyen lecture at Winterthur about how copious precious metal spangles, threads, and even lace served as walking bank accounts, shouting prosperity but still being available as liquid capital to an owner whose fortunes dipped so low that reaching for a scissors to snip off a bit for ready cash was a welcome option. To that end, I’ve doubled down on the gold accents. But not being as flush as landed gentry from the late 1500s, I’ve used imitation gold thread and gold tone mylar rounds.
I’ve also tried to emulate the more lush aspects of some historical blackwork pieces, that created depth and shaded nuance by using fills of different visual density, augmenting the effect with raised outlines. I would have liked to use a plaited stitch for the stems, but it’s clear that the original artisan didn’t leave room for them, so I settled on outlines that were markedly heavier than the fills, topped off by a whole-piece outline that was even thicker and more dimensional.
I also like the difference in blacks used. The fills in the thin modern-dyed spun silk single strand are dark enough to look lacy and contrast well with the ground. The outlines, done in the boutique, small batch historically dyed double strand (also spun) are a much softer black. In some places the black takes on a reddish or brownish tinge, or moderates to an even less dense charcoal. If they were as deeply toned as the fills I think that each leaf, petal, or wing would present more as a grey-scale visual mass rather than letting the fills speak louder than the outlines. Finally the deeply black modern dyed but glossier reeled filament silk used in the perimeter then echoes the black of the fills, and makes a world of difference to the piece, pulling it all together. All black, all different, and all contrasting with each other.
On planning and fill selection, I winged it. I didn’t sit down and plan anything. I picked fills on the fly, with only a vague idea of where I would put dense, sparse, and intermediate fills as I began each sprig or group. Some succeeded quite nicely, others I would re-do differently had I the chance. Would I ever sit down and plan an entire project’s density/darkness/shading map ahead of time to avoid this? Probably not. It’s more fun to bungee-jump stitch.
On to the piece. First a quick recap of the whole item:

On this whole coif shot I can see three center circles of motion in the design, one surrounding each rose, and one surrounding the two centermost unique motifs – the borage flower/strawberry pair. The rest of the flowers are surrounding those elements. Maybe I see them because I’ve been staring at the thing for so long, or maybe my admittedly ornate but heavily outlined rendition with the gold whipped stems sinking into the background pulls those surrounds forward. When the exhibit comes around and I can see all the other pieces it will be interesting to see what other symmetries they accentuate.
We’ll start at the upper left. Although I began at the lower right, it’s easier to walk across starting at this point. I give fill counts and cite the number of fills I used from the project’s official website. Now some of the ones in my doodle notebooks duplicate or near duplicate those (we were after all mining very similar sources), so I apologize if any double-listed ones ended up in the wrong pile.
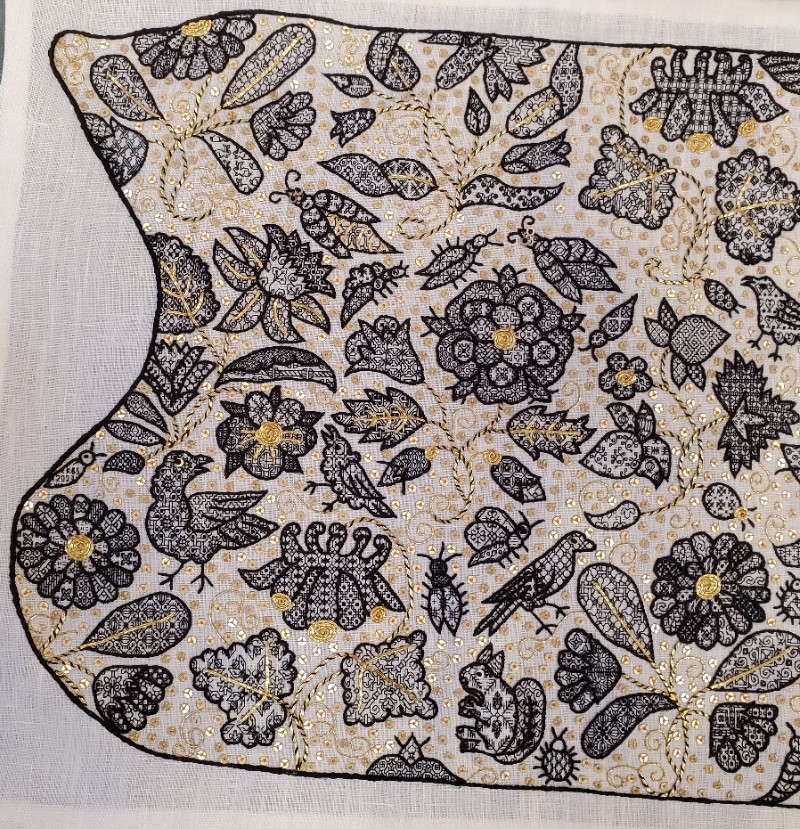
The first motif in the upper left I have been told is a marigold, one of six on the piece. It’s truncated at the edge by the indent. The marigolds were especially hard to work because those little jelly bean spaces of their petals were so tiny that most of the fills I had included repeats too large to be useful for them. I tended to use four repeats in the outer petal ring, repeating the sequence four times. The inner ring used different fills, usually two. Fourteen fills in this motif, twelve are mine, including the bunny rabbits. The other two are from the collections redacted by Toni Buckby, our Fearless Leader, and are available at the Unstitched Coif project website.
Immediately to right of the partial marigold in the corner is a truncated carnation or gillyflower (hard to tell them apart). Three of these are here, but only one isn’t cut by the perimeter. At this point, relatively late in my stitching I went out on the hunt for additional fills, and redacted a couple of pages of them for the upcoming third Ensamplario Atlantio volume. One of particular note is the leaf at the lower right, with that flying chevron shape, one of several I drafted up from a photo of a blackwork sampler, “Detached Geometric Patterns and Italianate Border Designs with Alphabet” 1697. National Trust Collections, Montacute House, Somerset, NT 597706. The twist and box of the sepal is from the same source. Yes, I know they are later than the coif’s original. Since by definition anything I doodle is even later still, I didn’t see the harm it using them. 18 fills total in this sprig, six from Toni’s redactions, two from mine, and ten of my own doodles.
Next to the right on this photo cut is a columbine. It’s barely snipped, and one of three on the piece. The large leaves made good showcases for some of the bigger repeats, even with the gold overstitching. As a result on this sprig we’ve got only five fills, two of which are from Toni’s pages. On this motif as on all of them, I tried to use fills of contrasting effect. Here in the flower we have the very strong linear grid of the main pattern, paired with the angular acorn spot motif. This flower is also an example of introducing movement or syncopation by NOT using the same grid for adjacent motifs.
Back to the left edge now. This sprig includes a narcissus or daffodil, plus a viola and something indeterminant, possibly a blossoming narcissus, all on one stem. Leaves are also of multiple forms. There are only two of this hybrid sprig on the piece, both nipped by their respective edges. All those little areas add up to 19 fills on this one. I’m particularly happy with the density effects I got on this one, with the narcissus throat, the leaf curl, and the viola sepals bringing darker depth. I did try to find two patterns of similar density for the lower petals on the narcissus, too. I have to look closely to remind myself that they are two petals of one design and three of another.
Next over is the rose. I’ll come back to the bugs that surround it. There are two roses on the coif, and two tiny partial bits on the lower edge. In truth, I’m not enthused about the way the big flower turned out. I like the sepals and the outer ring of petals (three fills, all of the same tone), but the inner rings aren’t well differentiated – although I used one fill for all five of the middle ring and that isn’t bad, that inner ring with its three fills is rather boring. Were I to do it over again I’d make some different choices here. I used sixteen fills in all for this sprig, including two of Toni’s set.
The creatures dancing “ring around the rosie” includes seven bugs and two birds. Visually they do make a circle around the rose, with one larger bug flying off above the narcissus. Here I spy a mistake, and the thing being in transit right now, it’s too late to fix. I meant to go back and add little gold stripes to the body of the bug to the upper right of the rose. Those tiny bits of couching were the ones I liked least to do. So it goes.
Like the marigold petals, the body parts of all the coif’s bugs were a challenge. Some are so tiny that it’s hard to squeeze anything resembling a pattern into them. I doodled on those, but I tried hard to make the doodles unique. In a couple of cases I found I had made a duplicate of a pattern stitched before, and went back to make modifications to one of the inadvertent pair. All of the large bugs with sequin eyes have a feature in common. Although it’s hard to see because of the stripes, I used the same pattern for both of their wings, but rotated it 90-degrees to give them extra movement. I have found no historical precedent for using directional fillings this way. Taken as a group, there are 27 fills among all of these bugs and birds, four of which are from Toni’s pages.
Reading across, the strawberries are next. (I’ll cover the bird to its right in the next post). There is only one strawberry sprig on the project, and it’s another challenge because of the small petal and sepal spaces. This is another motif I count as only a partial success. I like the top strawberry, flower, and leaf, but I think I should have chosen differently for the lower strawberry. Possibly working the sepals for the second one and that leafy whatever that terminates the sprig both darker. That would have made the lighter fill in the bottom bud a bit more congruent. Thirteen fills in all, four of them from Toni.
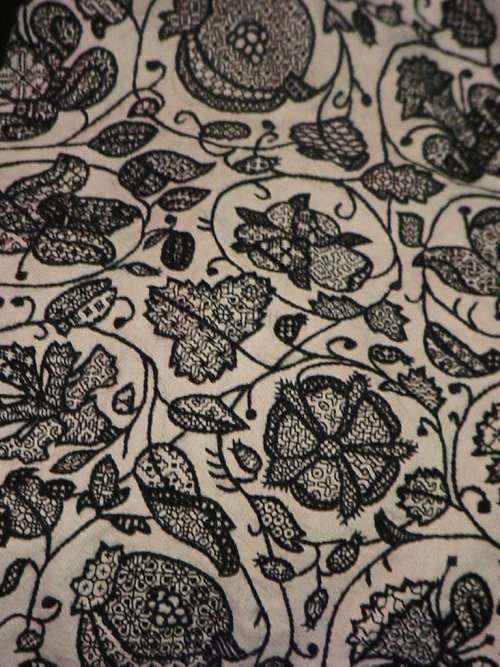
Back to the left hand edge of the photo, below the narcissus/viola stem are the large bird, and the second marigold (cut off at the edge). There’s also a tiny bug above the marigold in which I worked “KBS 2023” as my signature. This flower was my finishing point – the last one stitched. Most of the fills in the petals were improvised on the spot. The bird carries an interlace and star I remember doing on my first large piece of blackwork, an underskirt forepart, back in 1976. That piece however was worked on a ground that was about 28 count (14 stitches per inch), not 72 count (36 stitches per inch). You may even recognize some of the other fills I reused on the coif in the snippet below. Vital stats on Marigold #2 – 12 fills for the whole sprig including the large bird, one of which is Toni’s.
The second columbine, to the right of the bird, grows from the bottom edge of the coif. I wonder how many people will look closely enough at the leaf on the left to realize that it’s bugs. I was thinking bees, but I’ve been told they read more like flies, and “ick.” There are four fills in this sprig, one of which is Toni’s.
Adjacent to the right we find Needles the Squirrel, his friend the round bug, and one of those rose snippets. I group them together for convenience. Needles’ pine spray fill is mine, and came about during discussions on line and in the Unstitched Coif group’s Zoom meet-ups. Someone mentioned using an acorn fill for their squirrel, but UK folk were quick to point out that the indigenous Red Squirrel, who preferentially dines on pine nuts, was deeply endangered by the invasive Grey Squirrel, who prefers acorns. So I doodled up the spray, shared it with the group, and used it on mine, bestowing the appropriate name. I’ll find out in December if anyone else used this fill. I also did the directional shift in Needles’ ears. There are only six fills in this group.
Marigold #3 is in the right corner of this photo. He’s also rather a mess. I should have picked two dark and two light fills for the outer ring of petals, instead of one dark one and three intermediates. I did rotate the direction of the fills around the circumference. Oh, the snails? A variant of those snails with their wrong-way curled shell is on the majority of my blackwork pieces. Not quite a signature, but not far from one, either. There are 17 fills in this sprig, one from Toni.
On to the center of the piece.

Back up to the top of the center strip. Here we have the sadly bisected bird, with the fourth marigold to its right. Although the petals are a bit uneven, I did try something specific with this one, using two fills in of similar density in the center ring, and four also similarly sparse fills in the outer ring. I count this one as a success. Together these two motifs contain 13 fills, two of which come from Toni’s pages.
Below the marigold is the singular borage flower. There’s only the one, and he’s at the center of it all. I will cover the caterpillar later. He’s one of my favorites in the piece. I especially want to call out the tiny paisley at the bottom of the stem. The fill there is one that Toni redacted from a coif, V&A Accession T. 12.1948. It is very unusual fill, with the exception of a few that use a circle of stitches radiating from a center hole sunburst style, it is the ONLY historical fill I have seen that uses the “knight’s move” stitch – two units by one unit, to produce a 30-degree angle. Knight’s move stitches are very common in modern blackwork, but exceedingly rare in historical pieces. Knowing this I’ve drafted up hundreds of fills and in keeping with this paucity, have only included them on three or four of the most egregiously modern. The little stirrups in that paisley open up a whole new world of possibilities. Borage contains 11 fills. Five of them including the stirrups are Toni’s.
At the bottom below the borage is Carnation #2, attended by four insects. I am also fond of this one, especially the long skinny bud on the lower left. That striped lozenge filling is one of Toni’s and I adore it. With all the folded leaves there was ample space to play with density, and it was fun to pick these fills on the fly. All the more so because the combos worked. The insects, from lower left, a caterpillar or worm, an amply legged spider, a moth, and a beetle, are a playful way of rounding out the space between the center and the side areas, the latter being (mostly) mirrored near-repeats. This group holds a whopping 23 fills, nine of them from Toni’s redaction page.

And back up to the top we go. Carnation #3, another truncated motif. Like the last carnation this one had a lot of play for contrast. It was actually among the earlier sprigs I stitched because I began upside down in what is now the upper right hand corner. This is the motif on which I began to get a better feel for the size of the repeats in the fills and how that size related to the dimensions of the shape to be filled. There are 19 fills in this one, including two of Toni’s.
Below this last carnation is Rose #2 and its bug and bird armada. Don’t worry, I am not double counting the moth I included with Carnation #2. I like this rose slightly better than the other one, but don’t count either one as a stunning success. I may excerpt the rose and try again. In any case you can see that I’ve hit full stride here in using fills of various repeat sizes.
For the most part I stitch fills then go back and outline them when the motif is complete. I have always found that to be a forgiving way of working that allows fig-leafing of the fills’ often all to ragged edges. But on the caterpillar (my favorite insect on the coif) I started at the head, stitched its fill, and then outlined it. I continued in this manner segment by segment. I did this because I knew if I waited until the end, my divisions between the body segments would get muddy. I wanted to make sure that the little center divots that ran down his back were seen. I probably wouldn’t have attempted this if I hadn’t seen others in the Unstitched Coif group Zoom meetings working up all of their outlines, then going back and adding fills.
Rose #2 and accompanying critters used 31 fills, including six from Toni’s pages.
Below and a bit to the right of the rose is Columbine #3, and a partial rose. There’s also a lump from which the columbine sprouts, but that may be a mistaken interpretation on my part. Perhaps that was supposed to be an arched stem. Maybe yes, and maybe no. I spent a lot of time dithering about how to handle the columbines. Those curly narrow top protrusions in particular limited the size of the repeats that could fill them effectively, especially if I wanted to play up the contrast between the gold topped and plain petals. The circle fill (one of Toni’s) worked nicely and set the tone for my later choices. In this grouping there are nine fills, including Toni’s circles.
Back up to the top for Marigold #5, which happens to be the first bit I stitched. The leaf with the larger butterflies was the first fill I did. When I started I thought that stitching over 2×2 threads might be problematic, so I worked this one over 3×3. However my eye and hand are SO attuned to 2×2 that it was clear that the new count would drive me to distraction, so I quickly switched to my standard. But I didn’t pick out the errant leaf. I doubt if I hadn’t mentioned it you would have noticed. In any case you can see that I was very tentative on fill repeat size on this first flower. For example, I could have used much larger repeats in the leaves. Still this was the try-out. I beta tested using fills aligned in radial directions, the gold center coil (here only a half), veining and stems in couched gold double strand, and curls in couched single strand. And adding spangles. Once they were in I noted how the stems disappeared, so I went back and whipped them with black to make them stand out a bit from the background. This sprig uses 15 fills.
Below the marigold is the second Daffodil/Narcissus and Viola sprig. I’m generally pleased with it, although I wish I had saved the feather fill for one of the birds. You will note that I take no special care in always whipping the stems in the same direction. I did them in the most convenient/least awkward direction because needle manipulation to avoid catching previously laid down work was very important. As I went on I destroyed most of the sequin/French knot eyes and some of the smaller couched gold bits by snagging them with my needle tip or smashing them with ham-handed stitching. I ended the project by replacing all of the eyes. There are 19 fills in this motif, two of which are from Toni’s pages.
Last but not least we have yet another marigold, Marigold #6 with bird, bug, and bits. I confess that the marigold was my least favorite to work, even by the time I did this one – only the second one I stitched. That little intrusion below the bud may also be a vagrant bit of curl or stem, but I filled it in anyway. This bird has the first sequin/french knot eye I did. I also experimented with three sizes of little seed beads, but decided that they were too dimensional and/or just too big for this use (the paillettes I used are only 2mm across). Our final motif has 19 fills, including one from Toni’s page.
That ends the guided tour. The total count of unique fills on this piece is 274. 51 of them are from the pages of fills redacted by our Fearless Leader, Toni, and posted on the project’s home website. The remaining 223 are mine, mostly taken from my Ensamplario Atlantio series.
Would I ever attempt something like this again? In a heartbeat. BUT I will never do another piece of this size and stitch count to deadline. While it was intensely fun every minute of the roughly 900 hours I was stitching, I prefer to stretch those hours out over a longer time period. Intense thanks to Toni and my fellow Unstitched Coif participants, for the opportunity, the learning experience, the encouragement, and the camaraderie. I am looking forward to the December exhibit, and to meeting as many of you as possible, in person.
When the flyer for the exhibit is released I will post it here on String, on Facebook, Instagram, and Linked In. In the mean time, reserve the date – it will be on December 18 through the 24th, at the Bloc Gallery, Sheffield Museums, Sheffield, UK.
UNSTITCHED COIF – FINISH! MATERIALS AND TECHNIQUES
here have I been these past weeks? Stitching away in a sweatshop of my own making. That may sound tedious, but it was actually tons of fun. I had to drone away with intent to meet the completion deadline for the Unstitched Coif project. I’ve completed the embroidery, including some small repairs. All that’s left is neatening up the back a bit, hemming to final size, and shipping.
This is the first of two posts on finish. The next one will present details and commentary, motif by motif. But I still have work to do before mailing, so that will have to wait for another morning.

Yes, that little dip in the upper left is in the original, too. And yes, it does bother me, but (near) verbatim is near verbatim, so I kept it instead of extrapolating what should have been there.
Materials:
- 2.25 spools of Au Ver a Soie’s Soie Surfine spun silk for the fillings, purchased from Needle in a Haystack.
- 1.3 hanks of Golden Schelle’s black four-ply spun silk embroidery floss for the motif outlines. It’s worth noting that this is a hand-dyed product, prepared from a historically documented iron/tannin recipe, and in 500 years will probably have eaten itself to death, exactly as black threads in museum artifacts from the 1500s have deteriorated over time. I love the minor color variation and soft black produced by their small-batch method.
- About 0.25 hank of Tied to History’s Allori Bella silk in black – a reeled filament silk for the heavy perimeter outline. This one claims to be four-ply but is hard to separate. Each ply appeared to be made of three strands. I ended up using two of these constituent strands at a time, which means I got six working threads out of a length of the four-ply.
- About 0.25 of a hank of Japanese Gold #5, from the Japanese Embroidery Center in Atlanta, Georgia.
- One skein of six-strand Cifonda Art Silk (probably rayon) in a light gold color. I bought this in India, as part of a large lot for short money.
- 1.9 strings of 2mm gold tone paillettes, from General Bead. The description says there are 1000 spangles per string. I doubt that. Probably more like 500. Still, that’s a lot of spangles.
- John James needles – #12 beading needles (outlines, spangles, couching), and #10 blunt point beading needles (fills, whipping). The #12s were labeled as being blunt points, too, but they wre far sharper than the #10s. Many of the #10s, because I kept bending them as I worked, and a bent needle is harder to aim accurately.
- Mani di Fati’s 72×74 count linen – as recommended by our Fearless Leader, Toni Buckby.
- Toni’s elegant rendition of the Victoria and Albert Museum’s “Unstitched Coif”, Accession T.844-1974, shared at this link by her special permission.
Stitches Used:
- Fills – mostly double running stitch, with occasional digressions into “Heresy Stitch” (aka half back stitch), back stitch, and wild improvisation when lack of real estate and undulating edges required shoehorning motifs into tiny spaces. With one exception they are all done over 2×2 threads. When I started I thought that over 3×3 might be better, but my brain and hands are so trained to work 2×2 that it drove me nuts, so I reverted to the smaller size. But I didn’t bother ripping out the completed bit. Have fun hunting for it.
- Motif outlines – Reverse chain. A probable departure from historical usage. Carey, in her excellent book Elizabethan Stitches calls out twisted reverse chain as having documented use in 16th century historical artifacts, but mentions plain old reverse chain as having no provenance in that time. Which does seem very odd to me.
- Leaf veins and other gold details overlaid on top of black stitching – Simple couching over a double strand of the gold. Ends plunged. Plunging is another deviation from the historical. I have been schooled now by several people that is a practice common to the mid 1800s, and not before. In the 1580s gold ends were neatly tucked under. Look at all the gold I used, and especially at the short lengths. I voted to save my sanity.
- Stems – Also simple couching, but whipped with two strands of the black Soie Surfine. Where the stem extends a leaf vein, a single line of couching was laid down, but only the stem part was whipped. I began doing this after I finished the first flower, complete with background spangles, and the stems disappeared in the riot of gold.
- Spangles – I affixed my paillettes with three straight stitches each, hopping all over like a water drop on a griddle. Since I almost never strand over this was painful to do, but the ground’s dense weave and light color of the Art Silk convinced me that unless the piece was backlit, it would not be seen. Again, a sanity move.
- Perimeter outline – Yet another historical departure. I originally wanted to do this in Ladder Stitch, but the Allori silk isn’t robust enough to display stitch detail, and the modern severe blackest-black color makes such attempts moot. So I went for double reverse chain, also called Heavy Chain in the RSN’s on line stitch reference, worked as close and small as I could to make a fluid, heavily raised dense line.
Fill Sources:
I used two sources. One is the set of sourced historical redactions Toni provided on the group’s official website. They represent about 18% of the designs I used.
But now is true confessions time, and certainly not a surprise to those who know me, although I’ve avoided mentioning this in our group’s Zoom meetings. About 82% are from my own free books – Ensamplario Atlantio, Volumes I and II, along with the not-yet released Volume III that I am working on right now. (I was circumspect because this project is Toni’s. I’m just one of the foot soldiers. The glory and renown belong to the general.) My 82% includes an estimated 2% on-the spot improvs I came up with to get out of a jam.
Why a jam? Because early on in this project I declared that I would not be repeating fills between motifs. A flower could have multiple petals in the same pattern, or a bug might have matching wings in a single pattern, but once that pattern hit the cloth and the motif was completed, it was “burned” and not used again on the rest of the piece. That made some anxious moments because there are A LOT of shapes to fill, especially small jelly bean sized ones. More than once I made an inadvertent duplication and rather than ripping out the work, had to mod the second showing so it would be distinct. Or I had to fill a particularly challenging tiny spot, and just winged it because nothing I had would show well there.
What’s Left to Do:
Taming this shameful back. Mostly tacking down those annoyingly fraying gold ends, to the best of my ability. Then hemming to the final dimensions required for display. Nothing fancy, no drawn work hems or anything like that.
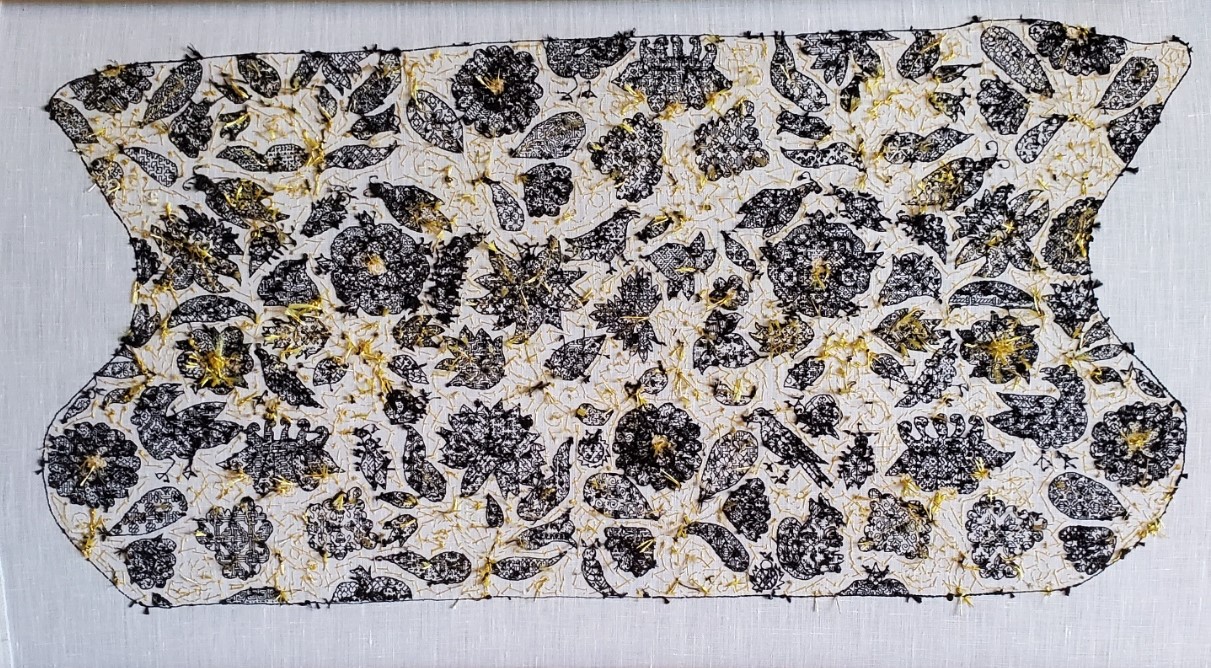
And of course the second post in this series. But for now, off to lion tame my dandelion mat of frizzy gold ends.
EVEN MORE ON AZEMMOUR
Yet another post only a stitching nerd will love.
Remember a while back, I pulled together some observations on the Azemmour Cluster? That’s a group of embroideries, usually known as fragments rather than whole cushions or other items. Those fragments were among the bits largely collected during the era of the Grand Tour (roughly 1870s up through World War I and on to the 1920s) when monied folk would do a season in Europe, collecting artworks and other items of interest. Needlework and lace collection were among those passions, along with other more traditional forms of art. Those gleaningss eventually landed in museums.
Since needlework fragments are not among the items most highly prized in museum collections, many remained in storage cabinets, with the donor’s provenance notes unchallenged. Or they did until museums began photographing these holdings both for their own use, and to post on line. At that time many of the attributions came under scrutiny, and did not hold up. In the past thirty-plus years I’ve been nosing these up, comparing them and making notes I’ve seen dozens of museum tags specifying stitches, dates, and places of origin change.
Among these collected and sometimes reclassified pieces were items in what some call the Azemmour Cluster. They were scraps sold to unwitting tourist-collectors as genuine late Medieval through Renaissance artifacts. But in actuality it does look like a lot of them, and a lot of the most represented designs in those museum back room cabinets, were produced in Morocco, with many dating to the late 1700s at the earliest, but most were likely made in the 1800s.
To be fair, the designs DO look like they express Renaissance roots. In the post above I even point out a piece that looks like it may be a predecessor. The Moroccan connection was known for some of these. Frieda Lipperheide in Old Italian Patterns for Linen Embroidery does point out that origin for some strips, noting their similarity to Italian designs.
Well, thanks to discussions in the Zoom meetings that are part of the Unstitched Coif project, a significant arguments strengthening the joint Moroccan sojurn of these designs has come to my attention.
Here are two samplers from the Victoria and Albert Museum’s collection. The images are theirs used here under fair use/academic auspices. The multicolor one is Accession T.35-1933, a 19th century piece from Morocco, stitched in silk on linen. Yes, most of the individual fragments of these designs are in monotone, usually red, but occasionally deep indigo, these two samplers with their collections of many designs are happy riots of color.
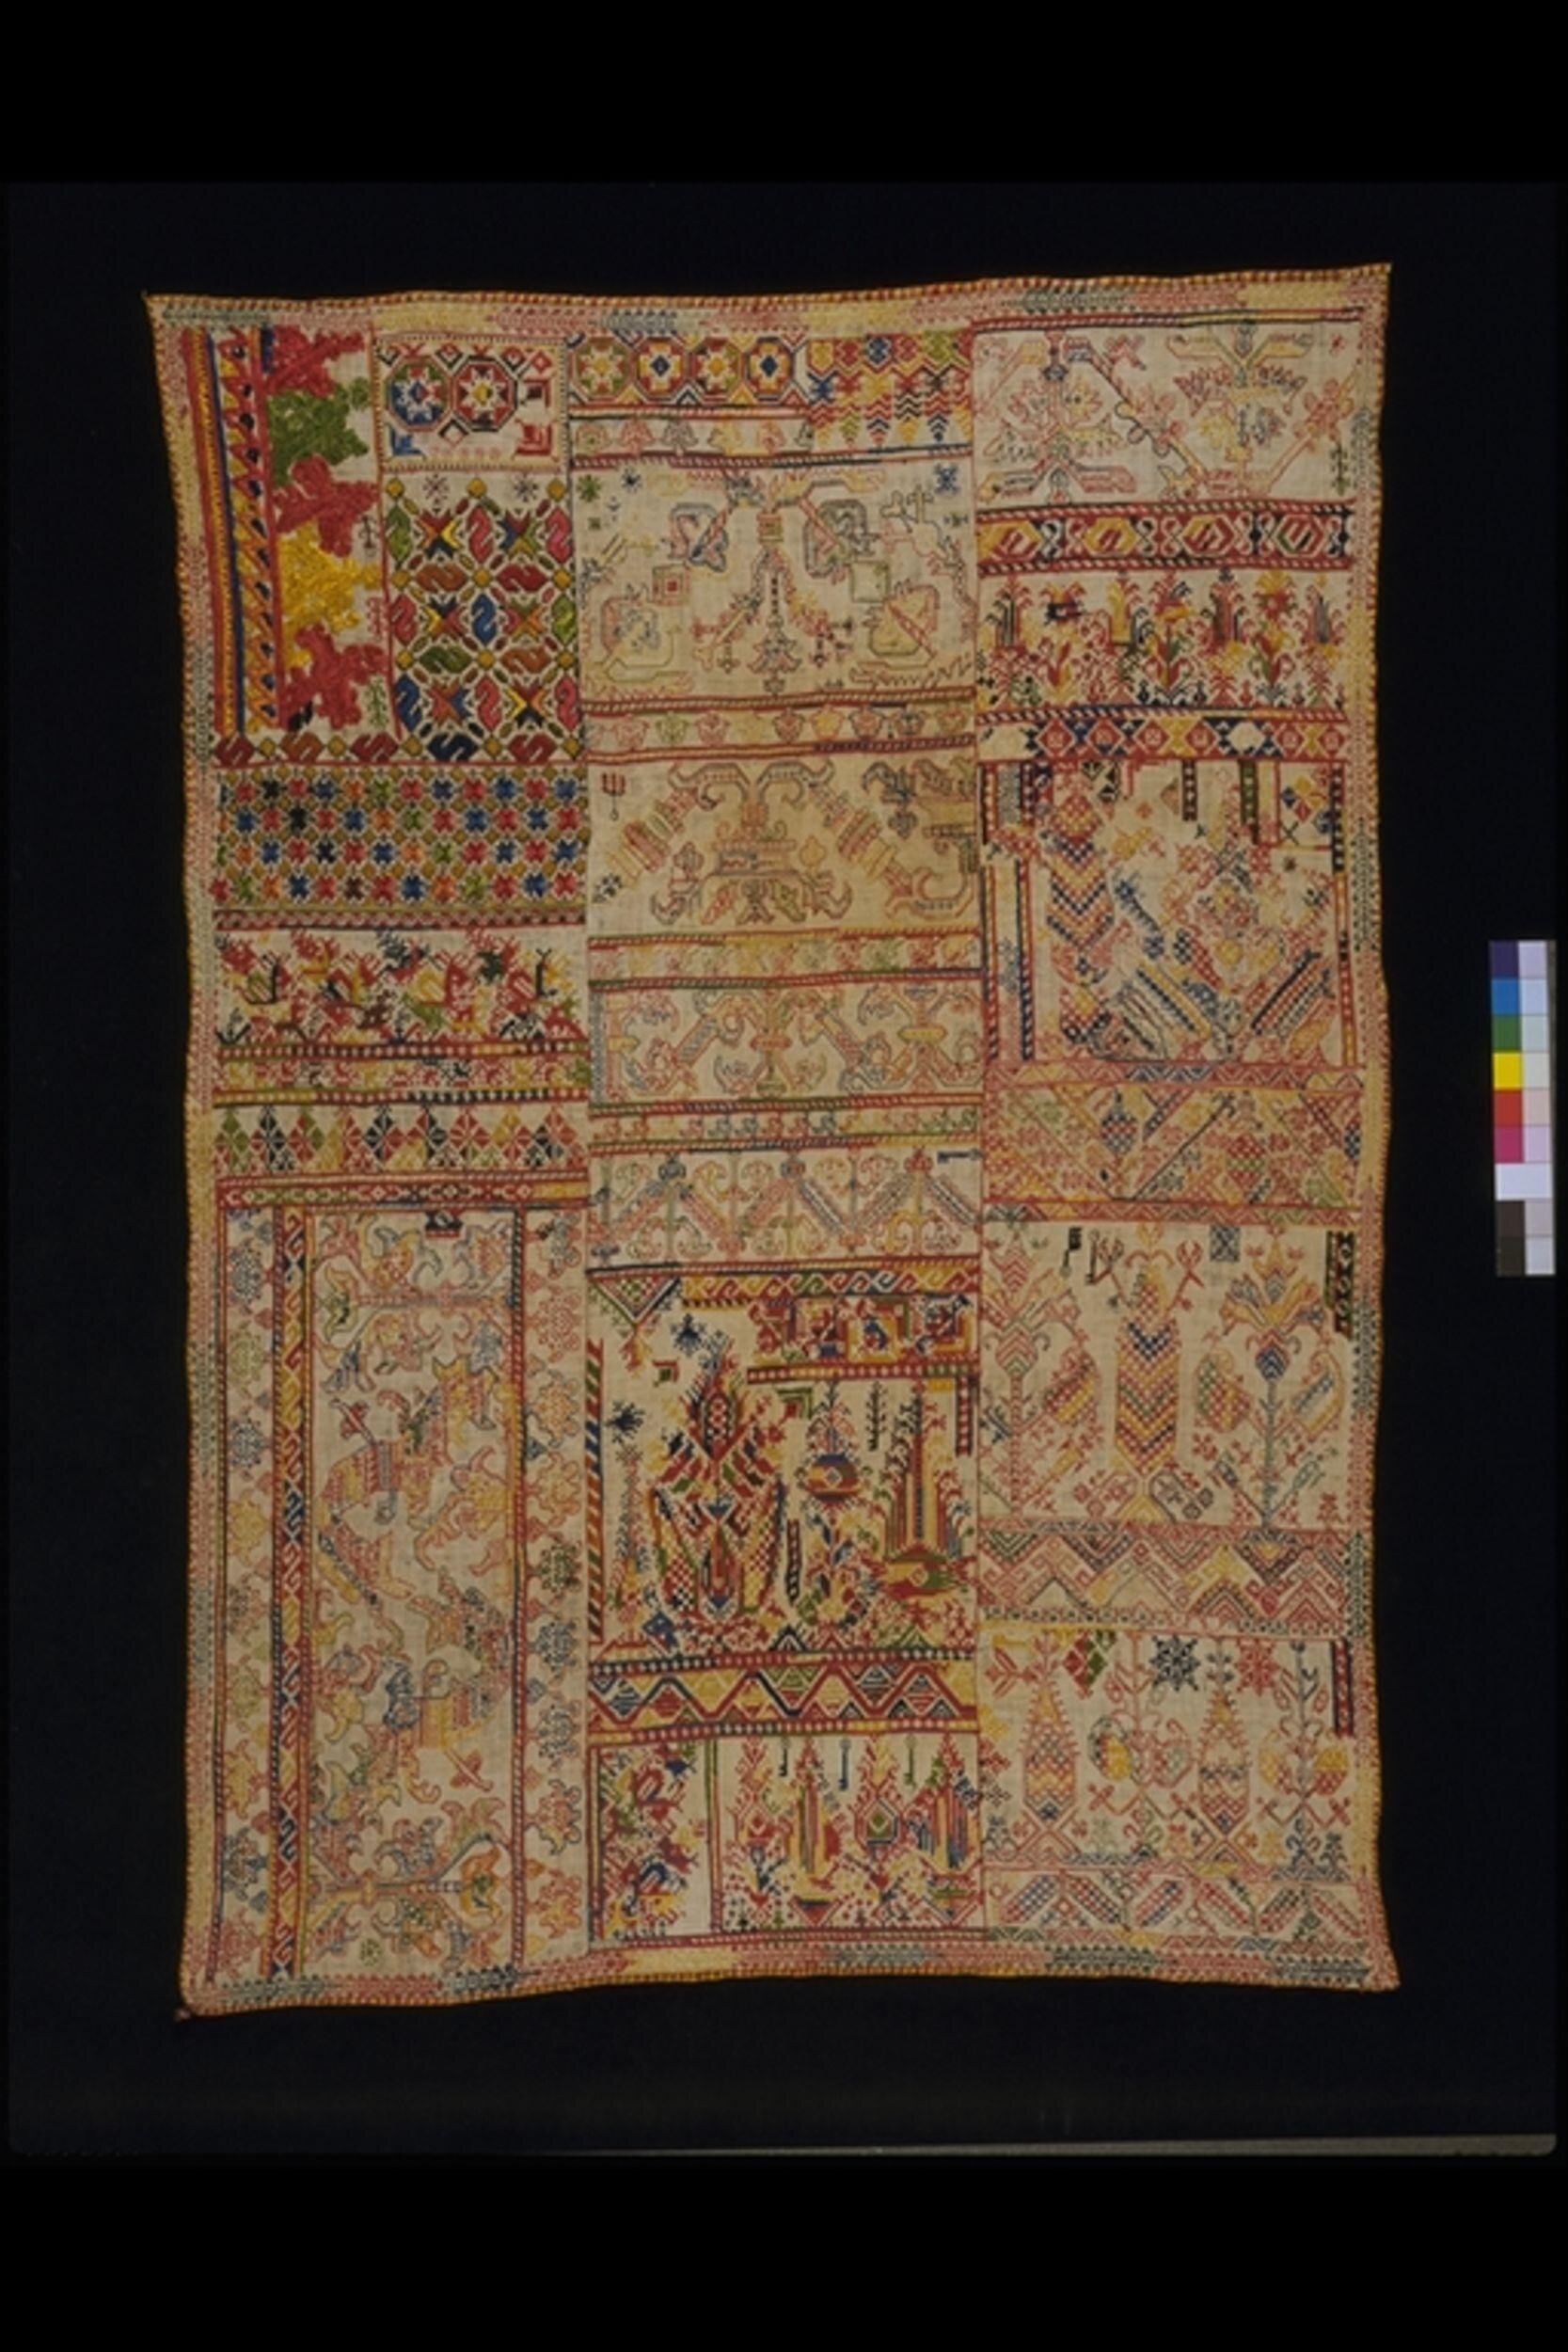
This black and white photo is also of a multicolor piece (Accession 372-1905), dated from the 1800s, and is also listed as of Moroccan origin.
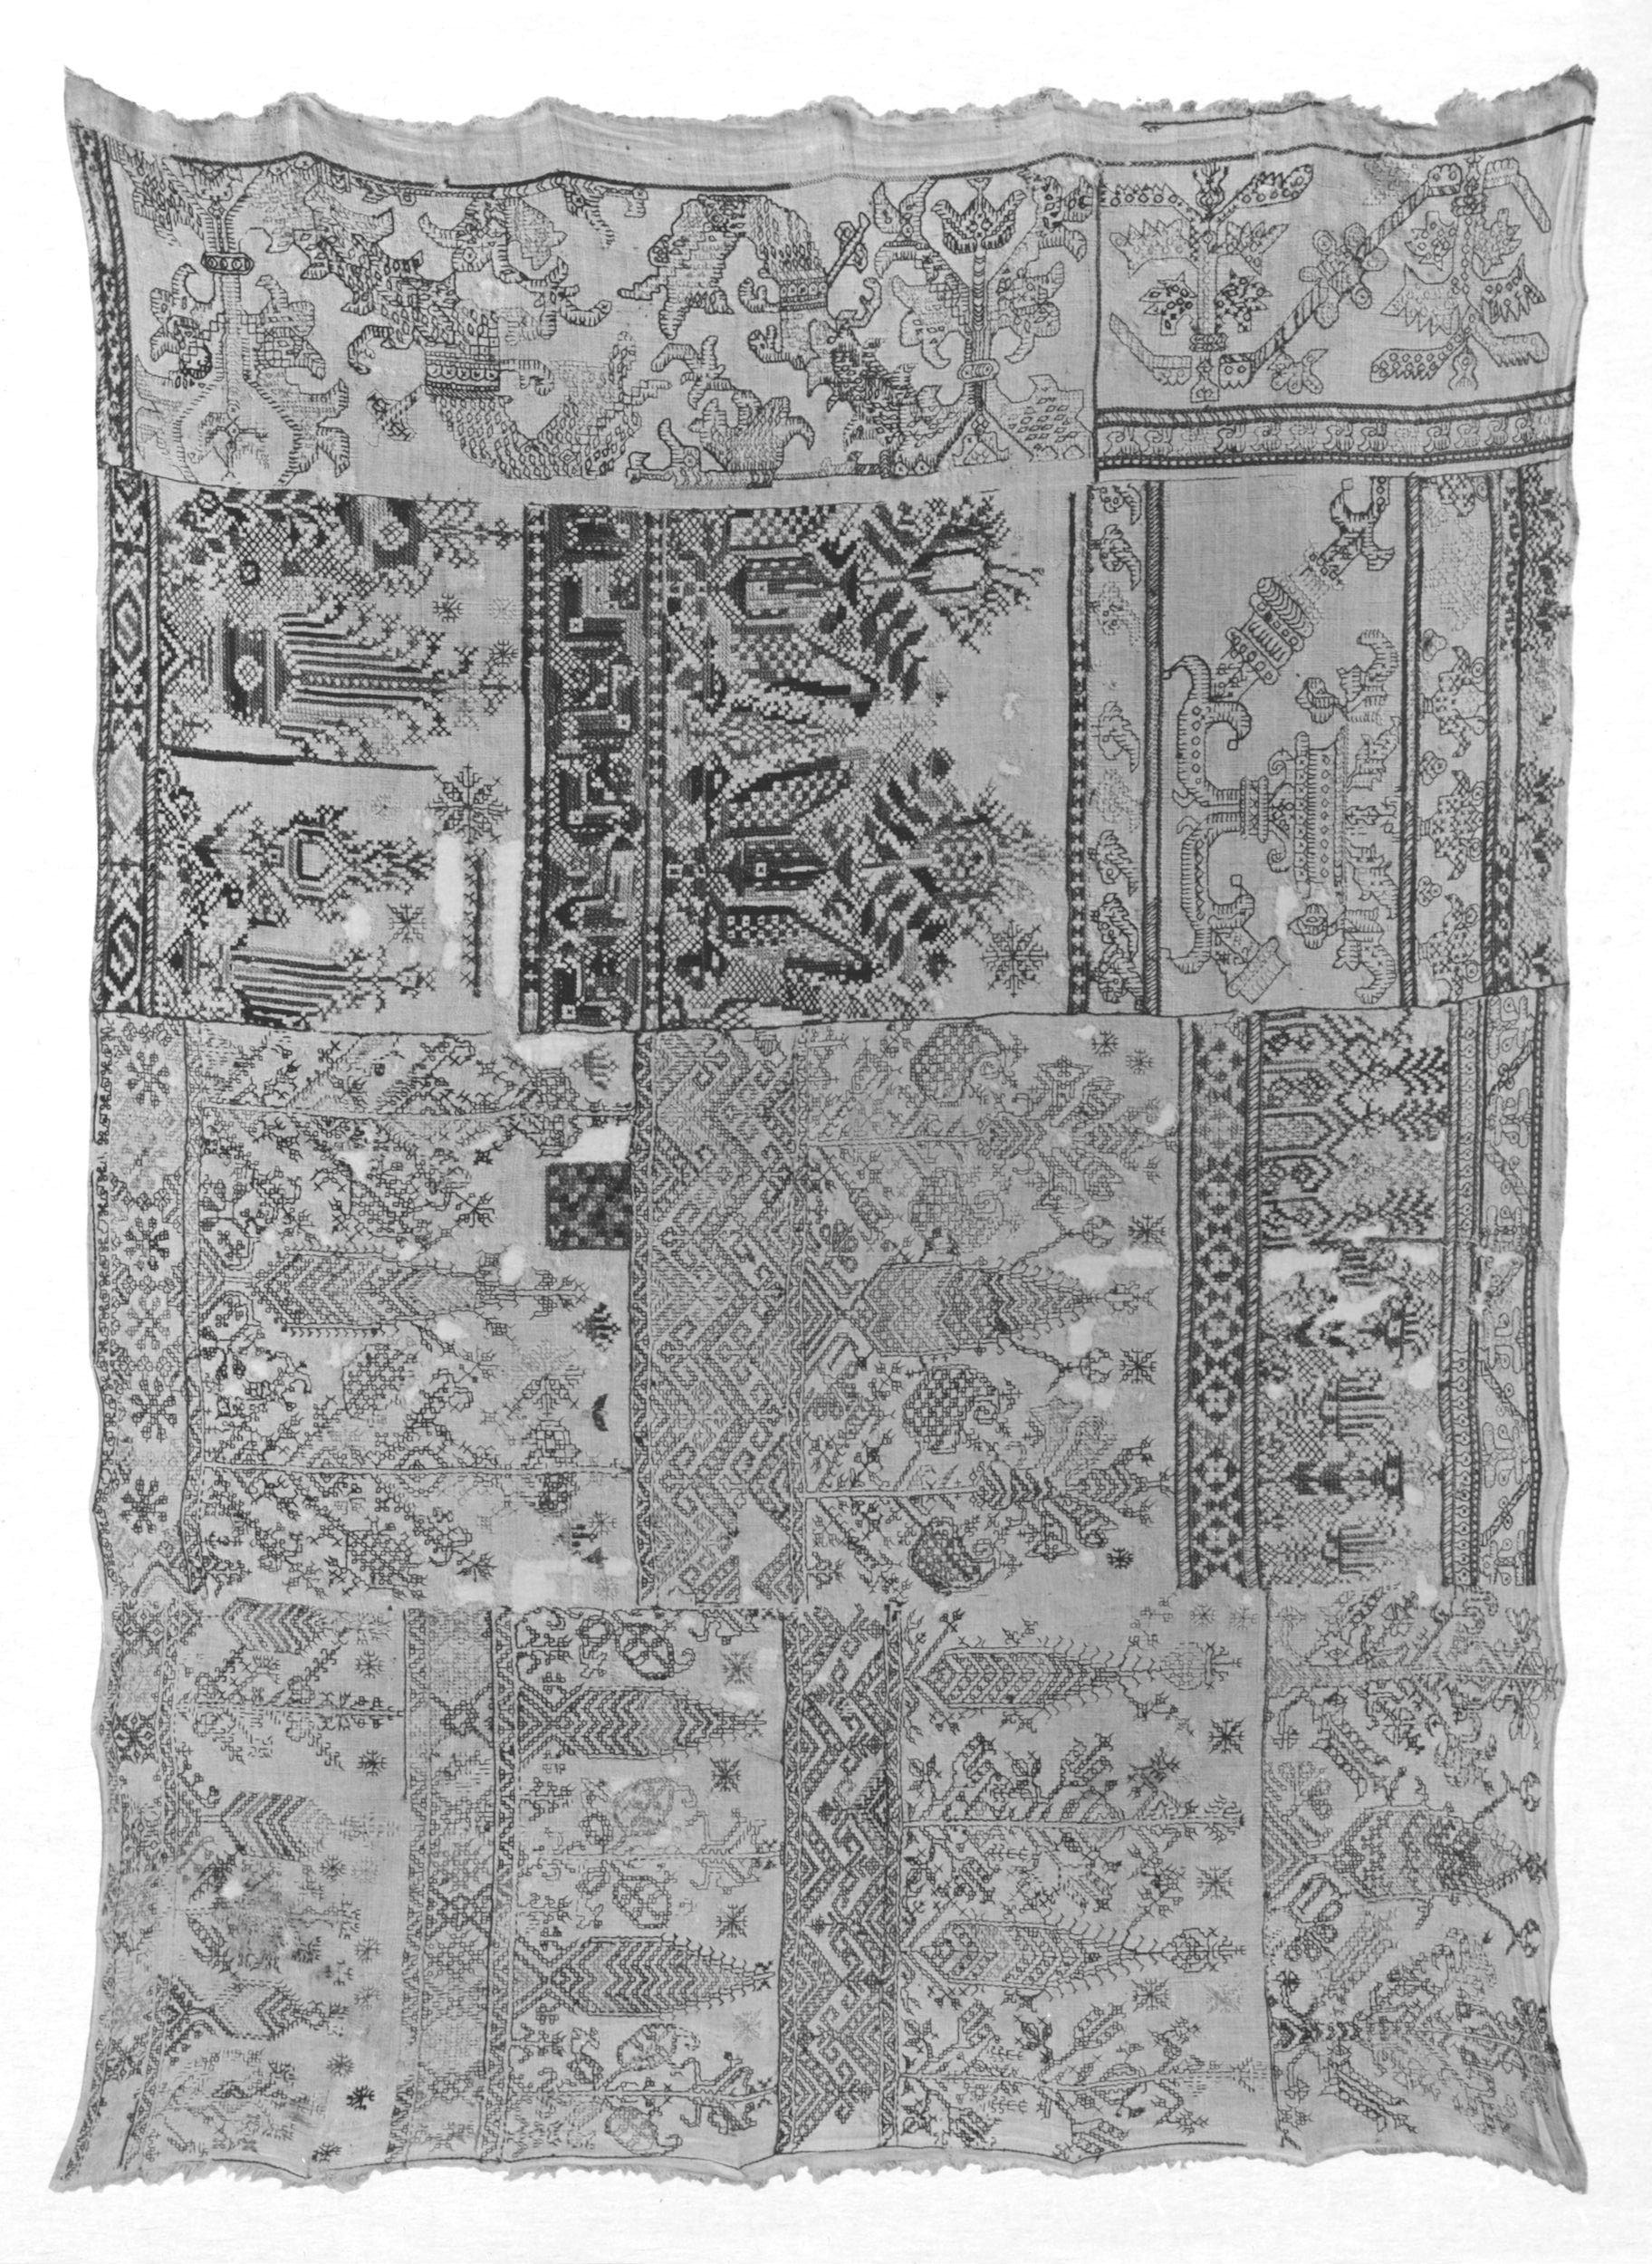
Both of these pieces contain two of the most common motifs in the cluster. This one is what I call the Spider Flower, for its spindly center blossom.
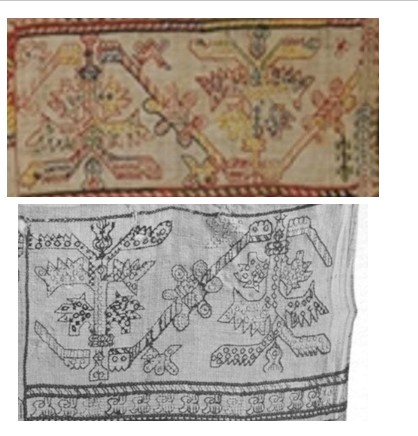
Here’s the second. I call it Wide Meander. This is found both with the wide strip looking rather sea-monster like with a gaping mouth, and in a tamer form, where the monsters have fused to become a super-wide belt like meander join. Discussions of both Wide Meander and Spider Flower are in my previous Azemmour post. Earlier musings on the Spider flower are here.

But these are not the only ones. The multicolor photo also has these two designs on it that I’ve discussed before.

The one on top is a variant of a pattern that is of Italian provenance. I mention it in this piece, and again in my discussion of voided grounds (under the boxed fill).
The one underneath I call the Pomegranate Meander. It’s clearly related to the Spider Flower, although in this case the ornaments on the joining diagonals are emphasized, rather than the center flower shape. It’s also mentioned in the Azemmour discussion cited earlier.
Plus it’s also worth noting that both of these V&A samplers show lots of variants of the customary accompanying borders so often seen with these main strip designs.
But for me the eye opener was the addition of another design to the group. Both samplers show the wide urn design.

This one I should have tweaked to based on the style of detail in the foreground. But I did graph it up for The Second Carolingian Modelbook based on this example from the Hermitage Museum, and accepted their identification as Italian, 16th to 17th century. Accession T-2714, entitled “Border Embroidered with Bowl and Stylized Plant Motifs” if the link breaks).

Here is my own rendition of this design, as I stitched it on my long green sampler.

Now we have a conundrum. We have many items whose dates and places have been corrected in museum collections. We have a continuing tradition of design replication and pattern re-use in a specific place. We have some predecessor designs and traditions that might have fed the Moroccan styles. And we even have some evidence of the post-Inquisition diaspora spreading these stitching styles TO settlements in Morocco. The Jewish link is cited by The Textile Museum of Canada. The Jewish Virtual Library notes the migration and community. The Jewish link is also mentioned here. The Textile Research Centre writes that production of Azemmour pieces died out in the mid 1900s, although recent revivals have been undertaken.
So where do we draw the line? Are these related items ALL to be reassigned to the Azemmour Cluster, with production dates in the 1700s through 1800s, sold to the unsuspecting as older artifacts? Are some possibly earlier, transitional pieces? Can we rely on just the wealth of ornament in the foreground of these strips to differentiate them from earlier forbearer pieces? Without detailed textile forensics, we may never know. But wherever and whenever their points of origin, it’s nice to see the family reunited again.
HALF A BIRD AND MORE ON WORKING METHOD
This poor little bird at the top had the bad happenstance of appearing on the edge line of the Unstitched Coif outline cartoon. He’s been horizontally bisected. I felt bad for him so I used an especially playful fill on his body.

Obviously I’m still soldiering on.

No doubt about it, 2×2 countwork on 70+ thread per inch linen moves along slowly. But I am about to hit two major milestones. The first is 50% completion. That’s just a couple of flower sprigs away. The second is consumption of my first full 100 meter spool of Au Ver a Soie’s Soie Surfine – the ultra-fine silk I am using for the fills. I have more than enough in reserve to continue on, so no supply side worries loom.
I’m now pretty well adapted to the magnifiers, but even so a forehead break every 20 minutes or so is needed. The headband mount stays seated in my optimum viewing range longer and and accommodates use of my usual bifocals, much better than using the glasses frame “arms.” Neither is comfortable, but I’ll pick discomfort + better sight every time.
I do wish that the magnifier would eat batteries more slowly. I only use the supplemental LEDs on the magnifier when working actual countwork in suboptimal light conditions. I don’t need the extra illumination when working the outlines or doing the goldwork and spangles. But even so, one set of three tiny coin batteries lasts for only about four days of stitching – roughly 14 to 16 hours. If I had a do-over I’d buy something with the same magnification levels, but that came equipped with a rechargeable light source. It would be very handy to plug it in each night and be ready for the next day’s stitching.
I still haven’t repeated fills between sprigs or insects (with one tiny exception). Folk have asked where I’ve gotten them, and how I use them (planning/choice and execution).
The sources for the fills I’ve used include the set painstakingly drafted out by our Fearless Leader, from close observation of select Actual Artifacts in the Victoria & Albert Museum’s collection. She has provided them as part of the tool set for this project. But I have to admit that the overwhelming majority of the fills I have used come from my own doodle notebooks, including the Ensamplario Atlantio series. Others I’ve improvised as I stitched, noodling up something unique to fill a difficult to render petal or bug body segment.
I reiterate that I am not sitting down and planning placements ahead of time. Nor am I drawing out the shapes on paper, then penciling in fills and stitching from those plans. I’m deciding on them as I come upon the spaces. Occasionally I get to a flower and say, “Hmm. Six segments, I can do six fills, three fills twice, or two fills three times.” Then I pick a treatment, and go looking for the first fill. In general I start with the largest segment of the design, pick something demonstrative for that space – roughly centering placement of the design by eye and working out from there; then select designs for the accompanying spaces to contrast or compliment. Take the Borage flower, for example:
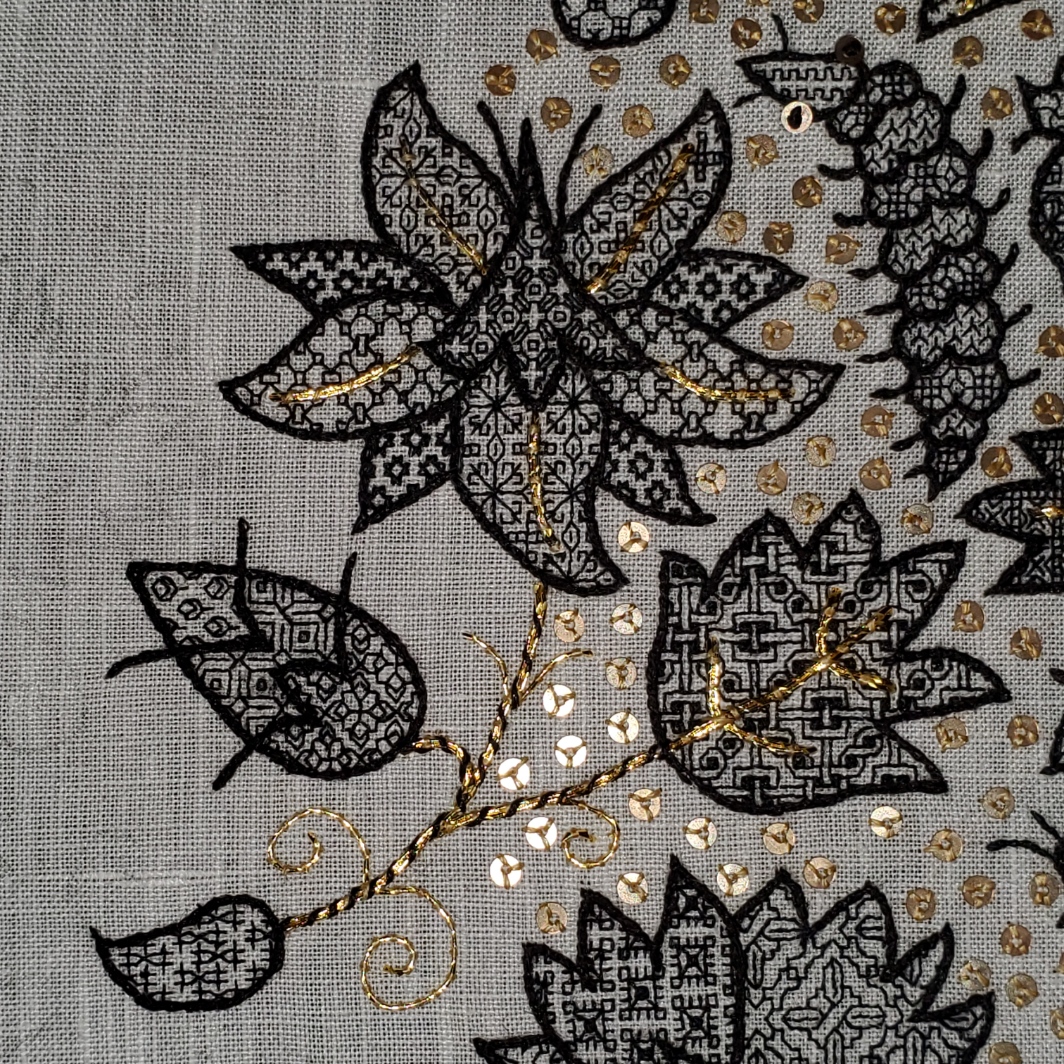
I started this one by doing the big leaf with the interlace fill. That one is from my doodle notebooks. It’s a grand fellow, and one of my favorites. I was waiting for a suitably large space to use it, so in it went. And no, I didn’t mind that it would be partly overworked with gold for the veins. It’s bold enough to stand up to that treatment.
Next I turned to the flower itself, starting with the largest downward extending petal in the center. I used one of the fills provided by the project leader, graphed from V&A accession T.230-1929, a sampler of fill designs. It’s six from the end on this page. It’s repeat is smaller than that in the leaf, but it still needs room to play. I also chose it because I liked the way its spiky linearity contrasted with the closed, boxy interlace nearby.
While I was working the first petal, I decided to divide the flower into a set of three petals, two petals, and four petal/sepals, and shade them so the set of four would be the darkest, and “recede” to the back. I worked the other two petals of the three-set with the same design I just completed, then went looking for a lighter, less dense one for the two-set, ending up with another from my doodle notebooks. It’s light and airy, and quite quick to stitch up. Although it uses a lot of lines and has squares, it is a nice complementing contrast with the first design, and it had enough space to let the design show. It was clear with these five petals done that the four-set would need to be significantly darker and smaller, but I didn’t want to do a tiny repeat because I’m saving those for the many-tiny-petals Marigold flowers. I found a small, dense one, again from my doodles.
With all of the petals done, I thought that a darker center “cone” was in order. I pawed through the project collections and my notebooks but didn’t see anything tasty, so I just improvised this final fill, starting with the familiar cross and circle base, and adding detail until I got the density I wanted. (I did add it to my current notes, though.) The feel of it is almost the opposite of the star-like fill I used in the four-set petal/sepals. Once the final fill was completed, I went back and worked the black raised outline in reverse chain, using two separable strands of a thicker four-strand silk floss, hand dyed by a friend of mine (a softer black from a historically accurate iron/tannin recipe).
On to the bud. All three of the designs I used in it are from my notebooks, although the bud design is very common, and a feather-line variant of it is in the project’s collection of designs from V&A Accession T.82-1924 (a cushion cover). Again, I picked three in ascending density from the base to the bud tip, looking for ones that contrasted both in tonal value and in composition. As per usual, the outlines were last.
The small paisley at the sprig’s base was last. Originally I had intended to use its fill elsewhere, but I decided to employ it as a stand-alone because it is Very Special. It’s from the project collections, drawn from V&A Accession T.12-1948 (a coif) by our Fearless Leader. It’s third from the end on this page.
It’s special because of the stitches used to form the center X in the double stirrup shaped motifs. Those are two 1 unit by 2 unit stitches, crossing in the center. I call them “knight’s move” stitches. They are vanishingly rare in historical count work, appearing most often as a component of eyelet type constructs, where many stitches radiate from a single center hole. But stand-alone? This is the FIRST time I’ve encountered one on an actual artifact or contemporary pattern graph. Yes, they are quite common in modern blackwork and strapwork because they add an angle to the designer’s toolbox. It’s a very useful and graceful angle that many designers employ to excellent effect (especially Banu Demirel of Seba Designs), but to my eye, they produce a different overall look and are a clear marker of modern design. So finding one here was like being slapped Monty Python style, with a flounder.
I shared the observation with our group leader, who I am sure is now on the lookout for other knight’s move examples. Until there’s a whole vocabulary of them though, I will view this fill as the exception that proves the rule, and continue to eschew anything but 45- 90- and 180- degree angles in my own design work.
Once all of the fills and their black outlines were done, I added the gold. First I couched down the doubled gold of the flower’s petal lines. Then doubled gold for the leaf veins/stems. I affix them all with small stitches of gold color faux silk. Leaf veins that meet up with stems are done as one length, with that center line being laid down first. I add the “crossbars” by teasing them underneath the centerline using a tiny thread crochet hook, then couching down their arms. Once all he double-strand work is done I add the single-strand gold curls. The final step is to whip JUST the stem portions of the sprig with two strands of the same Soie Surfine I am using single stranded for the fills. Those black stitches are not structural. They are just for effect, binding the flowers and leaves together and uniting the sprig and make it stand out from the ever encroaching flood of paillettes/spangles.
And yes, I will go back and add the gold curl at the tip of the paisley. But it encroaches too closely on neighboring design elements, and I don’t want to catch it as I stitch those. So it will be added later.
I hope this answers the questions about my “bungee jump” approach to this large and complex project. As with any such banquet, taking lots of small bites is a fun way to graze across the entire spread.
YET ANOTHER BLACKWORK PATTERN INTERPRETATION
A big thank you to the Facebook/Blogspot guru who posts at Attire’s Mind. Today he posted a painting from the collection of the National Gallery of Art, (Accession 1931.1.114 in case the links break). It’s a devotional image by Giovanni Battista Morini, and is entitled “A Gentleman in Adoration before the Madonna.” It’s dated to 1560.

The Attire’s Mind post called out the blackwork on cuffs and collar.
Of course I was smitten with the pattern and had to graph as close an approximation of it as I could. It’s got a bit of interpretation, but given that the original I am working from is paint and not countable linen, I think that relying on best-effort/logical construction that achieves the motifs using the least real estate is good enough.
This one is especially interesting because it looks like the artist went out of his way to depict two line thicknesses. These could have been achieved by using different stitches, or by varying thread thickness. I’ve tried to convey that look by using two line thicknesses in my chart. Experimentation with how to render this in real stitching would be lots of fun.
Now, I could save this along for eventual publication in The THIRD Carolingian Modelbook, which I’ve already begun compiling, but given my dismal track record of decade-plus production for each of that series’ two prior volumes, why wait?

You can click here to download this as an easy single page PDF file
It’s also available on my Embroidery Patterns page. Enjoy!
CRAWLING ALONG
My sort-of-weekly progress and lessons learned post about my Unstitched Coif entry. So you can see what’s new, I post the last general update photo alongside the new one:


I’ve added the rose, several bugs and a couple of leaves, a partial rose at the bottom edge, worked more of the stems and curls in gold, and seeded in more of the sequins once surrounding motifs were defined. I’m working on another leaf right now. And this means that I am almost finished with the first of the three tiled pattern print-outs. I’ll be moving onto the center sheet in the next day or so.
Obviously I am determined to make that completion deadline. I’ve been trying to stitch at least four hours per day, sometimes more if I can. Although we absconded to our place on Cape Cod for a long weekend, and I took my stitching with me. And there I had a grand time sitting out on our deck, working away in shaded sunshine and light airy breeze. Not too hot, and not too windy. (Thanks to the Resident Male for these live action photos).

It’s a bit easier to see in the following photo – I keep my left hand underneath and my right hand on top. I’m right hand dominant, but probably less so than many right-handers. My left is quite well trained at this point.

You can also see the magnifiers. I’ve found that they get less tangled in my hair if I wear them over a kerchief, rather than putting the headband directly over my pinned up braids. Yes, that’s one of the blackwork forehead cloths I stitched several years ago. It has worn like iron, surviving many washes, but I do now understand why forehead cloths are so often found bereft of their strings. This is the thing now, on its second set of strings (strips of linen, double folded and hand sewn), and this set is beginning to fray. Also note how the formerly crisp on grain right-angle triangle has changed shape under the stress of being worn. Another feature often seen in museum examples. More on the ones I made and the one I interrupted to do this blackwork project here.

In any case back to the Coif project.
As I’ve written before, stitching outside in bright but not direct light is amazingly better than stitching under the best available indoor lighting. A full spectrum lamp comes close, but even that can’t equal the absolute clarity evoked by outdoor ambient light. I will be working on my porches back at home, front or back, weather and heat willing for the best part of the day from now on.
The second thing is that hideous, tattered dark color pillowcase, pinned on to the top edge of my work, and hanging down behind. I have two – both way to destroyed for their original use. I use them as a double layer travel cover for this frame when I take it along with me. The travel cover I sewed is too small for this frame at max extension with lacing.
The reason it’s there is to limit light shining through the work. Unneeded light includes reflected light outdoors, light from the TV (often on while I stitch when I work indoors), or from other window or artificial sources when I am trying to stitch with my full spectrum light over my shoulder. Even outdoors with the sun behind me, having the dark “curtain” behind the work makes it just a tad easier to see the threads and aim accordingly.
I finish up with a detail shot of the creeping caterpillar. He’s my favorite insect on the piece, but he was surprisingly tough to do. There isn’t a lot of real estate in those heart-shaped body segments. I tried to find fill patterns that would contrast nicely both in tone and “spikey-ness”, and still be somewhat distinguishable in those tiny areas. I ended up using three – one for the face, and two alternating, for the rest of the body. The eyes are always fun. Where possible I’ve been using the same 2mm paillettes that spangle the ground for eyes, held on with French knots. Do you feel seen?
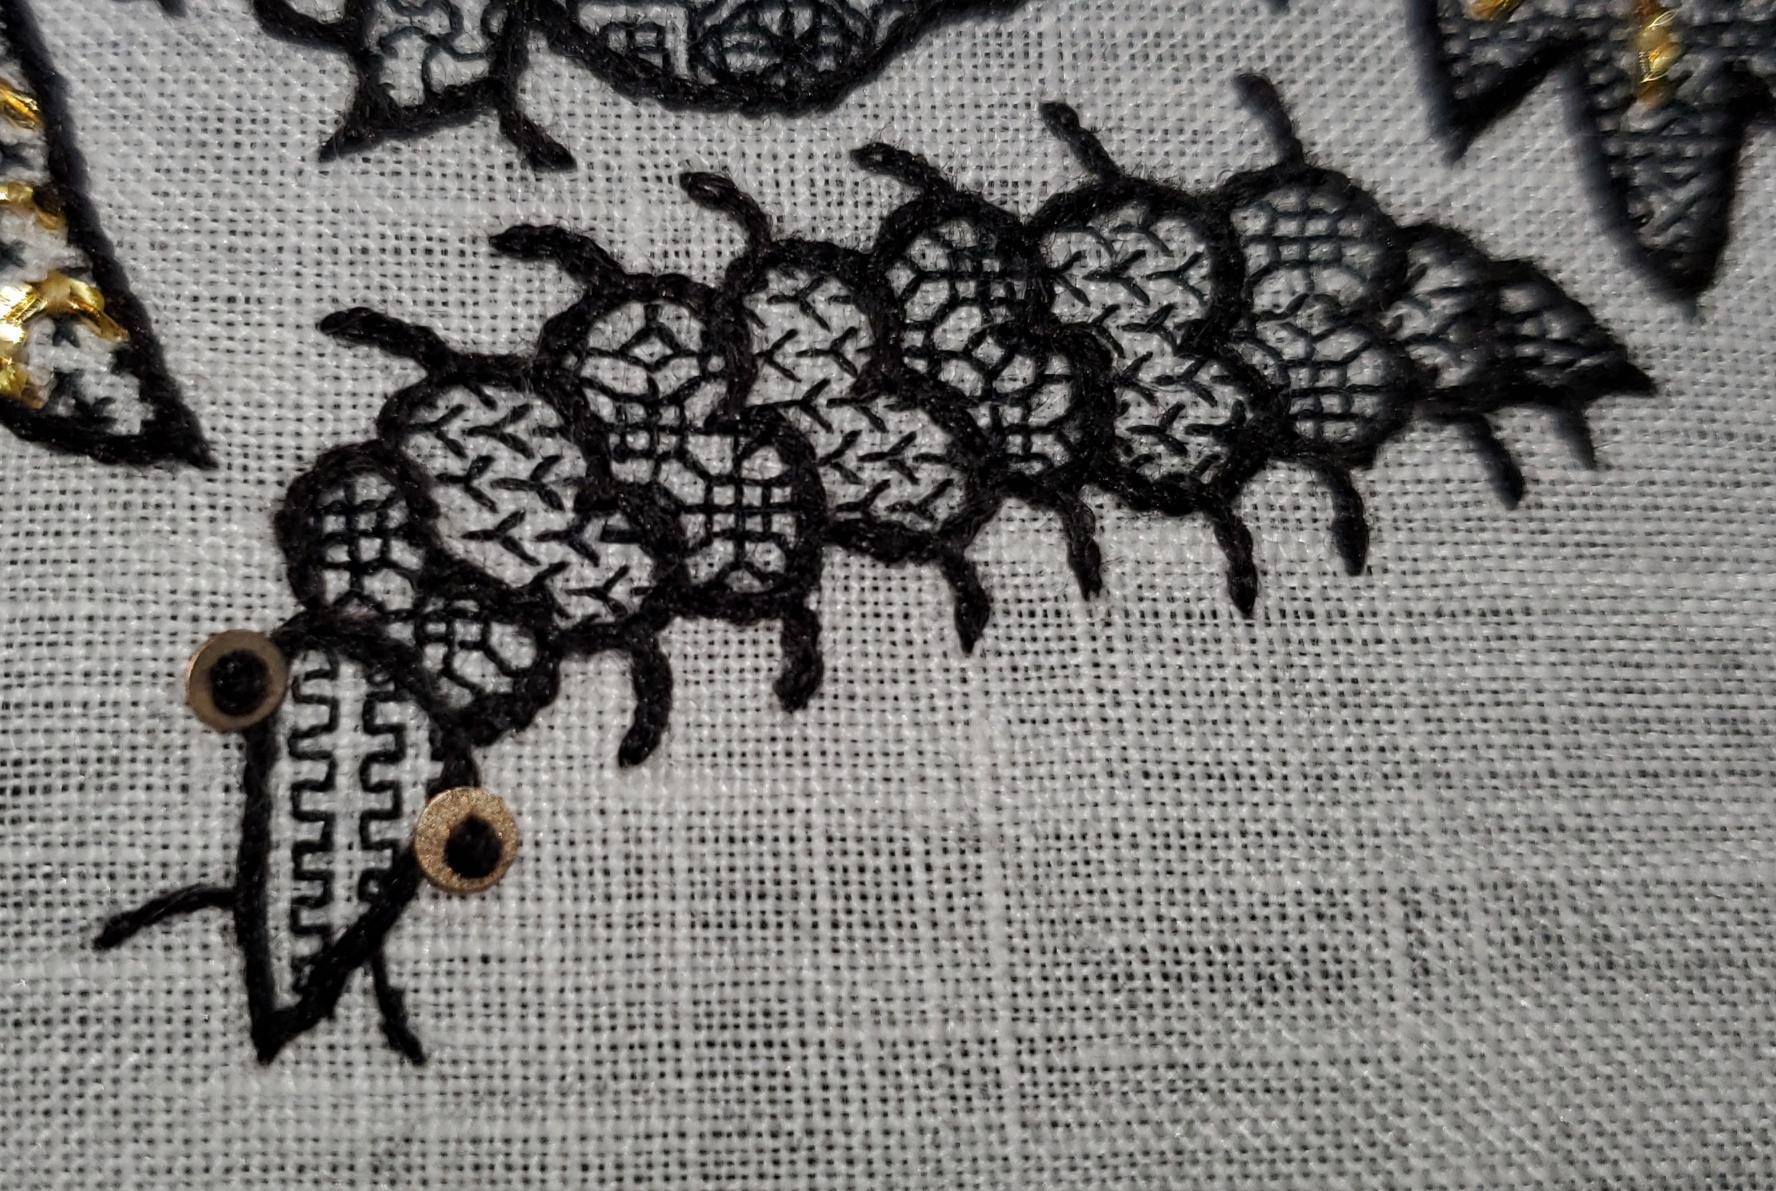
For the record, with one unconscious lapse (a repeat of plain squared fill in two tiny places), I have NOT yet duplicated a fill between design elements. A fill might appear twice in the same flower, creature, or leaf, but once that design element is done, I consider its fills “burned” and will try very hard not to use any of them again. That means even if a bug or flower repeats in the drawing, each iteration will have its own unique look. Or so I hope…
ENSAMPLARIO ATLANTIO – UPDATED
Back in 2011 I issued Ensamplario Atlantio – my first doodle notebook full of fill designs for inhabited blackwork. Many of those designs are also suitable for use as an all-over design or strip pattern. Back then many people had to cope with bandwidth restrictions which made downloading a larger file problematic. So I cut the book up into four pieces to mitigate the problem. Now in 2023, that need has passed.
I’ve taken the original book, corrected some mistakes and typos, added four new pages (24 individual designs), and stitched it back into one single file. Ensamplario Atlantio, Second Edition is now up and available for free download. Having the thing in one piece should make using it easier. And it will make keeping track of it easier for me.
So please click here to download and enjoy!
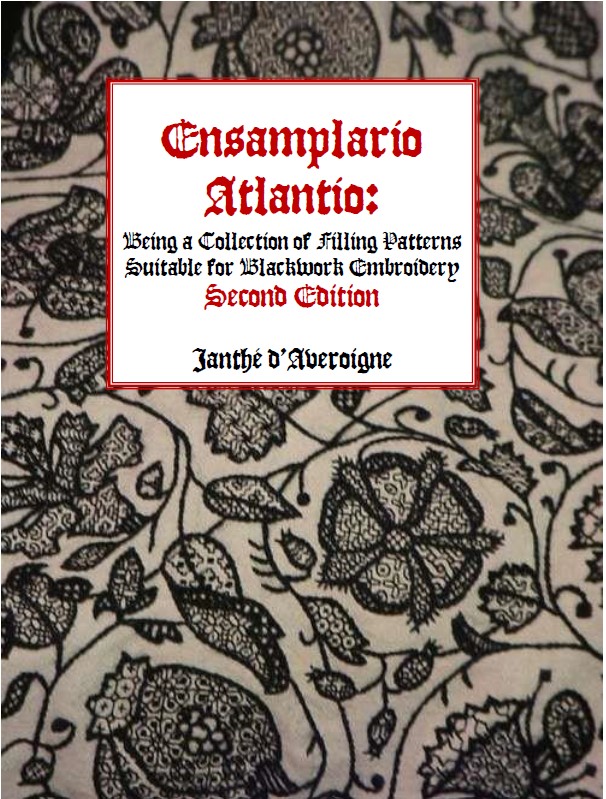
The sequel, Ensamplario Atlantio Volume II, with 200 more patterns including fills, bands, and yoke designs is also still available as a free download.
TIME CAPTURED
More progress on the Unstitched Coif project.
As for “Time Captured” – that’s what this piece is. Time ensnared by thread.
That raven-like bird took about six hours to stitch. The big carnation at the lower right took roughly 18, exclusive of its stem, leaf and tendrils. I took my first stitch on the coif on 16 April. A little over 7 weeks ago. I’d estimate that over those seven weeks I’ve put in between two and five hours a day stitching. The average is probably around 4 hours. So by conservative estimate, what you see here is over 225 hours of my time. And looking at the whole piece, I’m only about 20% complete. I’ve got to speed this up if I want to hit the deadline for submission to the exhibit. Oh, and for the person who brusquely offered to buy my coif when it’s done, I point out that I only have one rate for my time – my fully burdened professional hourly consulting rate. I hope you are prepared to spend in the six figures.
But I’m not complaining about the time spent. Every second has been fun, and a good deal of it has been spent “in the zone” where tedium and cares do not exist. For that it is a remarkably efficient source of centered self-therapy, that I am enjoying immensely.
And all in all, I am pleased with what I’ve put on the cloth. With the exception of the simple boxed filling for Big Bug’s head, which I also used for one petal in the half carnation at the top edge, I haven’t repeated any fills. I’m happy with the mix of light/dark; dense/sparse; and curved/angled fills. There’s one fill done at 3×3 threads, the first leaf I did, but it’s not a glaring problem and I won’t bother reworking it to the same 2×2 thread scale as the rest of the piece.
A few of the paillettes might have been better placed, but I’m not going to take the time to do it. I still need to add gold accents to the viola flower in the center, and to the wings of the largest insect. And I am considering picking out the gold bug antennae and bird feet. While they looked great before the great spangle-flood, they do get a bit lost amidst all the bling. If I do that, now is the time. There are only four bugs and two birds, with lots more to come in the remaining 80% of the piece left to go.
Working with the gold has been a challenge. It’s unruly, for starters. I had hoped to do one of the narrower Elizabethan plaited stitches for the stems and tendrils, but after blowing my budget on the Official Linen Ground, I couldn’t justify the expense of the amount of passing thread I would probably need, or the cost of “auditioning” several alternatives before I hit on the one best suited for the project. So I stash-dived and made do with the Japanese Imitation Gold #5 I bought and used for my Two Fish project. (The same project that introduced me to the 2mm spangles).

I tried, but couldn’t get the Gold #5 to work properly as a passing thread on this closely woven, fine ground. The metal strip around the outside unraveled and shredded, exposing the inner silk core. So I resorted to couching, and even that can be problematic.
While working it single or double stranded around the curves isn’t easy, it’s much easier if I employ the natural bend of the stuff instead of working against it. It tends to curl in one particular direction, and have a tighter bend radius in that direction. So I try to lay the thread to take advantage of it’s natural directionality.
Plunging – taking the ends of the stiff, couched gold from the front to the back of the work – can present problems. It’s especially difficult for tiny lengths of the gold, like the ones I did on the aforementioned antennae.
In plunging, you thread a “service needle” with a looped length of sturdy thread. You insert the service needle at the point where you wish the gold to end, catch the gold thread’s tail with the service needle’s loop, gently draw it tight, then make a short, sharp yank on the service needle, using the loop to pull the thread through to the back.

Above are two of the needles I use for this, with both the tiny #12 blunt point beading needle I’m using to stitch the fills, and the US and UK pennies I use for scale. I experimented with several, including larger tapestry needles before picking these. Not sure what they are, though. I found an unmarked paper of six of them in a box of assorted needlework oddities I found at a yard sale. The extremely smooth eyes plus is a bit of tiny variation in the size of the eyes and taper among them, which makes me think they might have been hand-finished, but I’ll never know. The polyester carpet thread I use for the plunging loop is extremely strong.
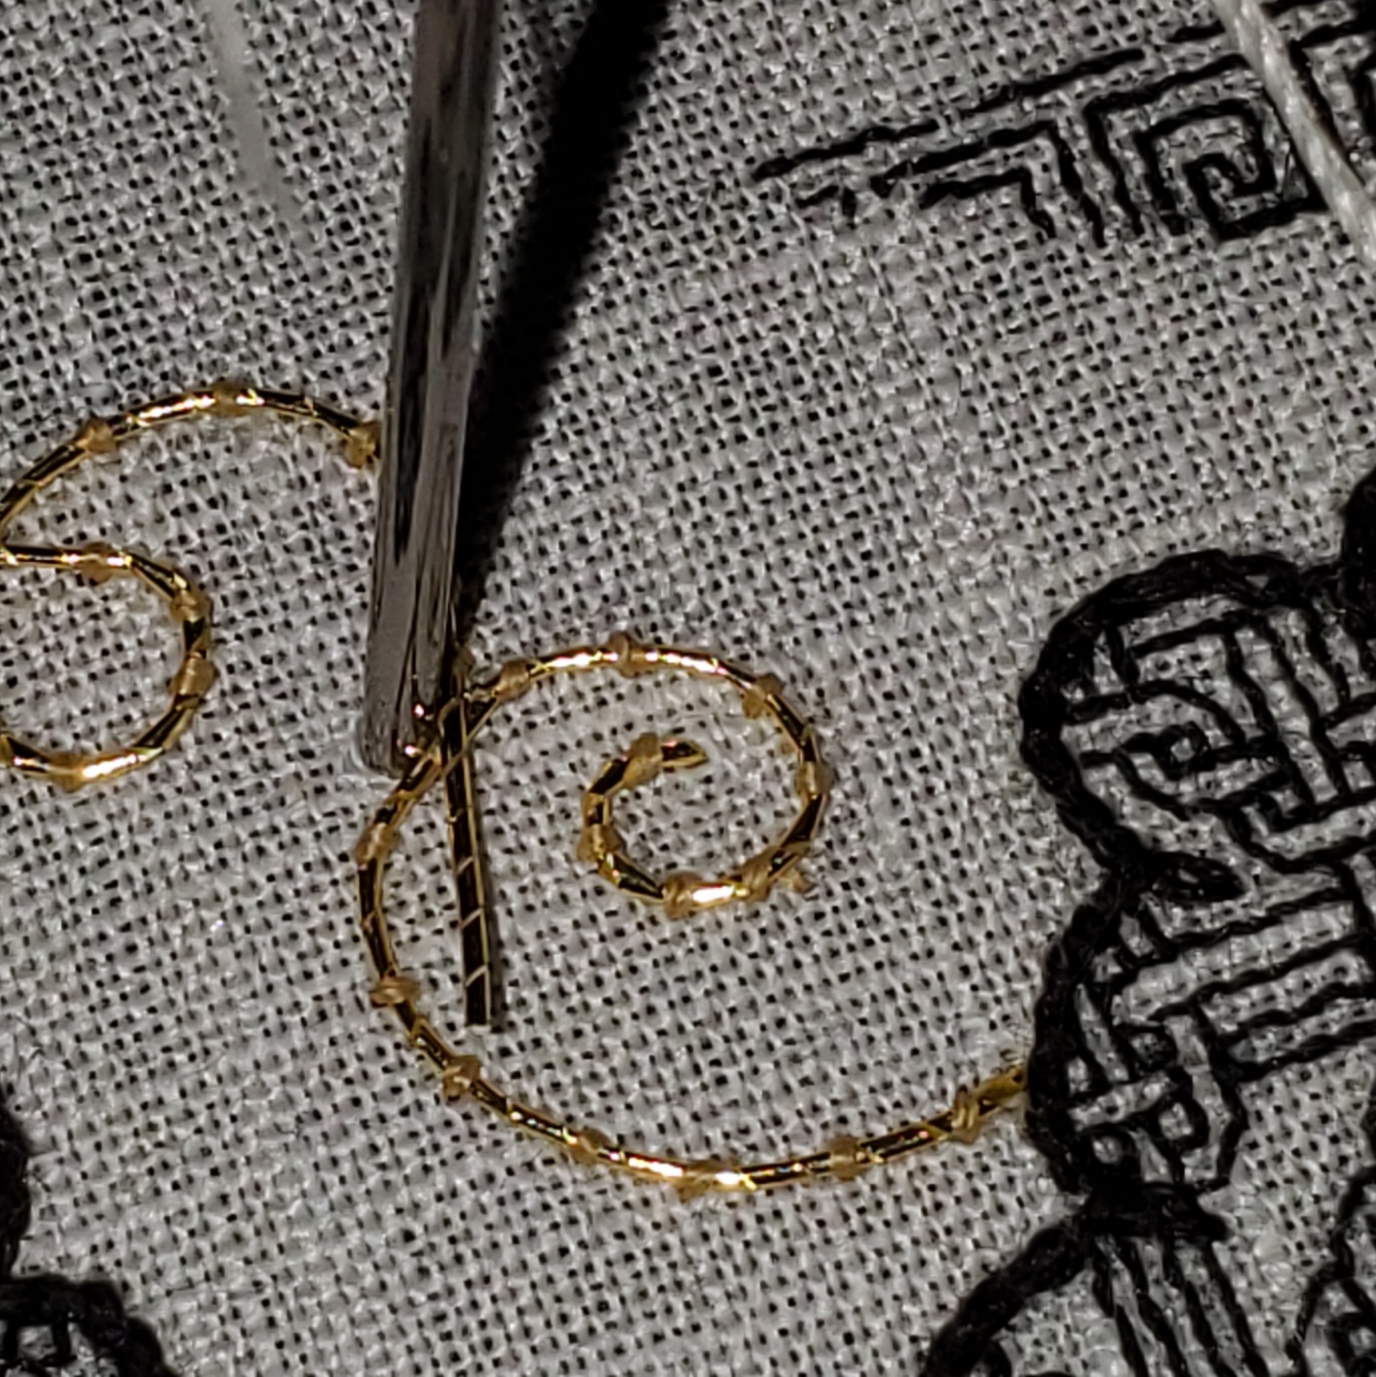

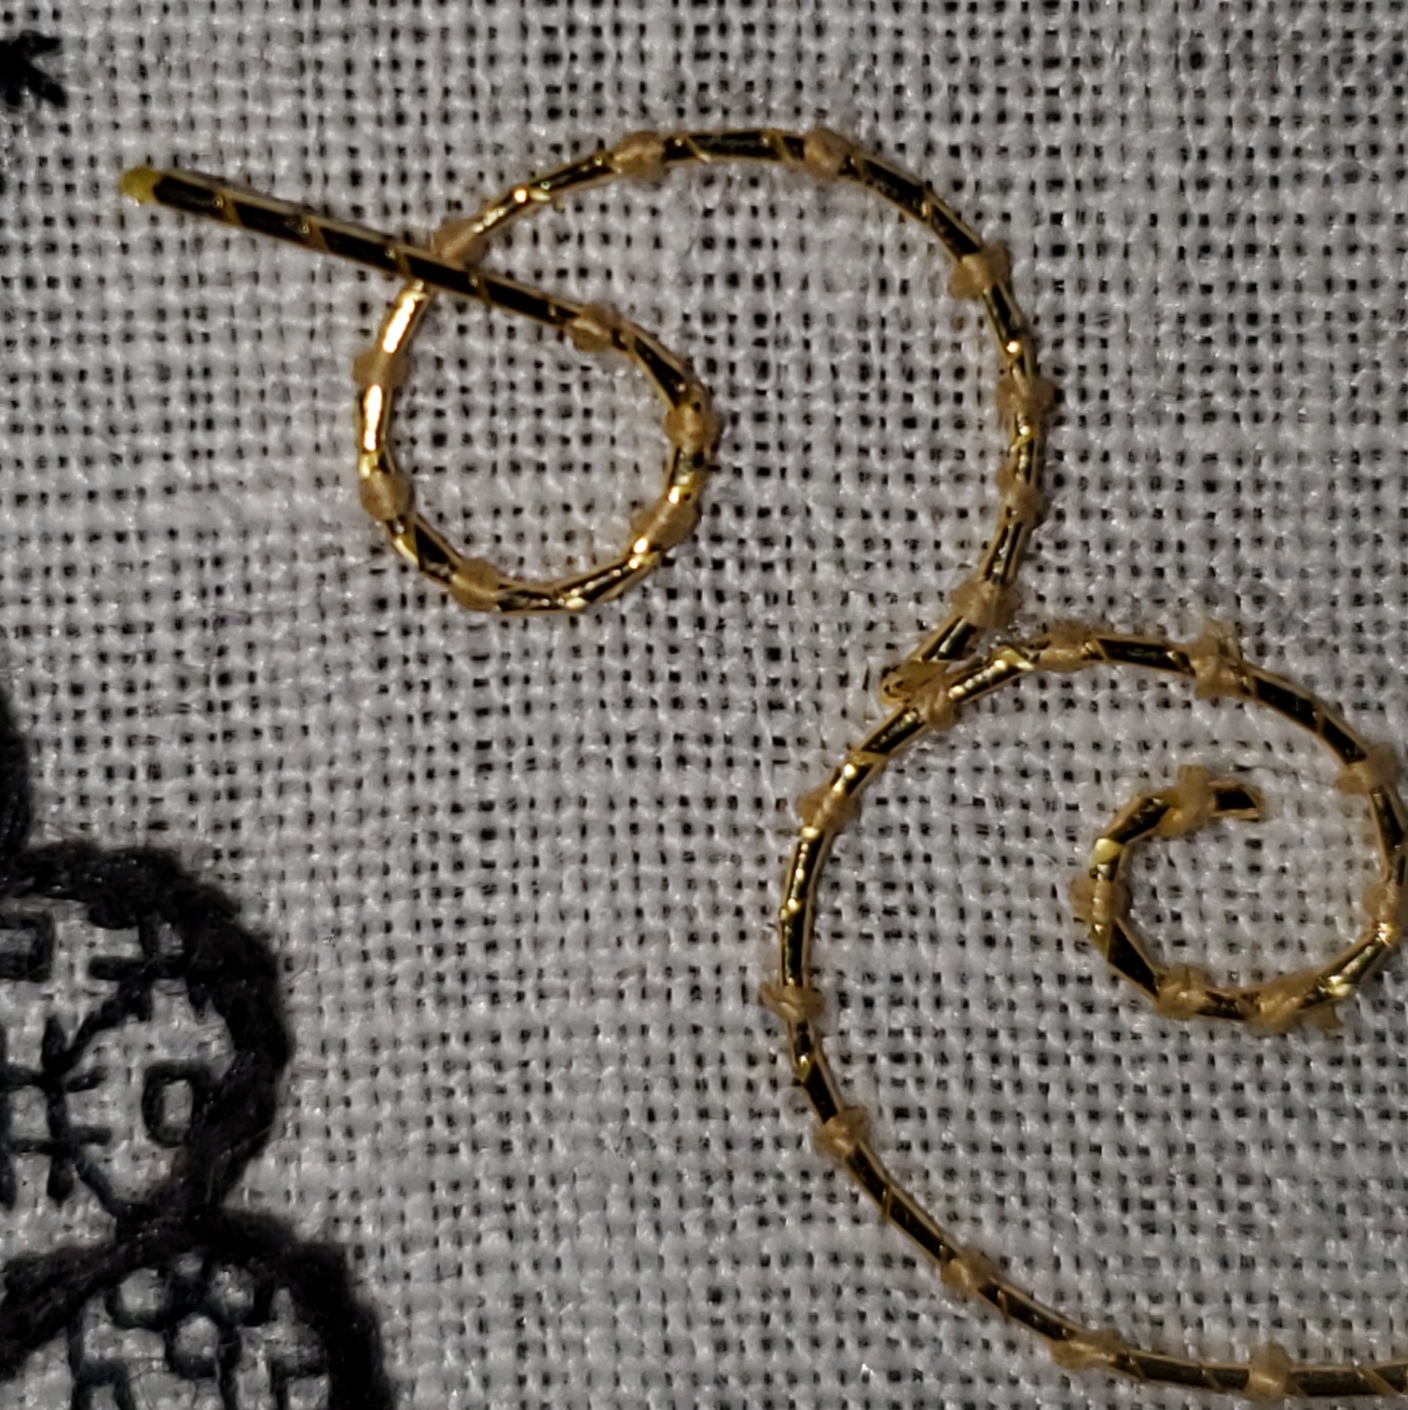
And an action sequence. At left, inserting my gargantuan needle into the spot where I want the gold to terminate. You can see how huge it is in comparison to the ground cloth weave. I go slowly, with the intent of pushing the weave threads aside, and not piercing them. The tail I am about to hide is the vertical bit adjacent to the plunge point. In the center, I’ve lassoed that tail and pulled it through my super-size, distended hole. The size of the hole helps avoid abrading and shredding the gold thread’s outer layer. And at right, the final result. I’ve used the tip of the plunging needle to ever so gently, stroke the ground cloth threads back into position. You’d never know that I had opened up a yawning crater there.
Why show all of this? Well, first to help those who might be considering using gold thread, but have had problems sewing with it. At no point in this process is my gold passed through the eye of a needle, nor is it dragged repeatedly through the cloth to form stitches. I hold it on the surface of my work, and use a needle with yellow silk to make tiny silk stitches, affixing the gold to the ground. I leave about a half inch (roughly 1.5 cm) gold tail when I begin my line of couching, then snip off the excess when I am done, leaving a tail of about the same length at the terminal end. Then I plunge both.
Second, to help explain why I am thinking of re-doing the bug antennae. Those are teeny tiny bits, most not even as long as the tails I leave to end off. No matter how tightly I stitch the yellow couching thread, about 75% of the time the act of plunging itself rips the whole bit of gold through the exit hole, right out of its affixing threads. It’s a major pain and production bottleneck. So in addition to those tiny bits visually disappearing into the spangled ground, I have great motivation for cutting that bit of detail from the rest of the work. I will replace it with the same simple reverse chain stitch in black silk that I used for the rest of the outlines.
Now to work up the courage to perform the surgery…
THE UNSTITCHED COIF TAKES A ROAD TRIP
Obviously I am still working on the Unstitched Coif project, and have a bit of progress over the past week or so. I might have had more, but we went to visit family in Buffalo, New York (about a 7.5 hour drive from Boston if you make no stops), and were too busy over the five days for me to steal more than an hour or two to stitch. We did have a great time, and got lots done – just not stitchy stuff.
I will report though that working outside in bright sunlight, even when sitting in the shade is the best illumination I’ve found. For those who look at fine stitching and wonder how folk in the pre-indoor lighting eras did it by firelight, candlelight, or tucked up next to a window, I would suggest that relying on natural sunshine is not a handicap at all, although it is time-limited by its very nature.

Yes, I am sitting in my mother-in-law’s garden, working the design upside-down. It’s upside-down for no other reason than when I first put my frame in the stand it happened to be in that orientation. I’ve just continued on that way. When work on the next vertical swath I may flip it over, but for now I’m just marching to the edge, which is now only a few design elements away.
Here are two clear progress shots, first showing the whole area I’ve done (about half of the first pattern sheet as displayed magnet-tacked to my work, above). Plus a detail shot of the latest bits.


A second, larger bird has joined the first, along with the multi-petal flower with its leaf, the rather odd looking columbine (the bit with the three gold petal ends) and some of the foliage, curls, and spangles that surround them. I’m now working on the first of two large grape leaves below the columbine. This area features some larger shapes to fill and I am having lots of fun with them by using some larger, more complex fills. The interlace currently being worked in the grape leaf looks complicated, but once the rhythm of the thing is started, it’s really quite logical.
And I am still on target for not repeating a fill between units. With one tiny exception, while the same fill design may appear more than once in a pattern element like a flower or a bug where a design may inhabit more than one petal or body segment, once that element is done I consider that fill to be “burned” and have not repeated it again. I suspect this will be more of a challenge as I move along, especially in the smallest spaces where there is little play for the more complex repeats.
In any case, I wish I were further along, but I’m also pleased with the progress to date. Gotta stitch faster, I guess…
LONG-LOST TWINS, PART VII
Today’s my birthday, and needlework friend Barbara posted a snippet to my Facebook feed of a voided panel showing couples dancing. That bit of fun led to more digging on my part. I knew of similar panels in a couple of places, so I decided to do another of these posts that only a needlework geek could love.
First, here’s the one that was most prominent in my notes. It’s in the collection of the Rhode Island School of Design (RISD), accession 47.199. They attribute it as Italian, circa 1600, and cite both the ground and the stitching as being cotton. I have some doubts about the materials citation, but I’m not an expert and haven’t seen the piece up close and personal. I do note however that it would be one of the two easiest examples of this family to chart.

It’s hard to see, but the ground appears to be in that tightly pulled Meshy stitch I’ve written about before. I do not know if the foreground and outlines are done in double running or back stitch. There’s no other info on working method or object purpose. But I sort of suspect that this might have been part of household decor – possibly a bed valence or decorative cover sheet, remotely possible – a tablecloth, but for that I would expect to see a butted corner, and not the arbitrary unworked bit at the extreme right of the stitching. It is interesting to see the tease that confirms my working method – there’s a tiny bit of the foliage on the “room divider” at the right edge that was outlined, but the voiding wasn’t worked up and around that little bit of outline, leaving it orphaned and alone. More argument for this having been displayed with that selvedge bit tucked away and unseen, as I would expect for the upper hanging around a bed.
In any case, here are some relatives. First a piece from the Boston Museum of Fine Arts, accession 38.1104. They cite it as 16th century, and Italian, worked in red silk on linen. Looks like the Meshy background to me.

You can see that the design is very close, but isn’t spot on exact. There is a different treatment of detail in both the foliage divider and the castle tower divider. The border (if there was one) is also gone, but we can’t judge that in absentia. There are also lots more small bits and bobs surrounding the dancers and the little guy in the RISD sample. The male figure has traded his crowned turban-line hat for a lush head of hair. And the little guy looks to be better dressed. I’d be tempted to call him a page in this version and possibly a cupid or eros figure in the RISD piece, due to the bit of arrow fletching? sticking up over his shoulder. And although I haven’t counted the units, or investigated closely enough to see if the thread count of the two grounds are even, the MFA’s snippet does seem to be a bit compressed north-south, compared to the RISD one. But not uniformly so. The upper bodies appear to be less squished than their lower halves.
And the third – this one from the Cleveland Museum of Art, Accession 1929.840. They note their piece as being done in silk on linen. It’s pretty clear that this one is in Meshy, too.

Based on very strong similarity between this piece and the MFA holding, I suspect these might have been true siblings, pieces from the same original, cut apart and sold to two separate collectors, which then ended up in two different museum collections. In fact if you compare the right edge of the MFA piece, and the left edge of this one we can see a bifurcated page boy – it is pretty likely that we are looking at the exact snip line where they were separated. As an aside, I like the little unfinished bit underneath the lower left leaf of the foliage divider, at the left edge of the piece. Again, confirmation that outlines were laid down first, then the background was worked.
This one is in the Metropolitan Museum of Art in New York City, accession 47.40. They call it “Border” and cite it as being Italian, and 17th century, worked in silk on linen.

Their original photo is a bit fuzzy, but it’s pretty clear that this piece is possibly another section of the same original that furnished the RISD snippet. Not only are the borders and proportions intact, but the small details of crown/hat, arrow, interior detail on the dividing motifs, and even the dress border of the woman dancer is identical.
And to wrap up, I have one more snippet in my notes. This is also from the MET collection, accession 07.62.58. They cite it as Italian or Greek, 17th century, and note that it’s silk on linen. They rightly describe the meshy ground as drawnwork.

By now you should be familiar with the details of this design. Yes – it looks closer to the CMA and MFA snippets than it does to the RISD and the other MET holding. But there are some subtle differences. The ground line is most obvious. In the other two non-bordered bits of this variant, the stitchers have taken more pains to keep a stable bottom edge of the stitching. That’s not to say there aren’t deviations from that on both pieces, but on this one is is far more evident. There are also some other minor differences in detail on the dividers and on the dancers’ outfits. Now I suspect that it was not uncommon for a very large project like a set of bed hangings to be worked by multiple stitchers. Even if a master laid down the outlines and had a crew working “clean-up” behind, filling in background and detail, a large team working quickly might make these minor copyist errors. I don’t think that there is enough difference here to clearly claim that this has no chance of being a piece of the same original as the CMA and MFA fragments.
So to sum up, I do think that two original artifacts furnished all of these bits. And I would go further to posit that the unbordered one might have even been unfinished prior to its dismemberment. I thank the collectors of the “Indiana Jones” era for heading off on their Grand Tours, and bringing back these pieces. I thank the museums for hanging onto these rarely studied snippets, and for posting photos of them on line, so we can speculate about their origin. And I thank Barbara for flagging the dancers for my birthday.
I return you now to regularly scheduled, non-boring Internet content. 🙂

