STAYING BUSY
What have I been doing of late? Well, being lucky, I can work from home, so that’s been taking up most time, especially with major deadlines in the past week. In the time that’s left over, I have to stay busy, and not as a sacrifice to the “cult of productivity.” Mostly because unless my hands are occupied, my thoughts wander to dark places.
I have subdued a reluctant sewing machine and run up some face masks for my family:

I’ve been knitting a pair of socks from a gorgeous ball of yarn I had put away as being “too good for socks.” Well, I deserve nice things, too.

I’ve done some casual research, and found another rendition of The Old Castle design, dated to 1590-1610. I added it to my round-up of the designs in that family.
And I’ve embarked on a new stitching project. It’s a curious one that has no short explanation behind it, and in a way – it’s the ultimate FanGirl project.
As I’ve mentioned before, The Resident Male (pictured above) writes prime SF/fantasy. He is currently working on the second book in his Blair and Terendurr series. One of the delights of living with an author is that you get to read the output long before it escapes into the wide, wide world. And if you are really lucky, parts are read out loud to you as they are completed.
One of the stories in the forthcoming second book features a rather unusual band of confederates. I can’t go into more detail because I don’t want to post spoilers. But they have a motto in an other-worldly language, “Lucus Orthai Ta,” which translates roughly to “Life’ll kill ya.” I thought it would be fitting as his #1 fan to make a present for my author: an embroidery of this phrase, framed with The Dance border I posted here last week.
I started by combing through my usual haunt for unusual alphabets, Ramzi’s Patternmaker Charts collection of near 100 year old Alexandre, Sajou and other pattern booklets and leporellos, The one I picked is the third one on this page. They don’t get much more baroque or difficult to read than that set of squiggles. Perfect for an alien language.
And so I present the start – working out from the center and in cross stitch for the lettering, on 44 count almost-evenweave linen in “art silk,” it will take me a while to get to my skeleton army in double running stitch. But I will…

As for the story, you are just going to have to wait for him to complete the second book. It will be worth the wait!
BOOKMAKING 110: THE GRAND FINALE
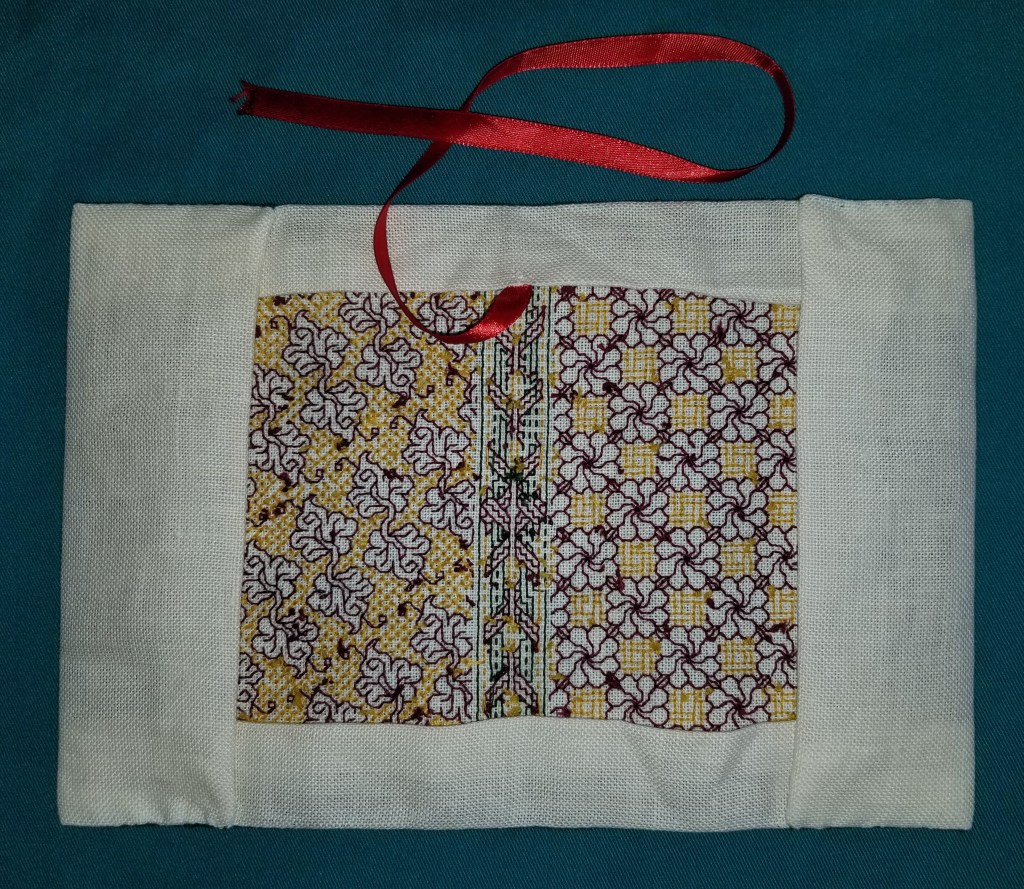
And just like that, the cover is finished and mounted on the target book:

And pix of the thing off the book, Here’s the outside, with everything finished off and sewn flat:

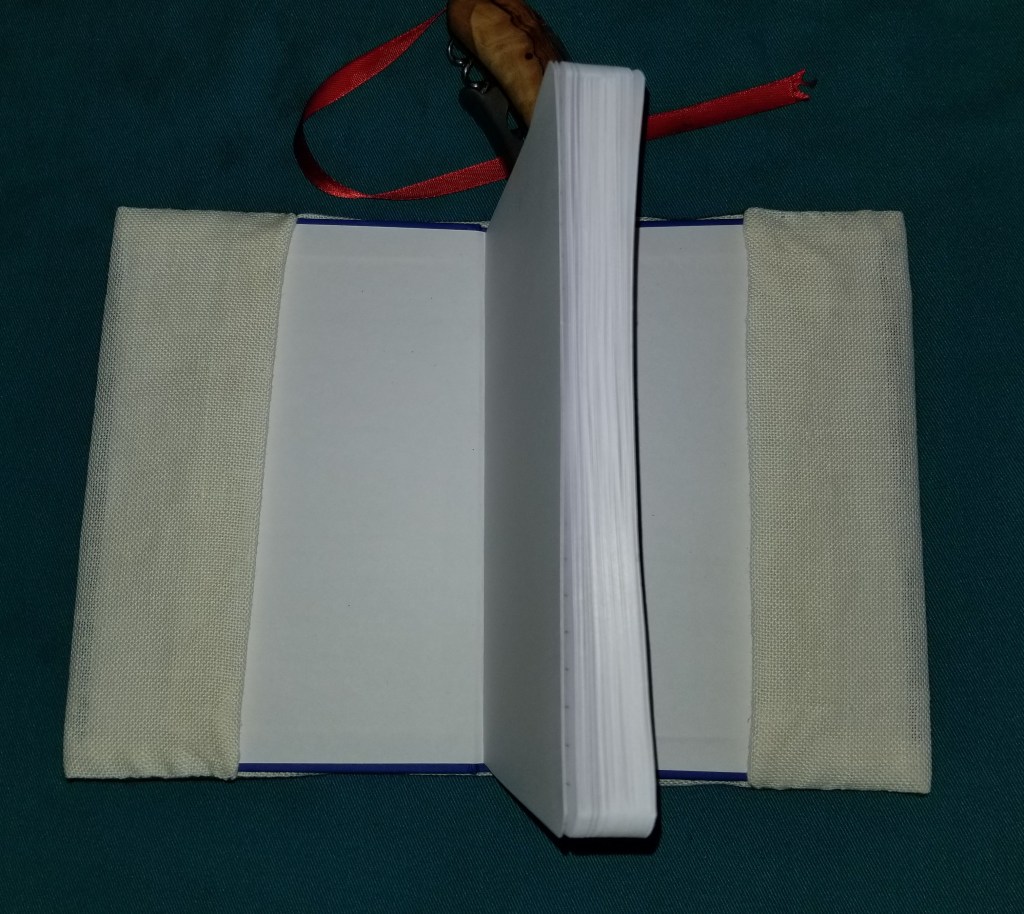
And the inside (with my reverse in all its messy splendor):
To clarify what was done:

- As shown above, first I folded in the top and bottom flaps, but I didn’t bother to hem them – I just made sure that the raw edges were covered. There will be no wear and tear on these flaps, so there was no need to protect them further.
- Then I folded in the left and right flaps. BUT in this case, because the book covers may slide in and out of the stitched jacket (if the recipient decides to feature the other side as the front cover, or ever replaces the book itself) – I did hem them for stability.
- The next step was to stitch the placeholder ribbon to the underside of the top flap. I left it extra long, so that it could be fished out and used, no matter which of the two sides of the embroidered jacket were deemed to be the official front.
- After all four flaps were prepped I stitched the edges of the left and right flaps to the top and bottom edges of the book cover’s front.
Now that last step can be done in several ways. The easiest is a simple whip stitch or invisible hem. But I never take the easy way out. Instead, I went back and extended the green double running line that defines the top and bottom edge of my stitched area out along my fold. I couldn’t put the thing back into the frame, so I did it in hand. Then having two green lines established, I used the same green embroidery floss to work them together, following (more or less) the logic that people who make biscornu use to seam together the two squares that form their curious little pincushions. A good tutorial for that is here.

The image above shows my wobbly last minute double running stitches, and how I united them front and back to make a heavier edge seam.
Finally, having done all of the finishing work, I slid the book’s own covers into the flaps of my stitched jacket. Here you see them in place, with the handy help of a large corkscrew, since I was running out of hands to hold everything in place.
And so, taaa daah! A small book with a nifty cover. A stitched project that doesn’t take up wall space, that can be adapted to any size book you have on hand. Embellish a devotional book that means a lot to you; or at the other end of the spectrum, disguise a racy novel for discrete subway reading. Use any pattern that tickles your fancy. Or several if that’s what speaks to you. But whatever you do – enjoy, be creative, and feel the pride in coming up with something that’s specifically and personally meaningful to you.
This concludes my stitched book jacket tutorial. Please post questions if you have them – I’ll do my best to answer.
THE DANCE
UPDATE: The Dance is now available as an easy PDF download via the Embroidery Patterns tab, above.
More free patterns. My stress abatement in this time is to doodle and design in addition to working on my own stitching and knitting. The designs below will eventually be part of a future work, but for now, I am sharing it as a broadside, so others whose stress abatement is stitching have ample food.
But before I present the pattern, some discussion. The main strip in this broadside mini-collection started out as a special request for a Danse Macabre design. I did it up, with some personally significant secondary motifs also requested, and delighted the recipient. But I wanted to play with it a bit more. I’ve changed it up somewhat, removed or changed the personal bits, and added a corner and secondary framing strips. And then having a partially empty page and an abhorrence of wasted space I just kept going, adding an unrelated border pair featuring swords and dart-like shapes, and as a lagniappe, a lemon meander. All are of my own design. The inspiration for the main strip will be evident in a moment.
Back to the Danse Macabre – that’s an allegory image from the 1400s and early 1500s. It’s something that appears in both religious and secular works, and is usually interpreted as a strong caution that no matter one’s station in life, wealth, or age – life is fragile, and all should be mindful of both mortality and the transitory nature of human vanity and pleasures.

But I have to say that I reject that morbid and moribund classical framing.
Instead, and in the current context, I look around. I hear about neighbors doing what they can to help each other. I read about people with talents – musicians, actors, artists of all levels of fame and proficiency – sharing what they can of themselves to enhearten, inspire, and entertain a frightened world. I witness the bravery of front line first responders and medical personnel, and the selflessness of many people in vital industries. I see many more small acts of kindness than I do malevolent and spiteful actions (although those latter ones do affect far more people proportionally per incident).
Now I see those dancing skeletons differently. They dance in defiance of mortality. They celebrate life in the face of danger and death. Living for others, to protect the lives of others, is the ultimate act of rebellion against an implacable enemy.
So, for all reading this, don’t break discipline. Keep away from others as much as possible. Heed the calls to do your part for community health. And if you are so inclined, feel free to stitch my Dance, with the joy with which I present it.

I make this file freely available for YOUR OWN PERSONAL, NON-COMMERCIAL USE. (NOTE: CHART IMAGE UPDATED ON 22 APRIL 2020)
As with my other offerings of late, this is “good-deed-ware.” Pay this gift forward by helping out someone else in need; phoning or getting in touch with a family member, friend or neighbor who could use a cheerful contact; volunteering time or effort; or if you can afford it – donating to one of the many local relief charities or food banks that are helping those displaced from work.
Finally, some notes on the patterns. In true historical style, the lesser framing borders have absolutely NO count relationship to their larger main motifs. This means that a square or rectangle of the Dance, which will meet up neatly at the corners provided full iterations of the repeat are used, will NOT be neatly framed by the plume flower or inner band, with the corner of the plume band guaranteed to present as shown. The same thing goes for the swords and companion darts. THEREFORE, I strongly suggest working the main band first to establish the width of your project. Then starting the companion border from the corners, and working it towards the center MIRRORING the corners and the direction of the plumes (or darts). When you get to the center of the work, fudge it.
The easiest way to fudge is to stop with the last full presentation of the plume or dart, symmetrically on the left and right of the center, then place a box in the “leftover” area around the center line. You can fill that box with your signature or a date. Or you can design a little supplemental motif to fill that space. And if all else fails, write to me or comment below with your problem area’s count, and I’ll see if I can help.
Stay safe and stay busy. And above all stay well!
HARSH LANGUAGE FOR HARSH TIMES
UPDATE: This pattern is now available as an easy-download PDF file, via the Embroidery Patterns tab, above.
I start with a gallery of finishes. Sanity saved! Smiles spread! (Think what you must about the phrasing – I’m happy that my goal of preserving both have been achieved).
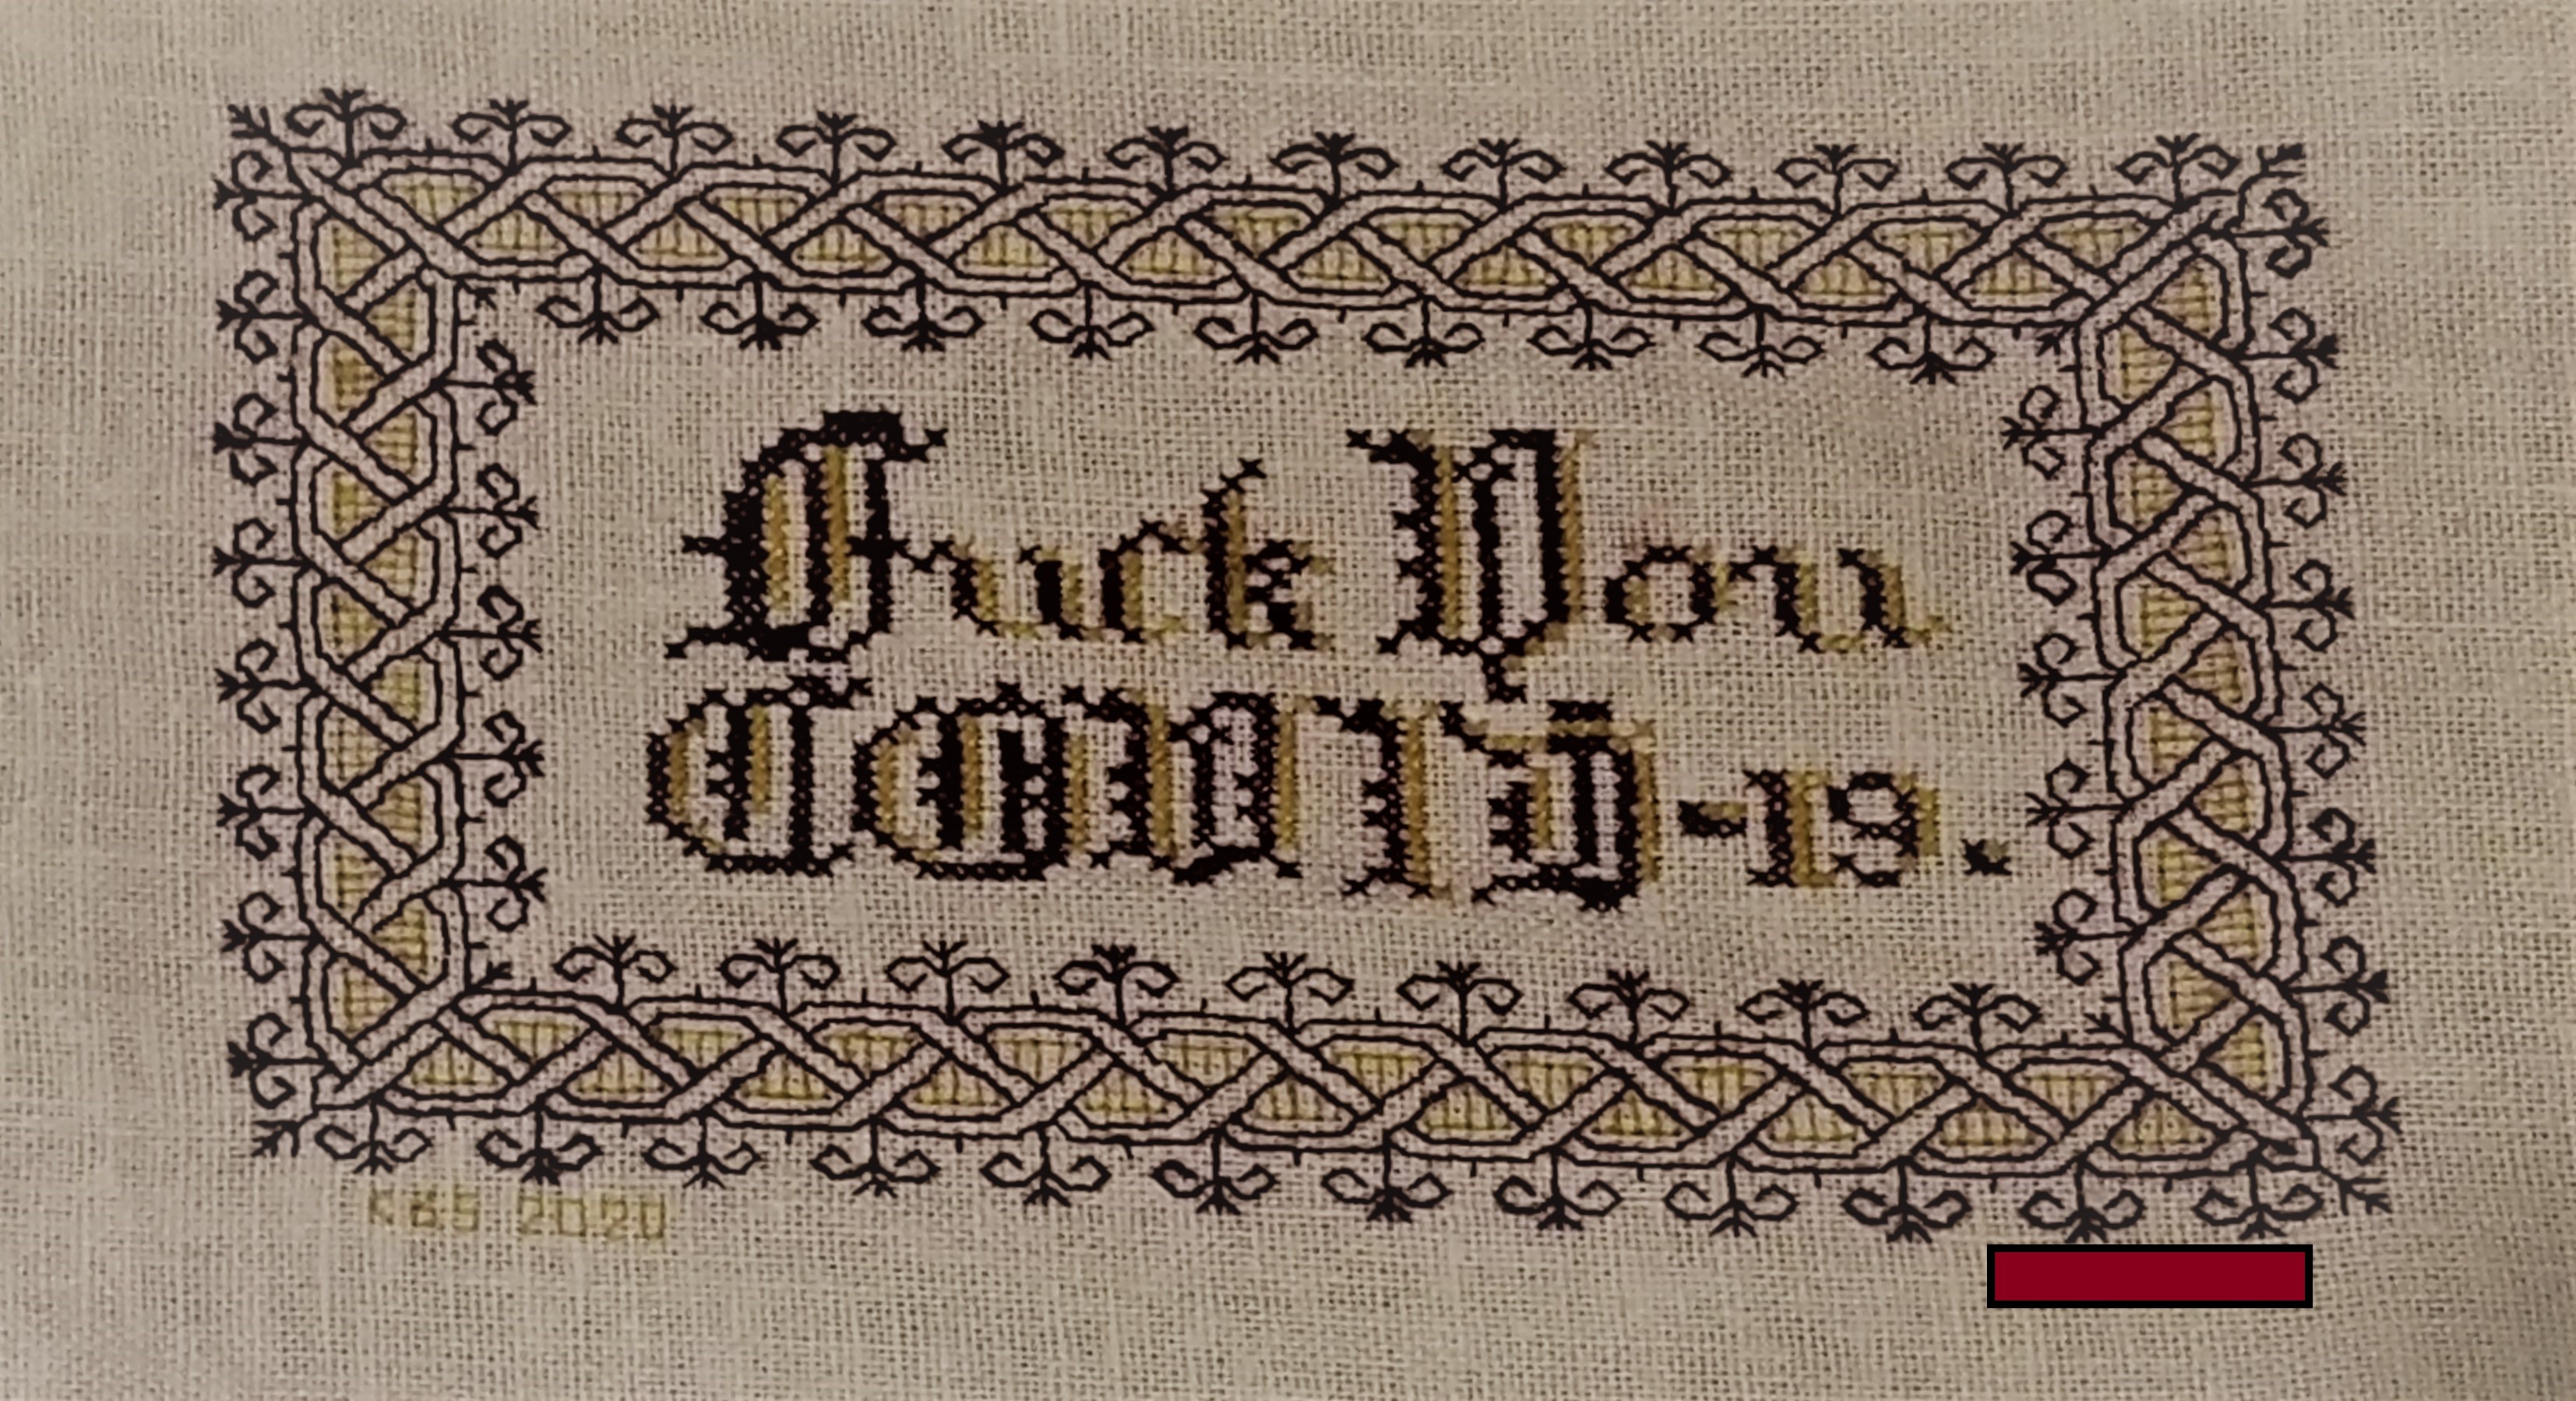
My own finish. Naturally dyed claret and mustard yellow wool on linen/cotton blend. I played with the color placement and letter forms a bit, since I can’t do anything verbatim these days.

Photo (c) 2020 by Madeline Keller-King, reproduced here by permission

Photo (c) 2020 by Breen Pat, reproduced here by permission
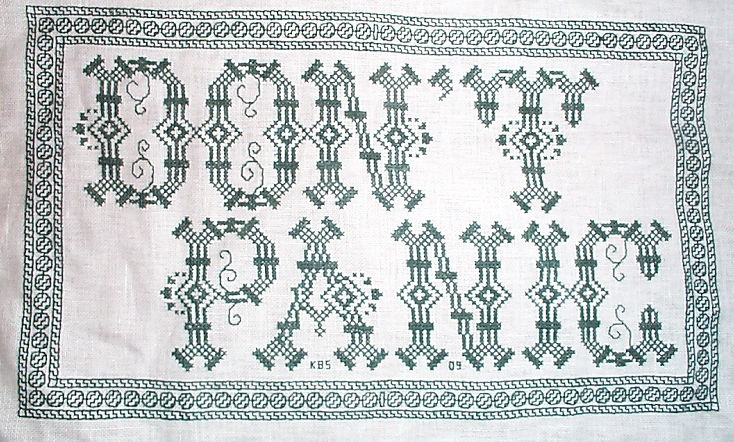
A couple of days ago I posted the design for my “Don’t Panic” piece, which has become shockingly relevant.
Friend Edith points out that harsh times call for harsh language, and that while some people might be soothed by a gentle statement, more strident expression suits many others.
Therefore for Friend Edith, and in the spirit of Dame Judy Dench, who is famed for stitching up provocative statements, I make this chart freely available for YOUR OWN PERSONAL, NON-COMMERCIAL USE.
Consider it as “good-deed-ware.” It’s tough out there right now. Pay this gift forward by helping out someone else in need; phoning or getting in touch with a family member, friend or neighbor who could use a cheerful contact; volunteering time or effort; or if you can afford it – donating to one of the many local relief charities or food banks that are helping those displaced from work right now.

Right-click on the image above to save it as a JPG.
This piece is intended to be done in cross stitch (the lettering), and double-running or back stitch (the frame). While it’s shown in black and red, use one color if you like, or substitute in as many other colors as you wish.
The source for the lettering is yet another of the offerings in Ramzi’s Patternmakercharts.blogspot.com collection. The border is from my recently released Ensamplario Atlantio II, a free collection of linear designs – mostly blackwork fills and borders.
Thank you Edith! Your inspiration and request will brighten the hearts of many, while rendering their walls cheekily NSFW.
(And there goes my PG blog rating, and any remaining shreds of reputation for gentility. But it’s worth it if someone smiles.)
BOOKMAKING 109: STITCHING FINISHED, ON TO ASSEMBLY STEP ONE
I’ve finished all of the stitching on the book cover project, now on to turning the flat piece of cloth into the finished item.
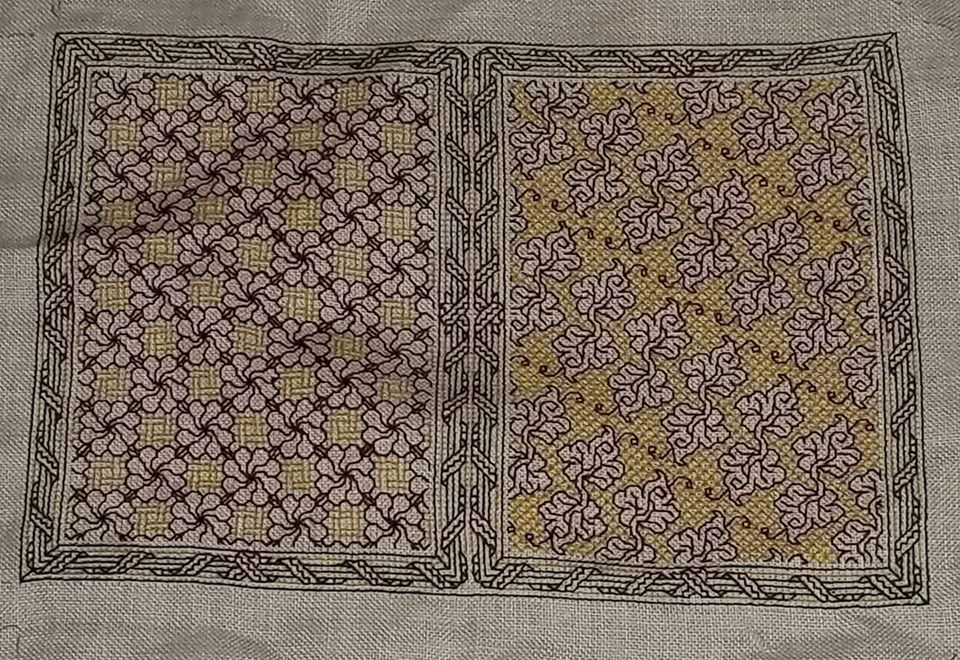
Although I am a teensy bit disappointed that my centering efforts on the leafy side did not pan out, I think you can see that my guess was correct. Given the eccentric nature of this slow-descent repeat, it’s not obvious at all.
An interesting thing happened – density of color. The yellow used on the front and the back are the same – same color number, even the same skein. But the diagonal diamond voided fill used behind the leaves is more dense than the lattice weave used with the swirly flowers. And the swirly flowers, having nice dense centers and connector leaves show the red as being more intense, too. The colors present differently depending on the stitching designs chosen. Close diagonals will appear visually more dense and darker than stitches done “with the weave” – horizontally or vertically.
While density differences do manifest in monochrome, they mostly present as grey scale from a distance, or in some blackwork substyles – something akin to the cross-hatched lines that are used to indicate depth and shadow. But in polychrome it works a bit differently. Individual colors – the same colors in fact – will pop or recede, or even intensify, depending on the closeness and orientation of the line segments on which they are used.
Making up the Book Cover
Well, for me at least the fun part is over. Now for the less interesting but no less exacting half of the project – turning this flat piece of cloth into a book jacket.

As you recall, we have the flaps all neatly defined by basted lines. These I will just turn over, not bothering to finish off the raw edges. They will be well concealed once the thing is sewn together, plus the added bulk of a turned or rolled hem would distort the lie of the stitched part of the cover.
First I flipped the thing over, with the “good side” down, so I could fold my flaps to the back. I set the creases along the stitching lines and the basted guide lines, setting them with my iron. It’s easier to do if you finger-press first to get the precise fold line, then follow the finger-pressed creases up with a warm iron. (Ignore the blue ironing board cover stained with the ghosts of projects long past).
I started by setting the folds on the top and bottom edge, and then the left and right sides.

Then I trimmed off some of the excess fabric at the top and bottom. I didn’t bother trimming the left and right because there really wasn’t much to trim.
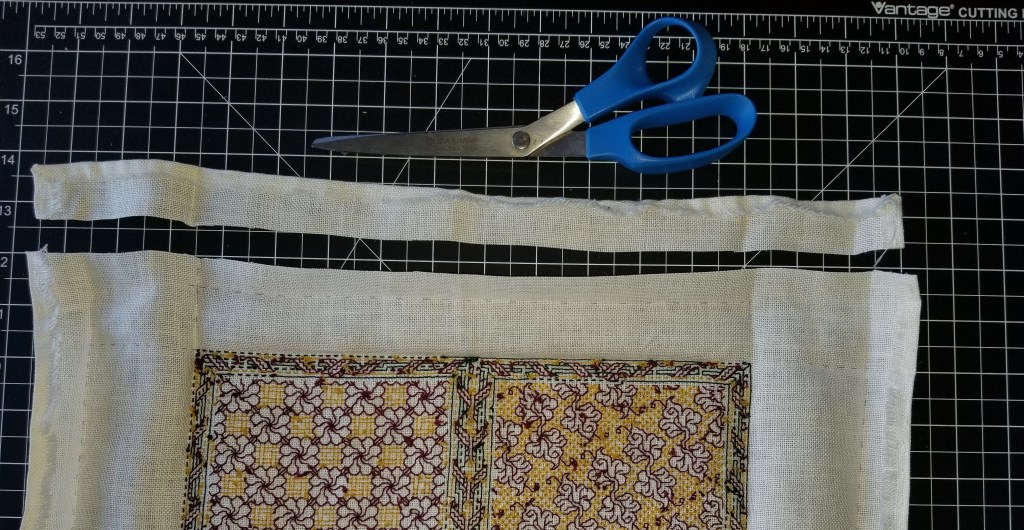
The next step was to fold everything in, and remove some of the bulk in the corners – note that I did not trim it all.

At this point with lots of nice, crisp creases in place, and no further need for the markings, I teased out all remaining bits of lavender basting thread.
On to the corners, to make them a bit sharp. There are other ways to do this, but origami-style “squash folding” to make a mitered corner is the simplest. I folded the corners in, ironed in the creases and pinned them for hand-tacking. And while I had the pin ball out (the needle-felted pin-puff is a treasured gift, made by Younger Spawn), I pinned the flaps to the body, although I will NOT be stitching them down..

And the last bit of prep was the stash-dive for a bit of red ribbon. That I will sew to the inside of the cover. It’s just long enough so it can be teased out to either the top or bottom, and will serve as an effective placemarker regardless of whether my recipient chooses the flower or the leafy side as the front cover.
Now off to do all of the tacking. The next post will cover sewing the end flaps in, to make the pockets into which the book covers will be slid. Before writing that bit up I want to experiment a bit, because I’d like those seams to be neat, and if possible – visible, and in green. We’ll see if that works out or if I punt and just stitch in the plain white sewing thread I am using for tacking and affixing the ribbon.
DON'T PANIC – AGAIN
A while back I stitched up this piece, both as a tribute to Hitchhiker’s Guide, and as a bit of inspiration for my office. I’m a proposal specialist – managing short deadlines and general panic are my stock in trade.
When I posted this on Facebook last Friday, I got several requests for the chart. So, tweaking memory dormant since 2009, I drafted one up.
I make this chart freely available for YOUR OWN PERSONAL, NON-COMMERCIAL USE. Consider it as “good-deed-ware.” It’s tough out there right now. Pay this gift forward by helping out someone else in need; phoning or getting in touch with a family member, friend or neighbor who could use a cheerful contact; volunteering time or effort; or if you can afford it – donating to one of the many local relief charities or food banks that are helping those displaced from work right now.
CLICK HERE TO DOWNLOAD THE DON’T PANIC CHARTS AND INSTRUCTIONS – THEN SAVE THE PDF THAT POPS UP
Eventually I will add this to the Embroidery Patterns page tabbed above. But for the time being – be safe, stay well, and care for those whom you love.

BOOKMAKING 108: RIPPING OUT AND RECOVERY
The last post of mea culpa probably left people wondering how it was going to all turn out. Here’s the result:

I only needed to tease out one straight line of stitching – the former rightmost edge of the previous side. Now the two borders join to make one larger mirrored strip that takes up the spine area and wraps around to be visible on the front and back. Not as I originally planned, but acceptable.
And I have been able to keep going on the second side, working my double leaves in red, and the diamond fill ground in yellow. Again, not as originally planned – the repeats will not be neatly centered left/right, but because this particular fill is eccentric, I bet it won’t be noticed by anyone who isn’t aware of the problem in the first place. (Mom, avert your eyes).
Now on to today’s submitted question:
How do you rip back?
With great care.
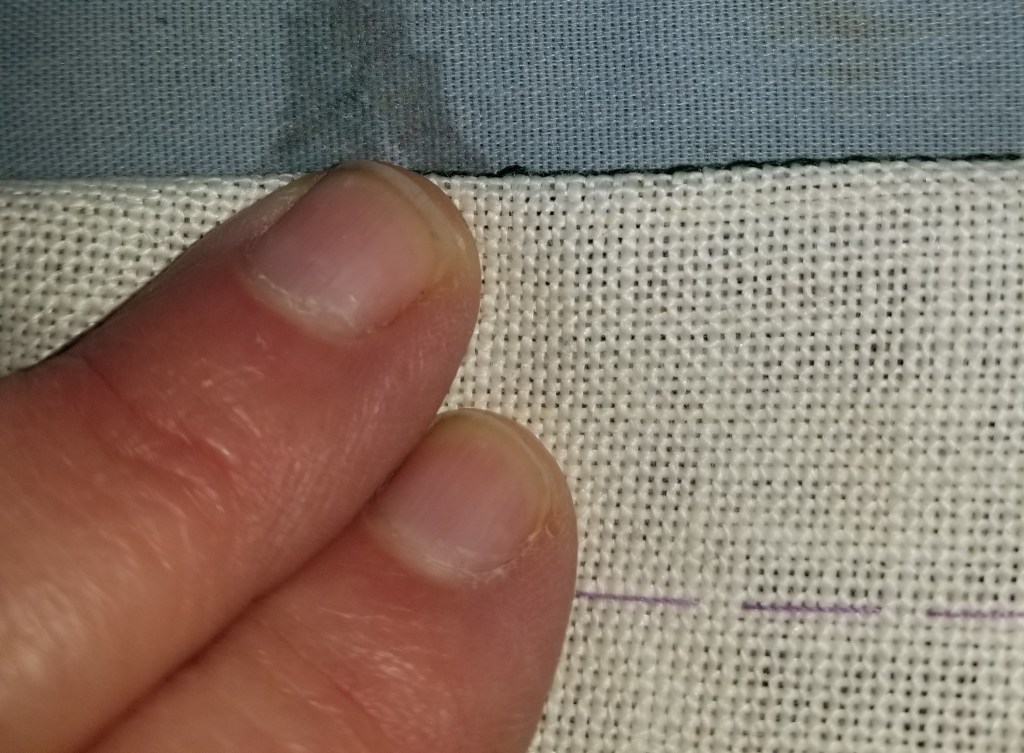
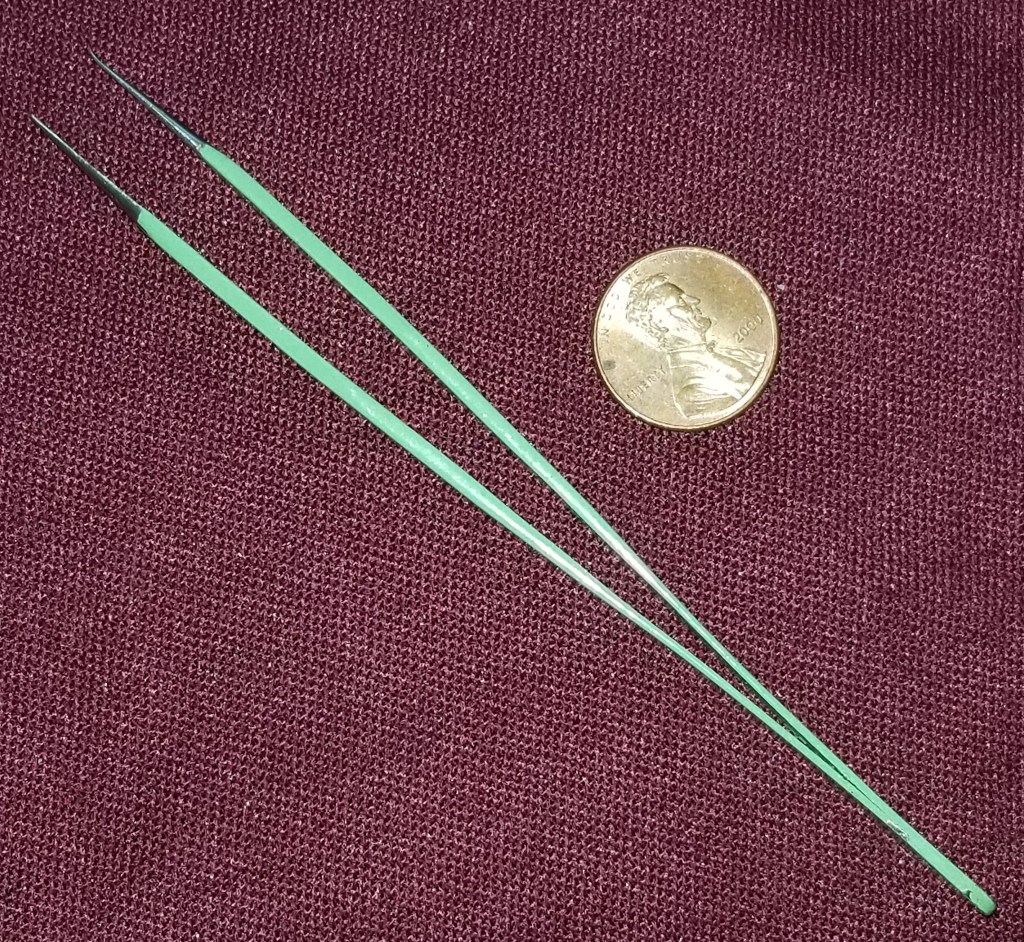
It’s very easy to inadvertently snip the ground cloth, and that’s a tragedy when it happens. But I have some tools that help.
The first thing is a pair of small embroidery scissors with a blunted tip. These are the latest addition to my ever growing Scissors Stable, and a recent holiday gift from The Resident Male. Note that one leg has a bump on it at the tip. That’s the side that is slid under the errant stitch being removed, to make the first snip. Although these are sharp all the way to the tip, the bump helps prevent accidentally scooping up and nipping the ground cloth threads.
To rip back taking all due care, I snip a couple of stitches on the FRONT of the work. Then I employ a laying tool and a pair of fine point tweezers for thread removal. The laying tool was also a gift from The Resident Male, and replaces a procession of thick yarn needles I used before I had it. My tool is about 3 inches long (about 7.6 cm).

My pair of tweezers is one intended for use in an electronics lab. I found it in the parking lot of a former job, probably dropped by someone testing robots in the back lot. I tried to return it, flogging it around to likely techfolk for several months, but had no takers. Seeing it was to remain an orphan, I adopted it into a new fiber-filled life. I love it. It’s wicked pointy, and even with the dented end (probably damaged when it fell off the test cart onto pavement), does a great job of removing tiny thread bits.
Having snipped the threads on the front, I use the laying tool’s point (augmented by the tweezers) to tease out the stitches in the reverse order they were worked, doing it from the back. Luckily this style of work has a logical order and it’s usually pretty easy to figure that out. But in some cases it gets harder. When that happens, it’s another judicious snip on the front, followed by use of the tweezers from behind to remove the thread ends for discard. (While I can sometimes recover/reuse a live thread after I catch a mistake of a few stitches, in general if the run is long, or I’ve ended off the strand there’s little point in trying to save it and stitch with the now-used and damaged/fuzzy piece of thread.)
If the color is in the least bit friable and liable to crock on the ground fabric, I cut more and pull less – making sure to remove all threads from the back rather than pull them forward to the front. This minimizes color/fuzz shed on the front, public side of the work.
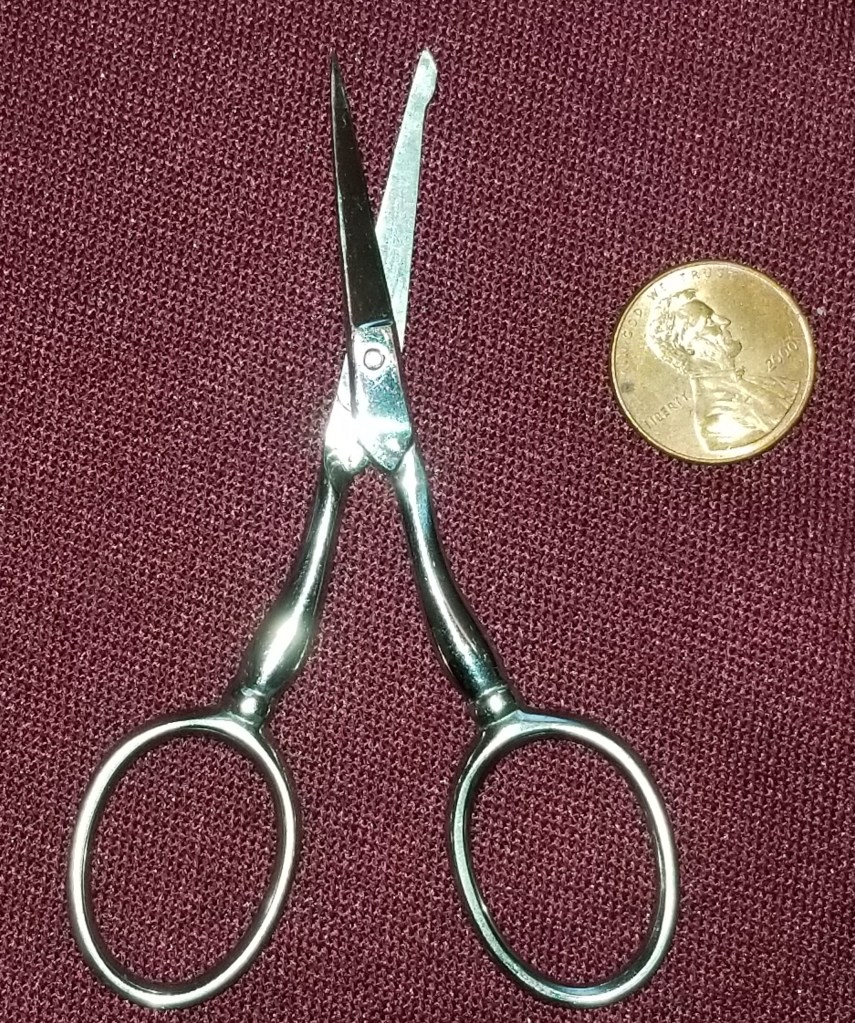
If any snipping needs to be done on the back, flat and parallel to the ground, I pull out another resident of my Scissors Stable – a pair of snips I bought at the SCA Birka marketplace event, two years ago. They look like this:
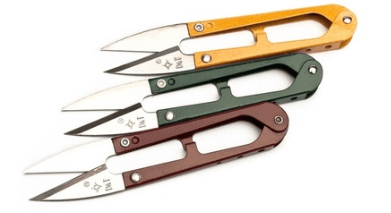
These were a great buy. Inexpensive, super-sharp (I think the snipping action helps keep them sharp), and because they are not held like finger-hole scissors, very easy to manipulate to snip close and flat to a surface.
And what to do if there are fuzzy bits or surface discolorations that remain on the front? Here’s my last resort. I wrote about it before:

Yes. Silly Putty. I have found that a couple of gentle blots will pick up fuzz and shed bits of color. The trick is NOT to scrub, just support the cloth from the back (I use the top of the stuff’s eggshell container), and press the putty gently onto the affected area – then remove it vertically and quickly. Make sure not to let it dwell on the surface.
I will caution that there is risk doing this. I have no way of knowing if anything exuded by Silly Putty will be a life-limiting factor for the threads or ground in 50 years – if discoloration or other complications might ensue. But the Materials Safety Data Sheet for it doesn’t turn up anything particularly evil, and I am willing to risk it. You will have to make that decision for yourself on your own. Having warned you I take no responsibility if it ends up doing so.
BOOKMAKING 107: THE HUBRIS OF FAULTY LAYOUT (AND PLANNED RECOVERY)
OK. Here I am, showing off my overconfidence in front of everyone. I admit it – I’m not perfect,. Often my enthusiasm gets in the way of prudence, and I forget things like double checking all measurements.
And so this happened
Here you see the “knot” I designed as the cheat at the center of the mirrored top and bottom border. It’s just fine – plump and happy. But wait! See that three stitch (6-thread) gap between it and the green border edge line coming in from the right? That shouldn’t be there! The spot the orange arrow indicates SHOULD be the center of that knot, to align with the center axis I’ve designated for this second side of my book cover.
Panic ensues. I go back and look at the entire border bit, from this center back to the right edge…

Nope. I didn’t miscount. The repeat is true. Why then am I off. (A deeper sense of panic sets in.)
I measure the leafy side of the book cover. It’s true to my original planned dimensions. Hmmm…. Can it be?

YES!
It looks like I made a major mistake in my layout that I did not notice when I worked the previous side. I inadvertently added the width of the spine to the width of the first side I stitched, over and above the spine width that’s already there and marked. I have nade a first side that’s marginally too big – about six stitches too big, and a second side with a main field that is no longer centered.
What to do?
I’ve got several choices
- Bury the thing in my Chest of Stitching Horrors(tm) and abandon it forever. Nope. Not going to happen. For one, there are witnesses (you); also a major promise of delivery.
- Do #1, but begin again. Not going to happen, either. I’ve gotten to far along to set this much effort aside.
- Pick out the entire first side and redo – or pick out the entire second side and redo. Tempting (especially the latter) but also not a favored option. While the mistake is real and is six stitches per side, I don’t think it warrants total destruction.
- Figure out a way to use as much as possible of the stitching done to date, and adapt. Being a bungie-jump stitcher, this is not the first time that things have gone seriously awry. Adapt. Reuse. Redirect. That’s my way. That’s what I will do.
Taking a moment to let the panic subside (as it usually does once I’ve figured out where the original mistake happened), I look at my options.
First, I point out that while being off six stitches on the front and six on the back sounds like a lot, at the thread count I’m using it’s only 3/16 of an inch per side, at most the book cover will be a teeny bit deep compared to the substrate notebook, but not enough to matter. Second, there is a blank area set aside for the spine – it’s six stitches wide. I can cannibalize it to compensate for half of the overage.
OK. Things are looking more manageable. Because the center of the second side is an eccentric repeat, in spite of my effort to balance it left/right, a skew presentation will not be all that noticeable, not compared to the same error on a totally symmetrical design like the flower-side. I can leave the double sprig and diamond ground section as-is.
For the border, I can leave in what I have, including the tell-tale center knot, and work the left side of the knot to mirror what I’ve already done on the right. If I do that by the time I get to the leftmost edge of this second cover I will be six stitches off count – eating up those six stitches I had set aside for the spine. The front and back covers should meet up along the single green line that marks the rightmost edge of the flower-patterned side above.
I hope. It should work. In theory. (The suspense is palpable.)
Stay tuned!
RETREAT TO THE BEACH
Yes, it’s time again for my Annual Shameless Act of Self-Promotion.
Thinking of a early season/full season/late season getaway? Someplace warm and blissfully quiet? Yet with the excitement of night life, galleries, shopping, theater, and restaurants close by? Want to avoid overseas flights?
Have I got a hide-away for you.
Beach!
Our summer condo in North Truro, Cape Cod, Massachusetts, right on the beach close to the Provincetown line is available for booking. for the summer 2020 season (although it is filling fast).


We are at Beach Point (the arrow on the map points back to Wellfleet, Provincetown is in the other direction, about a mile to the town line). We have reserved parking for two cars, plus a bus stop right in front of the building for the local shuttle to P’town – a quick trip to those restaurants, galleries, theater, and night life, with or without your car, and we are well within easy biking distance, too.
The condo is on the second floor, with a covered deck that provides morning/early afternoon shade (the one with the red deck chairs, below). The Shoreline development has its own private beach, and offers picnic tables, lounge chairs, bike racks, and grills to all who stay.

The apartment itself is two bedroom with two queen beds, with a full kitchen (full size stove with oven, fridge. dishwasher, microwave, sink, coffee maker, toaster, blender, and even a lobster pot). It is air conditioned/heated, and also has a washer and dryer, and a full bath with shower and whirlpool tub. The living room sofa folds out into a third queen size bed, so the place will sleep six, comfortably.


Pricing and availability are listed at the agent’s website. Prices vary by week, with significant savings in the shoulder seasons.
So, come and pull up a chair. Put your feet up, pull out your knitting or a good book, and feel the relaxation!

And since I am on the topic of Shameless Self-Promotion – here’s more.
A good book?
Even for those who need more immediate escape and can’t wait until warm weather, I always suggest a good book.

It’s no secret that The Resident Male writes books and short stories. Here’s his lead offering – the first of a burgeoning science fiction/mystery series. Of course, I’m biased, but I do recommend it highly. It’s a good read, full of compelling characters, alien cultures, heroics, and intrepid investigations – with a dash of sarcasm thrown in.
It’s available on Amazon, both in Kindle and paperback editions.
Meet Blair. Meet Terendurr. While you can’t quite share that favorite beverage with them, after getting to know them I’m betting that you will wish you could.
BOOKMAKING 106: QUESTIONS ON THE VOIDED DIAMOND GROUND
Yesterday’s post has inspired a few really good questions. Thanks for sending them in!
Are you working the diamond background in double running stitch?
Susan wants to know if the background diamonds are being worked totally double sided. I answer that while they certainly can be, in this case I am not bothering to do so.
No one will see the back of this piece once it’s in place on the target book. So I am working mostly, but not entirely in double running. Since I have jumped the gun somewhat and begun the background before all of my foreground motifs are complete, I have to be careful not to get ahead of myself and fill in too much – painting my yellow across the site of a future leaf. Therefore I am mostly working in double running, but reserving the right to pop over to “heresy stitch” to advance my working thread as needed, and to avoid painting myself into a corner, or covering up an area that would need to be picked out later.
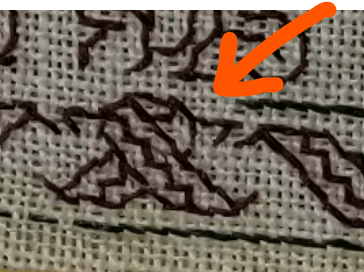
There must be gaps where the diamonds don’t meet up with the leaves. Are you working half-stitches to fill in those bits?
Lisa, this is an excellent question, and really observant of you to pick up on the issue! Here’s a diagram illustrating what she was talking about.
Note how in some spots, and especially around the tendrils and lobed leaf sections there is a half-stitch gap between the red outlines of my double leaf, and the yellow diamonds. Now I COULD go and work half stitches to continue the diamonds right up to the edge of the red, but in truth – it doesn’t matter. Because the yellow is so light compared to the red, and I’m working with a relatively heavy thread thickness for the count of the ground, the visual impact of those half-stitches is almost nil. So I cheat, and leave them out all together.
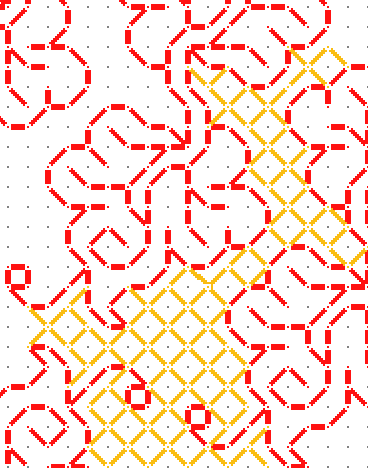
How do you get the diamonds to match up as you go around the leaves?
Another excellent question, Erin! The secret to doing this is NOT to start the diamonds in several spots. Begin it in one place, and grow it out from there, working around obstructions as they are encountered. It’s kind of like a fairy ring, (or if you are computer gaming fan – The Creep). By always extending the pattern area from an established bit of work out into new territory, I stay on target, and my diamonds always align.
Have more questions? Ask away!
