BOOKMAKING 102
This is the second piece in the series on making an embroidered book jacket, based on the general instructions I presented earlier this month. The first piece dealt with drafting up a simple pattern to construct the book cover, preparing the piece of cloth I am using, and transferring the guide lines from the pattern to the ground cloth.
In this session I discuss laying out the design for the embroidery itself. While I encourage folks to play along at home, starting their own book project and working with me, I will not be presenting a “Stitch-Along.” There will be no full project graphs presented here. Instead I encourage people to pick their own designs, and I hope that by describing my own thought processes, I will enable others to think outside the box.
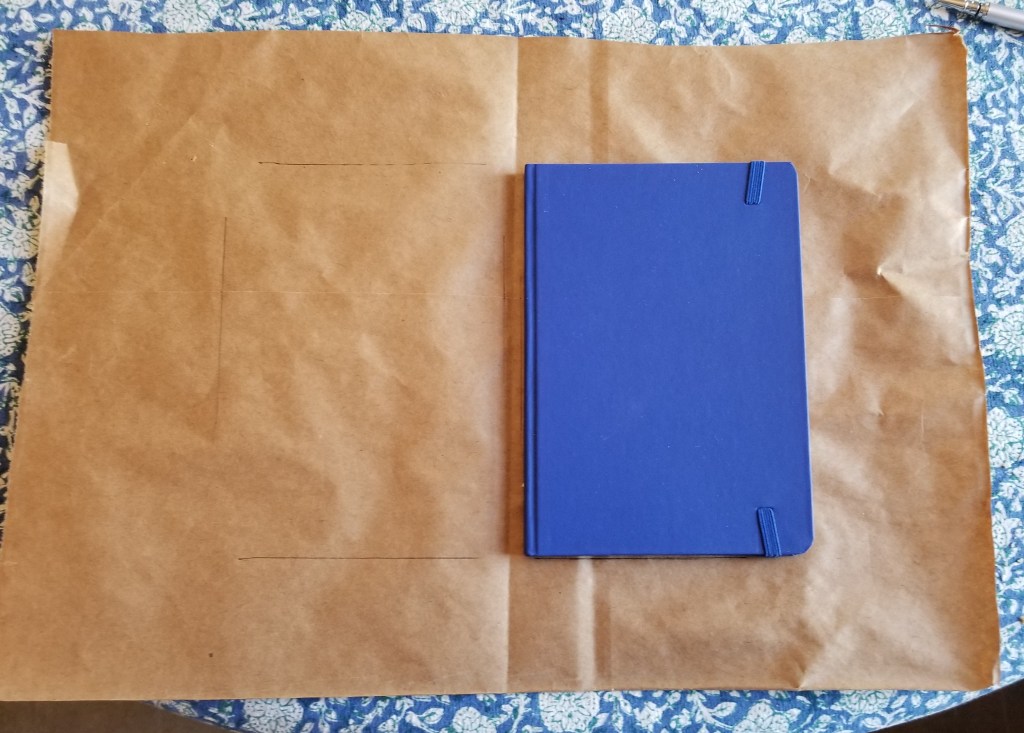
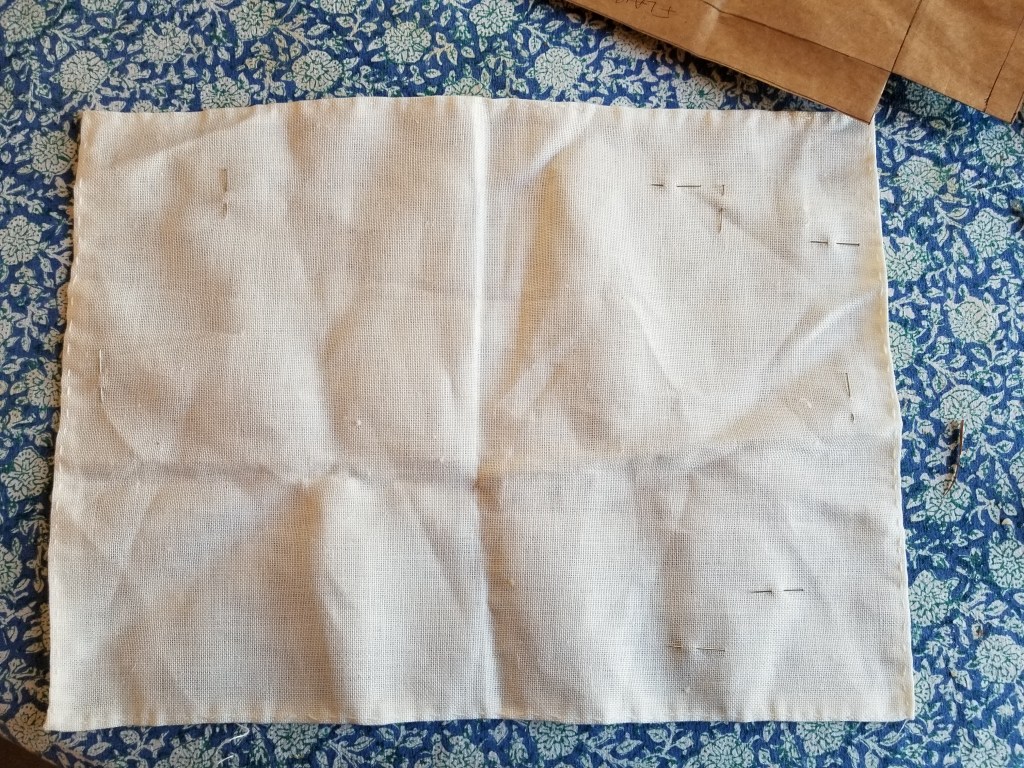
Let’s start where we left off. We have our ground cloth prepared and ready to stitch:

The stitching areas – the front, the spine and the back – are all defined by basting lines at their edges. There are also basting lines marking the horizontal center (spanning all three areas), and the vertical center of the front and back. The spine is so narrow that it’s easy to count to determine its exact vertical center.
Step 5. Stitch Design Layout
I chose a medium count even weave fabric for this. It’s is about 30-32 threads per inch, which means I’ll get 15 to 16 stitches per inch. There’s no reason why Aida or other purpose-woven grounds intended for cross stitch cannot be used. However the fineness of the cloth will influence what counted patterns are used.
As a “bungee-jump” stitcher, at this point I am just starting to think about my layout. Possibilities abound, and I try not to close any out until I am absolutely sure. For example, even before I get to the choice of the fill pattern(s) these general layout options exist:
- Work a single design to cover the entire piece, ignoring the divisions between the spine, front and back covers.
- Work the front and back covers separately, each with its own design, with or without some sort of stripe or divider running up the spine.
- I could work a border around the front and back cover, either meeting along the spine, or leaving space between for yet another fill.
- I could divide the front and back into subsections, and work each of them in a different fill (again, with our without borders)
- I could draw a freehand shape or other motif on the piece, then fill it with one or more fills (a la the inhabited blackwork style).
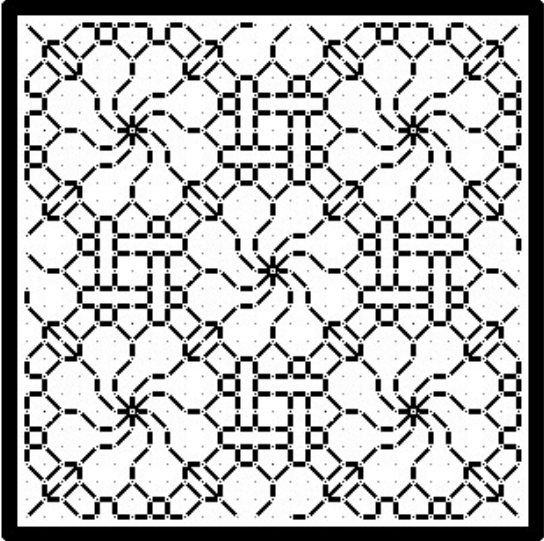
Here are general representations of some of the possibilities above:

Decisions, decisions. Best not to back myself up a tree. Not just yet. But right now I’m leaning to the version in the lower right. Front and back covers, each a single field pattern, but different; some sort of border around the edges of the front and back cover (same border front and back to unify the design). Something on the spine, possibly a third design, Possibly words. No clue.
Step 6. Stitch Design Selection
Since I am planning for 15 or so stitches per inch, my cover is about 3.5″ wide and 5.5″ tall. If I do a single repeat on each cover I will have room for play. My total field is about 52 stitches across x 82 stitches tall. Even if I subtract some for a border, there’s room for one of the larger repeats from Ensamplario Atlantio, or Ensamplario Atlantio II.
While I’ve stitched up some of these before, I haven’t play tested them all. This is a fun opportunity to do some I haven’t worked up yet. Plus I rarely do multiple colors, so maybe I’ll think of that, too. Paging through the books I come up with a few possibilities. Number 110 from Ens Atl II hits me for one of the covers, but just about every design in both books is a good candidate:
This is an intermediate complexity 16-stitch square repeat (the count from the center of one flower to the next is 16 stitches). A simple square repeat with a half-drop, I should be able to get at least 2.5 repeats across – that would be about 40 stitches across out of my available 52. That would leave 12 stitches (6 per side) for a border. And there’s nothing to say I can’t just truncate the design anywhere I like – there’s no reason to worry about completing the edge repeats across.
Now, if I had selected a coarser ground – say 11 count Aida, my stitching field would be smaller because there are fewer stitches per inch available. In that case my field would be about 38 stitches across. Two repeats would be all I could fit. I could still use this design to good advantage, but designs with a wider repeat, like this more complex panel of pears (28 stitch square), would be harder to squeeze in Just one full repeat would fit across, with a bit extra for a partial, or for a border. (Come to think of it, pears may be in order for the other cover… Hmmm. Not decided yet, but maybe…)

Why do I say “other cover” and not front or back. Simple. Both of these designs are totally symmetrical and at this point either one could serve as front or back, depending on which way the book is held.
Now on to placement. I have a couple of options. I could deliberately center my design at the centerpoints I established by basting, or I could skew them left/right/up/down, to produce an asymmetrical composition. Both are valid, and asymmetry can be quite dramatic. But I think I’ll stick to the easiest way out here. Instead of skewing the repeat, I will place the center of one flower exactly at the center of my cover area, and I will begin stitching there.
By beginning in the center I get to establish my design. I will work out left and right, and when I get close to the edge, I’ll stop and decide whether or not I still want a border, and if I do – I’ll pick it or design it to fit the available space. My guess is that I’ll probably work to within 6 – 8 stitches of the basted edge line. We’ll see…
Step 7. Thread/Color Selection
OK. I’ve got my lattice-and-rose picked out. What threads and colors to use… Again this is just my thoughts and preferences. For your project pick whatever you enjoy using that’s suitable for your chosen ground.
First, this is a removable book cover. It will get dirty. It may end up on another book after the target one is filled up. Chances are that it will need to be washed at some point in its life. Therefore I am opting for plain old cotton thread over silk or rayon. DMC will serve quite nicely.
I do a lot of monochrome, much of it modeled on historical pieces. I don’t get to play with multiple colors very often. I’m not a big fan of variegated threads for this type of work. I think the color gradations unless very carefully handled distract from the delicate structure of the stitching, so I’ll stick to solids. And nice, deep, contrasting solids. Two, possibly three colors.
Pawing through my stash I come up with the first two. If I use a third color, I will employ it on the border – not in the field patterns. I’ve chosen two regal colors – DMC 814, a deep red, and more burgundy/less crimson than the red I usually stitch with; plus DMC 3820, a goldenrod yellow – a color I rarely use.

Step 8. Start Stitching
Now for the fun part. Finally. After all of this planning and prep, I get to start stitching. I reserve the right at any time to decide I don’t like the result and pick everything out, but off I go, none the less.

On the piece above you can see the remnants of my light blue basting threads that marked my centerpoint. The center of one of the first flower I worked is exactly where those two lines intersected. Note that I clip back the basted centering threads to keep them out of my way as I go along. I find it’s better to remove them bit by bit, rather than stitch over them and try to pull them out later.
I am using one strand of floss, doubled. I cut a length twice as long as I need, extract one strand, and fold it in half, taking care to match the cut ends. Then I wax it lightly EXCEPT FOR the last inch, leaving the loop open. I thread the now adhered-together cut ends through my needle. Without making any knots, I make my first stitch, pulling my thread up from underneath and plunging back down from the top. I take care not to pull my thread all the way through and on the plunge back down, I catch the loop at the end of the thread with my needle. Then I gently draw up tension until the loop on the back looks like a normal running stitch. In effect, I’ve started off my double running with a noose instead of a knot.
I continue along in double running, plotting out my course to keep “leapfrogging” on. A lot of people trip up by thinking they have to stitch in one direction until half of their thread is used, then turn around and retrace their steps. For something like this, it’s better to head off in one direction until your strand is used up, taking detours as they arise but always returning back to your main path (if you don’t have enough thread to complete a detour and return, end off before you start the branch).
Then you take a second strand and fill in the every-other stitch on that main path. Any thread that remains after that second pass on established stitching is complete is used to go on further in the design. It’s kind of like a game of hop-scotch, one thread advancing, the other filling in then continuing the design, and the thread after that starting at the point the first one ended, but filling in the skipped stitches left behind by the second. Black is the first thread, red is the second, and blue is the third in this example. Each dangling leaf is a detour that’s started and finished on the baseline:
On my stitching you can see around the edges of the red flowers where I have left attachment points for future journeys, and in a couple of spots, the partially worked lines of departure for those branchings. I find the path planning to avoid painting myself into a corner to be mildly challenging, and quite relaxing. And yes – sometimes I do trap myself. So it goes. Sometimes I can use unidirectional heresy stitch to get myself out of a bind, sometimes I just have to knot off and go on. (I do knot unless there is a compelling reason to work entirely double-sided, but it’s got to be a darn good reason because I hate working in the ends.)
You’ve also noticed how I’ve employed my colors. The red for the connected flowers, and the gold for the background lattice. It’s just one way of doing it. I do end off each gold lattice segment separately, opting not to leave long connector stitches on the back.
I’ll be working on this for a bit longer before I make decisions about the border. If for nothing else, just to keep everyone in suspense.
In the mean time, if I’ve been a Bad Influence and led you astray, please feel free to comment, critique, send pix of your book cover in progress, or otherwise kibbitz. All input/feedback is welcome.
BOOKMAKING 101
After I wrote the last post which gave general directions on how to make a fabric slipcover for a small notebook, I decided I could do one better, and go step by step with pointers. Eventually this will join the tutorial series posted at the tab, above. But that will take a while since I’ll be doing this in real time. Please feel free to join along and work your own book project with me.
Step 1. Making the Book Jacket Pattern
Using a piece of brown paper cut from a grocery bag, I made a pattern/mock-up of my book jacket. This is based on the protective covers we (of a certain age) made to guard school-issued textbooks.
I started by tracing the size of my cover – front, spine, and back – on the brown paper, then I added the extra bits for the fold-ins front and back, plus a small turned in edge across the top. It really doesn’t matter what your book’s dimensions are – just trace it and add the flaps as shown below.
Tracing the book
The layout
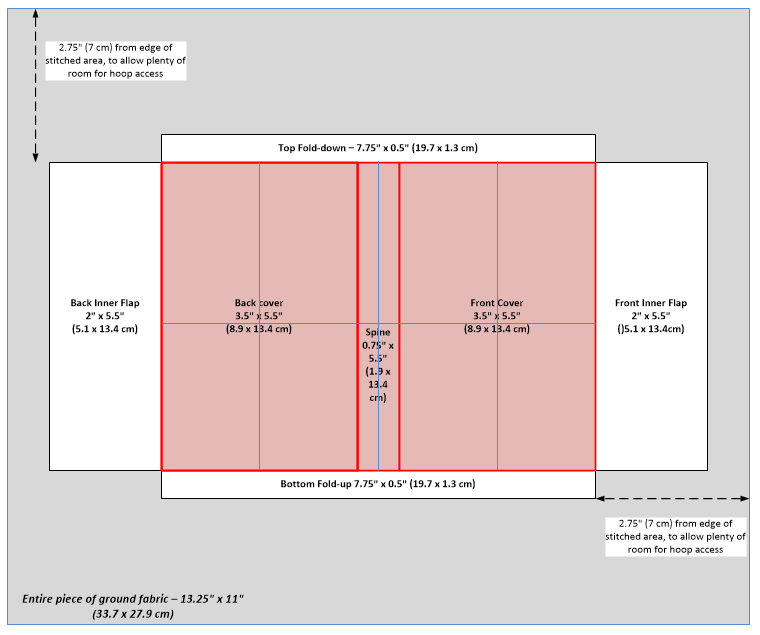
Note that I added some turn-over/hem allowances to the basic diagram above:

Try it on for a perfect fit
I cut my finished pattern out, folded it and fit it on my target book. Hooray! It fit and the book actually closed. The cloth version will be more stretchy and supple than brown paper, so I have no doubt that the thing will close more completely when it’s final. (HINT: If your book won’t get within inches of closing, redraft, adding a touch more width to the spine).


Step 2. Select and square the cloth.
I dug through my stash and found a piece of even weave that’s slightly larger than my brown paper mock-up/pattern. It’s about 30-32 threads per inch (estimated roughly), which would make it the equivalent of something between 14 and 16 count Aida. One drawback though, the edges do fray if left unhemmed or bound.

Whether you buy a pre-cut piece of even weave or snip your own from yard goods, chances are that the edges aren’t totally even on the grain of the weave. I like to square it off to make sure that my edges are true. I do this by pulling out the short threads that are snipped off at an angle, so that all remaining threads in both directions run the full length of my piece.

In the photo above, with the nasty bits unraveled, you can see that the piece of even weave I bought was not cut true. But now it is.
Why do this? To make sure your piece is neatly aligned on the cloth. It’s less vital on this project than on a sampler or other item you wish to frame, but it’s a good habit to get into, and will save you headaches down the road.
Step 3. Hemming
If you are using a less fray-prone ground like Aida, or just wish to skip this step, feel free. Be aware though that some loss may happen especially if you use and hoop and tug on your cloth to make it sufficiently taut for easy stitching. If you skip hemming, make sure you have an extra half-inch or so all the way around to compensate for any loss.
Were this intended to be a long term project, I’d trim off all of those little mini-fringes, and do a nice double-folded hem all the way around. But this is a quick and dirty project, and one that will finish with (gasp) cutting the ground cloth and discarding all of the existing edges. So I cheated. I just folded down the edges along the weave’s lines and pinched to set the crease and then used the threads I had pulled off the edges during Step 1 to do a plain running stitch, fixing the fold in place. And I didn’t bother trimming off the fuzzy fringes.

Step 4, Pattern Transfer
OK. I’ve got my cloth all prepped, and my pattern constructed. How to get those nice rectangular lines onto our nice, neatly aligned and properly squared/hemmed piece of ground?
I suppose I could trace them. But better than tracing is basting. If I baste using a neutral tone plain sewing thread that doesn’t shed color, I have non-smudge, non-erasable lines that are easy to remove without a trace. But where to put them?
I could take measurements of my cloth and my pattern then do math, and center the thing to within an inch of its life. Or I can cheat, and rely on the fact that I’ve squared my cloth (see!). All I need are a few pins.
I set my pattern down on my ground cloth and eyeball its placement. Then I insert pins to mark the edges of my to-be-stitched areas. In this case, although it’s optional, I also pinned out the location of the flap edges. Then I basted along the even weave grain, along the lines described by the pins. Note that I needed only ONE pin to denote each line:


And the final result:
All of my main pattern lines (sans hems) are indicated by lilac basted lines, absolutely on grain north/south/ and east/west with my ground cloth’s weave. It’s hard to see, but I’ve added three more guidelines, in pale bridesmaid’s blue. The mark the vertical centers of the front and back panels, and the horizontal center of the entire piece.
And now I’m ready to think about what stitch designs I will use, what design layout I might attempt, what colors/threads to select, and get started.
Stay tuned…
MAKING BOOK
OK. Now that I’ve armed a whole bunch of people with a wealth of counted all-over designs – what to do with them?
Pretty much anything you want. While samplers are the most common, there are lots and lots of things you can make that don’t involve using up precious wall space. Pincushions (either plain square or rectangular pillows, or fancy biscornu); pillow or cushion covers; napkins, doilies, and tablecloths; kerchiefs (aka for the historically-minded – forehead cloths); tray or coaster inserts (using pre-made items intended to showcase a piece of stitching or painting); zip or tied pouches or folios of various types – jewelry or lingerie rolls are examples; slip-in cases for sunglasses, phones, or tablet devices; small rice or lentil-filled handwarmers or heating pad pillows (warmed in the microwave, for gentle comfort or cold fingers); greeting cards or festive ornaments; all are examples of things that might sport your stitching.
But I want to revisit one project in particular – the book cover.
Making a Slip Cover for a Small Notebook

This is a general logic recipe for making a reusable slip cover in for a small notebook, using the same method as the standard brown-paper-bag covers kids of earlier eras employed to protect school-issued textbooks. The basic logic can be adapted to cover any size book. I’ve written this with special steps for counted embroidery project, but any fabric or stitching style can be used.
In this particular case I covered two small pocket notebooks, roughly equivalent in size to Moleskines, but of a far less expensive make. They are about 3.5 inches wide, by 5.5 inches tall, and roughly 0.5 inches thick across the spine (about 8.9 x 13.4 x 1.3 cm). They came with an elastic cord to keep them closed/mark one’s place, and were about half as expensive as the fancy name brand ones.
Layout
I wanted to know how big a piece of fabric I would need. Having measured a notebook, I did a mockup of the cover, drawing the shapes to size on a piece of paper to make my pattern. I used a brown paper grocery bag to do my layout and mockup (fitting it onto my target notebook to make sure it all worked. That pattern is now long gone, but here’s the logic I used. I strongly suggest making a mock-up and “dry fitting” it before you begin the project, just to make sure that the dimensions work. Note that some books have thicker cardboard covers or heavier spines than others, and may require a bit more “wiggle room” to be added to the measurements below – even if the books have the same general dimensions as the ones I used. If your book is significantly larger than mine you may want to increase the depth of the flaps all the way around. But you should not need to add more than the indicated amount beyond the stitching area (the red rectangle below). The overage of the grey area is just there to provide purchase for a hoop or frame.
Note that I’ve allowed a little bit of extra width for the spine, so that there is enough slack for the book to open and close properly. I’ve also allowed lots of extra room around the stitching area, to accommodate use of my hoop or snap frame. You can use a smaller piece of cloth closer to the dimensions of the book cover itself if you like, but be aware that frequent repositioning of the hoop to get close to the edges is a pain in the neck, and all of that tugging and yanking isn’t good for your threads or ground either. And if you’re mounting this on a flat or scrolling frame, tensioning the sides and ends very close to the stitching area can lead to distortion, so having a bit of extra room for the stress to even out is also good.
For my standard size pocket mini-notebook, I’ll need a piece of ground fabric that’s about 13.25 x 11 inches (33.7 x 27.9 cm – all metric measurements are rounded off). If I intended to hem my edges of my entire ground cloth prior to starting (as opposed to whipping or serging), I’d add a half inch all the way around to this measurement.
Selecting the Fabric
What type of fabric? Well, whatever you enjoy working. This project will be a tiny bit easier to lay out on even weave, but not overly so. You can use Aida, Monk’s Cloth, Fiddler’s Cloth, Hardanger, in whatever count is most comfortable. But the count you select will also be key for what design you select. The lower the count (fewer stitches per inch), the larger your finished iteration of the design will be and the fewer repeats of it will fit in these designated spaces. If for example you want to stitch 11 count Aida, our front cover – only 3.5 inches wide would mean your total stitching area is about 38 stitches wide (rounding down). A repeat of say 8 stitches across would appear 4 full times plus some fragment at left and right (more on this later). A repeat that’s 14 stitches across would show in full only twice, with a fragment at the left and right sides.
Why would layout be easier to do on even weave as opposed to Aida or one of the others? Because you can determine the center point more accurately on even weave. In one of the purpose woven grounds with their well established holes (and especially in the fewer-stitches-per-inch sizes), the centermost line of holes may be off the exact center of the piece just a teensy bit, and may be enough to annoy you.
One last suggestion – whip, or serge your edges after you cut your fabric to size. Some people use tape. I don’t recommend it because of the adhesive residue.
Marking the Fabric
In this type of project, where we don’t intend to graph out every single stitch beforehand, knowing where the edges and center lines are is very important. Some people use water soluble markers or pencils for this. I’m old fashioned. I would baste. Some people are very specific in technique, taking each basting stitch over 4 or 5 stitch equivalents to aid in counting, but I’m pretty haphazard. I just establish my lines and don’t try to make my basting stitches even.
To transfer the dimensions of the diagram above to my cloth, I’d start more or less in the center and measure out from there, basting in lines, probably in a couple of colors. I use plain old sewing thread; spools of thread inherited from my grandmother – 100% cotton, in pale pastels, too fragile for use in seaming, but perfect for this. I’d outline my stitching fields using one color (the heavy red lines on the diagram). Then I’d mark the center lines both north/south and east/west (the thin blue lines). You may find that you have either a line of holes or a full stitch at the very center of your front cover, back cover, and spine. Decide now if you are a perfectionist or not, and if your purpose woven cloth forces you to mark at one side or the other of any center column/row of stitches, which side of the center you have marked. More on this below.
There’s no strong reason to mark the no-sew flap areas at this point, but they are on the diagram so you know they exist, and their width should not be forgotten.
Choosing your Design
Elsewhere on the site you’ll find books and books of fills and other patterns. Thumb through. Pick something that appeals to you, that’s a good fit for your chosen ground fabric’s count. BUT also be aware of the Center Problem.
Some patterns have a specific center line. They have even repeats – 4 stitches, 8 stitches, 22 stitches – whatever. Each repeat is an EVEN number of stitches. These repeats mirror evenly left and right of an line. Other designs have ODD numbers of stitches in one repeat – 5 stitches, 9 stitches, 11 stitches – again any number but an ODD one. That means that there is a center stitch in these designs. Here are examples:

The wavy plumes (shown in two variants) are an EVEN 14-stitch repeat with a specific center line. The framed pears is an ODD 15-stitch repeat. It’s center is the X unit where the four pear stems meet.
Why does this matter? If you are a perfectionist using Aida (see above) and the center of your area to be stitched is in the middle in between two columns of holes, look for an ODD stitch repeat. If the center of those areas work out neatly to align with a column of holes pick an EVEN stitch repeat.
Now you know why I mentioned that layout on even weave is easier. Not being forced into using specific hole locations makes fudging that center line easier and if your heart is drawn to either an odd or even repeat, any finagling you might do to make placement will be less obvious.
Choosing Thread and Stitching
Here I am of less help, especially for folk using Aida. I can tell you that on 32-38 count linen (16-19 stitches per inch) I usually use one or two plies of silk or cotton floss. 40-50 count linen (20-25 stitches per inch), I use one ply. And that I run the thread through beeswax prior to stitching. If you are using a lower count ground I’m afraid you’ll have to experiment to see whether you like 1, 2 or 3 plies the best.
In any case, no matter what your ground is, your basted lines will tell you exactly where the center of your area to be stitched is. Find the center of your chosen pattern, and start from there. Double running or back stitch – even heresy stitch – it doesn’t matter. Start in the center and work your way out. You can choose to work the ENTIRE stitched area – front cover, spine and back cover as one unit, and start in the center of the spine. Or you can work the front and back covers either identically or different; and leave the spine unworked, or treat it in another manner (perhaps a narrow border, solidly covered with cross stitches, or anything else you dream up). There is no wrong here.
When you get close to the basting line that describes the edge of the section you are working on pause. Decide whether you want to continue the design right up to the edge, or if you want to stop (possibly at the natural edge of your repeat, or at some unobtrusive place in it) and save the remaining area to do a border. That’s what I decided to do on my two sample books above. Any narrow geometric band – even just parallel straight lines – can be used to frame the center design and draw the eye away from truncation of the center design.
Finishing the Piece and Assembly
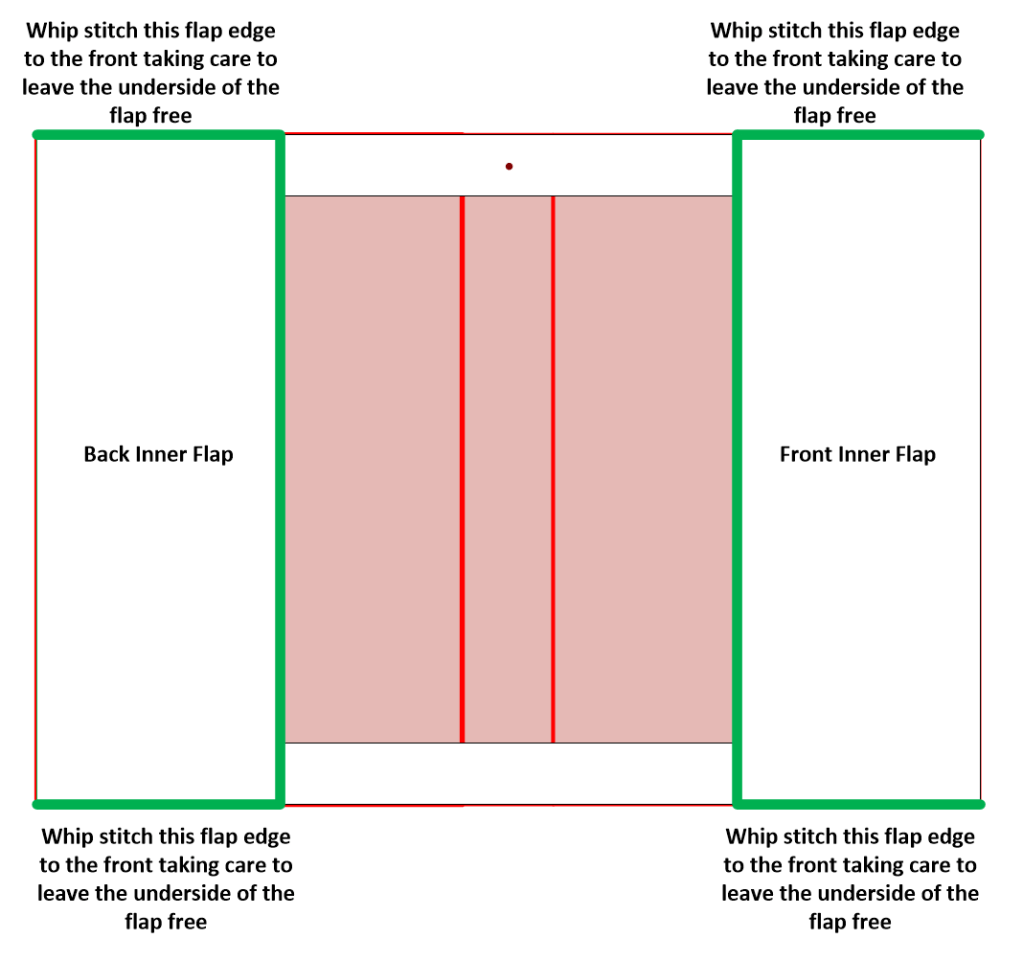
Once everything is all stitched, you can do a gentle wash and iron (nothing with big agitation, harsh detergent, or high heat). Or not. It’s up to you. Now is the time to draw or baste-mark those extra flaps. If you are going to serge them you can mark them and cut to exact size. Note that the ONLY places where secure edge treatment is mandatory are shown in green below. I strongly recommend hemming for those, although serging will work in a pinch. The other edges can be fray check secured or even left plain (they’ll never see the light of day again). Personally, I mark the flaps, and cut leaving a quarter inch seam allowance for the green bits that I turn back and hem, doing a veeerrrryyyy careful diagonal cut at the corner where the front and back inner flaps meet the top and bottom flaps. When I turn back the outer points of the front and back inner flaps and hem them down, I cut off the triangular excess to reduce bulk.
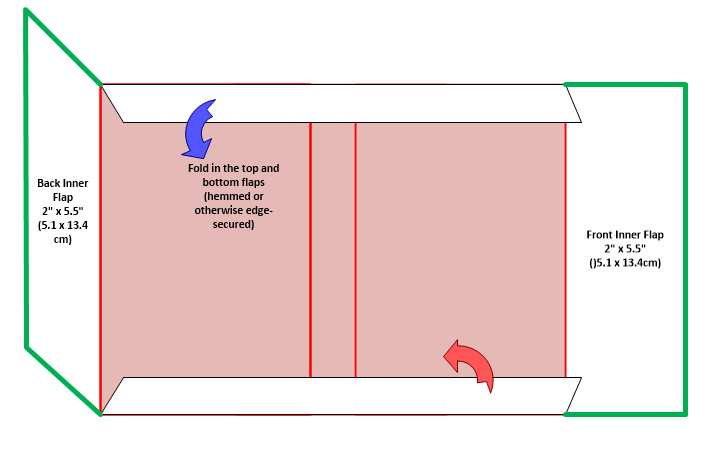
The top and bottom flaps do not need to be stitched down. Ironing them flat is enough. The final step is folding in the back and front inner flaps and stitching them to the front and back, along the edges of the book. This leaves a neatly edged pocket that will slide over the book cover. If the book cover doesn’t fit, feel free to snip it just a bit so that it slides in nicely. No one will ever know.
One last refinement. Many of these books come with an elastic loop that can be used to hold the book closed or mark a page. It’s useless in this application. I snip it off the book prior to fitting the cover. Instead, to serve as a bookmark, I stitch on a length of narrow ribbon, attaching it at the little red dot marked on the diagram above.
OK. Now armed with the basic how-to. Let’s see what you can come up with yourself!
CRAWLING ALONG, WITH SNAIL AND BEE
Satin stitch (for me at least) is sllloooowwwww. Especially compared with double running. Even though I am not working the satin stitch on count, the degree of precision needed to do the gold, cranberry, and white bits is even greater than the counted green outlines.
That said, progress is being made:

This is the center of the piece. I’m not entirely happy with every leaf or bud part done in satin, but I am not at this point going to go back and take anything out. What is, is. And for the record, as wobbly and multi-directional as my stitching is, that on the historical piece I have used as my inspiration is about as weak as mine.


But am learning as I go, and things are evening out a mite.
First was finding a better needle. It was pretty clear that the blunt tip/small eyed needles I favor for the outlines are not optimal for satin stitch. First, the eye that’s good for two strands of well-waxed floss is too small for three strands of unwaxed. And that rounded point, so well suited for slipping between threads for double running, is useless for piercing ground cloth threads to make nice, neat satin edges – even if those edges are partially “buried” underneath the outlines. I am not sure what size needle I am using (I pulled it from among a bunch of loose ones in my needle case), but it’s a standard larger eye embroidery sharp – not a tapestry needle.
Second was better threading. I am spoiled by waxing the living daylights out of my double running threads. Even if the two strands I use for the outlines require a tiny snip to get a good “point”, waxing guarantees a stiff, thin, easy to mount threading end. Not so the loose flossy strands of this ultra skinny silky stuff, used in threes or fours unwaxed for the satin stitching. They are unruly, prone to separating, fluffing out at the cut end, and otherwise uncooperative. Sometimes in a fit of desperation, I do wax the last half inch, but I prefer not to do that because the wax does drag off and mat down the rest of the strand. So I went looking for needle threaders to help. Thanks to Mary Corbet’s blog, I found some nifty tools, one of which I didn’t know I needed.
To start with, prior to making any purchases, I wanted to corral my needles, because for the first time ever, I was using multiple needle types on the same piece, and the pincushion at my elbow kept skittering off. I rummaged through my box of Useful Things, and came up with two flat rare earth magnets – formerly the insides of two heavy duty magnetic hooks. I’d saved them when the hook parts died. I glued them onto the verticals of my Millenium, in the corners. That worked nicely to keep my needles at hand, yet out of the way.
Now came threading. Obviously a needle threader would be required to cut down on my swearing and frustration. Mary had recommended some from Puffin. I liked the look of them from the structural standpoint, with flat hook style business ends, and not wire loops. So I ordered two in whimsical shapes vaguely reminiscent of Elizabethan coif motifs. One regular size, one small.

The snail with the larger hook works like a dream with the standard larger-eye embroidery needle. The bee with the little stinger surprised me by actually working with my tiny-eye ball-tip needles. Both are magnet-enabled, and now perch on the magnet I glued onto my frame.
And the needles they displaced? This is the thing I didn’t know I needed. Looking back, I could have done something similar with my two plain recycled magnets, but I never thought of it…
I got one of the Puffin needle-keepers.
This is the pretty side of the thing. It is also magnet-enabled, and the two magnets are quite strong. So strong in fact that they grasp and hold together not only through my cloth, but also through multiple folds of my pattern page printouts. So my design pages now sit neatly next to the area being stitched – not on a separate stand, or balanced awkwardly on a cushion nearby. My alternate needles are firmly fixed in place on the flower’s center, while my needle minder does its double-duty holding the pattern.
Here you see the corner of my frame in its stand-clamp, showing off the needle minder (left), and the glued-on magnet with both threaders (right). Everything to hand.

Please note I accept no freebies and make no endorsement deals. And since I don’t indulge myself often, tiny advances in kit are really special.
I’m a happy camper, even in the face of all that satin stitching. Bravo, Puffin! Useful tools, nicely made.
QUESTIONS ON THE LEAVES
Questions about my current project are popping in. I’ll try to answer the ones so far. Feel free to send more.
First, a progress shot:

As you can see, I’ve established the border on the second long side of the piece. I still have not decided on whether or not there will be wide borders along the short sides. That decision probably won’t occur until I have to advance the piece on the rollers of my roller frame. Right now the ground cloth’s center is (more or less) at the center of the exposed working area.
On to the questions.
How do you get the design onto the fabric?
I don’t. This is a counted style. I have a paper pattern that shows my repeat, graphed up into a grid. I look at that, then replicate the design on my cloth, using each group of 2×2 threads as my graph grid. It’s just a matter of looking left, seeing “Five stitches in line straight, then one diagonal to the left, then three straight left,” and stitching it.
As I work I constantly check back and forth to make sure that the newly stitched pieces are on target – true to the count of the design. To do that I tend not to work out on a long lead. I try to work adjacent areas so I can check them against each other as I go. For example on this design, I’ll confirm that the ed
My teacher told me that I always need to baste in an even grid before I start a large charted project. Why haven’t you done that?
Because I don’t need to. I do have basted lines that indicate the edges and center point of the area I will be stitching, but I tease them out and clip them as I go along to keep them out of my way. I’ve never used a fully gridded ground with guidelines basted in every ten or twenty stitches apart. I’m comfortable working that way, although I know that others need more alignment aids than I do.
Will you be making this available as a chart or kit?
Not as such. This leafy design will be included in my (ever) forthcoming book, The Second Carolingian Modelbook. (News of that book’s publication will be here on String first). But I won’t be issuing a project chart or kit for this piece.
What thread are you using?
I’m using the vintage “art silk” floss I bought in India. I wish it were real silk, but we do with what we have. One nice thing about it – it’s very fine, and presents much like finger spun if stitched closely.
For the green double-running stitch, I am using two strands of this floss, heavily waxed. For the satin stitch, I am using three strands, unwaxed. The stuff is a bit unruly, and keeping the satin stitch even and smooth is much harder than establishing the design in double running.

What’s the count of your ground?
It’s an 40-count evenweave 100% linen, stash aged. I’m not sure where/when I got it, but I dug it out from the bottom of the pile, so it wasn’t a recent purchase. I’m working over 2×2 threads, so that works out to about 20 stitches per inch. But I think there’s a minute variance in count north-south vs. east-west, so it’s probably more like 20 spi x 19.5 spi.
What will this be when you are done?
A monument to the time it took to stitch.
Seriously, while I had originally thought it would make a nifty pillow for our sofa, complementing the room’s colors and being a different finishing treatment from yet-another-wall-hanging. However, I’ve decided against that. The art silk in satin stitch is too friable, prone to snags and catches. The thought of throwing myself on the sofa and having the rivets of my jeans play havoc with those shiny, smooth bits is a harsh reality check. This will probably end up on my walls, like so many of my other pieces.
FALLING LEAVES
I did not plan to stitch this piece of crimson and gold leaves as a tribute to Fall, but it’s starting to look that way.
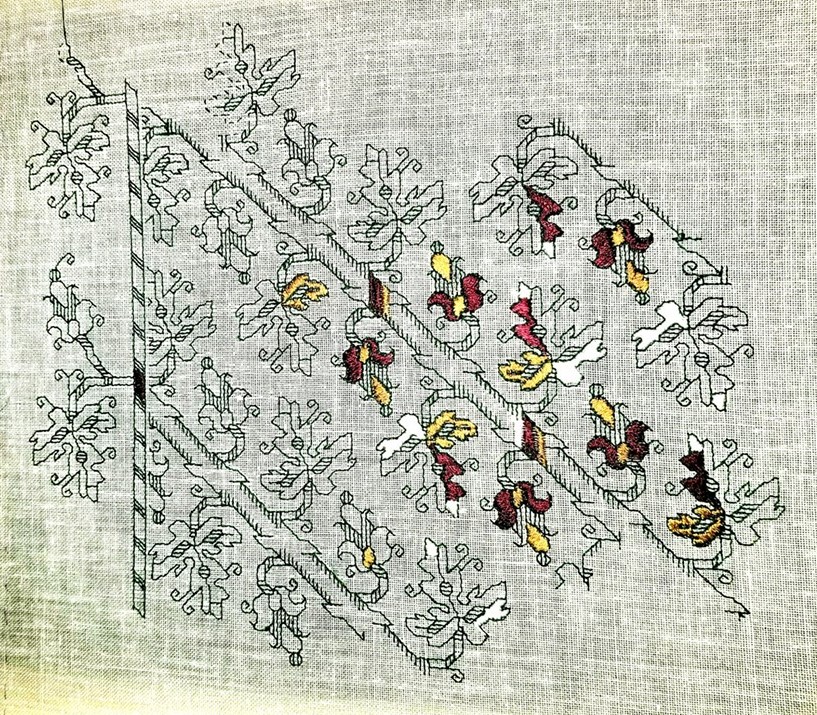
I’m munching along on both the repeat and the border. But being a tad lazy, I’ve been concentrating on the easy-to-do double running, and not on the high-concentration-to-achieve satin stitch. (I envy those who walk through satin stitch and make it look so simple).
This segment is about 65% as wide as the finished piece will be. The center diagonal branches will stretch a bit further to the left, possibly one or one and a half more iterations of the repeat. There will also be a companion border on that edge. I am still deciding whether or not I will add borders to the ends now captive on my frame’s rollers, or whether I will just finish out the design either truncated, or with the narrow diagonal trim, but without the accompanying outer leaves. Lots depends on what this will end up being. That decision is also still up in the air. Pillow? Framed piece? Soft-finished scroll hanging? I haven’t a clue. Not yet, anyway.
In any case, the double running is not presenting a problem. The design is pretty straightforward. Each side of the branch is its own baseline. The only tricky bit is placing the branch sides at the right spot. To do that, I have been using a point where the leaves approach each other closest. That’s the spot with the little “thumb” that sticks out and waves at its counterpart.

I work the next branch side by counting over from the established bit, then proofing my work as I go against other previously stitched areas. Yes, I do make mistakes, but by and large, once I have the pattern down – in this case mostly memorized after so many repeats, counting mistakes are rare.
Much more common is an annoyance of working with one hand in front and the other behind, and blind. Try as I may, I still catch and stitch through my working thread as I push the needle back up from the unseen side to the front. While waxing does help a bit for the double running sections, I still have to stop and de-tangle my stitching thread, often sacrificing a bit to the resulting fray. And it’s worse for the satin stitch areas because those can’t be waxed at all. Not and preserve that lovely sheen.
Since I have only a limited quantity of the thread I am using – more of the vintage “art silk” I bought in India – every inch lost to fraying is heartbreaking. In fact I am working compartmentalized so that I can terminate early, just in case running out of thread becomes all too real.
TAKING ON A LIFE OF ITS OWN
I continue on the Italian Renaissance leafy multicolor piece.

The skewed weave you may see is an artifact of image compression, and is not indicative of the appearance of the ground cloth.
Originally I had thought to do yet another sampler cloth, with lots of designs grouped rather willy-nilly, but I have changed my mind. The look of this particular ground is so striking that I want to do a larger example of it. I also have a companion edging for this all-over that I’m itching to apply. Right now I’m leaning towards a large rectangular piece, surrounded by that edging, possibly using some surface work in gold thread for added bling. I’m not sure what the finish will be, but I am considering making this into a pillow, which is one of the possible original uses for a design of this type.
Along the way I am re-learning the delights of Satin Stitch. It never was one of my faves, but the play of light using the faux silk thread can’t be beat. The deep green I’m using for the counted outlines in double running is waxed, but the satin stitch in-fillings are not in order to maximize sheen. And no – I’m not going to stitch every area in every leaf. I’m going to leave the piece partially filled in as it is above. That’s more or less along the lines of the original, but possibly leaving a bit more unfilled. The decision on working the red on the other half of each large leaf is still being made. On one hand it would look interesting, but on the other hand, so much red would overpower the rest of the stitching. Opinions are solicited here.
I’ve also learned the hard way how NOT to handle the multicolor fill on the branch. Originally I had done it as multiple rows of one-unit tall satin stitch, vertically. That broke up the color too much, so I picked that out and re-did it wider, but with the color broken up by the little bits of cross hatching on the sides of the stem. I am not entirely pleased, in part due to clumsy execution of the first. Working that bit horizontally is right out, both for fidelity to the original reasons, and due to the breadth and spread of those areas. I may need to explore threading my satin stitches underneath some of the crosshatches. Or just learning to do them more neatly…
The current plan is to work up the rest of the area inside this hoop, and then transfer the piece to my big flat frame. The thought of hooping over all that satin stitch brings the visceral feel of fingernails on a chalk board.
ANOTHER OPENING, ANOTHER SHOW
OK. Fresh off Cupids, I begin another haphazardly planned piece. As I start this write-up, I have no clear idea as to what I might be doing. But I do know how to start.
I’ve taken a piece of linen from my stash – it’s probably around 40 tpi – and I’ve hemmed it on three sides. The last side is selvedge and I am lazy.
I have also used regular sewing thread to mark out my absolute edges, and the centerlines. I hesitate to say horizontal and vertical because at this point I am not sure which orientation I will use. Note that I have not gridded the entire piece, nor are my basted guidelines done on any sort of regular count (other than following a specific line across the entire cloth).
Now on to think about threads. I’m tired of the DMC cotton I’ve been using. I still have some significant quantities of the faux silk I bought in India. My color selection is more limited, but there are several that remain in multi skein hanks. I’ve picked out some of these in deep forest, a burgundy, a gold, and an off-white/silvery. Polychrome!
Now on to the design itself. And observations on a design cluster.
I’m basing this one (at least in part) on an artifact on the Philadelphia Museum of Art, Accession 1894-30-114. The image below is cribbed from their site.

It’s a curious piece, not only because of the use of multicolors, but also because of the clearly counted linear outlines plus the satin stitch fills. Here’s my color-change start:

I haven’t done one of these multicolor, filled pieces yet, and I’m interested to see how I can gild this particular lily. In true bungee-jump stitching style I am not sure if I will fill out the entire cloth with this design, or if I will just do it as a center, then edge it around with other concoctions. Time (and thread availability) will tell.
Now as to why I think this one is part of a design cluster.
While I note that the dating for the Philadelphia Museum snippet is a bit odd (they claim 14th century, which to me is way too early), this piece has significant family resemblance to several other artifacts. One is the center panel of my Stupid Cupid sampler. Both it and the one I’m working now will be in The Second Carolingian Modelbook.

The original of this piece is in the Jewish Museum in New York, Accession F-4927.
Here’s another sample of a similar design. This bit is from the Metropolitan Museum of Art, Accession 79.1.14, along with my stitched rendition of the a very similar design as presented in Pauline Johnstone’s Three Hundred Years of Embroidery, Wakefield Press, 1986, on page 17. My bit is in red at the right. I included the chart for my version in The New Carolingian Modelbook.


UPDATE: The sample in Ms. Johnstone’s book (shown below) is a holding of the Embroiderer’s Guild, #5376. It looks like it and the Met fragments are more long-lost siblings. It’s stitch for stitch identical in every detail to the Met piece.

We have a clear provenance with the Jewish Museum’s piece. It’s dated with a reference to the Jewish calendar year 5343, which puts it at 1582/1583 on the standard Western calendar, and it’s from a congregation in Rome. The lady Honorata Foa either commissioned it or made it herself for donation to that congregation. I’ve written about it before.
The Met’s sample is “Italian, 16th century” (The Embroider’s Guild pegs their piece as 17th century); and the Philadelphia Museum of Art’s sample is also pegged as Italian, but bears rather that rather specious early date.
Now these three designs are not the same pattern. BUT they are quite similar in composition, aesthetic, and motif. All three use semi-realistic gnarled limbs in combo of stylized leaves and crosshatched branches. Two employ grape or berry clusters, and two use those odd multi-tier bell like flowers along with the leaves. All decorate leaves either all or in part with parallel lines, or segment them with some areas accented with parallel lines. And all use large leaves of similar form. Two employ similar sprig companion edgings, and all refer back to the crosshatched branch form for a small dividing border between the main field and the companion edging.
I have not yet found a modelbook example of a pattern in this style.
So…
Are these all examples of a regional substyle – a design vocabulary popular in Rome in the late 1500s? Are they products of a specific professional family of embroiders, or a commissioned workshop/atelier? Were these motifs in general circulation – copied from household to household either from printed pages or from previous stitcheries? Were they done by or associated with other members of Honorata Foa’s congregation?
We can only speculate, and acknowledge that these designs are in fact visual cousins, and in all probability present a snapshot of a specific style, from a specific place, and a specific point of time.
UPDATE UPDATE:
Oooh oooh! What should I find in the Uffuzi Museum’s on line taste of their current “Colors of Judiasm” exhibit, but another 17th century piece with stylistic ties to the items above! It’s beginning to look like this particular group has very close ties to the Italian Jewish community of the 1600s-1700s!

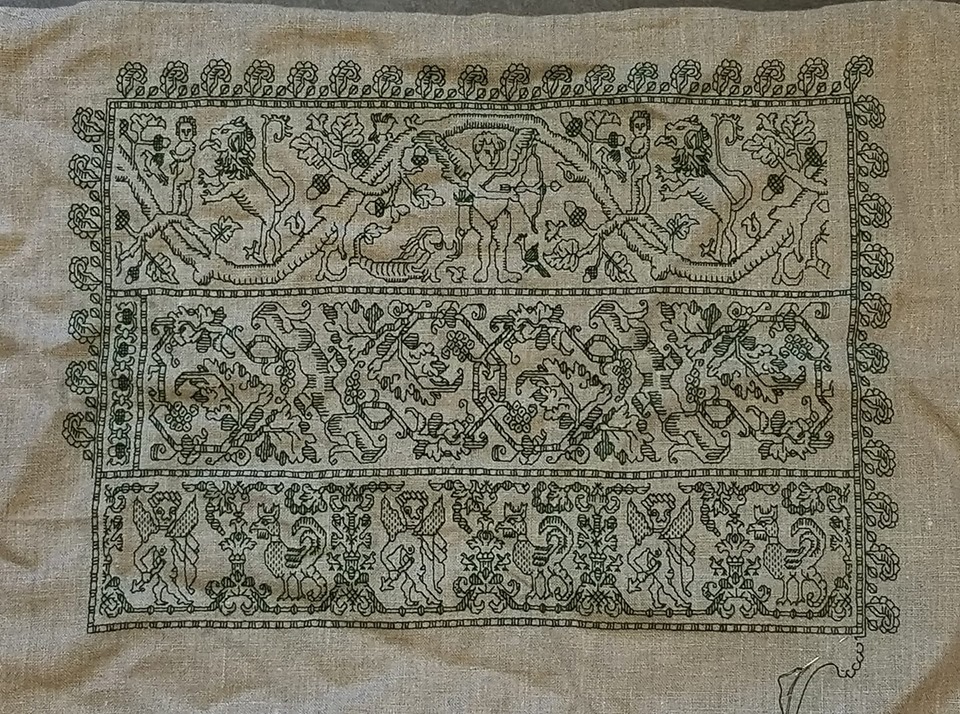
FLOCK OF STUPID CUPIDS
All that’s left to do is to tweak the corners. They don’t match, which is fine, but they should at least be of similar density. It’s also interesting to note that my so-called even-weave linen isn’t quite even. There’s a distinct difference in proportion between the plume flowers done horizontally and those done differently. The verticals are a bit elongated, north south. The same slight distortion also shows up in the proportions of the bottom cupid strip.

And along the way, I found yet another Separated at Birth example – possibly not siblings cut from the very same artifact strip, but close cousins at the very least.
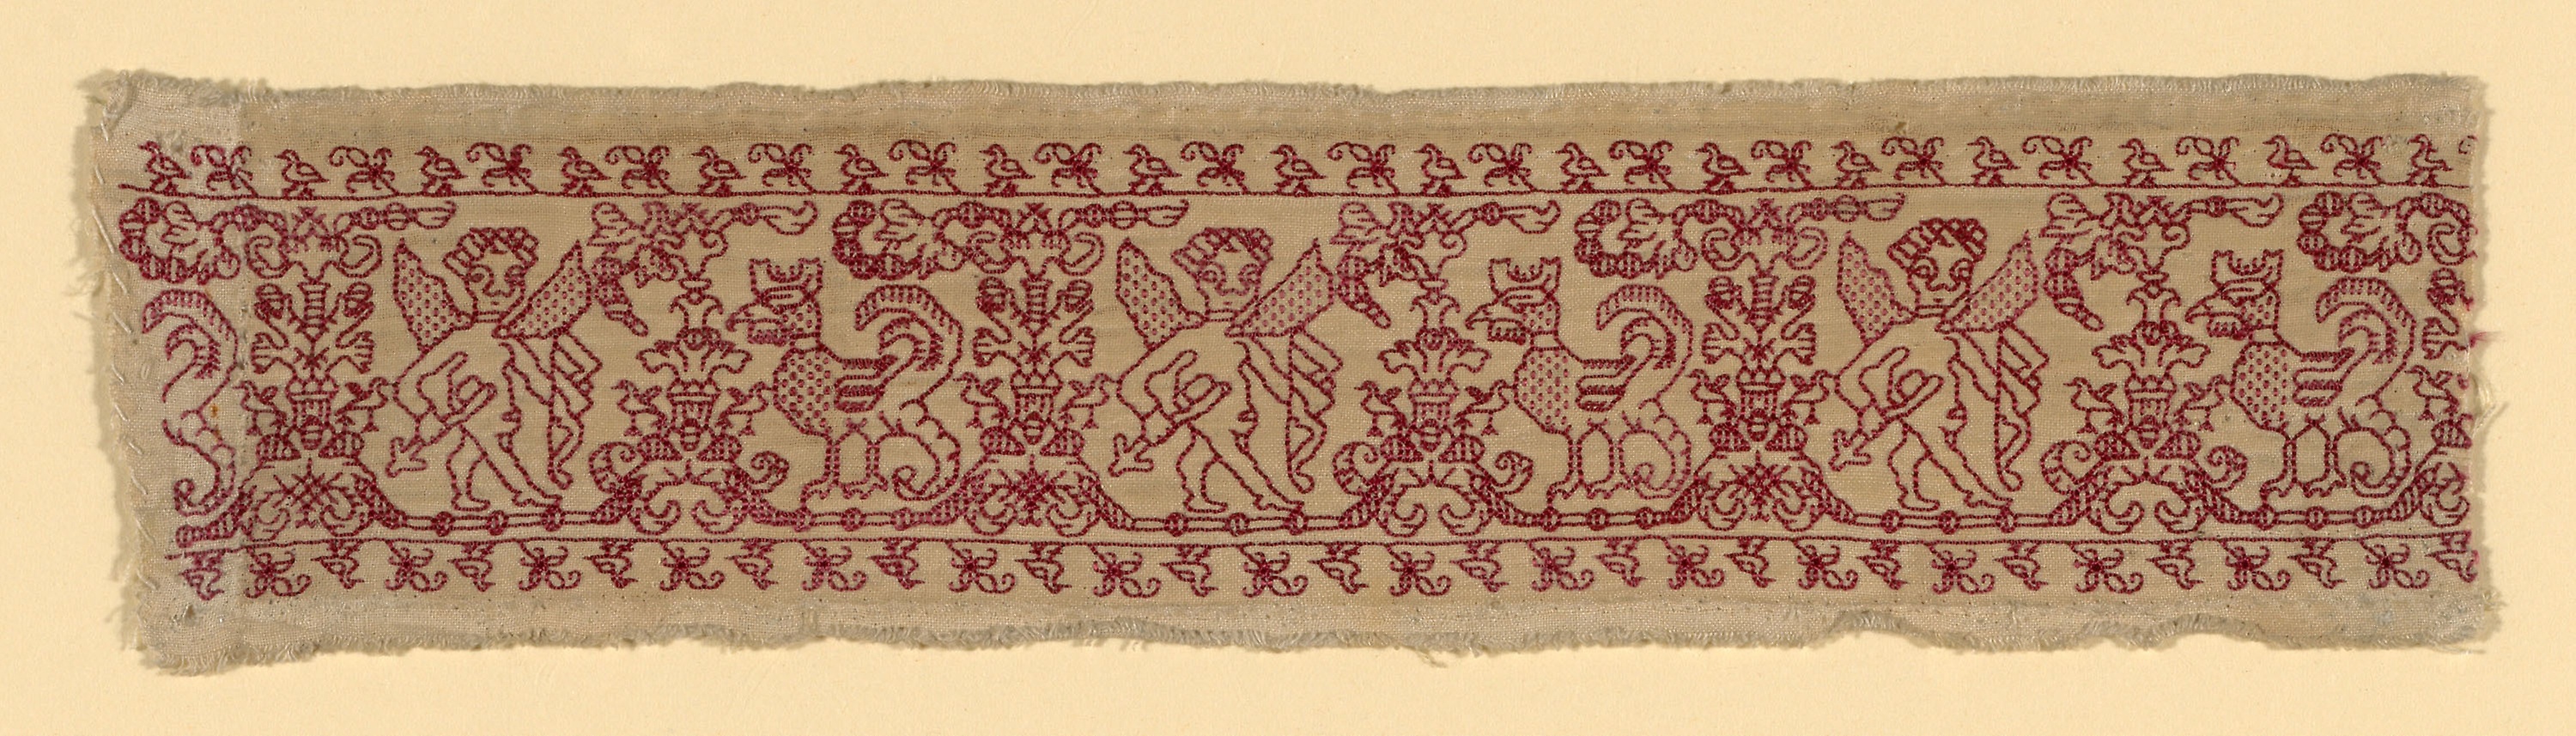
Here’s an example of the derpy cupid and cockatrice panel from the collection of the Art Institute of Chicago, Accession # 1907.665a (in case the link breaks).
And here’s the same design, in the collection of the Cooper-Hewitt, Accession # 1971-50-96. This is the one I graphed up for eventual inclusion in the forthcoming Second Carolingian Modelbook, from which I stitched my rendition. Note that although the stitch counts in the bit below and my rendition are identical, my sample is distorted by the proportions of my ground cloth’s weave compared to the original, which is distorted a bit in the other direction.

AIC dates theirs to 1601 to 1700, and it came to them as part of a Rogers Fund donation in 1907. CH’s sample came from one of my personal heroines – Madeline Hague, collector, curator and historical stitching researcher, and was donated to the museum with other items of her personal collection as a bequest. CH dates this from the 16th-17th century. Both agree on an Italian provenance.
There are some subtle differences between them that I didn’t notice until I had actually stitched up a length of the design. The birds on the narrow companion border on the top edge, although of the same design, do not face in the same direction on both strips. The bow in the AIC example is a bit more detailed, as are the sprouting separators between the cupids and cockatrices, but the CH’s sample has more detail on the cupid’s chest.
Still, the similarities do convince me that the two strips might have been worked from the same broadside sheet or modelbook illustration, or copied from a prior stitchery (or each other). They might have been worked by two people for use on the same original artifact or set of artifacts – cuffs, matching towels, bed hangings or sheets. One intriguing clue is the fact that each one sports a cut end, where the embroidered length is clearly snipped right through the stitching, and a “selvedge edge” where the embroidery deliberately stops before the cloth is cut (on the right on the CH sample, and on the left on the AIC snippet).
So. Were these used in tandem? Are they contemporary? Were they copied from the same source? Were they copied one from the other? We have no way of knowing. But as goofy as this cupid looks, he clearly has a mysterious and secret past.
UPDATE – NOVEMBER 2022
I have found another Cupids artifact, at a different museum. This one is from Boston Museum of Fine Arts, Accession 95.1125.
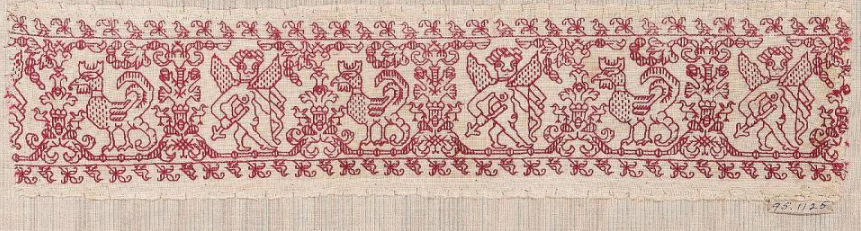
The museum says it is probably of Spanish or Italian origin, and does not posit a date. To confuse everyone all the more, it has the same breast/chest detail as the Cooper Hewitt sample, BUT it also has the lower bow detail of the AIC snippet. It also has the companion border of twigs and birds facing in opposite directions top and bottom, like the AIC holding. And as I examine these all more closely, I find that small details on the Cooper Hewitt sample differ among the repeats shown. For example, look at that chain of “bubble balls” that emerges from the flowered tree in between the cupids and roosters. The direction of the vertical striping on them isn’t uniform. Again the AIC and MFA samples are closer in their treatment of that bit.
PROBLEM AREAS? NOT SO MUCH.
Vacation week was quite relaxing, and I managed to get more stitching done than I thought I might. There’s something idyllic about sitting on warm sand under an umbrella, peeping over the top of the embroidery frame at the ebb and flow of the tide.

I squared off some of the missing bits along the right hand edge, and worked on the plume-flowers that march around the outside, rounding two more corners.
Now that I’m back at home and working from a graph is easier than on the windy beach, I will eke out the rightmost edge of the top cupid/lion strip. BUT the empty area to the right of the center strip is too narrow to subdivide with the established strapped frame. I’ll probably use it to sign the piece with my initials and the date. I’ll draft that space up in GIMP and if necessary, add a couple of small motifs to fill out the area.
That will leave just the corners. Once I have all four I’ll decide on how to play them. I might go back and pick out the cornermost plume-flower at the upper right, then introduce some sort of sprout-off-the-corner-point motif for all four corners, mostly similar, but with slight adaptations to local conditions.
Yes, my bungie jump style of stitching did lead to an unbalanced piece, but I like it. The cupid-cockatrice count problem described in the last post actually did me a favor by introducing a bit of movement and unconventionality into the thing.
Now to just finish my Stupid Cupid Sampler, all the while dreaming up the next piece. Planned or improvised? Your guess at this point is as good as mine. But either way, my plans are rudimentary at best, and you won’t see me drafting out the entire thing stitch-by-stitch.
