PAST PROJECTS AND LESSONS LEARNED – PART 2
Thanks, all for the kind reaction to the last post in this omnibus series. Thus emboldened, I blather on.
The New Carolingian Modelbook came out in 1995. As mentioned before, it started as my working notebook collections of designs redacted from book photos, microfilms of early modelbooks, and sketches of artifacts, then grew from there. Although it was well received, I didn’t get much recompense for my 13 years of work – the publisher only paid royalties on the first 250 books out of 2,000, and ran off with the rest. But I didn’t stop collecting patterns. As originals and artifact photos became increasingly accessible, I kept at it, trying to transcribe designs, norm repeats (artifacts rarely are stitch perfect, and often need to be averaged out – blending all variants and mistakes into one representation), and most of all – collect specific citations and links. This material is the core of my ever-forthcoming The Second Carolingian Modelbook. And along the way, starting around 2010, I couldn’t resist trying out what I had found.
We left off last in the 1990s at the start of my blogging career, so my projects are a bit better documented. As before, I zigzagged between knitting, crochet. I tended to knit more around the time my two spawn were born, and for a while thereafter, and then return to stitching when they were around kindergarten age. For most of the early 2000s I was consumed by knitting and with running the wiseNeedle website with its collection of crowd-sourced yarn reviews. But eventually I began stitching again.
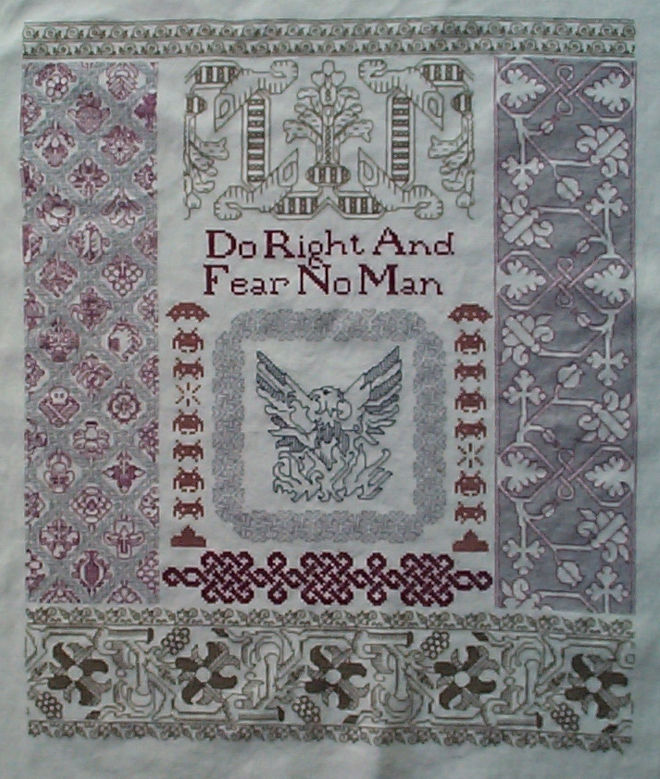
Elder Daughter went off to college in 2009, equipped with this bit of parental nagging. It is about 14.5 x 18 inches, worked on 30 count linen in Danish Flower Thread. Note the debut of the little skull and bones hiding amid the flowers from my Buttery interlace. The graph for the center phoenix is also here.
Lessons Learned: Around the time this was done with the help of Elder Daughter and others, I had figured out a new software solution for linear graphing because the method used for the phoenix wasn’t suitable for publication, and the hardware/software used for my previous work was now obsolete/unavailable. I started consolidating my doodles from various notebooks, backs of envelopes, and marginalia to better learn the methods and quirks of my GIMP-based custom drafting solution. Those experimental notes are what became Ensamplario Atlantio, and all graphs/charts I’ve done since have used the GIMP drafting method.
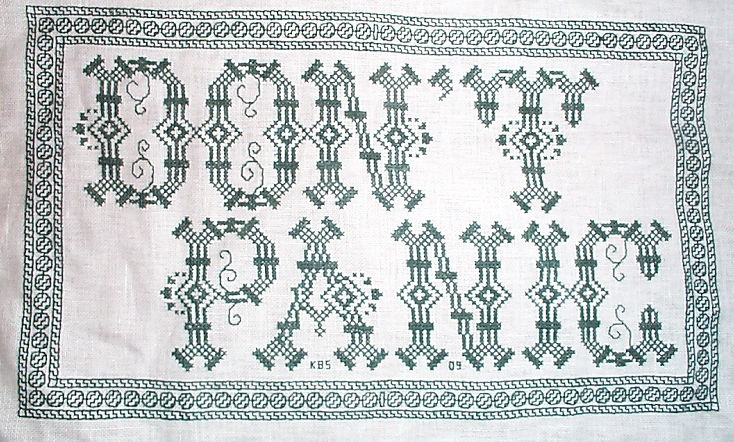
Fresh off the last piece I still had the itch to stitch. I did this part in homage to the Hitchikers’ Guide, part as appropriate decor for my office workspace (by trade I’m a proposal manager in high tech – deadlines and panic are my stock in trade). And possibly part because as parent of a new college student let loose on the world, I needed reassurance. It’s about 8 inches across, and was done in DMC cotton floss on 32 count cotton/linen blend. The bead border chart has been up on String for a long time, but I’ve also recently released a free full-graph pattern for this piece. Enjoy!
Lessons Learned: I was still experimenting with graphing out the lettered part ahead of time. Previously I had just guessed. This was also the first piece with a border I started in the corners rather than at the center, so that any “fudging” could happen in the center. While the north south bits of the frame worked out evenly, you can see the improvised bar in the center I inserted when it became clear that my bead repeat would not fit. And I bet you would never have noticed it if I hadn’t pointed it out.


Continuing the SF theme into 2010, I did this piece, featuring a quotation from noted author Arthur C. Clarke. It’s the first one to have designs from The Second Carolingian Modelbook (T2CM) on it, along with patterns from my earlier books. The new bits include all the full width designs between “ADVANCED” and the adaptation of Bostocke’s strawberries at the bottom. The narrow bands left and right of the wreath and column are a mix of older and newer designs. This one also hangs in my workspace now, to the confusion of my (mostly non-SF loving) coworkers.
Lessons Learned: I had a lot of fun with this one. I played with multiple thicknesses of thread and density of design, along with the two colors, and enjoyed balancing the effects that could be achieved with that limited group of variables. The strips are a mix of one and two strands of standard DMC floss. The solid ground voided strips are all in LACS, as is the foreground stitched daSera repeat from TNCM at the very top. I was particularly pleased with the hops panel shown in the detail. The design was done in two strands, but the (non historical) ground behind it – the diagonals worked mirrored – was done in single strand.
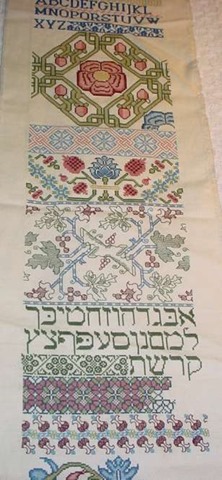
By 2012 I was full throttle on pulling together a sequel to TNCM. Drafting and writing for The Second Carolingian Modelbook (T2CM) was off and running. And of course I had to playtest the designs as I went along. Most of these (with three exceptions I worked from Lipperheide) are in the sequel. The big black sampler is done in silk on 36 count linen. The stitching area is about 24 inches across. Understandably it took me about 13 months to finish, and will be on the cover of T2CM. It was an eventful year, that included Younger Spawn’s appendix adventure, and the demise of my all-volunteer wiseNeedle independent website, out-competed by Ravelry and other paid-advertiser info sources.
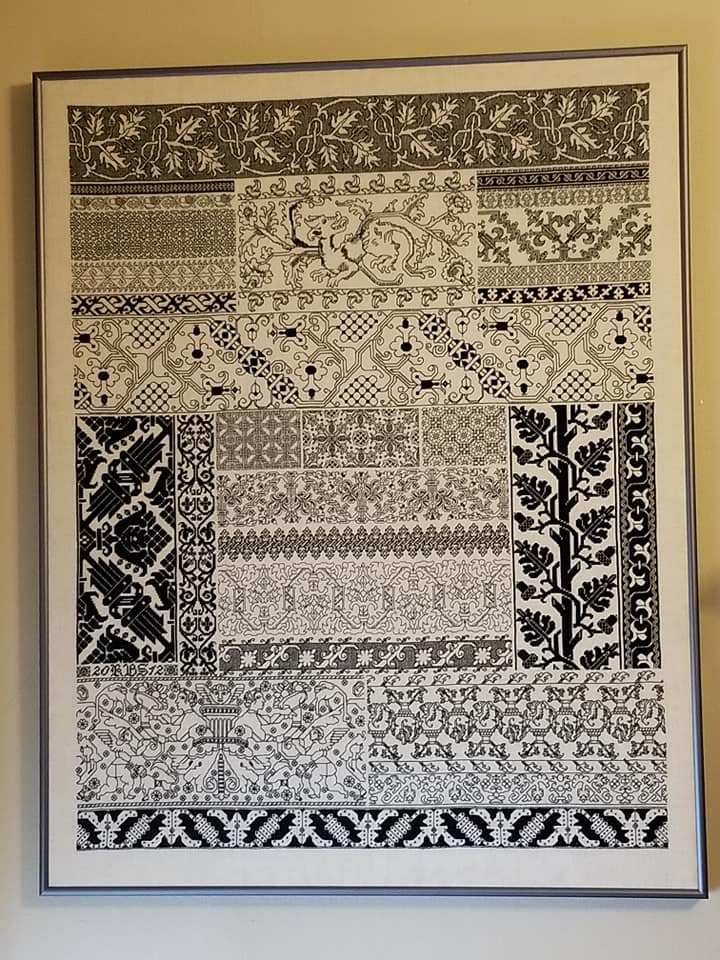
No new stitches to speak of in this one but I did use long armed cross stitch on the panel at the very bottom, the oak leaf and acorn bit, and in the spot fillings for the “beads” in the wide meander just below the lion/dragon beastie. The texture it produces when massed has a very plaited appearance compared to plain old cross stitch.
Lessons Learned: Composition and balance work better if you impose a tiny bit of order on the chaos. I basted in several guidelines, dividing my total piece up into several zones. Although I picked them on the fly with no real advance planning, worked my individual panels and strips inside those zones, making sure to ground the piece at the top, bottom, left and right with darker, denser designs.

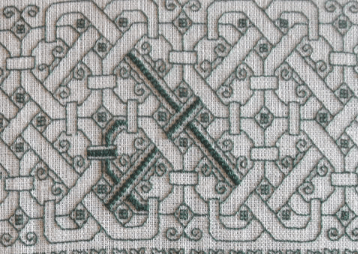

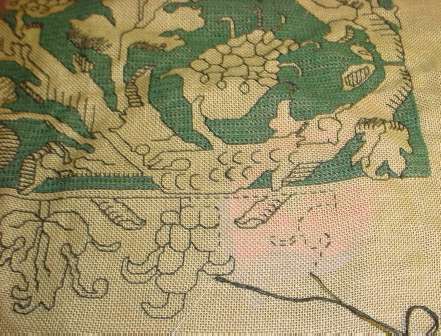
2012 marked the start of Big Green, done in silk on 50 count linen. Unlike the ones above, he is still unfinished. The designs on this one are entirely from T2CM. I WILL go back and finish this piece, but other things have gotten in the way. I took it with us for our sojurn in India, but between the heat and lack of a good spot to sit and stitch, I never got much further on it. Also the meshy technique is amazingly time consuming. One two-hour evening will produce a patch about the size of a quarter. One thing to note about the meshy stitch – I now know why it has survived on so many pieces even when the surrounding linen is long gone. It’s amazingly dense, near indestructible, and I can say truthfully – impossible to pick out. By contrast surface voided work is fragile, catching and degrading with abrasion, washing and wear.
Lessons Learned: I have been using this piece to experiment with stitching techniques. The interlace (first detail) uses Montenegrin Stitch. The straight runs were pretty easy, but without the most excellent Autopsy of the Montenegrin Stitch by Amy Mitten, the bendy bits would have driven me insane to figure out. And the big voided repeat where I stalled out (a stitching family I’ve nicknamed “The Lettuce Repeat”) is done in the tightly pulled meshy technique so common among voided artifacts. I had first tried out a different pulled thread technique for the topmost design, but the effect was nowhere near that of the historical pieces. But at maximum tension Italian Four Sided Stitch, based on the technique in Christie’s Samplers and Stitches (1920) was spot on. But it has to be done in silk because cotton isn’t strong enough to stand up to the force required to achieve the solid mesh. (My previous reference to the stitch was based on another edition of Christie’s work, now no longer accessible on line). And it’s (relatively) easy to hide ends while working it – burying them in spots that will be totally overworked later.

That 2013/2014 stay in India necessitated a scouting run to find housing and schools in May of 2012. I needed something small and portable to do on that trip, so the first two book covers were born. I worked these from T2CM patterns on 30 count linen/cotton blend, using DMC floss. They were small Moleskine-look-alikes, and were donated to the SCA East Kingdom’s largess program, to be given as small gifts by the seated royalty. Although I put notes in each one hoping that the recipients would get in touch, I have no idea where these ended up. Still, they were quick stitch pieces and fun.
Lessons Learned: While I have always known that stitching is a wonderful icebreaker, especially during International travel, at this point I had no idea that Kasuthi existed. It’s a traditional Indian stitching style and very close cousin to Blackwork’s precursors. A lady in Mumbai airport remarked on the black and red book and asked where I had learned to do it. That sparked yet another flurry of research.

Most of my production in India was knitted, largely lacy pieces. I did a couple of test knits of pieces designed by the generous and well-followed MMario, now of blessed memory, and a couple of other bits of my own design. I had many knitpals in Pune, whom I had “met” via Ravelry prior to our arrival. That kept me more or less in that craft, but I did do some small excursions into stitching. One was the red Ganesh cloth, above. I stitched it in 2013 as a new-house gift for the parents of our driver, Rupesh. I do hope it has brought the family the intended luck. This one is pretty well documented here on String, including the source of the outlines and Ensamplario Atlantio fill numbers for all of the motifs I used. It’s done on a not-so-even weave 32 count cotton/linen blend, in DMC floss.
Lessons Learned: The Italian hem stitching I used to finish off the cloth neatly actually took more time to do than Lord Ganesh himself. But I liked it, and filed that family of stitching away for future reference. Someday.

In 2013 I tried my hand at Kasuthi. This little motif is a traditional one, and is worked entirely in double sided double running stitch. It’s on a relatively coarse 28 count cotton, also in DMC floss. My main reference for Kasuthi was Karnataki Kashida by Anita Chawadapurkar and Menaka Prakashan. It’s in Marathi, but friends helped out by reading bits to me in translation. Here’s a post I did on the style.
Lessons Learned: I had originally intended on making a set of napkins, but when I washed this piece, the oh so carefully ended off threads, so well buried and invisible here, did fluff up a bit. So I scotched that idea.

Also in India, just before we left in 2014, I started this piece, with the intent to make a pouch for my stitching tools. The cloth is a standard linen dish towel, bought at a local supermarket. The thread is also linen. It remains unfinished.
Lessons Learned: While this ground started out as a very stitch-able 32 count more or less even weave, tossing it in the washing machine shrank it in unexpected ways. The threads in one direction ended up being about 30 across. Those in the other direction ended up something closer to 42, so the dimensions of the thing deformed. But undaunted I tried to stitch anyway, working over 2×3 threads. But the smaller threads were very hard to see, and the linen thread frayed beyond belief (this was before I learned to use beeswax). It sits in my Chest of Stitching Horrors(tm), never to be completed.
This takes me up to around the time we returned from India, in 2014. And I’m not done yet. If interest has continued, I will do one more of these, to finish out up to the most current things on my frames.
PAST PROJECTS AND LESSONS LEARNED – PART 1
This post is to answer Susan and Michelle, who asked how long I’ve been doing counted stitching and blackwork, and who wanted to see some of my other pieces.
At the risk of tooting my own horn, here’s the story. More or less. Over the years, I’ve cobbled together a few publications (some still unfinished); given away many pieces; started more projects than I’ve completed; and wandered away to and back from knitting and crochet. Please indulge me as I reminisce. I promise to put in lessons-learned as I go along to make it bearable.
All of these are original compositions of found and/or original motifs. I haven’t done a counted work kit or pattern designed by someone else since I was 12. It looks like I don’t often finish, which while it has some truth to it, I’ve given away many of the completed pieces, so what I have in my stash to show off are the unfinished bits.
The first counted project I did that’s not plain old cross stitch and is in the greater continuum that includes blackwork (that I still have) is a sorry, unfinished sampler I began in high school, circa 1973/74, continuing on and off up to January 1975. There are double running bits in it – among the very first I ever did. Most of the designs I cribbed from photos of band samplers and traditional pieces – taking magnifying glasses to the teeny and blurry photos of historical or ethnographic pieces in general survey embroidery books and books on samplers. It’s probably on 28 count even weave, using Coats & Clarks floss. Colors were haphazard at best – I used what I had at the time, and din’t plan much in advance.

Lesson Learned: A glimmer of the sad truth that while I am a starter, it’s much harder to be a finisher. I suppose I could go back and add in the tree and animals I originally intended. But there are so many other things I want to finish off first.
By the spring of my freshman semester, I found the SCA – an organization that advocates the hands-on exploration of the arts, sciences, and entertainments of pre-1600 cultures. That put the nail in this piece (being a mishmash of post 1600 band sampler patterns), but I found an inspiration. I had need to make a favor for a certain individual with a Spanish persona. So I zigged sideways and back in time a bit to blackwork, stitched over the summer of 1975. It’s the project that killed the sampler, above.

The only information I had on blackwork during the summer I stitched this was a tiny thumbnail photo of the Faulklands Cushion in Mary Thomas’ Book of Embroidery. I drew the leaf shapes and my device, and did diapered fillings freehand, on muslin. There’s also a bit of needle lace around the edge, with points at the corners – everything now dirtied and tattered by use. (The silver horse is couched and surface stitched – it’s a pouch, also a present for the same person.)
Lessons Learned: In retrospect – research. Learn and do, not the other way around. There is a lot about this piece that’s flat out wrong, but my heart was in the right place (and also properly given). Also far more people were interested in learning how to do blackwork than the couching, or in a bit of needle lace I was also working at the same time.
The next bit of blackwork I did was after I did a bit more investigation into the style, both for my own edification, and because I wanted to encourage others to do historical stitching, and to do that, I needed to know more about it first. This piece started out as a cushion cover or possibly a tablecloth but within three days of the start, turned into an underskirt for my coronation dress (started just before the crown tourney, October 1976, worn in April 1977). Major thanks for the inspiration to do this piece go to Mistress Kathryn Goodwyn, who gave me Bath’s Embroidery Masterworks book, which in turn furnished the rough outline of the coiling fruits, flowers, and leaves.

The original dress is long gone, but I still have this Melton wool monstrosity with the entire panel – still a squared off (I never cut off the side bits). There are some small stitched areas you can’t see here, hidden inside the skirt, but the piece was never completed as a full rectangle. It’s worked on a sale faux linen coarse weave tablecloth my mother found on a department store sale table. Probably at something like 30 threads per inch (about 15 stitches per inch). This one is more accurate – diapered fills on the count, heavy twisted chain stitch outlines, satin stitched berries.
A bonus – I wrote a paper on the style and also submitted the piece for credit in my Sophomore year art history course, so not only did I have an SCA coronation dress, I got two As for it in mundane life.
Lessons learned: Stitching to deadline does suck some of the fun out of the project. My double-deadline (our coronation and the associated schoolwork) come to mind every time I look at it. It’s also an excellent reference piece, because I can look at each leaf and know exactly which class and lecture I was sitting through while I was stitching it.
The next thing I attempted was a coif, circa 1979 or so. For some unknown reason I wanted to use muslin as a ground. It’s about 70 or so threads per inch, done with super fine handsewing thread – roughly 35 stitches per inch. I never finished (obviously). This little bit was donated to the East Kingdom Doll Project to better equip my tiny effigy.

Lessons Learned: It’s good to be ambitious, but to be overly so isn’t worth the effort. The teeny-tiny stitching here is largely wasted. At this scale it’s so small that one has to be six inches away to make out any detail.
After this came a series of small pieces, given as gifts, plus works in other embroidery styles. I also issued two booklets of designs for blackwork, hand drawn and photocopied. And I learned to knit. The next piece I still have is this sampler, made circa 1983, in part to remember my father and his favorite saying. It’s DMC floss on a plain linen table runner found in a church rummage sale discard bin.

Many of the designs on this one were in my hand-drawn booklets. But shortly after this I became increasingly rigorous in my documentation. My early notes were lost in an apartment move, and I had to begin again from scratch. This collection bridges that period and moves from my rather more scattered previous inquiries to more of what I am doing now. Note that the sunflowers and hearts on my ’74 piece are here again, just above my signature. There are also four designs on this that I sketched from a missionary’s collection of Chinese designs, collected in the 1890s. I ran across those notes while working as an intern at the Harvard Peabody Museum, circa 1977-1978. A few of the better documented bits made the cut and ended up in The New Carolingian Modelbook (TNCM).
Lessons Learned: Large and done on the fly (added design by design, with little advance planning) I discovered I liked the adventure of “bungie-jump stitching.” Looking back now I am not entirely pleased with the balance of the composition. But it includes a few well-loved motifs and still hangs proudly on my wall.
Next up were a few play test pieces of the designs that were in my earlier hand-drawn booklets that later became the core of TNCM. These were done in the 1980s and 1990s.
The piece above is a bit from a sampler intended as a wedding present for a friend whose engagement sadly ended before the sampler was finished (circa 1985). It’s done in DMC cotton on 32 count linen. I still have it and it’s still not complete, due to some vague association with the unfortunate end of the inspiring romance, and not wanting to tempt fate.
Lesson learned: Don’t pour effort into something that depends entirely on circumstances out of your control. Also, picking a limited color set and sticking with it provides a lot of unity in what might otherwise be a very scattershot work.
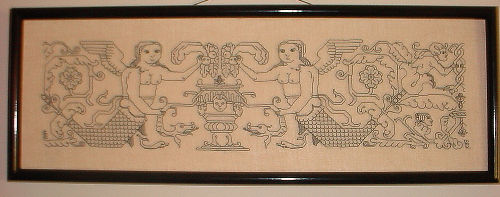
These shameless mermaids that got an honorable mention award at Woodlawn Plantation. I stitched them in 1988, Au Ver a Soie Silk on 36 count linen. I like that I didn’t center the motif on this one.
Lesson learned: It’s surprising what will offend people. The prize committee pinned the ribbon over the bust of one of the mermaids, and put a post-it note over the other. And then hung the thing alllll the way up near the ceiling of the main room, where no one could peek under.
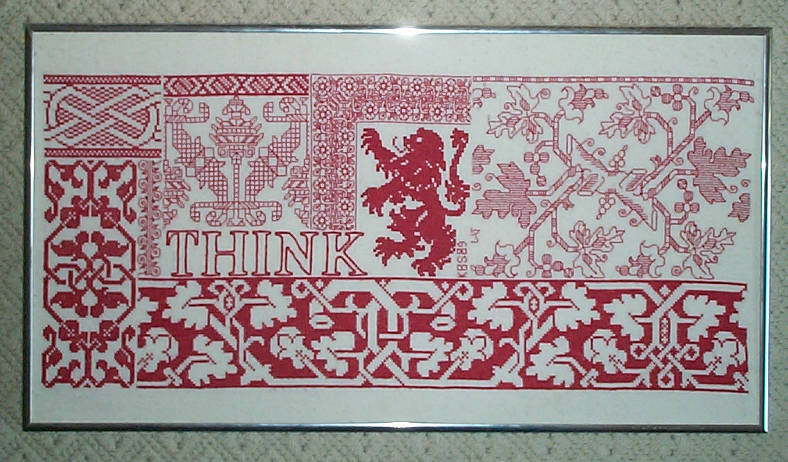
“Think.” Done for the husband in 1989. DMC on 32 count linen around 1989. The leafy log panel (in TNCM) looks familiar? Scroll up – it’s also on the wedding sampler, but there in multicolor.
Lesson Learned: Visual density of small designs can be overwhelming. I always loved my original briar rose tangle – the corner design surrounding the lion, but only on paper. I’ve never been happy with it stitched up. The detail is entirely lost.
Circa 1990 or so I began work on my Forever Coif. Silk and silver, on 50 count. It’s still on the frame. It was intended to go with a reworked dress that featured the underskirt panel shown up at the top of this tirade. But it was not to be.


The fruits and flowers in the standard strawberry frame are original. I’ve lost the notebook where I had additional motifs doodled up. To finish I will have to think up new ones.
Lesson Learned: I’m still lousy at finishing. Eventually I will. But not as a coif – probably just as a rectangle, and wall-mount. Also, don’t design in a medium that doesn’t allow easy back-up. After this project I switched to drafting on the computer, exclusively.

“Do not Meddle in the Affairs of Wizards, for they are Subtle and Quick to Anger.” For the husband, in 1995. DMC on 36 count linen One of my faves, with several TNCM designs. This is also the first piece I did that used long-armed cross stitch (LACS) both for foreground in the daSera knot in the center, and background on the bottom motif that looks like an S designed by a Renaissance era Dr. Seuss. More reuse of bits on this one, too, including a scalloped edging (below “wizard”) that’s also on the very first piece on this page.
Lesson Learned: People are easily mystified when you break your words up in a non-standard manner. Also, LACS is lots more fun than plain old cross stitch.
Partially finished shot of a large leafy repeat that’s shown in TNCM. I did finish this but have no pix of the final object. Given to a dear friend after completion circa 1996. Danish Flower Thread on 38 count linen, and more LACS.
Lesson Learned; Take more photos.


Two “try out” pieces, just playing with no intent to finish either one. Upper one in linen thread, lower one in Danish Flower Thread on 38 count linen. The grounds on the voided strips are all long-armed cross stitch.
Lessons Learned: A lot. Neither of these grounds are true even weave. I was playing with how skew weaves distort designs. The one on the bottom is counted over 3×2 threads to make up for it.
This just takes me up to 1998 or so and I’ve skipped lots of pieces for which I have no photos, but this post is getting long. I guess the main lesson learned is that practice and perseverance help in any pursuit, even the most trivial. If people are interested, I’ll keep going.
DETERMINING THREAD COUNTS OF SMALL-GAUGE LINENS
Lately I’ve been seeing discussion of linen, and whether or not it has to be even weave, sold specifically for counted thread work to be suitable for blackwork, cross stitch or other forms of grid-aligned stitchery. I maintain that while that does make things easier, and guarantees a certain precision look, it may not always be needed. Here’s a sample of a not-quite even weave being used for double running stitch.

First thanks to My Stealth Apprentice for the lovely linen remnant I’m using.
While it looks pretty uniform, it’s not. Up close you can see that the thread count is not even in both directions. Also you can see the combo of thin and thick threads that I admit can make stitching a challenge. But you can also see that both circumstances don’t quite matter as much as one might think.
My own counts, estimated by trying to take measurements between two pins placed an inch apart have been off up until now. But totally by accident, I’ve hit on a better way to calculate thread count, and it happened by using a standard US penny as a reference point to show relative scale.
The penny is three quarters of an inch across by specification. By taking a zoom-in photo, then counting the threads it obscures, we get a vertical thread count of about 33 threads in 3/4″ (counting the threads “tall”), and a horizontal count of about 25 threads in 3/4″ (counting the threads “wide”). A bit of math – multiplying both values by 1.33 – and that works out to a thread count of about 43.9 x 33.25 threads per inch. Not even weave in the least. But I can still work a (slightly squashed) rendition of the design on it. It’s distorted, but in a way that would not be apparent if this was to be done entirely as a strip.
However, I AM working this design as a frame around my central motif, complete with corners, so the skeleton dance will appear rotated to fit all four sides. Just as this bit is slightly squashed north-south, when I get to the side 90-degrees from this, the design will be squashed east-west – making my bony bois and pomegranates taller and thinner than they will appear here.
Optimal? Maybe some folks would object. But I am betting that it will still look good.
Oh, and add a penny (or any other coin or flat object with fixed and known dimensions) to your stitching gadget box, along with your phone’s camera. It’s much easier than those pins…
STAYING BUSY
What have I been doing of late? Well, being lucky, I can work from home, so that’s been taking up most time, especially with major deadlines in the past week. In the time that’s left over, I have to stay busy, and not as a sacrifice to the “cult of productivity.” Mostly because unless my hands are occupied, my thoughts wander to dark places.
I have subdued a reluctant sewing machine and run up some face masks for my family:

I’ve been knitting a pair of socks from a gorgeous ball of yarn I had put away as being “too good for socks.” Well, I deserve nice things, too.

I’ve done some casual research, and found another rendition of The Old Castle design, dated to 1590-1610. I added it to my round-up of the designs in that family.
And I’ve embarked on a new stitching project. It’s a curious one that has no short explanation behind it, and in a way – it’s the ultimate FanGirl project.
As I’ve mentioned before, The Resident Male (pictured above) writes prime SF/fantasy. He is currently working on the second book in his Blair and Terendurr series. One of the delights of living with an author is that you get to read the output long before it escapes into the wide, wide world. And if you are really lucky, parts are read out loud to you as they are completed.
One of the stories in the forthcoming second book features a rather unusual band of confederates. I can’t go into more detail because I don’t want to post spoilers. But they have a motto in an other-worldly language, “Lucus Orthai Ta,” which translates roughly to “Life’ll kill ya.” I thought it would be fitting as his #1 fan to make a present for my author: an embroidery of this phrase, framed with The Dance border I posted here last week.
I started by combing through my usual haunt for unusual alphabets, Ramzi’s Patternmaker Charts collection of near 100 year old Alexandre, Sajou and other pattern booklets and leporellos, The one I picked is the third one on this page. They don’t get much more baroque or difficult to read than that set of squiggles. Perfect for an alien language.
And so I present the start – working out from the center and in cross stitch for the lettering, on 44 count almost-evenweave linen in “art silk,” it will take me a while to get to my skeleton army in double running stitch. But I will…

As for the story, you are just going to have to wait for him to complete the second book. It will be worth the wait!
BOOKMAKING 110: THE GRAND FINALE
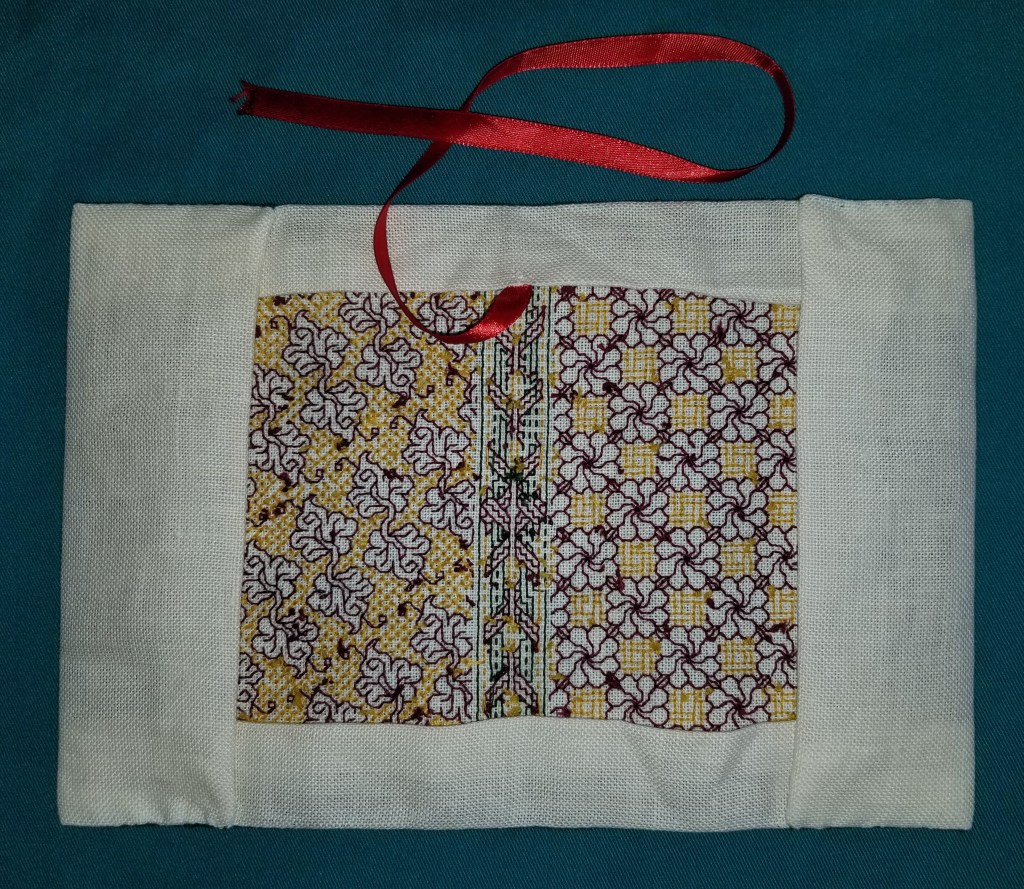
And just like that, the cover is finished and mounted on the target book:

And pix of the thing off the book, Here’s the outside, with everything finished off and sewn flat:

And the inside (with my reverse in all its messy splendor):
To clarify what was done:

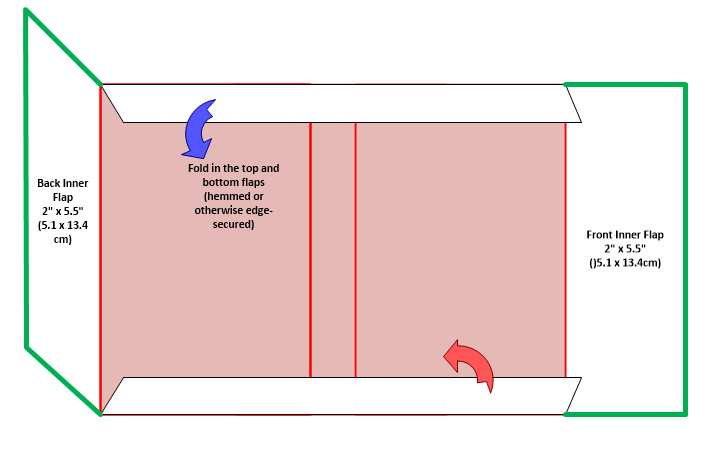
- As shown above, first I folded in the top and bottom flaps, but I didn’t bother to hem them – I just made sure that the raw edges were covered. There will be no wear and tear on these flaps, so there was no need to protect them further.
- Then I folded in the left and right flaps. BUT in this case, because the book covers may slide in and out of the stitched jacket (if the recipient decides to feature the other side as the front cover, or ever replaces the book itself) – I did hem them for stability.
- The next step was to stitch the placeholder ribbon to the underside of the top flap. I left it extra long, so that it could be fished out and used, no matter which of the two sides of the embroidered jacket were deemed to be the official front.
- After all four flaps were prepped I stitched the edges of the left and right flaps to the top and bottom edges of the book cover’s front.
Now that last step can be done in several ways. The easiest is a simple whip stitch or invisible hem. But I never take the easy way out. Instead, I went back and extended the green double running line that defines the top and bottom edge of my stitched area out along my fold. I couldn’t put the thing back into the frame, so I did it in hand. Then having two green lines established, I used the same green embroidery floss to work them together, following (more or less) the logic that people who make biscornu use to seam together the two squares that form their curious little pincushions. A good tutorial for that is here.

The image above shows my wobbly last minute double running stitches, and how I united them front and back to make a heavier edge seam.
Finally, having done all of the finishing work, I slid the book’s own covers into the flaps of my stitched jacket. Here you see them in place, with the handy help of a large corkscrew, since I was running out of hands to hold everything in place.
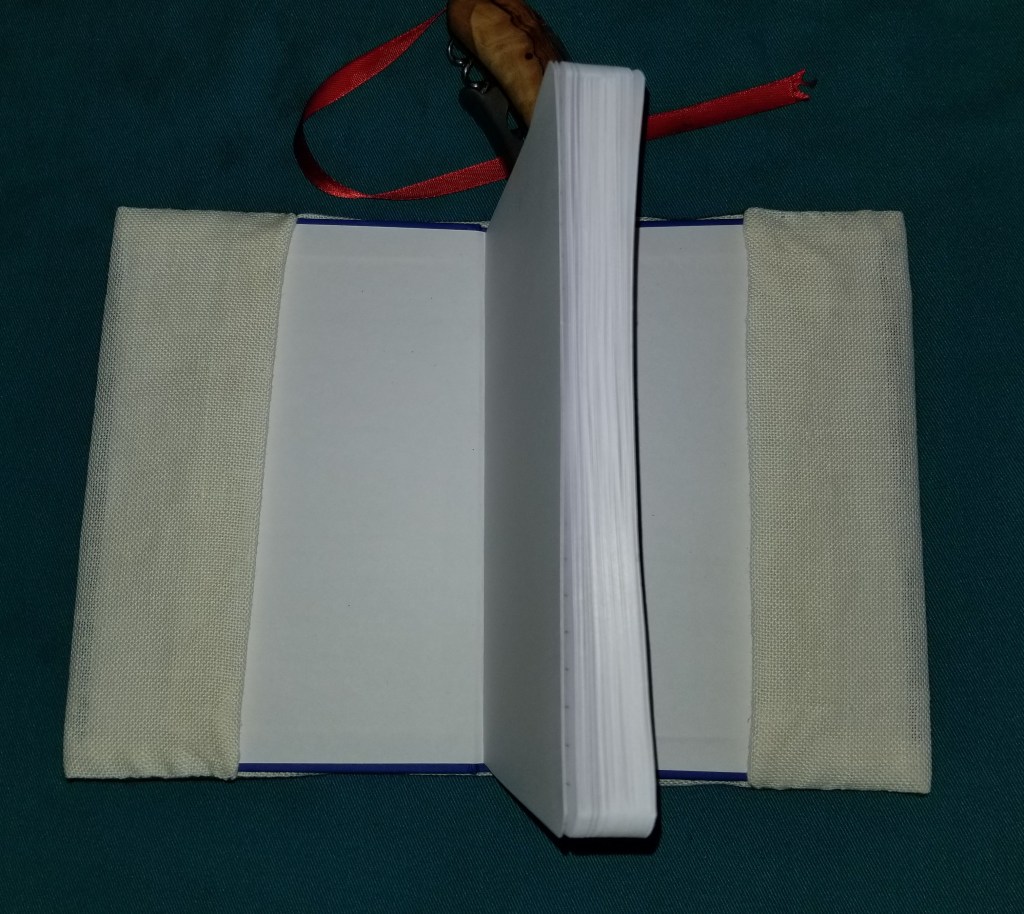
And so, taaa daah! A small book with a nifty cover. A stitched project that doesn’t take up wall space, that can be adapted to any size book you have on hand. Embellish a devotional book that means a lot to you; or at the other end of the spectrum, disguise a racy novel for discrete subway reading. Use any pattern that tickles your fancy. Or several if that’s what speaks to you. But whatever you do – enjoy, be creative, and feel the pride in coming up with something that’s specifically and personally meaningful to you.
This concludes my stitched book jacket tutorial. Please post questions if you have them – I’ll do my best to answer.
BOOKMAKING 108: RIPPING OUT AND RECOVERY
The last post of mea culpa probably left people wondering how it was going to all turn out. Here’s the result:

I only needed to tease out one straight line of stitching – the former rightmost edge of the previous side. Now the two borders join to make one larger mirrored strip that takes up the spine area and wraps around to be visible on the front and back. Not as I originally planned, but acceptable.
And I have been able to keep going on the second side, working my double leaves in red, and the diamond fill ground in yellow. Again, not as originally planned – the repeats will not be neatly centered left/right, but because this particular fill is eccentric, I bet it won’t be noticed by anyone who isn’t aware of the problem in the first place. (Mom, avert your eyes).
Now on to today’s submitted question:
How do you rip back?
With great care.
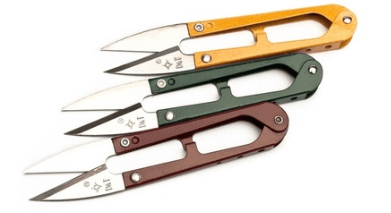
It’s very easy to inadvertently snip the ground cloth, and that’s a tragedy when it happens. But I have some tools that help.
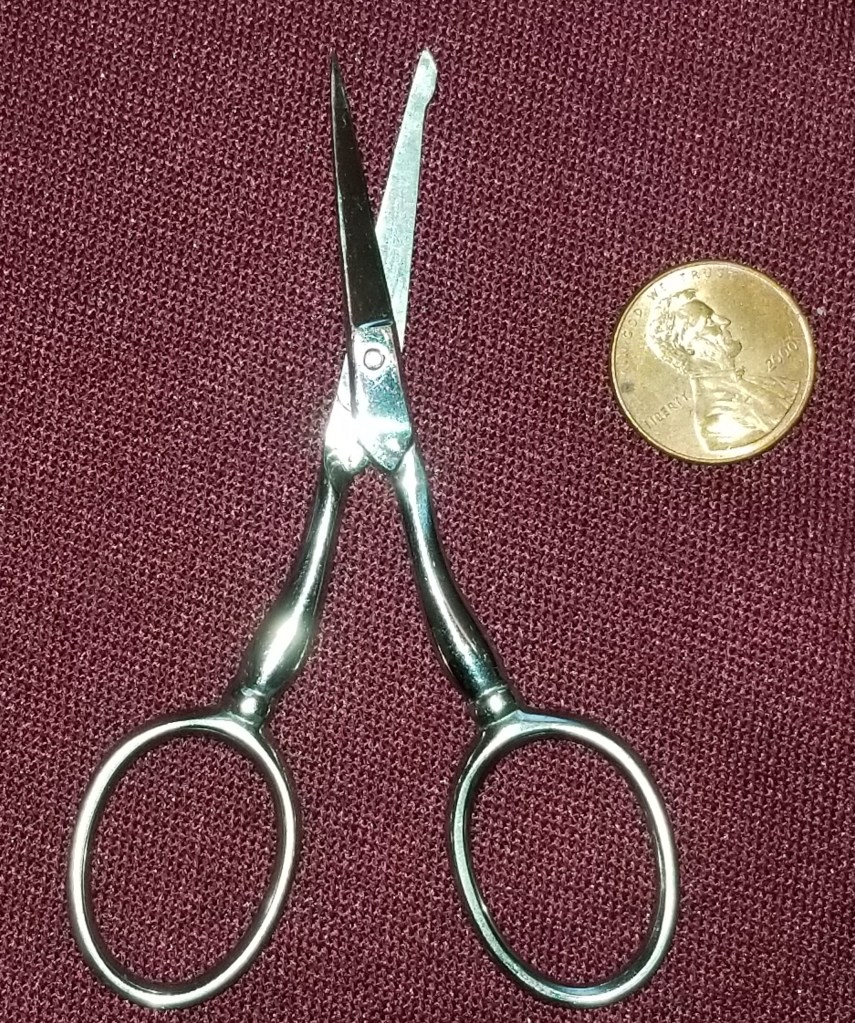
The first thing is a pair of small embroidery scissors with a blunted tip. These are the latest addition to my ever growing Scissors Stable, and a recent holiday gift from The Resident Male. Note that one leg has a bump on it at the tip. That’s the side that is slid under the errant stitch being removed, to make the first snip. Although these are sharp all the way to the tip, the bump helps prevent accidentally scooping up and nipping the ground cloth threads.
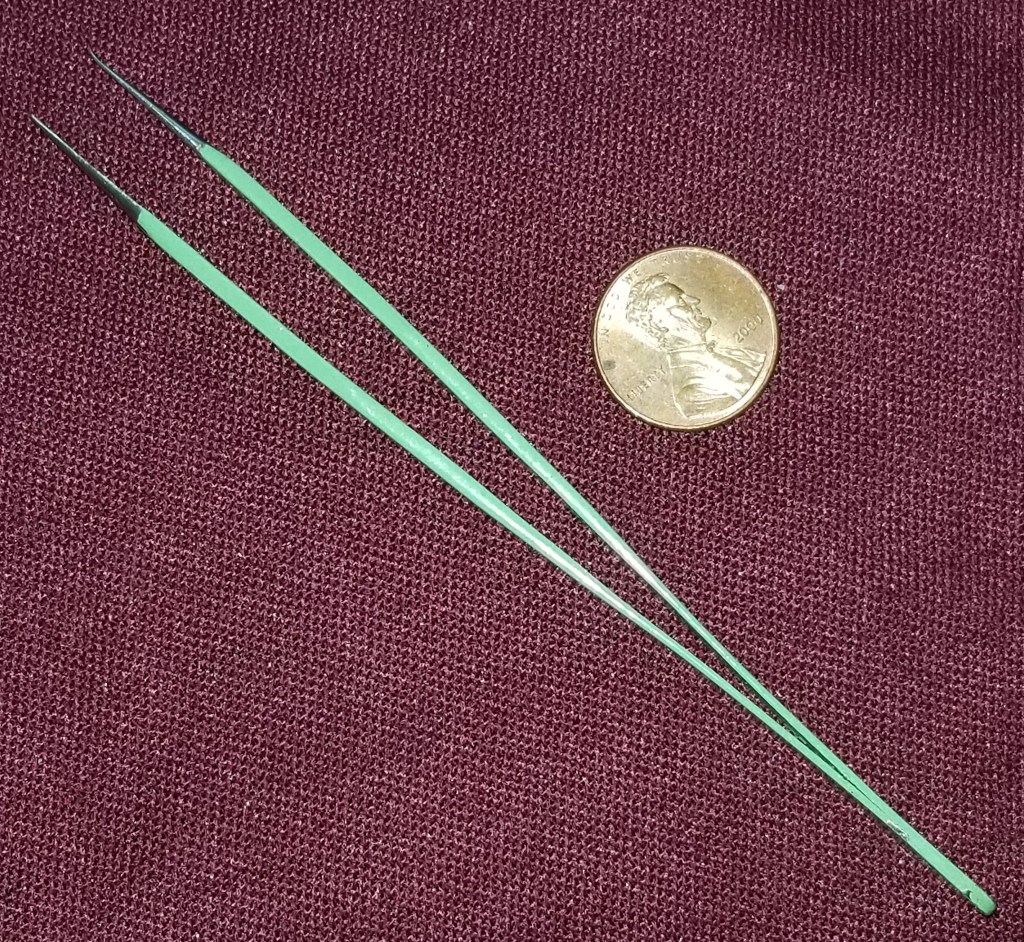
To rip back taking all due care, I snip a couple of stitches on the FRONT of the work. Then I employ a laying tool and a pair of fine point tweezers for thread removal. The laying tool was also a gift from The Resident Male, and replaces a procession of thick yarn needles I used before I had it. My tool is about 3 inches long (about 7.6 cm).

My pair of tweezers is one intended for use in an electronics lab. I found it in the parking lot of a former job, probably dropped by someone testing robots in the back lot. I tried to return it, flogging it around to likely techfolk for several months, but had no takers. Seeing it was to remain an orphan, I adopted it into a new fiber-filled life. I love it. It’s wicked pointy, and even with the dented end (probably damaged when it fell off the test cart onto pavement), does a great job of removing tiny thread bits.
Having snipped the threads on the front, I use the laying tool’s point (augmented by the tweezers) to tease out the stitches in the reverse order they were worked, doing it from the back. Luckily this style of work has a logical order and it’s usually pretty easy to figure that out. But in some cases it gets harder. When that happens, it’s another judicious snip on the front, followed by use of the tweezers from behind to remove the thread ends for discard. (While I can sometimes recover/reuse a live thread after I catch a mistake of a few stitches, in general if the run is long, or I’ve ended off the strand there’s little point in trying to save it and stitch with the now-used and damaged/fuzzy piece of thread.)
If the color is in the least bit friable and liable to crock on the ground fabric, I cut more and pull less – making sure to remove all threads from the back rather than pull them forward to the front. This minimizes color/fuzz shed on the front, public side of the work.
If any snipping needs to be done on the back, flat and parallel to the ground, I pull out another resident of my Scissors Stable – a pair of snips I bought at the SCA Birka marketplace event, two years ago. They look like this:
These were a great buy. Inexpensive, super-sharp (I think the snipping action helps keep them sharp), and because they are not held like finger-hole scissors, very easy to manipulate to snip close and flat to a surface.
And what to do if there are fuzzy bits or surface discolorations that remain on the front? Here’s my last resort. I wrote about it before:

Yes. Silly Putty. I have found that a couple of gentle blots will pick up fuzz and shed bits of color. The trick is NOT to scrub, just support the cloth from the back (I use the top of the stuff’s eggshell container), and press the putty gently onto the affected area – then remove it vertically and quickly. Make sure not to let it dwell on the surface.
I will caution that there is risk doing this. I have no way of knowing if anything exuded by Silly Putty will be a life-limiting factor for the threads or ground in 50 years – if discoloration or other complications might ensue. But the Materials Safety Data Sheet for it doesn’t turn up anything particularly evil, and I am willing to risk it. You will have to make that decision for yourself on your own. Having warned you I take no responsibility if it ends up doing so.
BOOKMAKING 107: THE HUBRIS OF FAULTY LAYOUT (AND PLANNED RECOVERY)
OK. Here I am, showing off my overconfidence in front of everyone. I admit it – I’m not perfect,. Often my enthusiasm gets in the way of prudence, and I forget things like double checking all measurements.
And so this happened
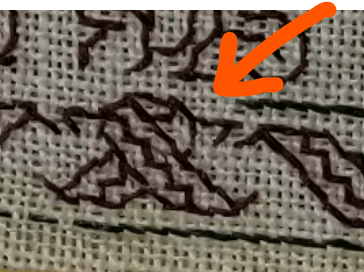
Here you see the “knot” I designed as the cheat at the center of the mirrored top and bottom border. It’s just fine – plump and happy. But wait! See that three stitch (6-thread) gap between it and the green border edge line coming in from the right? That shouldn’t be there! The spot the orange arrow indicates SHOULD be the center of that knot, to align with the center axis I’ve designated for this second side of my book cover.
Panic ensues. I go back and look at the entire border bit, from this center back to the right edge…

Nope. I didn’t miscount. The repeat is true. Why then am I off. (A deeper sense of panic sets in.)
I measure the leafy side of the book cover. It’s true to my original planned dimensions. Hmmm…. Can it be?

YES!
It looks like I made a major mistake in my layout that I did not notice when I worked the previous side. I inadvertently added the width of the spine to the width of the first side I stitched, over and above the spine width that’s already there and marked. I have nade a first side that’s marginally too big – about six stitches too big, and a second side with a main field that is no longer centered.
What to do?
I’ve got several choices
- Bury the thing in my Chest of Stitching Horrors(tm) and abandon it forever. Nope. Not going to happen. For one, there are witnesses (you); also a major promise of delivery.
- Do #1, but begin again. Not going to happen, either. I’ve gotten to far along to set this much effort aside.
- Pick out the entire first side and redo – or pick out the entire second side and redo. Tempting (especially the latter) but also not a favored option. While the mistake is real and is six stitches per side, I don’t think it warrants total destruction.
- Figure out a way to use as much as possible of the stitching done to date, and adapt. Being a bungie-jump stitcher, this is not the first time that things have gone seriously awry. Adapt. Reuse. Redirect. That’s my way. That’s what I will do.
Taking a moment to let the panic subside (as it usually does once I’ve figured out where the original mistake happened), I look at my options.
First, I point out that while being off six stitches on the front and six on the back sounds like a lot, at the thread count I’m using it’s only 3/16 of an inch per side, at most the book cover will be a teeny bit deep compared to the substrate notebook, but not enough to matter. Second, there is a blank area set aside for the spine – it’s six stitches wide. I can cannibalize it to compensate for half of the overage.
OK. Things are looking more manageable. Because the center of the second side is an eccentric repeat, in spite of my effort to balance it left/right, a skew presentation will not be all that noticeable, not compared to the same error on a totally symmetrical design like the flower-side. I can leave the double sprig and diamond ground section as-is.
For the border, I can leave in what I have, including the tell-tale center knot, and work the left side of the knot to mirror what I’ve already done on the right. If I do that by the time I get to the leftmost edge of this second cover I will be six stitches off count – eating up those six stitches I had set aside for the spine. The front and back covers should meet up along the single green line that marks the rightmost edge of the flower-patterned side above.
I hope. It should work. In theory. (The suspense is palpable.)
Stay tuned!
BOOKMAKING 106: QUESTIONS ON THE VOIDED DIAMOND GROUND
Yesterday’s post has inspired a few really good questions. Thanks for sending them in!
Are you working the diamond background in double running stitch?
Susan wants to know if the background diamonds are being worked totally double sided. I answer that while they certainly can be, in this case I am not bothering to do so.
No one will see the back of this piece once it’s in place on the target book. So I am working mostly, but not entirely in double running. Since I have jumped the gun somewhat and begun the background before all of my foreground motifs are complete, I have to be careful not to get ahead of myself and fill in too much – painting my yellow across the site of a future leaf. Therefore I am mostly working in double running, but reserving the right to pop over to “heresy stitch” to advance my working thread as needed, and to avoid painting myself into a corner, or covering up an area that would need to be picked out later.
There must be gaps where the diamonds don’t meet up with the leaves. Are you working half-stitches to fill in those bits?
Lisa, this is an excellent question, and really observant of you to pick up on the issue! Here’s a diagram illustrating what she was talking about.
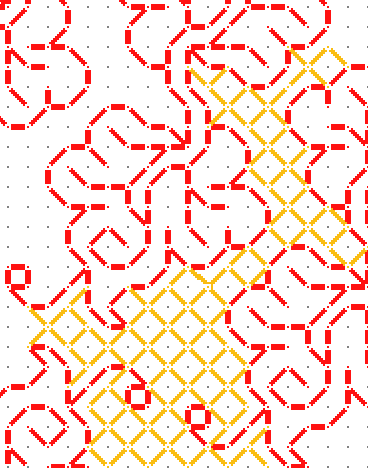
Note how in some spots, and especially around the tendrils and lobed leaf sections there is a half-stitch gap between the red outlines of my double leaf, and the yellow diamonds. Now I COULD go and work half stitches to continue the diamonds right up to the edge of the red, but in truth – it doesn’t matter. Because the yellow is so light compared to the red, and I’m working with a relatively heavy thread thickness for the count of the ground, the visual impact of those half-stitches is almost nil. So I cheat, and leave them out all together.
How do you get the diamonds to match up as you go around the leaves?
Another excellent question, Erin! The secret to doing this is NOT to start the diamonds in several spots. Begin it in one place, and grow it out from there, working around obstructions as they are encountered. It’s kind of like a fairy ring, (or if you are computer gaming fan – The Creep). By always extending the pattern area from an established bit of work out into new territory, I stay on target, and my diamonds always align.
Have more questions? Ask away!
BOOKMAKING 104 – QUESTIONS ON LAYOUT AND DESIGN
On to the rest of the border and filling out the field…
I’ve gotten a few questions and feedback notes on this project. I’ll try to answer.
How do you know where to put the centers and corners?
It’s hard to make out on the in process pix because I snip away/tease out the bits as I encroach upon them, but I have basted guidelines showing me the exact center of my piece both north/south and east/west. They are in light blue thread. I’ve also marked the borders of my stitching area in lilac thread. You can just make out the guideline remnants on the photo below.
Also, if you page back in this tutorial series, you’ll see that I started in the center, then worked out to the right, leaving room for my as-yet-unchosen border. Then I picked one and started stitching. When I neared the corner I looked at what I’d done and doodled up a corner, then worked it. I repeated the process, stitching back to the center and doodling up the center bit, working it on the exact center of my marked stitching area. Then I worked the other side of the center bit mirror image of the established stitching.

How did you get the second top corner to line up perfectly with your basted edge?
It’s counted. The center line of my stitching area is at the exact center of the area to be stitched. That means if there are (picking a number at random) 43 stitches to the right of it, there will be 43 to the left. If my pattern is symmetrical, it’s easy to see when you’ve gotten to the same point on the left as you ended off on the right.
What would you have done if you were one thread off?
It happens. Sometimes for every bit of measuring, exact folding, and counting (and especially on even weave) that center line ends up being one thread or even one full stitch off. In this case – no big deal. I would work my repeat totally symmetrical as I have above, and “push” that tiny bit of overage into the spine of the book.
How do you keep track of where you are with all those colors?
I admit it’s a challenge, and this design would be a lot easier in monochrome. I don’t like to leave long skips on the back, so for the most part, there are a lot of starts and stops. The longest leap I will take is three stitches, and I prefer not even to do that. This means that in the main field of flowers, while I can keep a baseline double running logic chaining flower after flower together, those little crosshatched interlaces of yellow between them are “islands” – each one begun and ended off separately.
You can see in the photo at the top of the page that there are two green threads dangling off the right side of the hoop. Those are the strands I am using for the border outlines. Rather then ending them off at the edge of my hoop, I’ve chosen to keep them “alive.” Pretty soon I’ll be advancing the hoop to finish off the bottom of the stitched area, and I’ll use them up as the border area progresses. Sometimes I’ll take a pin and insert it in the waste edge of my design (or another spot where any perturbing of the ground cloth weave will not matter), then wind the excess thread around it to keep it up and out of the way while I stitch nearby.
And in the border area at the top – I just did some of the green striped “column” that runs down the center of my border. I know that the red ribbon that wraps it is three stitches wide. I started at the edge of the existing red ribbon and worked “heresy style” across the first line, then hopped down and worked standard double running for the center one, and again for the one after that. That meant my working thread was now positioned at the left side of that block of three stripes, and ready to hop over three again to begin the next block of three stripes. I kept going in this manner until I used up my green working thread. Next I will go back and fill in the red ribbon, and finish up with the short spurts of yellow. And yes, that does mean a lot of ends. I would never attempt a multicolor piece that was totally double-sided.
It’s hard enough to pick a pattern, now you want me to design centers and corners, too?
Perhaps I did get a bit ahead of myself and I could have chosen a simpler border. One that isn’t directional like this one with its wrapping is. And mirroring around the center can look a bit daunting, as can doodling up a custom join. But there’s no reason to be intimidated.
I noodled up #1 in the set below. But I didn’t have to. My treatment could have been much simpler.
#3 for example ignores mirroring, directionality, centers, and corners. It just starts at a random point of the repeat, goes across the area to be covered, and arbitrarily ends at the edge of the desired space. Then it starts up again, butted against the bit already stitched. And it doesn’t matter if it’s centered or truncated. (By the way, plain butted pieces with truncated rather than an elegantly ended or mitered repeat is the most represented treatment for corners in museum collections of historical stitching)
In #2 and #4, I’ve kept the mirroring (but I didn’t have to) and inserted small simple shapes to fill the contested areas. #2 uses plain old squares. Nothing fancy. #4 reserves those spots for personalization. Initials, dates, small stars, whatever. What I’m trying to show here is that there is no one right way, and all treatments look good. Go simple, go complex. It doesn’t matter, your piece will be beautiful, and best of all – it will be uniquely yours.

More questions?
Idly curious or wanting to do you own book cover? All is good. Happy to help. Got a question? Send it in.
MAKING BOOK
OK. Now that I’ve armed a whole bunch of people with a wealth of counted all-over designs – what to do with them?
Pretty much anything you want. While samplers are the most common, there are lots and lots of things you can make that don’t involve using up precious wall space. Pincushions (either plain square or rectangular pillows, or fancy biscornu); pillow or cushion covers; napkins, doilies, and tablecloths; kerchiefs (aka for the historically-minded – forehead cloths); tray or coaster inserts (using pre-made items intended to showcase a piece of stitching or painting); zip or tied pouches or folios of various types – jewelry or lingerie rolls are examples; slip-in cases for sunglasses, phones, or tablet devices; small rice or lentil-filled handwarmers or heating pad pillows (warmed in the microwave, for gentle comfort or cold fingers); greeting cards or festive ornaments; all are examples of things that might sport your stitching.
But I want to revisit one project in particular – the book cover.
Making a Slip Cover for a Small Notebook

This is a general logic recipe for making a reusable slip cover in for a small notebook, using the same method as the standard brown-paper-bag covers kids of earlier eras employed to protect school-issued textbooks. The basic logic can be adapted to cover any size book. I’ve written this with special steps for counted embroidery project, but any fabric or stitching style can be used.
In this particular case I covered two small pocket notebooks, roughly equivalent in size to Moleskines, but of a far less expensive make. They are about 3.5 inches wide, by 5.5 inches tall, and roughly 0.5 inches thick across the spine (about 8.9 x 13.4 x 1.3 cm). They came with an elastic cord to keep them closed/mark one’s place, and were about half as expensive as the fancy name brand ones.
Layout
I wanted to know how big a piece of fabric I would need. Having measured a notebook, I did a mockup of the cover, drawing the shapes to size on a piece of paper to make my pattern. I used a brown paper grocery bag to do my layout and mockup (fitting it onto my target notebook to make sure it all worked. That pattern is now long gone, but here’s the logic I used. I strongly suggest making a mock-up and “dry fitting” it before you begin the project, just to make sure that the dimensions work. Note that some books have thicker cardboard covers or heavier spines than others, and may require a bit more “wiggle room” to be added to the measurements below – even if the books have the same general dimensions as the ones I used. If your book is significantly larger than mine you may want to increase the depth of the flaps all the way around. But you should not need to add more than the indicated amount beyond the stitching area (the red rectangle below). The overage of the grey area is just there to provide purchase for a hoop or frame.
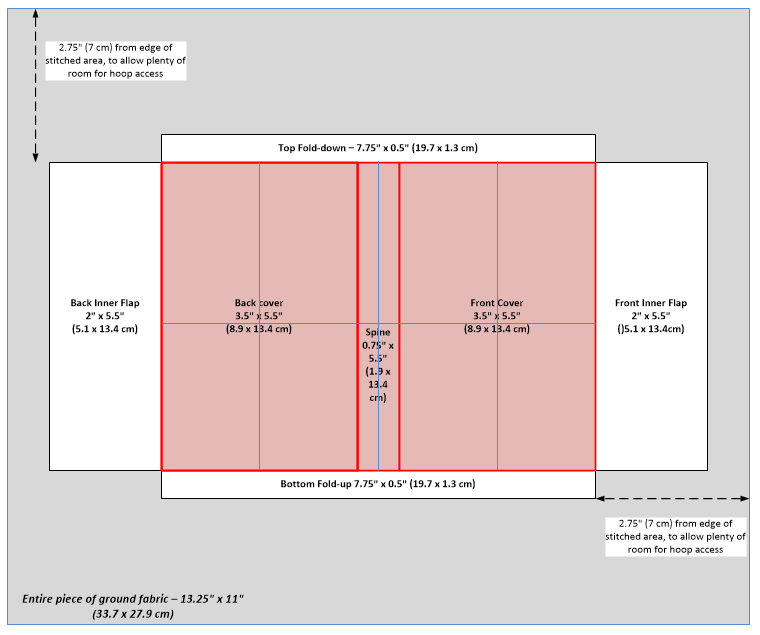
Note that I’ve allowed a little bit of extra width for the spine, so that there is enough slack for the book to open and close properly. I’ve also allowed lots of extra room around the stitching area, to accommodate use of my hoop or snap frame. You can use a smaller piece of cloth closer to the dimensions of the book cover itself if you like, but be aware that frequent repositioning of the hoop to get close to the edges is a pain in the neck, and all of that tugging and yanking isn’t good for your threads or ground either. And if you’re mounting this on a flat or scrolling frame, tensioning the sides and ends very close to the stitching area can lead to distortion, so having a bit of extra room for the stress to even out is also good.
For my standard size pocket mini-notebook, I’ll need a piece of ground fabric that’s about 13.25 x 11 inches (33.7 x 27.9 cm – all metric measurements are rounded off). If I intended to hem my edges of my entire ground cloth prior to starting (as opposed to whipping or serging), I’d add a half inch all the way around to this measurement.
Selecting the Fabric
What type of fabric? Well, whatever you enjoy working. This project will be a tiny bit easier to lay out on even weave, but not overly so. You can use Aida, Monk’s Cloth, Fiddler’s Cloth, Hardanger, in whatever count is most comfortable. But the count you select will also be key for what design you select. The lower the count (fewer stitches per inch), the larger your finished iteration of the design will be and the fewer repeats of it will fit in these designated spaces. If for example you want to stitch 11 count Aida, our front cover – only 3.5 inches wide would mean your total stitching area is about 38 stitches wide (rounding down). A repeat of say 8 stitches across would appear 4 full times plus some fragment at left and right (more on this later). A repeat that’s 14 stitches across would show in full only twice, with a fragment at the left and right sides.
Why would layout be easier to do on even weave as opposed to Aida or one of the others? Because you can determine the center point more accurately on even weave. In one of the purpose woven grounds with their well established holes (and especially in the fewer-stitches-per-inch sizes), the centermost line of holes may be off the exact center of the piece just a teensy bit, and may be enough to annoy you.
One last suggestion – whip, or serge your edges after you cut your fabric to size. Some people use tape. I don’t recommend it because of the adhesive residue.
Marking the Fabric
In this type of project, where we don’t intend to graph out every single stitch beforehand, knowing where the edges and center lines are is very important. Some people use water soluble markers or pencils for this. I’m old fashioned. I would baste. Some people are very specific in technique, taking each basting stitch over 4 or 5 stitch equivalents to aid in counting, but I’m pretty haphazard. I just establish my lines and don’t try to make my basting stitches even.
To transfer the dimensions of the diagram above to my cloth, I’d start more or less in the center and measure out from there, basting in lines, probably in a couple of colors. I use plain old sewing thread; spools of thread inherited from my grandmother – 100% cotton, in pale pastels, too fragile for use in seaming, but perfect for this. I’d outline my stitching fields using one color (the heavy red lines on the diagram). Then I’d mark the center lines both north/south and east/west (the thin blue lines). You may find that you have either a line of holes or a full stitch at the very center of your front cover, back cover, and spine. Decide now if you are a perfectionist or not, and if your purpose woven cloth forces you to mark at one side or the other of any center column/row of stitches, which side of the center you have marked. More on this below.
There’s no strong reason to mark the no-sew flap areas at this point, but they are on the diagram so you know they exist, and their width should not be forgotten.
Choosing your Design
Elsewhere on the site you’ll find books and books of fills and other patterns. Thumb through. Pick something that appeals to you, that’s a good fit for your chosen ground fabric’s count. BUT also be aware of the Center Problem.
Some patterns have a specific center line. They have even repeats – 4 stitches, 8 stitches, 22 stitches – whatever. Each repeat is an EVEN number of stitches. These repeats mirror evenly left and right of an line. Other designs have ODD numbers of stitches in one repeat – 5 stitches, 9 stitches, 11 stitches – again any number but an ODD one. That means that there is a center stitch in these designs. Here are examples:


The wavy plumes (shown in two variants) are an EVEN 14-stitch repeat with a specific center line. The framed pears is an ODD 15-stitch repeat. It’s center is the X unit where the four pear stems meet.
Why does this matter? If you are a perfectionist using Aida (see above) and the center of your area to be stitched is in the middle in between two columns of holes, look for an ODD stitch repeat. If the center of those areas work out neatly to align with a column of holes pick an EVEN stitch repeat.
Now you know why I mentioned that layout on even weave is easier. Not being forced into using specific hole locations makes fudging that center line easier and if your heart is drawn to either an odd or even repeat, any finagling you might do to make placement will be less obvious.
Choosing Thread and Stitching
Here I am of less help, especially for folk using Aida. I can tell you that on 32-38 count linen (16-19 stitches per inch) I usually use one or two plies of silk or cotton floss. 40-50 count linen (20-25 stitches per inch), I use one ply. And that I run the thread through beeswax prior to stitching. If you are using a lower count ground I’m afraid you’ll have to experiment to see whether you like 1, 2 or 3 plies the best.
In any case, no matter what your ground is, your basted lines will tell you exactly where the center of your area to be stitched is. Find the center of your chosen pattern, and start from there. Double running or back stitch – even heresy stitch – it doesn’t matter. Start in the center and work your way out. You can choose to work the ENTIRE stitched area – front cover, spine and back cover as one unit, and start in the center of the spine. Or you can work the front and back covers either identically or different; and leave the spine unworked, or treat it in another manner (perhaps a narrow border, solidly covered with cross stitches, or anything else you dream up). There is no wrong here.
When you get close to the basting line that describes the edge of the section you are working on pause. Decide whether you want to continue the design right up to the edge, or if you want to stop (possibly at the natural edge of your repeat, or at some unobtrusive place in it) and save the remaining area to do a border. That’s what I decided to do on my two sample books above. Any narrow geometric band – even just parallel straight lines – can be used to frame the center design and draw the eye away from truncation of the center design.
Finishing the Piece and Assembly
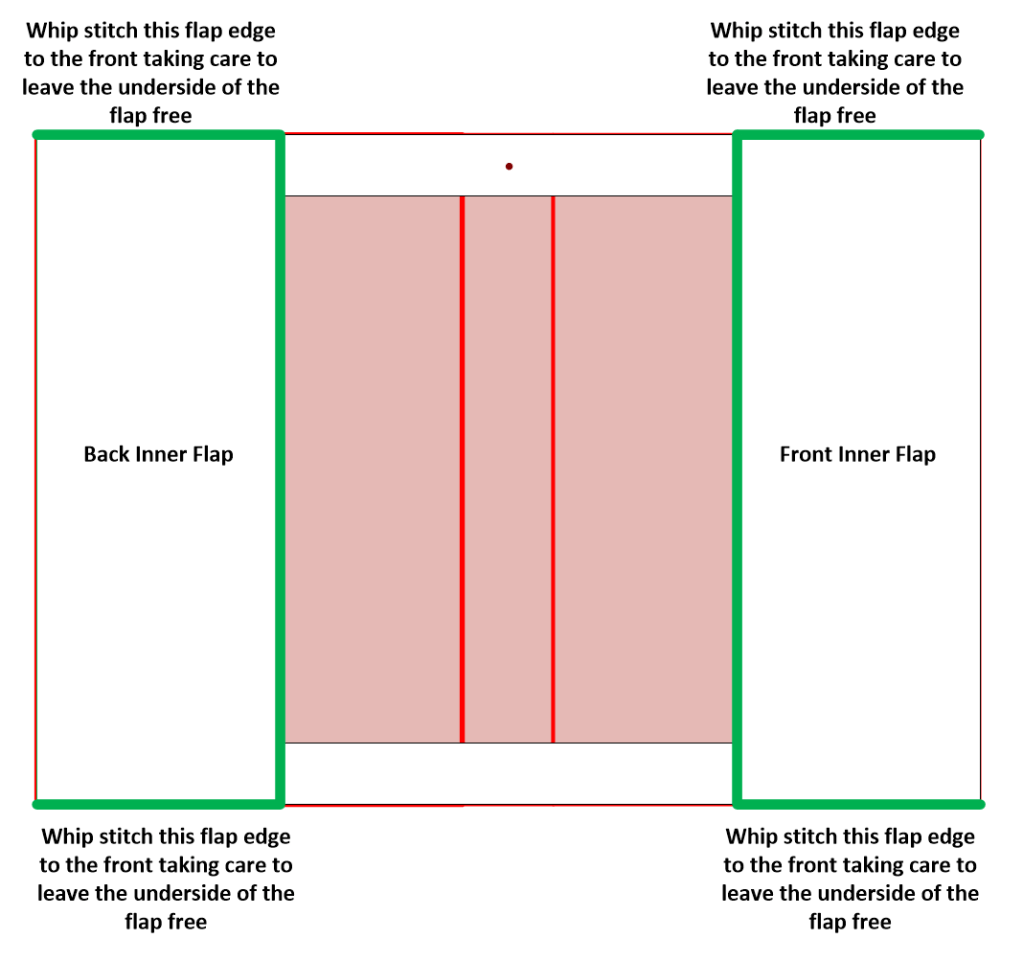
Once everything is all stitched, you can do a gentle wash and iron (nothing with big agitation, harsh detergent, or high heat). Or not. It’s up to you. Now is the time to draw or baste-mark those extra flaps. If you are going to serge them you can mark them and cut to exact size. Note that the ONLY places where secure edge treatment is mandatory are shown in green below. I strongly recommend hemming for those, although serging will work in a pinch. The other edges can be fray check secured or even left plain (they’ll never see the light of day again). Personally, I mark the flaps, and cut leaving a quarter inch seam allowance for the green bits that I turn back and hem, doing a veeerrrryyyy careful diagonal cut at the corner where the front and back inner flaps meet the top and bottom flaps. When I turn back the outer points of the front and back inner flaps and hem them down, I cut off the triangular excess to reduce bulk.
The top and bottom flaps do not need to be stitched down. Ironing them flat is enough. The final step is folding in the back and front inner flaps and stitching them to the front and back, along the edges of the book. This leaves a neatly edged pocket that will slide over the book cover. If the book cover doesn’t fit, feel free to snip it just a bit so that it slides in nicely. No one will ever know.
One last refinement. Many of these books come with an elastic loop that can be used to hold the book closed or mark a page. It’s useless in this application. I snip it off the book prior to fitting the cover. Instead, to serve as a bookmark, I stitch on a length of narrow ribbon, attaching it at the little red dot marked on the diagram above.
OK. Now armed with the basic how-to. Let’s see what you can come up with yourself!
