THE CLASSIC PROBLEM
Too much stitching left to do. Too little thread. With about a quarter of the stitching remaining I have a problem.

I am using thread I brought back from India. I found it in a shop in the old shopping district in Pune. They specialized in crafting materials, especially beads, pre-embroidered pieces, knitting yarns, and other goodies. But they had a few skeins of what looked like silk floss in one of the display cases. I pointed at it and asked the shopkeeper if he had more. He sent a little boy up into the storerooms, and he came back with a very dusty and crumbling cardboard box full of odds and ends. All of the same type of thread (which turned out to be “art silk” – rayon) but all of very limited quantity. I picked out all of what remained in non-pastel colors, including several multi-skein hanks of deep red, and bought it all, for an astonishingly low price.
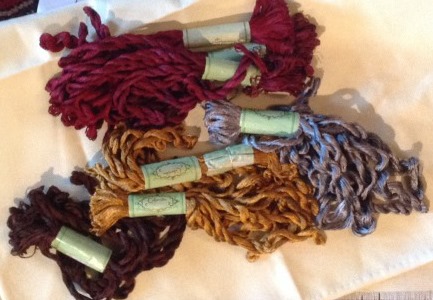
As you can see there’s a pile of crimson there. What remains of that pile now is much less –

The wound bobbin in the middle is what I’ve been using (with a caveat). It’s Cifonda Art Silk color number 145. So is the hank on the left. The hank on the right is color number 144. It’s in the same continuum, but a click lighter. At the bottom is flaming cherry red 530, not even close.
The caveat on the bobbin? It’s holding two skeins of 145. Underneath is New-145. On top is Old-145. I wound off the new one, then after stitching the bit below, went on a Wild Hunt, and found one last remaining skein of Old-145. You can’t see the difference between them, right? Neither could I until this happened.

I bet you can see it now. Leaf #3 and part of the interlace below it stands out. I stitched it with the New-145. It’s redder, more garnet in tone than the established work. Clearly the same color number, but a different dye lot (even though dye lots are not labeled ). Even if I could get more of this stuff the chance of matching color with my very-well-aged stock is practically nil.
I will finish out as much as possible with my last skein of Old-145. I may or may not pick out this leaf . Still thinking on that… And also thinking on how to finish out the piece using only what I have on hand. Go for New-145? Go lighter with 144? I’ve seen historical pieces whose stitchers faced the same problem and blithely ignored it. Which is what I will end up doing, one way or the other…
PROGRESS BY THE BEACH
Lest anyone think I’m on vacation, not so. Yes, we ran away to the beach place this three-day weekend past, but in this work from home era, we worked from there, and prepped the place for our booked guests in compliance with the state COVID-era short term rental requirements.
Still, even though it wasn’t all for fun, on Sunday I did get the chance to stitch on the beach. I adore it, even though the intense sunshine can lead to “white out” conditions on the linen, making thread counting difficult.

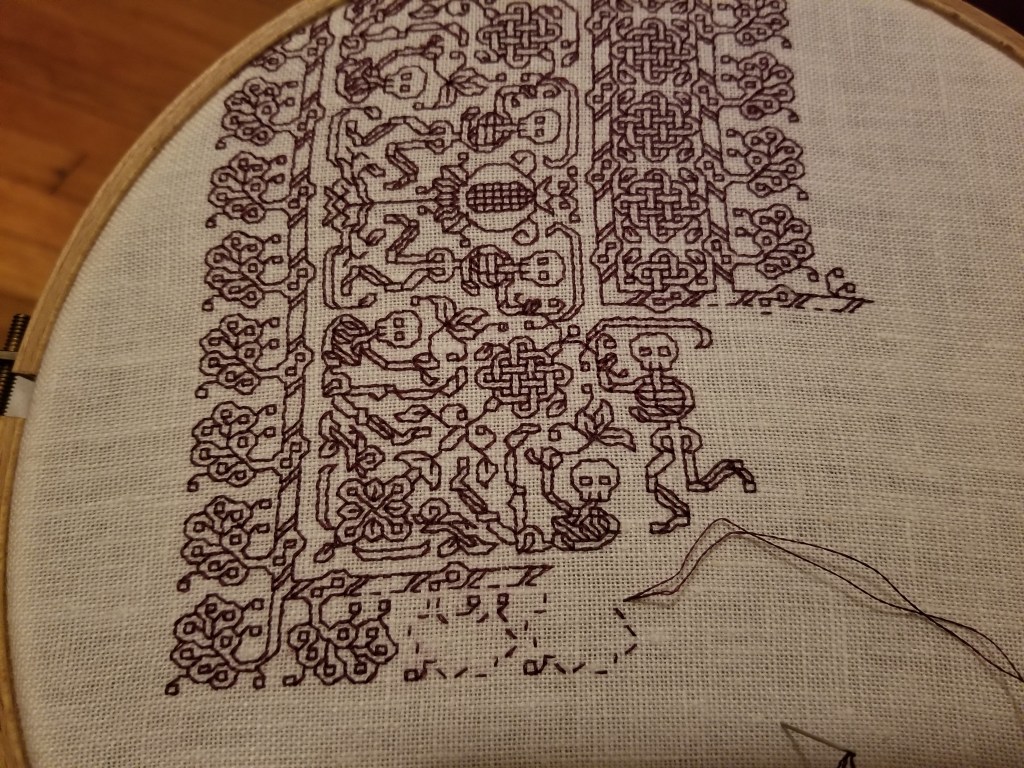
As for how far I’ve gotten so far – I’m just starting on the third corner:

Excuse the wrinkles – I don’t iron until the very end.
You can see the diagonal “spine” of the mitered corner. A snail will squeeze itself in underneath the rightmost tumbler’s feet. I will wrap the plume edging up and around the corner, too. You can even see the start of the double border with extra knot on the inner edge of the rising strip-to-be.
I wish I had grand new insights to share on this piece, but being in the home stretch, I’m fresh out. This is also always the most dangerous part of a project for me. I’ve figured out all that’s new, and all that’s left is perseverance – dogged execution of the known until completion. It’s the point where I often wander off to do something novel and interesting, with the promise of new challenges.
So, if you have any questions about working these long repeats, keeping place in them, how to draft them up, or pretty much anything else, feel free to ask. Now’s a good time to engage my attention. And I’ll thank you for keeping me on track and marching in time with my bois.
PROOFING
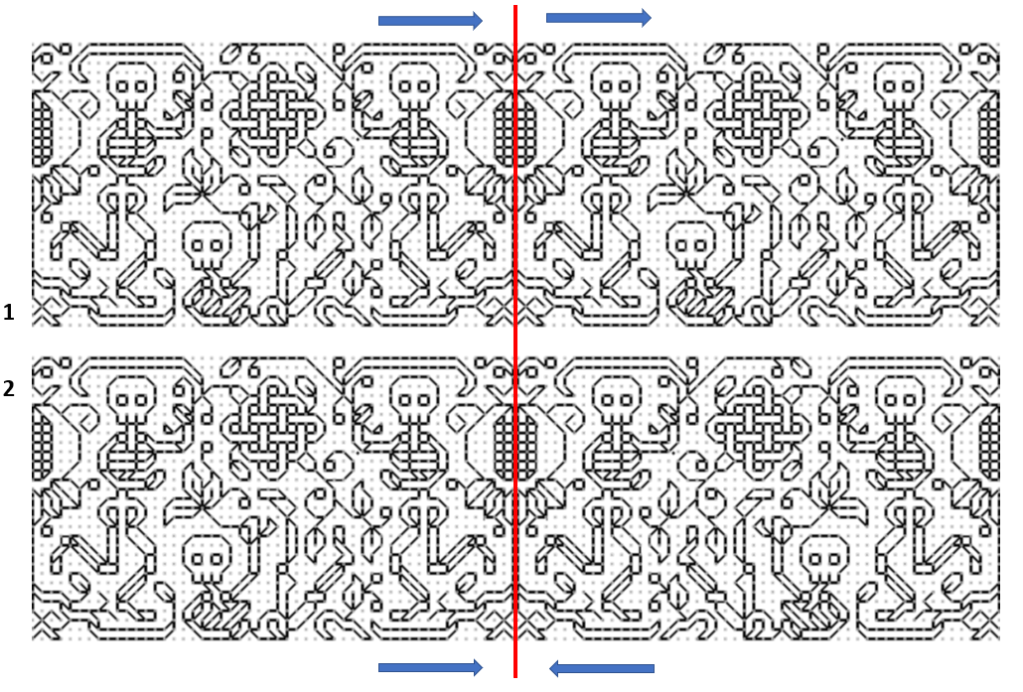
And we march around the perimeter, making skeleton after skeleton.

I’m just shy of half-way now, and I had to extend a tendril out to that point to make sure that I’m hitting my center mark. And I did!

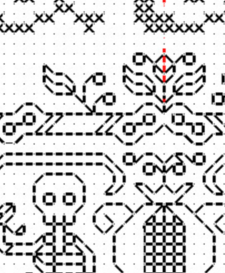
As you can see comparing the blue line on the photo and the red line on the snippet of my chart, I’m spot on for alignment – not even a thread left or right of my center line.
One question I keep getting is how I maintain my location and ensure everything is in the correct spot without pre-gridding my work (without basting in an extensive set of guidelines to establish larger 10 (or 20) unit location aid across the entire groundcloth). I generally reply, “By proofing against established work,” but that then generates the second question. “How?”
So I attempt to answer.
For the most part I almost never work on fully charted out projects, with every stitch of the piece carefully plotted in beforehand. I compose my own pieces rather than working kits or charts done by others, and as a result I never have a full every-stitch representation as my model. My working method is to define center lines (and sometimes edge boundaries), but I pick strips or fills on the fly, starting them from my established centers, and working from smaller charts that are specific to the particular motif or fill that’s on deck. However, if lettering is involved I am more likely to graph that part out to completion prior to stitching, to ensure good letter and line spacing. (Leading, spacing, and kerning are close to my heart both as someone whose day job deals in documents, and as a printer’s granddaughter.)
For this project I DID prepare a full graph to ensure the centered placement of my very prominent text motto against the frame. I also wanted to miter the corners of the frame (reflect on a 45-degree angle) rather than work strips that butt up against each other, AND I wanted the skeleton repeat to work out perfectly on all four legs of the frame. To do that I had to plan ahead more than I usually do. (Note that the repeat frequency of the accompanying smaller edgings are different from the skeleton strip, so I also had to “fudge” center treatments for them so they would mirror neatly – another reason to graph the entire project).
But even with a full project graph available against which work, I didn’t grid – I worked as I always do, relying on entirely on close proofing as I go along.
The first step is a “know your weaknesses” compensation. To make sure I am on target I almost never extend a single long line ahead of myself, especially not on the diagonal because I make the majority of my mistakes miscounting a long diagonal. Instead I try to grow slowly, never stitching very far away from established bits, so I can make these checks as I work:
- Does the stitching of my new bit align both vertically and horizontally with the prior work? Am I off by as little as one thread? Am I true to grid?
- Is my new bit in the right place? Does the placement of the design element align with what’s been stitched before? For example, in this case, is do the toes of the mirror imaged bois back to back to the pomegranates match in placement in relation to each other and to the bottom of the pomegranate’s leaves?

Are my motifs in the right place?
- Am I working properly to pattern? It doesn’t matter if I am using a small snippet with just the strip design or fill that’s being stitched, a full project chart, or (as I am now) using prior stitching as my pattern – copying what’s been laid down on the cloth. Am I true to my design as depicted?


(Note the compression due to uneven thread count of the fabric.)
As I work, I constantly proof in these three ways – checking to make sure that my work is true. And if I discover a problem, I trace back to see where I went wrong, and I ruthlessly eliminate the mistake. For the record – there’s nothing to be gained by letting off-count stand in the hope of compensating later. Trust me – you’ll forget, mistakes will compound on mistakes, and you’ll end up wasting even more time, thread, and psychic energy on the eventual fix.
I hope this explains what I mean by proofing as you go. I know for most of the readers here, this will be second nature, and they won’t have thought of it as a disciplined approach, but for newer stitchers the old maxim “Trust but verify” should become a mantra. Verify, verify, verify. The sanity you save will be your own.
Finally, for Felice, who doubted I was using double running stitch for such a complex project in spite of the in process photos that showed the dashes of half-completed passes, here’s the reverse.
Yes, I do use knots for work with backs that won’t be seen, but I do it carefully so that the knots don’t pull through. Point and laugh if you must, but I reserve the right to ignore you.
HEADING FOR THIRD
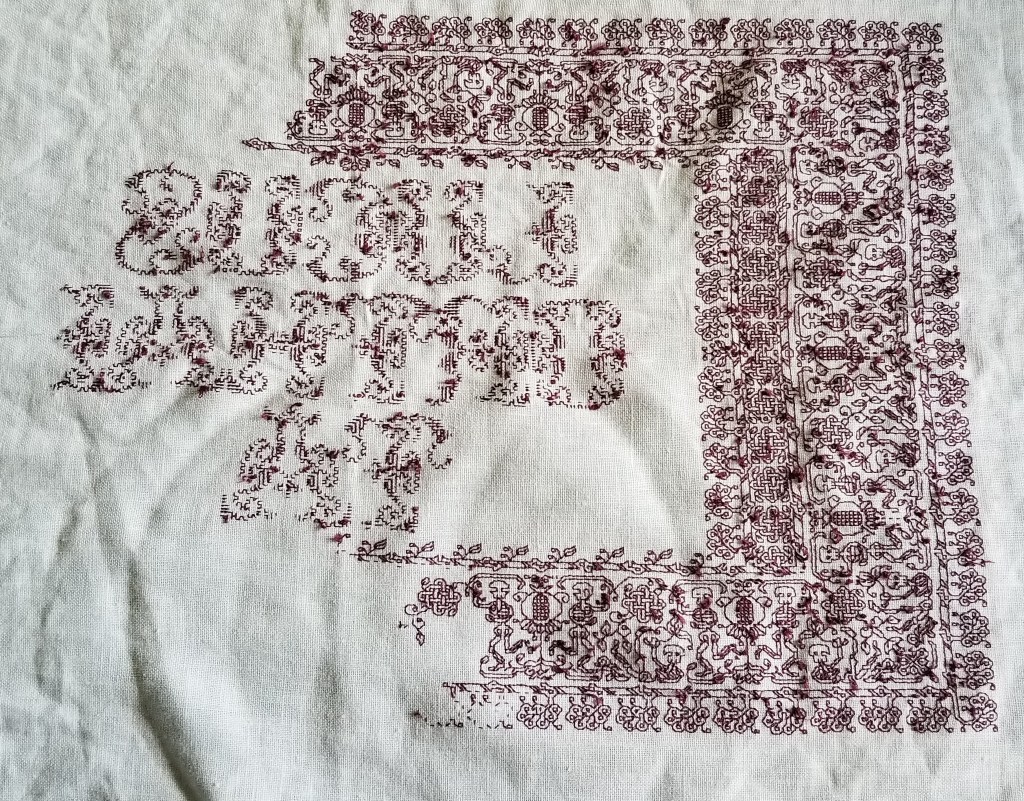
I’m finishing up the second corner on my sampler, and beginning the strip across the bottom of the piece, headed for the bottom center, then on to the third corner.
It’s going faster now because I’m free of the chart. I’ve (mostly) memorized the design now, and have ample reference stitching to refer to if I need reminders. The remaining two sides are just mirrors of what’s there already – with the corner and both centers established, there’s nothing on the chart that I haven’t already worked.
Questions from my inbox:
Why aren’t you working on a grid/why haven’t you basted guidelines every ten stitches so you can keep your place?
I don’t need to, although I do have two basted guidelines that mark the center of the piece, one north/south, and one east/west. I proof carefully of established stitching. That’s why you never see a long run “out in front” of the design as I work. For me, that’s a recipe for disaster.
I AM working in double running stitch. You can see the baseline for the bottom plume border in process. I will keep going in this direction until I finish this piece of silk. Then having established the bottom border (note that I work the branch from which the plumes bloom as I go), I’ll switch to the center strip and do more of the skeletons. When I catch up, I’ll hop up to the top border and do more of that. The whole design progresses more or less evenly across the design, keeping pace with itself as I go.
Why are you working left to right?
I’m right handed, and stitch with my right on top and my left below, using (in this case) a sit-upon hoop so both hands are free for stitching. I keep a very bright light over my left shoulder. By working left to right, I can see the previously worked bits (they are not covered by my right hand), so I can keep check on alignment of the new stitching, plus there is no shadow from my hand or shoulder occluding the work in progress. And when I start not at the left or right edge of my piece, but at the center, I often flip my work upside down, so I am also working the second half of my strip from left to right. Were I left handed or favored my left hand for the top when working two-handed, I would probably work from right to left, with the light over my right shoulder.
Can this piece be done double-sided?
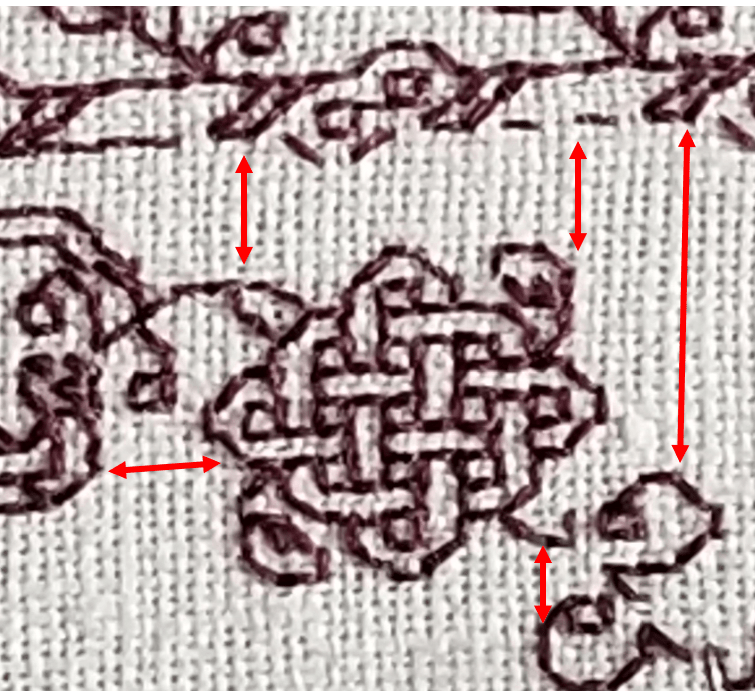
Yes and no. Right now it can be done mostly double-sided in double running stitch (aka Holbein Stitch, or Punto Scritto). But not entirely. The skeletons and the pomegranates are their own units, large enough for burying the ends invisibly on the reverse. Not so the snail – he’s rather small and would be difficult to stitch on his own, with invisible starts/endings. There is also the problem of tiny isolated elements. The eyes are the most obvious example, but the plume border has that little skew two-box spot at the base of each plume, plus a floating square in one of the lobes of the plume.
If I were to set this up for totally two-sided work, I would run a single unifying baseline across the entire bottom of the piece, and adding a stitch to tie the ribbons held by the skeletons to the side curlicue of the pomegranate. I’d also add a brow line to the skeletons, and anchor down the floating spots in the plume flowers. The red stitches below show the general idea:

With the red additions, all floating elements have been locked into the main trace. There are no islands left, large or small. The bois can now be done entirely double sided. And if contemplating another design with isolated bits, similar additions will render it likewise. (The astute will note that this doesn’t contain the snails in the as-stitched piece – I improvised them on the fly, and never bothered adding them to my quick and dirty project chart.)
Why didn’t I do this in the first place? It didn’t occur to me, and I like the rather puzzled look of the browless, wide-eyed bois.
Where can I find the pattern?
Look here for the broadside that contains the dancing skeletons and plume border, plus the reason why I don’t think they are morbid or creepy. And if you want to see all previous posts on this project, here’s the link.
No Cerberus?
One observant reader noted the skeletons and pomegranates and suggested a Cerberus (three headed hell hound) as the logical thematic accompaniment. Not a bad idea, and more grist for my imagination mill. Thanks!
Questions, comments, derision, criticism, suggestions? Send them in either in the comments here, or to the contact address alluded to in the About tab, above.
TAKING IT IN STRIDE…
See this egg?

It’s the one on my face. And deservedly so.
A quick recap:
- I’m working a project on skew count linen – with a different number of threads in the warp and weft. – Confirmed, that’s a fact.
- If a design is worked on such a ground, it will be compressed – shorter in the direction that has the higher count, and stretched out in the direction that has the lower count. – Again confirmed. That’s also true.
- I counted my threads, and planned out a design that featured “padding” on to compensate for anticipated compression, so that the difference between the proportions of the strips going across the top of my work, and down the side of it would not be so evident. – Yup. I did that, and I like the extra wide knot strip that I doodled up to use there.
BUT
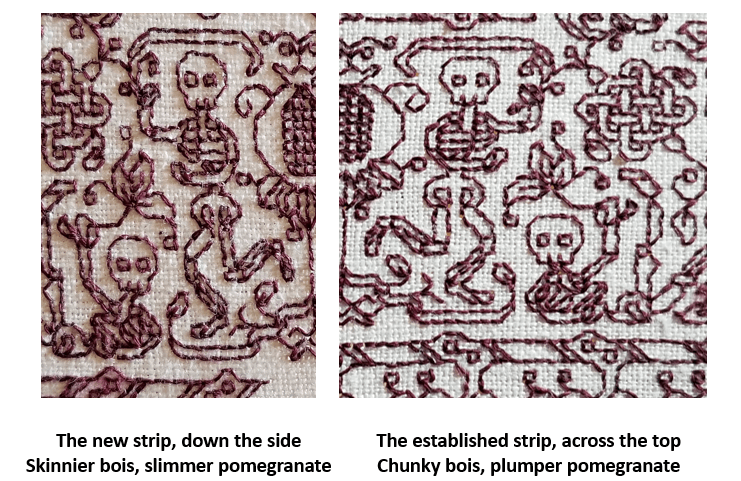
Major snafu. I did not properly record my count/measurements and reversed them, attributing the denser count to the wrong direction. Instead of the new strip ending up with squatter, flatter skeletons after I rounded the corner, close comparison shows the new bois to be leaner and lankier than the ones previously stitched. Even more embarrassing, I did not notice the problem until I had a fair bit worked up.
So it goes.
Obviously I have a good lesson-learned on this one to add to my roster of mistakes as teaching moments. And I’m not going to go back and rip anything out. (I may have a second lesson on finite stash supply vs. thread consumption rates to painfully experience, too.) So my piece stays as is, and I get to look like an idiot in front of everyone. While this isn’t going as planned, and I did make a giant mistake – it’s not totally fatal. I declare myself just a tiny bit sadder, but wiser, and will keep soldiering on.

You may point and laugh now.
DANCING AROUND THE CORNER
Having gone on and on about straight repeats as my bony bois march across the top of my piece, we have now come to the first corner.
Thankfully, my count is spot-on and everything is in place.
But why did I start with the strip of skeletons doomed to dance upside down? Because I knew that I would probably make some tiny adjustments to the design as I went along. The viewer’s eye is drawn to the closest point of the work, and the most logical part – that’s always the strip across the bottom, where the motifs are all right-side-up.
It’s unlikely that any small tweaks would be noticeable in the upside-down part at the top. So being too lazy (and waaay too short of thread I can’t replenish) I started there, knowing that I would not be ripping back vast regions to norm those tweaks.
Closer up, in a more normal orientation:

My last post discussed the non-historical use of the same framing element on either side of a mirrored repeat with horizontal directionality. Here’s another feature of this strip that’s not often seen in museum artifacts – the mitered corner.
The majority of corner treatments in surviving historical fragments have butted-up or improvised corners. Carefully plotted mirror images across a diagonal (mitering) are quite hard to find. But I decided to do one anyway. You can spot the diagonal running through the center line of the rightmost internal knot, down through some leafy bits, and into a flower-like shape. I’ve also established the beginning of the 90-degree flipped border, with the upper part of that skeleton plus the first pomegranate underway.
I’ve also rounded the outside corner. In a serendipitous happenstance (I can’t claim I planned it ahead of time), the width and height counts of my marching plumes are equal, so I was able to fudge the corner with one last plume on a long stem.
Side note: At this point I really don’t need to refer to my printed pattern any more, I am mostly working off prior stitching, with occasional glances back at my chart to make sure all is aligned and true.
But that inside edging – it’s different. I’ve introduced another element, playing with the eternity knots and tying them into the plume strip. I did this because the thread count of the warp (the threads that stretch up-down in the detail photo) is denser than the thread count of the weft (those that go across in the detail photo). The closer together the threads are, the more compressed the design will be in that direction. My skeletons marching up/down the sides of my piece will end up looking ever so slightly shorter and chunkier compared to their more lanky brothers that tumble across the top and bottom. BUT I can draw the eye away from that difference by adding the additional knotwork strip.
So it turns out that my design is all about insouciance, breaking historical composition precepts, and visual deception. Still for all of that I think that its look is more closely aligned to the aesthetic of historical blackwork rather than more modern pieces. Just my opinion, feel free to differ.
Class Handout Page
And for having the patience to read down this far, here’s another present. I was going through some older files and came across this class handout page. I’ve taught several workshops using it. The last one I came equipped to do was for a public SCA demo in Rhode Island, although the circumstances and attendees made just sitting and chatting about the stitching a better option. Still, I did update the handout, and it may as well be of use to someone.
The patterns are (more or less) ordered in level of complexity, and are intended to be a self-tutorial in double running stitch. When I teach I provide the page below, a strip of Monk’s cloth and length of standard embroidery floss and needle, plus an inexpensive hand hoop (if I have some to spare). Depending on prior experience, stitching proficiency, confidence level I encourage the participant to select one of the designs from the leftmost two columns, to try out face-to-face in the workshop. Then I encourage everyone to use the rest for self-study at home.
For self study, what I suggest is to just grab a piece of cloth and begin – no need to plan an intense, composed sampler. Pick a point anywhere on your chosen ground, then starting at the spot in the upper left column where you feel comfortable, continue down that column to the simple acorns. Then keep going. The next design in the complexity sequence is the flower spring at the top of the next column. Go down that column to the folded ribbons.
After that, I’d suggest attempting the birds at the bottom left. From there the vertical star flowers, then the knots, four-petal flower meander, and the design immediately above the title. Once you’ve done all that the remaining four intermediate patterns on the page should be well within your grasp (the heart flower all-over, fancy acorns, geometric strip, and oddly sprouting peppermint-stick squash blossoms).
Of course you can be totally random and just use these designs as you will. No need to march in lock step with the protocol, above.

Download this handout in PDF format from my Embroidery Patterns page. It’s the last one listed (click on the thumbnail there to get it, then save it locally).
As ever, if you stitch up something from any of my designs, please feel free to send pix. I always get a big smile out of seeing you having fun with the pattern children. And if you specifically say so and give permission to re-use your photo, I will be happy to post it here and index it under “Gallery”.
MORE ON REPEATS
The repeat on my Dance strip and corner is a bit unusual, and seems to be causing far more problems for stitchers than I anticipated. I designed it so it could be used both as a straight repeat and as a mirrored repeat, but that appears to be the source of the confusion. I’ve talked about the types of repeats and symmetries before, but I will recap briefly.
Here are some basic types of strip-pattern repeats:

- A straight repeat is one in which each unit is repeated “as is”. It is not flipped or mirrored, but marches on like the first line of Rs.
- A mirror (aka bounce) repeat works like the second line of Rs. There are two center lines, and the design mirrors itself between them.
- A meander, the design elements both mirror and flip.
- One-directional meander with mirroring but no flipping.
- One directional meander with flipping but no mirroring. (No example to hand).
- A tumble, the design elements rotate around a center point. (No example to hand).
There are other ways to construct a symmetrical repeat that elaborate on the tumble, introducing further mirroring or flipping, however I will say only the first four methods above are represented in European embroidery styles prior to around 1700, with types #1-#3 being by far the most common, and #4 being rare, but not unknown. And I can’t lay hands on a good example of #5. I haven’t done a comprehensive survey to determine when tumbles (#6) or their more complex derivatives begin to manifest but I can’t say that I recall seeing them on a museum artifact in the time range I pursue.
I also note that patterns can also include more than one type of symmetry, and layered symmetry pieces can become quite complex. There’s more on that in the earlier (and longer) post on repeats I mentioned before.
Now back to the pattern at hand. Here is the basic unit that makes up The Dance.

Notice that the three bony bois cavort in a playground defined by the center of the framing pomegranates. This unit can be combined to make a strip in one of two ways – As a straight repeat (#1), or as a bounce repeat (#2)
I’ve added the blue arrows to help identify the difference. Look at the fellow lolling on the ground. Above, he’s always facing the same direction. Below, he’s facing his mirror image.
To have a Type #2 bounce repeat that uses THE SAME framing device for both bounce points is at best extremely rare. Most use different devices as the two separators, like this little dolphin repeat from my ever-forthcoming book.

Now. What does this mean? Less authenticity, but more versatility. My current project uses the Dance centered around a single project axis. I use mirroring at ONLY the very center of my piece, with runs of straight repeat left and right until they meet up with a corner. Why? Why not? I liked the look:

But if I were working around a piece with a fixed circumference, like on a strip that was to be seamed into cuff, and there was not room for an even number of repeats, I might appreciate the ability to use an odd number of repeat units (along with type #1 symmetry), to better fit the area to be stitched.
I hope this helps.
GALLERY
Finally. After nine long years since the design challenge was issued and I responded with a pattern for the Flying Spaghetti Monster, a finish has been spotted in the wild.

Special thanks to stitcher Zelda Doyle, who had fun with the thing, then posted the result on Facebook and made my day. This photo is hers, of her own work, and reproduced here by permission. The chart for His Noodly Glory is here.
Have you done something fun with one of the pattern children and wish to add to our Gallery? Please let me know.
DETERMINING THREAD COUNTS OF SMALL-GAUGE LINENS
Lately I’ve been seeing discussion of linen, and whether or not it has to be even weave, sold specifically for counted thread work to be suitable for blackwork, cross stitch or other forms of grid-aligned stitchery. I maintain that while that does make things easier, and guarantees a certain precision look, it may not always be needed. Here’s a sample of a not-quite even weave being used for double running stitch.

First thanks to My Stealth Apprentice for the lovely linen remnant I’m using.
While it looks pretty uniform, it’s not. Up close you can see that the thread count is not even in both directions. Also you can see the combo of thin and thick threads that I admit can make stitching a challenge. But you can also see that both circumstances don’t quite matter as much as one might think.
My own counts, estimated by trying to take measurements between two pins placed an inch apart have been off up until now. But totally by accident, I’ve hit on a better way to calculate thread count, and it happened by using a standard US penny as a reference point to show relative scale.
The penny is three quarters of an inch across by specification. By taking a zoom-in photo, then counting the threads it obscures, we get a vertical thread count of about 33 threads in 3/4″ (counting the threads “tall”), and a horizontal count of about 25 threads in 3/4″ (counting the threads “wide”). A bit of math – multiplying both values by 1.33 – and that works out to a thread count of about 43.9 x 33.25 threads per inch. Not even weave in the least. But I can still work a (slightly squashed) rendition of the design on it. It’s distorted, but in a way that would not be apparent if this was to be done entirely as a strip.
However, I AM working this design as a frame around my central motif, complete with corners, so the skeleton dance will appear rotated to fit all four sides. Just as this bit is slightly squashed north-south, when I get to the side 90-degrees from this, the design will be squashed east-west – making my bony bois and pomegranates taller and thinner than they will appear here.
Optimal? Maybe some folks would object. But I am betting that it will still look good.
Oh, and add a penny (or any other coin or flat object with fixed and known dimensions) to your stitching gadget box, along with your phone’s camera. It’s much easier than those pins…
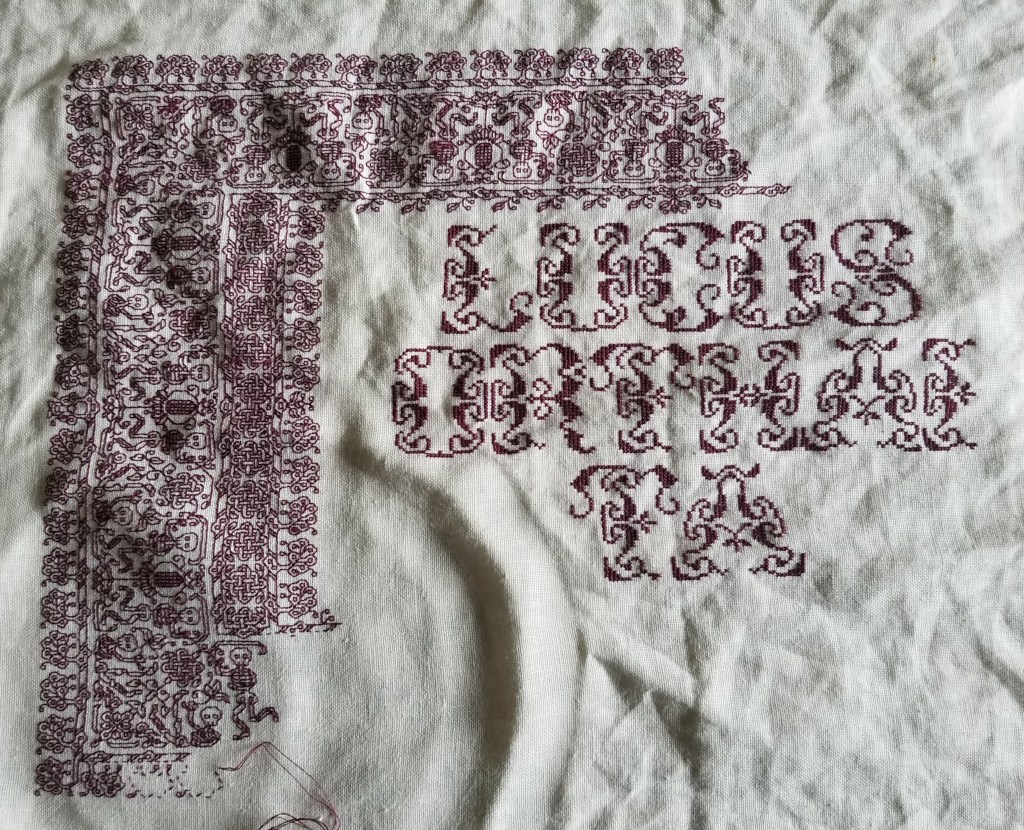
LETTERING COMPLETE – ON TO THE DANCE
I’ve been working away on my admittedly odd fandom sampler, and have finished the motto.

US penny provided for scale.
With more precise counting, the ground cloth is approximately 46-48 threads per inch but isn’t exactly even weave, so the piece is roughly 23 x 24 stitches per inch, with small variations for slubs or skinny threads. But that’s ok.
As for what this rather curious saying in the equally curious and difficult to decipher font says, it’s “Lucus orthai ta.” It’s a saying in an alien language that figures in The Resident Male’s forthcoming book. It translates to “Life’ll kill ya,” and so was fitting to be something ringed round with the skeletons from my Dance pattern page.
Having finished with the plain old cross stitch part, now comes the fun stuff. In an unusual move for me, I’ve graphed out an adaptation of the Dance strip and corner, specific for this piece. I usually don’t bother, but in this case I wanted to be sure that everything was centered. You can see just above the “LUC” I’ve begun a course of the innermost edge of the wide border. It’s mirrored at the center point, over the C. I did this so that my corners would meet up perfectly. Now of course as I go on we’ll see how well I have been ensnared by hubris. But for now, I can hope. Also consult my pattern graph.
Oh. And for the strip across the top, the skeletons will be upside down. You have been warned.
Questions about materials or technique? Comments on the futility of producing a tribute to an as-yet unpublished book? Desire to read the first book in the series? Post your queries here and I’ll try to answer.
AFTERMATH OF A WINDY DAY
Yesterday was windy. Really, really windy. My neighborhood was hit by several amazingly strong downbursts that felled more than several trees. While a big chunk of the two trees in the corner of our lot fell victim, we were lucky in that there were no injuries, nor was there any major damage to any houses or cars. Note that the wind was SO loud when this happened we did not hear the crash. I felt a tremor through the floor, and went to look out of the window, having no clue as to the cause. This is what I saw:

Yes, my neighbor’s empty shed was dented a bit, and the rather iffy fence between our properties took some additional damage, but for such a large pile of downed wood, we came off quite lightly.
Today the tree crew is here. They are removing the debris, and trimming up the larger of the two maples involved in an effort to preserve it. Sadly, the slightly smaller (but still quite large) maple in front of the corner tree is too shredded to save. It’s only got two remaining tufts in its crown – not enough to keep it going. So, compromised as it is, it’s coming down today, in a deliberate rather than wind-wild bit of destruction.
First – how to remove half-a-tree, splayed across two properties, and precariously balanced?
From above.
This aeronaut descended on the boom crane, affixed the lift straps to the main segment, and up they went. Once the limb was off the ground and over a safe spot, he lowered himself down by rope, and the crane lifted the thing up and over my neighbor’s house to dangle in their front yard.


Then the ground crew cut the “fingers” off the suspended “hand” and fed them into the chipper/disposal truck. In the mean time, other guys in the back yard hauled the smaller stuff away.

After this debris was cleared, it was time to prune back the shattered limb of the larger maple, and to remove the smaller one (seen next to the hard-hatted fellow in the photo above).
The result. One sadly halved corner tree, and one stump.

It’s going to be a lot sunnier in our yard from now on. And that corner now cries out for a large shrub of some type – preferably with nice, dense leaves, for privacy. I also suspect that negotiation with the neighbor to the side will lead to the elimination or replacement of the falling fence. There’s also that stump to deal with…
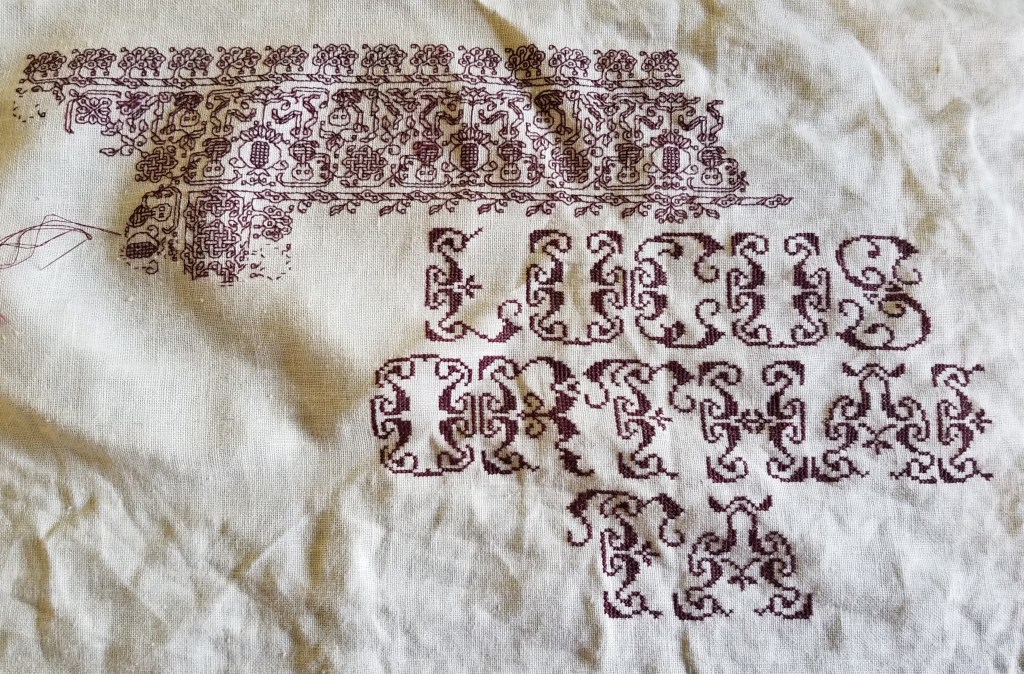
Oh. And to prove that progress indoors is happening, too – here’s the latest on my Lucus Orthai Ta sampler, that will bear my dancing skeletons edging:

I’m just beginning the L, having finished UCU. On the second line TH and part of the A are complete. You can also spy a tiny bit of the innermost band of the edging above the UC. It’s mirrored at the centerpoint – its rightmost edge in the snippet worked so far. More on that as the piece grows, but first I have to complete the letters in cross stitch. Like finishing up a dreaded dish for dinner, before getting dessert.
