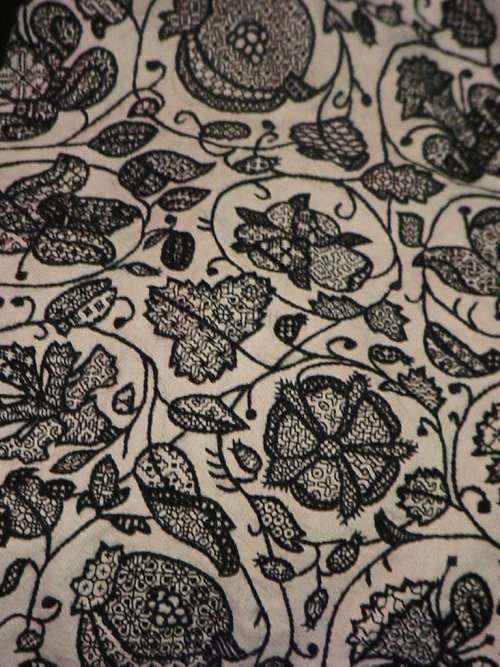
UNSTITCHED COIF – FINISH! MATERIALS AND TECHNIQUES
here have I been these past weeks? Stitching away in a sweatshop of my own making. That may sound tedious, but it was actually tons of fun. I had to drone away with intent to meet the completion deadline for the Unstitched Coif project. I’ve completed the embroidery, including some small repairs. All that’s left is neatening up the back a bit, hemming to final size, and shipping.
This is the first of two posts on finish. The next one will present details and commentary, motif by motif. But I still have work to do before mailing, so that will have to wait for another morning.

Yes, that little dip in the upper left is in the original, too. And yes, it does bother me, but (near) verbatim is near verbatim, so I kept it instead of extrapolating what should have been there.
Materials:
- 2.25 spools of Au Ver a Soie’s Soie Surfine spun silk for the fillings, purchased from Needle in a Haystack.
- 1.3 hanks of Golden Schelle’s black four-ply spun silk embroidery floss for the motif outlines. It’s worth noting that this is a hand-dyed product, prepared from a historically documented iron/tannin recipe, and in 500 years will probably have eaten itself to death, exactly as black threads in museum artifacts from the 1500s have deteriorated over time. I love the minor color variation and soft black produced by their small-batch method.
- About 0.25 hank of Tied to History’s Allori Bella silk in black – a reeled filament silk for the heavy perimeter outline. This one claims to be four-ply but is hard to separate. Each ply appeared to be made of three strands. I ended up using two of these constituent strands at a time, which means I got six working threads out of a length of the four-ply.
- About 0.25 of a hank of Japanese Gold #5, from the Japanese Embroidery Center in Atlanta, Georgia.
- One skein of six-strand Cifonda Art Silk (probably rayon) in a light gold color. I bought this in India, as part of a large lot for short money.
- 1.9 strings of 2mm gold tone paillettes, from General Bead. The description says there are 1000 spangles per string. I doubt that. Probably more like 500. Still, that’s a lot of spangles.
- John James needles – #12 beading needles (outlines, spangles, couching), and #10 blunt point beading needles (fills, whipping). The #12s were labeled as being blunt points, too, but they wre far sharper than the #10s. Many of the #10s, because I kept bending them as I worked, and a bent needle is harder to aim accurately.
- Mani di Fati’s 72×74 count linen – as recommended by our Fearless Leader, Toni Buckby.
- Toni’s elegant rendition of the Victoria and Albert Museum’s “Unstitched Coif”, Accession T.844-1974, shared at this link by her special permission.
Stitches Used:
- Fills – mostly double running stitch, with occasional digressions into “Heresy Stitch” (aka half back stitch), back stitch, and wild improvisation when lack of real estate and undulating edges required shoehorning motifs into tiny spaces. With one exception they are all done over 2×2 threads. When I started I thought that over 3×3 might be better, but my brain and hands are so trained to work 2×2 that it drove me nuts, so I reverted to the smaller size. But I didn’t bother ripping out the completed bit. Have fun hunting for it.
- Motif outlines – Reverse chain. A probable departure from historical usage. Carey, in her excellent book Elizabethan Stitches calls out twisted reverse chain as having documented use in 16th century historical artifacts, but mentions plain old reverse chain as having no provenance in that time. Which does seem very odd to me.
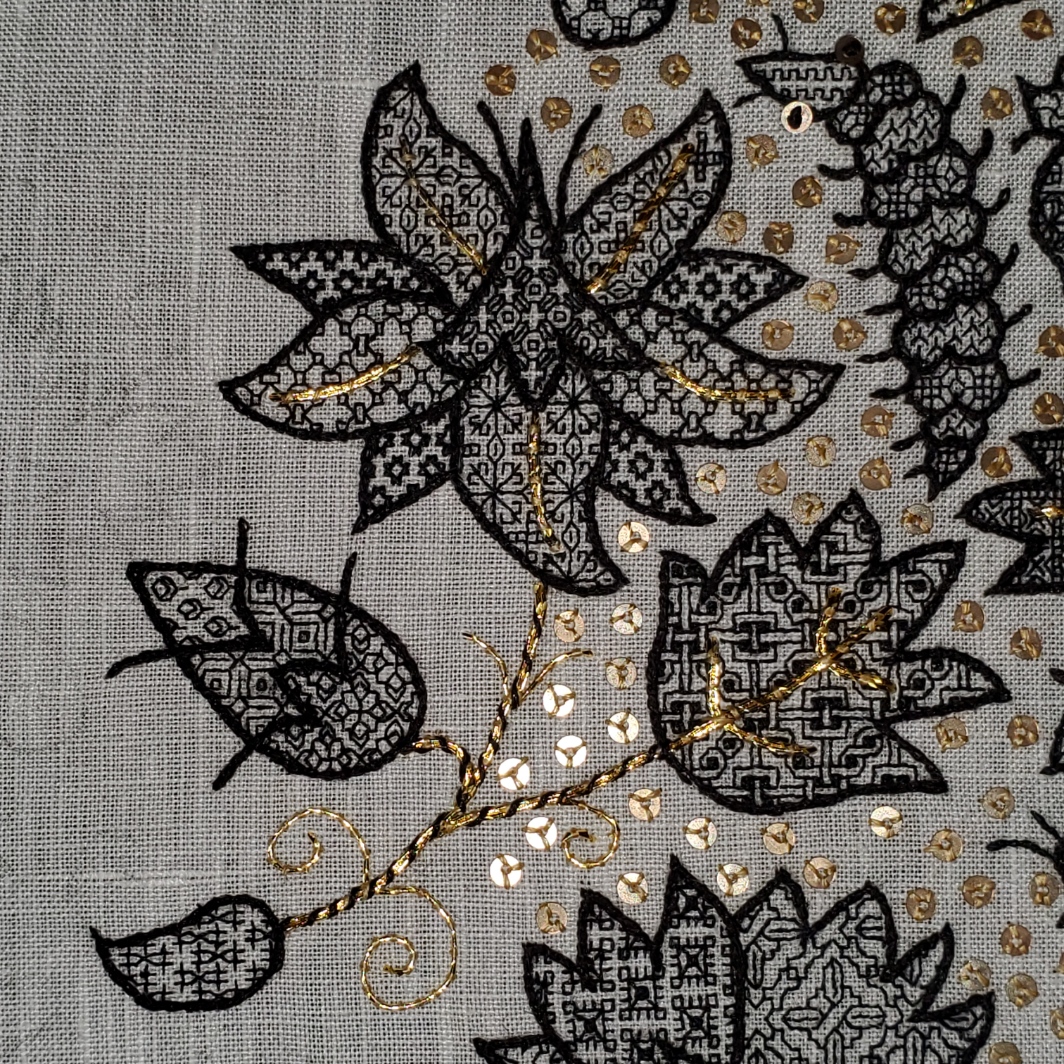
- Leaf veins and other gold details overlaid on top of black stitching – Simple couching over a double strand of the gold. Ends plunged. Plunging is another deviation from the historical. I have been schooled now by several people that is a practice common to the mid 1800s, and not before. In the 1580s gold ends were neatly tucked under. Look at all the gold I used, and especially at the short lengths. I voted to save my sanity.
- Stems – Also simple couching, but whipped with two strands of the black Soie Surfine. Where the stem extends a leaf vein, a single line of couching was laid down, but only the stem part was whipped. I began doing this after I finished the first flower, complete with background spangles, and the stems disappeared in the riot of gold.
- Spangles – I affixed my paillettes with three straight stitches each, hopping all over like a water drop on a griddle. Since I almost never strand over this was painful to do, but the ground’s dense weave and light color of the Art Silk convinced me that unless the piece was backlit, it would not be seen. Again, a sanity move.
- Perimeter outline – Yet another historical departure. I originally wanted to do this in Ladder Stitch, but the Allori silk isn’t robust enough to display stitch detail, and the modern severe blackest-black color makes such attempts moot. So I went for double reverse chain, also called Heavy Chain in the RSN’s on line stitch reference, worked as close and small as I could to make a fluid, heavily raised dense line.
Fill Sources:
I used two sources. One is the set of sourced historical redactions Toni provided on the group’s official website. They represent about 18% of the designs I used.
But now is true confessions time, and certainly not a surprise to those who know me, although I’ve avoided mentioning this in our group’s Zoom meetings. About 82% are from my own free books – Ensamplario Atlantio, Volumes I and II, along with the not-yet released Volume III that I am working on right now. (I was circumspect because this project is Toni’s. I’m just one of the foot soldiers. The glory and renown belong to the general.) My 82% includes an estimated 2% on-the spot improvs I came up with to get out of a jam.
Why a jam? Because early on in this project I declared that I would not be repeating fills between motifs. A flower could have multiple petals in the same pattern, or a bug might have matching wings in a single pattern, but once that pattern hit the cloth and the motif was completed, it was “burned” and not used again on the rest of the piece. That made some anxious moments because there are A LOT of shapes to fill, especially small jelly bean sized ones. More than once I made an inadvertent duplication and rather than ripping out the work, had to mod the second showing so it would be distinct. Or I had to fill a particularly challenging tiny spot, and just winged it because nothing I had would show well there.
What’s Left to Do:
Taming this shameful back. Mostly tacking down those annoyingly fraying gold ends, to the best of my ability. Then hemming to the final dimensions required for display. Nothing fancy, no drawn work hems or anything like that.

And of course the second post in this series. But for now, off to lion tame my dandelion mat of frizzy gold ends.
HALF A BIRD AND MORE ON WORKING METHOD
This poor little bird at the top had the bad happenstance of appearing on the edge line of the Unstitched Coif outline cartoon. He’s been horizontally bisected. I felt bad for him so I used an especially playful fill on his body.

Obviously I’m still soldiering on.

No doubt about it, 2×2 countwork on 70+ thread per inch linen moves along slowly. But I am about to hit two major milestones. The first is 50% completion. That’s just a couple of flower sprigs away. The second is consumption of my first full 100 meter spool of Au Ver a Soie’s Soie Surfine – the ultra-fine silk I am using for the fills. I have more than enough in reserve to continue on, so no supply side worries loom.
I’m now pretty well adapted to the magnifiers, but even so a forehead break every 20 minutes or so is needed. The headband mount stays seated in my optimum viewing range longer and and accommodates use of my usual bifocals, much better than using the glasses frame “arms.” Neither is comfortable, but I’ll pick discomfort + better sight every time.
I do wish that the magnifier would eat batteries more slowly. I only use the supplemental LEDs on the magnifier when working actual countwork in suboptimal light conditions. I don’t need the extra illumination when working the outlines or doing the goldwork and spangles. But even so, one set of three tiny coin batteries lasts for only about four days of stitching – roughly 14 to 16 hours. If I had a do-over I’d buy something with the same magnification levels, but that came equipped with a rechargeable light source. It would be very handy to plug it in each night and be ready for the next day’s stitching.
I still haven’t repeated fills between sprigs or insects (with one tiny exception). Folk have asked where I’ve gotten them, and how I use them (planning/choice and execution).
The sources for the fills I’ve used include the set painstakingly drafted out by our Fearless Leader, from close observation of select Actual Artifacts in the Victoria & Albert Museum’s collection. She has provided them as part of the tool set for this project. But I have to admit that the overwhelming majority of the fills I have used come from my own doodle notebooks, including the Ensamplario Atlantio series. Others I’ve improvised as I stitched, noodling up something unique to fill a difficult to render petal or bug body segment.
I reiterate that I am not sitting down and planning placements ahead of time. Nor am I drawing out the shapes on paper, then penciling in fills and stitching from those plans. I’m deciding on them as I come upon the spaces. Occasionally I get to a flower and say, “Hmm. Six segments, I can do six fills, three fills twice, or two fills three times.” Then I pick a treatment, and go looking for the first fill. In general I start with the largest segment of the design, pick something demonstrative for that space – roughly centering placement of the design by eye and working out from there; then select designs for the accompanying spaces to contrast or compliment. Take the Borage flower, for example:
I started this one by doing the big leaf with the interlace fill. That one is from my doodle notebooks. It’s a grand fellow, and one of my favorites. I was waiting for a suitably large space to use it, so in it went. And no, I didn’t mind that it would be partly overworked with gold for the veins. It’s bold enough to stand up to that treatment.
Next I turned to the flower itself, starting with the largest downward extending petal in the center. I used one of the fills provided by the project leader, graphed from V&A accession T.230-1929, a sampler of fill designs. It’s six from the end on this page. It’s repeat is smaller than that in the leaf, but it still needs room to play. I also chose it because I liked the way its spiky linearity contrasted with the closed, boxy interlace nearby.
While I was working the first petal, I decided to divide the flower into a set of three petals, two petals, and four petal/sepals, and shade them so the set of four would be the darkest, and “recede” to the back. I worked the other two petals of the three-set with the same design I just completed, then went looking for a lighter, less dense one for the two-set, ending up with another from my doodle notebooks. It’s light and airy, and quite quick to stitch up. Although it uses a lot of lines and has squares, it is a nice complementing contrast with the first design, and it had enough space to let the design show. It was clear with these five petals done that the four-set would need to be significantly darker and smaller, but I didn’t want to do a tiny repeat because I’m saving those for the many-tiny-petals Marigold flowers. I found a small, dense one, again from my doodles.
With all of the petals done, I thought that a darker center “cone” was in order. I pawed through the project collections and my notebooks but didn’t see anything tasty, so I just improvised this final fill, starting with the familiar cross and circle base, and adding detail until I got the density I wanted. (I did add it to my current notes, though.) The feel of it is almost the opposite of the star-like fill I used in the four-set petal/sepals. Once the final fill was completed, I went back and worked the black raised outline in reverse chain, using two separable strands of a thicker four-strand silk floss, hand dyed by a friend of mine (a softer black from a historically accurate iron/tannin recipe).
On to the bud. All three of the designs I used in it are from my notebooks, although the bud design is very common, and a feather-line variant of it is in the project’s collection of designs from V&A Accession T.82-1924 (a cushion cover). Again, I picked three in ascending density from the base to the bud tip, looking for ones that contrasted both in tonal value and in composition. As per usual, the outlines were last.
The small paisley at the sprig’s base was last. Originally I had intended to use its fill elsewhere, but I decided to employ it as a stand-alone because it is Very Special. It’s from the project collections, drawn from V&A Accession T.12-1948 (a coif) by our Fearless Leader. It’s third from the end on this page.
It’s special because of the stitches used to form the center X in the double stirrup shaped motifs. Those are two 1 unit by 2 unit stitches, crossing in the center. I call them “knight’s move” stitches. They are vanishingly rare in historical count work, appearing most often as a component of eyelet type constructs, where many stitches radiate from a single center hole. But stand-alone? This is the FIRST time I’ve encountered one on an actual artifact or contemporary pattern graph. Yes, they are quite common in modern blackwork and strapwork because they add an angle to the designer’s toolbox. It’s a very useful and graceful angle that many designers employ to excellent effect (especially Banu Demirel of Seba Designs), but to my eye, they produce a different overall look and are a clear marker of modern design. So finding one here was like being slapped Monty Python style, with a flounder.
I shared the observation with our group leader, who I am sure is now on the lookout for other knight’s move examples. Until there’s a whole vocabulary of them though, I will view this fill as the exception that proves the rule, and continue to eschew anything but 45- 90- and 180- degree angles in my own design work.
Once all of the fills and their black outlines were done, I added the gold. First I couched down the doubled gold of the flower’s petal lines. Then doubled gold for the leaf veins/stems. I affix them all with small stitches of gold color faux silk. Leaf veins that meet up with stems are done as one length, with that center line being laid down first. I add the “crossbars” by teasing them underneath the centerline using a tiny thread crochet hook, then couching down their arms. Once all he double-strand work is done I add the single-strand gold curls. The final step is to whip JUST the stem portions of the sprig with two strands of the same Soie Surfine I am using single stranded for the fills. Those black stitches are not structural. They are just for effect, binding the flowers and leaves together and uniting the sprig and make it stand out from the ever encroaching flood of paillettes/spangles.
And yes, I will go back and add the gold curl at the tip of the paisley. But it encroaches too closely on neighboring design elements, and I don’t want to catch it as I stitch those. So it will be added later.
I hope this answers the questions about my “bungee jump” approach to this large and complex project. As with any such banquet, taking lots of small bites is a fun way to graze across the entire spread.
CRAWLING ALONG
My sort-of-weekly progress and lessons learned post about my Unstitched Coif entry. So you can see what’s new, I post the last general update photo alongside the new one:


I’ve added the rose, several bugs and a couple of leaves, a partial rose at the bottom edge, worked more of the stems and curls in gold, and seeded in more of the sequins once surrounding motifs were defined. I’m working on another leaf right now. And this means that I am almost finished with the first of the three tiled pattern print-outs. I’ll be moving onto the center sheet in the next day or so.
Obviously I am determined to make that completion deadline. I’ve been trying to stitch at least four hours per day, sometimes more if I can. Although we absconded to our place on Cape Cod for a long weekend, and I took my stitching with me. And there I had a grand time sitting out on our deck, working away in shaded sunshine and light airy breeze. Not too hot, and not too windy. (Thanks to the Resident Male for these live action photos).

It’s a bit easier to see in the following photo – I keep my left hand underneath and my right hand on top. I’m right hand dominant, but probably less so than many right-handers. My left is quite well trained at this point.

You can also see the magnifiers. I’ve found that they get less tangled in my hair if I wear them over a kerchief, rather than putting the headband directly over my pinned up braids. Yes, that’s one of the blackwork forehead cloths I stitched several years ago. It has worn like iron, surviving many washes, but I do now understand why forehead cloths are so often found bereft of their strings. This is the thing now, on its second set of strings (strips of linen, double folded and hand sewn), and this set is beginning to fray. Also note how the formerly crisp on grain right-angle triangle has changed shape under the stress of being worn. Another feature often seen in museum examples. More on the ones I made and the one I interrupted to do this blackwork project here.

In any case back to the Coif project.
As I’ve written before, stitching outside in bright but not direct light is amazingly better than stitching under the best available indoor lighting. A full spectrum lamp comes close, but even that can’t equal the absolute clarity evoked by outdoor ambient light. I will be working on my porches back at home, front or back, weather and heat willing for the best part of the day from now on.
The second thing is that hideous, tattered dark color pillowcase, pinned on to the top edge of my work, and hanging down behind. I have two – both way to destroyed for their original use. I use them as a double layer travel cover for this frame when I take it along with me. The travel cover I sewed is too small for this frame at max extension with lacing.
The reason it’s there is to limit light shining through the work. Unneeded light includes reflected light outdoors, light from the TV (often on while I stitch when I work indoors), or from other window or artificial sources when I am trying to stitch with my full spectrum light over my shoulder. Even outdoors with the sun behind me, having the dark “curtain” behind the work makes it just a tad easier to see the threads and aim accordingly.
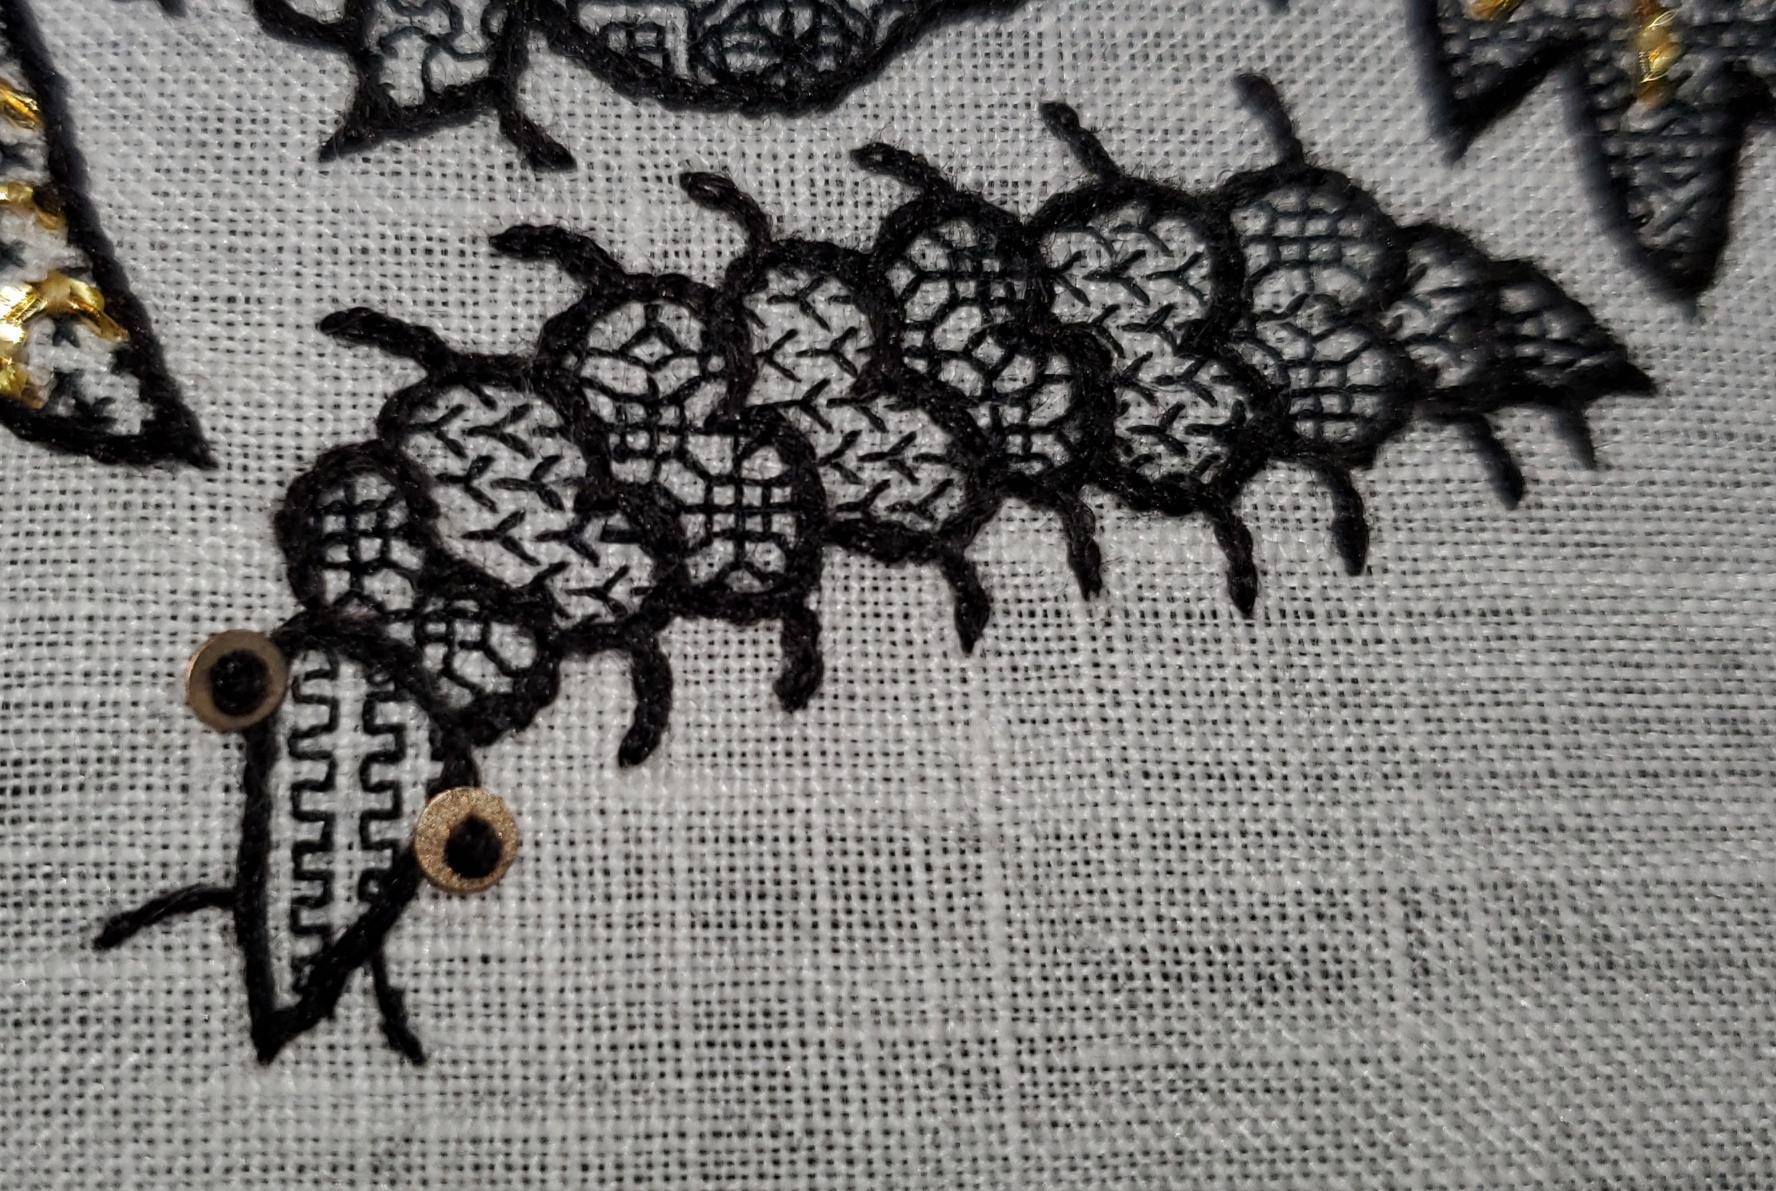
I finish up with a detail shot of the creeping caterpillar. He’s my favorite insect on the piece, but he was surprisingly tough to do. There isn’t a lot of real estate in those heart-shaped body segments. I tried to find fill patterns that would contrast nicely both in tone and “spikey-ness”, and still be somewhat distinguishable in those tiny areas. I ended up using three – one for the face, and two alternating, for the rest of the body. The eyes are always fun. Where possible I’ve been using the same 2mm paillettes that spangle the ground for eyes, held on with French knots. Do you feel seen?
For the record, with one unconscious lapse (a repeat of plain squared fill in two tiny places), I have NOT yet duplicated a fill between design elements. A fill might appear twice in the same flower, creature, or leaf, but once that design element is done, I consider its fills “burned” and will try very hard not to use any of them again. That means even if a bug or flower repeats in the drawing, each iteration will have its own unique look. Or so I hope…
ENSAMPLARIO ATLANTIO – UPDATED
Back in 2011 I issued Ensamplario Atlantio – my first doodle notebook full of fill designs for inhabited blackwork. Many of those designs are also suitable for use as an all-over design or strip pattern. Back then many people had to cope with bandwidth restrictions which made downloading a larger file problematic. So I cut the book up into four pieces to mitigate the problem. Now in 2023, that need has passed.
I’ve taken the original book, corrected some mistakes and typos, added four new pages (24 individual designs), and stitched it back into one single file. Ensamplario Atlantio, Second Edition is now up and available for free download. Having the thing in one piece should make using it easier. And it will make keeping track of it easier for me.
So please click here to download and enjoy!
The sequel, Ensamplario Atlantio Volume II, with 200 more patterns including fills, bands, and yoke designs is also still available as a free download.
TIME CAPTURED
More progress on the Unstitched Coif project.
As for “Time Captured” – that’s what this piece is. Time ensnared by thread.
That raven-like bird took about six hours to stitch. The big carnation at the lower right took roughly 18, exclusive of its stem, leaf and tendrils. I took my first stitch on the coif on 16 April. A little over 7 weeks ago. I’d estimate that over those seven weeks I’ve put in between two and five hours a day stitching. The average is probably around 4 hours. So by conservative estimate, what you see here is over 225 hours of my time. And looking at the whole piece, I’m only about 20% complete. I’ve got to speed this up if I want to hit the deadline for submission to the exhibit. Oh, and for the person who brusquely offered to buy my coif when it’s done, I point out that I only have one rate for my time – my fully burdened professional hourly consulting rate. I hope you are prepared to spend in the six figures.
But I’m not complaining about the time spent. Every second has been fun, and a good deal of it has been spent “in the zone” where tedium and cares do not exist. For that it is a remarkably efficient source of centered self-therapy, that I am enjoying immensely.
And all in all, I am pleased with what I’ve put on the cloth. With the exception of the simple boxed filling for Big Bug’s head, which I also used for one petal in the half carnation at the top edge, I haven’t repeated any fills. I’m happy with the mix of light/dark; dense/sparse; and curved/angled fills. There’s one fill done at 3×3 threads, the first leaf I did, but it’s not a glaring problem and I won’t bother reworking it to the same 2×2 thread scale as the rest of the piece.
A few of the paillettes might have been better placed, but I’m not going to take the time to do it. I still need to add gold accents to the viola flower in the center, and to the wings of the largest insect. And I am considering picking out the gold bug antennae and bird feet. While they looked great before the great spangle-flood, they do get a bit lost amidst all the bling. If I do that, now is the time. There are only four bugs and two birds, with lots more to come in the remaining 80% of the piece left to go.
Working with the gold has been a challenge. It’s unruly, for starters. I had hoped to do one of the narrower Elizabethan plaited stitches for the stems and tendrils, but after blowing my budget on the Official Linen Ground, I couldn’t justify the expense of the amount of passing thread I would probably need, or the cost of “auditioning” several alternatives before I hit on the one best suited for the project. So I stash-dived and made do with the Japanese Imitation Gold #5 I bought and used for my Two Fish project. (The same project that introduced me to the 2mm spangles).

I tried, but couldn’t get the Gold #5 to work properly as a passing thread on this closely woven, fine ground. The metal strip around the outside unraveled and shredded, exposing the inner silk core. So I resorted to couching, and even that can be problematic.
While working it single or double stranded around the curves isn’t easy, it’s much easier if I employ the natural bend of the stuff instead of working against it. It tends to curl in one particular direction, and have a tighter bend radius in that direction. So I try to lay the thread to take advantage of it’s natural directionality.
Plunging – taking the ends of the stiff, couched gold from the front to the back of the work – can present problems. It’s especially difficult for tiny lengths of the gold, like the ones I did on the aforementioned antennae.
In plunging, you thread a “service needle” with a looped length of sturdy thread. You insert the service needle at the point where you wish the gold to end, catch the gold thread’s tail with the service needle’s loop, gently draw it tight, then make a short, sharp yank on the service needle, using the loop to pull the thread through to the back.

Above are two of the needles I use for this, with both the tiny #12 blunt point beading needle I’m using to stitch the fills, and the US and UK pennies I use for scale. I experimented with several, including larger tapestry needles before picking these. Not sure what they are, though. I found an unmarked paper of six of them in a box of assorted needlework oddities I found at a yard sale. The extremely smooth eyes plus is a bit of tiny variation in the size of the eyes and taper among them, which makes me think they might have been hand-finished, but I’ll never know. The polyester carpet thread I use for the plunging loop is extremely strong.
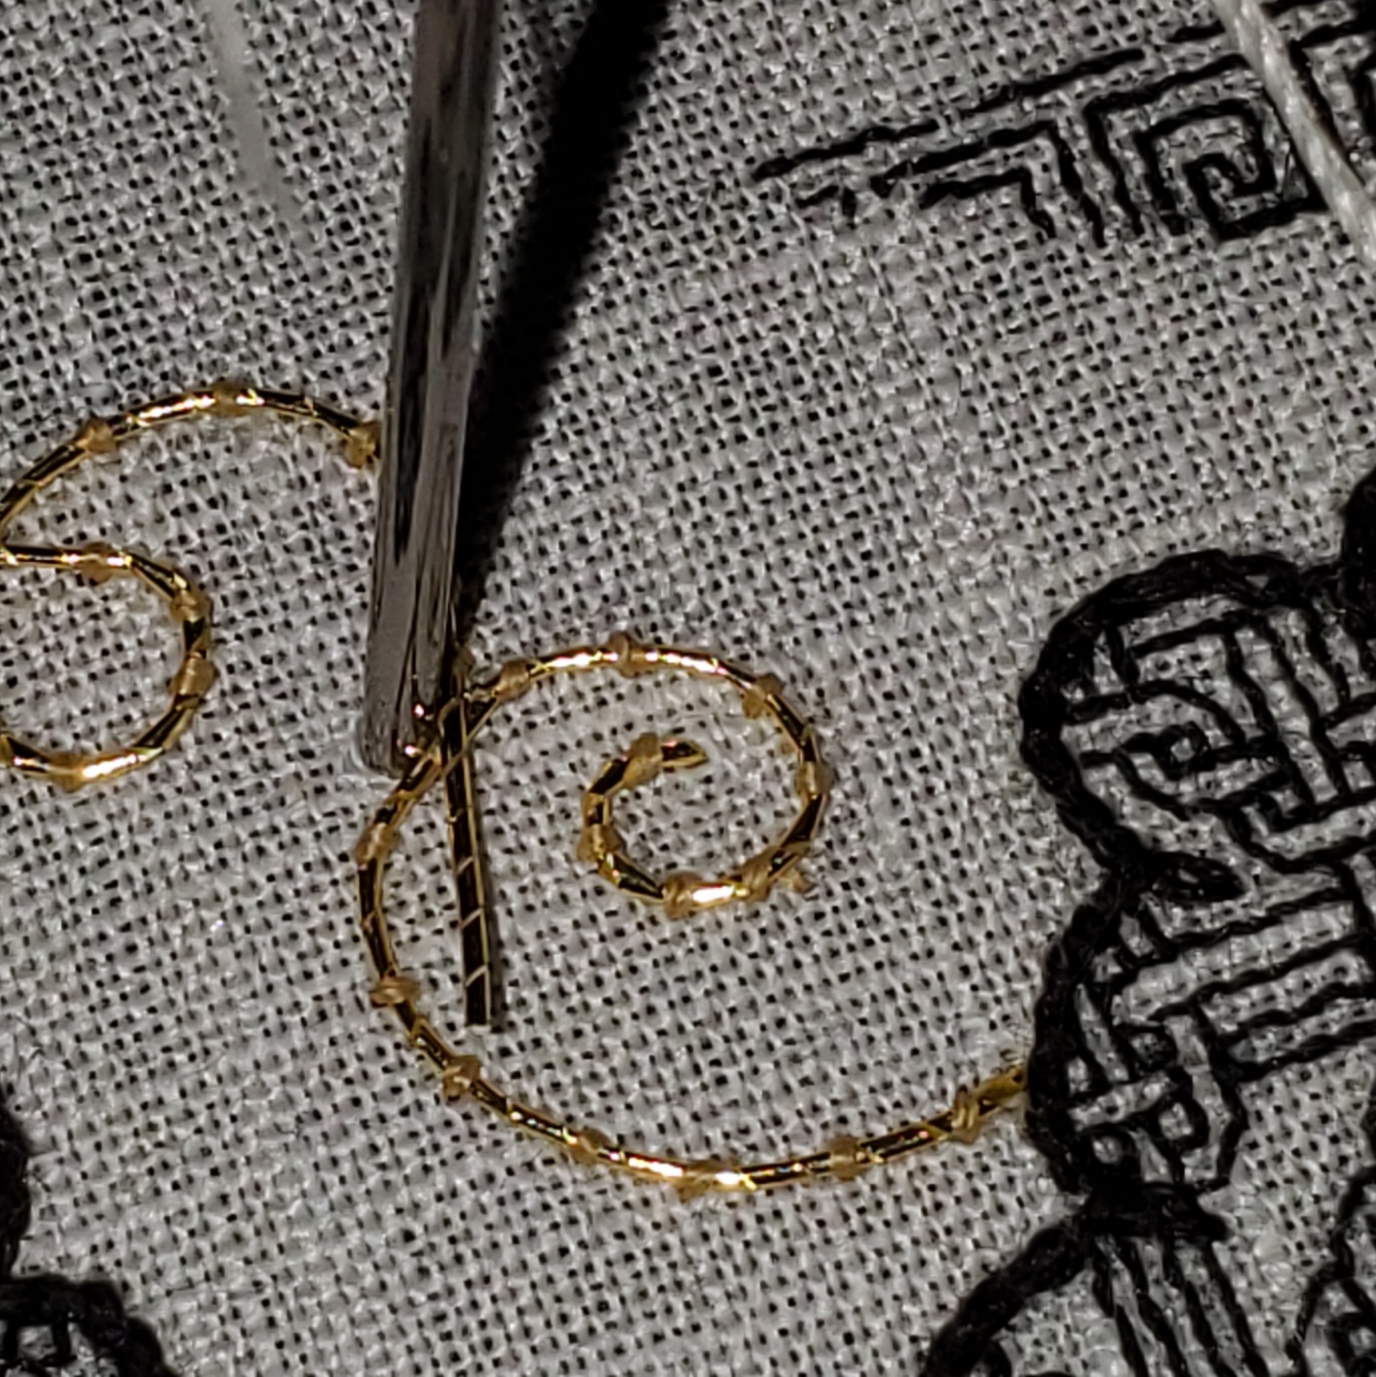

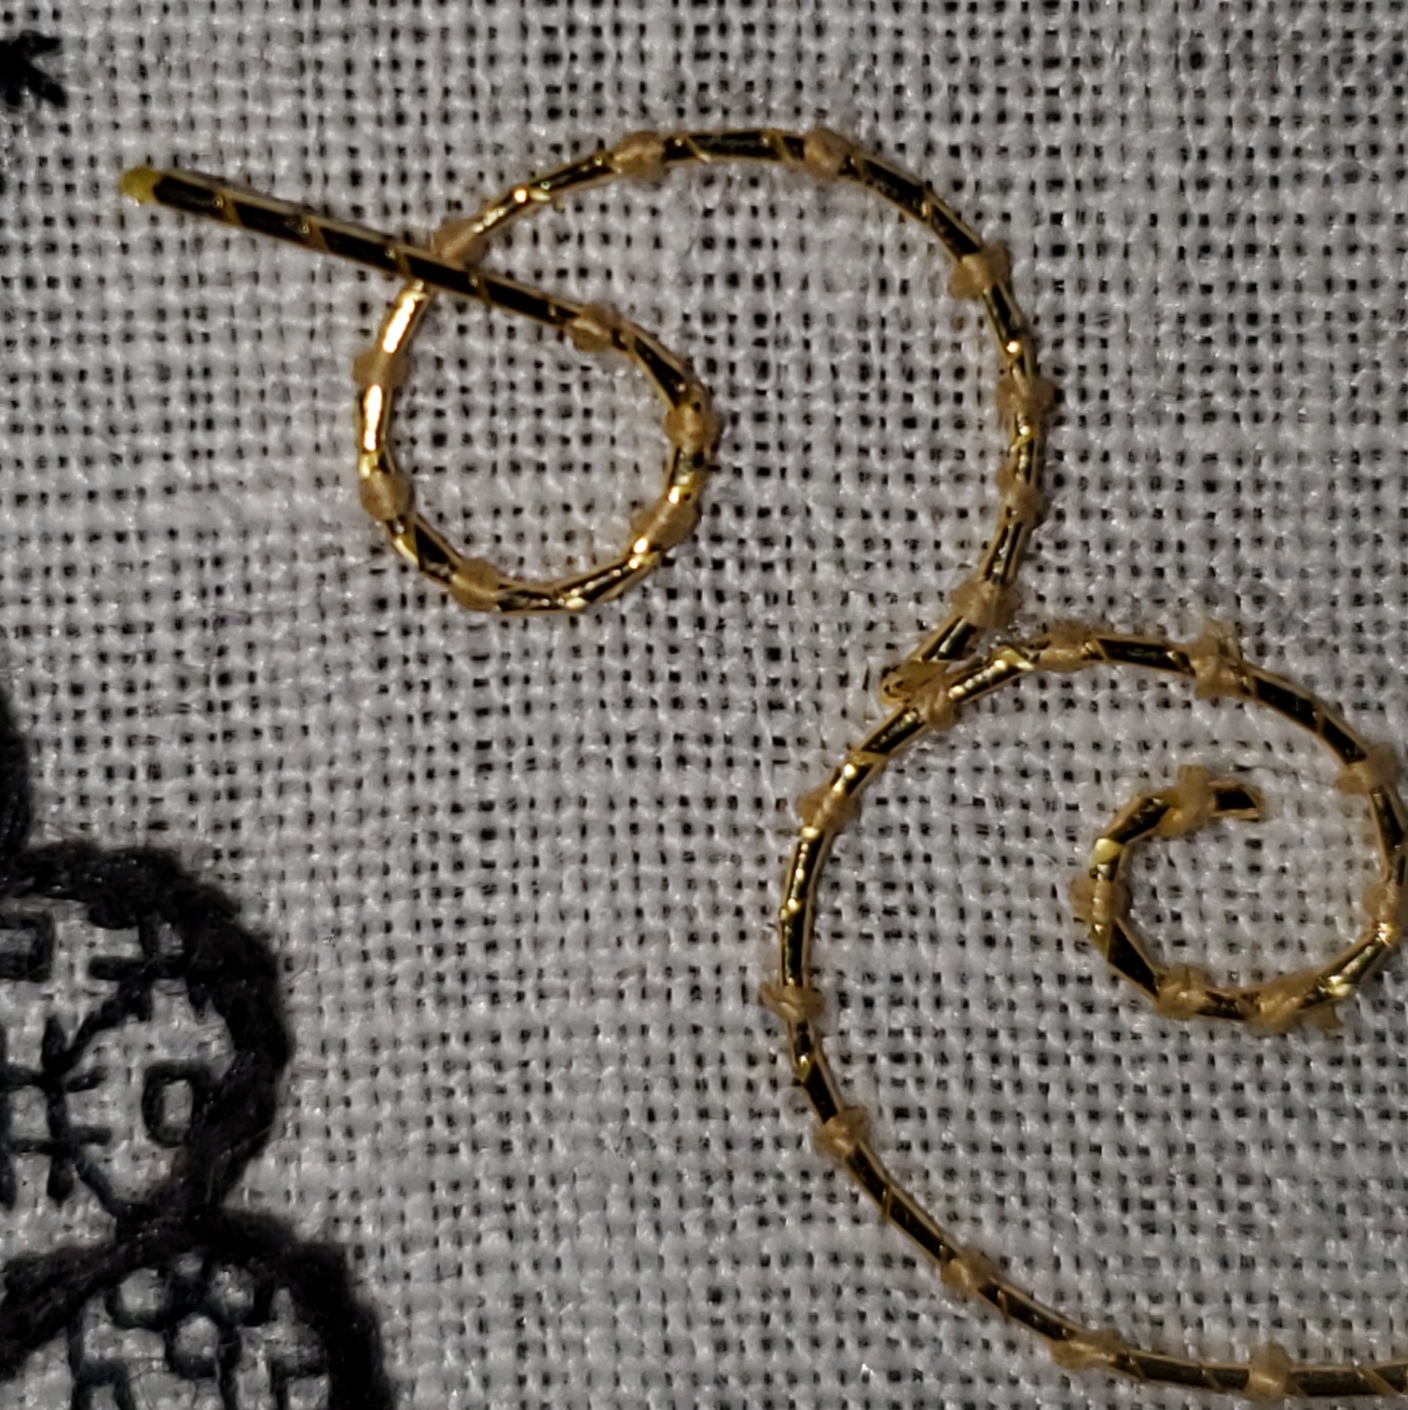
And an action sequence. At left, inserting my gargantuan needle into the spot where I want the gold to terminate. You can see how huge it is in comparison to the ground cloth weave. I go slowly, with the intent of pushing the weave threads aside, and not piercing them. The tail I am about to hide is the vertical bit adjacent to the plunge point. In the center, I’ve lassoed that tail and pulled it through my super-size, distended hole. The size of the hole helps avoid abrading and shredding the gold thread’s outer layer. And at right, the final result. I’ve used the tip of the plunging needle to ever so gently, stroke the ground cloth threads back into position. You’d never know that I had opened up a yawning crater there.
Why show all of this? Well, first to help those who might be considering using gold thread, but have had problems sewing with it. At no point in this process is my gold passed through the eye of a needle, nor is it dragged repeatedly through the cloth to form stitches. I hold it on the surface of my work, and use a needle with yellow silk to make tiny silk stitches, affixing the gold to the ground. I leave about a half inch (roughly 1.5 cm) gold tail when I begin my line of couching, then snip off the excess when I am done, leaving a tail of about the same length at the terminal end. Then I plunge both.
Second, to help explain why I am thinking of re-doing the bug antennae. Those are teeny tiny bits, most not even as long as the tails I leave to end off. No matter how tightly I stitch the yellow couching thread, about 75% of the time the act of plunging itself rips the whole bit of gold through the exit hole, right out of its affixing threads. It’s a major pain and production bottleneck. So in addition to those tiny bits visually disappearing into the spangled ground, I have great motivation for cutting that bit of detail from the rest of the work. I will replace it with the same simple reverse chain stitch in black silk that I used for the rest of the outlines.
Now to work up the courage to perform the surgery…
FIRST BUGS, NOW BIRDS
I’m edging into a new neighborhood on the Unstitched Coif Project. This one is inhabited by birds. The first one is stitched and I’m thinking on the fills for the second. You can see him at the center bottom of the piece, now presented in the correct orientation.

I think he looks a bit like a tiny raven, A slightly confused one at that. I could not resist the visual pun of using the feather fill from the collection presented at the official website for his body. You can make out another oddly shaped bird sketched in below and to the right of the pansy/viola flower.
All in all, I’m pleased with the way this is turning out, although like all participants, I wish my project was proceeding faster. Working so tiny is taxing. Mr. Raven for instance took about four hours to complete, counting the fills, outlining, sequin eye, and couched gold feet.
My game of not repeating fills between units is still afoot, although I am finding it harder and harder to find or devise fills for the particularly tiny areas, like the sepal-leaves on the pansy. And I have to go back and add lighter gold banding the the wings of the big bug.
One more challenge is that of adding the overstitched elements – the couched vein leaves and feather markings on Mr. Raven. I do the fills first, then neaten up their edges with the heavier outlines. But the fills obscure the placement of the overstitching. I do that by eye, referring to a printout of the master design. I’ve mentioned before that others do the outlines first, but with the heavy, embossed reverse chain stitch, working inside tiny spaces would be extremely difficult. I leave that to those who are using outline stitch, freehand fills, and speckling.
Today’s agenda will be filling out the spray of leaves at the (now) right edge, adding the gold stems to it, and flooding the few newly surrounded white space areas with spangles.
In other news, last weekend I visited Younger Spawn and surrendered the bespoken Eyeball Bolster Cushion, seen here in its forever home, on the target low back mid-century modern sofa for which it was designed. A perfect fit. The recipient was totally thrilled.

The sharp-eyed will spot my stitching set up near the sunny window. I added a hex wrench to my stitching kit, and can take the thing including the disassembled stand with me when I am on walkabout.
While I was out in Spawn’s neighborhood we went to a garden center/plant nursery. Spawn added to the resident collection of exotic houseplants that make the apartment a livable and calming oasis. I noticed that the prices for large, healthy outdoor plants were much lower there in the suburban Albany/Troy New York area than they are here in the outskirts of Boston, so I bought some plants to augment my growing perennial collection. Here they are, just before I plonked them into their spots.
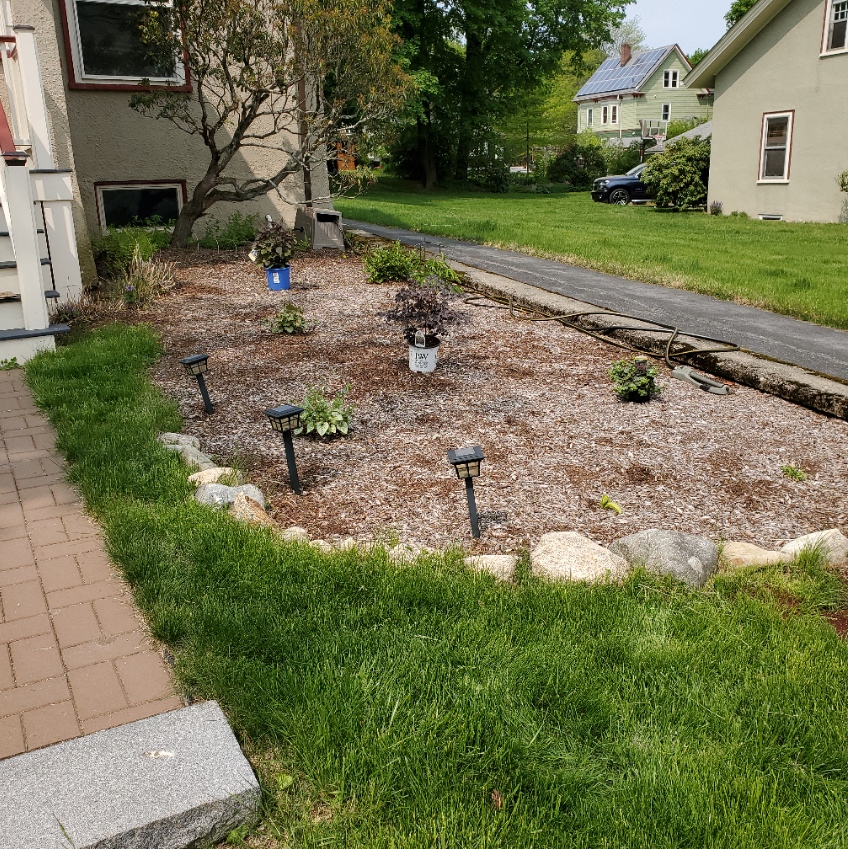
The big blue pot in back is a Chocolate Eupatorium (aka Joe Pye Weed). It’s a fall bloomer, with white flowers. The white pot in the middle is a red-leafed Astilbe variant, with purple/red flowers in mid to late summer. And the little guy over near the hose is a low-growing creeping sedum, that blooms purple in the fall. They join the transplanted peony, curly leafed Hosta, lemon Hosta, pink Astilbe, and two types of Brunnera (one red leaf, one green) that survived last year’s drought and fierce heat that doomed my Aconitum (wolfbane), and Hellebore. A less poisonous garden this year, but one I hope will outlive my ungentle care.
PRICE ALERT
One last thing – if you are interested in buying my pattern collection The Second Carolingian Modelbook, you may want to do so before 30 June. Amazon Kindle is raising print fees, and because the thing is on a razor thin margin, I will be forced to raise the price. I am sorry for this. I tried hard to keep it under $30.00 US per copy, and it will remain so until the end of June, but after than the price will be going up.

BLACKWORK/STRAPWORK RESOURCES HERE ON STRING
NOTE: UPDATED TO BE CURRENT THROUGH 15 JULY 2025
Blackwork embroidery seems to be having an Official Moment right now, with tons of new interest. I’ve got a lot of resources here that might be useful to folk beginning or continuing their journeys, but it’s not well indexed. So I post this round-up of on site resources in the hope of lending a hand. And to be able to point to the whole set if asked. Image at the end for the eye candy effect. List below has been updated since it was originally posted.
Technique and Tools
- Double Running Stitch Logic. One of many times I’ve tried to explain double running stitch and two-sided work. This post led to the tutorial series listed below.
- Assorted Blackwork Hints. Answers to questions about my working methods. Making mistakes; guidelines; where to start; simple tracing using “the poor person’s light box”; multicolor; equipment hints (frames, needles, wax); and a list of tricks for path planning in double running logic.
- Blackwork Thread Thickness and Grounds. One strand or two for double running? Why is it sometimes hard to keep your lines straight and even.
- Blackwork Heresy. Back stitch, double running, and the hybrid that floats between them, which I nicknamed “Heresy Stitch.” Useful but not something I’ve documented in historical works. Can be easier for people who get lost when working double running, and saves thread when compared to back stitch.
- What Makes a Blackwork Pattern Difficult? Cautions and mitigations for three challenges, that might help simplify those trouble spots.
- On Charting. How to look at a photo and then translate the design to paper.
- Determining the Thread Count of Small-Gauge Linens. How to use a penny (or other tiny thing with a known and stable diameter) plus a cell phone camera to figure out the count of a hard-to-see ground.
- Cornered Again. One way to handle placement of bands on a band sampler and a wrap around frame edging, with minimal advanced planning.
- Filling In. More questions from the mailbag, including some unusual names for stitch techniques that appear in museum annotations.
- Proofing. How I check alignment as I stitch, to make sure I’m not wandering off count.
- Turning a Strip Repeat into an All-over. This one also belongs under the free linear stitch patterns heading below. A couple of ways to make a single width strip into a double, and how I ended up turning it into a Green Man square.
- Travel Cover for a Flat Frame. How I made mine, and how you can make one, too.
- Hoops! Sizes, thicknesses, wrapping, and more.
- Working on skew counts (non-evenweave linens). An aside in the discussion of a past project, but lots of tech info here.
- Typography in embroidery design. Choose your typefaces carefully!
- The Buzz on Beeswax. Why I am such a fan of using it in blackwork.
Inspiration
- Elizabethan Blackwork Smock. Photos of the famous Victoria & Albert Museum smock (1575-1585), Accession T.113 through 118-1997, plus my redaction of some of the fills used on it.
- Blackwork Inspiration. Some sources for folk looking for project ideas for original pieces of contemporary blackwork
- Digression – Blackwork Embroidery. Lots of links to portraits and other artworks showing blackwork. Some of them might still work.
- More Inspiration from Historical Sources. Another link roundup of countwork appearing in paintings and portraits. Some of these links may still be live, too.
- Forehead cloths. The coif’s companion. Much easier to wear in modern context (see Bragging, below).
- Ironwork at the V&A. These pieces sing “outline potential” to me.
Voided Works
- Voided Grounds. A roundup of various treatments for voided work, where the background is overstitched but the foreground remains (mostly) unworked. This is the style that was reborn in the 1800s as Assisi work, and is also known as reserva stitching.
- Voided Pieces and Outlines. Do historical voided pieces always sport outlines? Were they done first? Were they always on the count?
- Voided Narrative Panels. A style cluster of voided works probably done by drawing the foreground designs freehand, then working the background up to those lines.
- Meshy! Working that hard-pulled mesh like voided style that totally encapsulates the ground fabric’s threads.
History, Speculation, Pattern Clusters, Printing Block Migrations and Other Musings
- The Twain do Meet. Introduction to Kasuthi Kashida. Blackwork’s Indian cousin
- Looking East Again. Double running stitch pieces from the Wardak Hazara people of Pakistan. Another example of a South Asian stitching tradition that may be one of blackwork’s lesser known Eastern cousins.
- A Missing Link? A curious family of Egyptian Islamic artifacts of the 10th to 15th centuries, that have no proven relationship to inhabited blackwork (the kind with hard outlines and geometric fills), yet presage its aesthetic.
- The Azemmour Cluster. A group of patterns that in the time I’ve been paying attention has had their commonality and point of origin increasingly recognized, moving them from late 19th century source annotations that identified them as Renaissance era products made everywhere from Greece to Spain, and placing them in Morocco.
- The Spider Flower. A design that is probably part of the Azemmour Cluster
- Revisiting the Stupid Cupids – Multiple versions of the cupid and oak leaf meander.
- A Pattern’s Pedigree. Random thoughts about a specific family of patterns that shows up both voided and unvoided.
- The Leafy Family. A wide leaf-bearing meander that shows up multiple times in artifact inventories.
- More Cousins. The Leafy Bricks group.
- Cornered! Possible working direction and four different corner treatments of a famous, oft photographed handkerchief in the V&A.
- Italian Leafy, Occasionally Multicolor. Another design family of large panels and edgings that have curiously similar design elements, and a direct association of one example with the Jewish community of Rome, hard dated to 1582/1583.
- Long Lost Twins, Part I. That ubiquitous urns and piping harpies design. (I revisited this one in Part V, below)
- Long Lost Twins, Part II. Oak branch, leaf and acorn design, executed in both monochrome and polychrome, multiple versions.
- Long Lost Twins, Part III. Another very common pattern with multiple iterations, in multiple museums, two instances of which may have been cut from one original piece.
- Long Lost Twins, Part IV. Multiple instances of a simple Y and wrap meander.
- Long Lost Twins, Part V. Lots more on that harpies/urns design; found in many museums, many iterations, and even multiple stitching modalities.
- Long Lost Twins, Part VI. Two instances of a column design, very probably once cut from the same artifact. Fragments of which are held in two museums
- Long Lost Siblings? Another case of a single source artifact probably cut in two, now held by two different museums.
- Long Lost Twins, Part VII. Resuming the series. This is a voided pattern showing dancers, several pieces possibly cut from two originals before dispersal to various collectors.
- When is More of the Same Not More of the Same? Examining differences among different editions of various modelbooks, trying to parse out whether they were reprinted from the same block, hand tinted, or recarved.
- Modelbook Blocks: Acorns and Chickens. A classic. Was the block simply traded and reprinted, or was there copying afoot?
- One Design’s migration. Another look into multiple printings of the same design, and differences/similarities among those iterations.
- Early Marketing? Or Not… Speculation set aside by actually looking at the when and where of a pattern published both with and without religious mottoes.
- Repeating On and On on Repeats. A summary of the types of rotations and mirrorings commonly seen in long strip patterns
- Ocular Proof? My argument that Othello’s strawberry speckled handkerchief used in the play to implicate Desdemona might have been conceived of by Shakespeare as a countwork piece.
- A Curious Applique Technique. Not embroidery, but often appearing in modelbooks alongside it. Take a strip of leather or cloth, cut it with precision into a pattern that duplicates itself on either side of the bisecting line. Twice the yardage and no waste. Wildly clever.
- The Symmetries of Linear Stitched Fills and Strips. The difference between designs with even and odd numbered stitch counts, and how they can be used to best advantage. Plus pitfalls of aligning them with each other, especially when using purpose-woven grounds like Aida.
- Griffins. A discussion of a very common griffin design, and how it moved through time and across geography.
- The Unstitched Coif Project Exhibit. My photos and links for all of the coifs produced.
- More on 16th and 17th century pieces associated with Italy’s Foa family. Recognizable design elements characterize this cluster.
- Even More on Azemmour. Additional observations on a cluster of embroideries from Morocco, common in museum and private holdings. Some of which were sold to early collectors as Renaissance fragments.
The Unstitched Coif Project
- Completed coif – discussion of my materials, sources, and method. Includes a writeup of the stitches used, and why.
- Completed coif – discussion of my finish and fills. Close ups of the completed project, plus a motif by motif round up.
- The Unstitched Coif exhibit. All of the coifs submitted for display in December 2023.
- All of the posts tagged with Unstitched Coif. For those who want to get up close and personal with each motif as it was created.
 My Unstitched Coif Project contribution, now available in high definition photography of both the front and back. It was collected by the Victoria & Albert Museum, and they have updated the piece’s permanent on-line accession page with those images.
Talks and Classes
The Stitches Speak
These are the slides from a round-up of historical counted styles I presented at a Society for Creative Anachronism needlework and textiles gathering in 2012. Mostly eye candy, and divided for ease of posting, not by subject area. However sources are listed.
- My post-event summary
- Part 1. The rest of these are my slide deck as presented. No script, just the images.
- Part 2.
- Part 3.
- Part 4.
- Part 5.
- Part 6.
Workshop Handout
This is the broadside I hand out when I teach workshops on double running stitch. It’s pretty much a self-paced tutorial, with the simplest designs at the upper left, and progressing in difficulty to the lower right. If you work these at your own speed as a band or jumble sampler, by the time you’ve done them all you can tackle just about any linear design. And although I do use this to teach double running stitch logic, no one will say you sinned if you decide to complete it in back stitch.
- Class handout. (Also available on the Embroidery Patterns tab).
Patterns
Free
Linear Units (Line Segments)
- Ensamplario Atlantio. Seconnd Edition. A collection of blackwork fills from my doodle notebooks, some my own, some from artifacts, but when I started this I didn’t intend to publish, so I didn’t keep track. Some of the larger ones work well as all-over designs, or for small projects like biscornus or holiday ornaments. All four previous segments of the original release stitched back together, along with some additional content.
- Ensamplario Atlantio Volume II. More fills, plus some strip designs and yokes. 90% original (exceptions are footnoted). In one file this time, as technology marched on since publication of the first.
- Ensamplario Atlantio Volume III. You guessed it. Even more fills, plus lots of strip and all-over patterns and even a couple of yokes. Same paradigm as the previous volumes, with the few redacted designs called out in footnotes. Anything indicated with a star is my own original work.
- My Embroidery Patterns tab. Most but not all of the designs below also appear there, plus more.
- Rose Chart. Outline for a heraldic style rose
- Ganesh Project. How to replicate my blackwork method Lord Ganesh, done as a present for a family friend in India.
- Crowdsourced simple diamond interlace, with small motif fills provided by String’s followers. Use some or all. (Also on the Embroidery Patterns tab).
- Dancing Pirate Octopodes. The design that led to the crowdsourced project. (Also on the Embroidery Patterns tab)
- Leopards. (Also on the Embroidery Patterns tab)
- The Epic Fandom Stitch-Along. 19 bands, 9 of which are quasi-traditional, 10 of which are wildly anachronistic, with spaceships, dinosaurs, pirates, references to Star Trek, Star Wars, and Dr. Who. Guidance for the whole project is included.
- The Epic Fandom Stitch-Along in ONE easy to download PDF. The whole thing, informational posts, instructions and all charts for the project above.
- Cat and Mouse. A large panel with Art Deco style cats, mice, and yarn balls. (Also on the Embroidery Patterns tab).
- Bands from a 16th century Camica. Hem, collar, seam bands, and striping. (Also on the Embroidery Patterns tab)
- Those Snails. They crawl all over my work. I share some.
- Jesters at the Fence. A snippet from TNCM (see below).
- Bead border. (Also available on the Embroidery Patterns tab)
- Ring of Rats. Another Art Deco style chart (also available on the Embroidery Patterns tab)
- Tessellated Cats. This design is included in the free book Ensamplario Atlantio Volume III, available on the My Books Tab.
- Elizabeth Hardwick’s Sleeves. Another redacted chart for a historical alll-over design. Redacted from a portrait. (An easy downloadable PDF is also on the Embroidery Patterns tab).
- PERSIST sampler – a chart for a slightly slimmed down version of my Persist piece. (An easy downloadable PDF is also on the Embroidery Patterns tab).
- A Holbein Collar. Collar on a man’s shirt, redacted from a portrait. (An easy downloadable PDF is also on the Embroidery Patterns tab).
- Hebrew Alphabet and commonly embroidered words. I mashed up a few sources to come up with this one, including a very early Apple II pixelated typeface. But the letter forms are tweaked enough to be mine. (An easy downloadable PDF is also on the Embroidery Patterns tab).
- Border or strip design. I used this one on my chatelaine ribbon. It’s also in Ensamplario Atlantio III. (An easy downloadable PDF is also on the Embroidery Patterns tab).
- A Spanish Gentleman’s Collar. An actual example of Spanish blackwork. Redacted from a portrait. (An easy downloadable PDF is also on the Embroidery Patterns tab).
- Another Portrait, Another Redaction. Sleeve detail for a woman’s chemise charted from a circa 1500 Italian portrait. This one with chickens. (An easy downloadable PDF is also on the Embroidery Patterns tab).
- Pattern from a Gentleman’s collar, circa 1560. Chart and discussion of graphing from a painting. (An easy downloadable PDF is also on the Embroidery Patterns tab).
- Correction to The New Carolingian Modelbook, Plate 73 – the really wide interlace. I finally got around to stitching this one up and discovered that two of the overlaps as charted in the book were wrong. So I issue an update. Given the better layout and composition of my more recently composed plates, this pattern is now presented on two pages, both as a wide border and as an even wider iteration that can be used as an all over and as an even wider border. This PDF also available on the Embroidery Patterns tab
Box Units (squares)
- Unicorn. Box unit (not linear) chart for a unicorn, courtesy of Elder Offspring.
- Castles and Caravels. Box unit design featuring a three-towered castle, and its relationship of that motif to some Spanish pieces.
- Knot More Knots! Simple interlaces in box units (Also on the Embroidery Patterns tab)
- Simple Geometric from 1546. This one is also box units, and works well for stitching, knitting, and crochet.
- Da Sera Bud Interlace. Another box unit pattern. (Also available on the Embroidery Patterns tab)
- Fun with Odonata. Another box unit design, this one for dragonflies. Note that they can be used for knitting, too. (Also on the Embroidery Patterns tab)
- Fun with Lagomorphs. A box unit design for a leaping rabbit. (Also on the Embroidery Patterns tab)
- A Simple Interlace. I lost the source annotation for this box unit design aeons ago.
Not Free
- The New Carolingian Modelbook: Counted Patterns from Before 1600. Also known as TNCM. Sadly out of print. It’s in queue for update as scholarship has advanced in the years since it came out. There are corrections aplenty! You might be able to find it on the used market, but at a wildly inflated price.
- The Second Carolingian Modelbook: A Collection of Charted Patterns for Needleworkers and Artisans. Also known as T2CM Link to Amazon page is on the indicated post.
Tutorials
These are also accessible via the Tutorials tab at the top of every page here. but below they are listed in the correct chronological order
Double Running Stitch Logic
- Double Running Stitch Logic 101 – Two Sided Work and Baseline Identification. Basic logic of why baselines matter if you want to work something either totally two sided, or using two-sided logic for thread economy
- Double Running Stitch Logic 102 – Working from the Baseline. How to follow one, step by step.
- Double Running Stitch Logic 103 – Accreted and Hybrid Approaches. Breaking down a large non-linear chart for easier stitches.
- Double Running Stitch Logic 104. A review comparing back stitch and double running, and how to determine if a design can be worked totally two-sided or not.
Charting Linear Designs using GIMP Drafting Software
I found commercial charting software treats linear charts as an afterthought, so with help, I invented my own graphing method which I have used for all of my books. This series is for folk who want to move on to designing and drawing their own charts, and doing so using the dot and bar method I invented. GIMP is freeware, and if you’ve ever used Photoshop or Illustrator, and are familiar with layer-based drawing logic, the learning on-ramp for this method will be familiar. Although this was prepared for an earlier version of GIMP, these instructions are still relevant, although the GIMP menu screens now look slightly different.
- Charting. A comparison of my dot-and-bar method with the traditional drawn-on-quadrille-graph-paper method.
- GIMP Charting Tutorial 101. The logic of a layer-based drafting tool.
- GIMP Charting Tutorial 102. Getting started, basics of working with GIMP.
- GIMP Charting Tutorial 103. Building the dot layer of your template.
- GIMP Charting Tutorial 104. Layer management and building the design and mask layers of your template
- GIMP Charting Tutorial 105. Drawing the design.
- GIMP Charting Tutorial 106. Additional tools including those for erasing, flipping, alignment, and rotation
- GIMP Charting Tutorial 107. Hints on printing
- GIMP Charting Tutorial 108. Preconstructed templates to save you time.
Just Bragging
- My big underskirt forepart. Why I stitched it
- Forehead cloths for modern wear. Kind of like a kerchief, works well and keeps the hair out of my eyes in seaside winds, adapted from the companion piece often seen with a matching coif.
- Trifles wall hanging. Made as a “mom nag” for my younger spawn, done using blackwork techniques and fills.
- Blackwork sampler done in 1983. Musings on why this piece is not entirely successful in terms of stitching density distribution.
- Two Fish. No astrological connection, just two koi circling on couched gold water. Indigo and deep green silk on 40 count linen
- Fangirl Sampler – A key phrase from the science fiction series by my Resident Male, in an off-world language. It translates to “Life’ll kill you”. I am after all his fangirl army of one. Alphabet from an old Sajou leaflet, but the rest is all my design. The dancing skeletons border is available on the Embroidery Patterns tab.
- Grape Sideboard Scarf. An artifact-based main field with a self-designed companion border.
- Blackwork sampler done as the cover for T2CM, finished in 2012. Below.
AND WE HAVE THE FIRST BUG!
Not to worry, it’s not a computer or programming glitch. It’s completion of the first bug on my rendition of the Unstitched Coif project. The bugs, birds and other inhabitants of this flowery sprawl are especially fun to work.

I may add a tiny motif in his “collar,” it seems a bit bare; and I may go back and darken up the bug body to get better contrast against the wings. But I do like the opposing directionality of the coil pattern on the wings. I am also still debating the density of the paillette spangles. Thinking on their original use, to provide both sparkle in dim interiors and by candlelight, and to signal the wealth of the wearer, packing them in for max bling seems right. However I know to modern eyes the look in full artificial light is cluttered, and I’ve gotten feedback accordingly. We’ll see.
As to new bits in execution – the bug’s eyes are also the same 2mm paillettes, but instead of being affixed with three little gold color faux silk stitches, they are held on with large French knots in the center. I thought about using beads, I have a large seed bead stash that I’ve kept since the 1960s. It came to me jumbled, and my sisters helped sort some of it out. I picked out three candidate colors – black glass, clear glass with gold foil centers, and an opalescent black/metallic glass, and have been experimenting with them both with and without the spangles underneath. You can see below how much better the flat spangle and French knot looks.


I haven’t ruled out using beads yet. There are some bugs with especially tiny faces. I might use them for the eyes of those. They are ever so slightly smaller than the paillettes, but not by much. But French knots may be the solution there, too.
In other developments, my kit has expanded. Thanks to the insight and generosity of long time friend and needlework confidante Kathryn Goodwyn (who took pity on me and came to the rescue) I now have a small clip on light for supplemental illumination. Kathryn says she found it in a Dollar Store (a low price bargain outlet for my UK visitors). I will probably jury rig a thin wooden yardstick across the top edge of my frame later on, as I get closer to the center of the piece and need the extra light there.

Another materials improvement to report. I have switched threads for the fills. I had been using YLI 100, doubled. One strand was too thin, but two looked a bit muddy. I am now using Au Ver à Soie’s Soie Surfine and I like the line and angles better. I won’t tell you when/where I switched, and I don’t think you’ll be able to spot it. Although the two approaches are very close in total width, the Surfine does stitch more smoothly and works up more evenly.
In addition, I attended the first Zoom meet-up for the project yesterday. Toni Buckby, our Fearless Leader did a great thumbnail intro to blackwork in general. its stylistic evolution over time, and the coif project in specific. We were truly inspired to plunge on in, or continue depending on our start status. There were enthusiastic folk in attendance from the UK, US, Canada, and New Zealand (that individual is truly dedicated, considering that it was 1:00am there at the time). It was fun to meet up, share questions, and generally get to know each other.
As promised, I did ask about plans to make the drawing of the coif accessible at the project website. Ms. Buckby assured us that it will be, although the website is still under construction, and it isn’t there right now. But if you do pop by, you’ll see a few of the V&A’s fantastic collection of blackwork artifacts, plus her invaluable hand drawn charts for the specific geometric fills used on them.
I admit the large cushion (V&A Accession T.81-1924) at the top of the official project page brings back wonderful memories.
A blurry image of that artifact was the first bit of blackwork I stumbled across, in Mary Thomas’s Embroidery Book. I was smitten, and shortly thereafter I had need of a special gift for he who would eventually become my Resident Male. Although I had already graphed up and stitched a number of sampler bands from book photos, I took the plunge into blackwork with no guidance other than Mary Thomas, and produced this. It’s now very well worn, and the needle lace around the edges is quite frayed, but for something stitched in the spring of 1975, on muslin, using mostly the wrong stitches, it’s not entirely discreditable.
After that there my fate was sealed.


My blackwork underskirt forepart (left and centers) – stitched in Fall 1976-Spring 1977. My Forever Coif, started in Spring 1990 and still unfinished.
UNSTITCHED COIF PROJECT DEVELOPMENTS – NEEDLES AND OFFICIAL SITE
Your periodic Unstitched Coif project update post!
First some progress on my own rendition. Having established my vocabulary, I’m gaining momentum, aided in part by The Right Tool.

The Right Tool? My size #12 rounded point beading needles finally arrived! What’s the difference? In the photo below, a standard John James brand size #28 gold finish tapestry needle is above, and a #12 blunt point beading needle from the same maker is below.

The beading needle is less than half the thickness of the tapestry needle, and it has a much smaller eye and more pronounced end taper. While that does make it harder to thread, it also makes the thread less likely to fall out of the eye while stitching. And that thin shaft and point are small enough to slip between the threads of the 70+ count linen I am using without distorting them. I said before that shoving the (comparatively) large point of the #28 through this weave was like passing a pencil through the mesh of a screen window, and I wasn’t kidding. The very rounded point and larger diameter made it hard to “stay on target” and hit the exact between-thread spot that needs to be pierced, and the thicker shaft, especially at the eye distorts the weave as it moves through, making subsequent counts close by all the more difficult.
So if you are working this project, or in fact any project on an extremely fine count ground, spare yourself, your eyes, and your fingers grief, and grab a #12. You will be happier, and more speedy for it.
Now the big news here isn’t my new needles or my minor progress. It’s that the official website for the group, blackworkembroidery.org has gone live! Right now it’s still pretty sparse, with a lovely selection of artifact links to blackwork pieces in the V&A’s collection, and some graphed fill stitches. I suspect that the content will blossom over time. But the best part is that it includes a link to a Discord chat group, dedicated to the Unstitched Coif project! I’ll be taking advantage of that under the user name Rotangus (the name I use on Discord for gaming forums), but I will wait to post until Toni Buckby, our Fearless Leader, posts. But I hope to be part of the conversations there.
I THINK I’M ON THE RIGHT TRACK
The Unstitched Coif project continues.
After some experimentation, mostly documented in prior posts, I think I’ve hit on what will probably be the combo of threads and techniques I am going to use. I am still waiting for my fine beading needles and one last fine filament silk, which I may or may not work in. I like the look of mixed threads in a project, even mixed blacks, so even if that thread is late to the party, it still may be incorporated.

As usual, both US and UK pennies provided for scale.
Obviously I am going to be using counted fills for most if not all of the blackwork fields. I may do a few areas in a freehand fill, but probably not speckling. I like the look but find execution of those tiny dots very boring.
Having tried multiple times to whip the gold around silk, I finally realized that whipping silk around gold is much easier to do. I used a double strand of the Japanese Gold #5 for the stems and leaf veins, in simple couching. But I thought that the plain gold lines looked quite wimpy for the stems, and the visually dense bits of blackwork look stranded, and not unified into a design. So I will be whipping just the exposed stem areas with silk. I experimented with two different silks in the bit above, the longer stem being the Golden Schelle hand-dyed, and the shorter one being the unidentified small batch silk I had in my stash. Both use two strands. I may end up using them both, with the Golden Schelle for wider, more prominent stems, and the other for smaller offshoots. Time will tell.
The curly tendrils are single strand Japanese Gold #5, again simply couched. The half-flower center (cut off by the edge of the coif) is the same gold, double strand, again couched. I will do the full circle flower centers in spiral couching. I thought about a spiderweb, but as I found out this wrapped gold does not play well as a passing thread, so I will stick to couching.
And the paillette. I know he’s all by himself right now, but as I finish areas I will be peppering the between ground with them, just for the fun of added bling.
To answer questions and issues from my inbox:
- Are you planning or plotting out all of your fills beforehand?
No. I’m just picking them at random whim, at most considering if I want a dense or a lighter one for the spot I am about to stitch. Since picking out on this fine ground is not fun, even if I am not 100% satisfied with my choice, I will keep going with any fill started, once committed. In general if a fill has an identifiable motif in it I try to center that bit in the “meatiest” part of the area being stitched, then work from that point out to the edges, but I don’t plot out the exact placement ahead of time, and fills in adjacent units can end up skew on count to each other. Sometimes I even do that on purpose to increase visual movement in the composition. - Where are you getting your fills?
Well, if you know me you know I have endless notebooks full, some of which I have shared for free elsewhere on this site. Plus I have been known to make them up on the fly. But I do not intend to use this project as personal advertising, and won’t be mentioning them again. - Can you send me the pattern?
It’s not mine to share. I’ve put in feedback to the project organizer suggesting that once the official website is up and running later this month, that the design be made available there. - How can you see to do this so small?
Waybackwhen, my 25 year old eyes could do this un-augmented – nearsightedness being a bit of a natural magnifier. But that was long ago. I am using a lighted magnifying aid which can be worn over glasses. It does take a bit of getting used to, so it’s not a perfect solution but so far it’s working for me. Again, I am uncomfortable being a product shill, but the thing made by Beileshi, is easily found on Amazon, and is reasonably priced. - Where did you get the linen?
I’ve posted the link before, so here it is again. It’s not exorbitantly priced for linen but shipping to the US doubles the cost, which makes it a bit spendy, and there’s no real break in the shipping surcharge for buying larger amounts and sharing the bounty. As far as quality, in my piece at least there is a fair bit of slubs and really fine threads, that makes counting a bit harder. The weave is also off a bit – you can see that my motifs are stretched a bit north-south as opposed to east-west. But at this scale I doubt anyone will notice. - Are you stitching 1×1?
No, that would be a bit much even for me. I’m doing mostly 2×2 because I find it easiest to count, but the butterfly squares fill above was done 3×3. I may mix up the counts to achieve density effects. Again time will tell. - Where did you get the spangles? Are they handmade?
No, they are not. They are tiny 2mm center-hole gold-tone circles, flat (no cupping like a faceted sequin). These are the same ones I used on my Two Fish piece. I will share the source again because I know paillettes this small are very hard to find in the US. I ordered them from General Bead in San Francisco, California. - Too bad, looks nice but I’m disappointed. You know you aren’t being historically accurate, right?
I don’t pretend that I am. The base pattern cartoon provided by the Unstitched Coif project certainly is. The general aesthetic is. The project leader assures me that this particular linen is the closest she has found to the linen of museum artifacts. But this is my modern interpretation of that museum original, and I do not claim it to be a fully documented representation of a specific historical style or period-limited materials/technique set. Here are my aberrations:- My thread mix – For black, partially filament silks with modern dye, partially spun silks in a mix of modern and historically documented dyes. The gold tone thin silk I am using for couching and affixing the paillettes is “art silk” – rayon, that I found in India. I had it on hand, and it’s largely invisible in this project. I spent enough on the linen and other materials that I feel justified in economizing here.
- The gold thread. It’s got the look (more or less) and is a thin filament of metal around a silk core, but it’s not exactly what was used contemporary with the base design, and is unsuited to use as a passing thread on a ground this dense. But again, I had it on hand and it is affordable.
- The paillettes. Machine made, probably mylar painted gold. Again I plead my pocket.
- [UPDATE] The density of the paillettes. Some people have stated that my use of them is too tightly packed
- The fills. I know my fancy will run away with me (it already has), and my fills will be my own choice and largely of my own devising. I will not be able to be individually documented one by one to specific historical artifacts or blackwork depictions.
- The stitch used for outlining. I’m using reverse chain. Yes, I know that Jacqui Carey specifically points it out as a modern stitch in Elizabethan Stitches, but given its gently raised line, speed of accurate execution, ease of handling tight curves, and its vague similarity to Elizabethan Twisted Chain (also cited by Carey), I can be forgiven this time- and effort-saving sin.
- The whipped couched gold. No historical source for this I know of, but I also admit I am not posessed of encyclopedic knowledge.
