THE UNSTITCHED COIF EXHIBIT
As promised, here’s a recap of the exhibit. It was an immersive whirlwind of talent, exuberance, and fun. I am very happy we were able to go. I just wish we had longer to chat with all the delightful, creative folk in attendance. But first, here’s a run-down of the displays. Note that while the Unstitched Coif was well represented, it isn’t the only project Toni Buckby is doing. More on those other efforts after the coifs…
The Unstitched Coif
I tried to take photos that showed the individual displayed pieces in situ, among their neighbors. The official website http://blackworkembroidery.org is hosting stitcher-provided blurbs and supplemental photos – the same info that is in the official exhibit book. This linked page indexes all of the stitchers alphabetically by first name. I provide the names of the stitchers for each photo below to save squinting. Pop over to that official site page for high-res closeups of any coifs that catch your eye.
First, the introductory material – a brief on the project, plus a sample of the pattern transcribed onto cloth (but not stitched) and made up into wearable configuration. If you open the poster photo in another window you may be able to zoom in enough to read the text.


And on to the coifs, in groups of three as displayed. There is an amazing variety of techniques, approaches, color interpretations, embellishments, and general artistic vision. The little QR codes on the name tags led to the stitcher’s personal submissions referenced above. Again, if you see something that you want to examine in lovely detail, go to this page and click on the stitcher’s name to read that material.
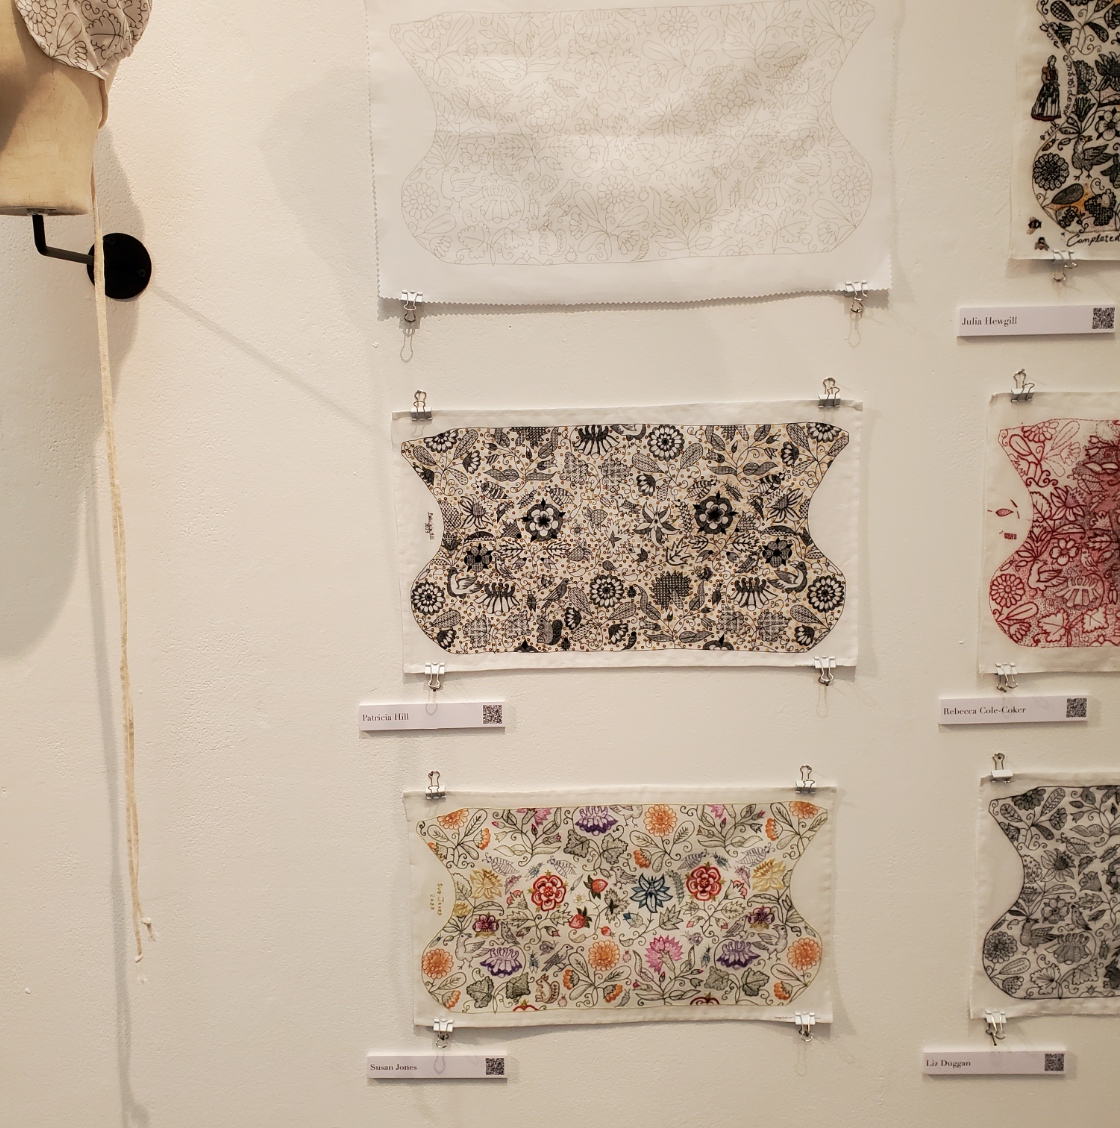
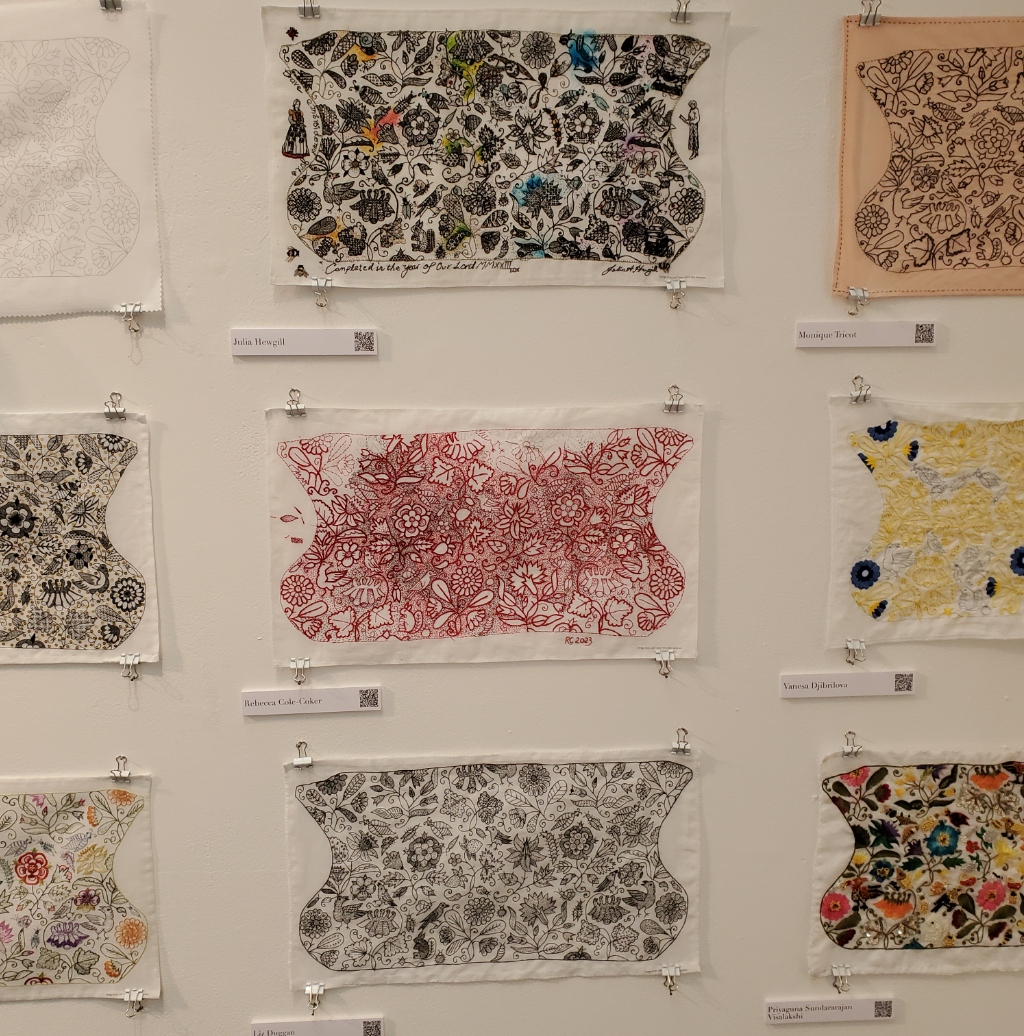

| Unstitched cloth Patricia Hill Susan Jones | Julia Hewgill Rebecca Cole-Coker Liz Duggan | Monique Tricot Vanesa Djibrilova Priyaguna Sundararajan Visalakshi |
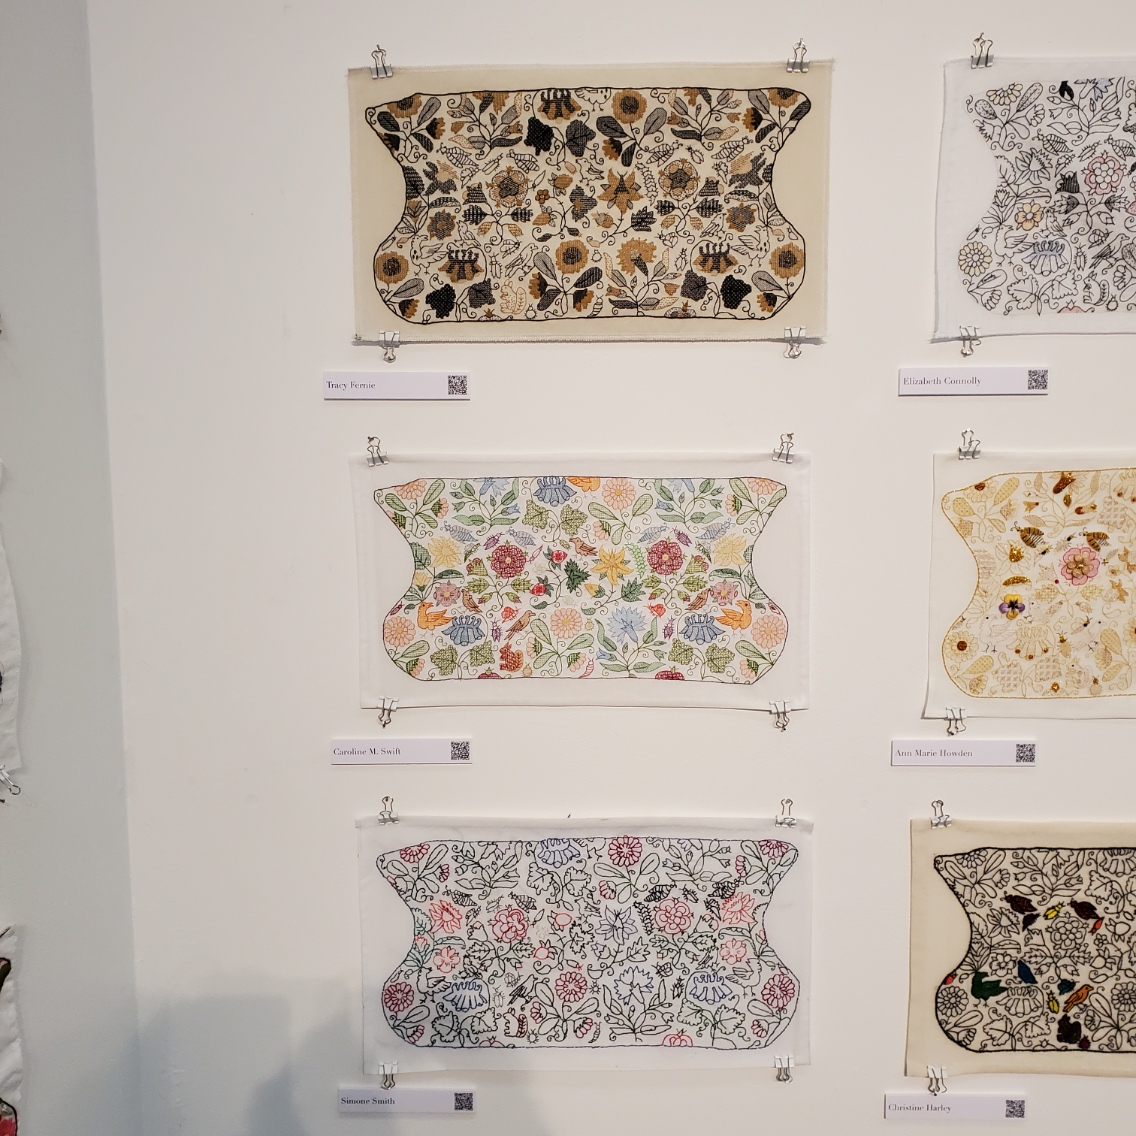

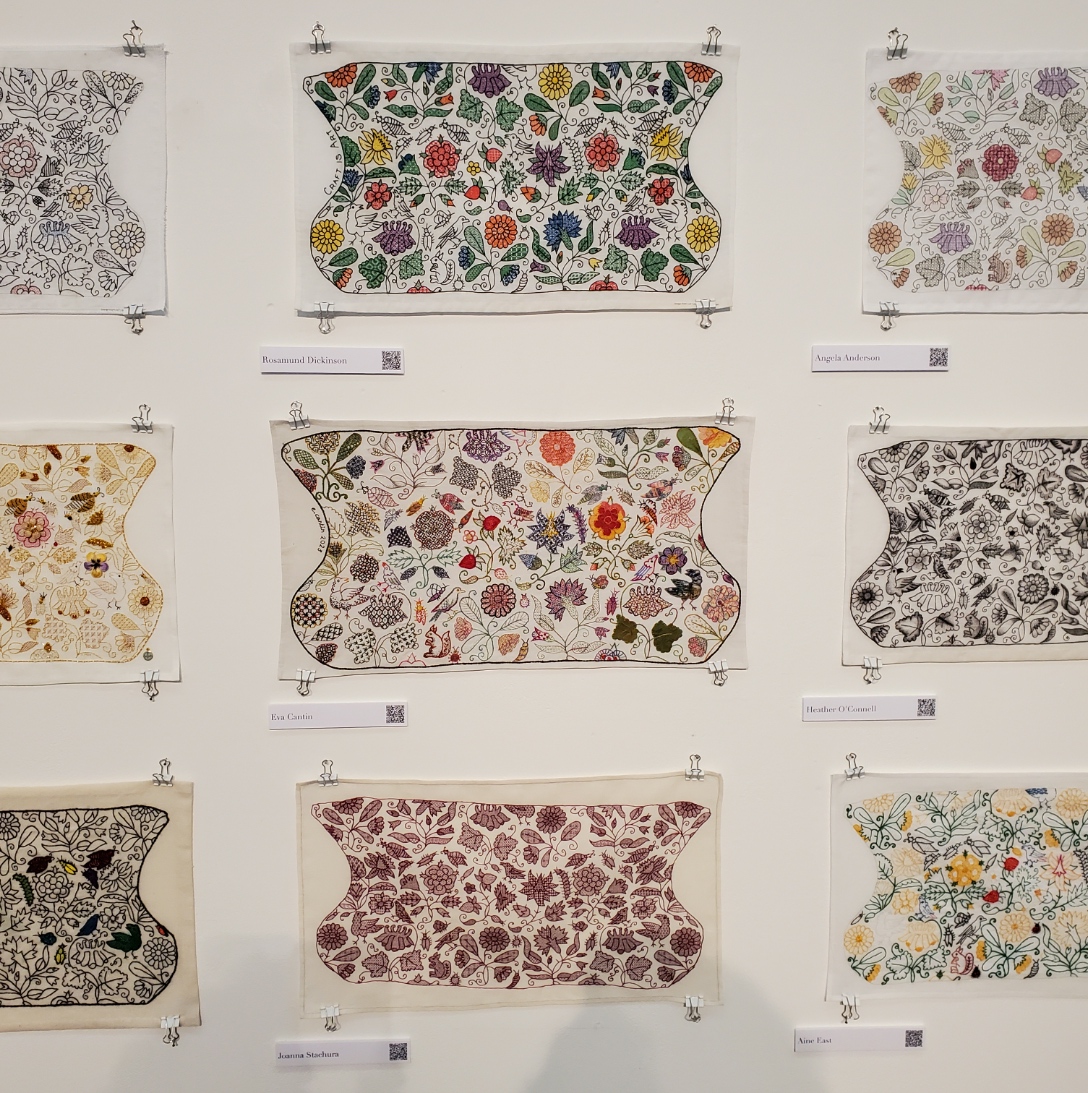
| Tracy Fernie Caroline M. Swift Simone Smith | Elizabeth Connolly Ann Marie Howden Christine Harley | Rosamund Dickinson Eva Cantin Joanna Stachura |
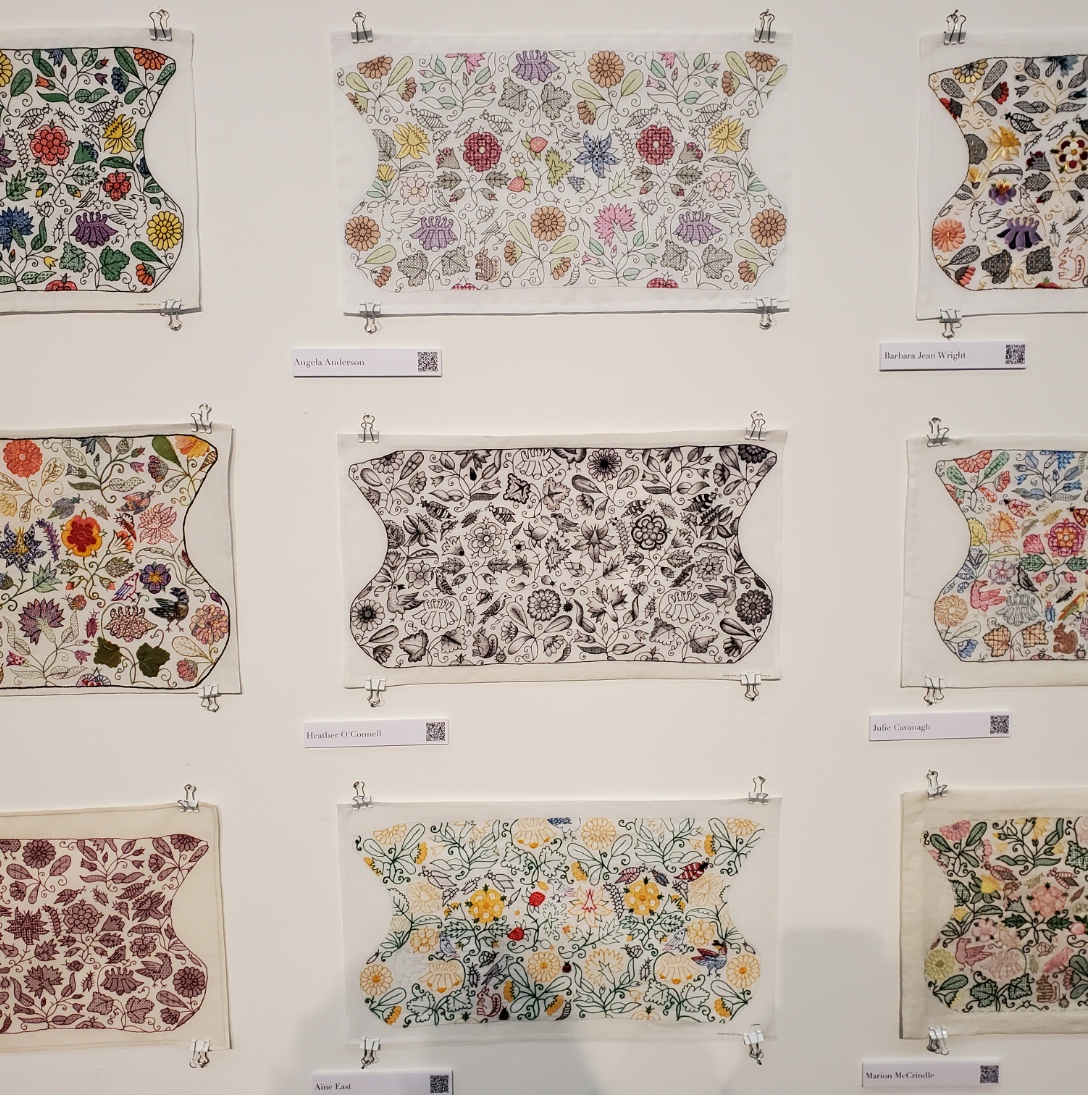


| Angela Anderson Heather O’Connell Aine East | Barbara Jean Wright Julie Cavanagh Marion McCrindle | Elizabeth Dymond Holly Searle Margery Dickson |


| Jane Burnham Vicki Parsons Jen Cable | Anna Tagg Sue Critchley Becky Stewart | Louise Goult Jill Kipnis Sarah Capel |


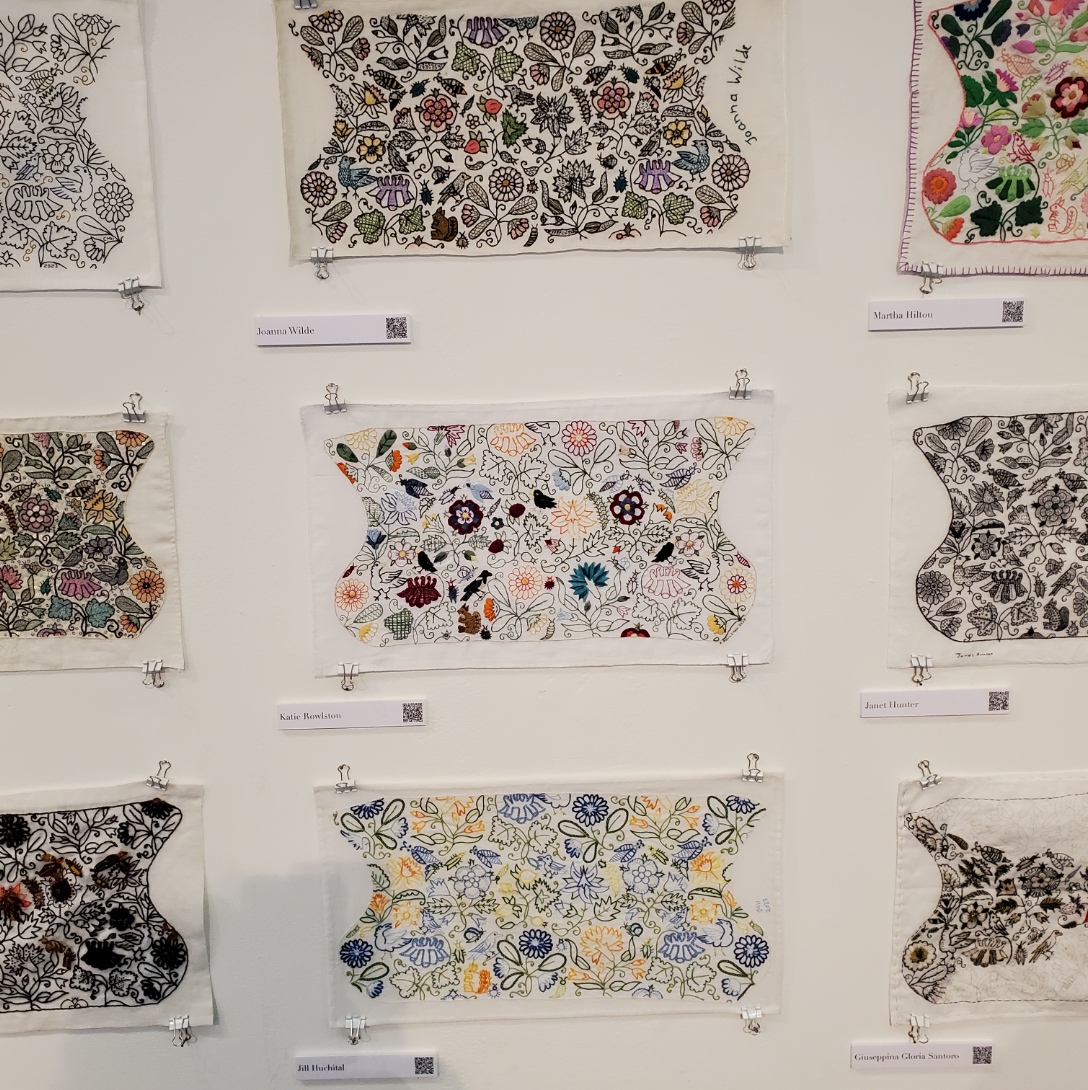
| Catherine Hill Kim Brody Salazar Jen Best | Christine Hillman Jo Tyrrell Victoria Keech | Joanna Wilde Katie Rowlston Jill Huchital |
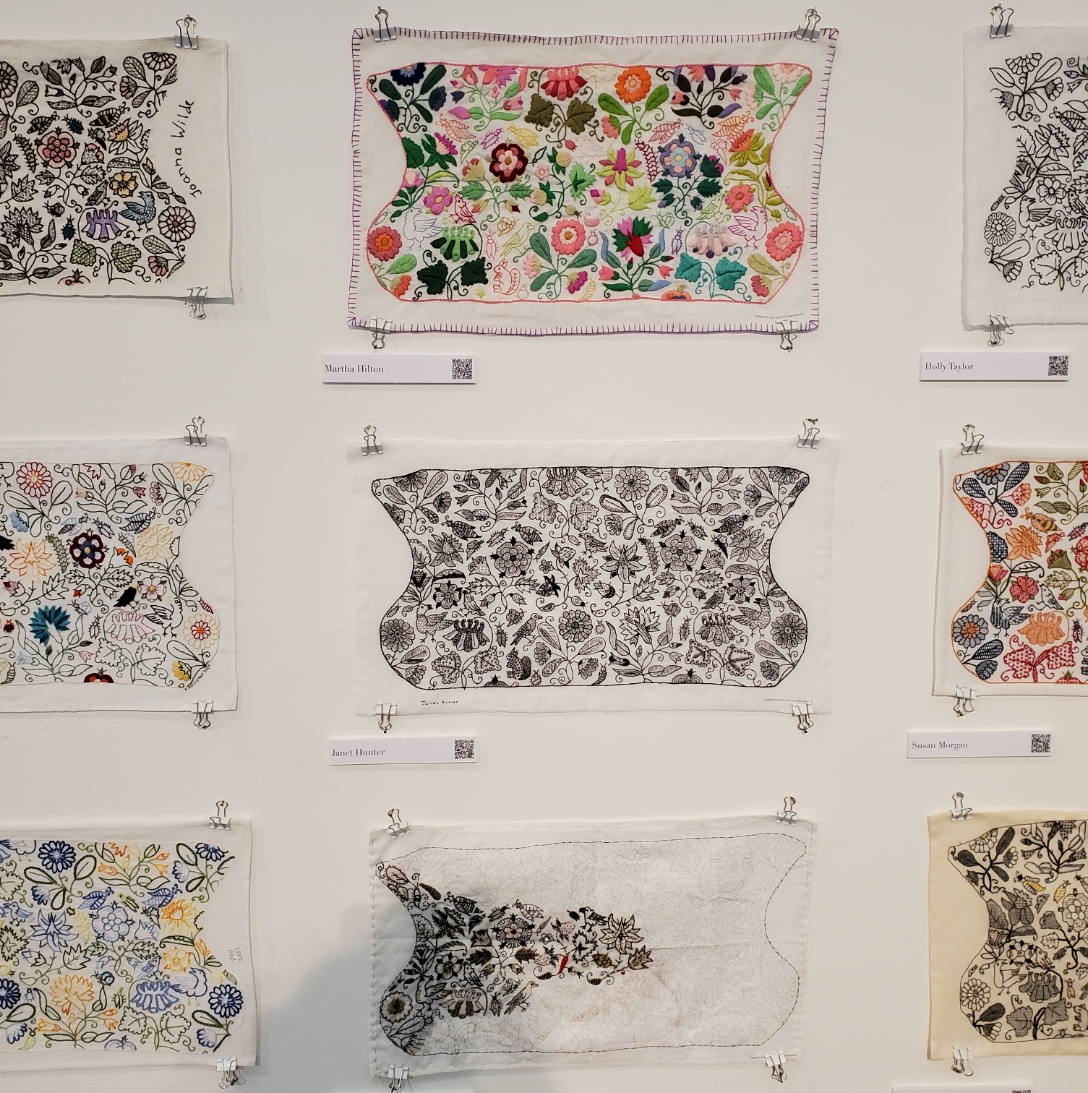

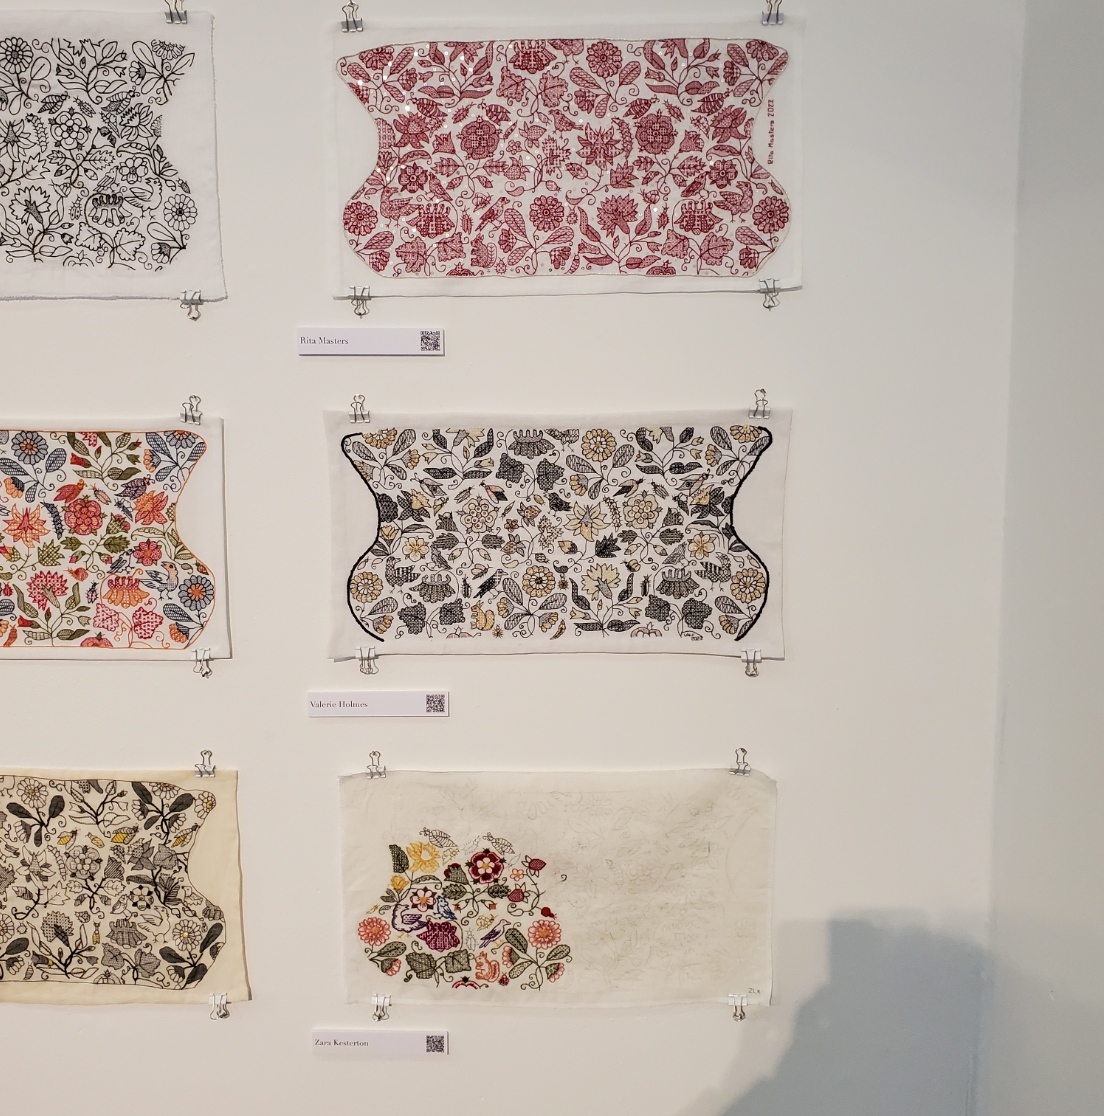
| Martha Hilton Janet Hunter Giuseppina Gloria Santoro | Holly Taylor Susan Morgan Leila Scott | Rita Masters Valerie Holmes Zara Kesterton |
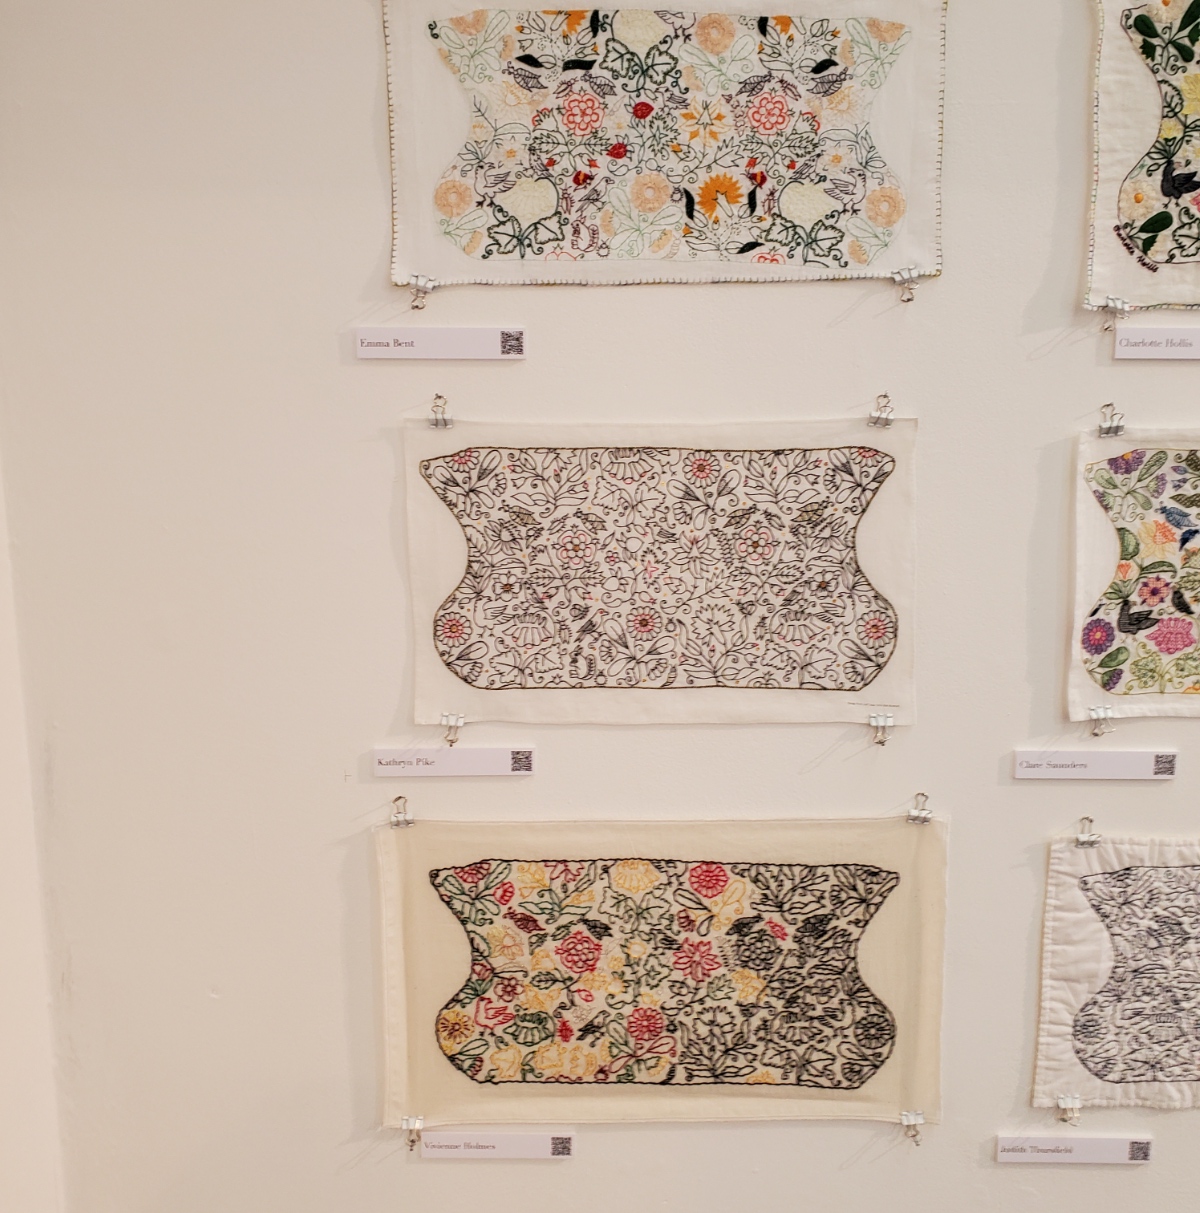
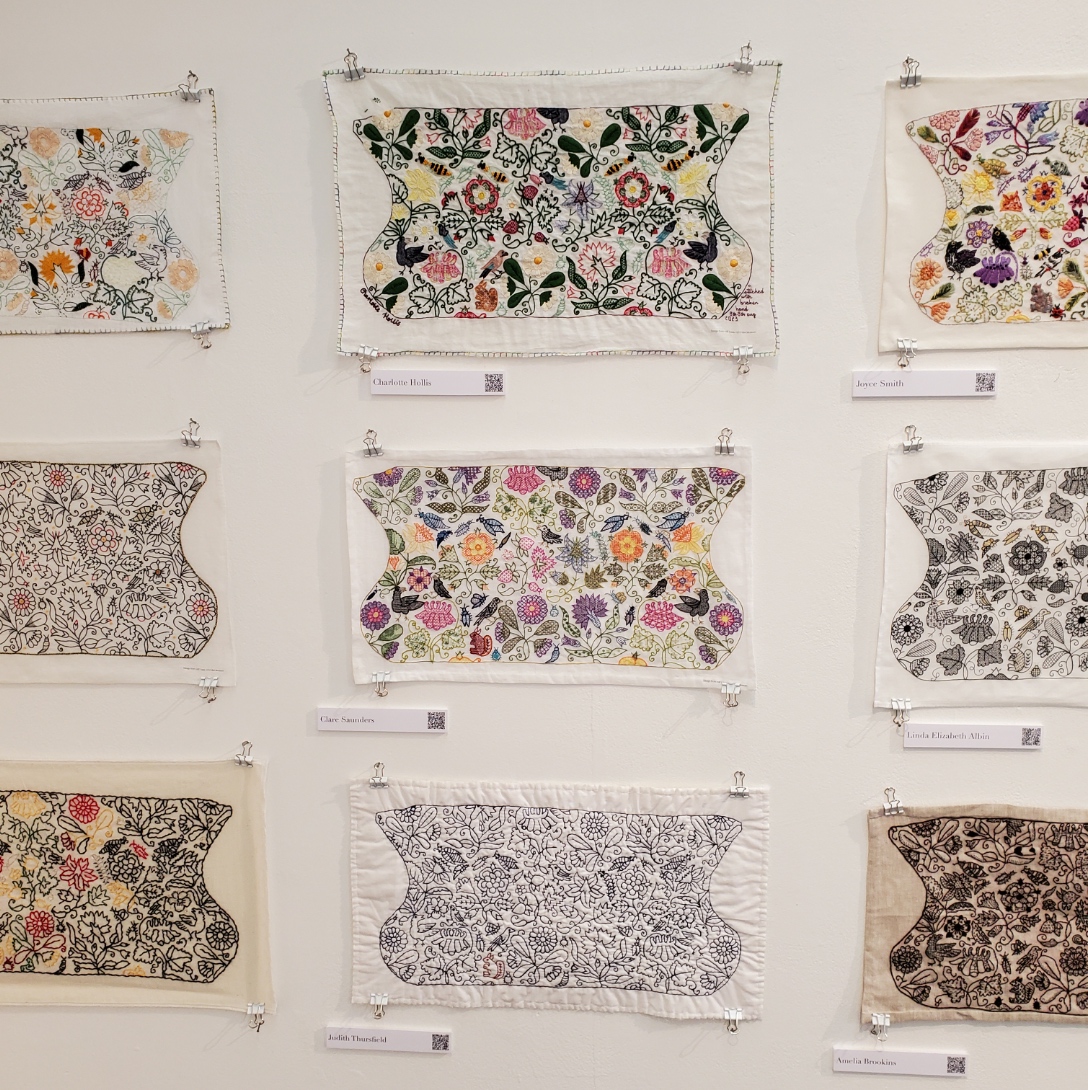
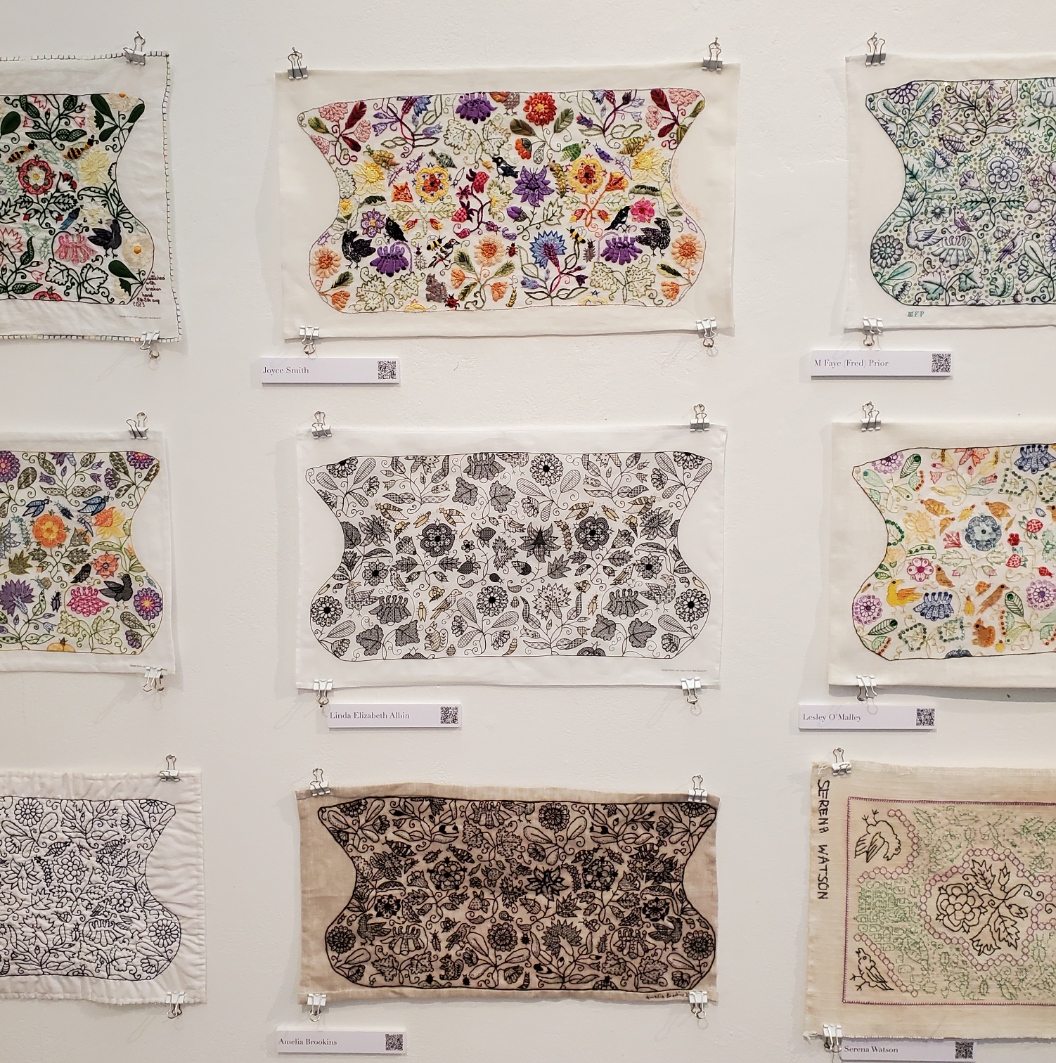
| Emma Bent Kathryn Pike Vivienne Holmes | Charlotte Hollis Clare Saunders Judith Thursfield | Joyce Smith Linda Elizabeth Albin Amelia Brookins |


| M. Faye (Fred) Prior Lesley O’Malley Serena Watson | Isabelle Verny Mathieu Anna Vereker Fiona Johnston | Bridget Marrow Ann Fitzgerald Debbie Gonet |

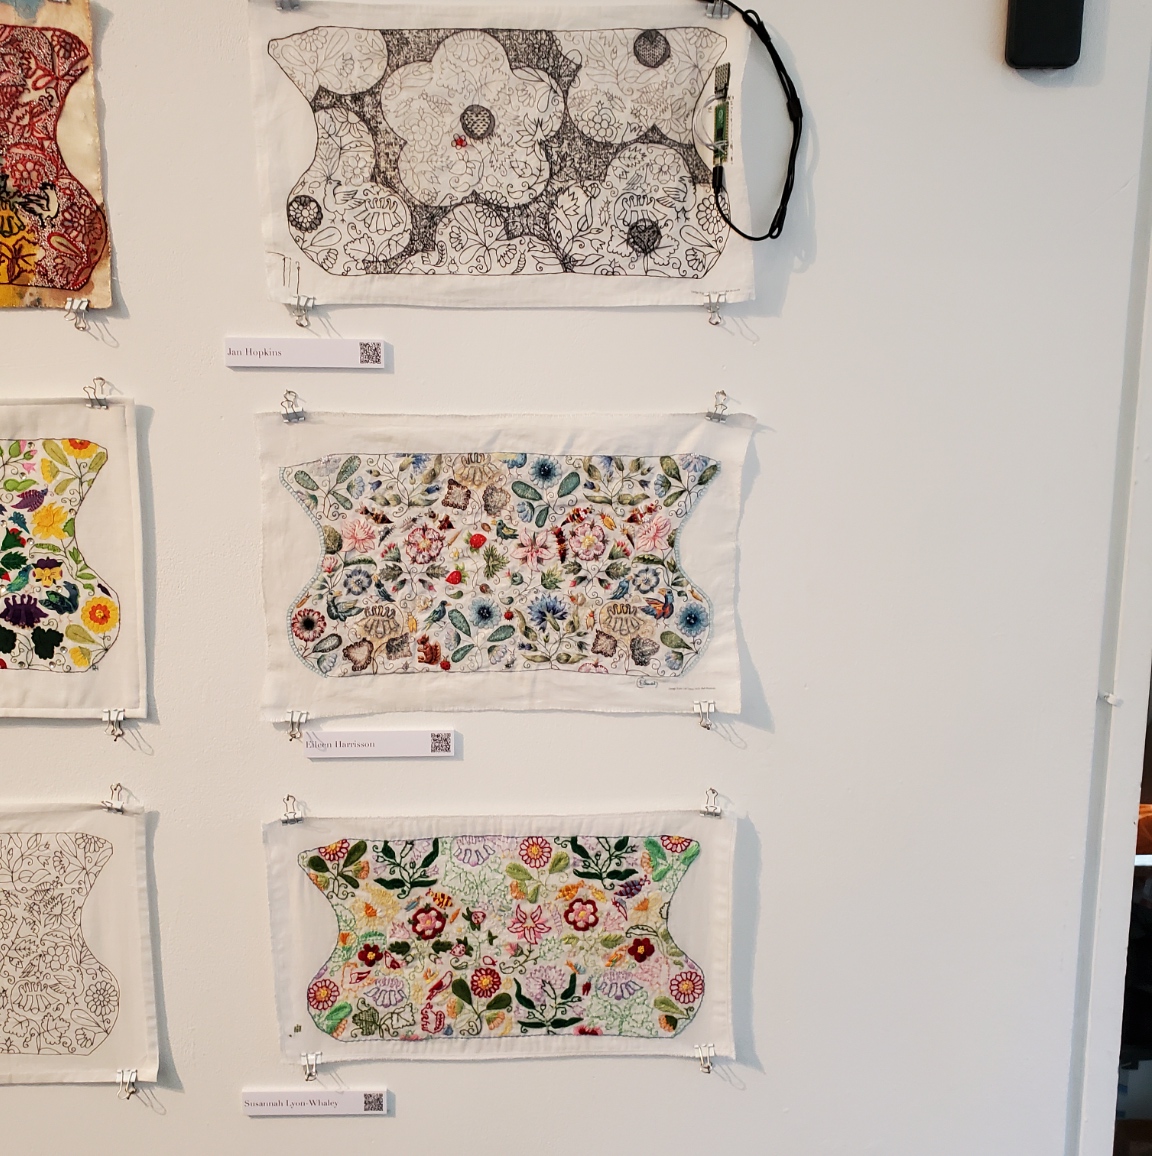

| Duwenavue Sante Johnson Rebecca Harrison-Page Linda Hadden | Jan Hopkins Eileen Harrisson Susannah Lyon-Whaley | Long wall photo to round out the set. |
Coif Replication
As she describes it, Toni Buckby hit upon the idea for the Unstitched Coif project while working on a replication assignment for the Victoria and Albert Museum. They have many pieces of blackwork that are literally eating themselves to death – the tannic black dye used on the silk threads turns them brittle over time. Now, some 400-500 years after they were stitched they are crumbling, leaving only the holes in the ground behind. But these pieces are still sought after for research by visiting enthusiasts/scholars. Toni was commissioned to do a full stitch by stitch reproduction of V&A accession T.12-1948, a well known and popular (although rapidly disintegrating) piece. Her reconstruction is intended for use in educational and outreach efforts because the original is now to fragile to be handled for view.
Toni sourced modern materials as close as possible to those of the original (the 72/74 threads per inch ground is the same one recommended for use on the Unstitched Coif project). She used forensic investigation of the “fossil” piercings and older photos to work out the now crumbled fills and outlines that can no longer be seen on the artifact itself. Her repro is at right.


Other Forensic Analyses and Reproductions
Toni is mapping out another very famous bit of blackwork in the V&A’s collection – the Falkland Pillow Cover, Accession T.81.1924. (In coincidence, this is the piece whose tiny thumbnail photo in Mary Thomas’ Embroidery Book set me off on my own blackwork journey back in the early ’70s). She is using layered drafting methodology to posit the placement and patterning of sections that have now largely disappeared.


Toni is also in mid-project of an ambitious effort to map the patterns on the three dimensional Falkland Waistcoat , V&A Accession T.80-1924, also a victim of thread degradation, plus other distortions and alterations. The goal of this effort is to chart the 3D design and translate it into flat patterning on garment sections that can be replicated and reassembled into a full reproduction. As you can see, exploring the garment shape by modeling is already underway. (Again, click on the photos to open in a new window, so you can enlarge them to read the text).


There was much more to the exhibit – a series of photos and explanations on materials suitability and choice methodology, and samples of the stitches used. But I’ve gone on long enough.
Suffice it to say that it was total immersion in the subject matter that sings to me, surrounded by people who understand and appreciate the artistry, time, and technique it requires. I met so many people, so talented and so gracious, who took time to chat with me, share their insights, and to mutually giggle in joy of finding others of the like mind. I’ve learned a lot from this project both in my own stitching, and from each and every version displayed here. I am deeply indebted to Toni for pulling the community together, orchestrating the effort, inspiring us along the way, and pointing the way forward, beyond. I do hope that this stitched together fellowship persists, and joins forces on future efforts. I know my needle is sharp and ever ready.
UP CLOSE AND PERSONAL!
Yesterday a friend and I went to the Boston Museum of Fine Arts, in specific to see the “Strong Women in Renaissance Italy” exhibit. We also took in “Fashioned by Sargent”, and wandered at will and whim through other halls, especially those in the new wing. All in all, it was a splendid day out, full of fascinating things to see and discuss, in excellent company. This post focuses on the Strong Women exhibit. I enjoyed the Sargent exhibit, too, but I took fewer photos. If my friend has more than I do, I might do a follow on about it though.
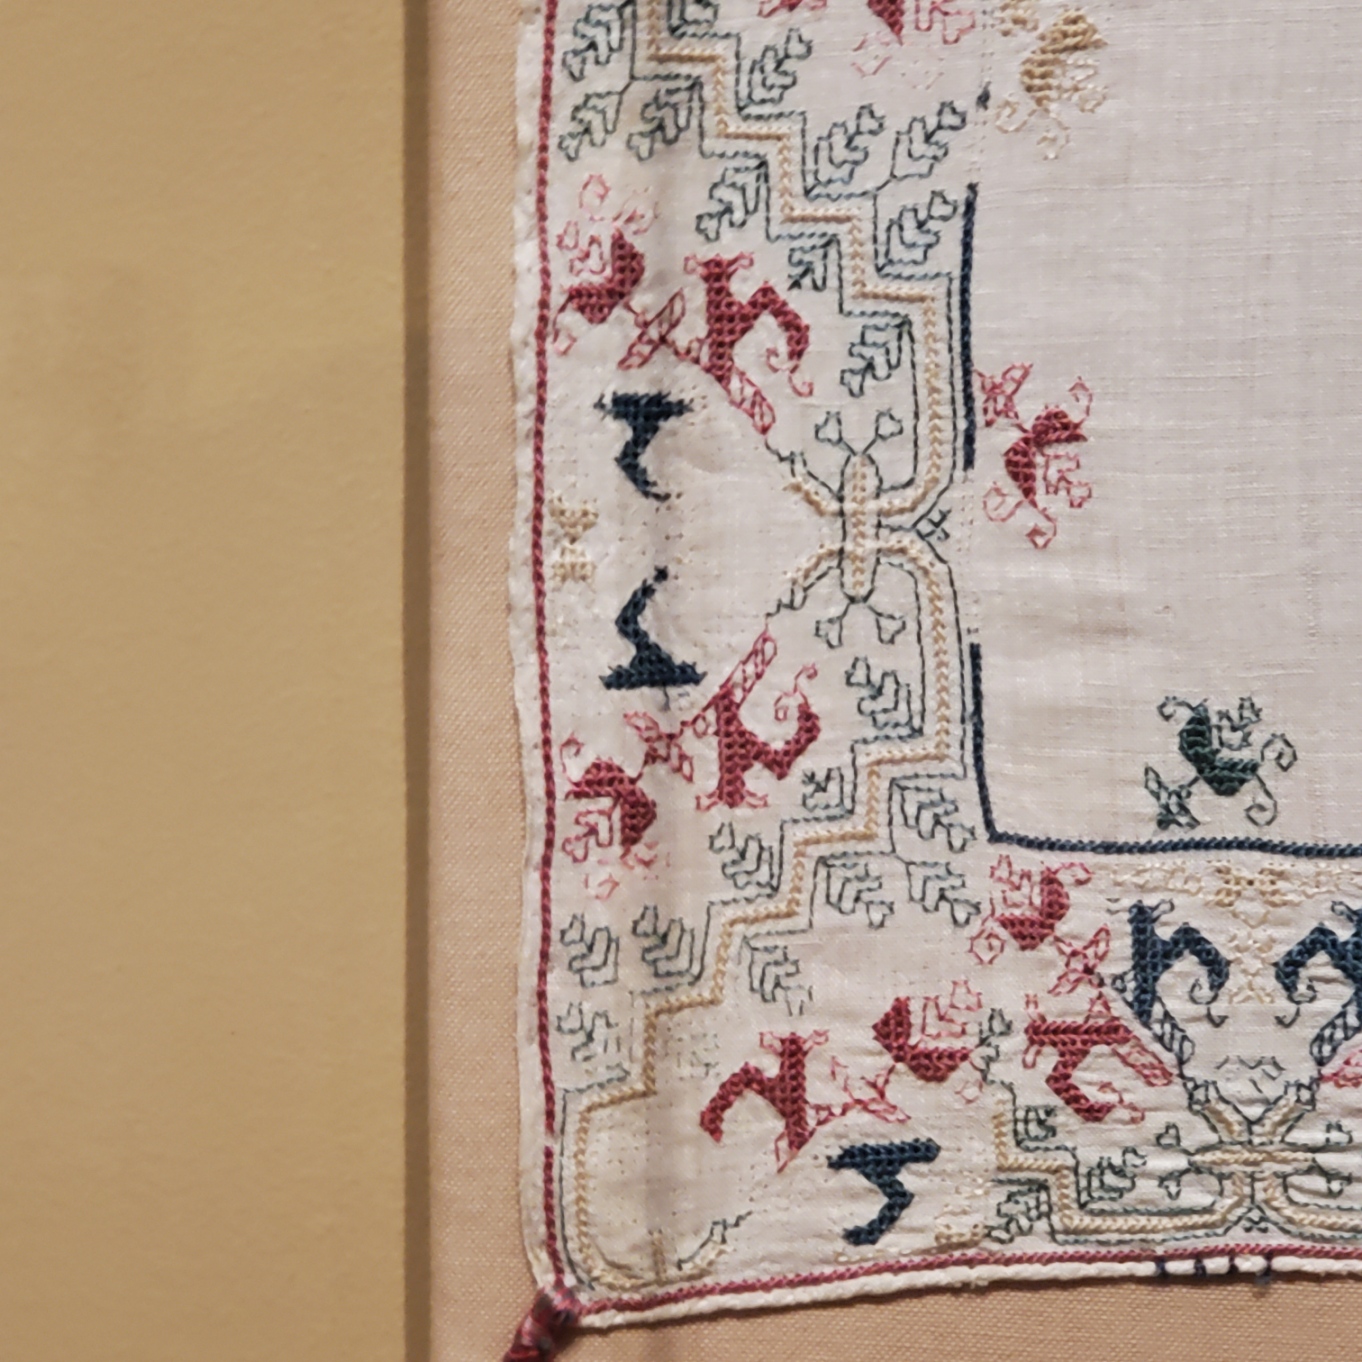
My main motivating reason to go was that the Renaissance exhibit included an artifact I’ve written about before. On loan from the Jewish Museum in New York is Honorata Foa’s red countwork Torah binder. Here is a photo I took at the MFA, of a bit that’s folded under in the official Jewish Museum photo linked above.

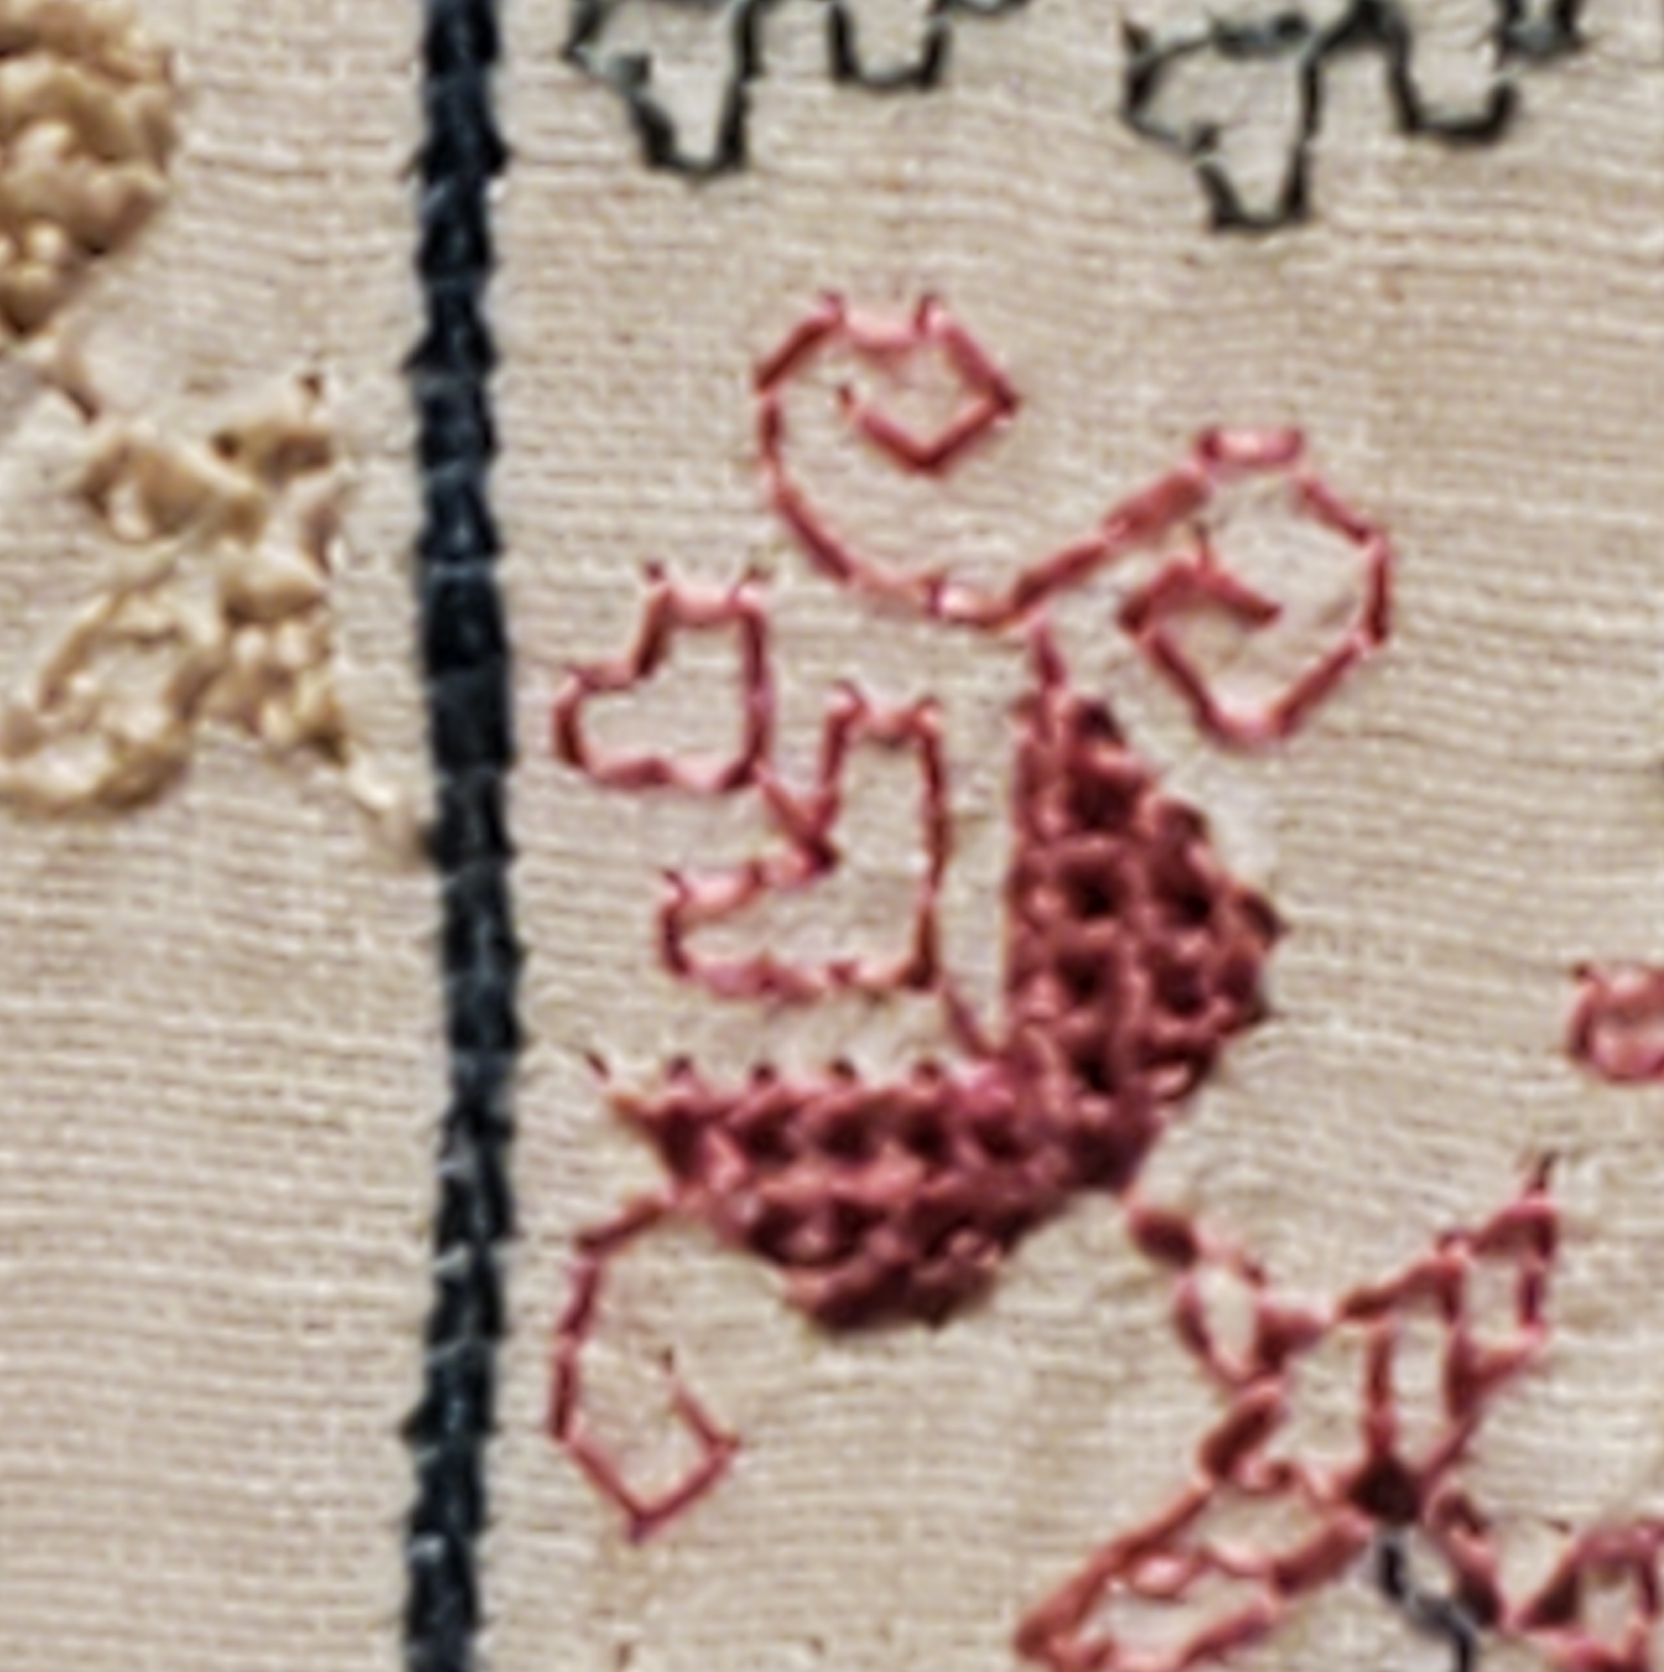
And an ultra-closeup. Note that the work is stitched over a grid of 3×3 threads.
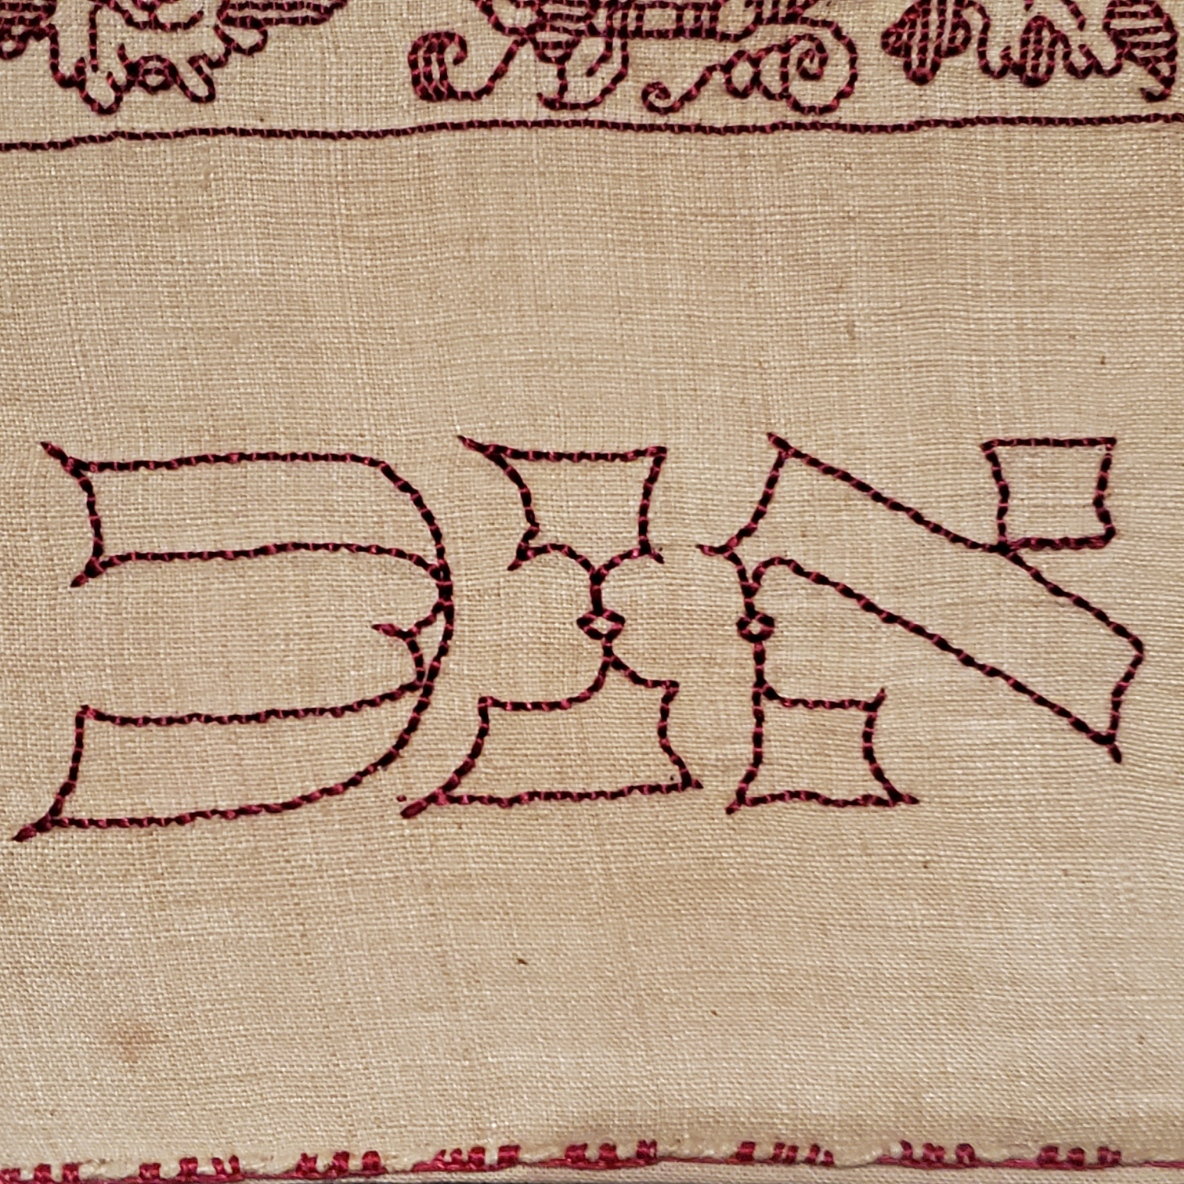
Compare the original to my rendition, stitched on a big-as-logs, known thread count of 32 threads per inch, over 2×2 – 16 stitches per inch. Yes, I brought it with me, and photographed it held up to the glass display case.
Given the difference in scale of the two, and allowing for the inch or so of distance between them, a rough eyeball estimate is that the ground for the Foa original is about the equivalent of the 72-ish count linen we all used for the Unstitched Coif project. I also think that the weave on the Foa original is ever so slightly more compressed east-west than it is north-south. making the diagonals a tiny bit more upright than they are on my version. Fascinating stuff!
Now that I see the structure, scale and alignment of the Hebrew letters, I am beginning to think that they were written out and then over stitched, conforming as much as possible to the 3 over 3 rubric, as opposed to the regular countwork of the foliate strapwork above them. For one, they don’t inhabit the same baseline. And they do seem to employ improvised angles and variant stitch lengths, although they were clearly done by someone with a skilled hand who took pains to keep stitch length as uniform as possible over those variant angles. Even so, I may be able to improvise a full alphabet of them, adapting the missing letters from the forms of those that are displayed and known. Another to-do for my ever-growing list…
The Foa Torah Binder was not the only fascinating bit of needlework or textiles on display. On the non-stitched side, there were two long lengths of sumptuous silk velvet brocade, one with a manipulated texture (possibly stamped to create highlights and shadows). What struck me the most was the scale of the patterns. The pomegranate like flower units were as big as turkey platters – far larger even than the legendary motif on the front and center of the famous Eleanor of Toledo portrait:
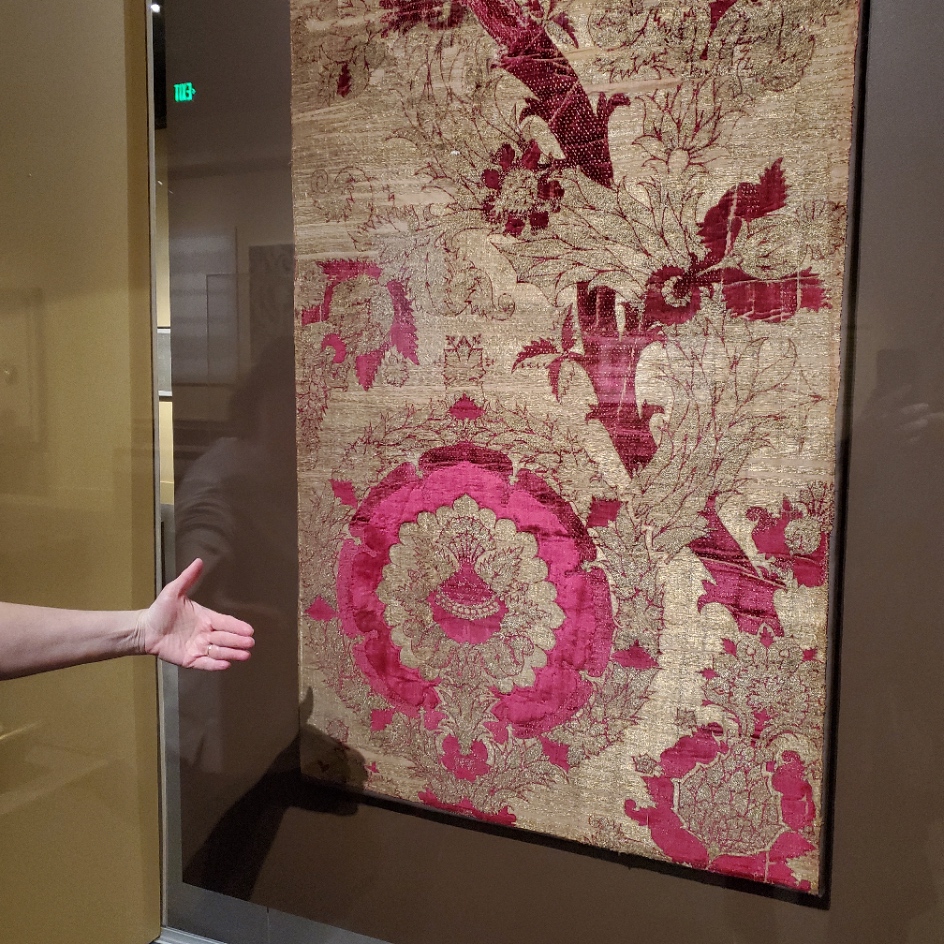

The red one on the left was credited as “Length of Velvet”, from Florence, circa 1450-1500. MFA accession 31.140. The helping hand for scale was provided by my friend. The one of the right is “Length of Velvet”, possibly from Venice, 15th century. MFA accession 58.22. The photo at the museum link is closer to the color (the gallery was dark) and shows off the highlights and shadows impressed into the velvet. Those aren’t two colors, they are the product of some sort of manipulation of the nap. It’s not shorter in the lighter sections, it looks like it’s all the same length, but some just catches the light differently, which is what made me think that it might have been heat/water manipulated with carved blocks. But that’s just the idle speculation of someone who knows nothing about fabric manipulation techniques.
There was another counted piece. It can be difficult to judge the size of these from on line museum photo collections. Even when the dimensions are given, sometimes it just doesn’t input.

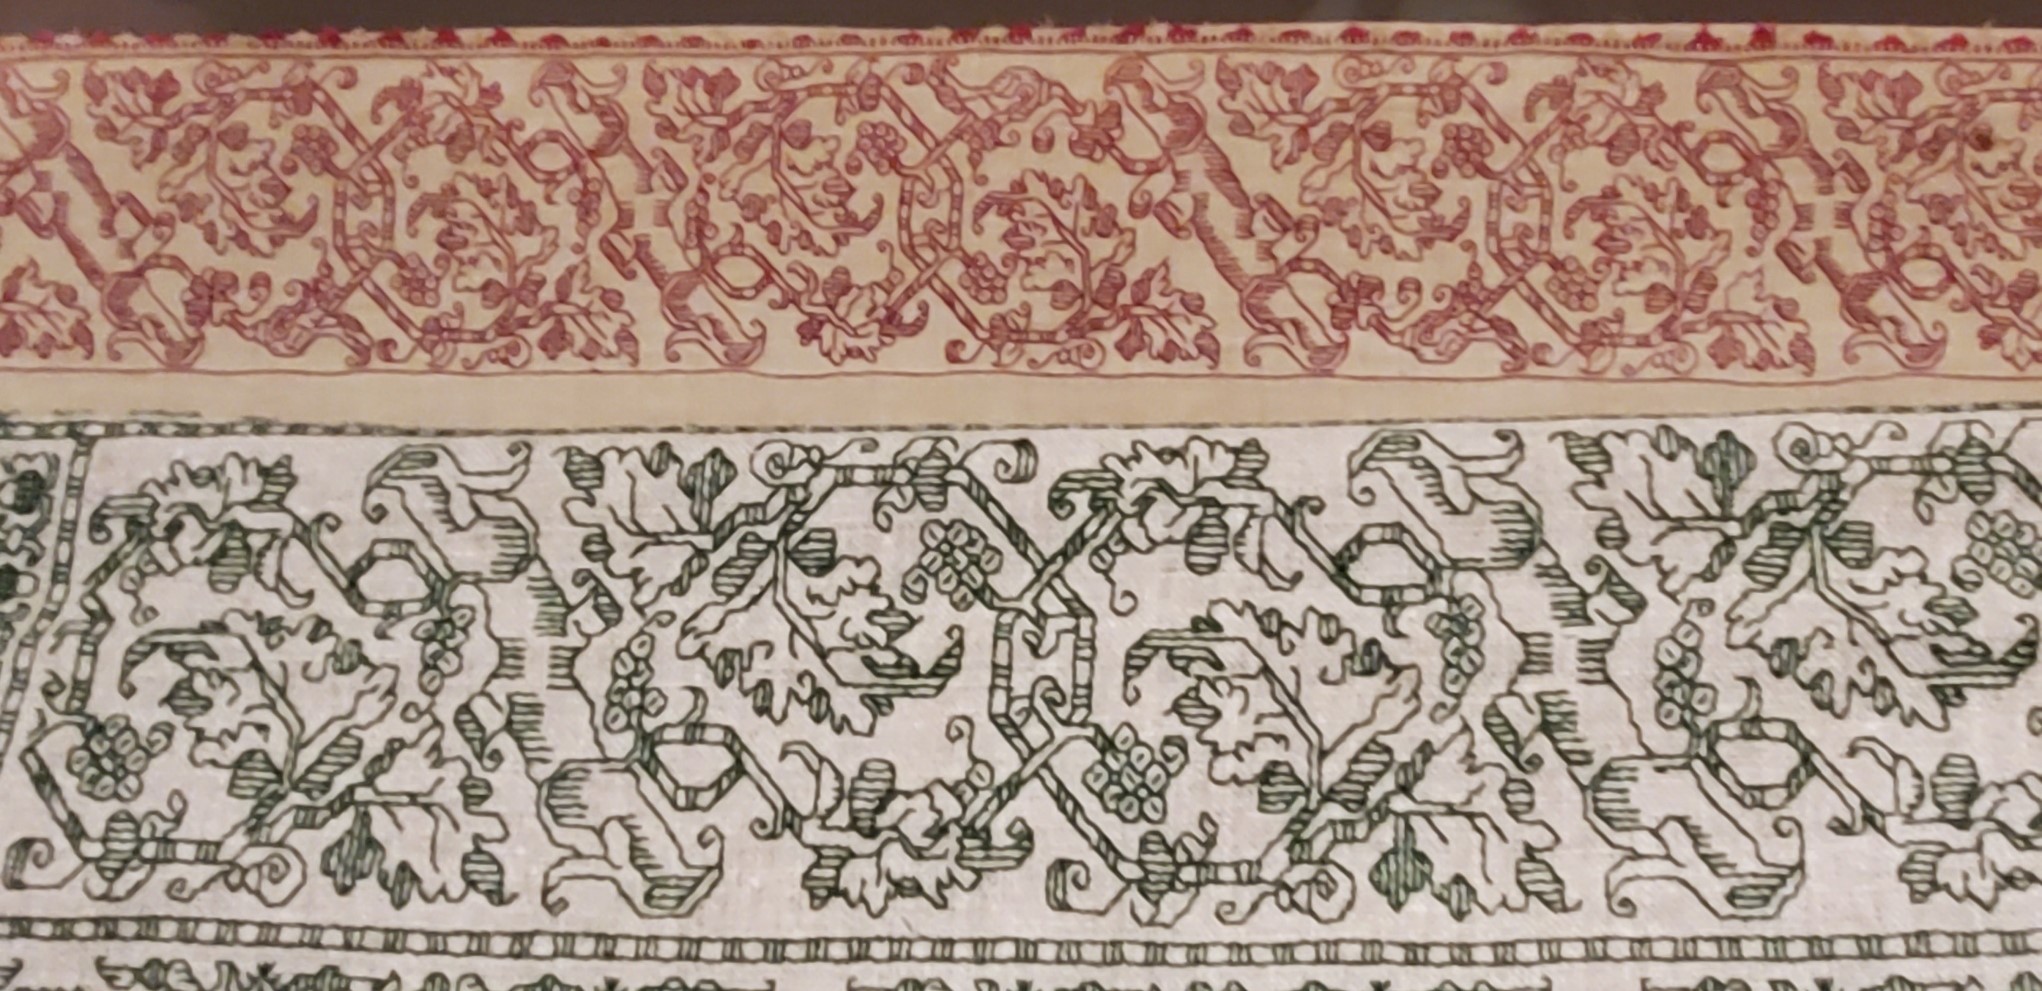
Photo above shamelessly borrowed from the museum page, where they describe it as a towel. The object’s name is a purported description of the stitches used. Punto Scritto and Punto a Spina Pesce MFA Accession 83.242, Italian, 16th century. Towel size? Nope. Tablecloth to seat 8 size. Wow.
Here are my photos.


Punto Scritto is another name for double running stitch. That’s ok. Punto a Spina Pesce has been used by the museum to describe some but not all Italian works featuring a variant long armed cross stitch. I think I can see that in the solid, heavier green and yellow lines.
Without having seen the backs, which would clarify this, I suspect that Punto a Spina Pesce (fishbone stitch), is the version of long armed cross stitch that is done by taking stitches with the needle parallel to the direction of stitching as one moves down the row, rather than the one where the needle is held vertically as one works. While the front of both is almost identical, the appearance of the reverse differs, with the horizontal-needle one being formed similar to the way stitches in herringbone are worked. The horizontal method leaves long parallel traces that align with the row-like appearance of the front. If multiple rows are worked this way, there are raised welts in all but the first and last row because the thread on the back is double layered as each consecutive row is added. In the latter there are also parallel lines on the back, but they are perpendicular to the direction of the stitching and overlapping threads on the back are also vertical. As to which one is “correct” – both seem to exist in the folk tradition, so pop some popcorn and sit back to watch the proponents of each fight it out.
A third technique is used. The colored buds are filled in using what I call “Meshy” – the drawn work stitch based on double sided boxed cross stitch that totally covers the ground, and is pulled tightly enough to look like a mesh net of squares. That’s most often employed as a ground stitch in voided work, but it is not uncommon in foreground use, as well. This one is on my charting list, too.
One last thought on this piece – it reminds me a bit of a strip I charted and stitched up a while back, as part of my big blackwork sampler. The source for that one is here, Metropolitan Museum of Art, Accession 79.1.13, Strip, Italian, 16th century but the photo below is of my work.

There were more stitched pieces in the room, but the only other charted one was this adorable chubby unicorn piece in drawn thread. It’s tons of fun to stumble across things I’ve got in my research notes, but never seen in person. This one is MFA’s “Lace”, 16th century Italian, Accession 43.237. Long shot below borrowed from their site.

The museum chose to display this one scrolled, like they did the Torah Binder, so that only a portion was visible. Here are my three shots, left, right, and center.


Yes, there are many ways to achieve this look. But squinting closely one can see that no threads were picked from the work as in withdrawn thread work. There are neat little bundles of three threads where the solid areas meet the mesh ground. (Easier to see in the flesh than in my photo though).

It’s clear that this piece was cut from a larger cloth. I wouldn’t be surprised to find another fragment of it in another museum collection someday. That’s not uncommon. But for now, chubby unicorns, their big quaternary star and attendant scrawny vegetation are also on my to-chart list. But I am curious about the ornament above them.
Now there were lots of other items on display in this exhibit, most of which I’ve seen in the BMFA’s on line photo collection – other stitchery, several modelbooks (all open to needle lace pages), lots of ceramics, and many paintings. Some of which from the “back stacks” – items not on usual display. It was grand to see them out and being admired. I admit I did not download the guided tour and didn’t buy the accompanying $45 book, but while there were lots of women depicted in these massed works, there were very few historical individuals described or shown.
I was hoping to learn more about (for example) what individual female members of the Italian mercantile nobility actually did, beyond being married for political alliances. There were a few portraits, but not much of the story behind the sitters’ identities (if known at all) was presented in the in-room captions. There was a smattering of works by female artists, but the majority of pieces were by men, depicting saints, virtues, and ideals – laudable and arguably strong, but not the personal presence I had hoped for. All in all it was a lovely exhibit, with tons of pieces that were interesting in and of themselves, but as an exhibit showing the power and reach of Renaissance Italian women, it came off more as an assemblage of things from their time, rather than a documentation of their lives, ambitions, and accomplishments.
ANOTHER FOA FAMILY ARTIFACT
A while back I did a long post on a design cluster that appears in Italian work of the 1500s to 1600s. It’s characterized by thin stems, grape leaves, striated flowers, curls, and occasionally, infilling in multiple colors. Here are some examples of the style family, and how they have fared in my hands.
Philadelphia Museum of Art, Accession 1894-30-114.
The museum dates this (a bit improbably) as being 14th century, Italian. I would bet that attribution hasn’t been revisited since acquisition in 1894. Here’s my in-process rendition of it (my own redaction).
There’s also this piece in the collection of the Metropolitan Museum of Art, Accession 51449.71.1.4. The Embroiderer’s Guild has another piece of what may be the same original in their archives. The MET dates this as 16th century, Italian. The photo below is my rendition of this work – my own redaction, in T2CM – the original photo is not as clear.

Finally we have this one. It’s in the Jewish Museum in New York, Accession F-4927. The original bears an embroidered date in the Jewish calendar, so there’s no quibbling with the point of temporal origin. It’s labeled Italy, 1582/83. Again, here’s my workup of my own redaction.

This last piece is a Torah binder, a decorative strap to hold the scroll together in between uses. The bundled scroll and its rollers would have been further protected by a richly embroidered covering, and if the congregation could afford it, adorned with a silver front plate, crown, and reading pointer. Making and/or commissioning such things was both a great good deed and a point of family prestige. In addition to the date, the binder bears the dedication” In honor of the pure Torah, my hand raised an offering, Honorata… wife of… Samuel Foa, it is such a little one.” The museum’s blurb notes that Italian Jewish women often were donors of important textiles and other objects, doing so to commemorate family births or marriages.
When I first wrote about these objects I noted that Honorata Foa might have commissioned the work, or might have done it herself. With so little data available, it would be difficult to make that determination.
Now however, I’ve stumbled across another stitched item credited to a Foa family matriarch. This one is later. Although it is still a foliate meander, is clearly of a later style, surface embroidery, and not counted. It’s in the MET’s collection, accession 2013.1143. Excerpt of the museum’s photo below.

It too bears an inscription and specific date. The museum blurb translates it as “Miriam, of the House of Foa, took an offering from that which came into her hands; and she gave it to her husband, Avram. The year of peace (5376) to the lover of Torah.” The date equates to 1615/16 on the common calendar. The museum entertains the thought that Miriam might have been the embroiderer, herself.
I was amazed to find two pieces donated by the same family, 33 years apart, showing so strongly the major stylistic shift in stitching that was taking place over that time. I also feel a bit more confident about attributing the earlier piece to Honorata’s hand.
I‘ve found some other material about a Foa family that flourished in Sabbioneta, Italy in the mid to late 1500s, with an extensive business in printing bibles and prayer books. But the only textile work the publisher’s blurb mentions (but doesn’t show) is a tapestry covered bible. I may have to get the book it cites, a family chronicle written by Eleanor Foa, a modern day descendent. I’ve also found a reference to Eugenie Foa, a fiction writer of the 1800s, who wrote about French Jewish life, setting Esther, one of her characters, in an embroidery workshop. But the full text is behind permissions I don’t have (the Google link to the full text mentions Esther in Foa’s work, but the linked blurb does not). Other works that mention the modern Foa family and its scions trace origins back to the publishers of Sabbioneta, but do not mention any link to handwork.
There’s clearly a slew of thesis topics here for someone who wants to take it up: the Foa family and its involvement in the hand embroidery industry of the time. Was the prominent printing family also involved in embroidery, or was it another similarly named/possibly related branch? Was the leafy grape design cluster something from their (posited) workshop? Are there other extant products from or writings by family members? (I’d fair faint away if there was a modelbook of embroidery designs among their archives). Did the family persist in its embroidery vocation over time? If so, how did their products evolve?
As ever research rarely answers more questions than it evokes.
UPDATE: Honorata Foa’s Torah binder will be on display at the Boston Museum of Fine Arts, as part of their Strong Women in Renaissance Italy exhibit, 9 October 2023, through 7 January 2024. Although the museum’s page doesn’t show it, an article in the New York Times offered an in-gallery photo of the piece. Amazing, since I had no idea that this was happening until after I posted this blog entry.
EVEN MORE ON AZEMMOUR
Yet another post only a stitching nerd will love.
Remember a while back, I pulled together some observations on the Azemmour Cluster? That’s a group of embroideries, usually known as fragments rather than whole cushions or other items. Those fragments were among the bits largely collected during the era of the Grand Tour (roughly 1870s up through World War I and on to the 1920s) when monied folk would do a season in Europe, collecting artworks and other items of interest. Needlework and lace collection were among those passions, along with other more traditional forms of art. Those gleaningss eventually landed in museums.
Since needlework fragments are not among the items most highly prized in museum collections, many remained in storage cabinets, with the donor’s provenance notes unchallenged. Or they did until museums began photographing these holdings both for their own use, and to post on line. At that time many of the attributions came under scrutiny, and did not hold up. In the past thirty-plus years I’ve been nosing these up, comparing them and making notes I’ve seen dozens of museum tags specifying stitches, dates, and places of origin change.
Among these collected and sometimes reclassified pieces were items in what some call the Azemmour Cluster. They were scraps sold to unwitting tourist-collectors as genuine late Medieval through Renaissance artifacts. But in actuality it does look like a lot of them, and a lot of the most represented designs in those museum back room cabinets, were produced in Morocco, with many dating to the late 1700s at the earliest, but most were likely made in the 1800s.
To be fair, the designs DO look like they express Renaissance roots. In the post above I even point out a piece that looks like it may be a predecessor. The Moroccan connection was known for some of these. Frieda Lipperheide in Old Italian Patterns for Linen Embroidery does point out that origin for some strips, noting their similarity to Italian designs.
Well, thanks to discussions in the Zoom meetings that are part of the Unstitched Coif project, a significant arguments strengthening the joint Moroccan sojurn of these designs has come to my attention.
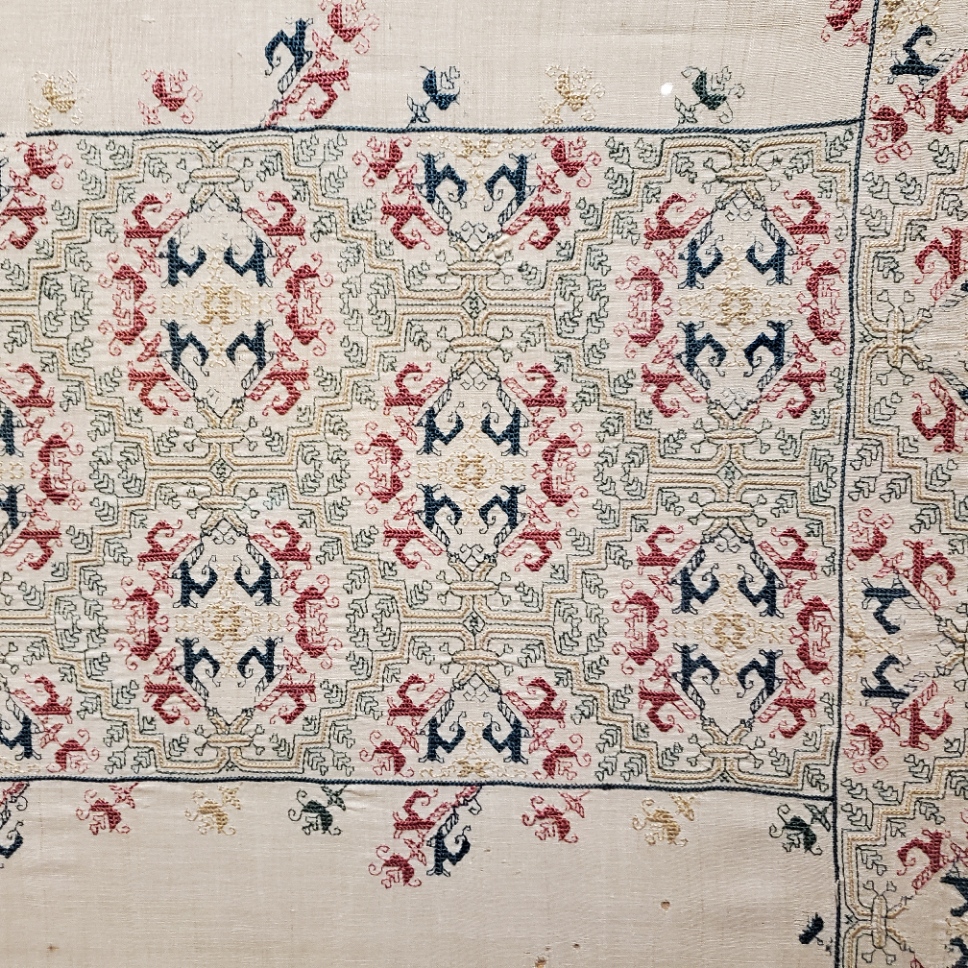
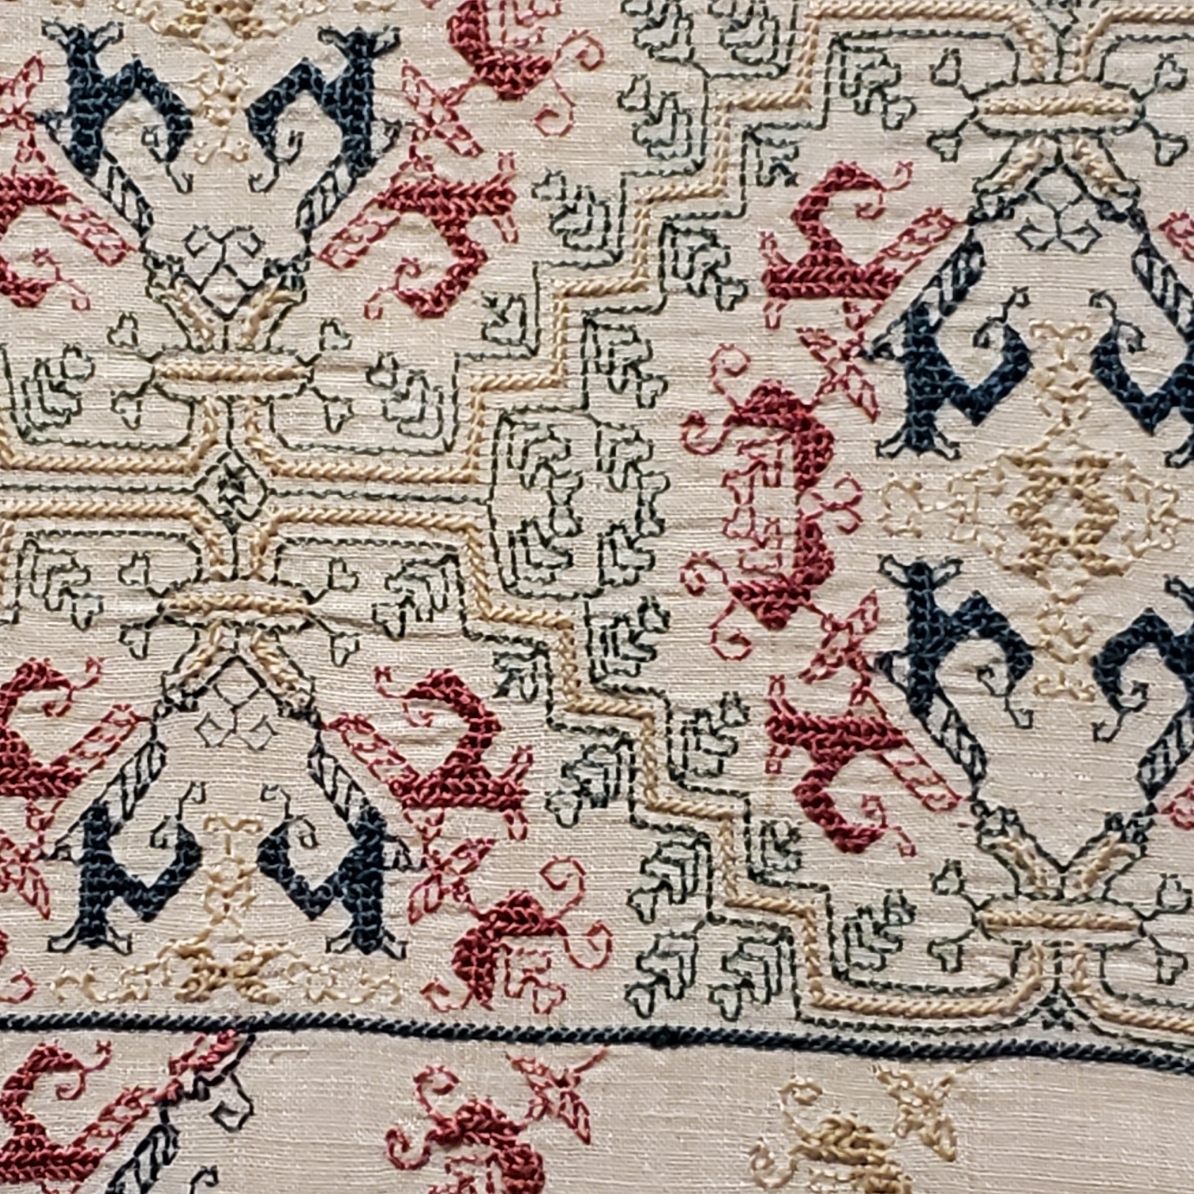
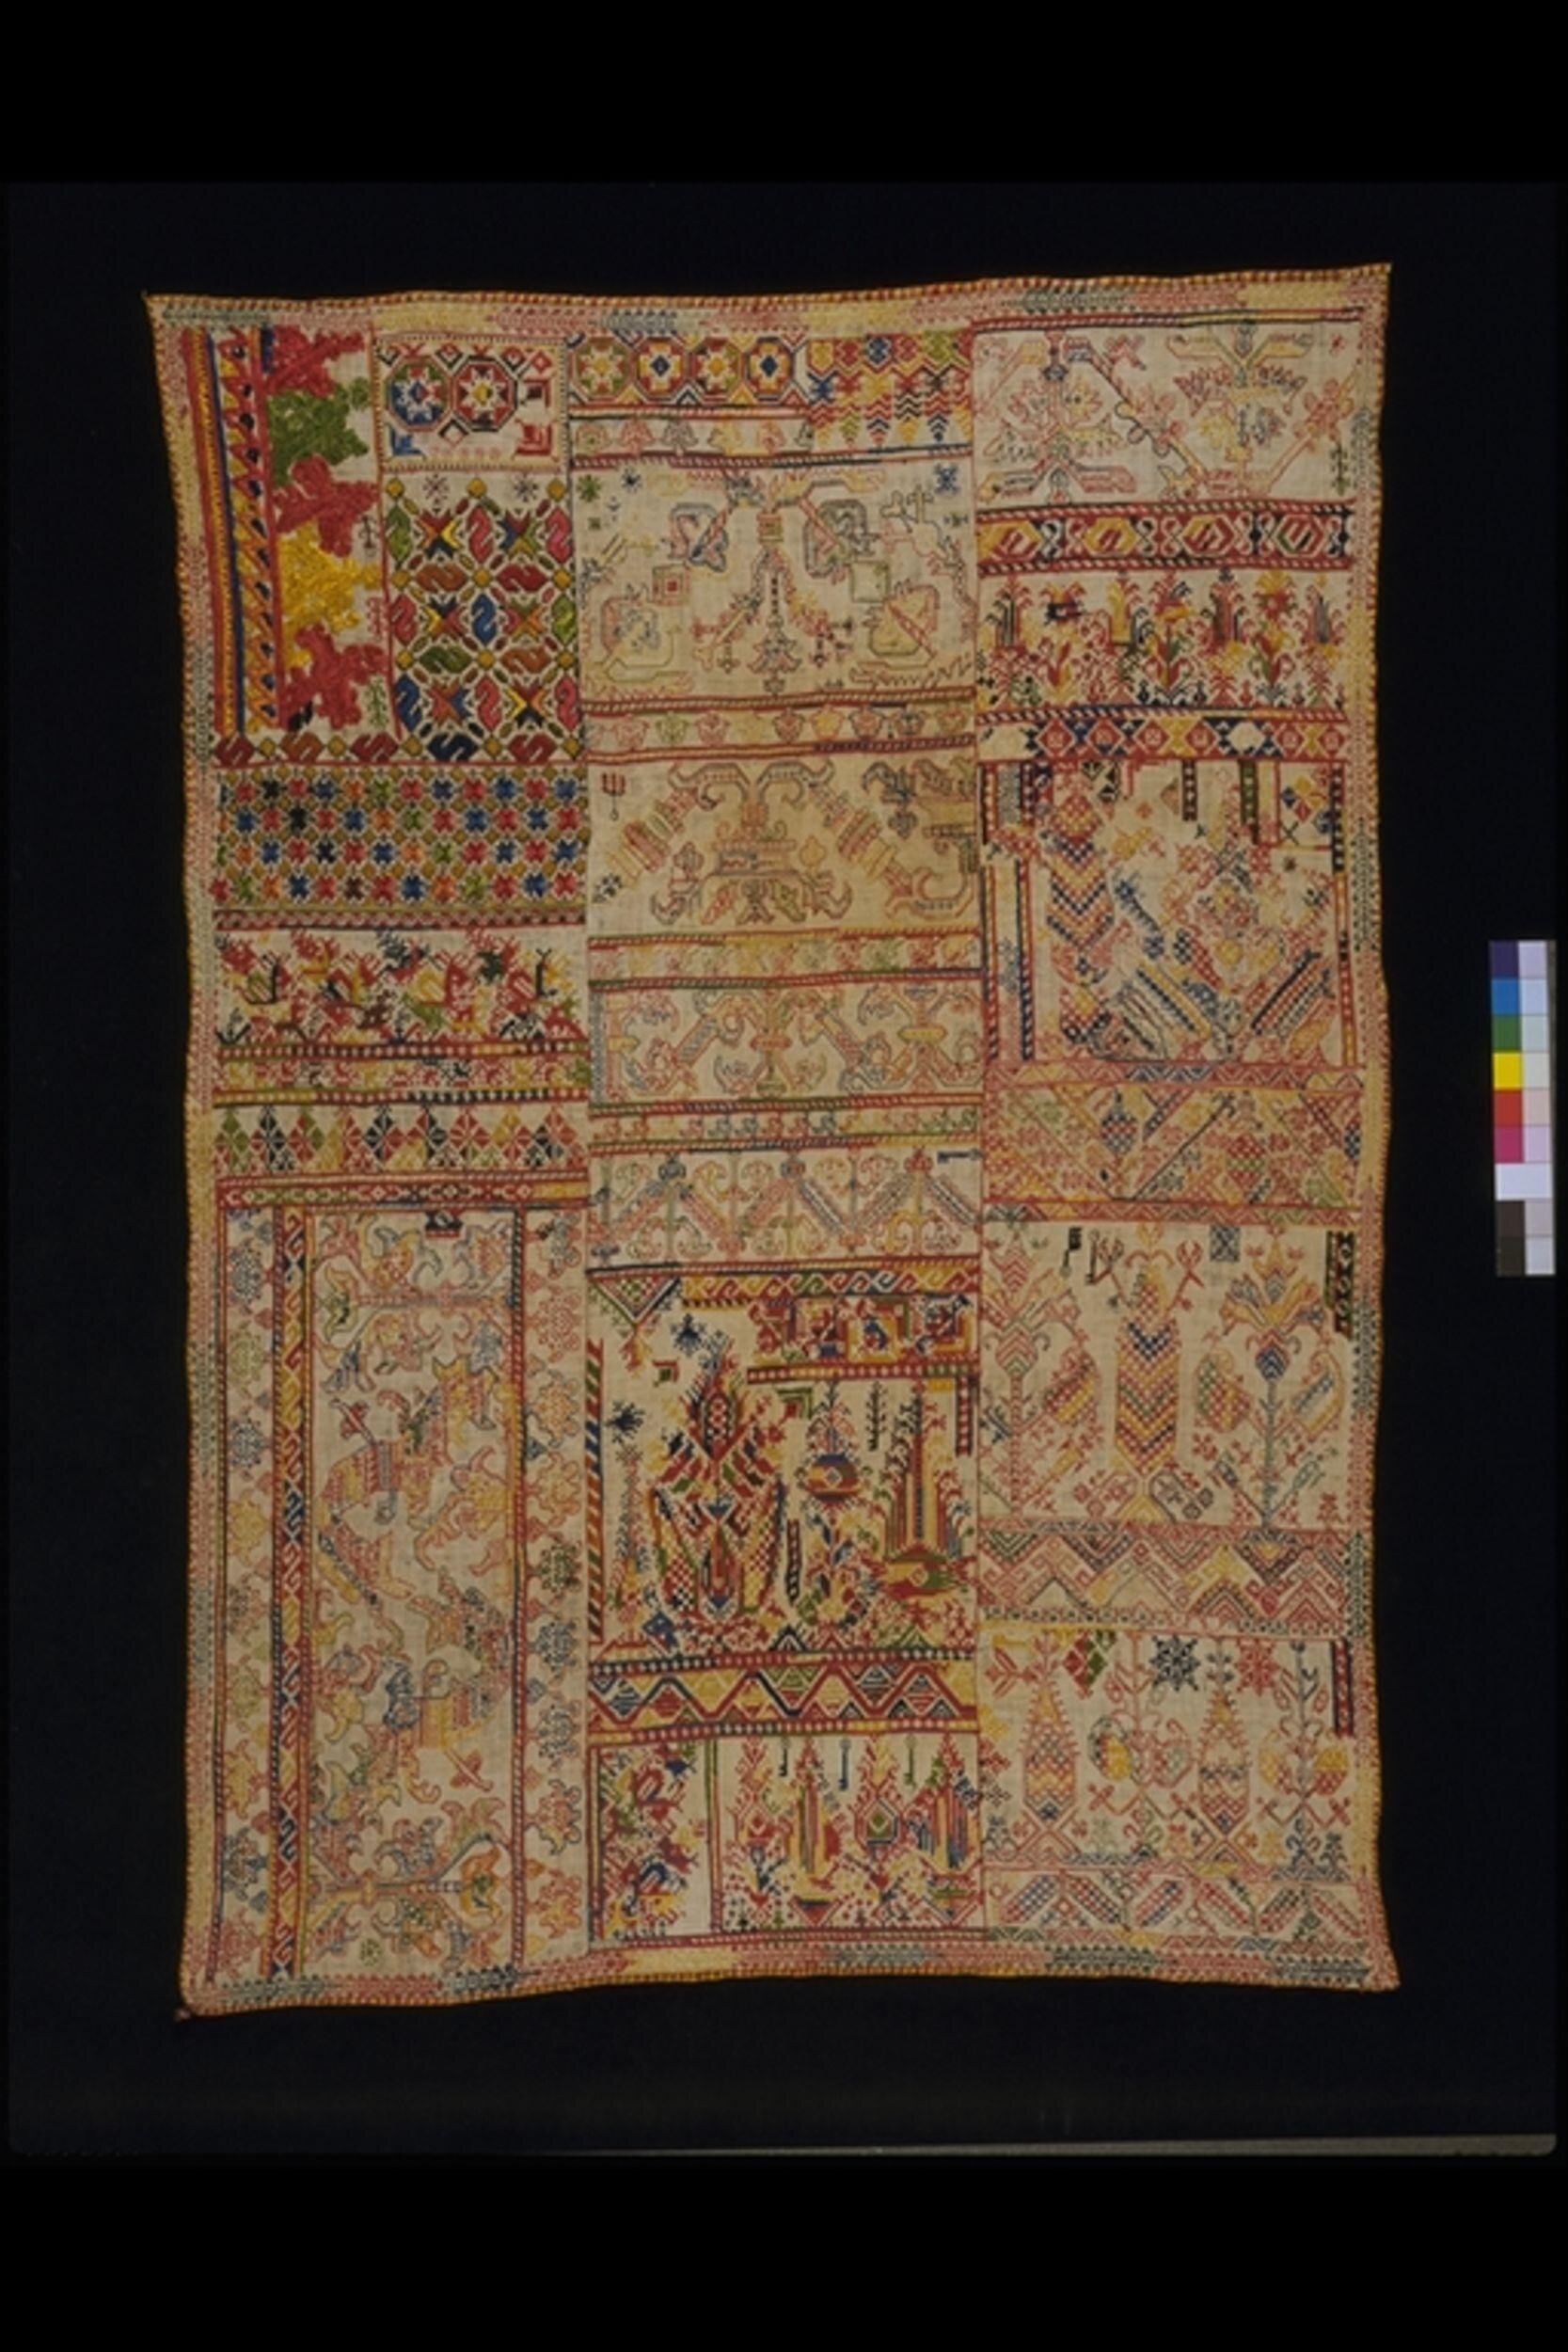
Here are two samplers from the Victoria and Albert Museum’s collection. The images are theirs used here under fair use/academic auspices. The multicolor one is Accession T.35-1933, a 19th century piece from Morocco, stitched in silk on linen. Yes, most of the individual fragments of these designs are in monotone, usually red, but occasionally deep indigo, these two samplers with their collections of many designs are happy riots of color.
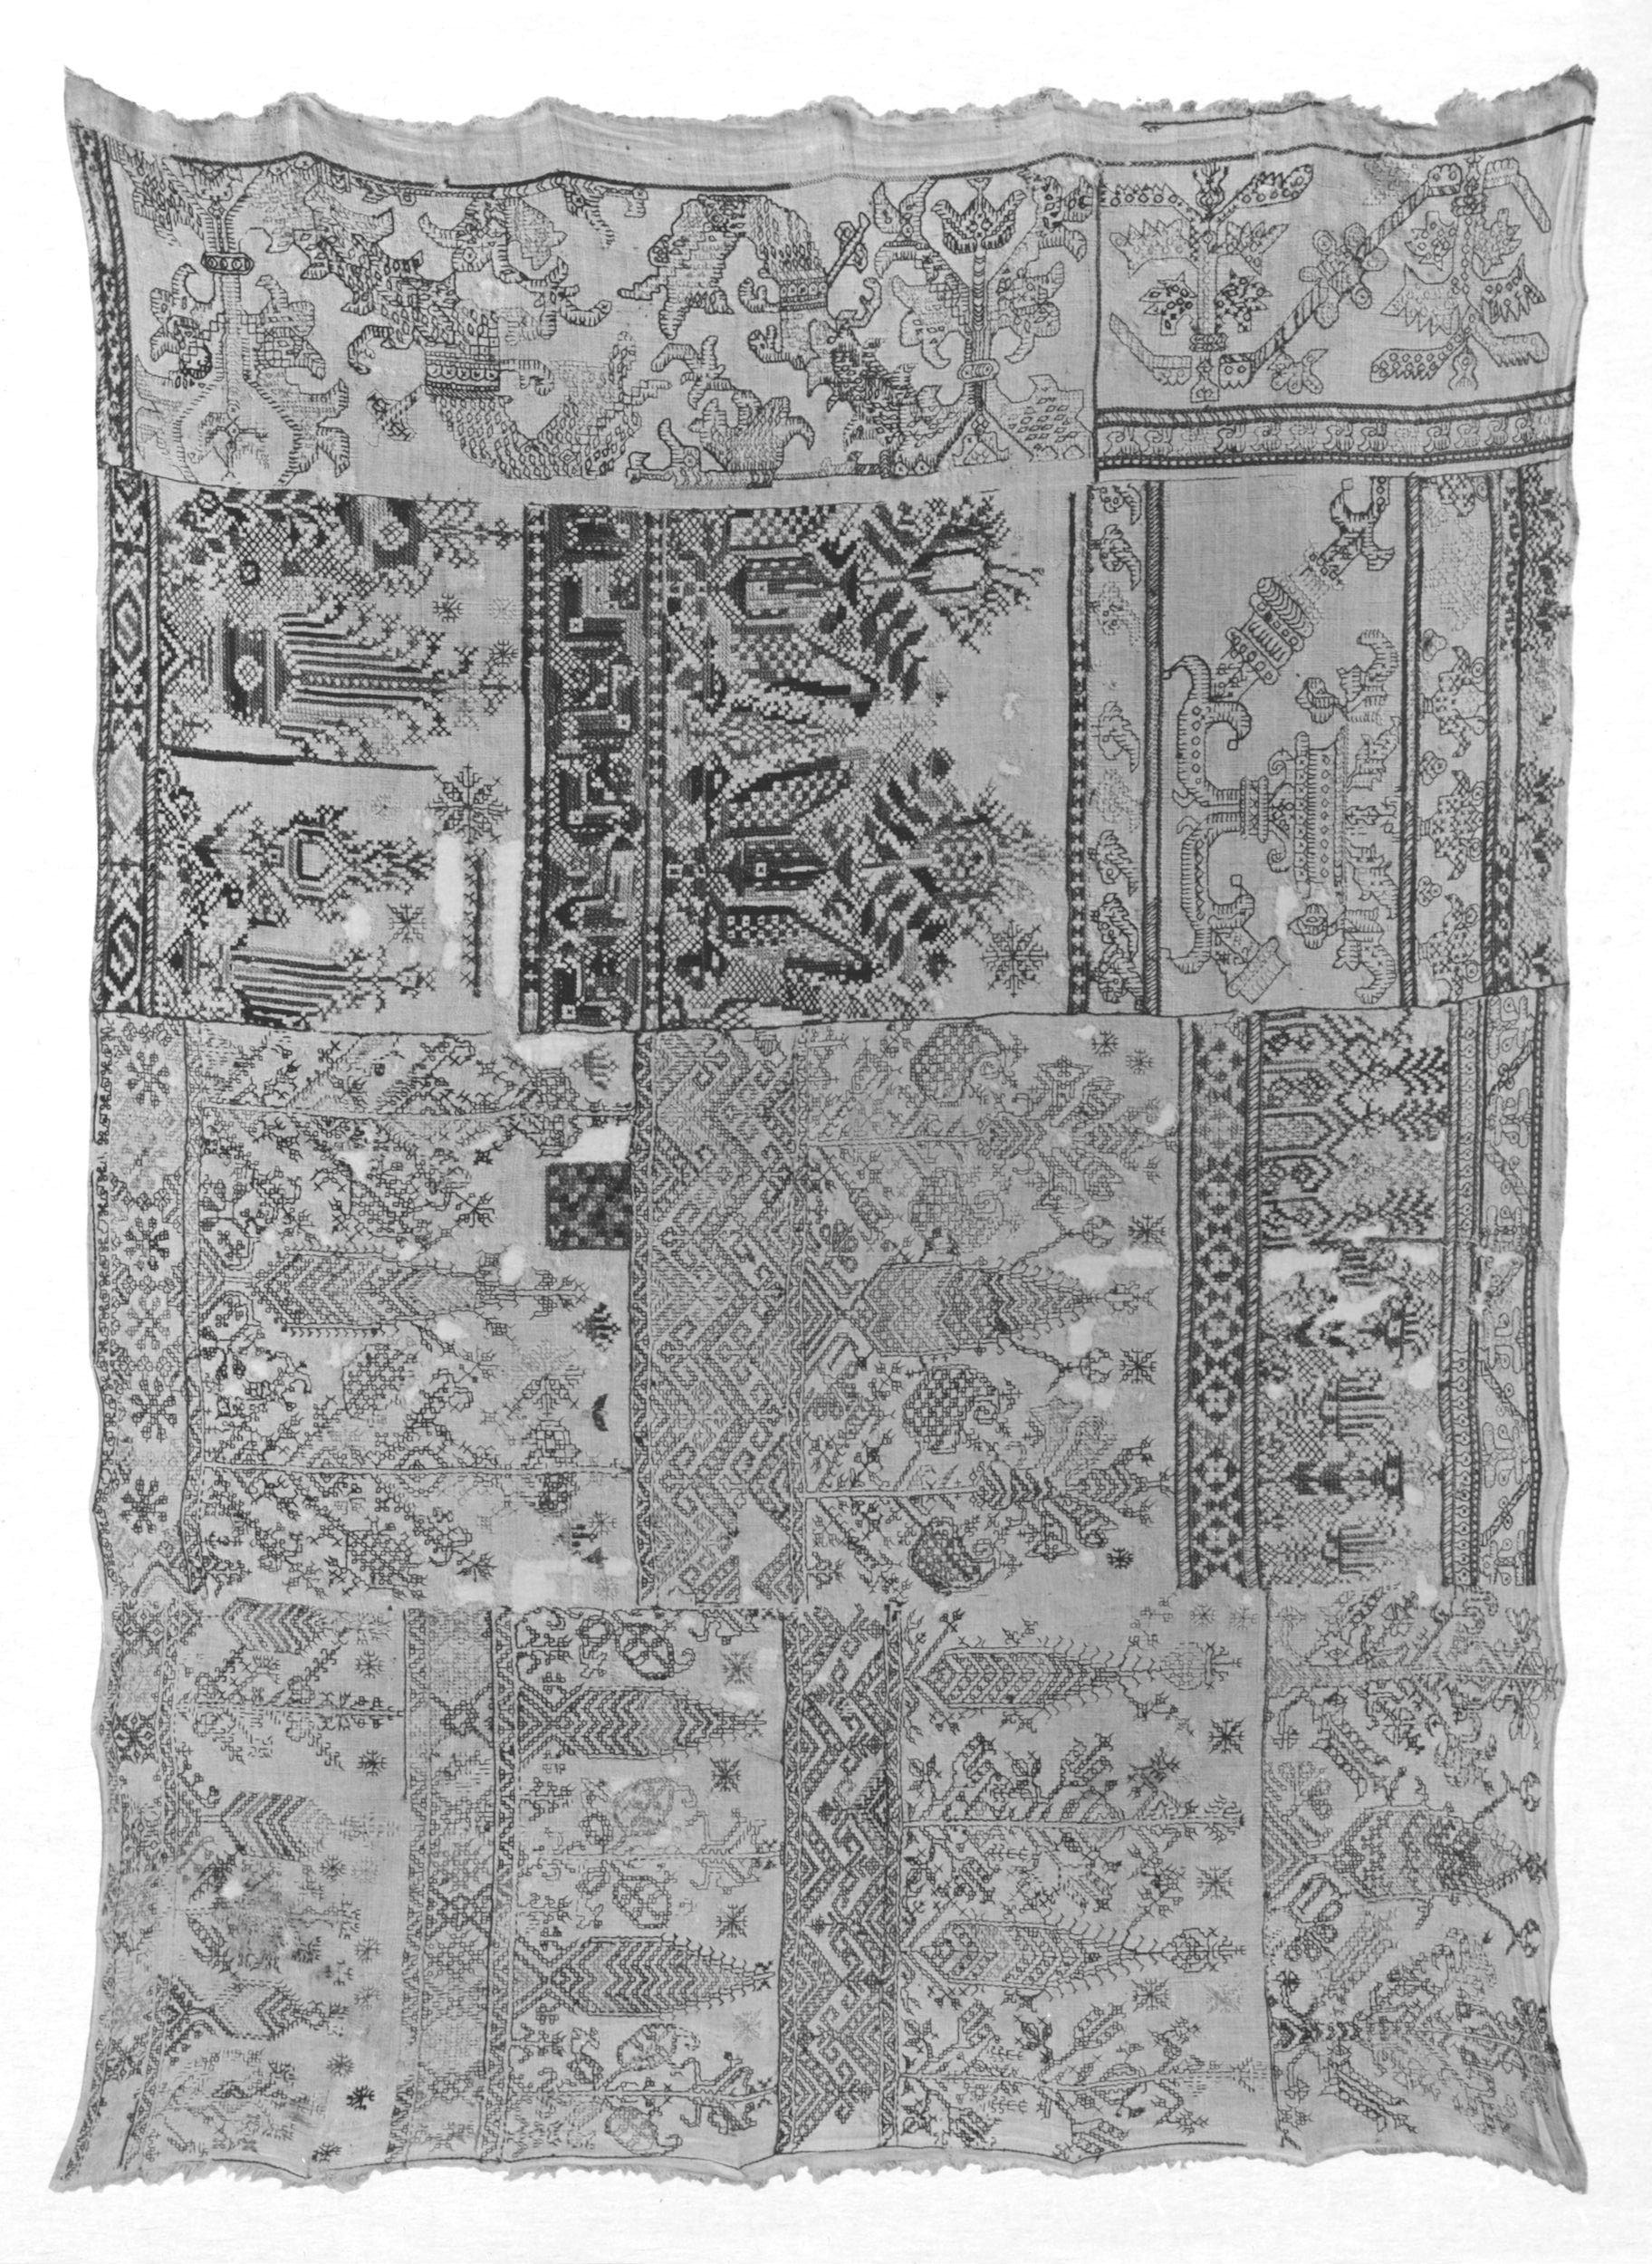
This black and white photo is also of a multicolor piece (Accession 372-1905), dated from the 1800s, and is also listed as of Moroccan origin.
Both of these pieces contain two of the most common motifs in the cluster. This one is what I call the Spider Flower, for its spindly center blossom.
Here’s the second. I call it Wide Meander. This is found both with the wide strip looking rather sea-monster like with a gaping mouth, and in a tamer form, where the monsters have fused to become a super-wide belt like meander join. Discussions of both Wide Meander and Spider Flower are in my previous Azemmour post. Earlier musings on the Spider flower are here.

But these are not the only ones. The multicolor photo also has these two designs on it that I’ve discussed before.

The one on top is a variant of a pattern that is of Italian provenance. I mention it in this piece, and again in my discussion of voided grounds (under the boxed fill).
The one underneath I call the Pomegranate Meander. It’s clearly related to the Spider Flower, although in this case the ornaments on the joining diagonals are emphasized, rather than the center flower shape. It’s also mentioned in the Azemmour discussion cited earlier.
Plus it’s also worth noting that both of these V&A samplers show lots of variants of the customary accompanying borders so often seen with these main strip designs.
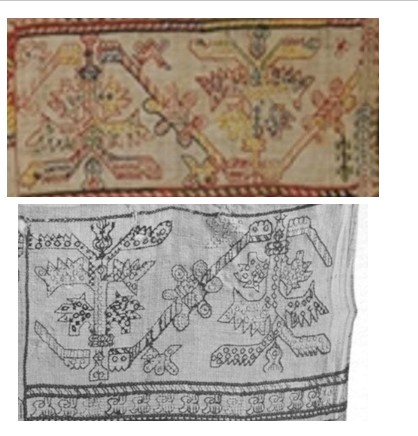
But for me the eye opener was the addition of another design to the group. Both samplers show the wide urn design.

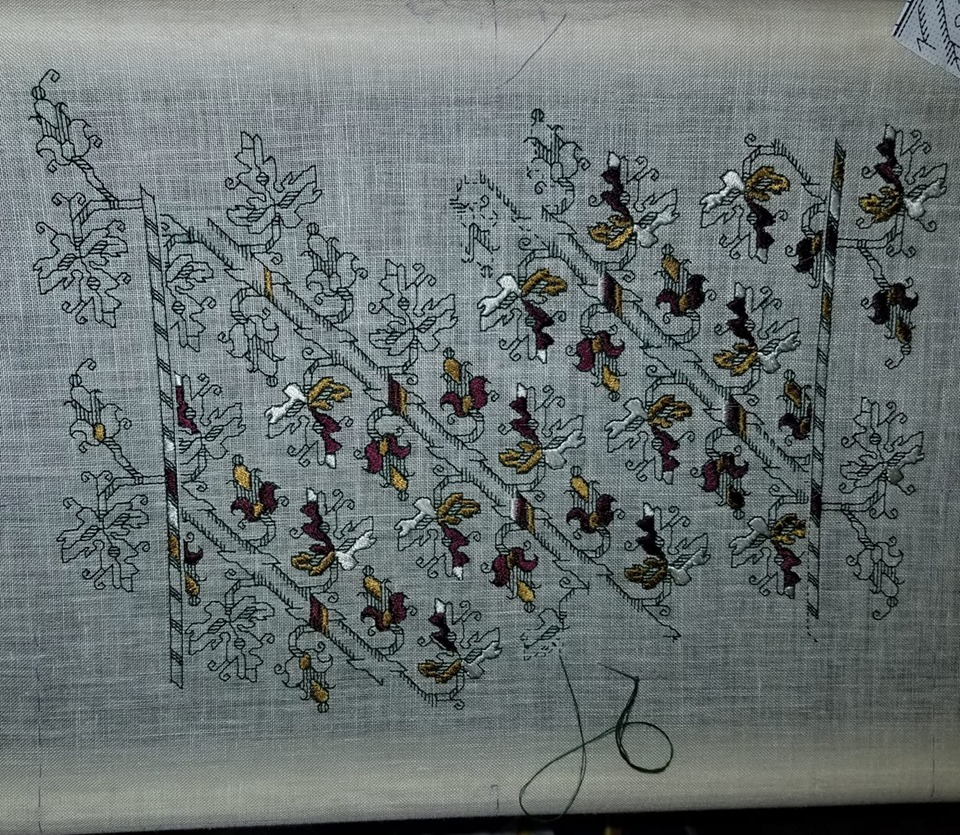
This one I should have tweaked to based on the style of detail in the foreground. But I did graph it up for The Second Carolingian Modelbook based on this example from the Hermitage Museum, and accepted their identification as Italian, 16th to 17th century. Accession T-2714, entitled “Border Embroidered with Bowl and Stylized Plant Motifs” if the link breaks).

Here is my own rendition of this design, as I stitched it on my long green sampler.

Now we have a conundrum. We have many items whose dates and places have been corrected in museum collections. We have a continuing tradition of design replication and pattern re-use in a specific place. We have some predecessor designs and traditions that might have fed the Moroccan styles. And we even have some evidence of the post-Inquisition diaspora spreading these stitching styles TO settlements in Morocco. The Jewish link is cited by The Textile Museum of Canada. The Jewish Virtual Library notes the migration and community. The Jewish link is also mentioned here. The Textile Research Centre writes that production of Azemmour pieces died out in the mid 1900s, although recent revivals have been undertaken.
So where do we draw the line? Are these related items ALL to be reassigned to the Azemmour Cluster, with production dates in the 1700s through 1800s, sold to the unsuspecting as older artifacts? Are some possibly earlier, transitional pieces? Can we rely on just the wealth of ornament in the foreground of these strips to differentiate them from earlier forbearer pieces? Without detailed textile forensics, we may never know. But wherever and whenever their points of origin, it’s nice to see the family reunited again.
YET ANOTHER BLACKWORK PATTERN INTERPRETATION
A big thank you to the Facebook/Blogspot guru who posts at Attire’s Mind. Today he posted a painting from the collection of the National Gallery of Art, (Accession 1931.1.114 in case the links break). It’s a devotional image by Giovanni Battista Morini, and is entitled “A Gentleman in Adoration before the Madonna.” It’s dated to 1560.

The Attire’s Mind post called out the blackwork on cuffs and collar.
Of course I was smitten with the pattern and had to graph as close an approximation of it as I could. It’s got a bit of interpretation, but given that the original I am working from is paint and not countable linen, I think that relying on best-effort/logical construction that achieves the motifs using the least real estate is good enough.
This one is especially interesting because it looks like the artist went out of his way to depict two line thicknesses. These could have been achieved by using different stitches, or by varying thread thickness. I’ve tried to convey that look by using two line thicknesses in my chart. Experimentation with how to render this in real stitching would be lots of fun.
Now, I could save this along for eventual publication in The THIRD Carolingian Modelbook, which I’ve already begun compiling, but given my dismal track record of decade-plus production for each of that series’ two prior volumes, why wait?

You can click here to download this as an easy single page PDF file
It’s also available on my Embroidery Patterns page. Enjoy!
LONG-LOST TWINS, PART VII
Today’s my birthday, and needlework friend Barbara posted a snippet to my Facebook feed of a voided panel showing couples dancing. That bit of fun led to more digging on my part. I knew of similar panels in a couple of places, so I decided to do another of these posts that only a needlework geek could love.
First, here’s the one that was most prominent in my notes. It’s in the collection of the Rhode Island School of Design (RISD), accession 47.199. They attribute it as Italian, circa 1600, and cite both the ground and the stitching as being cotton. I have some doubts about the materials citation, but I’m not an expert and haven’t seen the piece up close and personal. I do note however that it would be one of the two easiest examples of this family to chart.

It’s hard to see, but the ground appears to be in that tightly pulled Meshy stitch I’ve written about before. I do not know if the foreground and outlines are done in double running or back stitch. There’s no other info on working method or object purpose. But I sort of suspect that this might have been part of household decor – possibly a bed valence or decorative cover sheet, remotely possible – a tablecloth, but for that I would expect to see a butted corner, and not the arbitrary unworked bit at the extreme right of the stitching. It is interesting to see the tease that confirms my working method – there’s a tiny bit of the foliage on the “room divider” at the right edge that was outlined, but the voiding wasn’t worked up and around that little bit of outline, leaving it orphaned and alone. More argument for this having been displayed with that selvedge bit tucked away and unseen, as I would expect for the upper hanging around a bed.
In any case, here are some relatives. First a piece from the Boston Museum of Fine Arts, accession 38.1104. They cite it as 16th century, and Italian, worked in red silk on linen. Looks like the Meshy background to me.

You can see that the design is very close, but isn’t spot on exact. There is a different treatment of detail in both the foliage divider and the castle tower divider. The border (if there was one) is also gone, but we can’t judge that in absentia. There are also lots more small bits and bobs surrounding the dancers and the little guy in the RISD sample. The male figure has traded his crowned turban-line hat for a lush head of hair. And the little guy looks to be better dressed. I’d be tempted to call him a page in this version and possibly a cupid or eros figure in the RISD piece, due to the bit of arrow fletching? sticking up over his shoulder. And although I haven’t counted the units, or investigated closely enough to see if the thread count of the two grounds are even, the MFA’s snippet does seem to be a bit compressed north-south, compared to the RISD one. But not uniformly so. The upper bodies appear to be less squished than their lower halves.
And the third – this one from the Cleveland Museum of Art, Accession 1929.840. They note their piece as being done in silk on linen. It’s pretty clear that this one is in Meshy, too.

Based on very strong similarity between this piece and the MFA holding, I suspect these might have been true siblings, pieces from the same original, cut apart and sold to two separate collectors, which then ended up in two different museum collections. In fact if you compare the right edge of the MFA piece, and the left edge of this one we can see a bifurcated page boy – it is pretty likely that we are looking at the exact snip line where they were separated. As an aside, I like the little unfinished bit underneath the lower left leaf of the foliage divider, at the left edge of the piece. Again, confirmation that outlines were laid down first, then the background was worked.
This one is in the Metropolitan Museum of Art in New York City, accession 47.40. They call it “Border” and cite it as being Italian, and 17th century, worked in silk on linen.

Their original photo is a bit fuzzy, but it’s pretty clear that this piece is possibly another section of the same original that furnished the RISD snippet. Not only are the borders and proportions intact, but the small details of crown/hat, arrow, interior detail on the dividing motifs, and even the dress border of the woman dancer is identical.
And to wrap up, I have one more snippet in my notes. This is also from the MET collection, accession 07.62.58. They cite it as Italian or Greek, 17th century, and note that it’s silk on linen. They rightly describe the meshy ground as drawnwork.

By now you should be familiar with the details of this design. Yes – it looks closer to the CMA and MFA snippets than it does to the RISD and the other MET holding. But there are some subtle differences. The ground line is most obvious. In the other two non-bordered bits of this variant, the stitchers have taken more pains to keep a stable bottom edge of the stitching. That’s not to say there aren’t deviations from that on both pieces, but on this one is is far more evident. There are also some other minor differences in detail on the dividers and on the dancers’ outfits. Now I suspect that it was not uncommon for a very large project like a set of bed hangings to be worked by multiple stitchers. Even if a master laid down the outlines and had a crew working “clean-up” behind, filling in background and detail, a large team working quickly might make these minor copyist errors. I don’t think that there is enough difference here to clearly claim that this has no chance of being a piece of the same original as the CMA and MFA fragments.
So to sum up, I do think that two original artifacts furnished all of these bits. And I would go further to posit that the unbordered one might have even been unfinished prior to its dismemberment. I thank the collectors of the “Indiana Jones” era for heading off on their Grand Tours, and bringing back these pieces. I thank the museums for hanging onto these rarely studied snippets, and for posting photos of them on line, so we can speculate about their origin. And I thank Barbara for flagging the dancers for my birthday.
I return you now to regularly scheduled, non-boring Internet content. 🙂
BLACKWORK/STRAPWORK RESOURCES HERE ON STRING
NOTE: UPDATED TO BE CURRENT THROUGH 15 JULY 2025
Blackwork embroidery seems to be having an Official Moment right now, with tons of new interest. I’ve got a lot of resources here that might be useful to folk beginning or continuing their journeys, but it’s not well indexed. So I post this round-up of on site resources in the hope of lending a hand. And to be able to point to the whole set if asked. Image at the end for the eye candy effect. List below has been updated since it was originally posted.
Technique and Tools
- Double Running Stitch Logic. One of many times I’ve tried to explain double running stitch and two-sided work. This post led to the tutorial series listed below.
- Assorted Blackwork Hints. Answers to questions about my working methods. Making mistakes; guidelines; where to start; simple tracing using “the poor person’s light box”; multicolor; equipment hints (frames, needles, wax); and a list of tricks for path planning in double running logic.
- Blackwork Thread Thickness and Grounds. One strand or two for double running? Why is it sometimes hard to keep your lines straight and even.
- Blackwork Heresy. Back stitch, double running, and the hybrid that floats between them, which I nicknamed “Heresy Stitch.” Useful but not something I’ve documented in historical works. Can be easier for people who get lost when working double running, and saves thread when compared to back stitch.
- What Makes a Blackwork Pattern Difficult? Cautions and mitigations for three challenges, that might help simplify those trouble spots.
- On Charting. How to look at a photo and then translate the design to paper.
- Determining the Thread Count of Small-Gauge Linens. How to use a penny (or other tiny thing with a known and stable diameter) plus a cell phone camera to figure out the count of a hard-to-see ground.
- Cornered Again. One way to handle placement of bands on a band sampler and a wrap around frame edging, with minimal advanced planning.
- Filling In. More questions from the mailbag, including some unusual names for stitch techniques that appear in museum annotations.
- Proofing. How I check alignment as I stitch, to make sure I’m not wandering off count.
- Turning a Strip Repeat into an All-over. This one also belongs under the free linear stitch patterns heading below. A couple of ways to make a single width strip into a double, and how I ended up turning it into a Green Man square.
- Travel Cover for a Flat Frame. How I made mine, and how you can make one, too.
- Hoops! Sizes, thicknesses, wrapping, and more.
- Working on skew counts (non-evenweave linens). An aside in the discussion of a past project, but lots of tech info here.
- Typography in embroidery design. Choose your typefaces carefully!
- The Buzz on Beeswax. Why I am such a fan of using it in blackwork.
Inspiration
- Elizabethan Blackwork Smock. Photos of the famous Victoria & Albert Museum smock (1575-1585), Accession T.113 through 118-1997, plus my redaction of some of the fills used on it.
- Blackwork Inspiration. Some sources for folk looking for project ideas for original pieces of contemporary blackwork
- Digression – Blackwork Embroidery. Lots of links to portraits and other artworks showing blackwork. Some of them might still work.
- More Inspiration from Historical Sources. Another link roundup of countwork appearing in paintings and portraits. Some of these links may still be live, too.
- Forehead cloths. The coif’s companion. Much easier to wear in modern context (see Bragging, below).
- Ironwork at the V&A. These pieces sing “outline potential” to me.
Voided Works
- Voided Grounds. A roundup of various treatments for voided work, where the background is overstitched but the foreground remains (mostly) unworked. This is the style that was reborn in the 1800s as Assisi work, and is also known as reserva stitching.
- Voided Pieces and Outlines. Do historical voided pieces always sport outlines? Were they done first? Were they always on the count?
- Voided Narrative Panels. A style cluster of voided works probably done by drawing the foreground designs freehand, then working the background up to those lines.
- Meshy! Working that hard-pulled mesh like voided style that totally encapsulates the ground fabric’s threads.
History, Speculation, Pattern Clusters, Printing Block Migrations and Other Musings
- The Twain do Meet. Introduction to Kasuthi Kashida. Blackwork’s Indian cousin
- Looking East Again. Double running stitch pieces from the Wardak Hazara people of Pakistan. Another example of a South Asian stitching tradition that may be one of blackwork’s lesser known Eastern cousins.
- A Missing Link? A curious family of Egyptian Islamic artifacts of the 10th to 15th centuries, that have no proven relationship to inhabited blackwork (the kind with hard outlines and geometric fills), yet presage its aesthetic.
- The Azemmour Cluster. A group of patterns that in the time I’ve been paying attention has had their commonality and point of origin increasingly recognized, moving them from late 19th century source annotations that identified them as Renaissance era products made everywhere from Greece to Spain, and placing them in Morocco.
- The Spider Flower. A design that is probably part of the Azemmour Cluster
- Revisiting the Stupid Cupids – Multiple versions of the cupid and oak leaf meander.
- A Pattern’s Pedigree. Random thoughts about a specific family of patterns that shows up both voided and unvoided.
- The Leafy Family. A wide leaf-bearing meander that shows up multiple times in artifact inventories.
- More Cousins. The Leafy Bricks group.
- Cornered! Possible working direction and four different corner treatments of a famous, oft photographed handkerchief in the V&A.
- Italian Leafy, Occasionally Multicolor. Another design family of large panels and edgings that have curiously similar design elements, and a direct association of one example with the Jewish community of Rome, hard dated to 1582/1583.
- Long Lost Twins, Part I. That ubiquitous urns and piping harpies design. (I revisited this one in Part V, below)
- Long Lost Twins, Part II. Oak branch, leaf and acorn design, executed in both monochrome and polychrome, multiple versions.
- Long Lost Twins, Part III. Another very common pattern with multiple iterations, in multiple museums, two instances of which may have been cut from one original piece.
- Long Lost Twins, Part IV. Multiple instances of a simple Y and wrap meander.
- Long Lost Twins, Part V. Lots more on that harpies/urns design; found in many museums, many iterations, and even multiple stitching modalities.
- Long Lost Twins, Part VI. Two instances of a column design, very probably once cut from the same artifact. Fragments of which are held in two museums
- Long Lost Siblings? Another case of a single source artifact probably cut in two, now held by two different museums.
- Long Lost Twins, Part VII. Resuming the series. This is a voided pattern showing dancers, several pieces possibly cut from two originals before dispersal to various collectors.
- When is More of the Same Not More of the Same? Examining differences among different editions of various modelbooks, trying to parse out whether they were reprinted from the same block, hand tinted, or recarved.
- Modelbook Blocks: Acorns and Chickens. A classic. Was the block simply traded and reprinted, or was there copying afoot?
- One Design’s migration. Another look into multiple printings of the same design, and differences/similarities among those iterations.
- Early Marketing? Or Not… Speculation set aside by actually looking at the when and where of a pattern published both with and without religious mottoes.
- Repeating On and On on Repeats. A summary of the types of rotations and mirrorings commonly seen in long strip patterns
- Ocular Proof? My argument that Othello’s strawberry speckled handkerchief used in the play to implicate Desdemona might have been conceived of by Shakespeare as a countwork piece.
- A Curious Applique Technique. Not embroidery, but often appearing in modelbooks alongside it. Take a strip of leather or cloth, cut it with precision into a pattern that duplicates itself on either side of the bisecting line. Twice the yardage and no waste. Wildly clever.
- The Symmetries of Linear Stitched Fills and Strips. The difference between designs with even and odd numbered stitch counts, and how they can be used to best advantage. Plus pitfalls of aligning them with each other, especially when using purpose-woven grounds like Aida.
- Griffins. A discussion of a very common griffin design, and how it moved through time and across geography.
- The Unstitched Coif Project Exhibit. My photos and links for all of the coifs produced.
- More on 16th and 17th century pieces associated with Italy’s Foa family. Recognizable design elements characterize this cluster.
- Even More on Azemmour. Additional observations on a cluster of embroideries from Morocco, common in museum and private holdings. Some of which were sold to early collectors as Renaissance fragments.
The Unstitched Coif Project
- Completed coif – discussion of my materials, sources, and method. Includes a writeup of the stitches used, and why.
- Completed coif – discussion of my finish and fills. Close ups of the completed project, plus a motif by motif round up.
- The Unstitched Coif exhibit. All of the coifs submitted for display in December 2023.
- All of the posts tagged with Unstitched Coif. For those who want to get up close and personal with each motif as it was created.
 My Unstitched Coif Project contribution, now available in high definition photography of both the front and back. It was collected by the Victoria & Albert Museum, and they have updated the piece’s permanent on-line accession page with those images.
Talks and Classes
The Stitches Speak
These are the slides from a round-up of historical counted styles I presented at a Society for Creative Anachronism needlework and textiles gathering in 2012. Mostly eye candy, and divided for ease of posting, not by subject area. However sources are listed.
- My post-event summary
- Part 1. The rest of these are my slide deck as presented. No script, just the images.
- Part 2.
- Part 3.
- Part 4.
- Part 5.
- Part 6.
Workshop Handout
This is the broadside I hand out when I teach workshops on double running stitch. It’s pretty much a self-paced tutorial, with the simplest designs at the upper left, and progressing in difficulty to the lower right. If you work these at your own speed as a band or jumble sampler, by the time you’ve done them all you can tackle just about any linear design. And although I do use this to teach double running stitch logic, no one will say you sinned if you decide to complete it in back stitch.
- Class handout. (Also available on the Embroidery Patterns tab).
Patterns
Free
Linear Units (Line Segments)
- Ensamplario Atlantio. Seconnd Edition. A collection of blackwork fills from my doodle notebooks, some my own, some from artifacts, but when I started this I didn’t intend to publish, so I didn’t keep track. Some of the larger ones work well as all-over designs, or for small projects like biscornus or holiday ornaments. All four previous segments of the original release stitched back together, along with some additional content.
- Ensamplario Atlantio Volume II. More fills, plus some strip designs and yokes. 90% original (exceptions are footnoted). In one file this time, as technology marched on since publication of the first.
- Ensamplario Atlantio Volume III. You guessed it. Even more fills, plus lots of strip and all-over patterns and even a couple of yokes. Same paradigm as the previous volumes, with the few redacted designs called out in footnotes. Anything indicated with a star is my own original work.
- My Embroidery Patterns tab. Most but not all of the designs below also appear there, plus more.
- Rose Chart. Outline for a heraldic style rose
- Ganesh Project. How to replicate my blackwork method Lord Ganesh, done as a present for a family friend in India.
- Crowdsourced simple diamond interlace, with small motif fills provided by String’s followers. Use some or all. (Also on the Embroidery Patterns tab).
- Dancing Pirate Octopodes. The design that led to the crowdsourced project. (Also on the Embroidery Patterns tab)
- Leopards. (Also on the Embroidery Patterns tab)
- The Epic Fandom Stitch-Along. 19 bands, 9 of which are quasi-traditional, 10 of which are wildly anachronistic, with spaceships, dinosaurs, pirates, references to Star Trek, Star Wars, and Dr. Who. Guidance for the whole project is included.
- The Epic Fandom Stitch-Along in ONE easy to download PDF. The whole thing, informational posts, instructions and all charts for the project above.
- Cat and Mouse. A large panel with Art Deco style cats, mice, and yarn balls. (Also on the Embroidery Patterns tab).
- Bands from a 16th century Camica. Hem, collar, seam bands, and striping. (Also on the Embroidery Patterns tab)
- Those Snails. They crawl all over my work. I share some.
- Jesters at the Fence. A snippet from TNCM (see below).
- Bead border. (Also available on the Embroidery Patterns tab)
- Ring of Rats. Another Art Deco style chart (also available on the Embroidery Patterns tab)
- Tessellated Cats. This design is included in the free book Ensamplario Atlantio Volume III, available on the My Books Tab.
- Elizabeth Hardwick’s Sleeves. Another redacted chart for a historical alll-over design. Redacted from a portrait. (An easy downloadable PDF is also on the Embroidery Patterns tab).
- PERSIST sampler – a chart for a slightly slimmed down version of my Persist piece. (An easy downloadable PDF is also on the Embroidery Patterns tab).
- A Holbein Collar. Collar on a man’s shirt, redacted from a portrait. (An easy downloadable PDF is also on the Embroidery Patterns tab).
- Hebrew Alphabet and commonly embroidered words. I mashed up a few sources to come up with this one, including a very early Apple II pixelated typeface. But the letter forms are tweaked enough to be mine. (An easy downloadable PDF is also on the Embroidery Patterns tab).
- Border or strip design. I used this one on my chatelaine ribbon. It’s also in Ensamplario Atlantio III. (An easy downloadable PDF is also on the Embroidery Patterns tab).
- A Spanish Gentleman’s Collar. An actual example of Spanish blackwork. Redacted from a portrait. (An easy downloadable PDF is also on the Embroidery Patterns tab).
- Another Portrait, Another Redaction. Sleeve detail for a woman’s chemise charted from a circa 1500 Italian portrait. This one with chickens. (An easy downloadable PDF is also on the Embroidery Patterns tab).
- Pattern from a Gentleman’s collar, circa 1560. Chart and discussion of graphing from a painting. (An easy downloadable PDF is also on the Embroidery Patterns tab).
- Correction to The New Carolingian Modelbook, Plate 73 – the really wide interlace. I finally got around to stitching this one up and discovered that two of the overlaps as charted in the book were wrong. So I issue an update. Given the better layout and composition of my more recently composed plates, this pattern is now presented on two pages, both as a wide border and as an even wider iteration that can be used as an all over and as an even wider border. This PDF also available on the Embroidery Patterns tab
Box Units (squares)
- Unicorn. Box unit (not linear) chart for a unicorn, courtesy of Elder Offspring.
- Castles and Caravels. Box unit design featuring a three-towered castle, and its relationship of that motif to some Spanish pieces.
- Knot More Knots! Simple interlaces in box units (Also on the Embroidery Patterns tab)
- Simple Geometric from 1546. This one is also box units, and works well for stitching, knitting, and crochet.
- Da Sera Bud Interlace. Another box unit pattern. (Also available on the Embroidery Patterns tab)
- Fun with Odonata. Another box unit design, this one for dragonflies. Note that they can be used for knitting, too. (Also on the Embroidery Patterns tab)
- Fun with Lagomorphs. A box unit design for a leaping rabbit. (Also on the Embroidery Patterns tab)
- A Simple Interlace. I lost the source annotation for this box unit design aeons ago.
Not Free
- The New Carolingian Modelbook: Counted Patterns from Before 1600. Also known as TNCM. Sadly out of print. It’s in queue for update as scholarship has advanced in the years since it came out. There are corrections aplenty! You might be able to find it on the used market, but at a wildly inflated price.
- The Second Carolingian Modelbook: A Collection of Charted Patterns for Needleworkers and Artisans. Also known as T2CM Link to Amazon page is on the indicated post.
Tutorials
These are also accessible via the Tutorials tab at the top of every page here. but below they are listed in the correct chronological order
Double Running Stitch Logic
- Double Running Stitch Logic 101 – Two Sided Work and Baseline Identification. Basic logic of why baselines matter if you want to work something either totally two sided, or using two-sided logic for thread economy
- Double Running Stitch Logic 102 – Working from the Baseline. How to follow one, step by step.
- Double Running Stitch Logic 103 – Accreted and Hybrid Approaches. Breaking down a large non-linear chart for easier stitches.
- Double Running Stitch Logic 104. A review comparing back stitch and double running, and how to determine if a design can be worked totally two-sided or not.
Charting Linear Designs using GIMP Drafting Software
I found commercial charting software treats linear charts as an afterthought, so with help, I invented my own graphing method which I have used for all of my books. This series is for folk who want to move on to designing and drawing their own charts, and doing so using the dot and bar method I invented. GIMP is freeware, and if you’ve ever used Photoshop or Illustrator, and are familiar with layer-based drawing logic, the learning on-ramp for this method will be familiar. Although this was prepared for an earlier version of GIMP, these instructions are still relevant, although the GIMP menu screens now look slightly different.
- Charting. A comparison of my dot-and-bar method with the traditional drawn-on-quadrille-graph-paper method.
- GIMP Charting Tutorial 101. The logic of a layer-based drafting tool.
- GIMP Charting Tutorial 102. Getting started, basics of working with GIMP.
- GIMP Charting Tutorial 103. Building the dot layer of your template.
- GIMP Charting Tutorial 104. Layer management and building the design and mask layers of your template
- GIMP Charting Tutorial 105. Drawing the design.
- GIMP Charting Tutorial 106. Additional tools including those for erasing, flipping, alignment, and rotation
- GIMP Charting Tutorial 107. Hints on printing
- GIMP Charting Tutorial 108. Preconstructed templates to save you time.
Just Bragging
- My big underskirt forepart. Why I stitched it
- Forehead cloths for modern wear. Kind of like a kerchief, works well and keeps the hair out of my eyes in seaside winds, adapted from the companion piece often seen with a matching coif.
- Trifles wall hanging. Made as a “mom nag” for my younger spawn, done using blackwork techniques and fills.
- Blackwork sampler done in 1983. Musings on why this piece is not entirely successful in terms of stitching density distribution.
- Two Fish. No astrological connection, just two koi circling on couched gold water. Indigo and deep green silk on 40 count linen
- Fangirl Sampler – A key phrase from the science fiction series by my Resident Male, in an off-world language. It translates to “Life’ll kill you”. I am after all his fangirl army of one. Alphabet from an old Sajou leaflet, but the rest is all my design. The dancing skeletons border is available on the Embroidery Patterns tab.
- Grape Sideboard Scarf. An artifact-based main field with a self-designed companion border.
- Blackwork sampler done as the cover for T2CM, finished in 2012. Below.
BADGE TETHERS AND MORE METHOD DESCRIPTION
In the last post I started a method description on working a large project without having to do a full chart of the entire design. I’ve now finished the first end and am starting on the second, so I continue the discussion.

I worked both the top and bottom borders to the same logical stopping point. Since I had begun both of them aligned to the exact center of my piece and was careful to follow the design exactly, the ends of both lined up. More or less. There’s actually one FEWER unit one one end of the top of the end strip than there is at the bottom. But I also bet that without knowing it was there, zooming in and looking for it, you would never have noticed. Again, a variance but not a fatal error, and far less egregious than the errors I’ve spotted on historical pieces.
There’s a lot of “white space” to the right of the stitching, but bear in mind that the opposite side is the one with the wonky end has less free space to play around in (it’s not just photo foreshortening, it’s really not parallel to the edge line I based on the true grain of the fabric). So in order to leave enough room even at the narrowest point, I have allowed for more “waste ground” on the more generous edges. I also am not sure exactly what I will be doing for the border yet. I was thinking a simple hem and some needle lace (picking up something I haven’t done in decades), but there’s also the temptation of a withdrawn element Italian style hemmed edge. And I may just leave all such elaborations off for a bit, to mull it over some more and possibly rehearse those very rusty techniques.
Anyway, back to the stitching at hand. Note also that in the shot above, I was working the bottom border out to the left, to the exact same stopping point as the edge on the right. I continued and finished both long side borders. So it was on to the second short side.
In the photo below the piece has been flipped so that the bottom in the shot below is now at the top. But where to place that second border?

Since the left and right ends of both long side strips end in exactly the same place, it’s easy. I went over to the finished work, determined that the “collision line” where the border meets the field pattern aligns with the curly end of one of the little sprigs that grows up from it. So I found the corresponding point on the second side and began the first pass of double running down it. I didn’t do the whole side, because I know I’ll be working those curls and sprigs eventually, and rather than risk a massive miscount due to the long run between those sets, I would prefer to work the larger floral border, then fill in the little secondary one once that’s been finished. But I DO need to know where the collision line is so I can fill out the truncated edges of my main field design.
I will probably begin the large border again from the center, although since the end points of my other short side border are known, I could just mirror those. We will see where whim and fancy take me. At this point, all of the known issues have been worked out, mitigated, or blissfully ignored. It’s just dogged completion of the motifs and borders from now on.
GADGETS – THE BADGE TETHER
Last year I mentioned using a retractable badge holder to help corral my scissors at the beach.

I clipped it onto the straps of the drink holder of my beach chair. That worked so well, I’ve been looking for ways to do something similar at home. I tried clipping the things to me or wearing my old work lanyards. Too fussy. My favorite stitching chair is wood and leather, with no good clipping spots on it. But I’ve been working this current project on my Hardwicke Manor sit-upon hoop/stand combo. It has a nice, long screw clamp. The clip jaws of one of my badge holders fits exactly on the exposed screw.

While I’m showing the thing holding my favorite scissors and laying tool, with both lapped in front of the work, in actual play the angle of the badge head suspends them behind and away from the fabric, so catching isn’t a hazard. I love the convenience of not fishing around for often-used tools, and the fun of repurposing these tiny work albatrosses for greater ease.
Oh, and on my big flat scrolling frame, remember those penny size strong magnets I glued to the uprights? They hold the badge leashes quite securely, too. So I have the advantage of tools-to-hand on my flat frames, too.

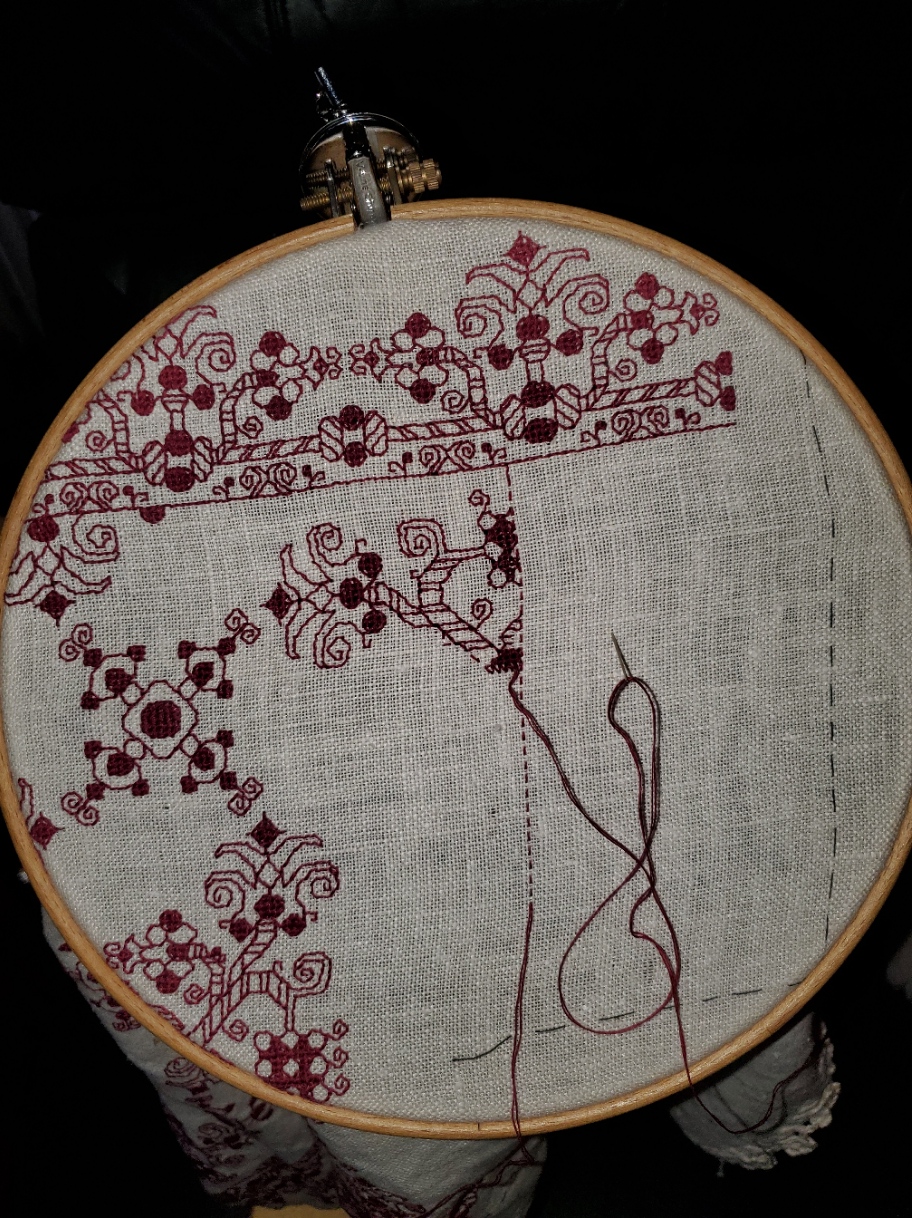
INTO UNKNOWN SEAS – METHOD DESCRIPTION
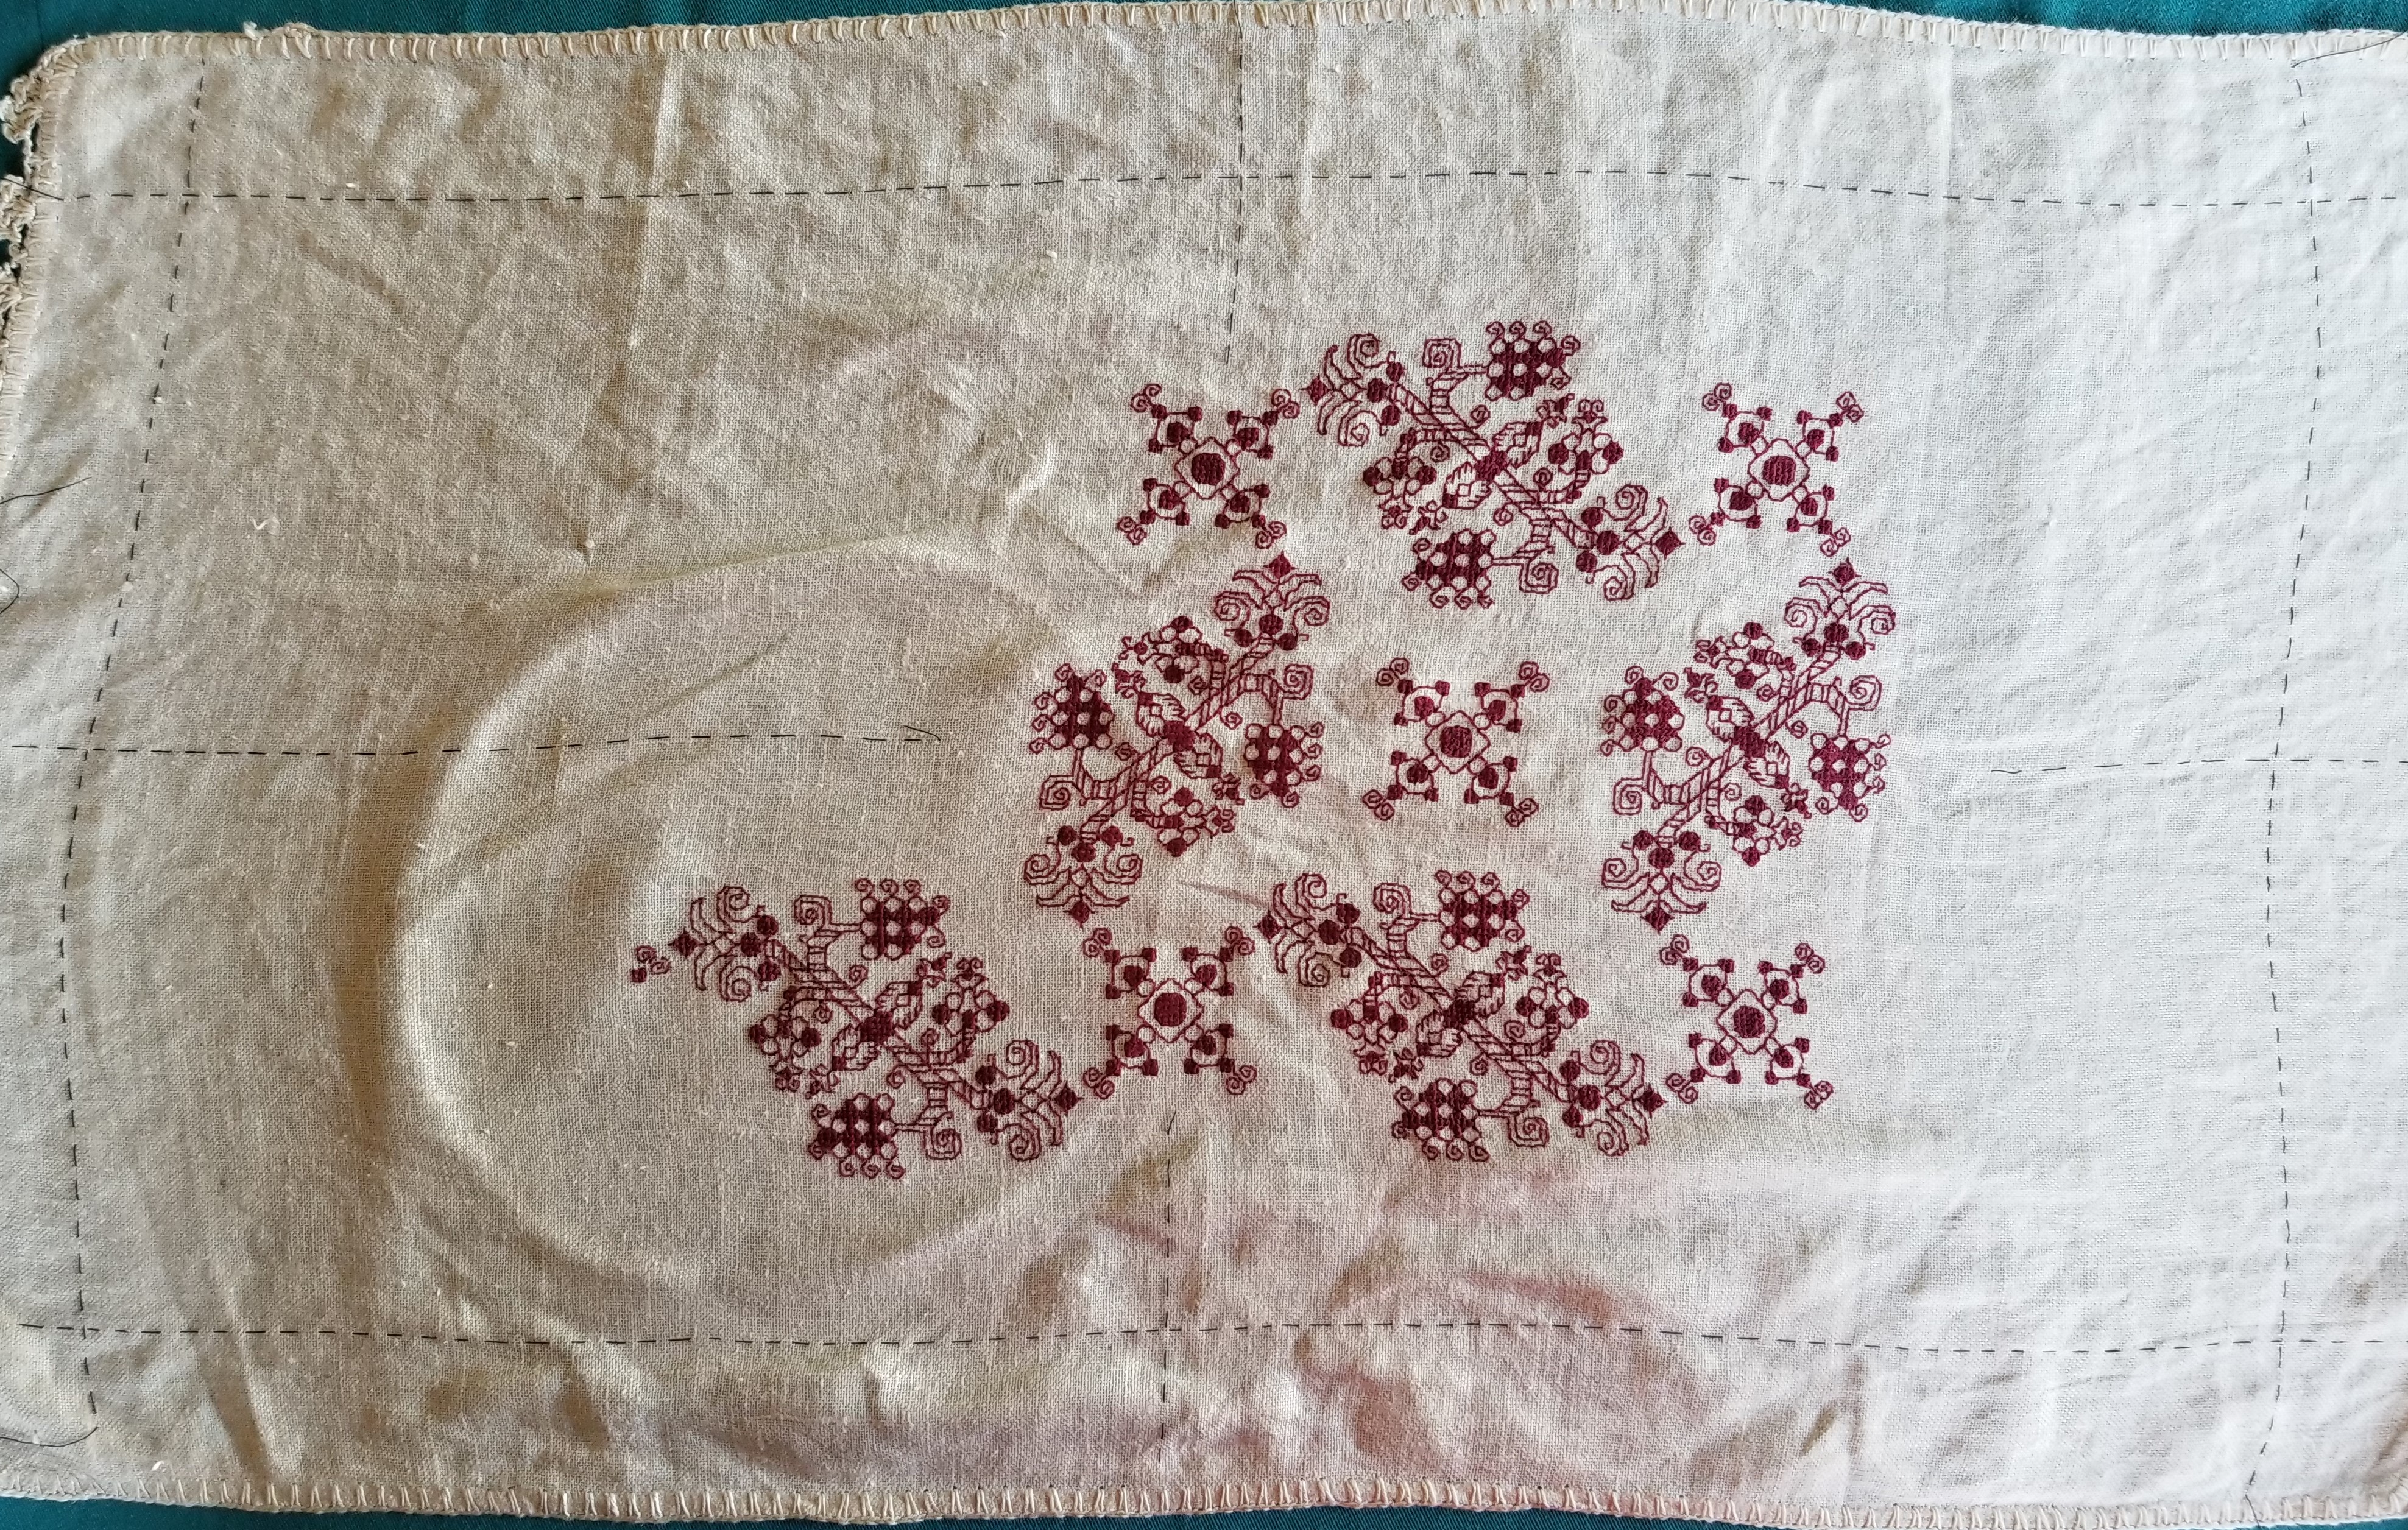
A couple of people have sent me private notes asking about how I go about designing a larger project without graphing the entire thing. I attempt to answer, using the current Dizzy Grapes sideboard scarf/placemat as a possible approach.
It’s true I didn’t know how I was going to proceed when I began this project. I had a graph for the main field repeat, but only one iteration of the design, but not a chart for the entire area that design would inhabit. I didn’t have a border (yet). I had a piece of cloth of dubious cut and unknown count, and I had picked a thread well represented in my stash, with known easy-care laundry properties. I knew I wanted to make a large placemat type sideboard scarf, as big as attainable given the materials on hand.
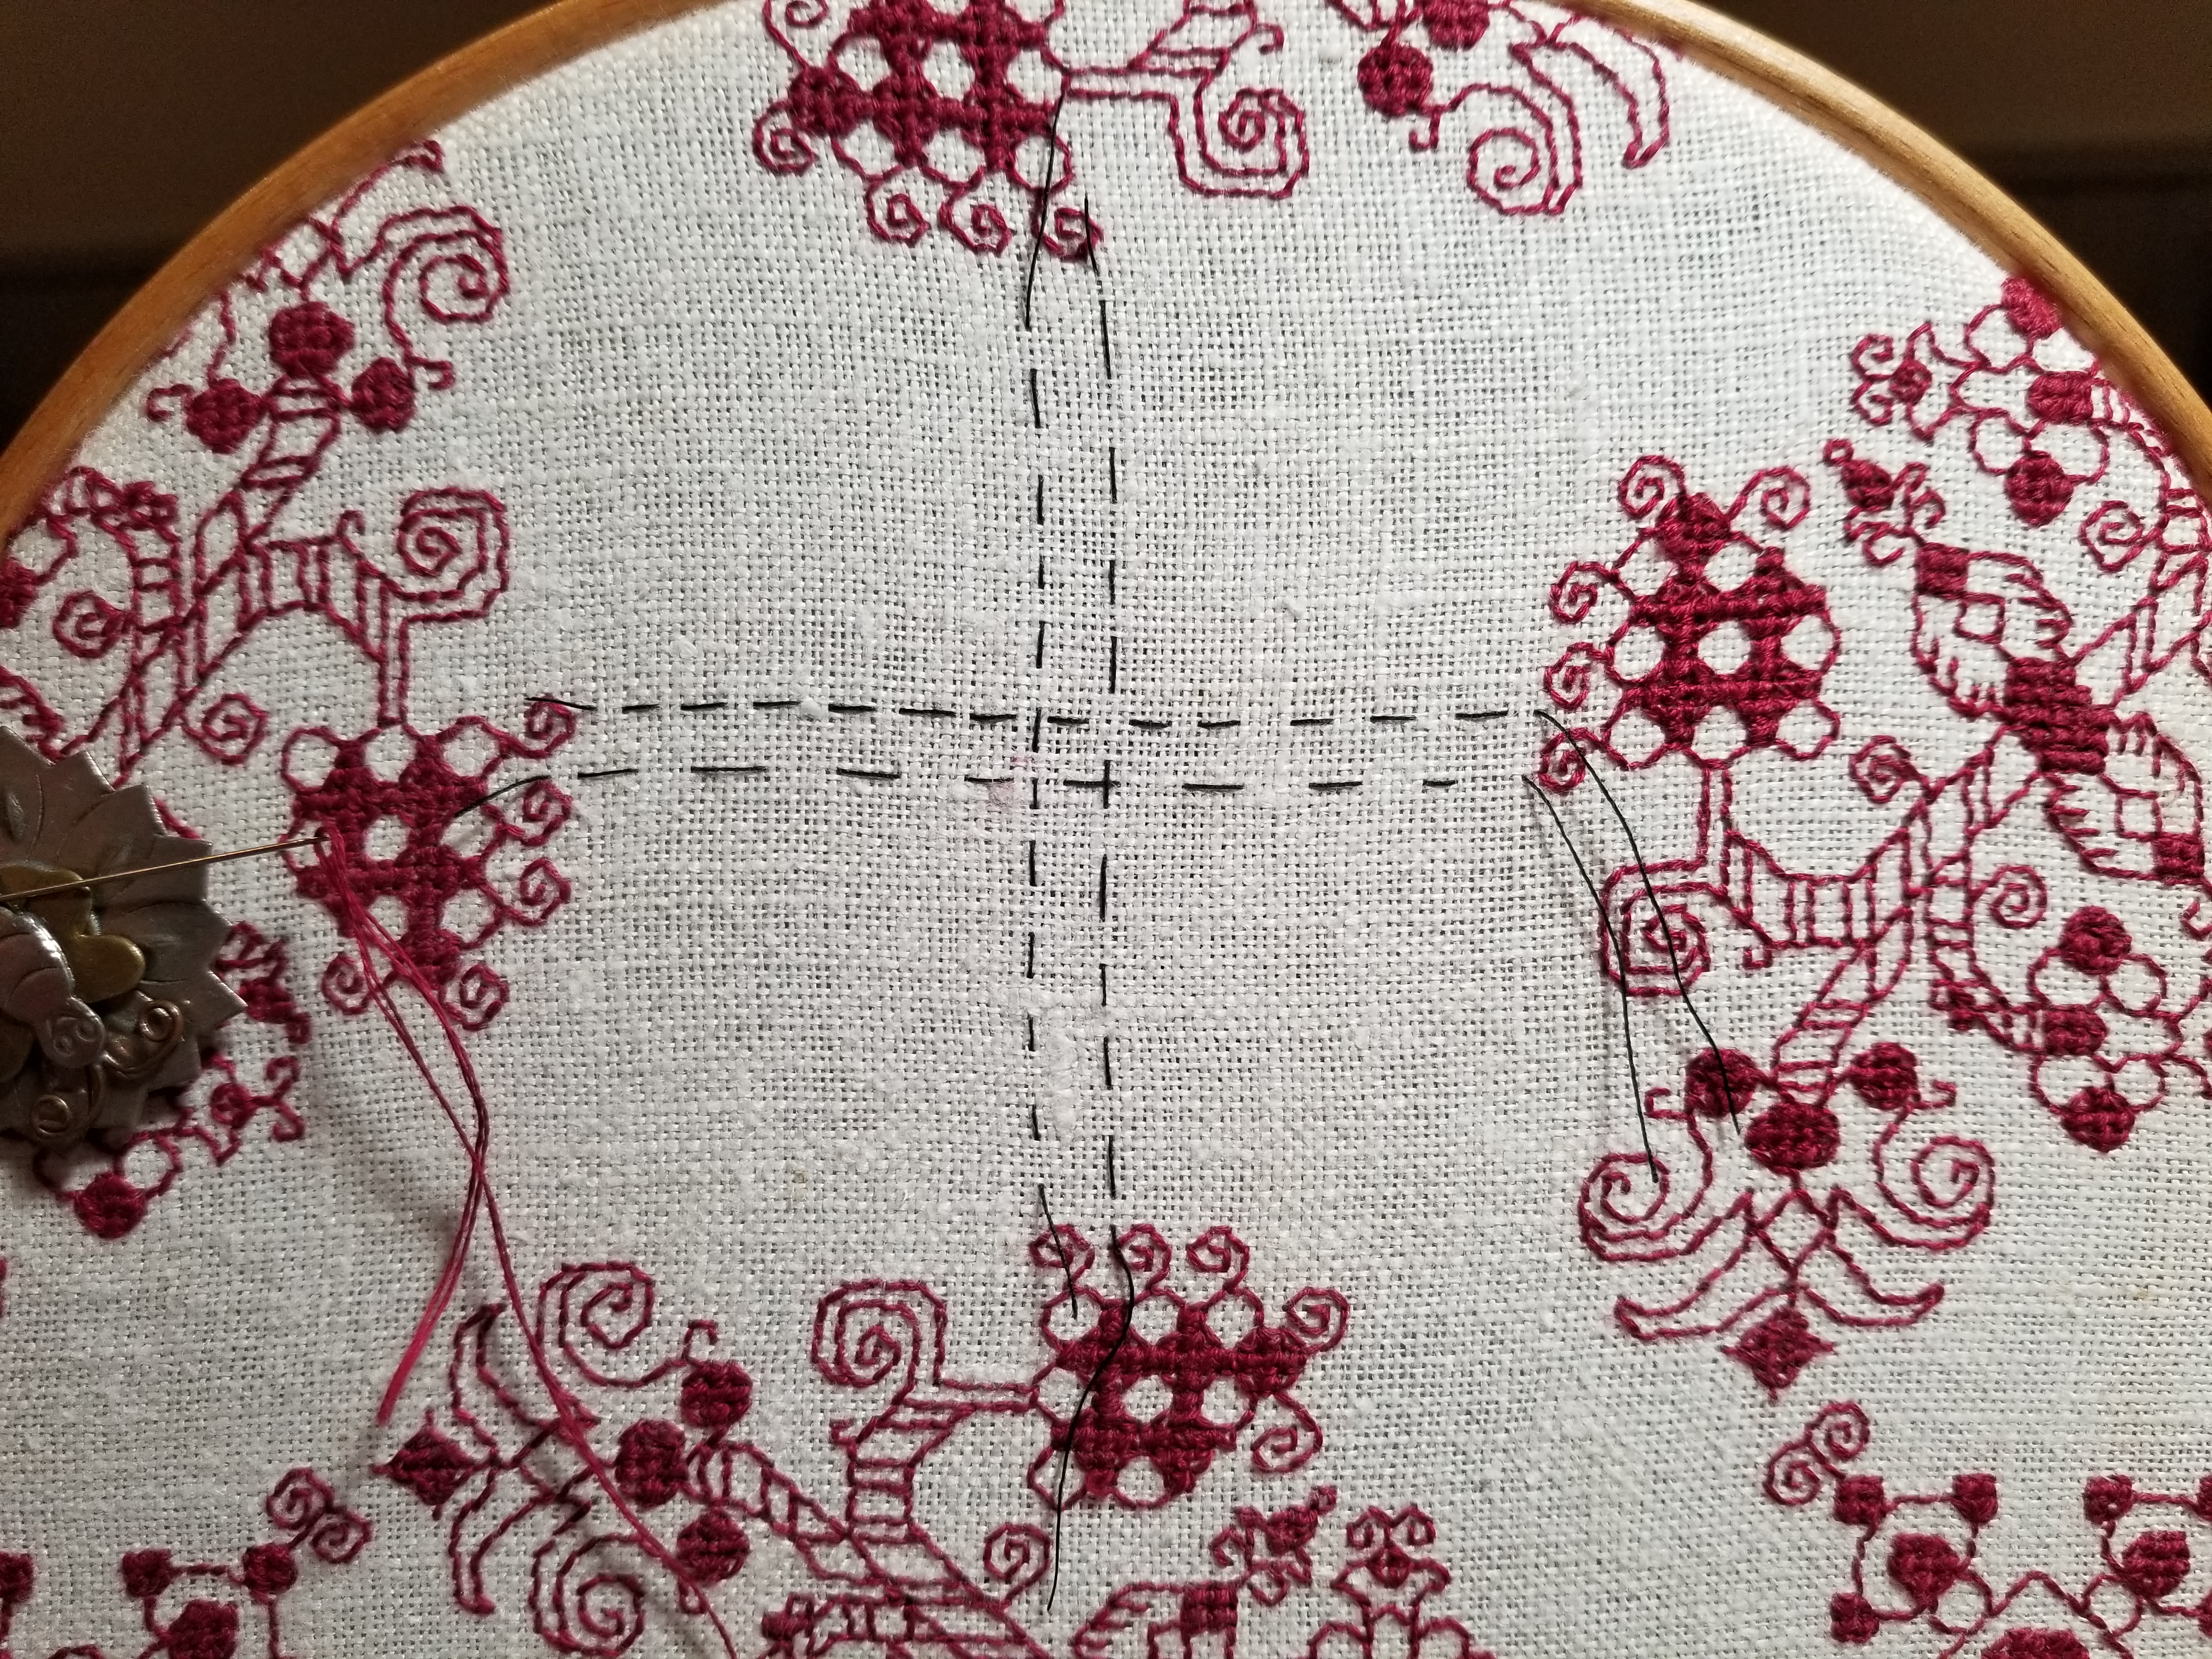
The first thing to do was to figure out the largest possible area I could stitch on my unevenly hemmed ground. Leaving a bit of a margin around for easy hooping, I took plain old sewing thread and basted in a to-stitch area, with a bit of a margin. In doing this I discovered that the person who had reclaimed this bit of antique linen and done the crocheted edge treatments had a rather liberal interpretation of rectangles in general. Once my edges were basted in, I used simple measure/fold to determine the center lines, both north/south and east/west. Those were basted, too. Here’s that first step:

I also determined the thread count of this well washed, buttery soft vintage linen. It averages about 32 threads per inch, but is quite uneven, ranging from 28 to 34 in places, but didn’t dwell on that beyond satisfying myself that there was enough “real estate” inside my designated area to accommodate at least two full repeats of my chosen design across the narrow dimension.
Having the dead center of the piece determined, I chose a center point on the field design. I could have used the center of the smaller motif. That would probably have been easier, but I wanted the large rotating floral shapes to dominate instead of the largely unworked area surrounding the smaller motif. That was a bit tricky because the motif has a square unit in the dead-center, but I worked that straddling my basted center mark. Then I began working, snipping back my basted center guides as I went. (From here on the piece is shown rotated, with the narrow dimension north/south and the wide one east/west).

The shot above shows that first center motif in process, with the center guides being snipped back as the work encroached.
From there it was a simple matter of adding more floral motifs and the smaller X motifs they spiral around. Then after a group of four florals were complete, defining the space between them, centering the free-floating X in that area. Here are shots of those two processes. Note that as a Lazy Person, instead of tedious counting in from the established stitching, I used temporary basting to determine the centerpoint for the free-floating X motifs.
How did I know where to stop? No clue initially. I figured I’d get as close to the edge of my defined real estate as I could with full motifs, then pause to assess. It’s clear in the left photo that another full cycle of the repeat would not fit neatly between the established work and the basted guideline. But that area is also a bit wide to be entirely border. The proportions would be off. Plus that small X motif in the center bottom looks odd without at least a partial snippet of the floral motif spinning off its bottom leg.
So I did a rough count of the width left and decided I wanted a border that was about two inches wide at its widest (about 5 cm). Back to the drawing board to draft out something that complemented the design, and was somewhere around 30 units tall. I doodled up a couple of possibilities before settling on one. One strong consideration was the use of an inner line to contain the field pattern, so it had something even against which to truncate.
Once I had my border in hand, I decided that a bit of the center flower in its repeat could scallop below the basted edge line, so allowing for those 6 units, I counted up from my basted edge guide, and beginning at the center point I started the border of the first side. Then I worked right and left until I got to the edge of the “uncertainty zone” – the area as yet unworked at the left and right of the piece. Here’s the first side’s border in process.
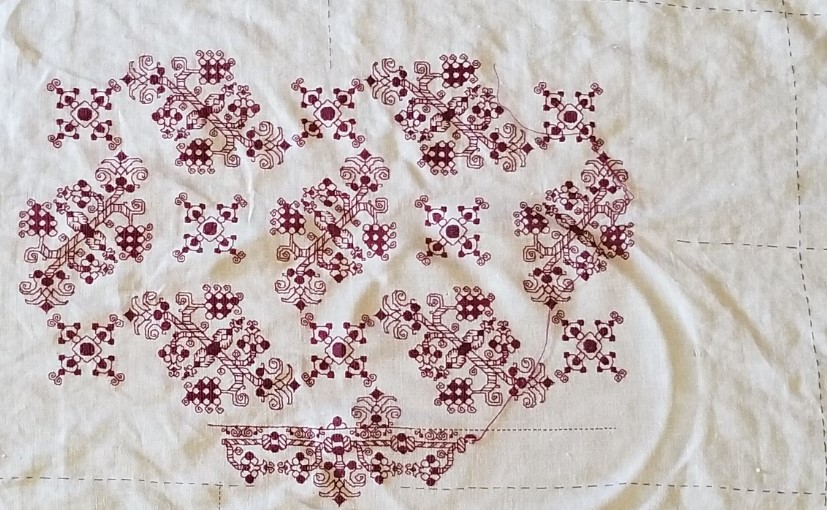
As I established the border’s top edge (that field containment line), I went back to the main field, and worked the truncated snippet of the floral motif to fit. You can see that first snippet in the photo above.
Now on to that second side. But I had a cheat! Instead of starting it by counting down, I looked at that center floral snippet on the first side. Then I worked the floral snippet on the opposite side to the same point. That established the containment line on the second side, and I began the border at the center of the second side, working out to the left and right.

Now on to the ends. You can see now that I’m making these decisions on the fly. When I started I had no clear idea of what I was going to do beyond “Field. Border. Big.” I’m handling the problems and decisions as they are encountered, with minimal fretting about perfection along the way.
I chose to do butted borders on this piece. Neatly mitered, squared, or fudged border corners do exist on historical pieces, but they are in the minority. Even though my self-designed border isn’t particularly period representative (those repeating centered units with their own bounce repeat, as opposed to simple twigs all marching it the same direction), I wanted to use a non-mitered corner. I could have ended each off, designed a separate corner square, but I didn’t want to introduce another design variant – the border was already too busy.
Where to start that side border? What happens to the longer top and bottom borders? Do they just end or should I try to end at a visually logical place? Well, I chose the latter. I kept going on the bottom border to the right until I ended at the center of the bounce repeat. It’s just a few units shy of my designated basted edge. Not a lot of waste there. And knowing the height of the border, I established my north-south containment line.

You can see that I’m working on the first of the two spin-off floral sprigs along this side. When that’s done I will go to the centerpoint of the right hand edge and begin working the border from there, headed back to the corner shown. The side borders will end where they end. They will truncate oddly for sure, but having made the bottom and top congruent, what is on the sides, will be what it is. The side as a whole however should truncate in the same spot where it meets up to the border on the top. But no one is perfect. If it’s off by a unit or two, I will have accomplished the same degree of precision as most of the Ancients. They weren’t perfect either.
Stay tuned! The Grand Excitement of seeing the final product remains; and with it how things meet up, how close to symmetry I achieve, and how any as yet unknown problems are solved. And that’s before I decide how I’m going to edge and trim the piece out. Needle lace and/or a withdrawn/pulled element hem are both possibilities I haven’t yet ruled out.
So there you have it. Another adventure in bungee-jump stitching – starting a project with little or no detailed planning, no full project chart (just a partial chart showing the minimum needed), and no clear idea at outset on handling challenges encountered en route. I hope sharing this process inspires folk to take up their own self-composed projects.
LOOKING EAST AGAIN
Back when we were doing the expat stint in Pune, India, I wrote about Kasuthi (aka Kasuti, Kashida), a blackwork cousin that deserves to be better known by Western double running stich aficionados. I recently stumbled across another sample of related stitching, this time from a bit further north.
The Hazara people, mostly in Afghanistan, but also present in Pakistan practice an interesting and related form of linear geometric stitchery. It’s hard to date beyond “traditional,” and given current geopolitics, deeper investigations are unlikely. But here is the limited info I’ve found, plus some examples, and some sources of additional information.
The Hazara are known for several forms of stitching, mostly but not exclusively counted styles using satin stitch, straight stitch, double running stitch and cross stitch, and is better known for phulkaris (large shawls often worked in geometric, counted straight stitches). These double running stitch pieces in particular are probably made by women of the Wardak Hazaras, who live mostly southwest of Kabul. This style is usually worked in cotton or silk on linen or cotton grounds. These double running stitch pieces are often finished out as small mats, bags, shawls, prayer cloths, and other covers.
First is the artifact that piqued my interest.

This is piece in the collection of the George Washington University Museum, Accession T-1240. They note it’s provenance as being Hazara from Afghanistan, probably sometime between 1880-1920. That mushy date range is the earliest and although it’s only semi-hard, is the only date I’ve seen for this style. Note the fields of diapered patterns stitched on the count on a not-so-evenweave ground. The designs skew east-west compared to north-south due to there being more ground fabric threads per unit measurement in one direction than the other. But skew or not I love the repetition and color usage. So I went looking for more.
This artifact is probably the best represented on line for the style, and shows up in most on-line photo collections of Afghan embroidery, although not always with attribution. It is nicknamed “The Snowflake Shawl” and was collected by Jania Mishra, the author of the art blog/sales gallery Woven Souls. She places it as Hazara, but does not opine a date. Still it’s clearly antique/vintage. Her write-up includes lots of close-up photos, and notes the relationship of this style of stitching to mathematical theory. Pop by her blog to truly admire the diverse detail of this piece.

More examples. On the left is a bandanna size prayer cloth that was sold by a textile/rug auction dealer, and on the right is what’s described as a Hazara napkin in the Galerie Ariana ethnic textiles sales site. (No affiliation with/endorsement of these sellers – I find dealers’ on-line photos and attributions an occasionally useful research supplement, although not all dealers’ listing data are of the same quality.)


What can we conclude about dissemination and influences?
Very little.
Double running is one of the simplest, oldest and most ubiquitous of stitches. The scholars of Kasuthi posit a vague “Persian origin” before adoption, mention of in literature, and refinement of the style in the Deccan area Chalukya dynasty courts of the mid 500s to mid 700s, and that dynasty’s later resurgences through the end of the 1100s, culminating in the disciplined style and vocabulary of traditional motifs that are known today through surviving examples dating to the 19th century. Overland trade routes have connected Northern India and Afghanistan and beyond going back to antiquity. The the flow of both peaceful and aggressive contact is also well known, as is historical trade that connected the northeastern African coast with India. Egypt’s Fustat region is another area where visually similar double running stitch artifacts from the Mamluk era (1200s-1500s) are found.
Is this another survival of some sort of time-lost tradition that also gave rise to Kasuthi, the Mamluk works, and by extension over time and geography (and by direct quotation noted by others as well as myself), the stepwise and geometric designs found in early European modelbooks at the dawn of the popular print era (early 1500s), and on to early European blackwork and strapwork? It’s tempting to speculate so, but we have absolutely no proof.
These Afghani pieces could also have been a product of later cultural influences, as waves of association washed back and forth along time’s shores. But the clear correspondences, whether they can be affixed to defined family tree, or are just casual correlations due to the limits of geometry and the simple stitching style itself, are to me are a source of endless fascination.
Here are a couple of sites with additional information on Hazara embroidery in general:
Source material for the Mamluk styles mentioned
- Marianne Ellis. Embroideries and Samplers from Islamic Egypt, Asmolean Museum, London, UK, 2001. ISBN1-85444-135-3.
- Ashmolean Museum Yousef Jameel Center for Islamic and Asian Art, Newberry Collection of Islamic Embroideries
And there are more traditional regional counted styles to explore in this area of cultural confluence. I promise to keep digging.
